
1. General
Reprint: New fried cold rice: understanding the implementation principle of Snowflake algorithm
Last time I watched a video explaining: [distributed ID] key high concurrency distributed global unique ID snowflake algorithm snowflake
2. Premise#
Snowflake is an open source high-performance ID generation algorithm (service) for Twitter.
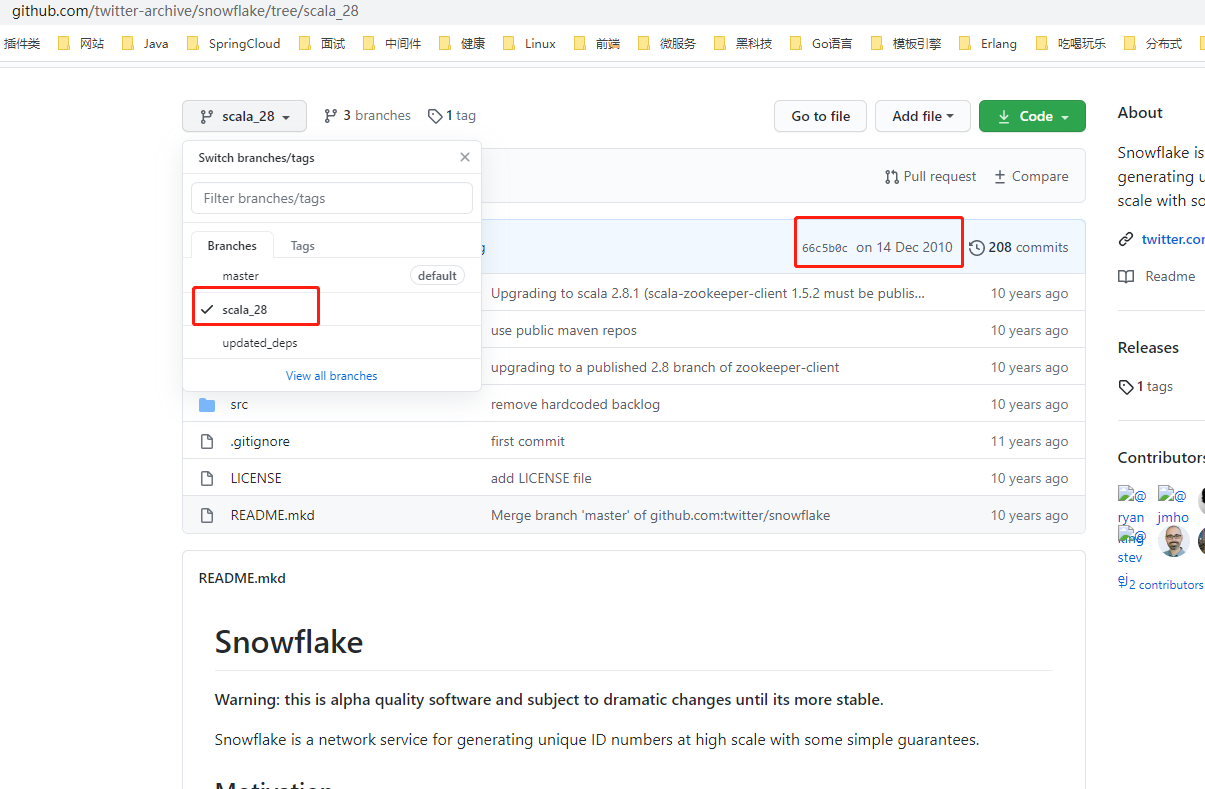
The above figure shows Snowflake's Github warehouse. The REAEMDE file in the master branch indicates that the initial version was released in 2010, based on Apache Thrift, earlier than Finagle (here Finagle is the building module for RPC services on twitter), and Snowflake used internally on Twitter is a completely rewritten program, It relies heavily on the existing infrastructure on Twitter to run.
The source code of the first version of Snowflake released in 2010 is written in Scala and archived in scala_28 branch. In other words, the original or improved version of Snowflake algorithm currently used by everyone is the product of ten years ago (currently 2020). I have to say that this algorithm is really powerful. Scala_ The motivation and requirements of the algorithm are introduced in branch 28. Here is a brief excerpt:
2.1 motivation:
There is no tool for generating sequential IDS in Cassandra. Twitter needs a new way to generate IDS when it changes from using MySQL to using Cassandra (which proves that the architecture is not designed, but iterated based on business scenarios).
2.2 requirements:
- High performance: each process generates at least 10K ID S per second, plus the network delay, and the response speed should be within 2ms.
- Sequencing: it has a self increasing trend according to time and can be sorted directly.
- Compactness: keep the length of the generated ID at 64 bit or less.
- High availability: the ID generation scheme needs to be as high as the storage service.
Let's analyze the implementation principle of Snowflake's source code.
3. Synopsis of snowflake scheme
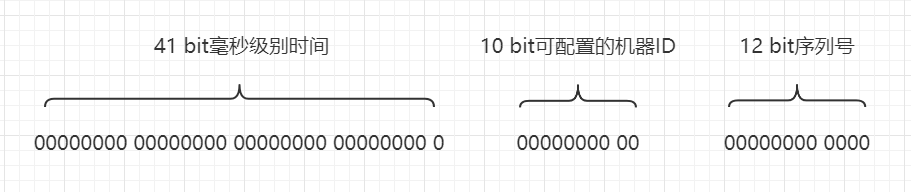
The design scheme of Snowflake in the first edition is:
- Time: 41 bit length, using millisecond precision, with a custom epoch, it can be used for about 69 years.
- Configurable machine ID: 10 bit length, which can be used by 1024 machines.
- Serial number: 12 bit length, which can be randomly selected from 4096 numbers, so as to avoid a single machine generating duplicate serial numbers within 1 ms.
However, in the actual source code implementation, Snowflake divides the 10 bit configurable machine ID into 5-bit Worker ID (which can be understood as the original machine ID) and 5-bit Data Center ID (Data Center ID). See idworker for details scala:
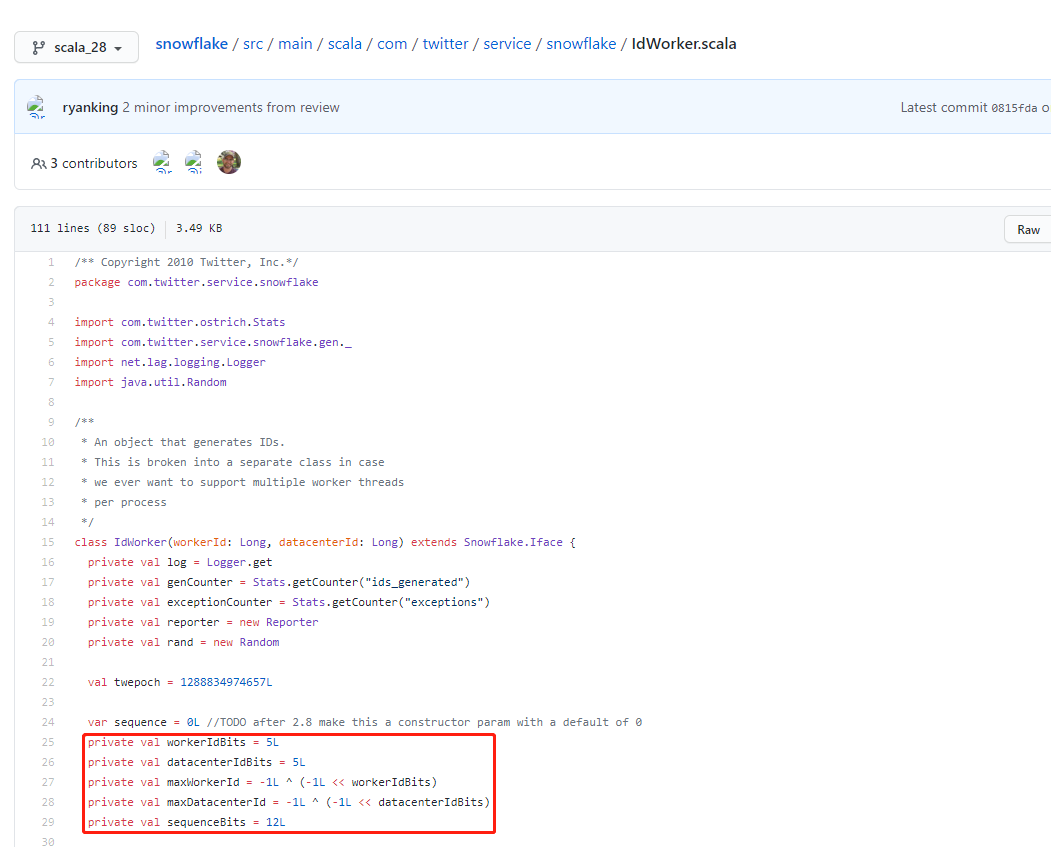
That is, up to 32 machine IDs and up to 32 data center IDS can be configured:
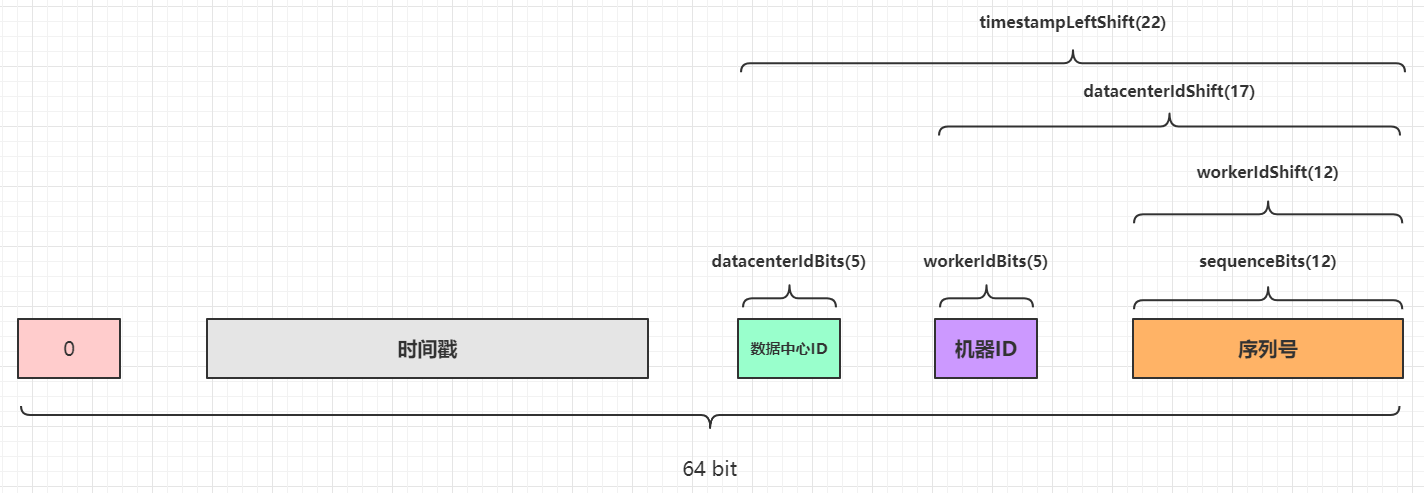
 Since the algorithm is written in Scala language and depends on the JVM language, the returned ID value is a Long type, that is, a 64 bit integer. In the original algorithm generation sequence, only the length of 63 bit s is used, and the unsigned number is to be returned. Therefore, add a 0 in the high bit (occupying 1 bit), and the total ID length is 64 bits:

Of which:
- The value range of 41 bit millisecond timestamp is: [0, 2 ^ 41 - 1] = > 0 ~ 2199023255551, a total of 2199023255552 numbers.
- The value range of 5-bit machine ID is: [0, 2 ^ 5 - 1] = > 0 ~ 31, a total of 32 digits.
- The value range of 5-bit data center ID is: [0, 2 ^ 5 - 1] = > 0 ~ 31, a total of 32 numbers.
- The value range of 12 bit serial number is: [0, 2 ^ 12 - 1] = > 0 ~ 4095, a total of 4096 digits.
In theory, 2199023255552 * 32 * 32 * 4096 completely different ID values can be generated.
Snowflake algorithm also has an obvious feature: it depends on the system clock. The 41 bit length millisecond level time comes from the system time stamp, so it must be ensured that the system time is progressive and clock callback cannot occur (generally speaking, multiple identical time stamps or past time stamps cannot be generated at the same time). In case of clock callback, snowflake will refuse to generate the next ID.
4. Supplement of bit operation knowledge#
Snowflake algorithm uses a lot of bit operations. Since the complement of integers is the storage form in the computer, integers in Java or Scala are represented by complement. Here, I will mention the knowledge of original code and complement.
- The original code is used for reading and the complement code is used for calculation.
- The complement of a positive number is the same as its original code.
- The complement of a negative number reverses all bits except the highest bit, and then adds 1 (the inverse code adds 1). This is also the way to restore the complement of a negative number to the original code.
- +The original code of 0 is 0000 0000, while the original code of - 0 is 1000 0000. The complement has only one 0 value, which is represented by 0000 0000. This is very important. The complement 0 has no ambiguity.
In short:
* [+ 11] Original code = [0000 1011] Complement = [0000 1011]
* [- 11] Original code = [1000 1011] Complement = [1111 0101]

* [- 11]Calculation process of complement:
        Original code                  1000 1011
        Except the highest bit, the other bits are reversed 1111 0100
        Plus 1                   1111 0101 (complement)
When using the original code and inverse code, the calculation result is not necessarily accurate, but when using the complement code, the calculation result is correct. Just remember this conclusion. There are no ex amp les here. In Snowflake's ID generation scheme, except for the highest bit, the other four parts are unsigned integers. Therefore, the efficiency of bit operation using complement for integers of four parts will be relatively high. Only in this way can we meet the original intention of Snowflake's high-performance design. Several bit operations are used in Snowflake algorithm: XOR (^), bitwise and (&), bitwise OR (|) and signed left shift (< <).
4.1 exclusive or
The operation rule of XOR is: 0 ^ 0 = 0 ^ 1 = 1 1 ^ 0 = 1 1 ^ 1 = 0, that is, if the bits are different, the result is 1, and if the bits are the same, the result is 0. The main functions are:
- Special position flip, that is, an exclusive or operation is performed on a number and a number with N bits of 1, which will flip the corresponding N bits, such as 0100 & 1111, and the result is 1011.
- And 0 exclusive or, the result is consistent with the original value.
- The values of two numbers interact: a = a ^ b, b = b ^ A, a = a ^ b. after these three operations are completed, the values of a and b are exchanged.
Here's the last one:
* [+ 11] Original code = [0000 1011] Complement = [0000 1011] a
* [- 11] Original code = [1000 1011] Complement = [1111 0101] b

a=a^b          0000 1011
               1111 0101
               ---------^
               1111 1110
b=b^a          1111 0101
               ---------^
               0000 1011  (Decimal number: 11) b
a=a^b          1111 1110
               ---------^
               1111 0101  (Decimal number:-11) a
4.2 bitwise AND#
The operation rule of bitwise sum is: 0 & 0 = 0, 0 & 1 = 0, 1 & 0 = 0, 1 & 1 = 1. The calculation result is 1 only when the corresponding bits are all 1. In other cases, the calculation result is 0. The main functions are:
- Reset: if you want to reset a number, you can perform bitwise sum with all numbers with bit 0.
- Take the finger position in a number. For example, to take the lower 4 bits in X, you only need to make a bitwise sum with zzzz... 1111. For example, take the lower 4 bits of 1111 0110, then 11110110 & 00001111 can get 00000110.
4.3 bitwise OR
The operation rule of bitwise sum is: 0|0 = 0, 0|1 = 1, 1|0 = 1, 1|1 = 1. As long as one bit exists, the calculation result is 1. The calculation result is 0 only when two bits are 0 at the same time. The main functions are:
- To assign 1 to some bits of a number, you only need to do bitwise OR operation with the number whose corresponding bits are all 0. For example, 1011 0000. If the lower four bits want to be assigned 1, 10110000 | 00001111 can get 1011 1111.
4.4 shift left with symbol
The operator with a signed left shift is < <, and the general format is: m < < n. The functions are as follows:
- The binary number (complement) of M moves n bits to the left.
- The left (high) moving part is discarded directly, and the right (low) moving part is supplemented with 0.
- Shift result: it is equivalent to the value of M multiplied by the n power of 2, and 0, positive and negative numbers are common.
- If the number of bits moved exceeds the maximum number of bits of this type, the compiler will modulo the number of bits moved. For example, int shifts 33 bits, but actually only 33% 2 = 1 bits are moved.
The deduction process is as follows (assuming n = 2):
* [+ 11] Original code = [0000 1011] Complement = [0000 1011]
* [- 11] Original code = [1000 1011] Complement = [1111 0101]

* [+ 11 << 2]Calculation process of
      Complement          0000 1011
      Shift left 2 bits     0000 1011
      Rounding off high to make up low      0010 1100
      Decimal number    2^2 + 2^3 + 2^5 = 44

* [- 11 << 2]Calculation process of
      Complement          1111 0101
      Shift left 2 bits     1111 0101
      Rounding off high to make up low      1101 0100
      Original code          1010 1100 (all bits of complement except the highest bit are reversed and 1 is added)
      Decimal number    - (2^2 + 2^3 + 2^5) = -44
You can write a main method to verify:
public static void main(String[] args) {
System.out.println(-11 << 2); // -44
System.out.println(11 << 2); // 44
}
4.5 combination skills#
Using the three bit operators mentioned above, we can realize some efficient calculation schemes by combining them with each other.
Calculate the maximum value that n bit s can represent:
There is such code in Snowflake algorithm:
// Bit length of machine ID
private val workerIdBits = 5L;
// Max machine ID - > 31
private val maxWorkerId = -1L ^ (-1L << workerIdBits);
The operator here is - 1L ^ (- 1L < < 5L). Sort out the order of operators, and then deduce using 64 bit binary numbers. The calculation process is as follows:
* [-1] Complement of         11111111 11111111 11111111 11111111 11111111 11111111 11111111 11111111
  Shift 5 bits left             11111111 11111111 11111111 11111111 11111111 11111111 11111111 11100000
  [-1] Complement of         11111111 11111111 11111111 11111111 11111111 11111111 11111111 11111111
  XOR                ----------------------------------------------------------------------- ^
  Complement of result          00000000 00000000 00000000 00000000 00000000 00011111 (decimal number 2)^0 + 2^1 + 2^2 + 2^3 + 2^4 = 31)
In this way, the maximum value n that can be represented by 5 bit s can be calculated. N is an integer and 0 < = n < = 31, i.e. 0, 1, 2, 3... 31. The maximum value of Worker ID and Data Center ID is obtained by using this combination operation.
Use the maximum value of fixed positioning as the Mask to avoid overflow:
There is such code in Snowflake algorithm:
var sequence = 0L
......
private val sequenceBits = 12L
// Here is the maximum value of sequence 4095
private val sequenceMask = -1L ^ (-1L << sequenceBits)
......
sequence = (sequence + 1) & sequenceMask
Finally, the operator is actually sequence = (sequence + 1) & 4095. Assuming that the current value of sequence is 4095, the calculation process is deduced as follows:
* [4095] Complement of                 00000000 00000000 00000000 00000000 00000000 00000000 00000111 11111111
  [sequence + 1] Complement of         00000000 00000000 00000000 00000000 00000000 00000000 00001000 00000000
  Bitwise AND                        ----------------------------------------------------------------------- &
  Calculation results                      00000000 00000000 00000000 00000000 00000000 00000000 00000000 00000000 (decimal number: 0)
You can write a main method to verify:
public static void main(String[] args) {
    int mask = 4095;
    System.out.println(0 & mask); // 0
    System.out.println(1 & mask); // 1
    System.out.println(2 & mask); // 2
    System.out.println(4095 & mask); // 4095
    System.out.println(4096 & mask); // 0
    System.out.println(4097 & mask); // 1
}
That is, x = (x + 1) & (- 1L ^ (- 1L < < N)) can ensure that the final x value will not exceed N, which makes use of the feature of "finger taking and positioning" in bitwise AND.
5. Snowflake algorithm implementation source code analysis#
Although Snowflake is written in Scala, its syntax is actually similar to that of Java. Just read it as Java code. When reading the code below, you will skip some logic of logging and measurement statistics. Let's look at idworker Scala attribute value:
// Define the benchmark era value, which is 09:42:54 Beijing time on November 4, 2010. It is estimated that it is a timestamp defined when submitting the code in the first edition of 2010
val twepoch = 1288834974657L

// Initialization serial number is 0
var sequence = 0L //TODO after 2.8 make this a constructor param with a default of 0

// The maximum bit length of the machine ID is 5
private val workerIdBits = 5L

// The maximum bit length of the data center ID is 5
private val datacenterIdBits = 5L

// Maximum machine ID value, decimal number is 31
private val maxWorkerId = -1L ^ (-1L << workerIdBits)

// Maximum data center ID value, decimal number is 31
private val maxDatacenterId = -1L ^ (-1L << datacenterIdBits)

// The maximum bit length of the serial number is 12
private val sequenceBits = 12L

// The machine ID needs to be shifted left by 12 digits
private val workerIdShift = sequenceBits

// Number of bits of data center ID to be shifted left = 12 + 5
private val datacenterIdShift = sequenceBits + workerIdBits

// The number of bits that the timestamp needs to shift left = 12 + 5 + 5
private val timestampLeftShift = sequenceBits + workerIdBits + datacenterIdBits

// Mask of serial number, decimal number 4095
private val sequenceMask = -1L ^ (-1L << sequenceBits)

// Initialize the last timestamp snapshot with a value of - 1
private var lastTimestamp = -1L

// The following code block is for parameter verification and initialization log printing, which is not analyzed here
if (workerId > maxWorkerId || workerId < 0) {
exceptionCounter.incr(1)
throw new IllegalArgumentException("worker Id can't be greater than %d or less than 0".format(maxWorkerId))
}

if (datacenterId > maxDatacenterId || datacenterId < 0) {
exceptionCounter.incr(1)
throw new IllegalArgumentException("datacenter Id can't be greater than %d or less than 0".format(maxDatacenterId))
}

log.info("worker starting. timestamp left shift %d, datacenter id bits %d, worker id bits %d, sequence bits %d, workerid %d",
timestampLeftShift, datacenterIdBits, workerIdBits, sequenceBits, workerId)
Then look at the core code logic of the algorithm:
// The synchronization method is actually protected synchronized long nextId() {...}
protected[snowflake] def nextId(): Long = synchronized {
    // Get system timestamp (MS)
    var timestamp = timeGen()
    // In high concurrency scenarios, multiple ID s are generated in the same millisecond
    if (lastTimestamp == timestamp) {
        // Ensure that there is no overflow after sequence + 1. The maximum value is 4095, which means that 4096 ID values can be generated at most within 1 millisecond
        sequence = (sequence + 1) & sequenceMask
        // If the sequence overflows, it becomes 0, indicating that the number of IDs generated concurrently in 1 millisecond exceeds 4096. At this time, the 4097th ID generated in the same 1 millisecond must wait for the next millisecond
        if (sequence == 0) {
            // The loop waits for the next millisecond value until it is greater than lastTimestamp
            timestamp = tilNextMillis(lastTimestamp)
        }
    } else {
        // In low concurrency scenarios, ID S are generated in different milliseconds
        // In the case of different milliseconds, because the outer method ensures that the timestamp is greater than or less than lastTimestamp, and in the case of less than, the clock callback occurs, and an exception will be thrown below, so it does not need to be considered
        // That is, only one case needs to be considered: timestamp > lasttimestamp, that is, the number of milliseconds of the currently generated ID is greater than the previous ID
        // Therefore, if the timestamp part increases, it can be determined that the integer value must increase, so the serial number can be directly assigned as 0 without calculation
        sequence = 0
    }
    // The obtained timestamp is smaller than the last saved timestamp, indicating that the clock is dialed back. In this case, an exception is thrown directly and the ID generation is rejected
    // Personally, I think this method should be advanced after the code var timestamp = timeGen()
    if (timestamp < lastTimestamp) {
      exceptionCounter.incr(1)
      log.error("clock is moving backwards.  Rejecting requests until %d.", lastTimestamp);
      throw new InvalidSystemClock("Clock moved backwards.  Refusing to generate id for %d milliseconds".format(lastTimestamp - timestamp));
    }
    // lastTimestamp saves the current timestamp as a snapshot of the last timestamp of the next method call
    lastTimestamp = timestamp
    // Measurement statistics, the generated ID counter is incremented by 1
    genCounter.incr()
    // X = (system timestamp - Custom era value) then shift 22 bits left
    // Y = (data center ID shifts 17 bits left)
    // Z = (machine ID shifted 12 bits left)
    // Last id = serial number sequence calculated by X | y | Z |
    ((timestamp - twepoch) << timestampLeftShift) |
      (datacenterId << datacenterIdShift) |
      (workerId << workerIdShift) |
      sequence
}

// Auxiliary method: get the current timestamp of the system (MS)
protected def timeGen(): Long = System.currentTimeMillis()

// Auxiliary method: obtain the current time stamp (MS) of the system, and ensure that it is larger than the incoming lastTimestamp with an endless loop, that is, obtain the next MS larger than the lastTimestamp
protected def tilNextMillis(lastTimestamp: Long): Long = {
    var timestamp = timeGen()
    while (timestamp <= lastTimestamp) {
      timestamp = timeGen()
    }
    timestamp
}
There are many bit operations in the last paragraph of logic, but if you skillfully use bit operators, the logic is not complex. Here you can draw a diagram to deduce:
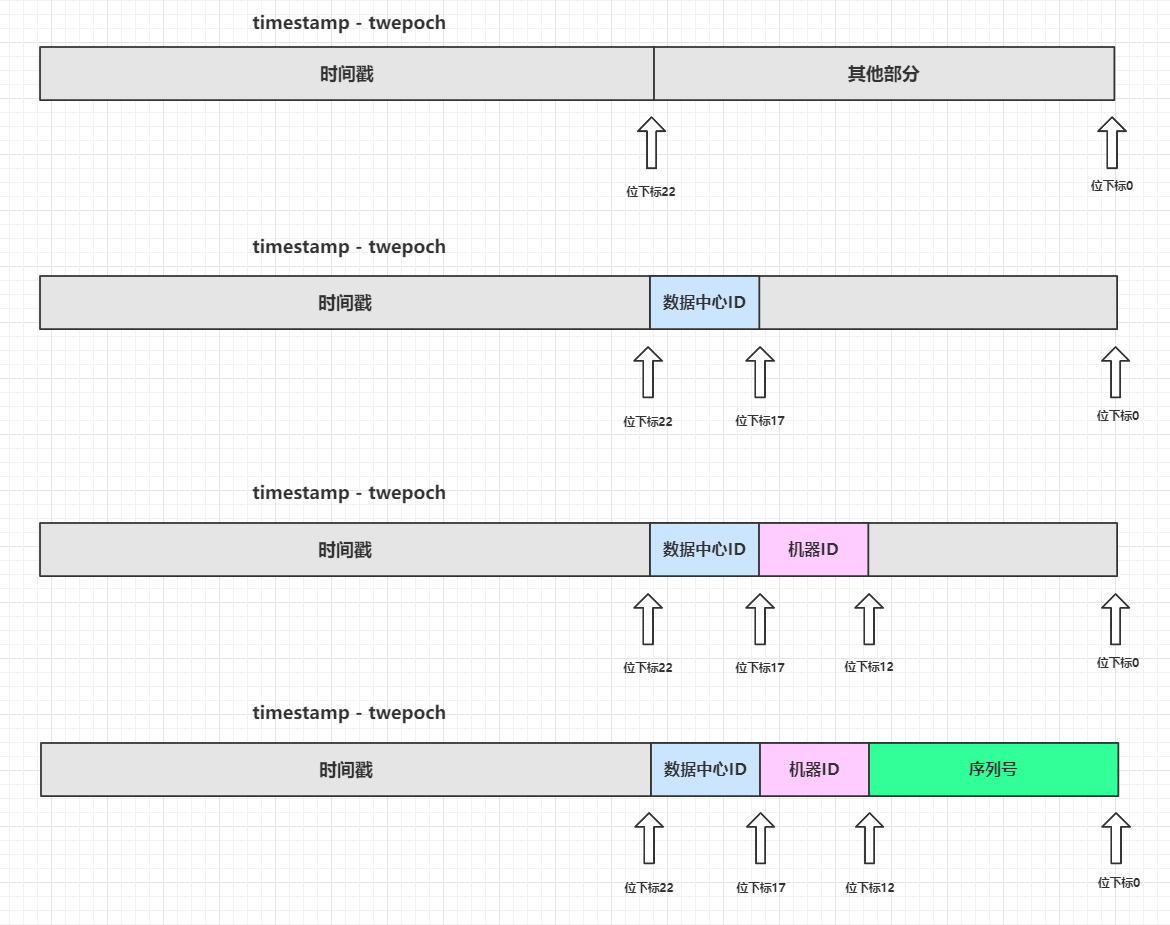
After the integer of the four parts is shifted to the left, the empty low bits will be supplemented with 0. Based on the bitwise or feature, as long as all low bits have 1, the corresponding bits will be filled with 1. Since the bits of the four parts will not be allocated beyond the boundary, the essence here is: the final number will be added after the four parts are shifted to the left.
6. Improvement of snowflake algorithm#
Snowflake algorithm has several major problems:
- The low concurrency scenario will produce continuous even numbers because the system clock in the low concurrency scenario always goes to the next millisecond value, resulting in the serial number being reset to 0.
- Depending on the system clock, clock callback will refuse to generate a new ID (throw an exception directly).
- The management of Woker ID and Data Center ID is troublesome. In particular, different cluster nodes of the same service need to ensure that the combination of Woker ID and Data Center ID of each node is unique.
Meituan's open source Leaf provides solutions to these three problems. The following figure is intercepted from com sankuai. inf.Leaf. snowflake. SnowflakeIDGenImpl:
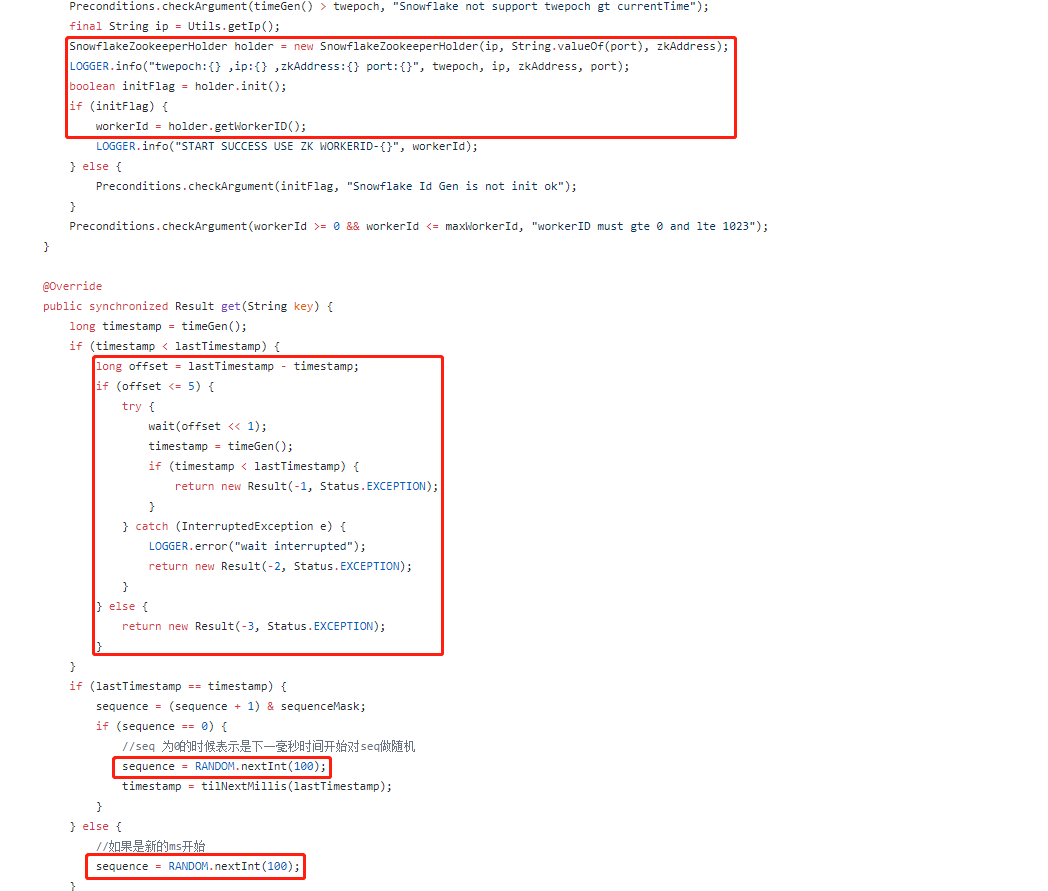
The corresponding solution is (without in-depth source code analysis, you can read the source code of the following Leaf if you are interested):
- Adding random sources to serial number generation will slightly reduce the maximum number of ID s that can be generated in the same millisecond.
- When the clock is dialed back, it waits for a certain period of time.
- Use Zookeeper to cache and manage Woker ID and Data Center ID.
The configuration of Woker ID and Data Center ID is extremely important. For multiple nodes in the same service (such as payment service) cluster, you must configure different machine ID and Data Center ID or the same Data Center ID and different machine ID (in short, ensure that the combination of Woker ID and Data Center ID is globally unique). Otherwise, in high concurrency scenarios, When the system clock is consistent, it is easy to generate the same ID value in multiple nodes. Therefore, the general deployment architecture is as follows:
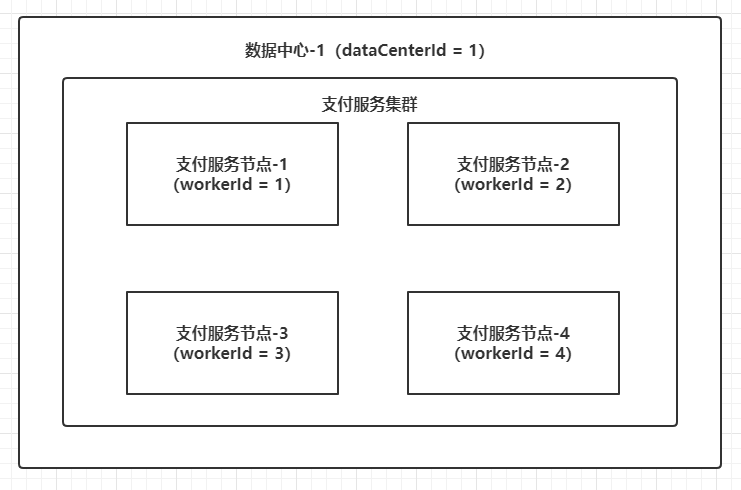
There are many ways to manage these two IDS, or an open source framework such as Leaf introduces distributed cache for management. Another example is that the entrepreneurial team where the author works has few production services. The Woker ID and Data Center ID are directly hard coded in the service startup script, and then the Woker ID and Data Center ID used by all services are uniformly registered in the team's internal knowledge base.
7. Self implementation simplified Snowflake#
If you don't consider the performance at all, clock callback, serial number generation, etc., you can actually remove all the bit operations and exception handling of Snowflake and use Long Tobinarystring() method combines strings to splice 64 bit binary numbers according to the idea of Snowflake algorithm, and then through Long The parselong() method is converted to a Long type. Write a main method as follows:
public class Main {

    private static final String HIGH = "0";

    /**
     * 2020-08-01 00:00:00
     */
    private static final long EPOCH = 1596211200000L;

    public static void main(String[] args) {
        long workerId = 1L;
        long dataCenterId = 1L;
        long seq = 4095;
        String timestampString = leftPadding(Long.toBinaryString(System.currentTimeMillis() - EPOCH), 41);
        String workerIdString = leftPadding(Long.toBinaryString(workerId), 5);
        String dataCenterIdString = leftPadding(Long.toBinaryString(dataCenterId), 5);
        String seqString = leftPadding(Long.toBinaryString(seq), 12);
        String value = HIGH + timestampString + workerIdString + dataCenterIdString + seqString;
        long num = Long.parseLong(value, 2);
        System.out.println(num);   // The output at a certain time is 3125927076831231
    }

    private static String leftPadding(String value, int maxLength) {
        int diff = maxLength - value.length();
        StringBuilder builder = new StringBuilder();
        for (int i = 0; i < diff; i++) {
            builder.append("0");
        }
        builder.append(value);
        return builder.toString();
    }
}
Then standardize the code and write a simple version Snowflake Engineering code of algorithm implementation:

// Primary key generator interface
public interface PrimaryKeyGenerator {

    long generate();
}

// Simple Snowflake implementation
public class SimpleSnowflake implements PrimaryKeyGenerator {

    private static final String HIGH = "0";
    private static final long MAX_WORKER_ID = 31;
    private static final long MIN_WORKER_ID = 0;

    private static final long MAX_DC_ID = 31;
    private static final long MIN_DC_ID = 0;

    private static final long MAX_SEQUENCE = 4095;

    /**
     * Machine ID
     */
    private final long workerId;

    /**
     * Data center ID
     */
    private final long dataCenterId;

    /**
     * Reference era value
     */
    private final long epoch;

    private long sequence = 0L;
    private long lastTimestamp = -1L;

    public SimpleSnowflake(long workerId, long dataCenterId, long epoch) {
        this.workerId = workerId;
        this.dataCenterId = dataCenterId;
        this.epoch = epoch;
        checkArgs();
    }

    private void checkArgs() {
        if (!(MIN_WORKER_ID <= workerId && workerId <= MAX_WORKER_ID)) {
            throw new IllegalArgumentException("Worker id must be in [0,31]");
        }
        if (!(MIN_DC_ID <= dataCenterId && dataCenterId <= MAX_DC_ID)) {
            throw new IllegalArgumentException("Data center id must be in [0,31]");
        }
    }

    @Override
    public synchronized long generate() {
        long timestamp = System.currentTimeMillis();
        // Clock callback
        if (timestamp < lastTimestamp) {
            throw new IllegalStateException("Clock moved backwards");
        }
        // Concurrent within the same millisecond
        if (lastTimestamp == timestamp) {
            sequence = sequence + 1;
            if (sequence == MAX_SEQUENCE) {
                timestamp = untilNextMillis(lastTimestamp);
                sequence = 0L;
            }
        } else {
            // Reset the sequence to 0 in the next millisecond
            sequence = 0L;
        }
        lastTimestamp = timestamp;
        // 41 bit timestamp string. If the number of bits is not enough, fill "0" on the left
        String timestampString = leftPadding(Long.toBinaryString(timestamp - epoch), 41);
        // 5-bit machine ID string. If it is not enough, fill "0" on the left
        String workerIdString = leftPadding(Long.toBinaryString(workerId), 5);
        // 5-digit data center ID string. If it is not enough, fill "0" on the left
        String dataCenterIdString = leftPadding(Long.toBinaryString(dataCenterId), 5);
        // 12 digit serial number string, not enough digits, fill "0" on the left
        String seqString = leftPadding(Long.toBinaryString(sequence), 12);
        String value = HIGH + timestampString + workerIdString + dataCenterIdString + seqString;
        return Long.parseLong(value, 2);
    }

    private long untilNextMillis(long lastTimestamp) {
        long timestamp;
        do {
            timestamp = System.currentTimeMillis();
        } while (timestamp <= lastTimestamp);
        return timestamp;
    }

    private static String leftPadding(String value, int maxLength) {
        int diff = maxLength - value.length();
        StringBuilder builder = new StringBuilder();
        for (int i = 0; i < diff; i++) {
            builder.append("0");
        }
        builder.append(value);
        return builder.toString();
    }

    public static void main(String[] args) {
        long epoch = LocalDateTime.of(1970, 1, 1, 0, 0, 0, 0)
                .toInstant(ZoneOffset.of("+8")).toEpochMilli();
        PrimaryKeyGenerator generator = new SimpleSnowflake(1L, 1L, epoch);
        for (int i = 0; i < 5; i++) {
            System.out.println(String.format("The first%s Generated ID: %d", i + 1, generator.generate()));
        }
    }
}
// The output at a certain time is as follows
 First generated ID: 6698247966366502912
 2nd generated ID: 6698248027448152064
 3rd generated ID: 6698248032162549760
 4th generated ID: 6698248033076908032
 5th generated ID: 6698248033827688448
Although the writing method of string splicing is inefficient, it will be highly readable. The engineering processed code can directly specify the equivalent of Worker ID and Data Center ID during instantiation. Moreover, this simple Snowflake implementation does not depend on a third-party library, and can be run directly after copying. The above method uses string splicing, which looks low-end. In fact, the bitwise or of the last part can be completely converted into addition:
public class Main {

    /**
     * 2020-08-01 00:00:00
     */
    private static final long EPOCH = 1596211200000L;

    public static void main(String[] args) {
        long workerId = 1L;
        long dataCenterId = 1L;
        long seq = 4095;
        long timestampDiff = System.currentTimeMillis() - EPOCH;
        long num = (long) (timestampDiff * Math.pow(2, 22)) + (long) (dataCenterId * Math.pow(2, 17)) + (long) (workerId * Math.pow(2, 12)) + seq;
        System.out.println(num);   // The output at a certain time is 3248473482862591
    }
}
In this way, it seems that the whole algorithm becomes simple, but it involves exponential operation and addition operation, and the efficiency will be relatively low.
8. Summary#
Snowflake algorithm is an algorithm with high performance as the core goal. Based on this purpose, it skillfully uses a large number of bit operations. This article has thoroughly analyzed the bit operations and specific source code implementation applied in snowflake. Finally, based on the official snowflake algorithm source code of Twitter, a Java implementation version is revised, and the improved method mentioned above is applied to fix the problem that only even numbers occur in low concurrency scenarios. It has been applied to the production environment for a period of time. The code warehouse is as follows (the code is not dependent on any third-party library, and can be directly used after being copied):
Github: https://github.com/zjcscut/framework-mesh/tree/master/java-snowflake
reference material:
Meituan Leaf source code
Twitter Snowflake
(the cover picture of c-3-d e-a-20200809 at the end of this article comes from Guoman's spirit cage)