With the growth of data volume, the performance of a single database can no longer meet the requirements. Therefore, the method of database and table division was born to improve the access performance of RMDB. The problem caused by database division is that transactions cannot be controlled through a single DB connection (multiple databases need multiple connections). Therefore, there is a need to coordinate multiple single database transactions. In the era of microservice, Due to the distributed deployment of services, and their respective services depend on different data sources, simple local transactions can no longer meet the requirements. To sum up, the concept of distributed transactions was born.
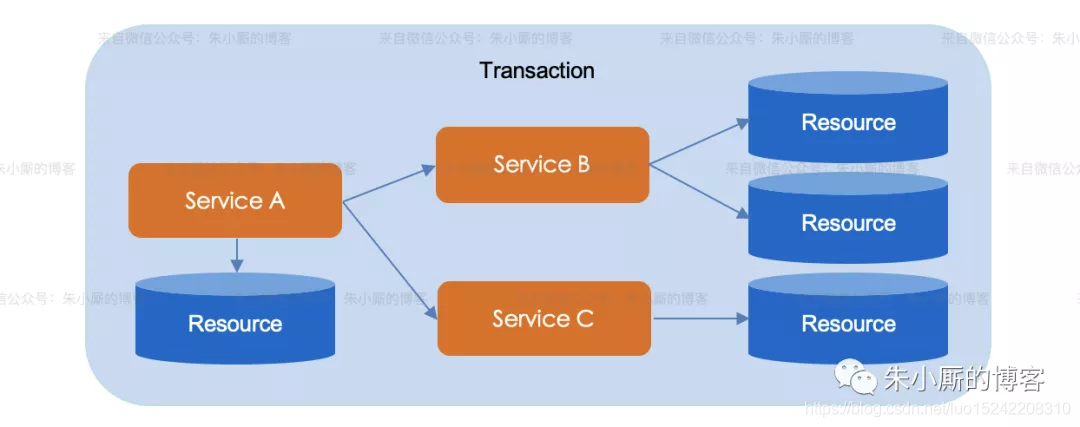
As Alibaba's open source distributed transaction solution, Seata (Simple Extensible Autonomous Transaction Architecture) is committed to providing high-performance and easy-to-use distributed transaction services under the microservice architecture. After the test of Alibaba's double 11 over the years, commercial products are also sold in Alibaba cloud and financial cloud, and Seata officially announced open source in January 2019.
Seata will provide users with AT, TCC, SAGA and XA transaction modes to create a one-stop distributed solution for users.
Next, combined with the actual combat, each mode is introduced in turn.
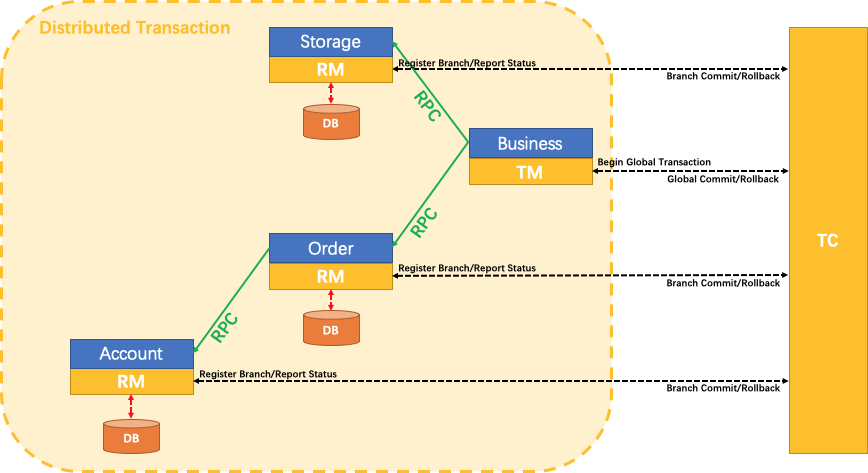
Overall architecture of Seata
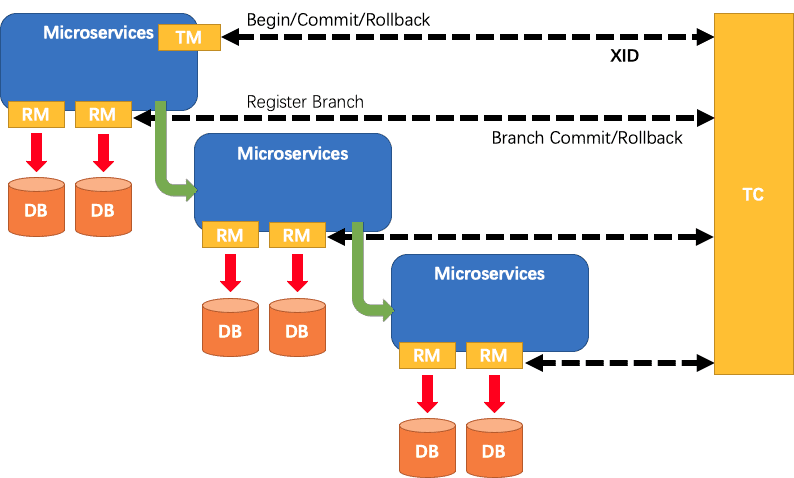
The overall architecture of Seata is shown in the figure above, which is divided into three roles: TC, TM and RM. TC (Server) is deployed as a separate Server, and TM and RM (Client) are integrated by business systems.
TC (Transaction Coordinator) - Transaction Coordinator
Maintain the status of global and branch transactions and drive global transaction commit or rollback.
TM (Transaction Manager) - transaction manager
Define the scope of a global transaction: start a global transaction, commit or roll back a global transaction.
RM (Resource Manager) - Resource Manager
Manage the resources of branch transaction processing, talk with TC to register branch transactions and report the status of branch transactions, and drive branch transaction commit or rollback.
A typical transaction process:
- TM applies to TC to start a global transaction. The global transaction is successfully created and a globally unique XID is generated.
- XID propagates in the context of the microservice invocation link.
- RM registers branch transactions with TC and brings them under the jurisdiction of global transactions corresponding to XID.
- TM initiates a global commit or rollback resolution for XID to TC.
- TC schedules all branch transactions under XID to complete the commit or rollback request.
Start Seata Server(TC)
The main steps for starting the Seata Server are as follows:
- Specify the registry (file, nacos, eureka, consult, etcd, zookeeper, sofa, redis) and configuration center (file, nacos, apollo, consult, etcd, zookeeper) through registry.conf
- If the registry is file, specify the storage mode (file, db, redis) and other configurations through file.conf
- If the registry is other (e.g. nacos), it needs to be modified /script/config-center/config.txt And import it into the corresponding configuration center
There are three storage modes (file, db and redis) in Seata Server (store.mode) (raft and mongodb will be introduced later). The file mode does not need to be changed and can be started directly. The comparison of different modes is as follows:
| Storage mode | initialization | explain |
|---|---|---|
| file | Start directly without change | Stand alone mode, high performance, Read and write global transaction session information in memory and persist the local file root.data |
| db | 1. Initial DB: seata/script/server/db/mysql.sql 2. Modify storage mode: store.mode="db" 3. Modify storage data source: store.db related attributes | High availability mode, The global transaction session information is shared through db, and the corresponding performance is worse |
| redis | 1. Modify storage mode: store.mode="redis" 2. Modify the related attributes of the storage data source: store.redis | High performance, risk of transaction information loss, redis persistence configuration suitable for the current scenario should be configured in advance |
As follows, take db Mysql as the storage mode and nacos as the configuration and registry center, and record the startup process of Seata Server as follows:
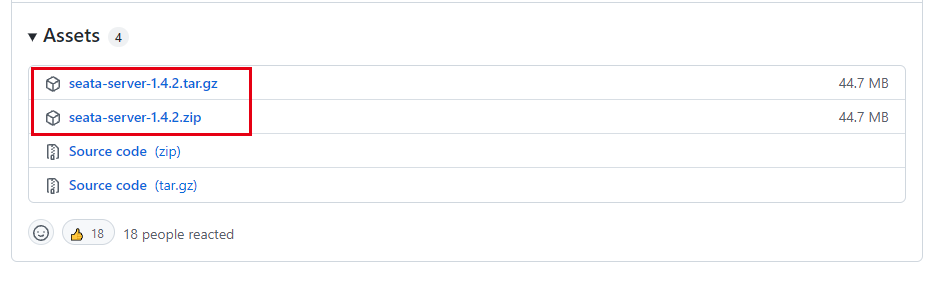
(1) Download the seata server startup package: https://github.com/seata/seata/releases
The directory structure after decompression is as follows:
E:\download\development\seata\seata-server-1.4.2>tree /f
│  LICENSE
│
├─bin
│      seata-server.bat
│      seata-server.sh
│
├─conf
│  │  file.conf
│  │  file.conf.example
│  │  logback.xml
│  │  README-zh.md
│  │  README.md
│  │  registry.conf
│  │
│  ├─logback
│  │      console-appender.xml
│  │      file-appender.xml
│  │      kafka-appender.xml
│  │      logstash-appender.xml
│  │
│  └─META-INF
│      └─services
│              io.seata.core.rpc.RegisterCheckAuthHandler
│              io.seata.core.store.db.DataSourceProvider
│              io.seata.server.coordinator.AbstractCore
│              io.seata.server.lock.LockManager
│              io.seata.server.session.SessionManager
│
├─lib
│  │  apollo-xxx-1.6.0.jar
│  │  druid-1.1.23.jar
│  │  eureka-client-1.9.5.jar
│  │  grpc-xxx-1.17.1.jar
│  │  HikariCP-3.4.3.jar
│  │  registry-client-all-5.2.0.jar
│  │  seata-xxx-1.4.2.jar
│  │  ......
│  │  sofa-xxx-1.0.12.jar
│  │  zkclient-0.11.jar
│  │  zookeeper-3.4.14.jar
│  │
│  └─jdbc
│          mysql-connector-java-5.1.35.jar
│          mysql-connector-java-8.0.19.jar
│
└─logs
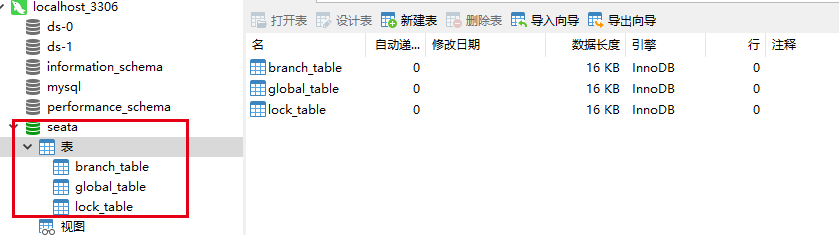
(2) Initialize DB mysql
Create a new database, seata, and then import script/server/db/mysql.sql Initialization script
(3) Start nacos
See my other blog: nacos quick start , that is, start nacos quickly in the windows local development environment. The access method is as follows:
http://localhost:8848/nacos
Default account / password: nacos/nacos
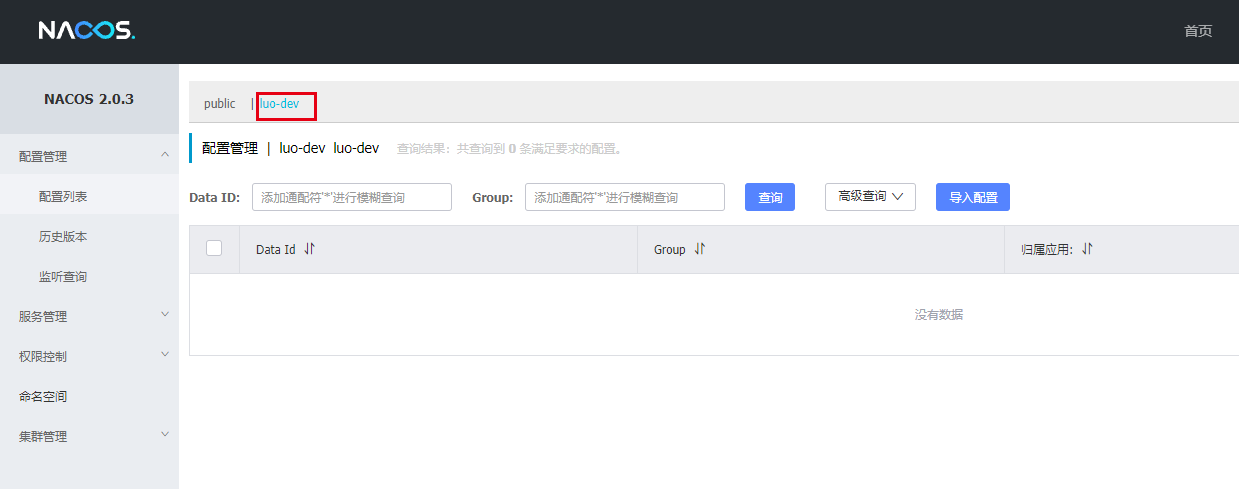
You can create a new namespace for local development. For example, I am used to using Luo dev for local development
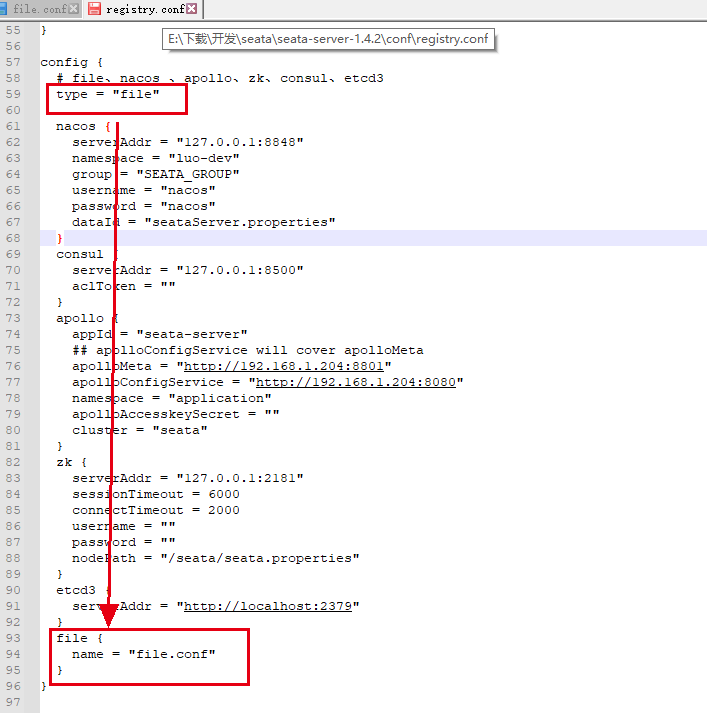
(4) Modify configuration center - conf / registry.conf - > config
Since the nacos configuration center is adopted, the red box in the config module in conf/registry.conf needs to be modified,
That is, config.type="nacos" and modify it to the corresponding Nacos configuration in step (3) under config.nacos,
config.nacos.serverAdd = "127.0.0.1:8848" corresponds to the address of the nacos server
config.nacos.namespace = "Luo dev" corresponds to the nacos namespace Luo dev
config.nacos.group = "SEATA_GROUP" corresponding to nacos group Seata_ GROUP
config.nacos.username = "nacao" corresponds to the user name of nacos
config.nacos.password = "nacos" user password corresponding to nacos
config.nacos.dataId = "seataServer.properties" corresponds to the configured dataId of the nacos server

Note:
The default config.type = "file" in registry.conf is configured through local files,
config.file.name="file.conf" specifies that conf/file.conf in the same directory is the corresponding configuration file location,
After setting config.type="nacos", it can be understood that if the configuration information is put into nacos, the configuration in the default file.conf file will not be read
(5) Import initial configuration to nacos
In the nacos configuration specified in step (4), it is defined that Seata Server needs to rely on the following configuration in nacos
namespace: luo-dev
group: SEATA_GROUP
dataId: seataServer.properties
Can https://github.com/seata/seata Clone locally,
The default configuration is /script/config-center/config.txt Defined in the document,
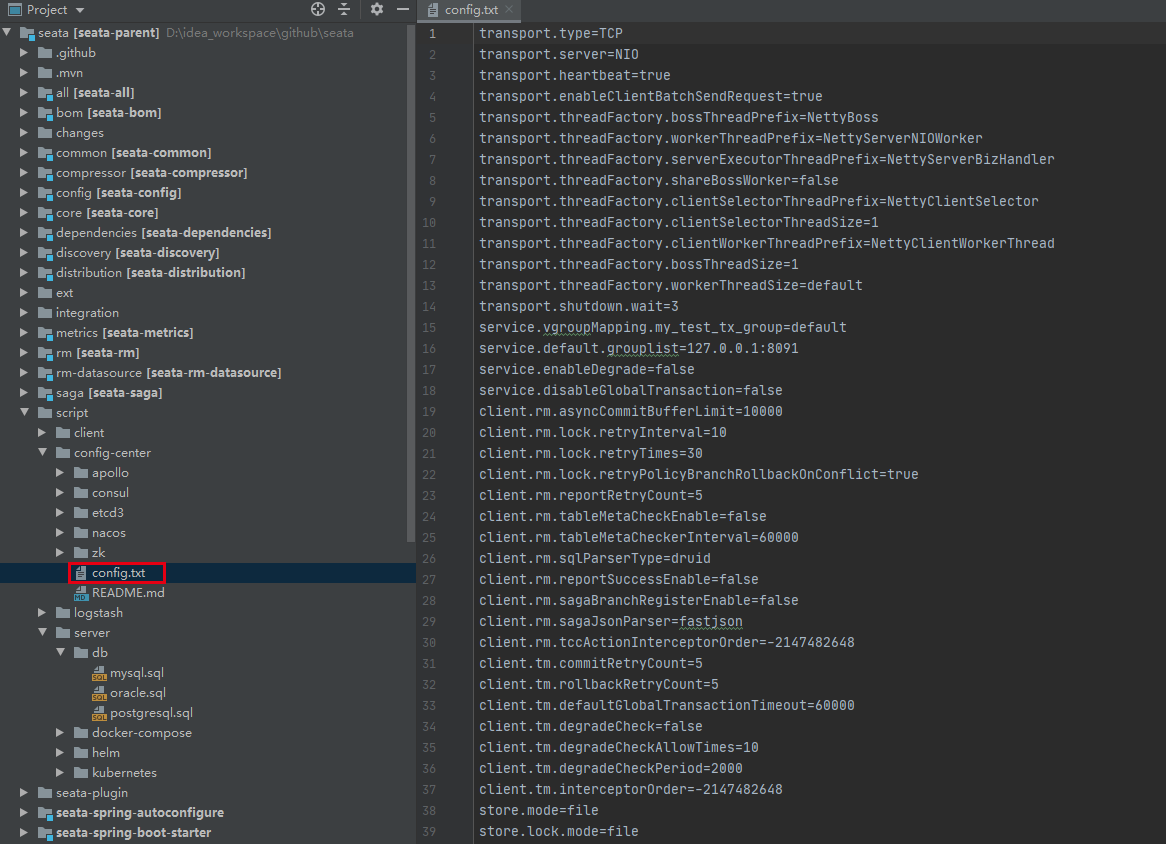
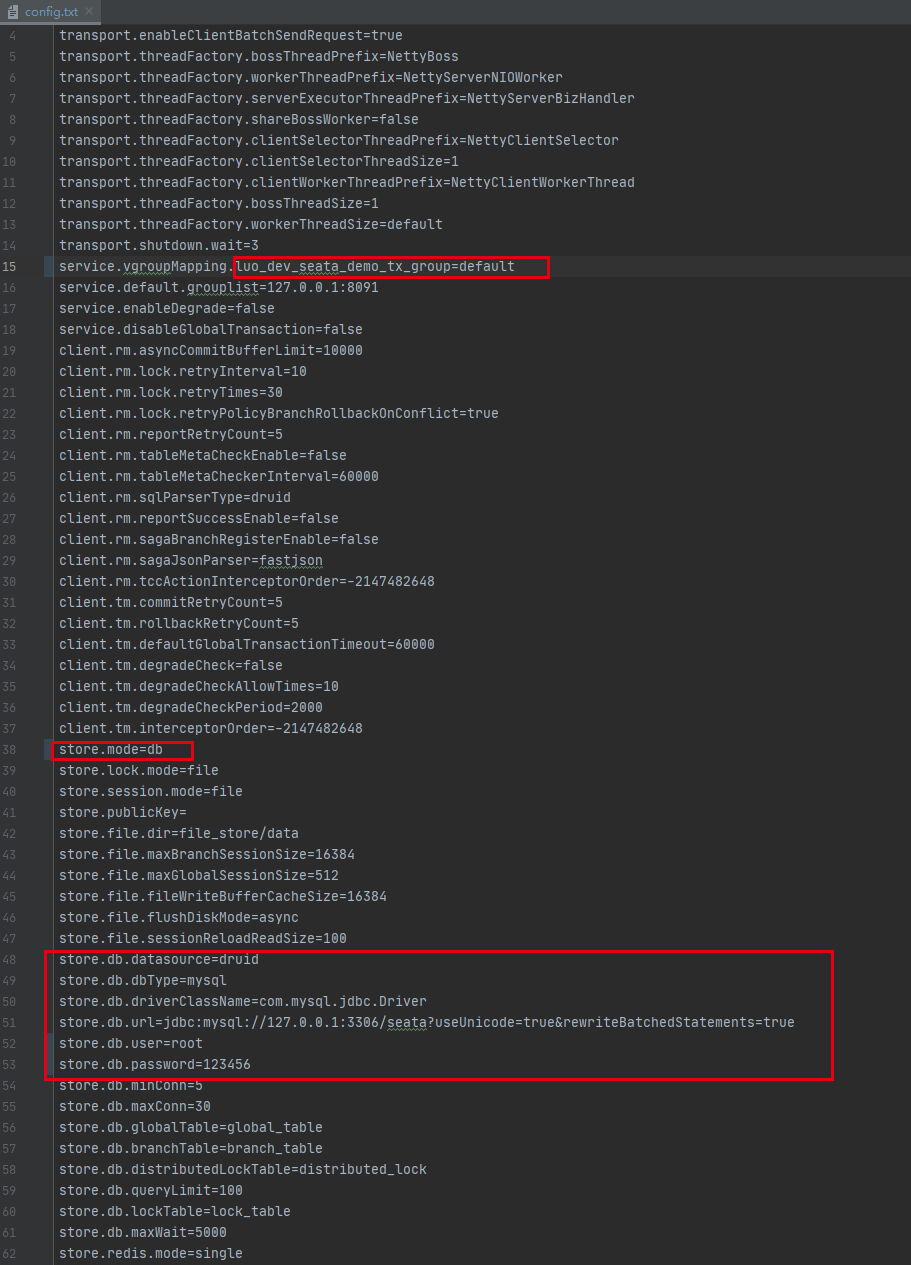
Since the storage mode is db mode, you need to modify the red box in config.txt,
That is, store.mode="db" and store.db is modified to the corresponding initial DB configuration in step (2),
For detailed configuration instructions, see: SEATA - user documentation - parameter configuration
For importing nacos configuration, the recommended methods in official documents are as follows:
Can pass script/config-center/nacos/nacos-config.sh Import the modified config.txt into nacos,
Note: in this way, the registry.conf - > registry.nacos.dataid configuration item needs to be deleted
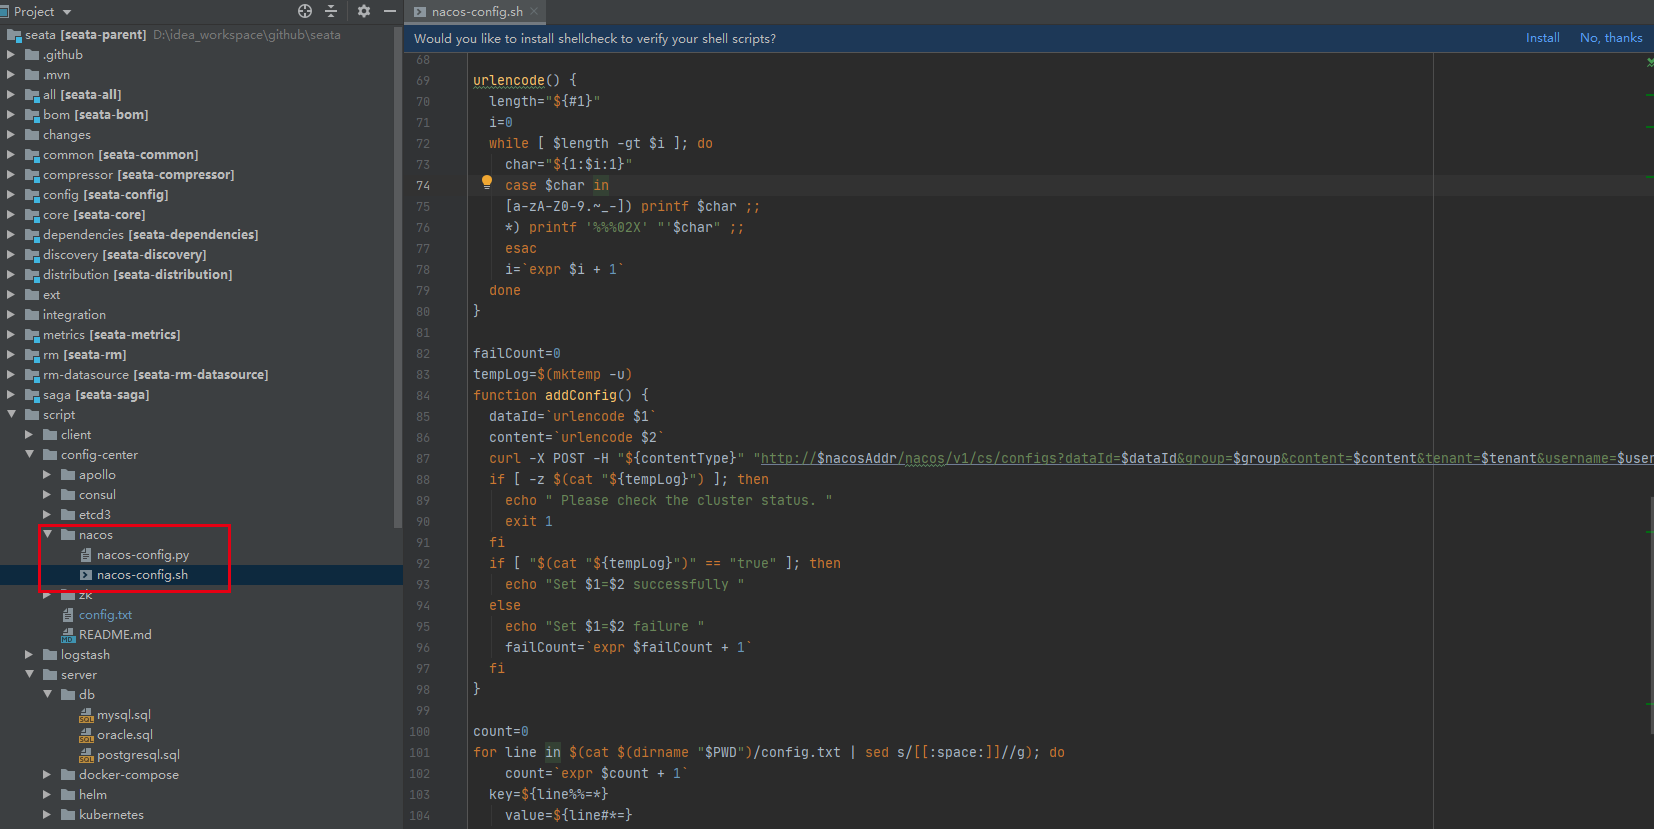
The nacos import configuration command is as follows:
# For details, see: https://github.com/seata/seata/tree/1.4.0/script/config-center
# -h: nacos host, default localhost
# -p: nacos port, default 8848
# -g: nacos grouping, default 'Seata'_ GROUP'.
# -t: Tenant information, corresponding to nacos namespace ID, default ''
# -u: nacos user name, default ''
# -w: nacos user password, default ''
script/config-center/nacos/nacos-config.sh ^
-h localhost -p 8848 ^
-g SEATA_GROUP ^
-t luo-dev ^
-u nacos -w nacos
The import result is shown in the figure below
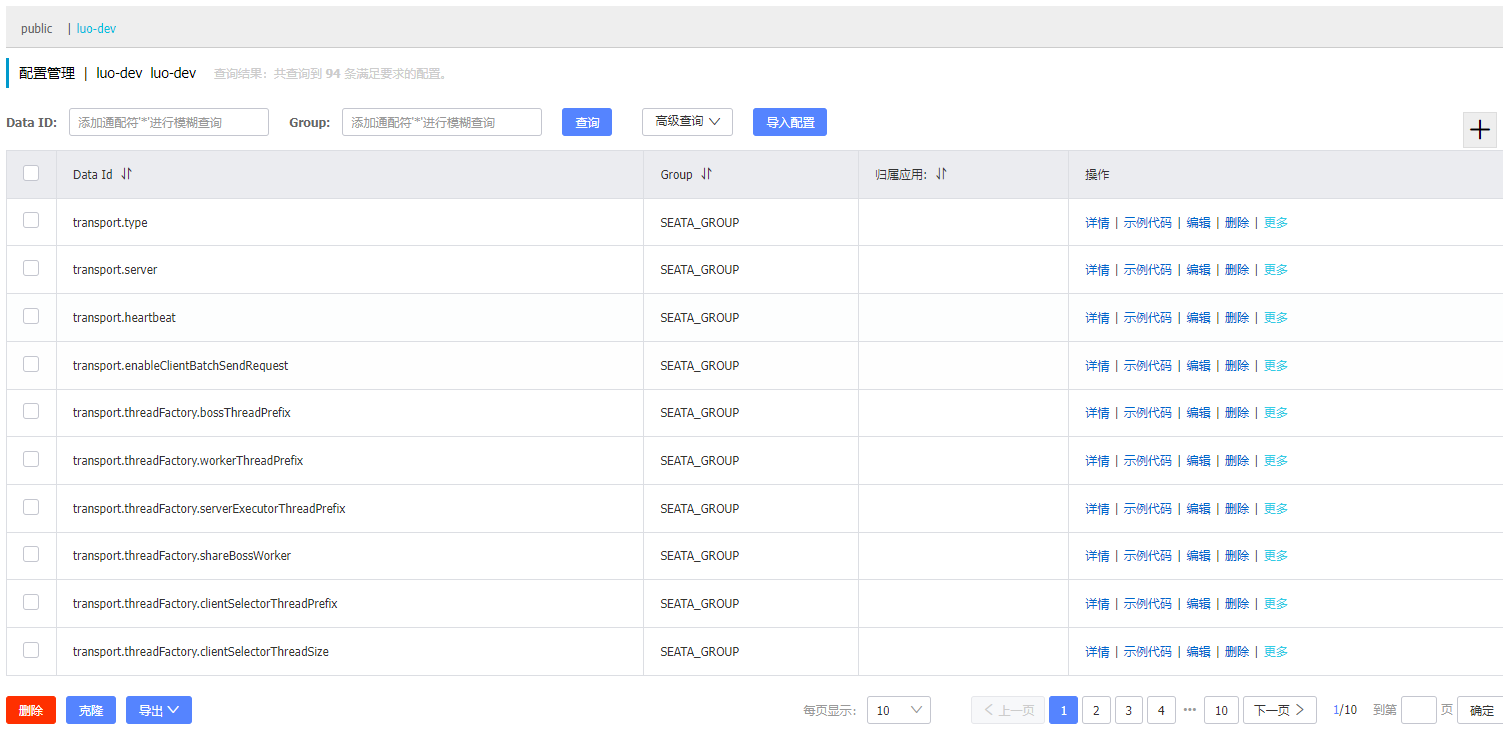
It can be found that the imported results become N multiple configuration items, and each item can be modified separately.
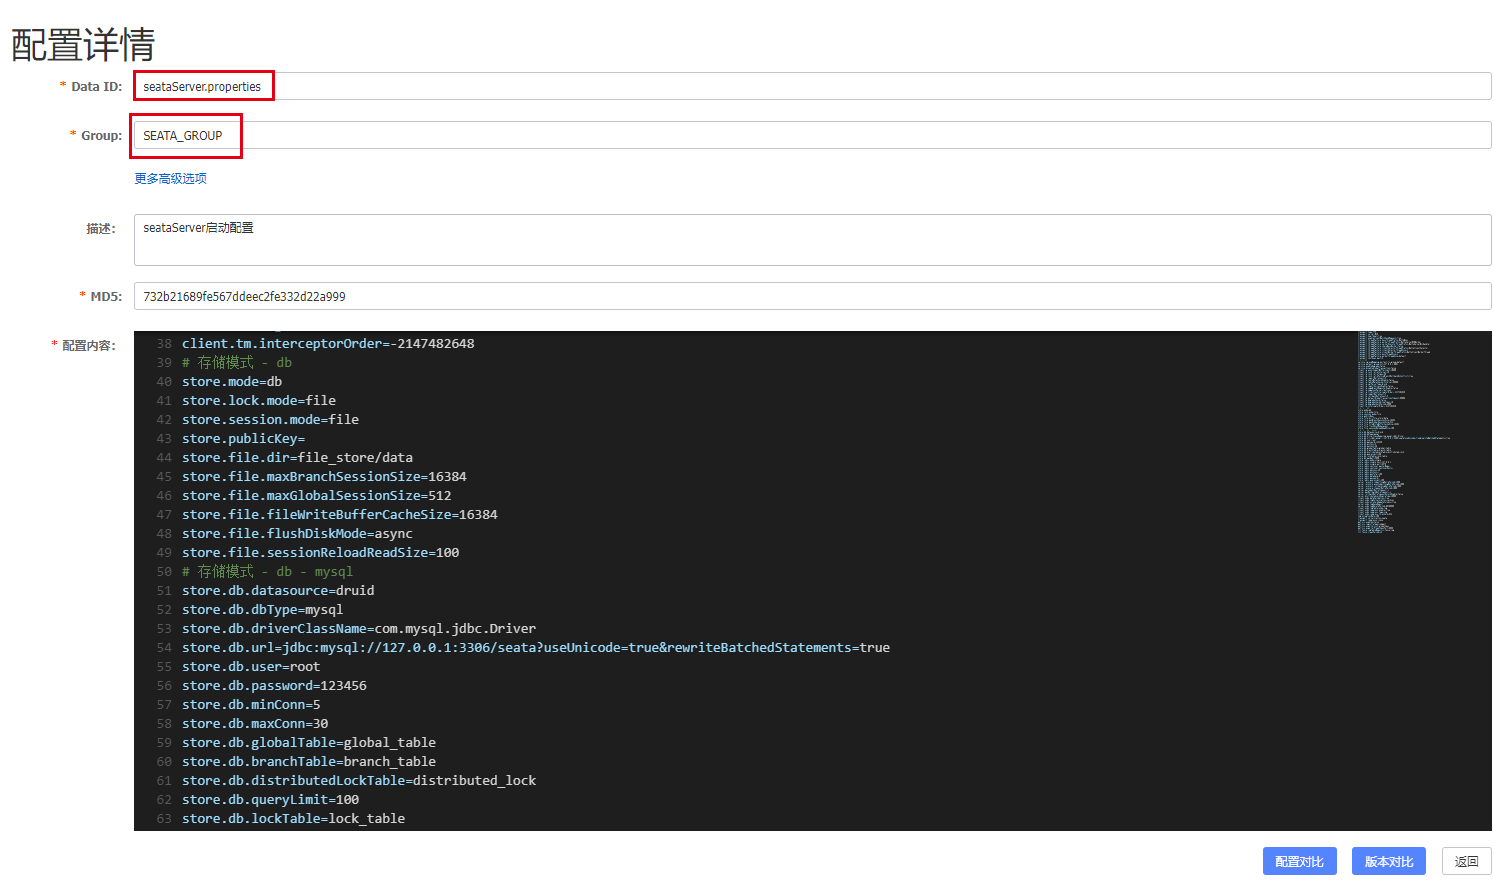
There is another manual import method, which I prefer,
That is, you can manually create the corresponding seataServer.properties configuration in nacos according to the previous registry.conf - > Registry - > nacos configuration, and directly copy the changed config.txt content to seataServer.properties, so that all configuration items are maintained in one configuration file.
namespace: luo-dev
group: SEATA_GROUP
dataId: seataServer.properties
(6) Modify registry - conf / registry.conf - > registry
Since the nacos registry is adopted, the red box in the registry module in conf/registry.conf needs to be modified,
That is, registry.type="nacos" and the corresponding Nacos configuration in step (3) is modified under registry.nacos,
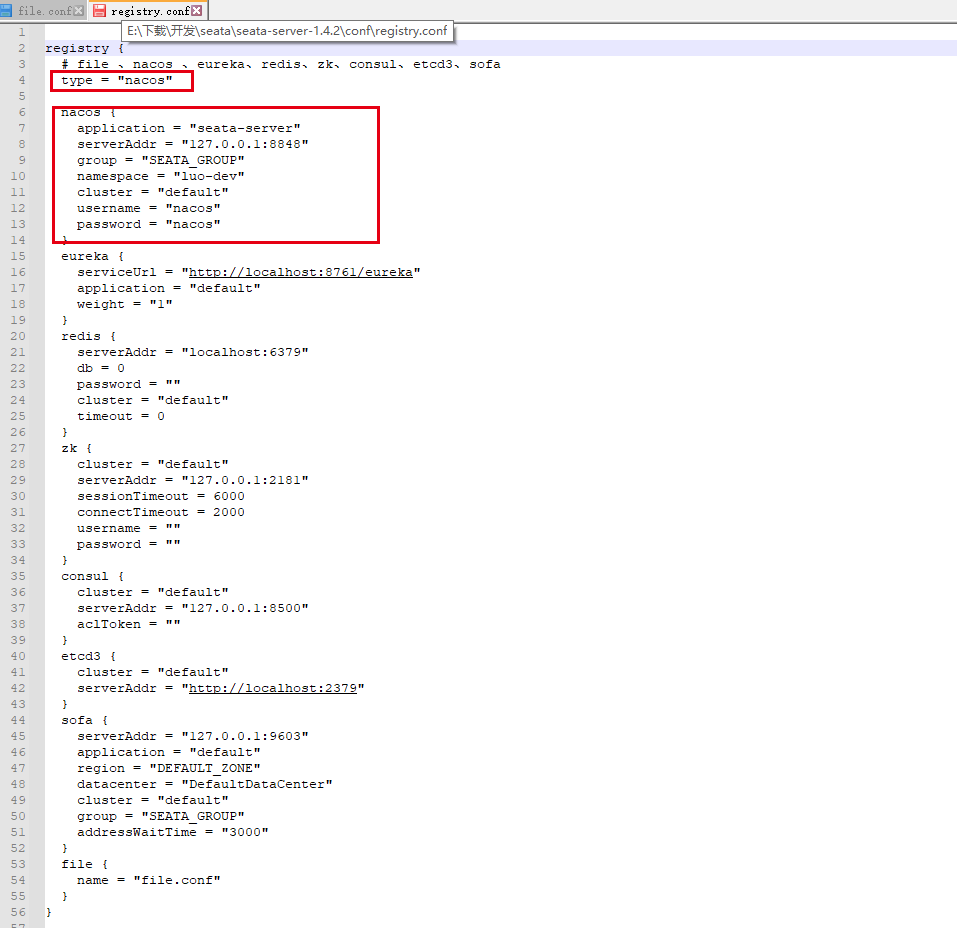
In step (4) and (5), the final content of conf/registry.conf is as follows:
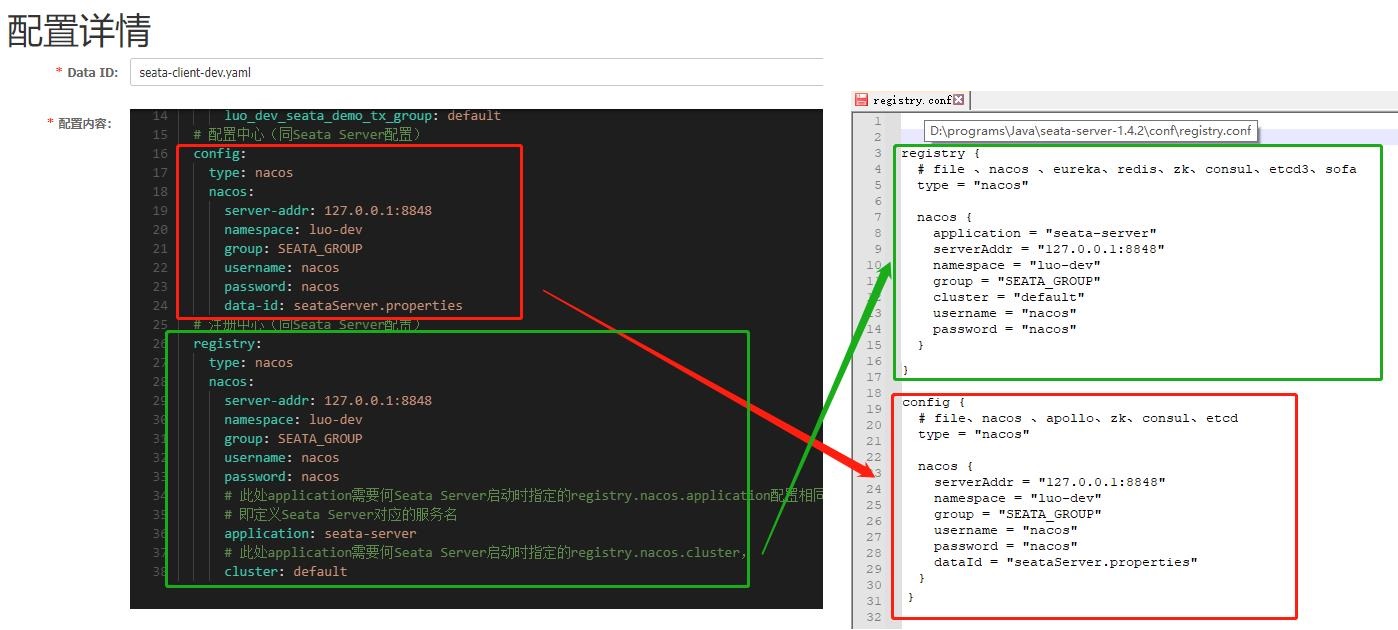
registry {
  # file ,nacos ,eureka,redis,zk,consul,etcd3,sofa
  type = "nacos"

  nacos {
    application = "seata-server"
    serverAddr = "127.0.0.1:8848"
    namespace = "luo-dev"
    group = "SEATA_GROUP"
    cluster = "default"
    username = "nacos"
    password = "nacos"
  }
  # Omit the configuration of eureka, redis, zk, consumer, etcd3, sofa and file

}

config {
  # file,nacos ,apollo,zk,consul,etcd3
  type = "nacos"

  nacos {
    serverAddr = "127.0.0.1:8848"
    namespace = "luo-dev"
    group = "SEATA_GROUP"
    username = "nacos"
    password = "nacos"
    dataId = "seataServer.properties"
  }
  # Omit the configuration of consumer, apollo, zk, etcd3 and file

}
(7) Start the Seata server
Execute bin/seata-server.sh (seata-server.bat can be executed on windows system)
# -h: ip registered with the registry
# -p: Server rpc listening port
# -m: Global transaction session information storage mode, such as file, db, redis. Read the startup parameters first (the version of Seata server 1.3 and above supports redis)
# -n: Server node. When there are multiple servers, each node should be distinguished to generate transactionids in different intervals to avoid conflicts
# -e: Multi environment configuration reference http://seata.io/en-us/docs/ops/multi-configuration-isolation.html
seata-server.bat -h 127.0.0.1 -p 8091

# start log
......
18:53:46,763 |-INFO in ch.qos.logback.classic.joran.JoranConfigurator@78c03f1f - Registering current configuration as safe fallback point

SLF4J: A number (18) of logging calls during the initialization phase have been intercepted and are
SLF4J: now being replayed. These are subject to the filtering rules of the underlying logging system.
SLF4J: See also http://www.slf4j.org/codes.html#replay
18:53:46.835  INFO --- [                     main] io.seata.config.FileConfiguration        : The file name of the operation is registry
18:53:46.839  INFO --- [                     main] io.seata.config.FileConfiguration        : The configuration file used is D:\programs\Java\seata-server-1.4.2\conf\registry.conf
18:53:48.453  INFO --- [                     main] com.alibaba.druid.pool.DruidDataSource   : {dataSource-1} inited
18:53:49.219  INFO --- [                     main] i.s.core.rpc.netty.NettyServerBootstrap  : Server started, listen port: 8091
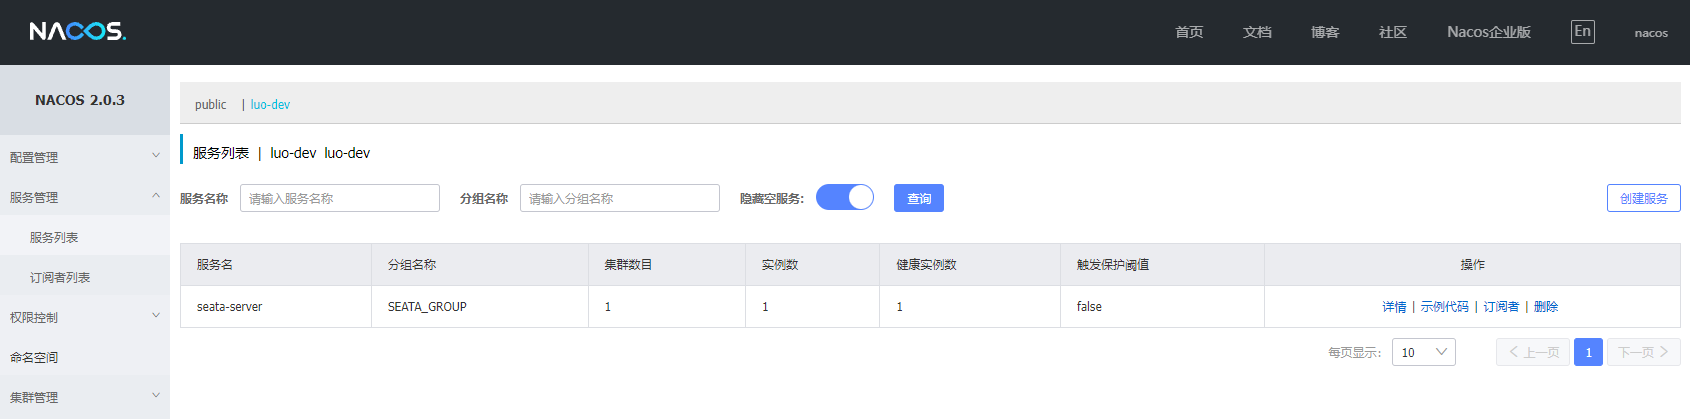
After successful startup, you can find that the Seata server service has been registered with nacos
Note:
For Seata Server high availability deployment, see:
Seata high availability deployment - K8S Deployment 3 replica + ConfigMap
AT mode
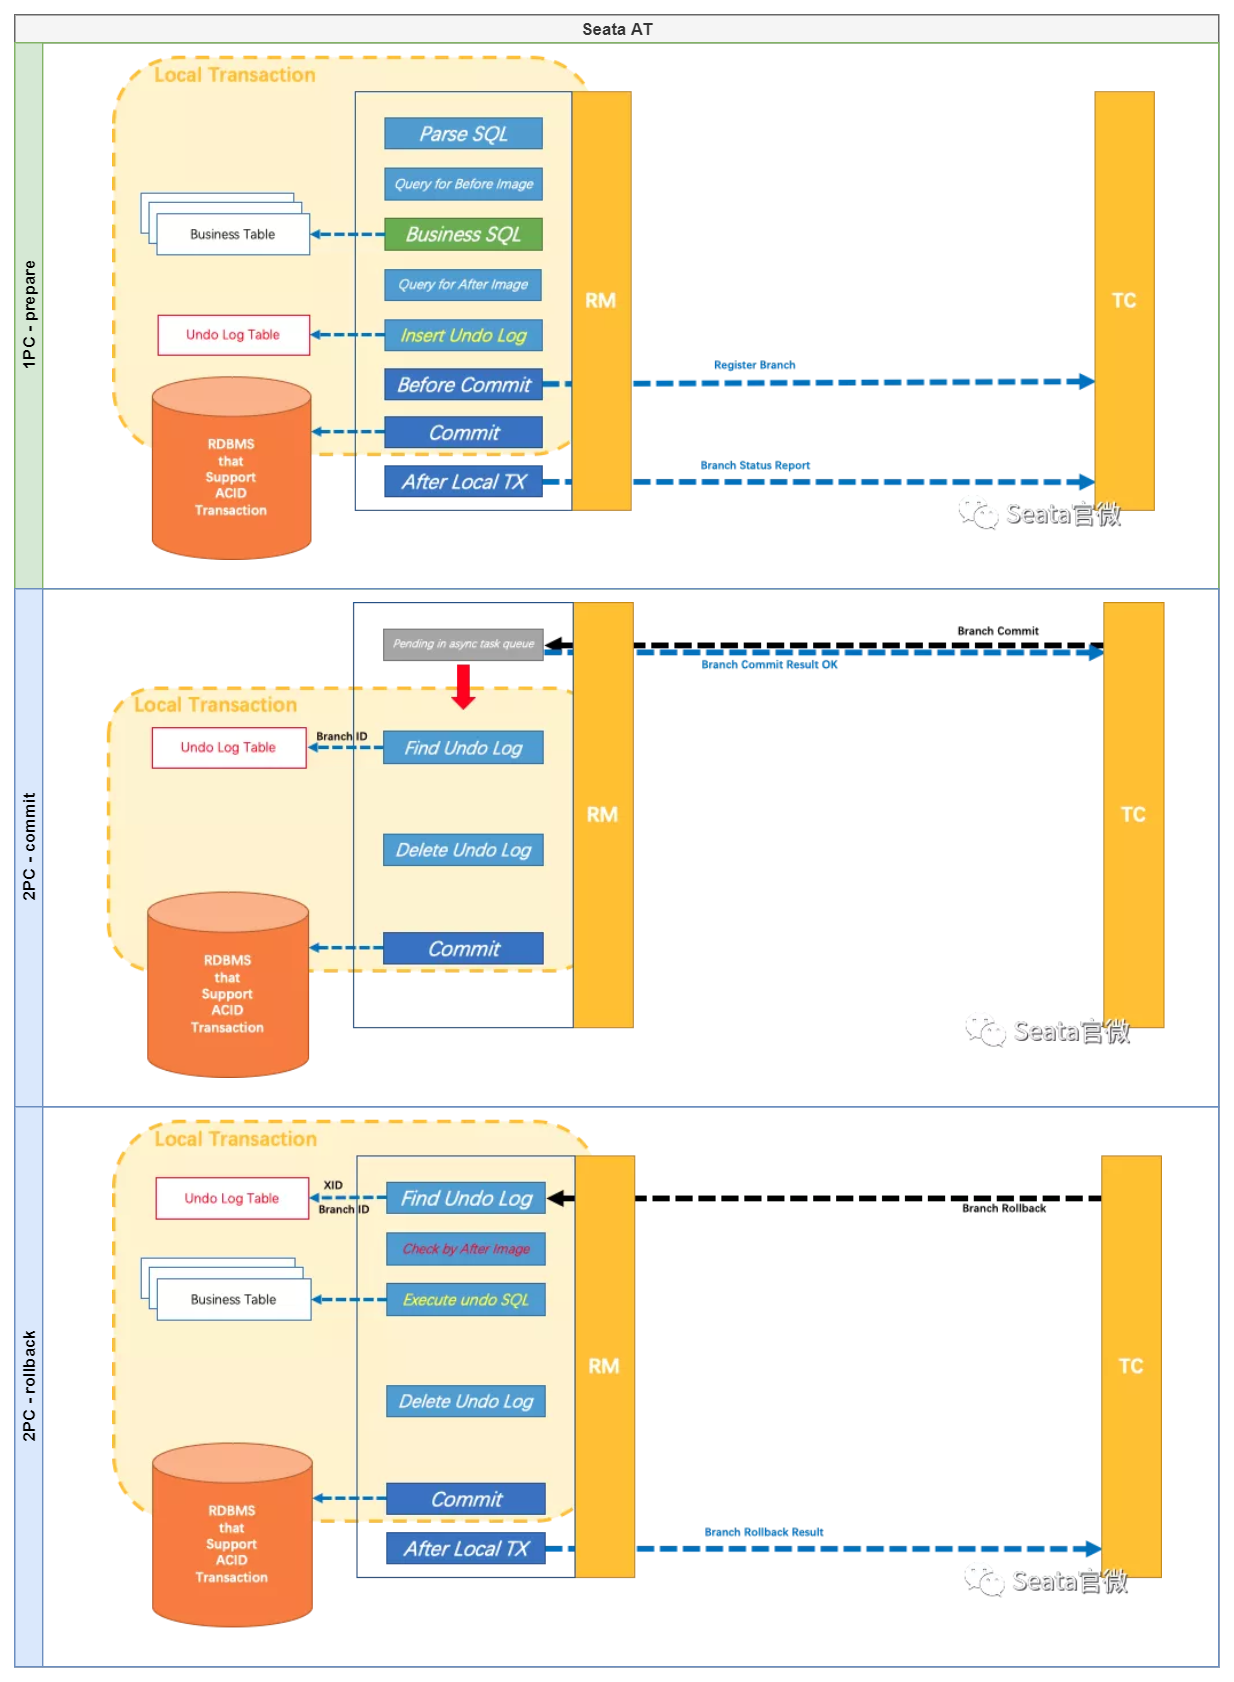
According to the different behavior patterns of branch transactions (RM) in 2PC, Seata divides branch transactions into:
- AT(Automatic (Branch) Transaction Mode)
Based on the local ACID transaction (i.e. applicable to RMDB), in the prepare phase, the developer completes the update operation based on the local transaction, and Seata automatically completes the commit and rollback (based on the seata undo_log table), that is, the corresponding Seata AT mode. - MT(Manual (Branch) Transaction Mode)
Independent of the support of underlying data resources, the developer can customize the prepare, commit and rollback logic, that is, the corresponding Seata TCC mode.
The execution phase of AT mode can be seen in the figure below, and the specific principle mechanism and isolation treatment can be seen in the official wechat: SEATA official micro - take you through SEATA's AT mode
Next combine Example of ordering process on Seata official website , specifically explain how the Java client integrates the Seata AT pattern
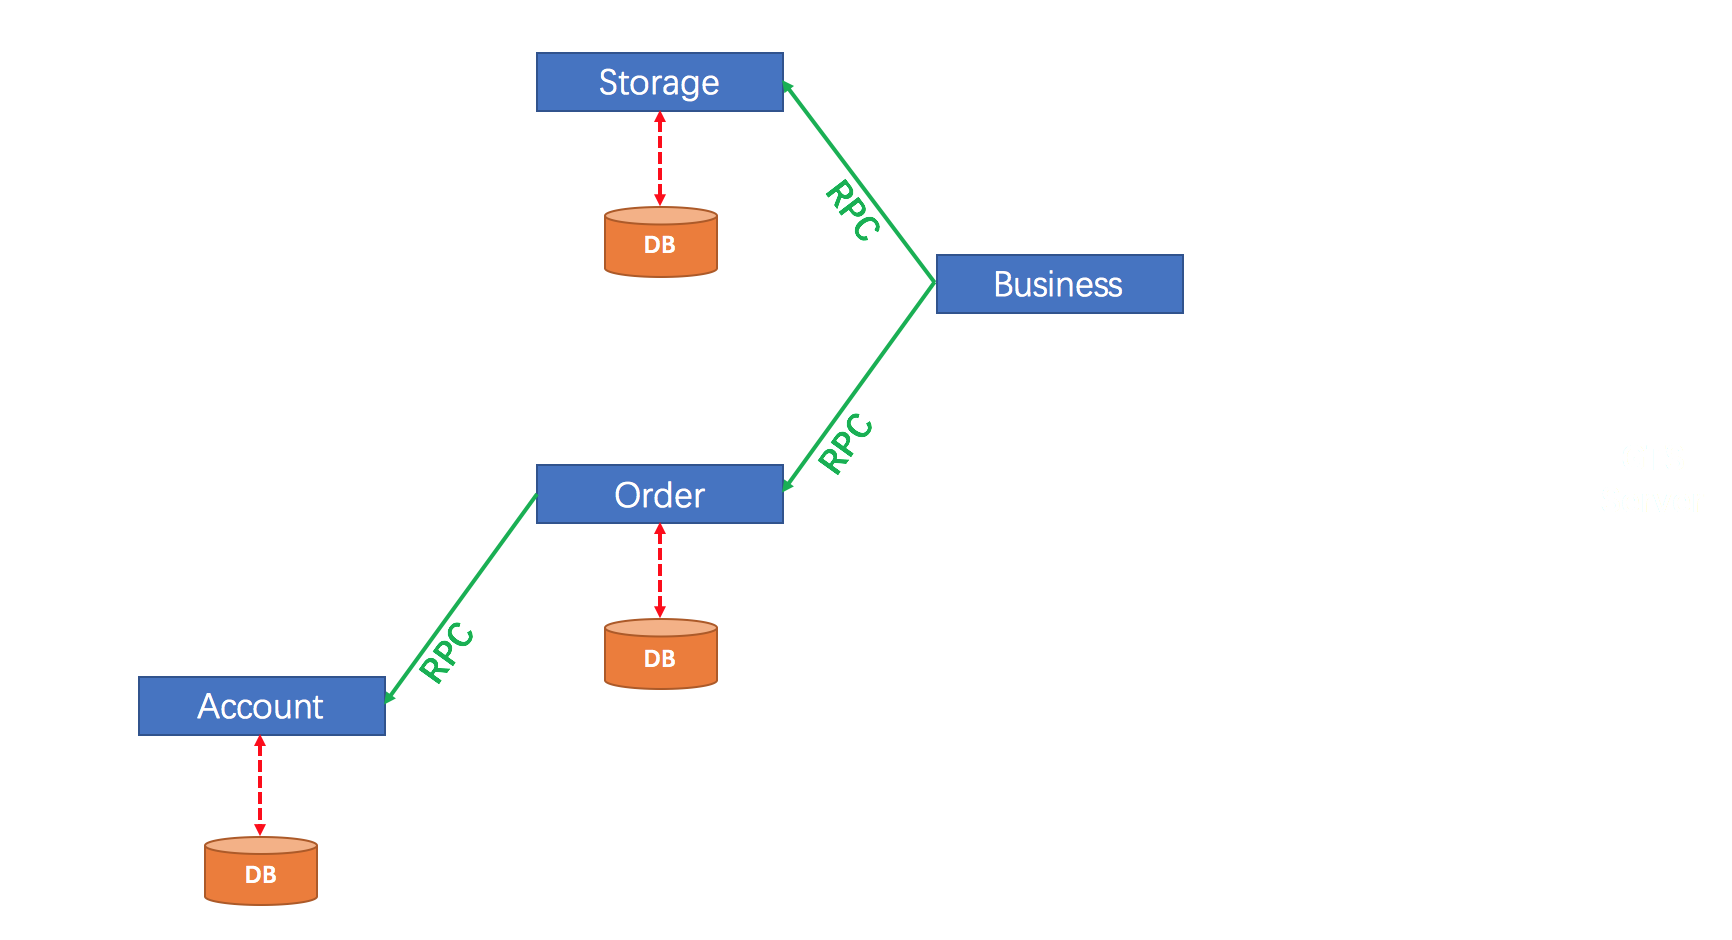
The example simulates an order placing process, that is, Business applications call Business in turn
- Storage - > inventory deduction
- Order - > account deduct user balance
- Order - > New Order
The example project Seata demo project is divided into four corresponding modules, as shown in the figure below
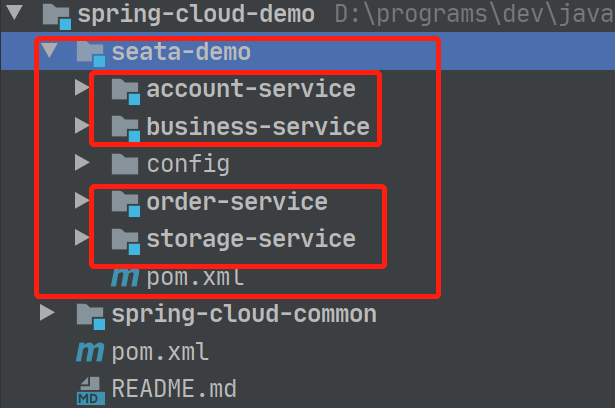
The specific service description is shown in the table below
| Service module | Service description | Service exposure port | Corresponding database |
|---|---|---|---|
| business-service | Business services Call storage service and order servcie Initiate a global transaction through @ GlobalTransactional Assume TM role | 8080 | nothing |
| storage-service | Inventory service Assume RM role | 8081 | dtx-storage |
| account-service | User services Assume RM role | 8082 | dtx-account |
| order-service | Order service Call account service Assume RM role | 8083 | dtx-order |
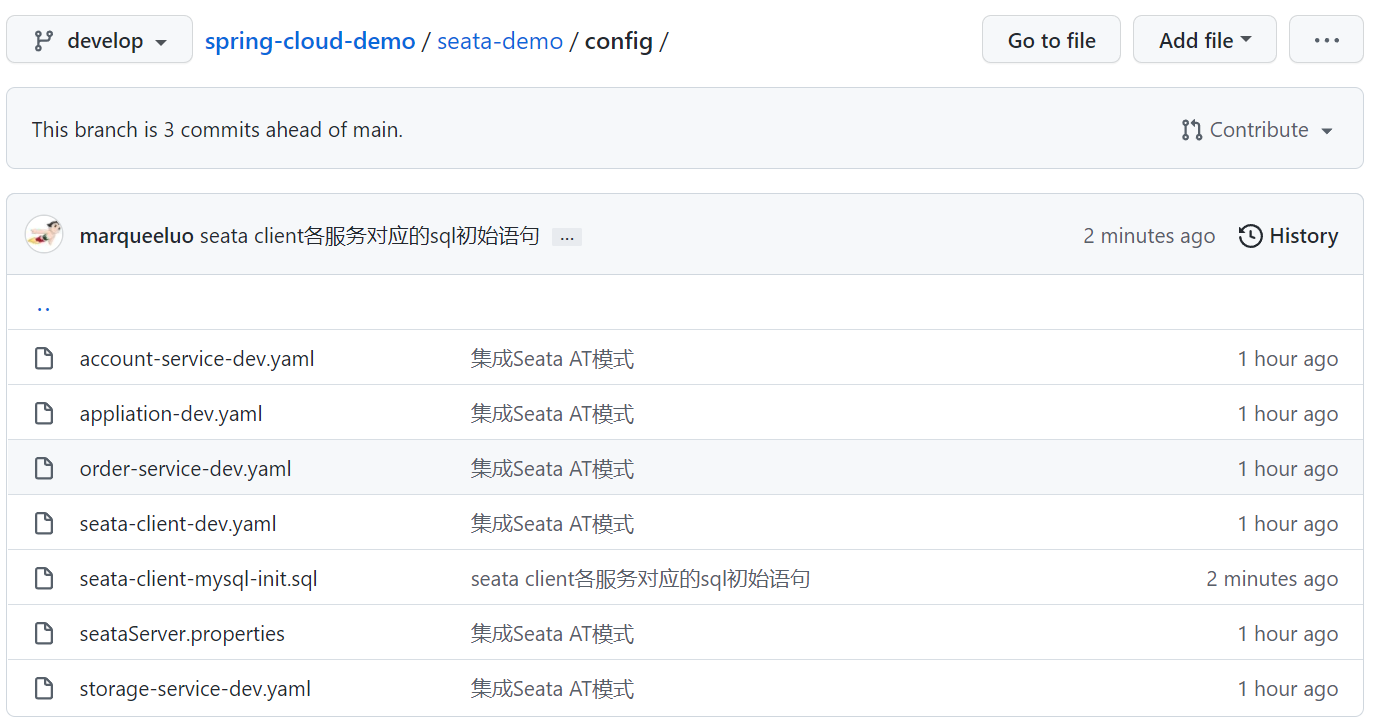
For specific source code, see: https://github.com/marqueeluo/spring-cloud-demo/tree/develop/seata-demo
Refer to the following table for the initial DB statement and nacos configuration: https://github.com/marqueeluo/spring-cloud-demo/tree/develop/seata-demo/config
(1) Client seata Maven dependency
reference resources seata - Deployment Guide - Considerations
 <!-- Attribute definition-->
<properties>
    <java.version>1.8</java.version>
    <spring-cloud.version>2020.0.4</spring-cloud.version>
    <spring-cloud-alibaba.version>2.2.6.RELEASE</spring-cloud-alibaba.version>
    <seata.version>1.4.2</seata.version>
</properties>

<!-- Dependency management definition -->
<dependencyManagement>
    <dependencies>
        <!-- springcloud rely on -->
        <dependency>
            <groupId>org.springframework.cloud</groupId>
            <artifactId>spring-cloud-dependencies</artifactId>
            <version>${spring-cloud.version}</version>
            <type>pom</type>
            <scope>import</scope>
        </dependency>

        <!--Spring Cloud Alibaba-->
        <dependency>
            <groupId>com.alibaba.cloud</groupId>
            <artifactId>spring-cloud-alibaba-dependencies</artifactId>
            <version>${spring-cloud-alibaba.version}</version>
            <type>pom</type>
            <scope>import</scope>
        </dependency>

        <!-- Alibaba Seata SpringBoot rely on -->
        <dependency>
			<groupId>io.seata</groupId>
			<artifactId>seata-spring-boot-starter</artifactId>
			<version>${seata.version}</version>
		</dependency>

		...
    </dependencies>
</dependencyManagement>


<dependencies>
	<!-- SpringCloudAlibaba Seata rely on -->
	<dependency>
	    <groupId>io.seata</groupId>
	    <artifactId>seata-spring-boot-starter</artifactId>
	</dependency>
	<dependency>
	    <groupId>com.alibaba.cloud</groupId>
	    <artifactId>spring-cloud-starter-alibaba-seata</artifactId>
	    <exclusions>
	    	<!-- Lower versions are excluded here seata 1.3.0,Use individually defined 1.4.2-->
	        <exclusion>
	            <groupId>io.seata</groupId>
	            <artifactId>seata-spring-boot-starter</artifactId>
	        </exclusion>
	    </exclusions>
	</dependency>
	...
</dependencies>
(2) Seata client integration Nacos configuration
For detailed configuration of Seata client and server, see:
seata parameter configuration version 1.3.0
seata - Nacos configuration center
seata - Nacos registry
https://github.com/seata/seata/blob/develop/script/client/spring/application.yml
The Seata client bootstrap.yaml is defined as follows
# Tomcat
server:
  port: 8081
spring:
  application:
    # apply name
    name: storage-service
  profiles:
    # Environment configuration
    active: dev
  cloud:
    # nacos configuration
    nacos:
      discovery:
        # Service registration address
        server-addr: 127.0.0.1:8848
        namespace: luo-dev
        group: SEATA_GROUP
      config:
        # Configuration center address
        server-addr: 127.0.0.1:8848
        namespace: luo-dev
        group: SEATA_GROUP
        # Configuration file format
        file-extension: yaml
        # Shared configuration
        shared-configs:
          # application-{profile}.yaml is jointly configured for the environment
          - data-id: application-${spring.profiles.active}.${spring.cloud.nacos.config.file-extension}
            group: SEATA_GROUP
          # Seata client - {profile}. Yaml is configured jointly with Seata client
          - data-id: seata-client-${spring.profiles.active}.${spring.cloud.nacos.config.file-extension}
            group: SEATA_GROUP
There are 3 profiles defined (corresponding to 3 profiles on nacos):
- storage-service-dev.yaml defines the inventory application configuration,
- application-dev.yaml defines the common configuration of the environment,
- seata-client-dev.yaml defines the common configuration of seata clients
The specific configuration of seata-client-dev.yaml is as follows:
seata:
  # Start seata
  enabled: true
  # Transaction group
  tx-service-group: luo_dev_seata_demo_tx_group
  enable-auto-data-source-proxy: true
  # Transaction mode - AT
  data-source-proxy-mode: AT
  # Whether to use JDK proxy (if false, use CGLIB)
  use-jdk-proxy: false
  service:
    vgroup-mapping:
      # Transaction group mapped to TC cluster name
      luo_dev_seata_demo_tx_group: default
  # Configuration center (same as Seata Server configuration)
  config:
    type: nacos
    nacos:
      server-addr: 127.0.0.1:8848
      namespace: luo-dev
      group: SEATA_GROUP
      username: nacos
      password: nacos
      data-id: seataServer.properties
  # Registry (same as Seata Server configuration)
  registry:
    type: nacos
    nacos:
      server-addr: 127.0.0.1:8848
      namespace: luo-dev
      group: SEATA_GROUP
      username: nacos
      password: nacos
      # Here, the registry.nacos.application configuration specified when starting the Seata Server is the same,
      # That is, define the service name corresponding to Seata Server
      application: seata-server
      # Here, the application needs the registry.nacos.cluster specified when the Seata Server is started,
      cluster: default
Note:
1. About the transaction grouping configuration of Seata Client side (corresponding to Seata Client dev.yaml in nacos)
seata.tx-service-group=luo_dev_seata_demo_tx_group
seata.service.vgroup-mapping.luo_dev_seata_demo_tx_group=default
The transaction group name in needs to be the same as that in the Seata Server side configuration (corresponding to seataServer.properties in nacos)
service.vgroupMapping.luo_dev_seata_demo_tx_group=default
Same as shown below

2. About the configuration of config and registry in the configuration of Seata Client (corresponding to Seata Client dev.yaml in nacos)
seata.config.*
seata.registy.*
It needs to be configured with the Seata Server side (conf/registry.conf in Seata Server)
config.*
registry.*
Same as shown below
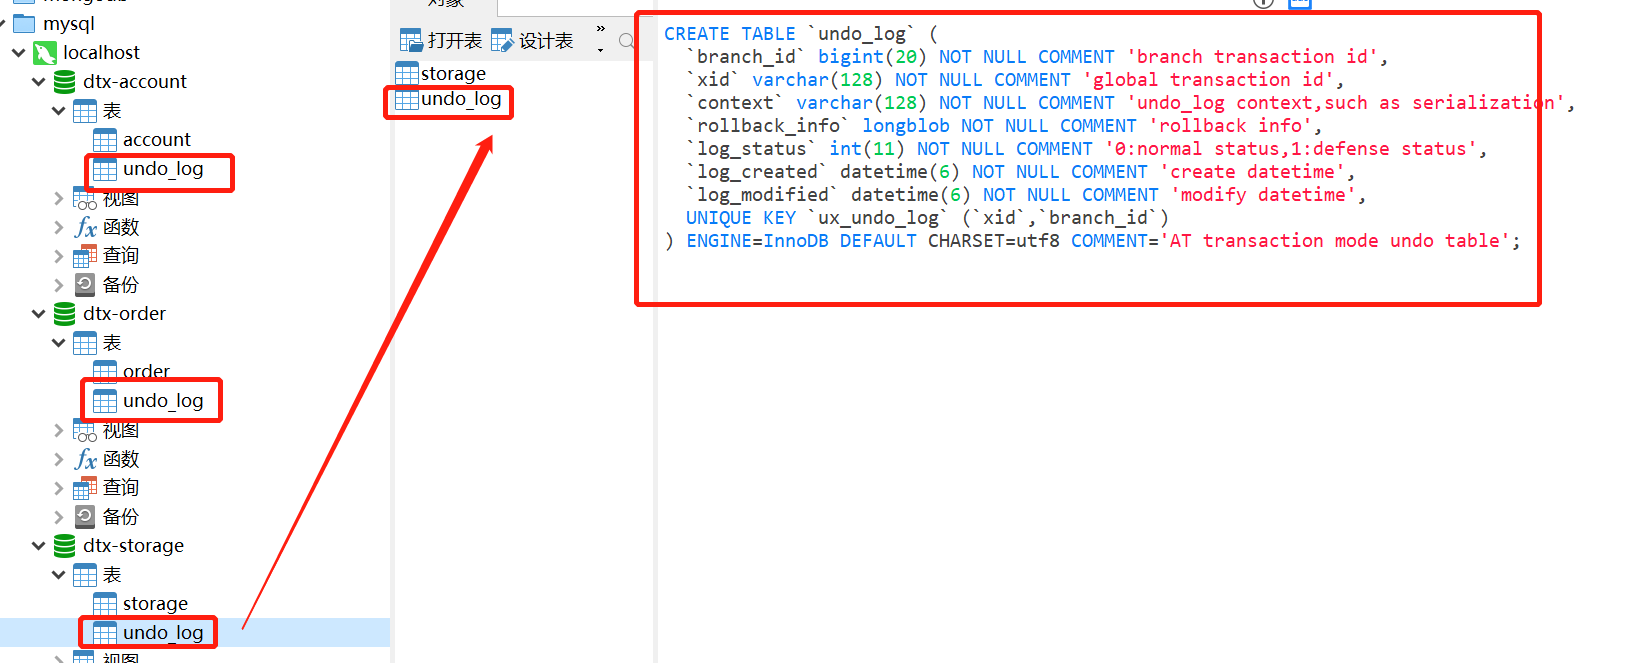
(3) Create undo_log table
In the database corresponding to each Seata AT client, you also need to create an undo corresponding to the AT mode_ Log table,
For table creation statements, see: https://github.com/seata/seata/blob/develop/script/client/at/db/mysql.sql
-- for AT mode you must to init this sql for you business database. the seata server not need it.
CREATE TABLE IF NOT EXISTS `undo_log`
(
    `branch_id`     BIGINT       NOT NULL COMMENT 'branch transaction id',
    `xid`           VARCHAR(128) NOT NULL COMMENT 'global transaction id',
    `context`       VARCHAR(128) NOT NULL COMMENT 'undo_log context,such as serialization',
    `rollback_info` LONGBLOB     NOT NULL COMMENT 'rollback info',
    `log_status`    INT(11)      NOT NULL COMMENT '0:normal status,1:defense status',
    `log_created`   DATETIME(6)  NOT NULL COMMENT 'create datetime',
    `log_modified`  DATETIME(6)  NOT NULL COMMENT 'modify datetime',
    UNIQUE KEY `ux_undo_log` (`xid`, `branch_id`)
) ENGINE = InnoDB
  AUTO_INCREMENT = 1
  DEFAULT CHARSET = utf8 COMMENT ='AT transaction mode undo table';
(4) AT mode programming model
As shown in the figure, business plays the role of TM, that is, initiating global transactions through the @ GlobalTransactional annotation,
Branch transactions (i.e. RM roles) in other services are no different from the general transaction @ Transactional programming model,
The following is the core code of the business storage service
/**
 * Order placing operation - AT global transaction is initiated through @ globaltransactional annotation
 *
 * @param userId
 * @param commodityCode
 * @param count
 * @return
 */
@Override
@GlobalTransactional
public RespResult<Order> handleBusinessAt(String userId, String commodityCode, Integer count) {
    log.info("start AT Global transactions, XID={}", RootContext.getXID());
    /** Deduct inventory */
    log.info("RPC Deduct inventory, parameter: commodityCode={}, count={}", commodityCode, count);
    RespResult storageResult = this.storageFeignClient.deduct(commodityCode, count);
    log.info("RPC Deduct inventory, result:{}", storageResult);
    if (!RespResult.isSuccess(storageResult)) {
        throw new MsgRuntimeException("RPC Deduct inventory - Return failed result!");
    }

    /** Create order */
    log.info("RPC Create order, parameters: userId={}, commodityCode={}, count={}", userId, commodityCode, count);
    RespResult<Order> orderResult = this.orderFeignClient.createOrder(userId, commodityCode, count);
    log.info("RPC Create order, result:{}", orderResult);
    if (!RespResult.isSuccess(orderResult)) {
        throw new MsgRuntimeException("RPC Create order - Return failed result!");
    }
    return orderResult;
}
The core code of order service is as follows:
@Override
@Transactional(rollbackFor = Exception.class)
public RespResult<Order> create(String userId, String commodityCode, Integer count) {
   //Calculate the order amount (assuming that the unit price of goods is 5 yuan)
   BigDecimal orderMoney = new BigDecimal(count).multiply(new BigDecimal(5));

   /** User deduction */
   RespResult respResult = accountFeignClient.debit(userId, orderMoney);
   log.info("RPC User deducts balance service, result:{}", respResult);
   if (!RespResult.isSuccess(respResult)) {
       throw new MsgRuntimeException("RPC User balance deduction service failed!");
   }

   /** Create order */
   Order order = new Order();
   order.setUserId(userId);
   order.setCommodityCode(commodityCode);
   order.setCount(count);
   order.setMoney(orderMoney);
   log.info("Save order information, parameters:{}", order);
   Boolean result = this.save(order);
   log.info("Save the order information, and the result is:{}", result);
   if (!Boolean.TRUE.equals(result)) {
       throw new MsgRuntimeException("Failed to save new order information!");
   }

   if ("product-3".equals(commodityCode)) {
       throw new MsgRuntimeException("abnormal:Simulation service exception:Order branch exception");
   }
   return RespResult.successData(order);

}
The core codes of storage service and account service are relatively simple. They only initiate dao calls,
For specific source code, see: https://github.com/marqueeluo/spring-cloud-demo/tree/develop/seata-demo
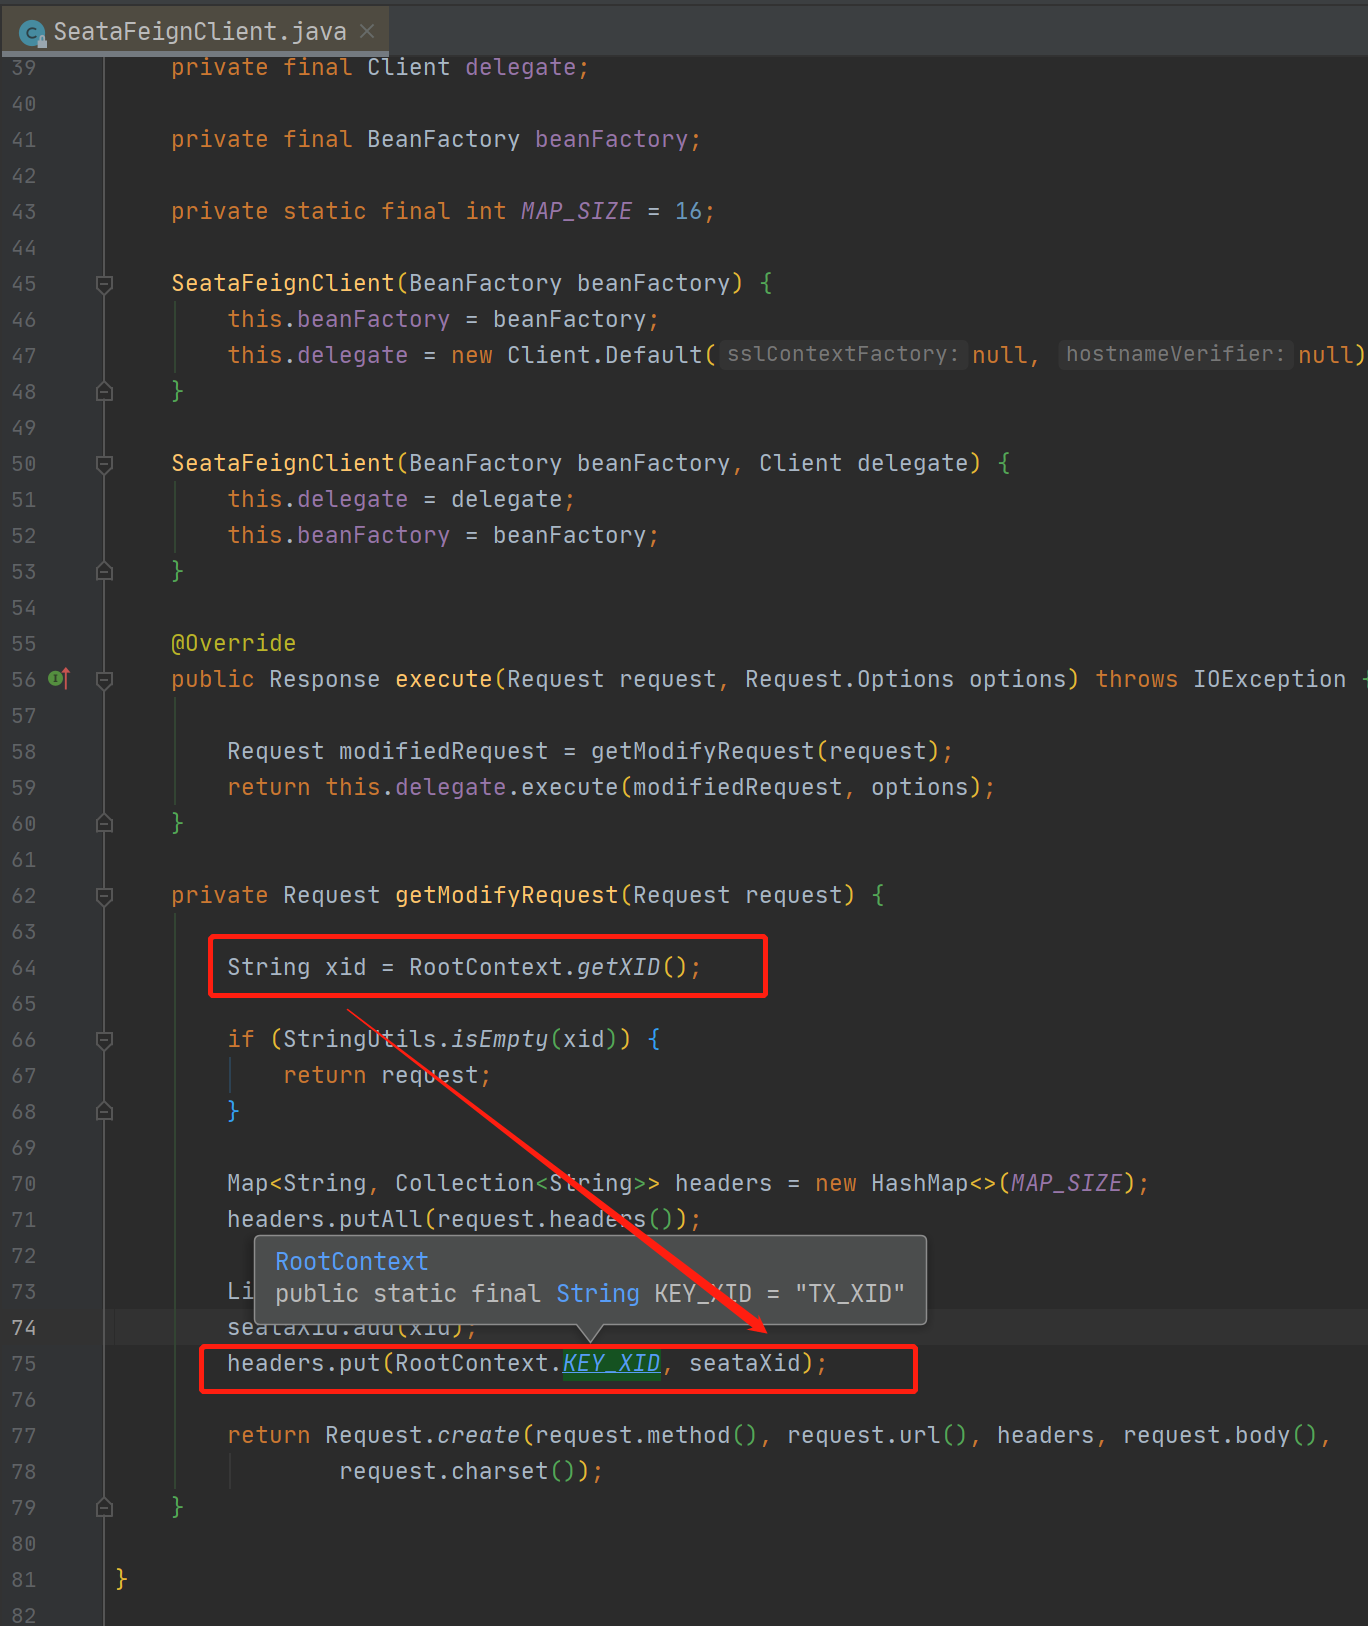
It should be noted that the cross service (Feign call) transfer of Seata transactions is through the SeataFeignClient class,
Put xid in http request header TX_ Call transfer between services in xid.
To be continued
- TCC mode
It does not depend on the support of underlying data resources, and the developer can customize the try, commit and cancel logic
... - SAGA mode
... - XA mode
...