Brief introduction of Django model and background
Author: once day date: February 13, 2022
This document is to summarize the relevant contents. Scattered knowledge is difficult to remember and learn.
This document is based on windows platform.
1. Database configuration
stay First met Django As mentioned in the article, Django is based on MTV design pattern. The first M(model) is the model, which is responsible for providing the interface between logic and data. The so-called data is the database.
Django uses SQLite3 database by default. Because Python natively supports SQLite3 database, you can use it directly without installing any programs. When learning, using SQLite3 can omit a lot of trouble.
mysite/settings. Details can be seen in the PY configuration file:
# Database
# https://docs.djangoproject.com/en/4.0/ref/settings/#databases

DATABASES = {
    'default': {
        'ENGINE': 'django.db.backends.sqlite3',
        'NAME': BASE_DIR / 'db.sqlite3',
    }
}
The above is the default database configuration, where:
- ENGINE: can be Django db. backends. sqlite3,django.db.backends.postgresql,django.db.backends.mysql,django.db.backends.oracle, of course, others are OK.
- NAME: the NAME of the database. If you use the default SQLite3, the database will be stored in your local machine as a file. At this time, the NAME should be the full absolute path of the file, including the file NAME. By default, the file is stored in your project root directory.
There will be additional information to fill in when using other databases. Only SQLite3 is considered here.
2. Create model
Django defines specific models in the form of custom Python classes. The physical existence of each model is a python Class. Each model represents a table in the database, the instance of each Class represents a row of data in the data table, and each variable in the Class represents a column of fields in the data table. Django combines Python code and database operation through the model to realize the encapsulation of SQL query language. Without SQL language, you can also operate the database through Python code, which is the so-called ORM.
The following two models are created: account and personal information:
#login/models.py
from django.db import models

# Create your models here.
class user_information(models.Model):
    user_name = models.CharField(max_length=20)
    user_birthday = models.DateTimeField("birthday")
    user_money = models.IntegerField(default=1000)#Default 1000 points

class account(models.Model):
    user = models.ForeignKey(user_information,on_delete=models.CASCADE)
    account_name = models.CharField(max_length=30)#The maximum character length of account name is 30
    password =models.CharField(max_length=60)#Password length up to 60
You can use the Field name as the first parameter in the document to make it more readable, and you can use it as an optional part of the document. For example, birthday in the example defines a human friendly name.
A foreign key relationship is defined here using ForeignKey. It tells Django that each Choice is associated with a corresponding Question (note that the foreign key should be written on the 'majority' side). Django supports common data relationships: one-to-one, many to one, and many to many.
For the specific preparation of model code, please refer to:
- django Part 2: model and background - Liu Jiang's django tutorial (liujiangblog.com)
- Django model_ w3cschool
- Models_w3cschool
3. Enable model
Relying on the above model, Django can the database table structure corresponding to the app and create a Python based database access API.
First, you need to register the login APP,
#mysite/setting.py
# Application definition
INSTALLED_APPS = [
    'login',#This is a short form, which is sufficient in most cases. It actually refers to login / apps LoginConfig in PY
    'django.contrib.admin',
    'django.contrib.auth',
    'django.contrib.contenttypes',
    'django.contrib.sessions',
    'django.contrib.messages',
    'django.contrib.staticfiles',
]
After registration, you need to record the changes to the model file and run the following command:
PS E:\django\mysite> python manage.py makemigrations login
Migrations for 'login':
  login\migrations\0001_initial.py
    - Create model user_information
    - Create model account
By running the makemigrations command, Django will detect changes to the model file and save these changes as a "migration".
migrations are files where Django saves model modification records, which are saved on disk. In the example, pol / 0001 is pol / MIS_ initial. Py, you can open it and have a look. All the contents saved in it are human readable and editable, which is convenient for manual modification at any time.
You can use the sqimigrate command to display SQL statements,
PS E:\django\mysite> python manage.py sqlmigrate login 0001
BEGIN;
--
-- Create model user_information
--
CREATE TABLE "login_user_information" ("id" integer NOT NULL PRIMARY KEY AUTOINCREMENT, "user_name" varchar(20) NOT NULL, "user_birthday" datetime NOT NULL, "user_money" integer NOT NULL);
--
-- Create model account
--
CREATE TABLE "login_account" ("id" integer NOT NULL PRIMARY KEY AUTOINCREMENT, "account_name" varchar(30) NOT NULL, "password" varchar(60) NOT NULL, "user_id" bigint NOT NULL REFERENCES "login_user_information" ("id") DEFERRABLE INITIALLY DEFERRED);
CREATE INDEX "login_account_user_id_b635b0f5" ON "login_account" ("user_id");
COMMIT;
Note that the output of these instructions is related to the database used!
You can also run the check command, which will check the errors in the project without actually migrating or linking the database.
PS E:\django\mysite> python manage.py check
System check identified no issues (0 silenced).
Next, the actual migration,
PS E:\django\mysite> python manage.py migrate
Operations to perform:
  Apply all migrations: admin, auth, contenttypes, login, sessions
Running migrations:
  Applying contenttypes.0001_initial... OK
  Applying auth.0001_initial... OK
  Applying admin.0001_initial... OK
  Applying admin.0002_logentry_remove_auto_add... OK
  Applying admin.0003_logentry_add_action_flag_choices... OK
  Applying contenttypes.0002_remove_content_type_name... OK
  Applying auth.0002_alter_permission_name_max_length... OK
  Applying auth.0003_alter_user_email_max_length... OK
  Applying auth.0004_alter_user_username_opts... OK
  Applying auth.0005_alter_user_last_login_null... OK
  Applying auth.0006_require_contenttypes_0002... OK
  Applying auth.0007_alter_validators_add_error_messages... OK
  Applying auth.0008_alter_user_username_max_length... OK
  Applying auth.0009_alter_user_last_name_max_length... OK
  Applying auth.0010_alter_group_name_max_length... OK
  Applying auth.0011_update_proxy_permissions... OK
  Applying auth.0012_alter_user_first_name_max_length... OK
  Applying login.0001_initial... OK
  Applying sessions.0001_initial... OK
The migrate command operates on all the migration records that have not yet been implemented. In essence, it reflects your changes to the model in the specific table in the database. Django through a picture called Django_ The table of migrations records and tracks the implemented migrate actions, and obtains which migrations have not been submitted by comparison.
Remember that there are three steps to modify the model:
- In models Modify the model in py;
- Run Python manage Py makemigrations create migration record files for changes;
- Run Python manage Py migrate to synchronize the operation to the database.
These steps are more effective in version control!
4. Try ORM
Django model layer has its own ORM system, which will automatically create an API for database access for each model. It can be used directly, which is very simple, convenient and easy to learn.
Next, let's enter the python interactive environment and try to use the database access API provided by Django. In contrast, enter the python environment by directly entering the "Python" command and call manage The PY parameter can set DJANGO_SETTINGS_MODULE environment variable is imported, and it will automatically follow MySite / settings Py, configure your python shell environment, so that you can import and call any module in your project.
PS E:\django\mysite> python manage.py shell
Python 3.10.2 (tags/v3.10.2:a58ebcc, Jan 17 2022, 14:12:15) [MSC v.1929 64 bit (AMD64)] on win32
Type "help", "copyright", "credits" or "license" for more information.
(InteractiveConsole)
Then perform some basic operations. Note that script commands are used in the same way as writing code:
>>> from login.models import user_information,account # Import the model class we wrote
#Query all user information
>>> user_information.objects.all()
<QuerySet []>

>>> from django.utils import timezone
#Get time
>>> timezone.now()
datetime.datetime(2022, 2, 13, 4, 20, 57, 797311, tzinfo=datetime.timezone.utc)
#Convert to local time
>>> timezone.localtime(timezone.now())
datetime.datetime(2022, 2, 13, 12, 23, 28, 577106, tzinfo=zoneinfo.ZoneInfo(key='Asia/Shanghai'))
#Create a user object
>>> u1= user_information(user_name="once day",user_birthday=timezone.now(),user_money=100000)
#Display saved to database
>>> u1.save()
 # By default, you will automatically get a self incremented primary key named id
>>> u1.id
1
# Access the value of the model field through the attribute call method of python
>>> u1.user_name
'once day'
>>> u1.user_money
100000
# Modify the value of the field by modifying the attribute, and then explicitly call the save method to save.
>>> u1.user_money=99999
>>> u1.user_money
99999
>>> u1.save()
#Query object
>>> u1
<user_information: user_information object (1)>
The above < question: question Object > is an unreadable content display. You can't get any intuitive information from it. Therefore, we need a little skill to let Django display some of the information we specify when printing the object.
#login/models.py
from django.db import models

# Create your models here.

class user_information(models.Model):
    user_name = models.CharField(max_length=20)
    user_birthday = models.DateTimeField("birthday")
    user_money = models.IntegerField(default=1000)#Default 1000 points

    def __str__(self) -> str:
        return  self.user_name+':'+str(self.user_money)
    def add_money(self,money):#Add money
        self.user_money+=money
        return self.user_money

class account(models.Model):
    user = models.ForeignKey(user_information,on_delete=models.CASCADE)
    account_name = models.CharField(max_length=30)#The maximum character length of account name is 30
    password =models.CharField(max_length=60)#Password length up to 60

    def __str__(self) -> str:
        return  self.account_name
It overloads an internal function__ str__, You can tell the python interpreter what to print. And add a money adding function.
Restart the command line! Then do the following
>>> from login.models import user_information,account # Import the model class we wrote
#Get previously created objects
>>> u1=user_information.objects.get(id=1)
#Now you can print key information
>>> u1
<user_information: once day:99999>
#Query all objects
>>> user_information.objects.all()
<QuerySet [<user_information: once day:99999>]>
# Django provides a large number of keyword parameter query API s
>>> user_information.objects.filter(id=1)
<QuerySet [<user_information: once day:99999>]>
>>> user_information.objects.filter(user_name="once day")
<QuerySet [<user_information: once day:99999>]>
#Using custom methods
>>> u1.add_money(1000000)
1099999
>>> u1
<user_information: once day:1099999>
# Displays all choice sets related to q objects. Currently, they are empty and have no associated objects.
>>> u1.account_set.all()
<QuerySet []>
#Create two accounts
>>> u1.account_set.create(account_name="onceday",password="1234566")
<account: onceday>
>>> u1.account_set.create(account_name="mark",password="123456")
<account: mark>
#Query again
>>> u1.account_set.all()
<QuerySet [<account: onceday>, <account: mark>]>
#Get the second account object
>>> a1=u1.account_set.get(id=2)
>>> a1.user
<user_information: once day:1099999>
#Delete the object
>>> a1.delete()
(1, {'login.account': 1})
#Query again and delete successfully
>>> u1.account_set.all()
<QuerySet [<account: onceday>]>
This is only part of the basic operation of the model. You can try to enhance the impression!
5.admin background management
One of the biggest advantages of Django based project management is that it provides one of the biggest advantages of Django based project management. This interface is only for site admin istrators and is not open to the public.
First create the administrator user,
PS E:\django\mysite> python manage.py createsuperuser
Username (leave blank to use '54041'): onceday
Email address: 54041551@qq.com
Password:
Password (again):
Superuser created successfully.
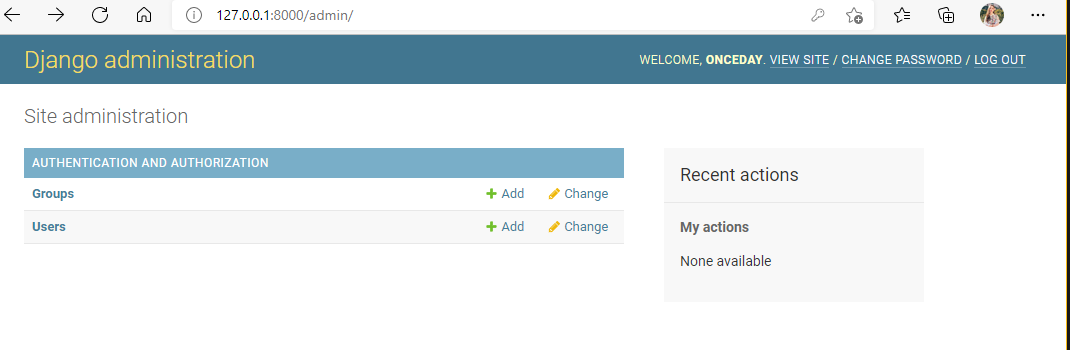
Then start the server, python manage Py runserver, browser input http://127.0.0.1:8000/admin/ , the login interface appears. Enter the user and password to login.
You can change the url of the management background in URLs Py configuration can be modified here!
At present, only Django can be seen in the site contrib. Auth module provides a model within the authentication framework, Groups and Users.
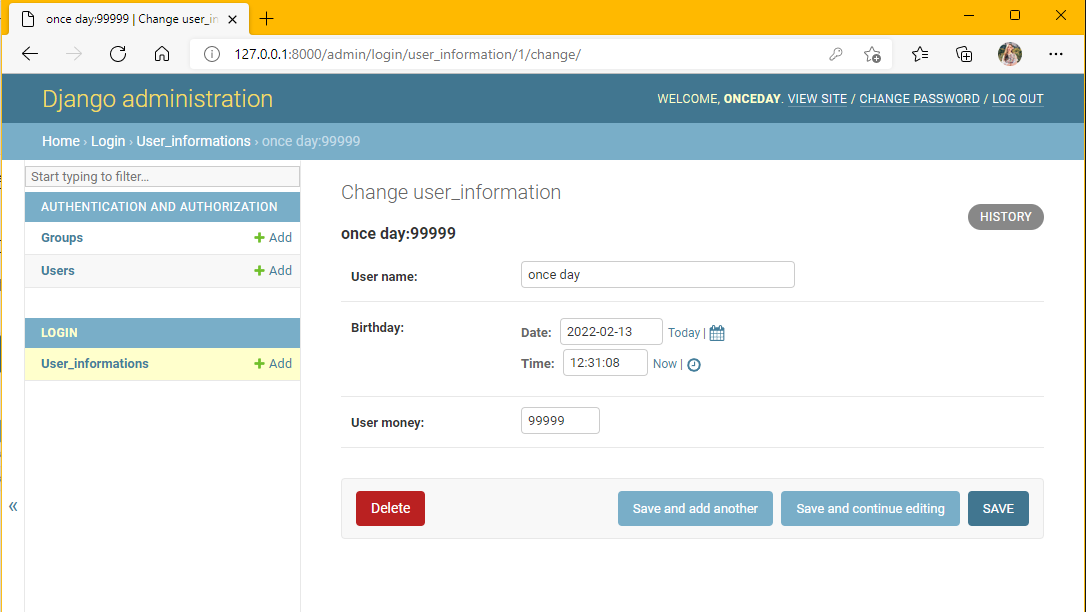
After registering the login application in admin, you can manage it in the site!
#login/admin.py
from django.contrib import admin

# Register your models here.

from login.models import user_information
#Import module and register
admin.site.register(user_information)
Re run the server! And visit the management site!
Note here:
- The form in the page is created by user_ The information model is automatically generated.
- Different model field types (DateTimeField, CharField) will appear as different HTML input box types.
- Each DateTimeField will automatically generate a clickable link. The date is Today and there is a calendar pop-up box; The time is Now and has a general time input list box.
At the bottom of the page are some optional buttons:
- delete: a deletion confirmation page pops up
- save and add another: save the current modification and load a new blank form of the current type object.
- save and continue editing: save the current modification and reload the editing page of the object.
- Save: save the changes and return to the list page of the current object type.
Click History in the upper right corner of the page to see all modification records of the current object, including modification time and operator.
If there is a problem with the time, the time is not configured correctly_ Zone, in China, usually has a time difference of 8 hours. Need in
mysite/setting. Modify the following code in py:
# Internationalization
# https://docs.djangoproject.com/en/4.0/topics/i18n/

LANGUAGE_CODE = 'en-us'
#Change the following line
TIME_ZONE = 'Asia/Shanghai'

USE_I18N = True

USE_TZ = True
Specific reference documents:
- django Part 2: model and background - Liu Jiang's django tutorial (liujiangblog.com)
- Admin_Django Girls study guide_ w3cschool