From the standpoint of testing, we hope that the code developed and written is unit tested, but in fact, there is always a gap between ideal and reality. In that case, why don't we develop and deploy the environment and carry out automatic testing and verification of services. The overall design idea is to develop the code written, use Dockerfile to build the image file, and then use docker compose to automatically start the image file. The next step is actually very simple. We test here for intelligent automatic verification. In fact, in the previous article system, after the intelligent test in the introduction is completed, At the end of the test, the specific test report and the mechanism to trigger the overall alarm if there is a problem. This article series mainly combines CI continuous integration tools to completely automate and intelligentize this process. Of course, the technology stack used is mainly Spring Boot.
After creating the Spring Boot project, simply write a test interface here. The source code of the controller layer is as follows:
package com.example.app;
import org.springframework.web.bind.annotation.RequestMapping;
import org.springframework.web.bind.annotation.RestController;
@RestController
public class AppController
{
@RequestMapping("/index")
public String hello()
{
return "Hello SpringBoot!";
}
@RequestMapping("/testDev")
public String testDev()
{
return "Test Development Engineer";
}
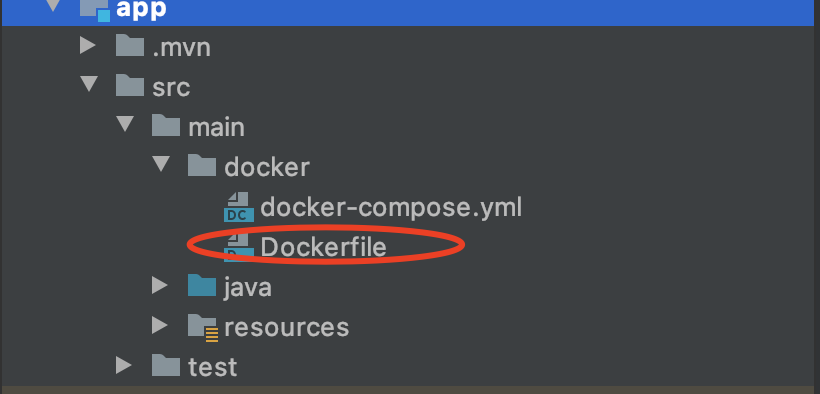
}This part of the code is actually relatively simple, so I won't explain it in detail here. After writing the code, write the Dockerfile file to build the image. The Dockerfile is mainly stored in the docker folder under src/main. After creating the docker folder, create the Dockerfile file in it, and then write the content information to build the image in the package. The specific directory structure is as follows:
The contents of Dockerfile folder are as follows:
FROM java:8
MAINTAINER Boundless
VOLUME /tmp
RUN mkdir /app
COPY app-0.0.1-SNAPSHOT.jar /app/app.jar
WORKDIR /app
EXPOSE 8081
CMD  ["java","-Djava.security.egd=file:/dev/./urandom","-jar","app.jar"]
Next, create docker - compose. In the docker folder YML file, which mainly defines the mirrored resources, network and start stop process. The content information of the file is as follows:
version: '3.2'
services:
  app:
    image: app:0.0.1-SNAPSHOT
    hostname: localhost
    ports:
    - "8081:8081"
    networks:
      - mynetwork
networks:
  mynetwork:
    external: true
In the above file, you can see that the customized network is mynetwork. You can create a network in docker and view the existing network information, as follows:
docker network ls
NETWORK ID          NAME              DRIVER              SCOPE
5e0d06b35341        bridge            bridge              local
34f731bed1dc        host              host                local
4b5926f1e44d        mynetwork         bridge              local
Write the test code. The test code is written in Python language combined with Pytest test framework. The specific test module is test_ sprintboot. The source code of Py is as follows:
import requests
import pytest

def test_springboot_index():
  r=requests.get("http://localhost:8081/index")
  assert r.status_code==200
def test_springboot_testDev():
  r=requests.get("http://localhost:8081/testDev")
  assert r.status_code == 200
The test code is relatively simple. What needs to be verified here is the intelligent verification after service automation deployment.
After the above preparations are completed, create a Pipeline project in Jenkins. The Pipeline script script is as follows:
pipeline{
    agent any
    stages{
        stage('build the image'){
            steps{
                sh '''cd /Applications/code/workSpace/data/app
                mvn clean package  -Dmaven.test.skip=true   docker:build'''
            }
        }
        stage('run the container'){
            steps{
                sh '''cd /Applications/code/workSpace/data/app/src/main/docker
                docker-compose up -d '''
            }
        }
        stage('smoke test'){
            steps{
                sh '''cd /Applications/code/workSpace/data/app/src/main/docker
                sleep 10s
                python3 -m pytest -v test_springboot.py'''
            }
        }
    }
}
Next, start the process of building and executing in CI. The visual interface information after building is as follows:
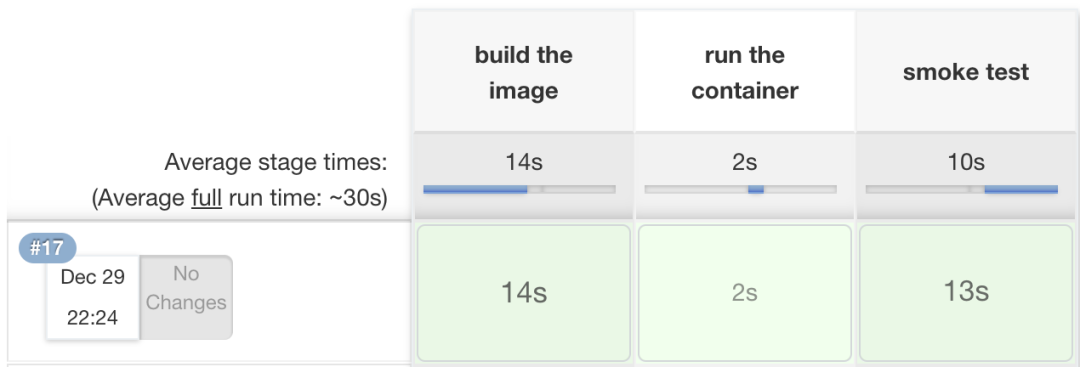
The output details are only displayed here, as follows:
======================== 2 passed, 3 warnings in 0.72s =========================
[Pipeline] }
[Pipeline] // stage
[Pipeline] }
[Pipeline] // node
[Pipeline] End of Pipeline
Finished: SUCCESS
For the quality delivery team, we need to think about how to combine the existing technology to achieve our goals and the means of quality verification. In fact, a verified R & D system process is to develop a system that requires unit testing of the code written by ourselves. In fact, it is a system that can be verified in a continuous pipeline way through the overall system, so as to improve the efficiency of delivery and submit high-quality code to the test team. In fact, the above idea is very simple, that is, from Docker to build the image, to start the container, and we conduct smoke test verification. Of course, there are many subsequent processes, such as other verification methods of the test team, such as code quality audit, API verification, etc. Thank you for your reading and attention. It will be updated continuously in the future.