Single nginx agent + mirror queue
Pull image
# Pull image
docker pull rabbitmq:3.8.7-management
# Create mount directory
mkdir -p /data/rabbitmqcluster/{rabbitmq01,rabbitmq02,rabbitmq03}
Create container
# first
docker run -d --hostname rabbitmq01  --restart=always --name rabbitmqCluster01 -v /data/rabbitmqcluster/rabbitmq01:/var/lib/rabbitmq -p 15672:15672 -p 5672:5672 -e RABBITMQ_ERLANG_COOKIE='rabbitmqCookie'  rabbitmq:3.8.7-management
# the second
docker run -d --hostname rabbitmq02 --restart=always --name rabbitmqCluster02 -v /data/rabbitmqcluster/rabbitmq02:/var/lib/rabbitmq -p 15673:15672 -p 5673:5672 -e RABBITMQ_ERLANG_COOKIE='rabbitmqCookie'  --link rabbitmqCluster01:rabbitmq01 rabbitmq:3.8.7-management
# Third
docker run -d --hostname rabbitmq03 --restart=always --name rabbitmqCluster03 -v /data/rabbitmqcluster/rabbitmq03:/var/lib/rabbitmq -p 15674:15672 -p 5674:5672 -e RABBITMQ_ERLANG_COOKIE='rabbitmqCookie'  --link rabbitmqCluster01:rabbitmq01 --link rabbitmqCluster02:rabbitmq02  rabbitmq:3.8.7-management
– name image name
-d background operation
-v / Host Directory: / container directory image name
– restart=always automatic restart
-p port mapping
-e RABBITMQ_ERLANG_COOKIE configures the same Erlang Cookie; Because RabbitMQ is implemented using Erlang, Erlang cookies are equivalent to the secret keys for communication between different nodes. Erlang nodes obtain authentication by exchanging Erlang cookies
– linkmultiple containers are connected by – link
After successful startup, you can access the account / password: guest / guest through IP:15672, IP:15673 and IP:15674.
Enter the container and join the cluster
# First node
docker exec -it rabbitmqCluster01 /bin/bash
rabbitmqctl stop_app
rabbitmqctl reset
rabbitmqctl start_app
exit
If this error occurs here, all containers need to be removed and - e RABBITMQ_ERLANG_COOKIE = 'rabbitmqCookie' remove this and run it again.

# Second node
docker exec -it rabbitmqCluster02 /bin/bash
rabbitmqctl stop_app
rabbitmqctl reset
rabbitmqctl join_cluster --ram rabbit@rabbitmq01
rabbitmqctl start_app
exit
# Third node
docker exec -it rabbitmqCluster03 /bin/bash
rabbitmqctl stop_app
rabbitmqctl reset
rabbitmqctl join_cluster --ram rabbit@rabbitmq01
rabbitmqctl start_app
exit
After all nodes join the cluster, the mirror cluster is realized
docker exec -it rabbitmqCluster01 /bin/bash
# Set synchronization policy
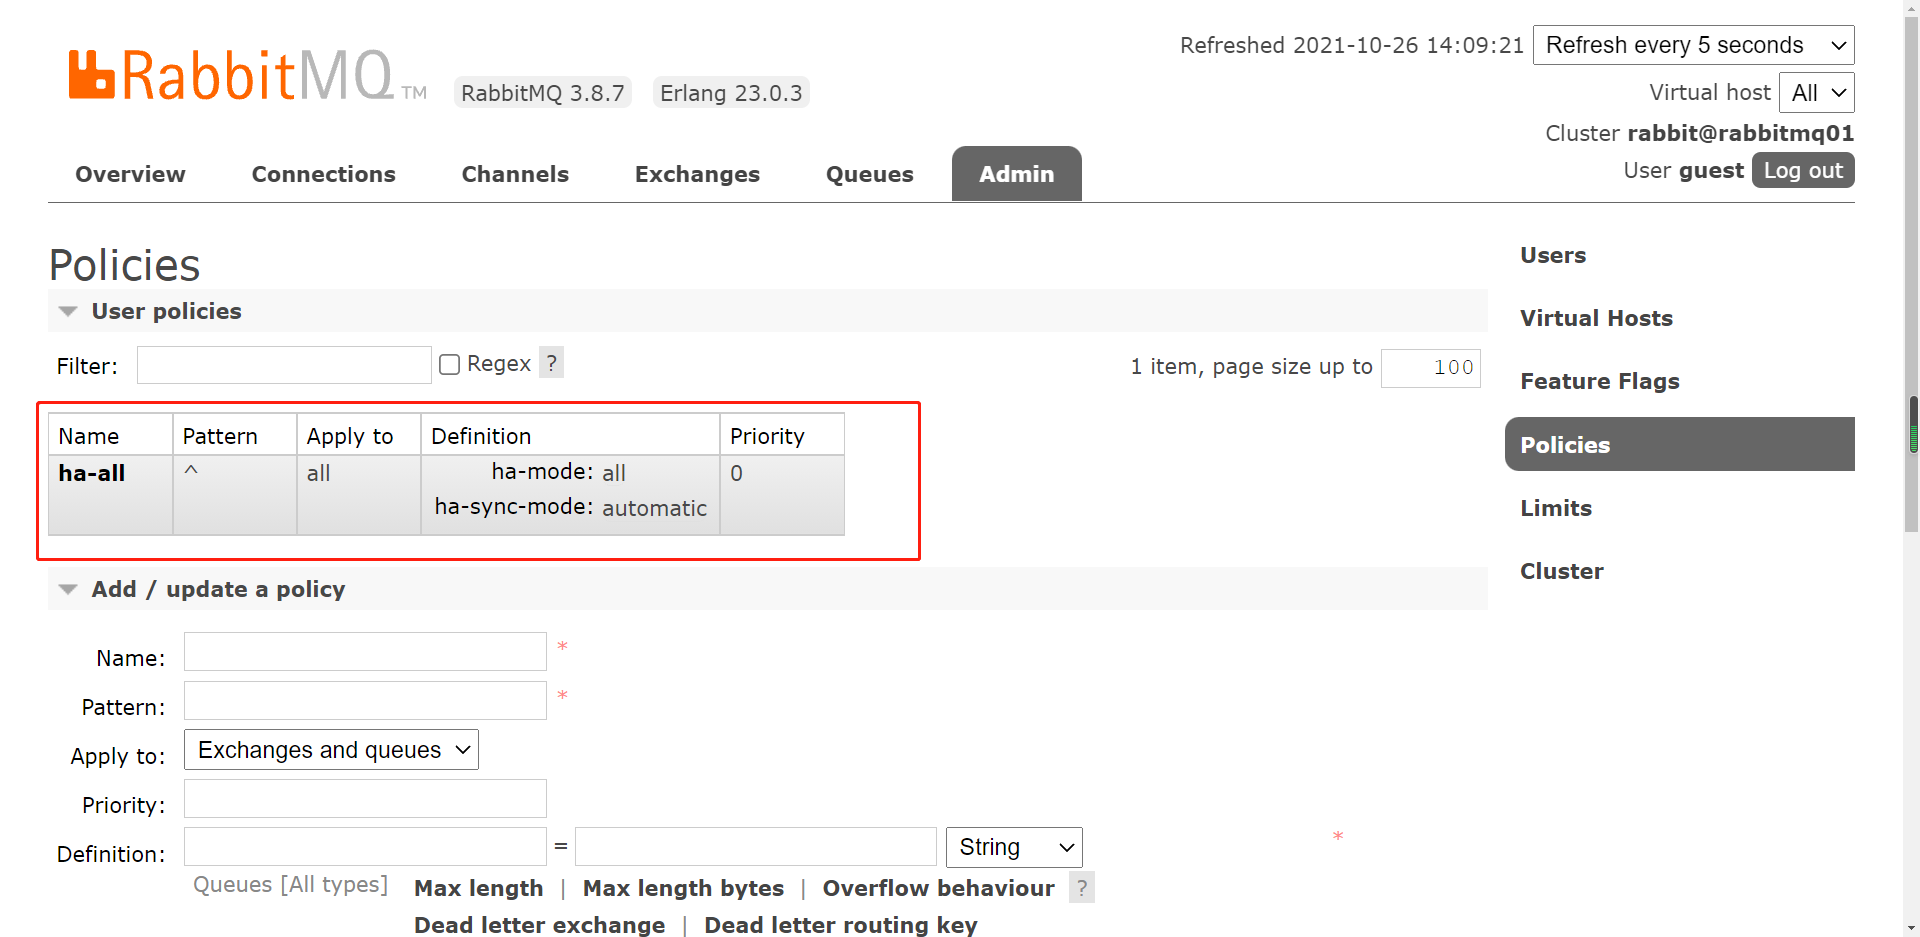
rabbitmqctl set_policy ha-all "^" '{"ha-mode":"all","ha-sync-mode":"automatic"}'
rabbitmqctl set_policy ha-all "^" '{"ha-mode":"all","ha-sync-mode":"automatic"}'
The wildcard ^ of the "^" queue name indicates all matching queue names
Ha all policy name, which can be customized
The HA mode mirror queue provides three modes:
- All: all node queues are mirrored
- exactly: Specifies the maximum number of mirror nodes in the mirror queue
- nodes: configure the mirror queue only for the specified specific node
Ha mode is synchronous mode
Build nginx agent
# Create mount directory
mkdir -p /data/nginx/conf
# Create nginx.conf configuration file
vim nginx.conf
user  nginx;
worker_processes  1;

error_log  /var/log/nginx/error.log warn;
pid        /var/run/nginx.pid;

events {
    worker_connections  1024;
}

http {
    include       /etc/nginx/mime.types;
    default_type  application/octet-stream;

    log_format  main  '$remote_addr - $remote_user [$time_local] "$request" '
                      '$status $body_bytes_sent "$http_referer" '
                      '"$http_user_agent" "$http_x_forwarded_for"';

    access_log  /var/log/nginx/access.log  main;

    sendfile        on;
    #tcp_nopush     on;
    keepalive_timeout  65;
    #gzip  on;
	proxy_redirect          off;
	proxy_set_header        Host $host;
	proxy_set_header        X-Real-IP $remote_addr;
	proxy_set_header        X-Forwarded-For $proxy_add_x_forwarded_for;
	client_max_body_size    10m;
	client_body_buffer_size   128k;
	proxy_connect_timeout   5s;
	proxy_send_timeout      5s;
	proxy_read_timeout      5s;
	proxy_buffer_size        4k;
	proxy_buffers           4 32k;
	proxy_busy_buffers_size  64k;
	proxy_temp_file_write_size 64k;

	#rabbitmq management interface
	upstream rabbitManage {
		server 172.26.160.253:15672; # Replace the IP here with the IP of your host
		server 172.26.160.253:15673;
		server 172.26.160.253:15674;
	}
	server {
        listen       15675;
        server_name  114.215.186.185; # This is the public IP address of the server
        location / {
            proxy_pass   http://rabbitManage;
            index  index.html index.htm;
        }

    }
}
# rabbitmq communication
stream{
	upstream rabbitTcp{
        server 172.26.160.253:5672;
        server 172.26.160.253:5673;
		server 172.26.160.253:5674;
    }

    server {
        listen 5675;
        proxy_pass rabbitTcp;
    }
}
How to view IP addresses
ip addr
ifconfig
hostname -i
Create nginx container
docker run -it -d --name=nginx -v /data/nginx/conf/nginx.conf:/etc/nginx/nginx.conf --privileged=true --net=host nginx
– whether privileged allows the docker application container to obtain the root permission of the host machine (special permission -)
– net=host no more port mapping
After Nginx is started, you can access the management interface through IP:15675. IP:5675 is connected mq.
You can see the policies created by us through admin > policies, and you can also create policies by using Add on the page.
nginx+keepalived for high availability
The cluster building steps are the same as the above single nginx. Here, we add keepalived to achieve high availability and fault tolerance.
An nginx has been built above, and we still need to build an nginx.
Build nginx
cd /data/nginx/conf
# create profile
vim nginx2.conf
Here we replace the IP of the public network with the IP of the host. Then use IP:15678 for management.
user  nginx;
worker_processes  1;

error_log  /var/log/nginx/error.log warn;
pid        /var/run/nginx.pid;


events {
    worker_connections  1024;
}

http {
    include       /etc/nginx/mime.types;
    default_type  application/octet-stream;

    log_format  main  '$remote_addr - $remote_user [$time_local] "$request" '
                      '$status $body_bytes_sent "$http_referer" '
                      '"$http_user_agent" "$http_x_forwarded_for"';

    access_log  /var/log/nginx/access.log  main;

    sendfile        on;
    #tcp_nopush     on;
    keepalive_timeout  65;
    #gzip  on;
	proxy_redirect          off;
	proxy_set_header        Host $host;
	proxy_set_header        X-Real-IP $remote_addr;
	proxy_set_header        X-Forwarded-For $proxy_add_x_forwarded_for;
	client_max_body_size    10m;
	client_body_buffer_size   128k;
	proxy_connect_timeout   5s;
	proxy_send_timeout      5s;
	proxy_read_timeout      5s;
	proxy_buffer_size        4k;
	proxy_buffers           4 32k;
	proxy_busy_buffers_size  64k;
	proxy_temp_file_write_size 64k;

	#rabbitmq management interface
	upstream rabbitManage {
		server 172.26.160.253:15672; # Replace the IP here with the IP of your host
		server 172.26.160.253:15673;
		server 172.26.160.253:15674;
	}
	server {
        listen       15676;
        server_name  172.26.160.253; # Here we use keepalived to manage, so we don't use public IP
        location / {
            proxy_pass   http://rabbitManage;
            index  index.html index.htm;
        }

    }
}
# rabbitmq communication
stream{
	upstream rabbitTcp{
        server 172.26.160.253:5672;
        server 172.26.160.253:5673;
		server 172.26.160.253:5674;
    }

    server {
        listen 5675;
        proxy_pass rabbitTcp;
    }
}
Create a second nginx container
docker run -it -d --name=nginx2 -v /data/nginx/conf/nginx2.conf:/etc/nginx/nginx.conf --privileged=true --net=host nginx
Install keepalived on the first nginx container to implement HA
docker exec -it nginx /bin/bash
# Update data source list
apt-get  -y update
# Install vim editor
apt-get -y  install vim
# Install keepalived
apt-get -y install keepalived
After installation, write the configuration file
vim /etc/keepalived/keepalived.conf
For details on the configuration of keepalived.conf, see Detailed explanation of kept.conf
! Configuration File for keepalived

global_defs {
   notification_email {
    ddz@163.com
   }
   notification_email_from 1584@qq.com
   smtp_server 192.168.200.1
   smtp_connect_timeout 30
   router_id keepalivep1 # only
   vrrp_skip_check_adv_addr
   vrrp_strict
   vrrp_garp_interval 0
   vrrp_gna_interval 0
}

vrrp_instance VI_1 {
    state MASTER # Master node
    interface eth0 # network card
    virtual_router_id 51 # The only 1 ~ 255 two nodes are consistent
    priority 100 # weight
    advert_int 1
    authentication {
        auth_type PASS
        auth_pass 1111
    }
    virtual_ipaddress {
       172.26.160.222 # Virtual IP
    }
}
# View the ip address of the current service through ip addr
virtual_server 172.26.160.235 15678 {
    delay_loop 3
    lb_algo rr
    lb_kind NAT
    persistence_timeout 50
    protocol TCP
    real_server 172.26.160.235 15675 {
        weight 1
    }
}

virtual_server 172.26.160.235 5678 {
    delay_loop 3
    lb_algo rr
    lb_kind NAT
    persistence_timeout 50
    protocol TCP
    real_server 172.26.160.235 5675 {
        weight 1
    }
}
Save the configuration and start keepalived.
service keepalived start # start-up
service keepalived restart # restart
Install keepalived on the first nginx container to implement HA
docker exec -it nginx2 /bin/bash
# Update data source list
apt-get  -y update
# Install vim editor
apt-get -y  install vim
# Install keepalived
apt-get -y install keepalived
After installation, write the configuration file
vim /etc/keepalived/keepalived.conf
! Configuration File for keepalived

global_defs {
   notification_email {
    ddz@163.com
   }
   notification_email_from 1584@qq.com
   smtp_server 192.168.200.1
   smtp_connect_timeout 30
   router_id keepalivep2 # only
   vrrp_skip_check_adv_addr
   vrrp_strict
   vrrp_garp_interval 0
   vrrp_gna_interval 0
}

vrrp_instance VI_1 {
    state BACKUP # Backup node
    interface eth0 # network card
    virtual_router_id 51 # The only 1 ~ 255 two nodes are consistent
    priority 100 # weight
    advert_int 1
    authentication {
        auth_type PASS
        auth_pass 1111
    }
    virtual_ipaddress {
       172.26.160.222 # Virtual IP
    }
}
# View the ip address of the current service through ip addr
virtual_server 172.26.160.235 15678 {
    delay_loop 3
    lb_algo rr
    lb_kind NAT
    persistence_timeout 50
    protocol TCP
    real_server 172.26.160.235 15676 {
        weight 1
    }
}

virtual_server 172.26.160.235 5678 {
    delay_loop 3
    lb_algo rr
    lb_kind NAT
    persistence_timeout 50
    protocol TCP
    real_server 172.26.160.235 5676 {
        weight 1
    }
}
Save the configuration and start keepalived.
service keepalived start # start-up
service keepalived restart # restart
Install keepalived on the host for forwarding
- Install keepalived
yum -y install keepalived
- After installation, write the configuration file keepalived.conf
! Configuration File for keepalived

global_defs {
   notification_email {
   	ddz@163.com
   }
   notification_email_from 1584@qq.com
   smtp_server 192.168.200.1
   smtp_connect_timeout 30
   router_id keepalivep
   vrrp_skip_check_adv_addr
   vrrp_strict
   vrrp_garp_interval 0
   vrrp_gna_interval 0
}

vrrp_instance VI_1 {
    state MASTER
    interface eth0
    virtual_router_id 51
    priority 100
    advert_int 1
    authentication {
        auth_type PASS
        auth_pass 1111
    }
    virtual_ipaddress {
       114.215.186.111 # This is your own public IP address
    }
}

virtual_server 114.215.186.111 15678 {# This is your own public IP address
    delay_loop 3
    lb_algo rr
    lb_kind NAT
    persistence_timeout 50
    protocol TCP
    real_server 172.26.160.222 15676 {  # The IP here is the virtual IP configured in the container
        weight 1
    }
}
virtual_server 114.215.186.111 5678 {
    delay_loop 3
    lb_algo rr
    lb_kind NAT
    persistence_timeout 50
    protocol TCP
    real_server 172.26.160.222 5676 {
        weight 1
    }
}
- After saving the configuration, start keepalived.
service keepalived start # start-up
service keepalived restart # restart
- After startup, you can access the console through IP:15678 and connect through IP:5678.
Reproduced at: Reprint address