prepare
When installing the docker image, first go to the docker hub to find the corresponding official image, then select the version, and then start the image according to the command in the description
docker official website address: https://hub.docker.com/
Common commands
- Pull image docker pull image name: image version (do not write the default latest)
- View image list docker images
- View running container docker ps
- View all containers docker ps -a
- Enter container docker exec -it container name (or container id) /bin/bash
- exit from container
- View container real-time logs docker logs -f container name (or container id)
- Delete image docker rmi image ID (or image name: label)
- Force deletion of image docker rmi -f image ID (or image name: label)
- Delete container docker rm container id or container name
- Force deletion of container docker rm -f container id or container name
mysql
mysql5.7 stand alone installation
Download: docker pull mysql:5.7
Mirror start:
docker run --name mysql5.7 \
-v /data/mysql5.7/data:/var/lib/mysql \
-v /data/mysql5.7/conf:/etc/mysql/conf.d \
-v /data/mysql5.7/log:/var/log/mysql  \
-e MYSQL_ROOT_PASSWORD=123456  \
-p 3310:3306 -d mysql:5.7
Command comments:
docker run --name mysql5.7 \   							#Container name
-v /data/mysql5.7/data:/var/lib/mysql \  				#Mount data directory
-v /data/mysql5.7/conf:/etc/mysql/conf.d \				#Mount configuration directory
-v /data/mysql5.7/log:/var/log/mysql  \					#Mount log directory
-e MYSQL_ROOT_PASSWORD=123456  \						#Set ROOT initialization password
-p 3310:3306 -d mysql:5.7								#-p port mapping - d background boot image name: Label
mysql8.0 stand alone installation
- Download docker pull mysql:8.0
- Mirror start
docker run --name mysql \
-v /data/mysql/data:/var/lib/mysql \
-v /data/mysql/conf:/etc/mysql/conf.d \
-v /data/mysql/log:/var/log/mysql  \
-e MYSQL_ROOT_PASSWORD=123456  \
-p 3306:3306 -d \
mysql:8.0
- Check whether the container starts docker ps -a
mysql8.0 master slave replication installation configuration
Create MySQL on the directory / data/mysql/conf CNF profile
[mysqld]
#Set the server ID to 1, which indicates the primary server and the unique ID of the instance. It cannot be the same as the slave ID of canal
server_id=1
#Start MySQ binary log system
log-bin=mysql-bin
#Select row mode
binlog-format=ROW
#The name of the database to be synchronized. If there are multiple databases, this parameter can be repeated, one row for each database
binlog-do-db=xxl_job
#Out of sync mysql system database
binlog-ignore-db=mysql
Create MySQL on the directory / data/mysql2/conf CNF profile
[mysqld]The configuration in is as follows
#The unique ID of the instance cannot be the same as the slave ID of canal, which is represented as the slave ID of the database
server-id=2
#MySQL binary system log
log-bin=mysql-bin
#Select row mode
binlog-format=ROW
#The name of the database to be synchronized. If there are multiple databases, this parameter can be repeated, one row for each database
replicate-do-db=xxl_job
#Out of sync mysql system database
replicate-ignore-db=mysql
Create MySQL on the directory / data/mysql3/conf CNF profile
[mysqld]The configuration in is as follows
#The unique ID of the instance cannot be the same as the slave ID of canal, which is represented as the slave ID of the database
server-id=3
#Start MySQL binary log system
log-bin=mysql-bin
#Select row mode
binlog-format=ROW
#The name of the database to be synchronized. If there are multiple databases, this parameter can be repeated, one row for each database
replicate-do-db=xxl_job
#Out of sync mysql system database
replicate-ignore-db=mysql
Then start the second and third containers of mysql and restart the first container
Restart mysql container: docker restart mysql
Start mysql2 container with image:
docker run --name mysql2 \
-v /data/mysql2/data:/var/lib/mysql \
-v /data/mysql2/conf:/etc/mysql/conf.d \
-v /data/mysql2/log:/var/log/mysql  \
-e MYSQL_ROOT_PASSWORD=123456  \
-p 3307:3306 -d \
mysql:8.0
Image startup mysql3 container:
docker run --name mysql3 \
-v /data/mysql3/data:/var/lib/mysql \
-v /data/mysql3/conf:/etc/mysql/conf.d \
-v /data/mysql3/log:/var/log/mysql  \
-e MYSQL_ROOT_PASSWORD=123456  \
-p 3308:3306 -d \
mysql:8.0
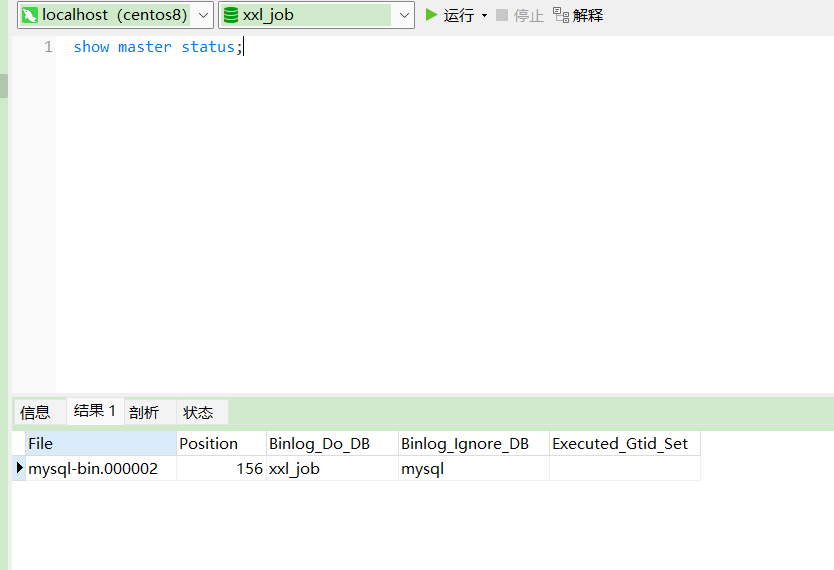
Execute show master status in the master database;
Execute the following command from the Library:
CHANGE MASTER TO
MASTER_HOST='Server host address',
MASTER_USER='user name',
MASTER_PASSWORD='password!',
MASTER_LOG_FILE='Binary file name',
MASTER_LOG_POS=position;
My corresponding command is:
CHANGE MASTER TO
MASTER_HOST='192.168.73.168',
MASTER_USER='root',
MASTER_PASSWORD='123456',
MASTER_LOG_FILE='mysql-bin.000002',
MASTER_LOG_POS=156;
If the following error is reported, you need to use the command stop slave first; Start the slave before stopping
> 3021 - This operation cannot be performed with a running slave io thread; run STOP SLAVE IO_THREAD FOR CHANNEL '' first.
Use the command start slave; Enable master-slave synchronization
Use the command show slave status; Check whether the synchronization status is turned on successfully

slave_io_running and slave_sql_running is yes for success
If unsuccessful, please check the following items
- Whether the table structure and data of the master database and the slave database are the same when synchronization is started. If there are differences, it is necessary to start master-slave replication after synchronization.
- Check whether the database synchronized by the master database has other connections. If yes, close it first and start it after the master-slave replication
- Check whether the ip users in the slave are correct
- Try a few more times
Finally, the master-slave replication is verified. The data change of the master database depends on whether it is automatically synchronized to the slave database
Spring boot uses shardingjdbc to configure read-write separation
Introduce dependency
<!-- sharding -->
<dependency>
	<groupId>org.apache.shardingsphere</groupId>
	<artifactId>sharding-jdbc-spring-boot-starter</artifactId>
	<version>4.0.0-RC1</version>
</dependency>
<!--Alibaba database connection pool -->
<dependency>
	<groupId>com.alibaba</groupId>
	<artifactId>druid-spring-boot-starter</artifactId>
	<version>1.1.14</version>
</dependency>
application. Configuration in properties
# shardingjdbc configuration
spring.shardingsphere.datasource.names=master,slave1,slave2
# Master data source configuration
spring.shardingsphere.datasource.master.type=org.apache.tomcat.jdbc.pool.DataSource
spring.shardingsphere.datasource.master.driver-class-name=com.mysql.jdbc.Driver
spring.shardingsphere.datasource.master.url=jdbc:mysql://192.168.73.168:3306/xxl_job?Unicode=true&characterEncoding=UTF-8
spring.shardingsphere.datasource.master.username=root
spring.shardingsphere.datasource.master.password=123456
# Configure 1 from data source
spring.shardingsphere.datasource.slave1.type=org.apache.tomcat.jdbc.pool.DataSource
spring.shardingsphere.datasource.slave1.driver-class-name=com.mysql.jdbc.Driver
spring.shardingsphere.datasource.slave1.url=jdbc:mysql://192.168.73.168:3307/xxl_job?Unicode=true&characterEncoding=UTF-8
spring.shardingsphere.datasource.slave1.username=root
spring.shardingsphere.datasource.slave1.password=123456
# Configure 2 from data source
spring.shardingsphere.datasource.slave2.type=com.alibaba.druid.pool.DruidDataSource
spring.shardingsphere.datasource.slave2.driver-class-name=com.mysql.jdbc.Driver
spring.shardingsphere.datasource.slave2.url=jdbc:mysql://192.168.73.168:3308/xxl_job?Unicode=true&characterEncoding=UTF-8
spring.shardingsphere.datasource.slave2.username=root
spring.shardingsphere.datasource.slave2.password=123456
#Configure the default data source master default data source, which is mainly used for writing
spring.shardingsphere.sharding.default-data-source-name=master
## Read write separation configuration
spring.shardingsphere.masterslave.load-balance-algorithm-type=round_robin
## Final data source name
spring.shardingsphere.masterslave.name=dataSource
## Master database data source name
spring.shardingsphere.masterslave.master-data-source-name=master
## From the list of library data source names, multiple commas are separated
spring.shardingsphere.masterslave.slave-data-source-names=slave1,slave2
## Turn on SQL display
spring.shardingsphere.props.sql.show=true
Elasticsearch
docker pull elasticsearch:7.16.3
Start:
docker run -d --name elasticsearch
-p 9200:9200 -p 9300:9300
-e "discovery.type=single-node"
-v /data/elasticsearch/data:/usr/share/elasticsearch/data
-v /data/elasticsearch/config:/usr/share/elasticsearch/config
elasticsearch:7.16.3
Command comments:
docker run -d --name elasticsearch 									# -d background startup -- name container name
-p 9200:9200 -p 9300:9300 											# -p port mapping
-e "discovery.type=single-node" 									# Startup parameter: single node startup
-v /data/elasticsearch/data:/usr/share/elasticsearch/data 			# Mount data directory
-v /data/elasticsearch/config:/usr/share/elasticsearch/config 		# Mount configuration directory
elasticsearch:7.16.3												# Image name: image label
logstash
Pull: docker pull logstash:7.16.3
Start:
docker run -d \
  --name=logstash \
  --restart=always \
  -p 5044:5044 \
  -v /data/logstash/data/:/usr/share/logstash/data/ \
  -v /data/logstash/config/:/usr/share/logstash/config/ \
  -v /data/logstash/logs/:/usr/share/logstash/logs/  \
  logstash:7.16.3
rocketmq
mkdir -p /data/rocketmq/rmqserver01/logs
mkdir -p /data/rocketmq/rmqserver01/store
mkdir -p /data/rocketmq/rmqbroker01/logs
mkdir -p /data/rocketmq/rmqbroker01/store
mkdir -p /data/rocketmq/rmqbroker01/conf

#Create server container
docker create -p 9876:9876 --name rmqserver01
-e "JAVA_OPT_EXT=-server -Xms128m -Xmx128m -Xmn128m"
-e "JAVA_OPTS=-Duser.home=/opt"
-v /data/rocketmq/rmqserver01/logs:/opt/logs
-v /data/rocketmq/rmqserver01/store:/opt/store
foxiswho/rocketmq:server-4.3.2

#Start container
docker start rmqserver rmqbroker

#Start the broker container
docker run -it -d --net host --name rmqbroker01 \
-e "JAVA_OPT_EXT=-server -Xms128m -Xmx128m -Xmn128m" \
-e "JAVA_OPTS=-Duser.home=/opt"  \
-v /data/rocketmq/rmqbroker01/conf/broker.conf:/etc/rocketmq/broker.conf \
-v /data/rocketmq/rmqbroker01/logs:/opt/logs \
-v /data/rocketmq/rmqbroker01/store:/opt/store \
--privileged=true \
foxiswho/rocketmq:broker-4.3.2

#Start rocketmq console
docker run -d \
-e "JAVA_OPTS=-Drocketmq.namesrv.addr=192.168.73.168:9876;192.168.73.168:9877 -Dcom.rocketmq.sendMessageWithVIPChannel=false" \
-p 8082:8080 -t \
styletang/rocketmq-console-ng:1.0.0