docker container network configuration
ip netns (network namespace) command
[root@Aimmi ~]# rpm -qa|grep iproute
iproute-5.9.0-4.el8.x86_64
[root@Aimmi ~]# ip netns help
Usage:  ip netns list           // List all namespaces
        ip netns add NAME       // Add namespace
        ip netns attach NAME PID
        ip netns set NAME NETNSID
        ip [-all] netns delete [NAME]
        ip netns identify [PID]
        ip netns pids NAME
        ip [-all] netns exec [NAME] cmd ...
        ip netns monitor
        ip netns list-id [target-nsid POSITIVE-INT] [nsid POSITIVE-INT]
NETNSID := auto | POSITIVE-INT
Create a Network Namespace
Create a file named ns0 Namespace for:
[root@Aimmi ~]# ip netns add ns0
[root@Aimmi ~]# ip netns list
ns0

Delete a file named ns0 Namespace for:
[root@Aimmi ~]# ip netns delete ns0

If you have the same name namespace Already exists, the command will report Cannot create namespace file "/var/run/netns/ns0": File exists Error.
[root@Aimmi ~]# ls /var/run/netns
ns0
[root@Aimmi ~]# ip netns add ns0
Cannot create namespace file "/var/run/netns/ns0": File exists


Error demonstration: create a namespace manually
[root@Aimmi ~]# touch /var/run/netns/ns1
[root@Aimmi ~]# ip netns list
Error: Peer netns reference is invalid.
Error: Peer netns reference is invalid.
ns1
ns0
For each Network Namespace, it will have its own independent network card, routing table, ARP table, iptables and other network related resources.
Operation Network Namespace
The p command provides the ip netns exec subcommand, which can be executed in the corresponding Network Namespace.
View the network card information of the newly created Network Namespace
[root@Aimmi ~]# ip netns exec ns0 ip a enters the namespace ns0 to execute the command ip a
1: lo: <LOOPBACK> mtu 65536 qdisc noop state DOWN group default qlen 1000
    link/loopback 00:00:00:00:00:00 brd 00:00:00:00:00:00
You can see that a lo loopback network card will be created by default in the newly created Network Namespace, and the network card is closed at this time. At this time, if you try to ping the lo loopback network card, you will be prompted that Network is unreachable
[root@Aimmi ~]# ip netns exec ns0 ping 127.0.0.1
connect: Network is unreachable
Enable lo loopback network card with the following command:
[root@Aimmi ~]# ip netns exec ns0 ip link set lo up
[root@Aimmi ~]# ip netns exec ns0 ip a
1: lo: <LOOPBACK,UP,LOWER_UP> mtu 65536 qdisc noqueue state UNKNOWN group default qlen 1000
    link/loopback 00:00:00:00:00:00 brd 00:00:00:00:00:00
    inet 127.0.0.1/8 scope host lo
       valid_lft forever preferred_lft forever
    inet6 ::1/128 scope host
       valid_lft forever preferred_lft forever
[root@Aimmi ~]# ip netns exec ns0 ping 127.0.0.1
PING 127.0.0.1 (127.0.0.1) 56(84) bytes of data.
64 bytes from 127.0.0.1: icmp_seq=1 ttl=64 time=0.018 ms
64 bytes from 127.0.0.1: icmp_seq=2 ttl=64 time=0.061 ms
64 bytes from 127.0.0.1: icmp_seq=3 ttl=64 time=0.040 ms
64 bytes from 127.0.0.1: icmp_seq=4 ttl=64 time=0.060 ms
Transfer equipment
We can transfer devices (such as veth) between different network namespaces. Since a device can only belong to one Network Namespace, the device cannot be seen in the Network Namespace after transfer.
Among them, veth devices are transferable devices, while many other devices (such as lo, vxlan, ppp, bridge, etc.) are not transferable.
Once the container is in operation, veth It will appear automatically
[root@Aimmi ~]# docker run -it --rm busybox
Unable to find image 'busybox:latest' locally
latest: Pulling from library/busybox
3aab638df1a9: Pull complete
Digest: sha256:52817dece4cfe26f581c834d27a8e1bcc82194f914afe6d50afad5a101234ef1
Status: Downloaded newer image for busybox:latest
/ # ip a
1: lo: <LOOPBACK,UP,LOWER_UP> mtu 65536 qdisc noqueue qlen 1000
    link/loopback 00:00:00:00:00:00 brd 00:00:00:00:00:00
    inet 127.0.0.1/8 scope host lo
       valid_lft forever preferred_lft forever
4: eth0@if5: <BROADCAST,MULTICAST,UP,LOWER_UP,M-DOWN> mtu 1500 qdisc noqueue
    link/ether 02:42:ac:11:00:02 brd ff:ff:ff:ff:ff:ff
    inet 172.17.0.2/16 brd 172.17.255.255 scope global eth0
       valid_lft forever preferred_lft forever
[root@Aimmi ~]# ip a
1: lo: <LOOPBACK,UP,LOWER_UP> mtu 65536 qdisc noqueue state UNKNOWN group default qlen 1000
    link/loopback 00:00:00:00:00:00 brd 00:00:00:00:00:00
    inet 127.0.0.1/8 scope host lo
       valid_lft forever preferred_lft forever
    inet6 ::1/128 scope host
       valid_lft forever preferred_lft forever
2: ens33: <BROADCAST,MULTICAST,UP,LOWER_UP> mtu 1500 qdisc fq_codel state UP group default qlen 1000
    link/ether 00:0c:29:ff:ac:9f brd ff:ff:ff:ff:ff:ff
    inet 192.168.145.188/24 brd 192.168.145.255 scope global dynamic noprefixroute ens33
       valid_lft 1120sec preferred_lft 1120sec
    inet6 fe80::20c:29ff:feff:ac9f/64 scope link noprefixroute
       valid_lft forever preferred_lft forever
3: docker0: <BROADCAST,MULTICAST,UP,LOWER_UP> mtu 1500 qdisc noqueue state UP group default
    link/ether 02:42:78:55:12:e9 brd ff:ff:ff:ff:ff:ff
    inet 172.17.0.1/16 brd 172.17.255.255 scope global docker0
       valid_lft forever preferred_lft forever
    inet6 fe80::42:78ff:fe55:12e9/64 scope link
       valid_lft forever preferred_lft forever
5: vethb2c2075@if4: <BROADCAST,MULTICAST,UP,LOWER_UP> mtu 1500 qdisc noqueue master docker0 state UP group default
Error: Peer netns reference is invalid.
    link/ether 4a:47:02:f4:f0:d4 brd ff:ff:ff:ff:ff:ff link-netnsid 0
    inet6 fe80::4847:2ff:fef4:f0d4/64 scope link
       valid_lft forever preferred_lft forever                  //Fifth
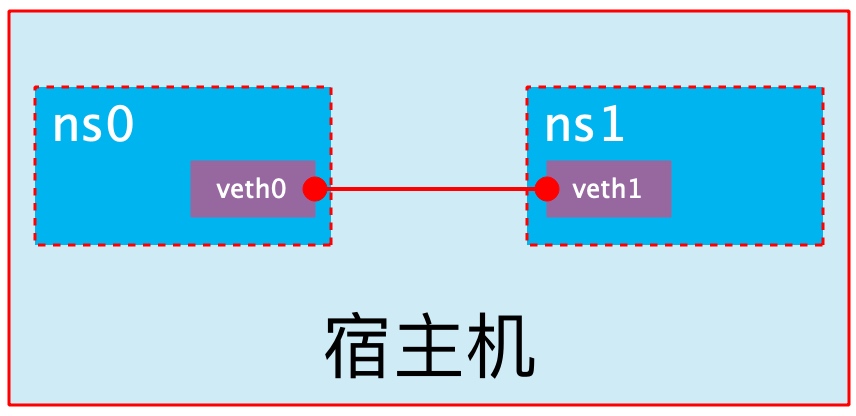
veth pair
The full name of veth pair is Virtual Ethernet Pair. It is a pair of ports. All packets entering from one end of the pair of ports will come out from the other end, and vice versa. veth pair is introduced to communicate directly in different network namespaces. It can be used to connect two network namespaces directly.
Create veth pair
[root@Aimmi ~]# ip link add type veth
[root@Aimmi ~]# ip link show
1: lo: <LOOPBACK,UP,LOWER_UP> mtu 65536 qdisc noqueue state UNKNOWN mode DEFAULT group default qlen 1000
    link/loopback 00:00:00:00:00:00 brd 00:00:00:00:00:00
2: ens33: <BROADCAST,MULTICAST,UP,LOWER_UP> mtu 1500 qdisc fq_codel state UP mode DEFAULT group default qlen 1000
    link/ether 00:0c:29:ff:ac:9f brd ff:ff:ff:ff:ff:ff
3: docker0: <NO-CARRIER,BROADCAST,MULTICAST,UP> mtu 1500 qdisc noqueue state DOWN mode DEFAULT group default
    link/ether 02:42:78:55:12:e9 brd ff:ff:ff:ff:ff:ff
6: veth0@veth1: <BROADCAST,MULTICAST,M-DOWN> mtu 1500 qdisc noop state DOWN mode DEFAULT group default qlen 1000
    link/ether e6:e0:e1:28:47:a6 brd ff:ff:ff:ff:ff:ff
7: veth1@veth0: <BROADCAST,MULTICAST,M-DOWN> mtu 1500 qdisc noop state DOWN mode DEFAULT group default qlen 1000
    link/ether 7e:19:0b:08:a6:e5 brd ff:ff:ff:ff:ff:ff
You can see that a pair of Veth pairs are added to the system to connect the two virtual network cards veth0 and veth1. At this time, the pair of Veth pairs are in the "not enabled" state.
Enable communication between network namespaces
Next, we use veth pair to realize the communication between two different network namespaces. Just now, we have created a Network Namespace named ns0. Next, we will create another information Network Namespace named ns1
[root@Aimmi ~]# ip netns add ns1
[root@Aimmi ~]# ip netns list
ns1
ns0
Then we add veth0 to ns0 and veth1 to ns1
[root@Aimmi ~]# ip link set veth0 netns ns0
[root@Aimmi ~]# ip netns exec ns0 ip a
1: lo: <LOOPBACK,UP,LOWER_UP> mtu 65536 qdisc noqueue state UNKNOWN group default qlen 1000
    link/loopback 00:00:00:00:00:00 brd 00:00:00:00:00:00
    inet 127.0.0.1/8 scope host lo
       valid_lft forever preferred_lft forever
    inet6 ::1/128 scope host
       valid_lft forever preferred_lft forever
6: veth0@if7: <BROADCAST,MULTICAST> mtu 1500 qdisc noop state DOWN group default qlen 1000
    link/ether e6:e0:e1:28:47:a6 brd ff:ff:ff:ff:ff:ff link-netnsid 0
[root@Aimmi ~]# ip link set veth1 netns ns1
[root@Aimmi ~]# ip netns exec ns1 ip a
1: lo: <LOOPBACK> mtu 65536 qdisc noop state DOWN group default qlen 1000
    link/loopback 00:00:00:00:00:00 brd 00:00:00:00:00:00
7: veth1@if6: <BROADCAST,MULTICAST> mtu 1500 qdisc noop state DOWN group default qlen 1000
    link/ether 7e:19:0b:08:a6:e5 brd ff:ff:ff:ff:ff:ff link-netns ns0
Then we configure the ip addresses for these Veth pairs and enable them
[root@Aimmi ~]# ip netns exec ns0 ip link set veth0 up
[root@Aimmi ~]# ip netns exec ns0 ip addr add 10.0.0.1/24 dev veth0
[root@Aimmi ~]# ip netns exec ns1 ip link set lo up
[root@Aimmi ~]# ip netns exec ns1 ip link set veth1 up
[root@Aimmi ~]# ip netns exec ns1 ip addr add 10.0.0.2/24 dev veth1
View the status of this pair of Veth pairs
[root@Aimmi ~]# ip netns exec ns0 ip a
1: lo: <LOOPBACK,UP,LOWER_UP> mtu 65536 qdisc noqueue state UNKNOWN group default qlen 1000
    link/loopback 00:00:00:00:00:00 brd 00:00:00:00:00:00
    inet 127.0.0.1/8 scope host lo
       valid_lft forever preferred_lft forever
    inet6 ::1/128 scope host
       valid_lft forever preferred_lft forever
6: veth0@if7: <BROADCAST,MULTICAST,UP,LOWER_UP> mtu 1500 qdisc noqueue state UP group default qlen 1000
    link/ether e6:e0:e1:28:47:a6 brd ff:ff:ff:ff:ff:ff link-netns ns1
    inet 10.0.0.1/24 scope global veth0
       valid_lft forever preferred_lft forever
    inet6 fe80::e4e0:e1ff:fe28:47a6/64 scope link
       valid_lft forever preferred_lft forever
[root@Aimmi ~]# ip netns exec ns1 ip a
1: lo: <LOOPBACK,UP,LOWER_UP> mtu 65536 qdisc noqueue state UNKNOWN group default qlen 1000
    link/loopback 00:00:00:00:00:00 brd 00:00:00:00:00:00
    inet 127.0.0.1/8 scope host lo
       valid_lft forever preferred_lft forever
    inet6 ::1/128 scope host
       valid_lft forever preferred_lft forever
7: veth1@if6: <BROADCAST,MULTICAST,UP,LOWER_UP> mtu 1500 qdisc noqueue state UP group default qlen 1000
    link/ether 7e:19:0b:08:a6:e5 brd ff:ff:ff:ff:ff:ff link-netns ns0
    inet 10.0.0.2/24 scope global veth1
       valid_lft forever preferred_lft forever
    inet6 fe80::7c19:bff:fe08:a6e5/64 scope link
       valid_lft forever preferred_lft forever
As can be seen from the above, we have successfully enabled this veth pair and assigned the corresponding ip address to each veth device. We try to access the ip address in ns0 in ns1:
[root@Aimmi ~]# ip netns exec ns1 ping 10.0.0.1
PING 10.0.0.1 (10.0.0.1) 56(84) bytes of data.
64 bytes from 10.0.0.1: icmp_seq=1 ttl=64 time=0.055 ms
64 bytes from 10.0.0.1: icmp_seq=2 ttl=64 time=0.041 ms
veth device rename
[root@Aimmi ~]# ip netns exec ns0 ip link set veth0 down
[root@Aimmi ~]# ip netns exec ns0 ip link set dev veth0 name eth0
[root@Aimmi ~]# ip netns exec ns0 ip link set eth0 up
[root@Aimmi ~]# ip netns exec ns0 ip a
1: lo: <LOOPBACK,UP,LOWER_UP> mtu 65536 qdisc noqueue state UNKNOWN group default qlen 1000
    link/loopback 00:00:00:00:00:00 brd 00:00:00:00:00:00
    inet 127.0.0.1/8 scope host lo
       valid_lft forever preferred_lft forever
    inet6 ::1/128 scope host
       valid_lft forever preferred_lft forever
6: eth0@if7: <BROADCAST,MULTICAST,UP,LOWER_UP> mtu 1500 qdisc noqueue state UP group default qlen 1000
    link/ether e6:e0:e1:28:47:a6 brd ff:ff:ff:ff:ff:ff link-netns ns1
    inet 10.0.0.1/24 scope global eth0
       valid_lft forever preferred_lft forever
    inet6 fe80::e4e0:e1ff:fe28:47a6/64 scope link
       valid_lft forever preferred_lft forever
[root@Aimmi ~]# ip netns exec ns1 ip link set veth1 down
[root@Aimmi ~]# ip netns exec ns1 ip link set dev veth1 name eth0
[root@Aimmi ~]# ip netns exec ns1 ip link set eth0 up
[root@Aimmi ~]# ip netns exec ns1 ip a
1: lo: <LOOPBACK,UP,LOWER_UP> mtu 65536 qdisc noqueue state UNKNOWN group default qlen 1000
    link/loopback 00:00:00:00:00:00 brd 00:00:00:00:00:00
    inet 127.0.0.1/8 scope host lo
       valid_lft forever preferred_lft forever
    inet6 ::1/128 scope host
       valid_lft forever preferred_lft forever
7: eth0@if6: <BROADCAST,MULTICAST,UP,LOWER_UP> mtu 1500 qdisc noqueue state UP group default qlen 1000
    link/ether 7e:19:0b:08:a6:e5 brd ff:ff:ff:ff:ff:ff link-netns ns0
    inet 10.0.0.2/24 scope global eth0
       valid_lft forever preferred_lft forever
    inet6 fe80::7c19:bff:fe08:a6e5/64 scope link
       valid_lft forever preferred_lft forever
[root@Aimmi ~]# ip netns exec ns1 ping 10.0.0.1
PING 10.0.0.1 (10.0.0.1) 56(84) bytes of data.
64 bytes from 10.0.0.1: icmp_seq=1 ttl=64 time=0.032 ms
64 bytes from 10.0.0.1: icmp_seq=2 ttl=64 time=0.027 ms
64 bytes from 10.0.0.1: icmp_seq=3 ttl=64 time=0.080 ms
Four network mode configurations
bridge mode configuration
[root@Aimmi ~]# docker run -it --rm busybox
/ # ip a
1: lo: <LOOPBACK,UP,LOWER_UP> mtu 65536 qdisc noqueue qlen 1000
    link/loopback 00:00:00:00:00:00 brd 00:00:00:00:00:00
    inet 127.0.0.1/8 scope host lo
       valid_lft forever preferred_lft forever
8: eth0@if9: <BROADCAST,MULTICAST,UP,LOWER_UP,M-DOWN> mtu 1500 qdisc noqueue
    link/ether 02:42:ac:11:00:02 brd ff:ff:ff:ff:ff:ff
    inet 172.17.0.2/16 brd 172.17.255.255 scope global eth0
       valid_lft forever preferred_lft forever
/ # exit
[root@Aimmi ~]# docker container ls
CONTAINER ID   IMAGE     COMMAND   CREATED   STATUS    PORTS     NAMES

Add when creating a container--network bridge With or without--network The effect of options is consistent
[root@Aimmi ~]# docker run -it --rm --network bridge busybox
/ # ip a
1: lo: <LOOPBACK,UP,LOWER_UP> mtu 65536 qdisc noqueue qlen 1000
    link/loopback 00:00:00:00:00:00 brd 00:00:00:00:00:00
    inet 127.0.0.1/8 scope host lo
       valid_lft forever preferred_lft forever
10: eth0@if11: <BROADCAST,MULTICAST,UP,LOWER_UP,M-DOWN> mtu 1500 qdisc noqueue
    link/ether 02:42:ac:11:00:02 brd ff:ff:ff:ff:ff:ff
    inet 172.17.0.2/16 brd 172.17.255.255 scope global eth0
       valid_lft forever preferred_lft forever
/ # exit
none mode configuration
No need to communicate, just to do some simple operations
[root@Aimmi ~]# docker run -it --rm --network none busybox
/ # ip a
1: lo: <LOOPBACK,UP,LOWER_UP> mtu 65536 qdisc noqueue qlen 1000
    link/loopback 00:00:00:00:00:00 brd 00:00:00:00:00:00
    inet 127.0.0.1/8 scope host lo
       valid_lft forever preferred_lft forever
/ # exit
container mode configuration
Start the first container
[root@Aimmi ~]# docker run -it --rm busybox
/ # ip a
1: lo: <LOOPBACK,UP,LOWER_UP> mtu 65536 qdisc noqueue qlen 1000
    link/loopback 00:00:00:00:00:00 brd 00:00:00:00:00:00
    inet 127.0.0.1/8 scope host lo
       valid_lft forever preferred_lft forever
12: eth0@if13: <BROADCAST,MULTICAST,UP,LOWER_UP,M-DOWN> mtu 1500 qdisc noqueue
    link/ether 02:42:ac:11:00:02 brd ff:ff:ff:ff:ff:ff
    inet 172.17.0.2/16 brd 172.17.255.255 scope global eth0
       valid_lft forever preferred_lft forever
Start the second container
[root@Aimmi ~]# docker run -it --rm busybox
/ # ip a
1: lo: <LOOPBACK,UP,LOWER_UP> mtu 65536 qdisc noqueue qlen 1000
    link/loopback 00:00:00:00:00:00 brd 00:00:00:00:00:00
    inet 127.0.0.1/8 scope host lo
       valid_lft forever preferred_lft forever
14: eth0@if15: <BROADCAST,MULTICAST,UP,LOWER_UP,M-DOWN> mtu 1500 qdisc noqueue
    link/ether 02:42:ac:11:00:03 brd ff:ff:ff:ff:ff:ff
    inet 172.17.0.3/16 brd 172.17.255.255 scope global eth0
       valid_lft forever preferred_lft forever
You can see that the IP address of the second container is 172.17.0.3, which is not the same as that of the first container, that is, there is no shared network. At this time, if we change the startup mode of the second container, we can make the IP of the second container consistent with that of the first container, that is, sharing IP, but not sharing file system.
Don't quit the first two and reopen the page
[root@Aimmi ~]# docker ps -a
CONTAINER ID   IMAGE     COMMAND   CREATED          STATUS          PORTS     NAMES
bba83a5b7c03   busybox   "sh"      17 seconds ago   Up 16 seconds             thirsty_franklin
f9fc77e4709f   busybox   "sh"      4 minutes ago    Up 4 minutes              sharp_sanderson
[root@Aimmi ~]# docker run -it --rm --network container:f9fc77e4709f busybox
/ # ip a
1: lo: <LOOPBACK,UP,LOWER_UP> mtu 65536 qdisc noqueue qlen 1000
    link/loopback 00:00:00:00:00:00 brd 00:00:00:00:00:00
    inet 127.0.0.1/8 scope host lo
       valid_lft forever preferred_lft forever
12: eth0@if13: <BROADCAST,MULTICAST,UP,LOWER_UP,M-DOWN> mtu 1500 qdisc noqueue
    link/ether 02:42:ac:11:00:02 brd ff:ff:ff:ff:ff:ff
    inet 172.17.0.2/16 brd 172.17.255.255 scope global eth0
       valid_lft forever preferred_lft forever
/ # hostname
f9fc77e4709f
At this point, we create a directory on the first container
/ # mkdir /tmp/data
/ # ls /tmp
data
Check the / tmp directory on the second container and you will find that there is no such directory, because the file system is isolated and only shares the network.
/ # ls
bin   dev   etc   home  proc  root  sys   tmp   usr   var
Deploy a site on the second container
 ls /var/www/
/ # echo 'test page' > /var/www/index.html
/ # /bin/httpd/ -f -h /var/www/
sh: /bin/httpd/: not found
/ # /bin/httpd -f -h /var/www/

[root@Aimmi ~]# docker ps
CONTAINER ID   IMAGE     COMMAND   CREATED         STATUS         PORTS     NAMES
3342de98128c   busybox   "sh"      2 minutes ago   Up 2 minutes             wizardly_
brahmagupta
bba83a5b7c03   busybox   "sh"      4 minutes ago   Up 4 minutes             thirsty_f
ranklin
f9fc77e4709f   busybox   "sh"      7 minutes ago   Up 7 minutes             sharp_san
derson
[root@Aimmi ~]# docker exec -it 3342de98128c /bin/sh
/ # netstat -antl
Active Internet connections (servers and established)
Proto Recv-Q Send-Q Local Address           Foreign Address         State
tcp        0      0 :::80                   :::*                    LISTEN
Access this site with a local address on the first container
/ # wget -O - -q 127.0.0.1
test page
It can be seen that the relationship between containers in container mode is equivalent to two different processes on a host
host mode configuration
Directly indicate that the mode is host when starting the container
[root@Aimmi ~]# docker run -it --rm --network host busybox
/ # ip a
1: lo: <LOOPBACK,UP,LOWER_UP> mtu 65536 qdisc noqueue qlen 1000
    link/loopback 00:00:00:00:00:00 brd 00:00:00:00:00:00
    inet 127.0.0.1/8 scope host lo
       valid_lft forever preferred_lft forever
    inet6 ::1/128 scope host
       valid_lft forever preferred_lft forever
2: ens33: <BROADCAST,MULTICAST,UP,LOWER_UP> mtu 1500 qdisc fq_codel qlen 1000
    link/ether 00:0c:29:ff:ac:9f brd ff:ff:ff:ff:ff:ff
    inet 192.168.145.188/24 brd 192.168.145.255 scope global dynamic noprefixroute ens33
       valid_lft 968sec preferred_lft 968sec
    inet6 fe80::20c:29ff:feff:ac9f/64 scope link noprefixroute
       valid_lft forever preferred_lft forever
3: docker0: <NO-CARRIER,BROADCAST,MULTICAST,UP> mtu 1500 qdisc noqueue
    link/ether 02:42:78:55:12:e9 brd ff:ff:ff:ff:ff:ff
    inet 172.17.0.1/16 brd 172.17.255.255 scope global docker0
       valid_lft forever preferred_lft forever
    inet6 fe80::42:78ff:fe55:12e9/64 scope link
       valid_lft forever preferred_lft forever
/ # ip link show
1: lo: <LOOPBACK,UP,LOWER_UP> mtu 65536 qdisc noqueue qlen 1000
    link/loopback 00:00:00:00:00:00 brd 00:00:00:00:00:00
2: ens33: <BROADCAST,MULTICAST,UP,LOWER_UP> mtu 1500 qdisc fq_codel qlen 1000
    link/ether 00:0c:29:ff:ac:9f brd ff:ff:ff:ff:ff:ff
3: docker0: <NO-CARRIER,BROADCAST,MULTICAST,UP> mtu 1500 qdisc noqueue
    link/ether 02:42:78:55:12:e9 brd ff:ff:ff:ff:ff:ff
At this point, if we start an http site in this container, we can directly access the site in this container in the browser with the IP of the host.
[root@Aimmi ~]# ss -antl
State           Recv-Q          Send-Q                    Local Address:Port                     Peer Address:Port          Process
LISTEN          0               128                             0.0.0.0:22                            0.0.0.0:*
LISTEN          0               128                                [::]:22                               [::]:*

/ # echo 'hello world' > /var/www/index.html
/ # /bin/httpd -f -h /var/www/

[root@Aimmi ~]# ss -antl
State           Recv-Q          Send-Q                    Local Address:Port                     Peer Address:Port          Process
LISTEN          0               128                             0.0.0.0:22                            0.0.0.0:*
LISTEN          0               128                                [::]:22                               [::]:*
LISTEN          0               9                                     *:80
Common operations of containers
View the host name of the container
[root@Aimmi ~]# docker run -it --rm busybox
/ # hostname
1d183d992db1
Inject hostname when container starts
[root@Aimmi ~]# docker run -it --rm --hostname zs busybox
/ # hostname
zs
/ # cat /etc/hostname
zs
/ # cat /etc/hosts
127.0.0.1       localhost
::1     localhost ip6-localhost ip6-loopback
fe00::0 ip6-localnet
ff00::0 ip6-mcastprefix
ff02::1 ip6-allnodes
ff02::2 ip6-allrouters
172.17.0.2      zs
/ # cat /etc/resolv.conf
# Generated by NetworkManager
search localdomain
nameserver 192.168.145.2
/ # ping www.baidu.com
PING www.baidu.com (14.215.177.38): 56 data bytes
64 bytes from 14.215.177.38: seq=0 ttl=127 time=31.057 ms
64 bytes from 14.215.177.38: seq=1 ttl=127 time=39.754 ms
64 bytes from 14.215.177.38: seq=2 ttl=127 time=25.531 ms
Manually specify the DNS to be used by the container
[root@Aimmi ~]# docker run -it --rm --hostname zs --dns 114.114.114.114 busybox
/ # hostname
zs
/ # cat /etc/resolv.conf
search localdomain
nameserver 114.114.114.114
/ # nslookup -type=a www.baidu.com
Server:         114.114.114.114
Address:        114.114.114.114:53

Non-authoritative answer:
www.baidu.com   canonical name = www.a.shifen.com
Name:   www.a.shifen.com
Address: 14.215.177.38
Name:   www.a.shifen.com
Address: 14.215.177.39
Manually inject the host name to IP address mapping into the / etc/hosts file
[root@Aimmi ~]# docker run -it --rm --hostname zs --dns 114.114.114.114 --add-host zs1:172.17.0.3 busybox
/ # cat /etc/hosts
127.0.0.1       localhost
::1     localhost ip6-localhost ip6-loopback
fe00::0 ip6-localnet
ff00::0 ip6-mcastprefix
ff02::1 ip6-allnodes
ff02::2 ip6-allrouters
172.17.0.3      zs1
172.17.0.2      zs
Open container port
When docker run is executed, there is a - p option to map the application ports in the container to the host, so that the external host can access the applications in the container by accessing a port of the host.
-
-The p option can be used multiple times, and the port it can expose must be the port that the container is actually listening to.
-
-Use format of p option:
-p <containerPort>
    Maps the specified container port to a dynamic port at all addresses of the host
-p <hostPort>:<containerPort>
    Add container port<containerPort>Map to the specified host port<hostPort>
-p <ip>::<containerPort>
    The specified container port will be<containerPort>Map to host assignment<ip>Dynamic port for
-p <ip>:<hostPort>:<containerPort>
    The specified container port will be<containerPort>Map to host assignment<ip>Port<hostPort>
Dynamic ports refer to random ports. The specific mapping results can be viewed using the docker port command.
The first way to use - p
[root@Aimmi ~]# docker run -d --name web --rm -p 80 nginx
Unable to find image 'nginx:latest' locally
latest: Pulling from library/nginx
e5ae68f74026: Pull complete
21e0df283cd6: Pull complete
ed835de16acd: Pull complete
881ff011f1c9: Pull complete
77700c52c969: Pull complete
44be98c0fab6: Pull complete
Digest: sha256:9522864dd661dcadfd9958f9e0de192a1fdda2c162a35668ab6ac42b465f0603
Status: Downloaded newer image for nginx:latest
ed8bf7174213a1195fd8993b0d48a18817727d61a9be715f2fc431b92d35441e
[root@Aimmi ~]# docker ps
CONTAINER ID   IMAGE     COMMAND                  CREATED         STATUS         PORTS                                     NAMES
ed8bf7174213   nginx     "/docker-entrypoint...."   5 seconds ago   Up 4 seconds   0.0.0.0:49153->80/tcp, :::49153->80/tcp   web
After the above command is executed, it will occupy the front end all the time. Let's open a new terminal connection to see what port 80 of the container is mapped to the host
[root@Aimmi ~]# docker port web
80/tcp -> 0.0.0.0:49153
80/tcp -> :::49153
It can be seen that port 80 of the container is exposed to port 32769 of the host. At this time, we can access this port on the host to see if we can access the sites in the container
[root@Aimmi ~]# curl http://127.0.0.1:49153
<!DOCTYPE html>
<html>
<head>
<title>Welcome to nginx!</title>
<style>
html { color-scheme: light dark; }
body { width: 35em; margin: 0 auto;
font-family: Tahoma, Verdana, Arial, sans-serif; }
</style>
</head>
<body>
<h1>Welcome to nginx!</h1>
<p>If you see this page, the nginx web server is successfully installed and
working. Further configuration is required.</p>

<p>For online documentation and support please refer to
<a href="http://nginx.org/">nginx.org</a>.<br/>
Commercial support is available at
<a href="http://nginx.com/">nginx.com</a>.</p>

<p><em>Thank you for using nginx.</em></p>
</body>
</html>
The second - p approach:
Map the container port to the specified port of the host
[root@Aimmi ~]# docker run -d --name web --rm -p 80:80 nginx
ed8bf7174213a1195fd8993b0d48a18817727d61a9be715f2fc431b92d35441e
[root@Aimmi ~]# docker port web
80/tcp -> 0.0.0.0:80
80/tcp -> :::80
iptables firewall rules will be generated automatically with the creation of the container and deleted automatically with the deletion of the container.
The third - p way:
Maps the container port to a random port of the specified IP
[root@Aimmi ~]# docker run --name web --rm -p 192.168.145.188::80 nginx
View the port mapping on another terminal
[root@Aimmi ~]# docker port web
80/tcp -> 192.168.145.188:49153
The fourth - p way:
Map the specified container port to the port specified by the host
[root@Aimmi ~]# docker run -d --name web --rm -p 127.0.0.1:80:80 nginx
ed8bf7174213a1195fd8993b0d48a18817727d61a9be715f2fc431b92d35441e
View the port mapping on another terminal
[root@Aimmi ~]# docker port web
80/tcp -> 127.0.0.1:80
Network attribute information of custom docker0 Bridge
To customize the network attribute information of docker0 bridge, you need to modify the / etc/docker/daemon.json configuration file
Official document related configuration https://docs.docker.com/network/bridge/
To customize the network attribute information of docker0 bridge, you need to modify the / etc/docker/daemon.json configuration file
[root@Aimmi ~]# vi /etc/docker/daemon.json
{
    "registry-mirrors": ["https://docker.mirrors.ustc.edu.cn/"]
    "big": "192.168.145.188"
}

[root@Aimmi ~]# systemctl restart docker
[root@Aimmi ~]# ip a
1: lo: <LOOPBACK,UP,LOWER_UP> mtu 65536 qdisc noqueue state UNKNOWN group default qlen 1000
    link/loopback 00:00:00:00:00:00 brd 00:00:00:00:00:00
    inet 127.0.0.1/8 scope host lo
       valid_lft forever preferred_lft forever
    inet6 ::1/128 scope host
       valid_lft forever preferred_lft forever
2: ens33: <BROADCAST,MULTICAST,UP,LOWER_UP> mtu 1500 qdisc pfifo_fast state UP group default qlen 1000
    link/ether 00:0c:29:a8:8f:68 brd ff:ff:ff:ff:ff:ff
    inet 192.168.47.161/24 brd 192.168.47.255 scope global noprefixroute dynamic ens33
       valid_lft 1169sec preferred_lft 1169sec
    inet6 fe80::c7db:4c9f:7bcc:55f5/64 scope link noprefixroute
       valid_lft forever preferred_lft forever
3: docker0: <NO-CARRIER,BROADCAST,MULTICAST,UP> mtu 1500 qdisc noqueue state DOWN group default
    link/ether 02:42:5b:66:73:8e brd ff:ff:ff:ff:ff:ff
    inet 192.168.1.1/24 brd 192.168.1.255 scope global docker0
       valid_lft forever preferred_lft forever
    inet6 fe80::42:5bff:fe66:738e/64 scope link
       valid_lft forever preferred_lft forever
The core option is bip, which means bridge ip. It is used to specify the IP address of docker0 bridge itself. Other options can be calculated from this address.
docker remote connection (not commonly used)
The C/S of dockerd daemon only listens to the address in Unix Socket format (/ var/run/docker.sock) by default. If you want to use TCP socket, you need to modify the / etc/docker/daemon.json configuration file
docker create custom bridge
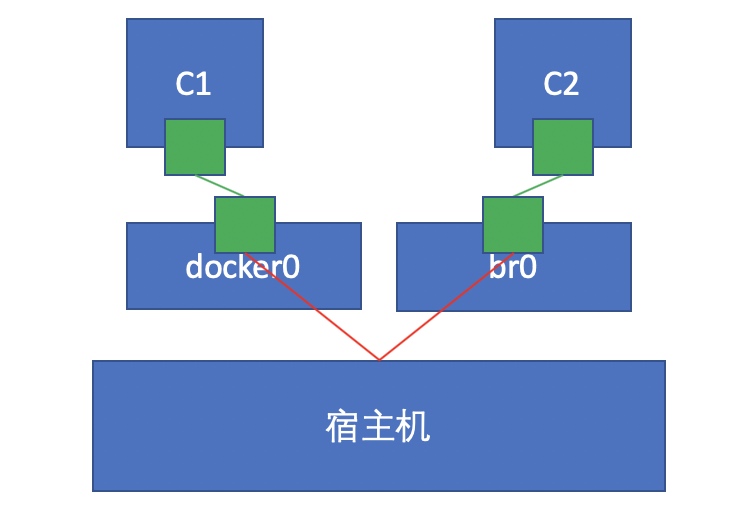
Create an additional custom bridge, which is different from docker0
[root@Aimmi ~]# docker network ls
NETWORK ID     NAME      DRIVER    SCOPE
bfef3a5a370d   bridge    bridge    local
6ceb6009fa51   host      host      local
722f6ab96f26   none      null      local
[root@Aimmi ~]# docker network create -d bridge --subnet "192.168.2.0/24" --gateway "192.168.2.1" br0
a298744eb8b168ee11c122a301dfd44d699c9cca7bfb9177944aae51fa7cef0e
[root@Aimmi ~]# docker network ls
NETWORK ID     NAME      DRIVER    SCOPE
a298744eb8b1   br0       bridge    local
bfef3a5a370d   bridge    bridge    local
6ceb6009fa51   host      host      local
722f6ab96f26   none      null      local
Create a container using the newly created custom bridge:
[root@Aimmi ~]# docker run -it --rm --network br0 busybox
/ # ip a
1: lo: <LOOPBACK,UP,LOWER_UP> mtu 65536 qdisc noqueue qlen 1000
    link/loopback 00:00:00:00:00:00 brd 00:00:00:00:00:00
    inet 127.0.0.1/8 scope host lo
       valid_lft forever preferred_lft forever
23: eth0@if24: <BROADCAST,MULTICAST,UP,LOWER_UP,M-DOWN> mtu 1500 qdisc noqueue
    link/ether 02:42:c0:a8:02:02 brd ff:ff:ff:ff:ff:ff
    inet 192.168.2.2/24 brd 192.168.2.255 scope global eth0
       valid_lft forever preferred_lft forever
Create another container and use the default bridge:
[root@Aimmi ~]# docker run -it --rm busybox
/ # ip a
1: lo: <LOOPBACK,UP,LOWER_UP> mtu 65536 qdisc noqueue qlen 1000
    link/loopback 00:00:00:00:00:00 brd 00:00:00:00:00:00
    inet 127.0.0.1/8 scope host lo
       valid_lft forever preferred_lft forever
25: eth0@if26: <BROADCAST,MULTICAST,UP,LOWER_UP,M-DOWN> mtu 1500 qdisc noqueue
    link/ether 02:42:ac:11:00:02 brd ff:ff:ff:ff:ff:ff
    inet 172.17.0.2/16 brd 172.17.255.255 scope global eth0
       valid_lft forever preferred_lft forever
Imagine whether b2 and b1 can communicate with each other at this time? If not, how to realize communication?
/ # hostname
1d183d992db1

[root@Aimmi ~]# docker network connect br0 bb1a030ba094 1d183d992db1

/ # ip a
1: lo: <LOOPBACK,UP,LOWER_UP> mtu 65536 qdisc noqueue qlen 1000
    link/loopback 00:00:00:00:00:00 brd 00:00:00:00:00:00
    inet 127.0.0.1/8 scope host lo
       valid_lft forever preferred_lft forever
25: eth0@if26: <BROADCAST,MULTICAST,UP,LOWER_UP,M-DOWN> mtu 1500 qdisc noqueue
    link/ether 02:42:ac:11:00:02 brd ff:ff:ff:ff:ff:ff
    inet 172.17.0.2/16 brd 172.17.255.255 scope global eth0
       valid_lft forever preferred_lft forever
27: eth1@if28: <BROADCAST,MULTICAST,UP,LOWER_UP,M-DOWN> mtu 1500 qdisc noqueue
    link/ether 02:42:c0:a8:02:03 brd ff:ff:ff:ff:ff:ff
    inet 192.168.2.3/24 brd 192.168.2.255 scope global eth1
       valid_lft forever preferred_lft forever
/ # ping 192.168.2.2
PING 192.168.2.2 (192.168.2.2): 56 data bytes
64 bytes from 192.168.2.2: seq=0 ttl=64 time=0.204 ms
64 bytes from 192.168.2.2: seq=1 ttl=64 time=0.069 ms
64 bytes from 192.168.2.2: seq=2 ttl=64 time=0.079 ms