1. Virtualized Networks
Network Namespace is a function provided by the Linux kernel and an important function for network virtualization. It can create multiple isolated network spaces, which have their own network stack information. Whether it's a virtual machine or a container, it runs as if it's all in a separate network. And the resources of different Network Namespaces are not visible to each other and cannot communicate with each other.
If our physical machine has four physical network cards, we will create four namespaces that can be independently associated to a separate namespace to use

As shown in the figure above, the first network card is assigned to the first namespace, the second to the second, the third to the third, and the fourth to the fourth. Other namespaces cannot see the current namespace because a device can only belong to one namespace.
This allows each namespace to configure IP addresses and communicate directly with external networks because they use physical network cards.
But what if we have more namespaces than physical network cards?
At this point, we can use a virtual network card device to simulate a set of devices using pure software. The Linux kernel level supports two levels of device emulation, one is a two-tier device and the other is a three-tier device.
Layer 2 Devices (Link Layer)
-
Link layer, the device that forwards messages. A virtual network card interface is created by using the kernel to simulate a two-tier device. This network interface occurs in pairs and is simulated as two ends of a network cable. One end is plugged in to the host and the other end is plugged in to the switch.
-
The kernel natively supports two-tier virtual bridge devices and uses software to build switches. Such as the brctl implementation of the bridge-utils tool.
-
Namespaces implemented by software switches and software allow you to simulate a host connecting to the switch for network connectivity. Two namespaces are equivalent to two hosts connected to the same switch.
Three Layer Device (Software Switch)
-
OVS: Open VSwitch open source virtual switch, which simulates advanced three-tier network devices such as VLAN, VxLAN, GRE, etc. It is not a module of the Linux kernel itself and therefore requires additional installation. It was developed by Cisco and many other network equipment manufacturers, and its functions are very powerful.
-
SDN: Software Defined Networks/Software Driven Networks need to support virtualization networks on the hardware level, as well as build complex virtualization networks on each host to run multiple virtual machines or containers.
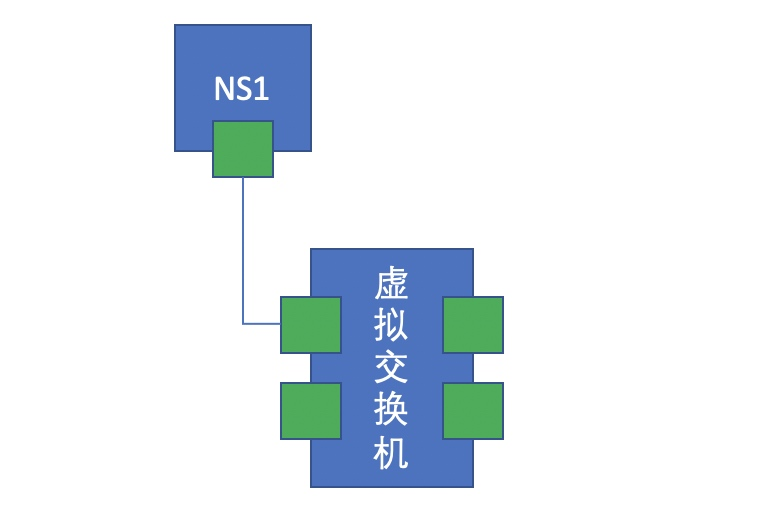
The Linux kernel simulates two-tier devices, each of which appears in pairs and can be simulated as two ends of a network cable, one end of which simulates the virtual network card of the host and the other end of which simulates the virtual switch, which is equivalent to having one host connect to a switch. The Linux kernel natively supports the functionality of a two-tier virtual bridge device, the software virtual switch. As shown in the following figure:
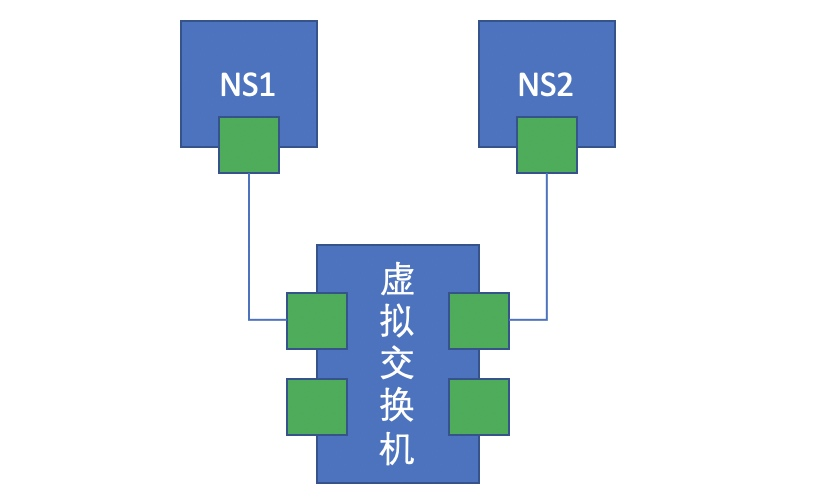
Then if there is another namespace, it creates a pair of virtual network cards, one end connects the namespace and one end connects the virtual switch, which is equivalent to two namespaces connected to the same switch network. If the card addresses of the two namespaces are configured in the same network segment, it is clear that they can communicate with each other. As shown in the following figure:
From the physical devices of network communication to network cards are implemented in a software-only way, which is called virtualized network.
2. Communication between single-node containers
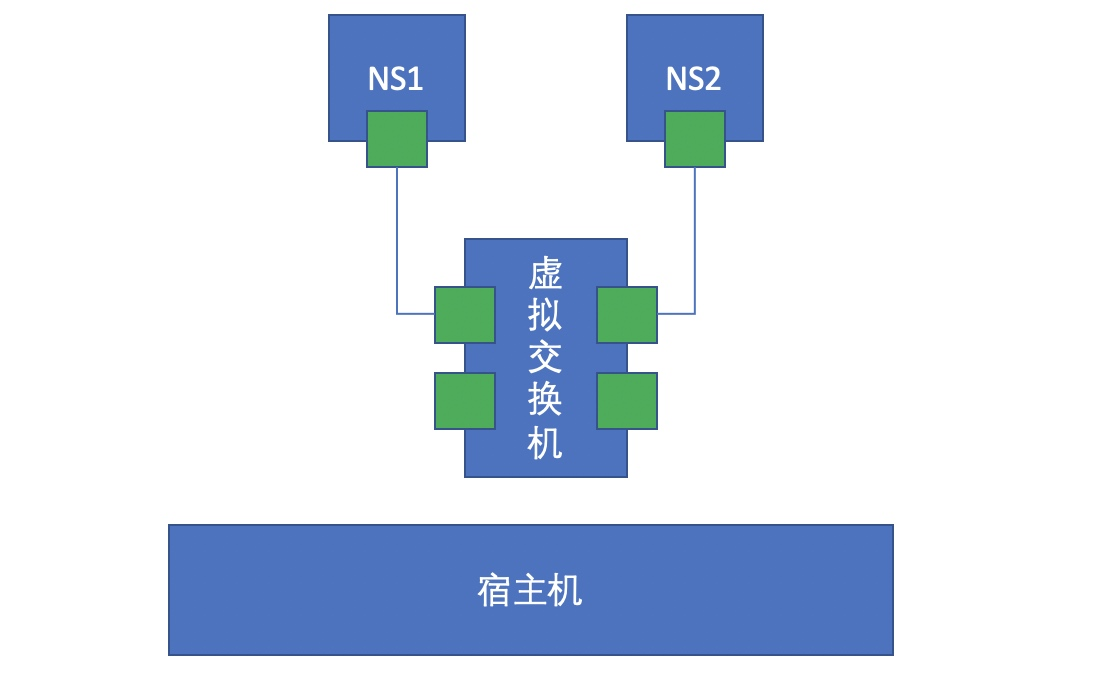
If two containers on the same physical machine want to communicate, our approach is to set up a virtual switch on this host, and then let the two containers create a pair of virtual network cards in a software-only way, half on the container and half on the virtual switch, so as to communicate. As shown in the following figure:
This is how two containers on a single node communicate with each other. Communication between two containers on a single node can also be complicated, such as what containers do we expect to build to communicate across switches?
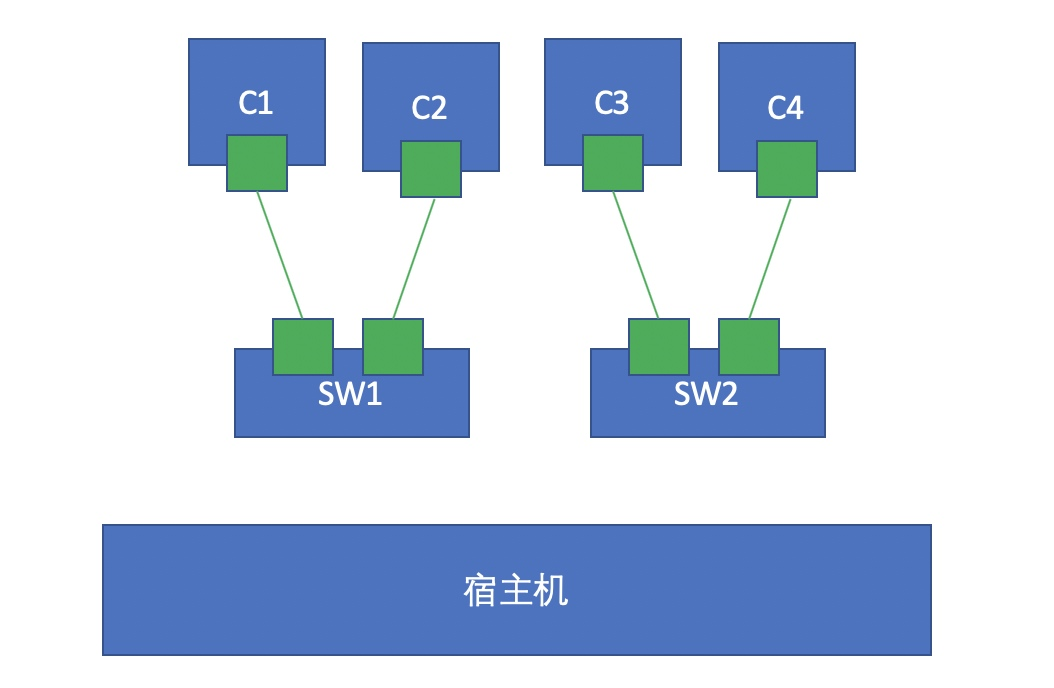
We make two virtual switches, each connected to different containers, as shown in the figure above. What if we want C1 and C3 to communicate? In fact, we can create a pair of network cards through the namespace, one end connected with SW1, the other end connected with SW2, so that the two switches connect. It is reasonable to say that C1 and C3 are two containers in different switches to achieve communication, but there is another problem with this, that is, if C1 and C3 are in different networks? If we are not on the same network, we have to use route forwarding to make it communicate, that is, we have to add a router between two switches. In fact, the Linux kernel itself supports route forwarding, as long as we turn on route forwarding. At this point, we can start another container, which runs a kernel and opens its forwarding function, thus simulating a router through which to implement routing forwarding.
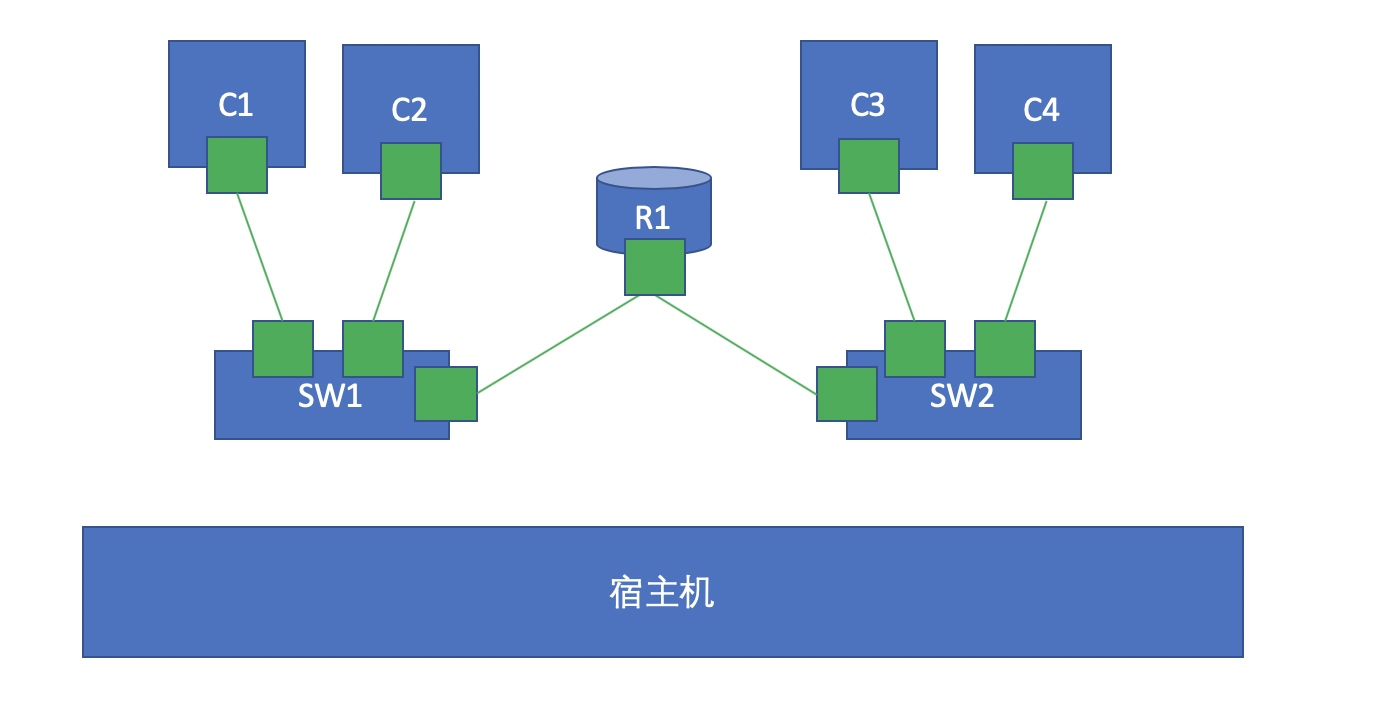
3. Communication between containers of different nodes
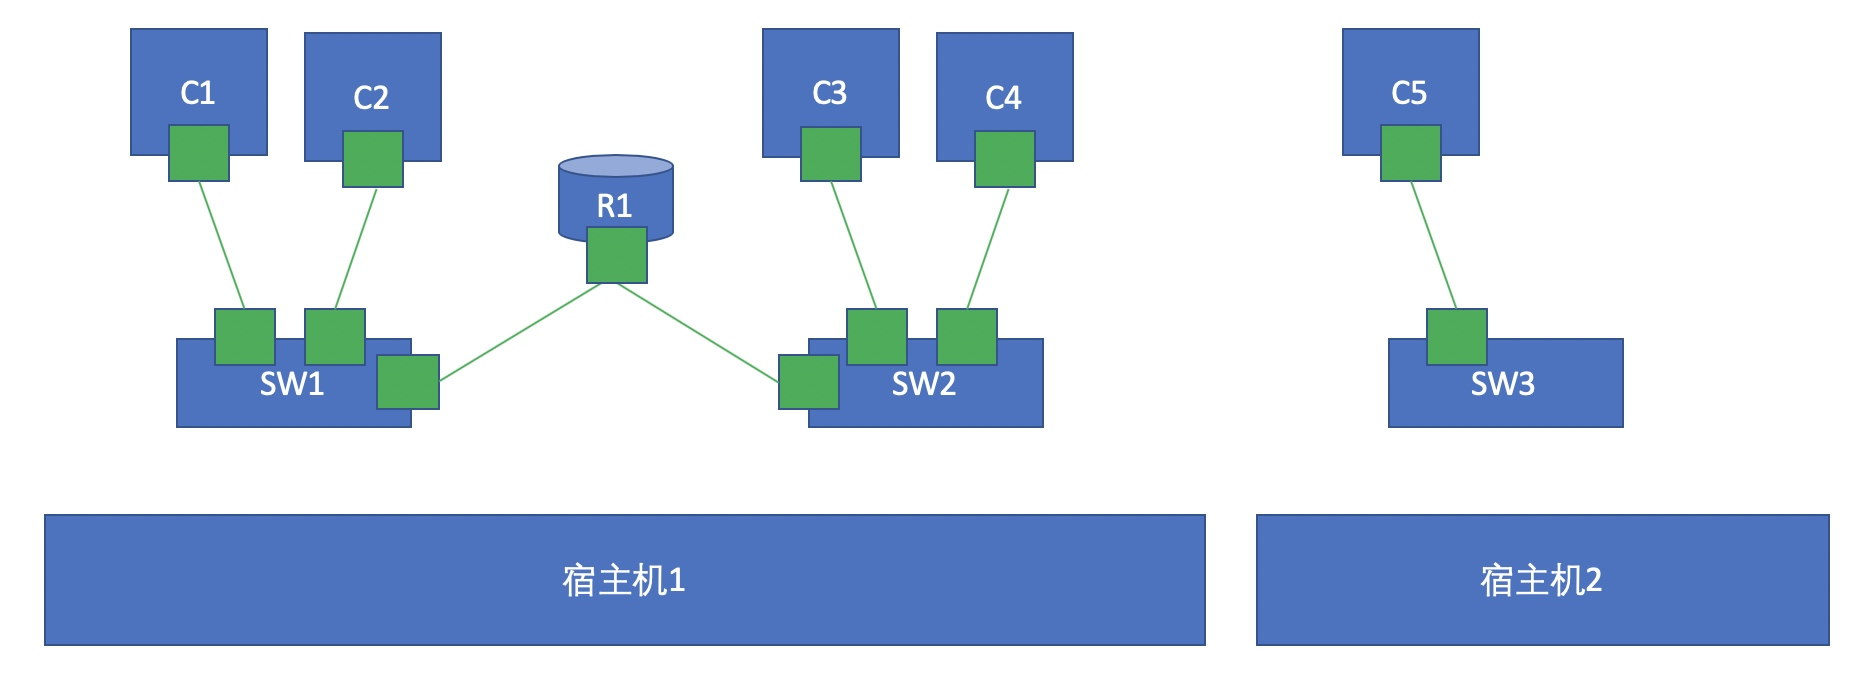
As shown in the figure above, what happens if C1 communicates with C5? Broadcast storms can easily occur if we use bridging, so in large virtual machine or container scenarios, bridging is undoubtedly self-destructive, so we should not use bridging for communication.
If, at first, we can neither bridge nor communicate with the outside world, then we can only use NAT technology. Expose the port of the container to the host via DNA T, access the port of the host to achieve the purpose of accessing the inside of the container, and at the requesting end we need to do SNAT to forward the packets through the host's real network card. However, this is inefficient because of two NAT conversions.
At this point, we can use a technology called Overlay Network to achieve the mutual communication between containers between different nodes.
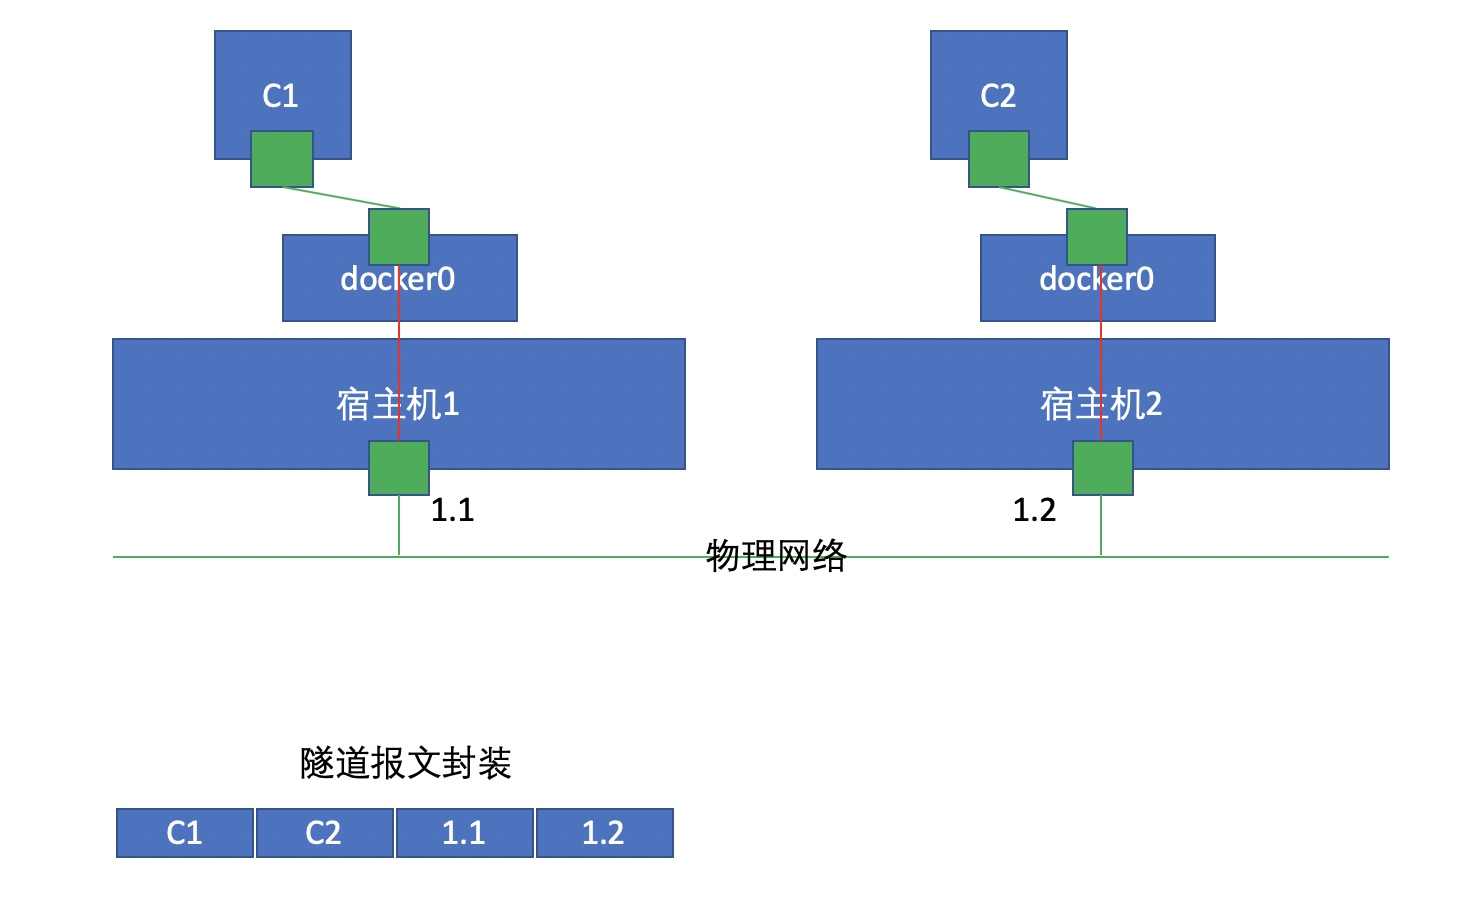
Overlay Network will tunnel the message, that is, add an IP header for the message before it is sent, which is the 1.1 and 1.2 parts of the figure above. Here 1.1 is the source and 1.2 is the target. When Host 2 receives the message, it unpacks and finds that the target container it is looking for is C2, and forwards the package to C2.
4. docker container network
Docker automatically provides three networks after installation and can be viewed using the docker network ls command
[root@localhost ~]# docker network ls
NETWORK ID     NAME      DRIVER    SCOPE
b312a3b5fc72   bridge    bridge    local
8977fc9aa760   host      host      local
a9f3e3786e5f   none      null      local
[root@localhost ~]#
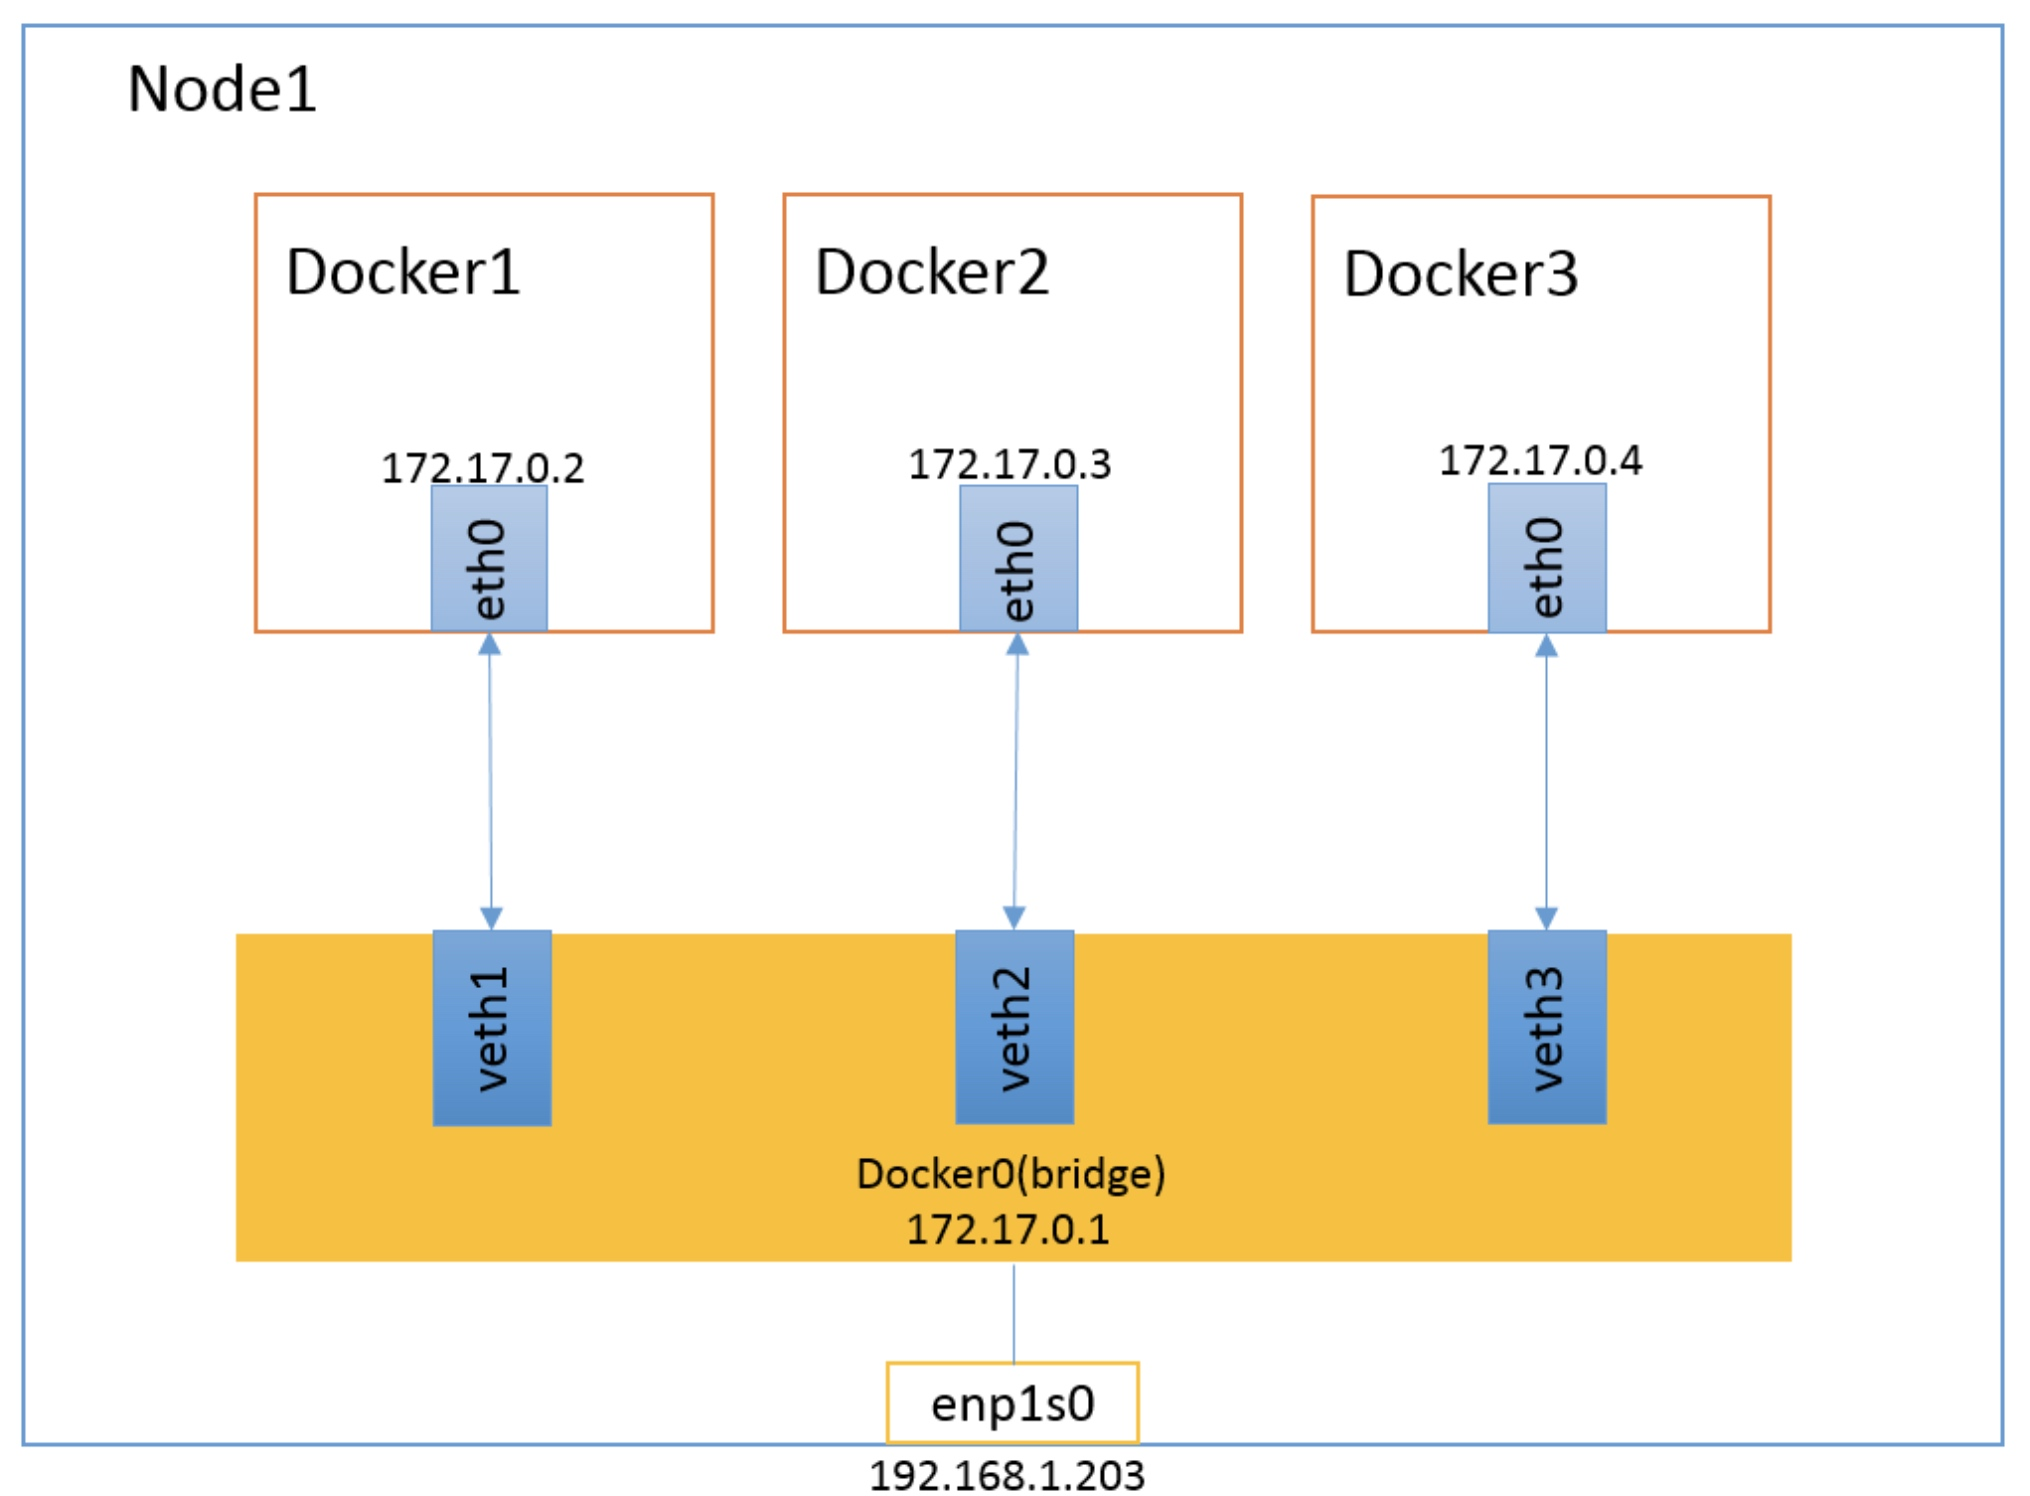
Docker uses a Linux bridge to virtual a Docker container bridge (docker0) on the host machine. When Docker starts a container, it assigns the container an IP address, called Container-IP, based on the segment of the Docker bridge, and the Docker bridge is the default gateway for each container. Because containers within the same host are connected to the same network bridge, direct communication between containers is possible through Container-IP of the container.
5. Four network modes of docker
| Network mode | To configure | Explain |
|---|---|---|
| host | –network host | Container and host share Network namespace |
| container | –network container:NAME_OR_ID | Container shares Network namespace with another container |
| none | –network none | Containers have separate network namespaces but do not have any network settings for them, such as assigning Veth pairs and bridge connections, configuring IP, etc. |
| bridge | –network bridge | Default mode |
When Docker creates a container, use the option - network to specify which network model to use. Default default is bridge (docker0)
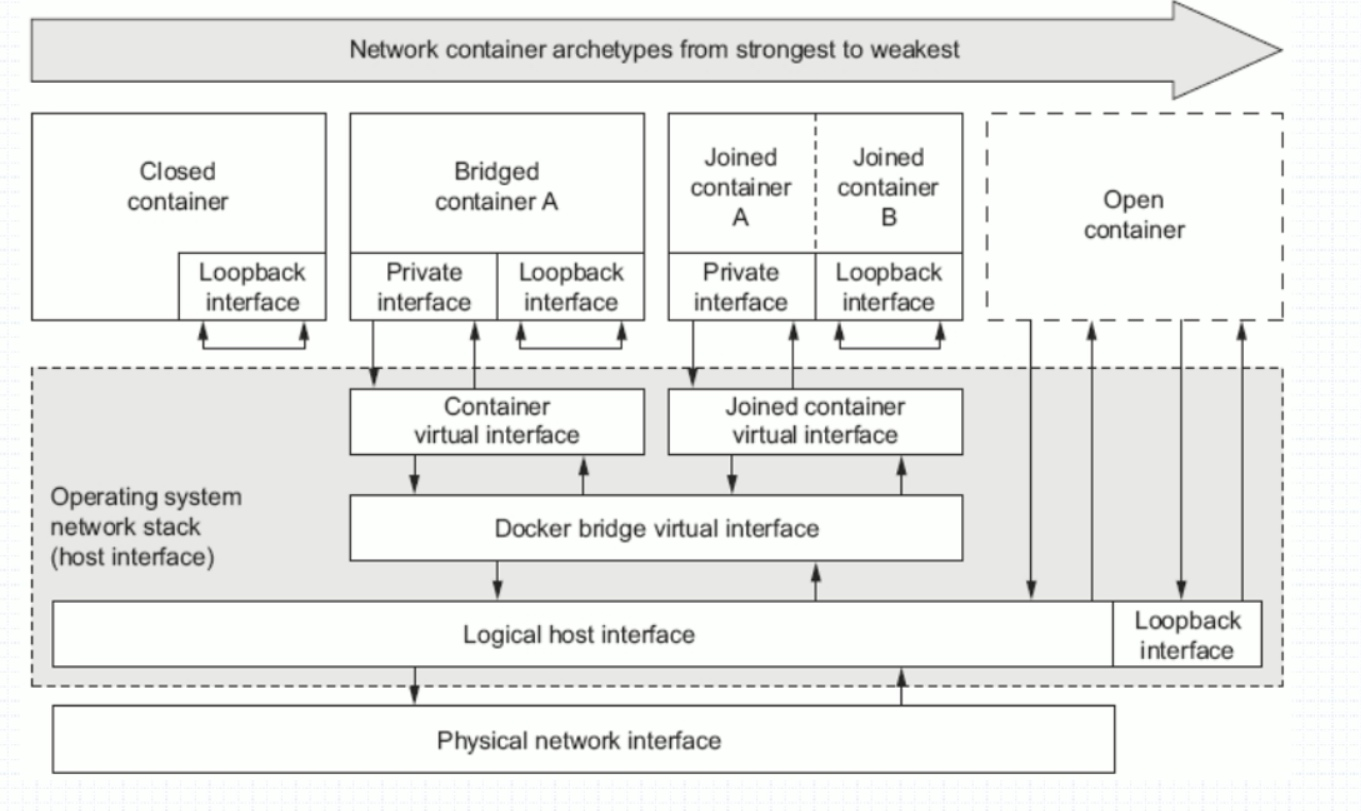
- Closed container: only loop interface, that is none type
- Bridged container A:bridge network type, container network access to docker0 network
- joined container A:container network type, which allows two containers to have partial namespace isolation (User, Mount, Pid) so that they have the same network interface, network protocol stack, between them
- Open container: Open network: Direct sharing of the three namespaces of the physical machine (UTS, IPC, Net), the world uses the physical host's network card to communicate, giving the container the privilege to manage the physical host network, that is, the host network type
5.1 host mode
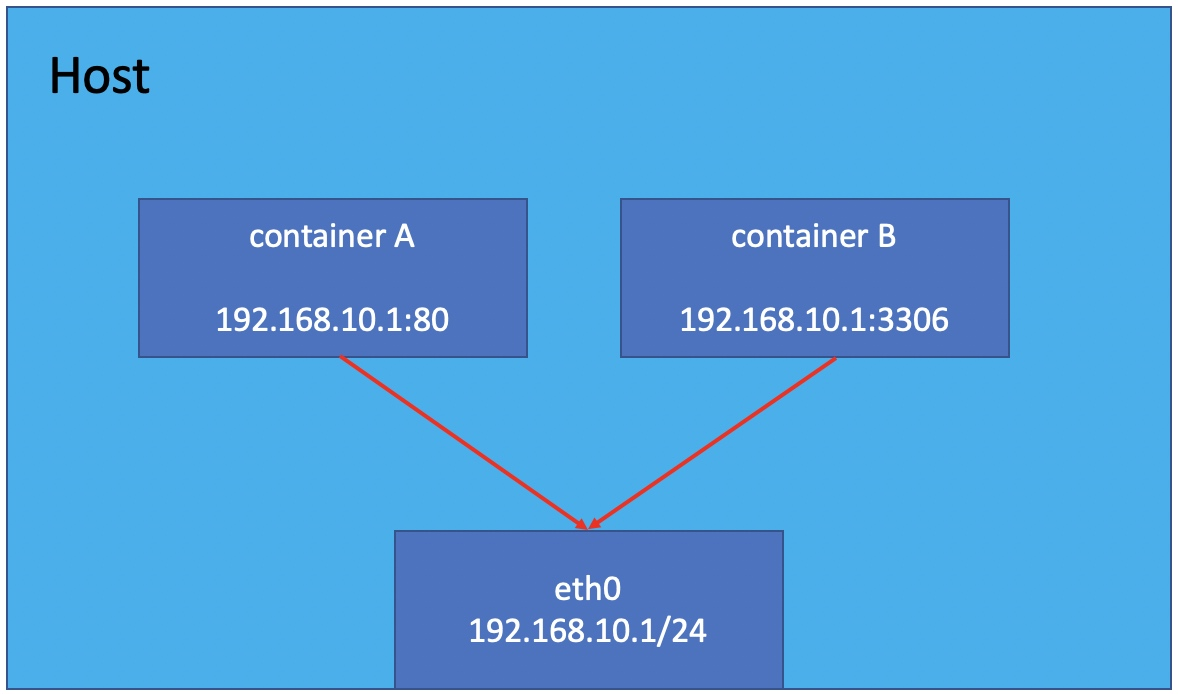
If the host mode is used when starting a container, the container will not get a separate Network Namespace but will share a Network Namespace with the host. Containers will not virtual out their own network cards, configure their own IP, etc., but use the host's IP and port. However, other aspects of the container, such as the file system, process list, and so on, are isolated from the host.
Containers using host mode can communicate with the outside world directly using the host's IP address. Service ports inside the container can also use the host's port without NAT. The most advantage of hosts is that network performance is better, but ports already used on docker host can no longer be used and network isolation is poor.
[root@localhost ~]# ip a
1: lo: <LOOPBACK,UP,LOWER_UP> mtu 65536 qdisc noqueue state UNKNOWN group default qlen 1000
    link/loopback 00:00:00:00:00:00 brd 00:00:00:00:00:00
    inet 127.0.0.1/8 scope host lo
       valid_lft forever preferred_lft forever
    inet6 ::1/128 scope host
       valid_lft forever preferred_lft forever
2: ens160: <BROADCAST,MULTICAST,UP,LOWER_UP> mtu 1500 qdisc mq state UP group default qlen 1000
    link/ether 00:0c:29:b9:12:52 brd ff:ff:ff:ff:ff:ff
    inet 192.168.8.137/24 brd 192.168.8.255 scope global dynamic noprefixroute ens160
       valid_lft 1349sec preferred_lft 1349sec
    inet6 fe80::a53a:d8ca:5571:35c8/64 scope link noprefixroute
       valid_lft forever preferred_lft forever
3: docker0: <NO-CARRIER,BROADCAST,MULTICAST,UP> mtu 1500 qdisc noqueue state DOWN group default
    link/ether 02:42:dc:0a:36:eb brd ff:ff:ff:ff:ff:ff
    inet 172.17.0.1/16 brd 172.17.255.255 scope global docker0
       valid_lft forever preferred_lft forever
    inet6 fe80::42:dcff:fe0a:36eb/64 scope link
       valid_lft forever preferred_lft forever
[root@localhost ~]# docker images
REPOSITORY         TAG       IMAGE ID       CREATED        SIZE
pengyudong/nginx   v1.1      aefe76d56ac3   27 hours ago   576MB
[root@localhost ~]# docker run -it --network host --rm --name nginx  aefe76d56ac3 /bin/sh
sh-4.4# ip a
1: lo: <LOOPBACK,UP,LOWER_UP> mtu 65536 qdisc noqueue state UNKNOWN group default qlen 1000
    link/loopback 00:00:00:00:00:00 brd 00:00:00:00:00:00
    inet 127.0.0.1/8 scope host lo
       valid_lft forever preferred_lft forever
    inet6 ::1/128 scope host
       valid_lft forever preferred_lft forever
2: ens160: <BROADCAST,MULTICAST,UP,LOWER_UP> mtu 1500 qdisc mq state UP group default qlen 1000
    link/ether 00:0c:29:b9:12:52 brd ff:ff:ff:ff:ff:ff
    inet 192.168.8.137/24 brd 192.168.8.255 scope global dynamic noprefixroute ens160
       valid_lft 1318sec preferred_lft 1318sec
    inet6 fe80::a53a:d8ca:5571:35c8/64 scope link noprefixroute
       valid_lft forever preferred_lft forever
3: docker0: <NO-CARRIER,BROADCAST,MULTICAST,UP> mtu 1500 qdisc noqueue state DOWN group default
    link/ether 02:42:dc:0a:36:eb brd ff:ff:ff:ff:ff:ff
    inet 172.17.0.1/16 brd 172.17.255.255 scope global docker0
       valid_lft forever preferred_lft forever
    inet6 fe80::42:dcff:fe0a:36eb/64 scope link
       valid_lft forever preferred_lft forever
sh-4.4#
5.2 container mode
This pattern specifies that the newly created container and an existing container share a Network Namespace instead of sharing it with the host. The newly created container does not create its own network card, configure its own IP, but shares IP, port range, and so on with a specified container. Similarly, the two containers are isolated except for network aspects, such as file systems, process lists, and so on. The processes of the two containers can communicate through the lo network card device.
[root@localhost ~]# docker images
REPOSITORY         TAG       IMAGE ID       CREATED        SIZE
pengyudong/nginx   v1.1      aefe76d56ac3   27 hours ago   576MB
[root@localhost ~]# docker run -it --rm --name nginx aefe76d56ac3 /bin/sh
sh-4.4# ip a
1: lo: <LOOPBACK,UP,LOWER_UP> mtu 65536 qdisc noqueue state UNKNOWN group default qlen 1000
    link/loopback 00:00:00:00:00:00 brd 00:00:00:00:00:00
    inet 127.0.0.1/8 scope host lo
       valid_lft forever preferred_lft forever
28: eth0@if29: <BROADCAST,MULTICAST,UP,LOWER_UP> mtu 1500 qdisc noqueue state UP group default
    link/ether 02:42:ac:11:00:02 brd ff:ff:ff:ff:ff:ff link-netnsid 0
    inet 172.17.0.2/16 brd 172.17.255.255 scope global eth0
       valid_lft forever preferred_lft forever
sh-4.4#
//Create a new container cont1 Specify that the network uses container mode
//Open another terminal
[root@localhost ~]# docker ps
CONTAINER ID   IMAGE          COMMAND     CREATED         STATUS         PORTS     NAMES
dfe1e143acf0   aefe76d56ac3   "/bin/sh"   3 minutes ago   Up 3 minutes             nginx
[root@localhost ~]# docker run -it --rm --name cont1 --network container:dfe1e143acf0 aefe76d56ac3

//Open another terminal to view
[root@localhost ~]# docker ps
CONTAINER ID   IMAGE          COMMAND                  CREATED         STATUS         PORTS     NAMES
2e49a2c1fc99   aefe76d56ac3   "/usr/local/nginx/sb..."   3 minutes ago   Up 3 minutes             cont1
dfe1e143acf0   aefe76d56ac3   "/bin/sh"                6 minutes ago   Up 6 minutes             nginx
[root@localhost ~]# docker exec -it dfe1e143acf0 /bin/sh
sh-4.4# ip a
1: lo: <LOOPBACK,UP,LOWER_UP> mtu 65536 qdisc noqueue state UNKNOWN group default qlen 1000
    link/loopback 00:00:00:00:00:00 brd 00:00:00:00:00:00
    inet 127.0.0.1/8 scope host lo
       valid_lft forever preferred_lft forever
30: eth0@if31: <BROADCAST,MULTICAST,UP,LOWER_UP> mtu 1500 qdisc noqueue state UP group default
    link/ether 02:42:ac:11:00:02 brd ff:ff:ff:ff:ff:ff link-netnsid 0
    inet 172.17.0.2/16 brd 172.17.255.255 scope global eth0
       valid_lft forever preferred_lft forever
sh-4.4#
5.3 none mode
Using none mode, the Docker container has its own Network Namespace, but no network configuration is made for the Docker container. That is, this Docker container does not have network card, IP, routing, etc. We need to add network cards, configure IP, etc. for the Docker container ourselves.
In this network mode, the container has only lo loopback network and no other network card. The none mode can be specified at container creation through the network none. This type of network can not be connected to the network, and a closed network can very well ensure the security of the container.
Scenarios:
- Start a container to process data, such as converting data formats
- Some background computing and processing tasks
//Create a new container nginx Specifies that the network uses none mode
[root@localhost ~]# docker ps -a
CONTAINER ID   IMAGE     COMMAND   CREATED   STATUS    PORTS     NAMES
[root@localhost ~]# docker images
REPOSITORY         TAG       IMAGE ID       CREATED        SIZE
pengyudong/nginx   v1.1      aefe76d56ac3   27 hours ago   576MB
[root@localhost ~]# docker run -it --rm --name nginx --network none aefe76d56ac3 /bin/bash
[root@4b8b63cc9d92 /]# ip a
1: lo: <LOOPBACK,UP,LOWER_UP> mtu 65536 qdisc noqueue state UNKNOWN group default qlen 1000
    link/loopback 00:00:00:00:00:00 brd 00:00:00:00:00:00
    inet 127.0.0.1/8 scope host lo
       valid_lft forever preferred_lft forever
[root@4b8b63cc9d92 /]#
5.4 bridge mode
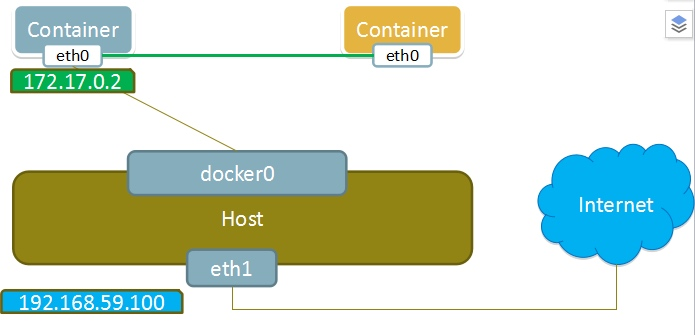
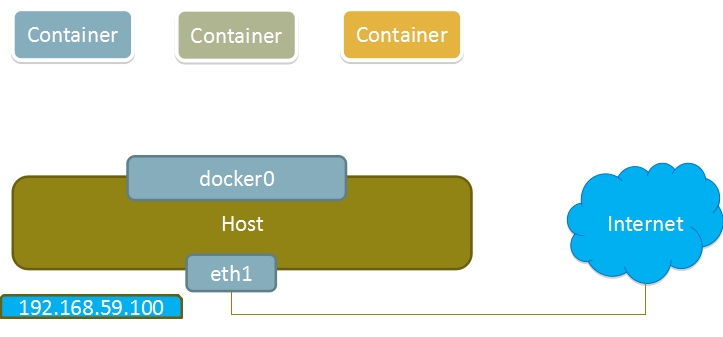
When the Docker process starts, a virtual network bridge named docker0 is created on the host, and the Docker container started on the host connects to the virtual network bridge. Virtual bridges work like physical switches so that all containers on the host are connected to a two-tier network through the switches.
Assign an IP from the docker0 subnet to the container for use, and set the IP address of the docker0 as the default gateway for the container. Create a pair of virtual network card veth pair devices on the host. Docker places one end of the veth pair device in the newly created container, named eth0 (the container's network card), and the other end in the host, named vethxxx after a similar name, and adds this network device to the docker0 bridge. You can view it through the brctl show command.
The bridge mode is the docker's default network mode, and the Write-no-network parameter is the bridge mode. When using docker run-p, docker actually makes DNA T rules in iptables to implement port forwarding. You can view it using iptables-t nat-vnL.
Docker bridges are virtual hosts, not real network devices, and external networks are inaccessible, which also means that external networks cannot access containers through direct Container-IP. If the container wants external access to be accessible, it can be enabled by mapping the container port to the host host host (port mapping), that is, docker run creates the container with the -p or -P parameter and accesses the container with [host IP]: [container port].
[root@localhost ~]# docker images
REPOSITORY         TAG       IMAGE ID       CREATED        SIZE
pengyudong/nginx   v1.1      aefe76d56ac3   27 hours ago   576MB
[root@localhost ~]# ip a
1: lo: <LOOPBACK,UP,LOWER_UP> mtu 65536 qdisc noqueue state UNKNOWN group default qlen 1000
    link/loopback 00:00:00:00:00:00 brd 00:00:00:00:00:00
    inet 127.0.0.1/8 scope host lo
       valid_lft forever preferred_lft forever
    inet6 ::1/128 scope host
       valid_lft forever preferred_lft forever
2: ens160: <BROADCAST,MULTICAST,UP,LOWER_UP> mtu 1500 qdisc mq state UP group default qlen 1000
    link/ether 00:0c:29:b9:12:52 brd ff:ff:ff:ff:ff:ff
    inet 192.168.8.137/24 brd 192.168.8.255 scope global dynamic noprefixroute ens160
       valid_lft 954sec preferred_lft 954sec
    inet6 fe80::a53a:d8ca:5571:35c8/64 scope link noprefixroute
       valid_lft forever preferred_lft forever
3: docker0: <NO-CARRIER,BROADCAST,MULTICAST,UP> mtu 1500 qdisc noqueue state DOWN group default
    link/ether 02:42:dc:0a:36:eb brd ff:ff:ff:ff:ff:ff
    inet 172.17.0.1/16 brd 172.17.255.255 scope global docker0
       valid_lft forever preferred_lft forever
    inet6 fe80::42:dcff:fe0a:36eb/64 scope link
       valid_lft forever preferred_lft forever
[root@localhost ~]# docker run -it --rm --name nginx aefe76d56ac3 /bin/bash
[root@07ed5f943f50 /]# ip a
1: lo: <LOOPBACK,UP,LOWER_UP> mtu 65536 qdisc noqueue state UNKNOWN group default qlen 1000
    link/loopback 00:00:00:00:00:00 brd 00:00:00:00:00:00
    inet 127.0.0.1/8 scope host lo
       valid_lft forever preferred_lft forever
32: eth0@if33: <BROADCAST,MULTICAST,UP,LOWER_UP> mtu 1500 qdisc noqueue state UP group default
    link/ether 02:42:ac:11:00:02 brd ff:ff:ff:ff:ff:ff link-netnsid 0
    inet 172.17.0.2/16 brd 172.17.255.255 scope global eth0
       valid_lft forever preferred_lft forever
[root@07ed5f943f50 /]#
[root@localhost ~]# docker run -it --rm --name centos -p 8080:80 aefe76d56ac3
[root@localhost ~]# docker ps
CONTAINER ID   IMAGE          COMMAND                  CREATED              STATUS              PORTS                                   NAMES
857f01cc88ce   aefe76d56ac3   "/usr/local/nginx/sb..."   14 seconds ago       Up 13 seconds       0.0.0.0:8080->80/tcp, :::8080->80/tcp   centos
07ed5f943f50   aefe76d56ac3   "/bin/bash"              About a minute ago   Up About a minute                                           nginx
[root@localhost ~]# docker exec -it 07ed5f943f50 /bin/sh
sh-4.4# ip a
1: lo: <LOOPBACK,UP,LOWER_UP> mtu 65536 qdisc noqueue state UNKNOWN group default qlen 1
    link/loopback 00:00:00:00:00:00 brd 00:00:00:00:00:00
    inet 127.0.0.1/8 scope host lo
       valid_lft forever preferred_lft forever
32: eth0@if33: <BROADCAST,MULTICAST,UP,LOWER_UP> mtu 1500 qdisc noqueue state UP group d
    link/ether 02:42:ac:11:00:02 brd ff:ff:ff:ff:ff:ff link-netnsid 0
    inet 172.17.0.2/16 brd 172.17.255.255 scope global eth0
       valid_lft forever preferred_lft forever
//View Port
[root@localhost ~]# ss -antl
State      Recv-Q     Send-Q         Local Address:Port          Peer Address:Port
LISTEN     0          128                  0.0.0.0:8080               0.0.0.0:*
LISTEN     0          128                  0.0.0.0:22                 0.0.0.0:*
LISTEN     0          128                     [::]:8080                  [::]:*
LISTEN     0          128                     [::]:22                    [::]:*
[root@localhost ~]# iptables -t nat -vnL
Chain PREROUTING (policy ACCEPT 0 packets, 0 bytes)
 pkts bytes target     prot opt in     out     source               destination
    5   536 DOCKER     all  --  *      *       0.0.0.0/0            0.0.0.0/0            ADDRTYPE match dst-type LOCAL

Chain INPUT (policy ACCEPT 0 packets, 0 bytes)
 pkts bytes target     prot opt in     out     source               destination

Chain POSTROUTING (policy ACCEPT 0 packets, 0 bytes)
 pkts bytes target     prot opt in     out     source               destination
    0     0 MASQUERADE  all  --  *      !docker0  172.17.0.0/16        0.0.0.0/0
    0     0 MASQUERADE  tcp  --  *      *       172.17.0.3           172.17.0.3           tcp dpt:80

Chain OUTPUT (policy ACCEPT 0 packets, 0 bytes)
 pkts bytes target     prot opt in     out     source               destination
    0     0 DOCKER     all  --  *      *       0.0.0.0/0           !127.0.0.0/8          ADDRTYPE match dst-type LOCAL

Chain DOCKER (2 references)
 pkts bytes target     prot opt in     out     source               destination
    0     0 RETURN     all  --  docker0 *       0.0.0.0/0            0.0.0.0/0
    0     0 DNAT       tcp  --  !docker0 *       0.0.0.0/0            0.0.0.0/0            tcp dpt:8080 to:172.17.0.3:80
[root@localhost ~]#
//View the detailed configuration of the bridge network
[root@localhost ~]# docker network inspect bridge
[
    {
        "Name": "bridge",
        "Id": "b312a3b5fc7278bcbb9438e3acea83300e3d0edc6553d49e08c9a98fa9dc3d11",
        "Created": "2021-12-01T18:55:27.763996269+08:00",
        "Scope": "local",
        "Driver": "bridge",
        "EnableIPv6": false,
        "IPAM": {
            "Driver": "default",
            "Options": null,
            "Config": [
                {
                    "Subnet": "172.17.0.0/16"
                }
            ]
        },
        "Internal": false,
        "Attachable": false,
        "Ingress": false,
        "ConfigFrom": {
            "Network": ""
        },
        "ConfigOnly": false,
        "Containers": {
            "07ed5f943f50bbf25ffd80773051bd3e0c88b8d22caa8236bc1950e30c91b240": {
                "Name": "nginx",
                "EndpointID": "f43c7634d03392705a2de41c53b74582acc3fa25cdc7a193ff363e8dd121b7e6",
                "MacAddress": "02:42:ac:11:00:02",
                "IPv4Address": "172.17.0.2/16",
                "IPv6Address": ""
            },
            "857f01cc88ce4a48307594265817d0fda5f876107ae185af2961633ff0247e06": {
                "Name": "centos",
                "EndpointID": "c1a7789eb7c4a8af3ab013e671c1ad3ded15b6f6c594130e00d3c82a7b2b5ecc",
                "MacAddress": "02:42:ac:11:00:03",
                "IPv4Address": "172.17.0.3/16",
                "IPv6Address": ""
            }
        },
        "Options": {
            "com.docker.network.bridge.default_bridge": "true",
            "com.docker.network.bridge.enable_icc": "true",
            "com.docker.network.bridge.enable_ip_masquerade": "true",
            "com.docker.network.bridge.host_binding_ipv4": "0.0.0.0",
            "com.docker.network.bridge.name": "docker0",
            "com.docker.network.driver.mtu": "1500"
        },
        "Labels": {}
    }
]
[root@localhost ~]#
[root@localhost ~]# yum -y install epel-release
[root@localhost ~]# yum -y install bridge-utils
[root@localhost ~]# brctl show
bridge name	bridge id		STP enabled	interfaces
docker0		8000.0242dc0a36eb	no		veth4970cc6
							veth8269763
[root@localhost ~]#