1, Docker container operation
1. Container creation
The process of loading a mirror into a container. The newly created container is stopped by default and does not run any program. A process needs to be initiated to start the container
format∶docker create [option]

Common options for mirroring∶
-i∶Keep the input of the container open
-t∶Give Way Docker Assign a pseudo terminal

docker create -it nginx:latest bash    #Bash is the abbreviation of system commands / bin/bash, / usr/bin/bash

2. View the running status of the container
docker ps -a #-The a option can display all containers, and only the running containers are displayed without - A

3. Start container
docker start Container ID/name

docker ps -a

4. Create and open container
(1) Format
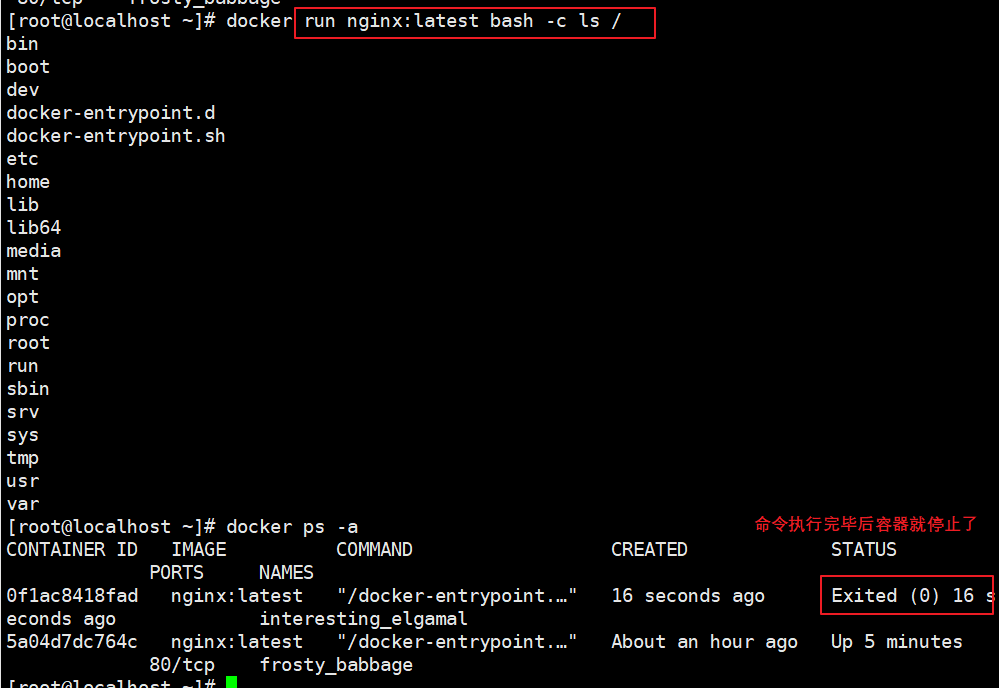
docker run image bash -c shell command

For example: docker run nginx:latest bash -c ls /  #You will find that a new container is created and a shell command is started and executed. The container takes this command as the first process. After the command is executed, the first process of the container is closed, and the container stops
(2) docker run process
Can be executed directly docker run Command, equivalent to executing first docker create Command, execute again docker start Command.
be careful∶A container is a container with which to run shell For the terminal where the command co exists, the command runs, the container runs, the command ends, and the container exits.
docker The container defaults to the first process inside the container, that is pid=1 Program as docker Whether the container is running, if docker In container pid = 1 Your process hangs, then docker The container will exit directly, that is to say Docker There must be a foreground process in the container, otherwise the container is considered dead.
When using docker run To create a container, Docker The standard running process in the background is∶
(1)Checks whether the specified mirror exists locally. When the image does not exist, it will be downloaded from the public warehouse
(2)Create and start a container using a mirror
(3)Allocate a file system to the container and mount a read-write layer outside the read-only image layer
(4)Bridge a virtual machine interface from the bridge interface configured by the host to the container
(5)Assign an address in the address pool IP Address to container;
(6)Execute the application specified by the user. After execution, the container is terminated
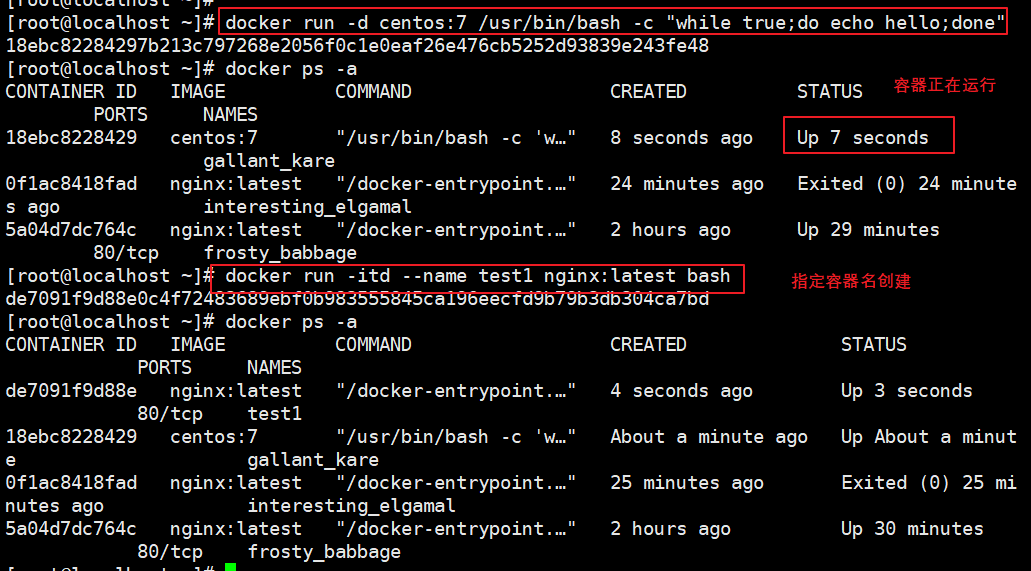
(3) Continuously run the container created by docker run in the background
Need in docker run Add after command -d Option let Docker The container runs in the background as a daemon. And the program that the container is running cannot end.
docker run -d nginx:latest bash -c "while true;do echo hello;done"
docker ps -a      #It can be seen that the container is always UP and running

docker run -itd --name test1 nginx:latest bash
5. Terminate container operation
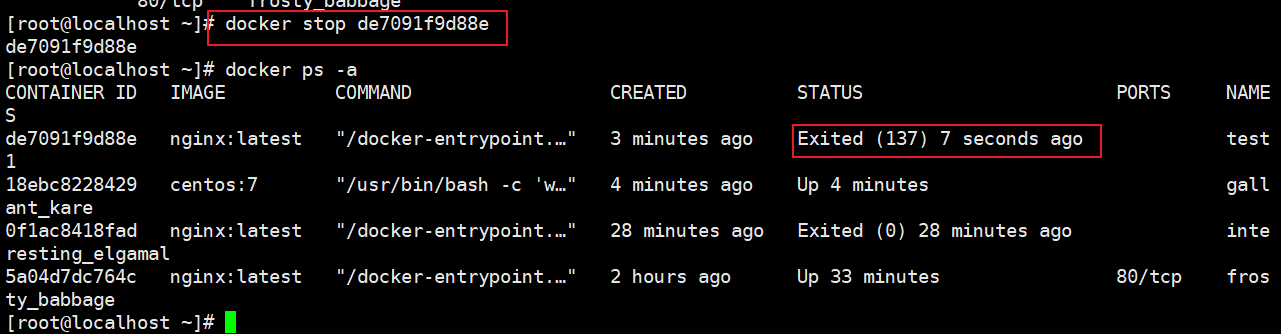
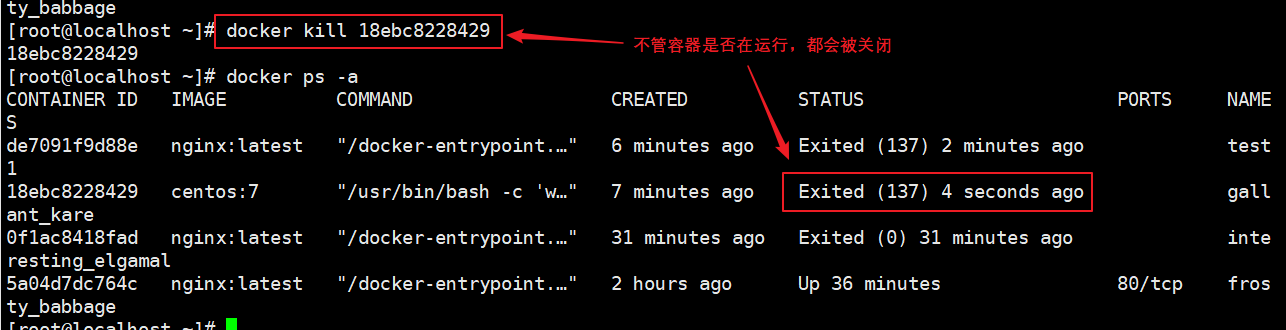
format∶ docker stop Container ID/name
docker stop [-t] de7091f9d88e       #-t specifies how many seconds to wait before directly kill ing the container. The default is 10 seconds

docker ps -a

Format: docker kill Container ID/name
docker kill c14bf5853a5e

docker ps -a

#The difference between kill and stop is that stop will notify the container that it needs to be closed. After waiting for about 10S, close the container and reserve a time for saving the service cache data. Kill will close the container immediately, and the data cached in memory may be lost directly
6. Entry of containers
format∶ docker exec -it container ID/name /bin/bash
-i Option means to keep the input of the container open
-t Option means let Docker Assign a pseudo terminal
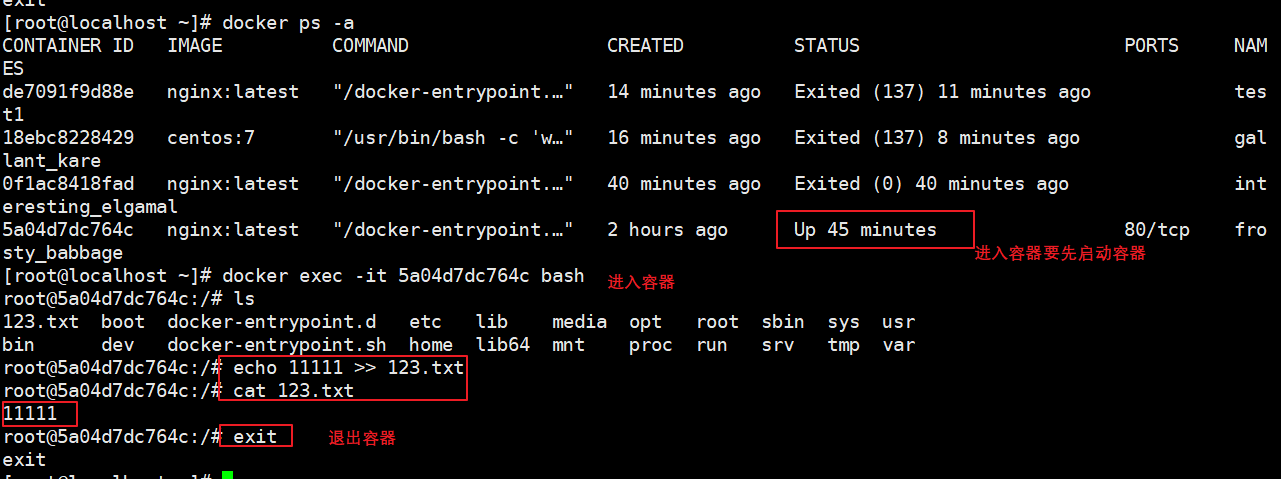
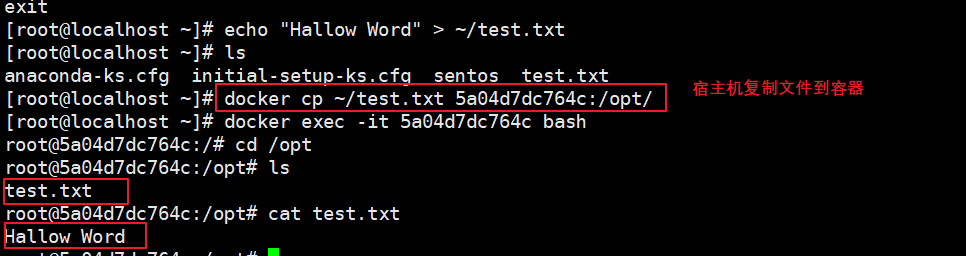
7. Copy files to container / host
echo "hello world" > ~/test.txt      #Create a file in the current directory and copy it to the container
docker cp ~/test.txt 924756260cb1:/opt/

#Copy files from container to host
docker cp 924756260cb1:/opt/test.txt ~/abc123.txt

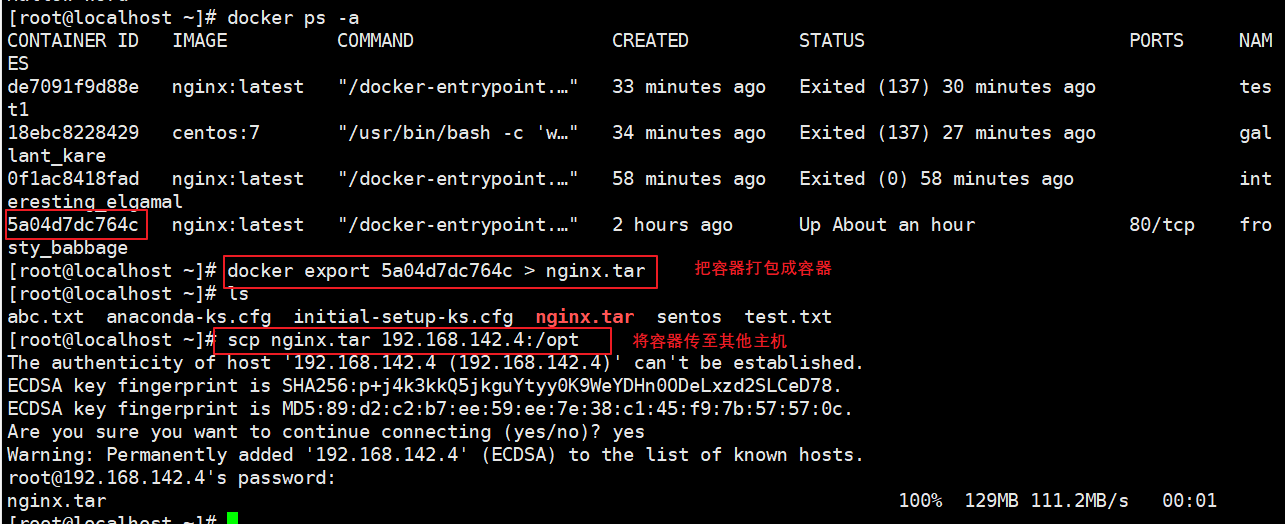
8. Export and import of containers
Users can migrate any Docker container from one machine to another. During the migration process, you can use the docker export command to export the created container as a file, regardless of whether the container is running or stopped. Export files can be transferred to other machines, and container migration can be realized through corresponding import commands
(1) Export
docker export container ID/name >file name
docker export 5c48f0d8de05 > nginx.tar
scp scp nginx.tar 192.168.80.12:/opt
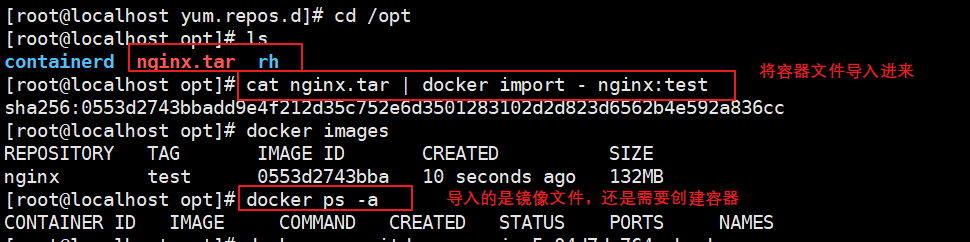
(2) Import
cat file name | docker import - Image name:label
cat nginx.tar | docker import - nginx:test

docker run -itd --name jc 0553d2743bba bash   #Recreate container

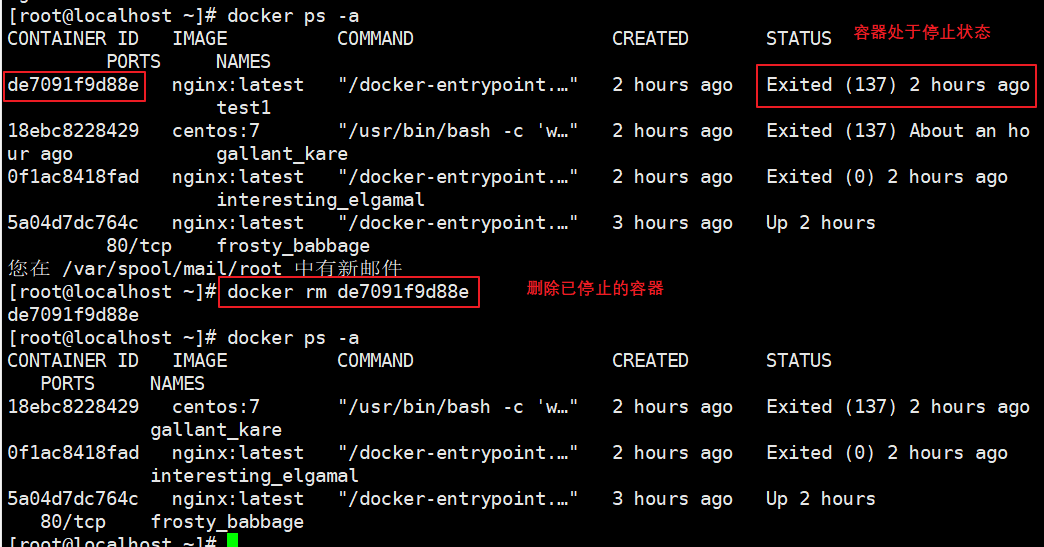
9. Delete container
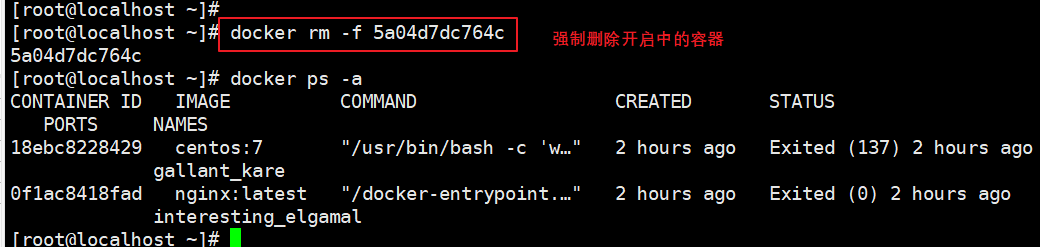
#You need to stop the container for deletion first. If you force the deletion of the running container, you need to add "- f". rmi is to delete the image warehouse, and rm can be used to delete the container
 format∶docker rm [-f] container ID/name
docker stop container ID                            #Delete container in terminated state
docker rm container ID
docker rm -f container ID                           #Force deletion of running containers

#Batch stop container
docker ps -a | awk 'NR>=2{print "docker stop "$1}' | bash
docker ps -a | awk 'NR>=2{print $1}' | xargs docker stop

#Batch delete all containers
docker ps -a | awk 'NR>=2{print "docker rm "$1}'| bash
docker ps -a | awk 'NR>=2{print $1}'| xargs docker rm

#Batch delete image
docker images | awk 'NR>=2{print "docker rmi "$3}'| bash

#Delete none mirror
docker images | grep none | awk '{print $3}' | xargs docker rmi

#Batch cleaning containers stopped in the background
docker rm $(docker ps -a -q)

2, Docker network
1. Implementation principle of Docker network
(1) Docker uses Linux bridging. A docker container bridge (docker0) is virtualized on the host. When docker starts a container, an IP address, called container IP, will be assigned to the container according to the network segment of the docker bridge. At the same time, the docker bridge is the default gateway of each container. Because the containers in the same host are connected to the same bridge, the containers can communicate directly through the container IP of the container. The default assigned IP network segment is 172.17.0.0 and docker0 is 172.17.0.1 as the gateway
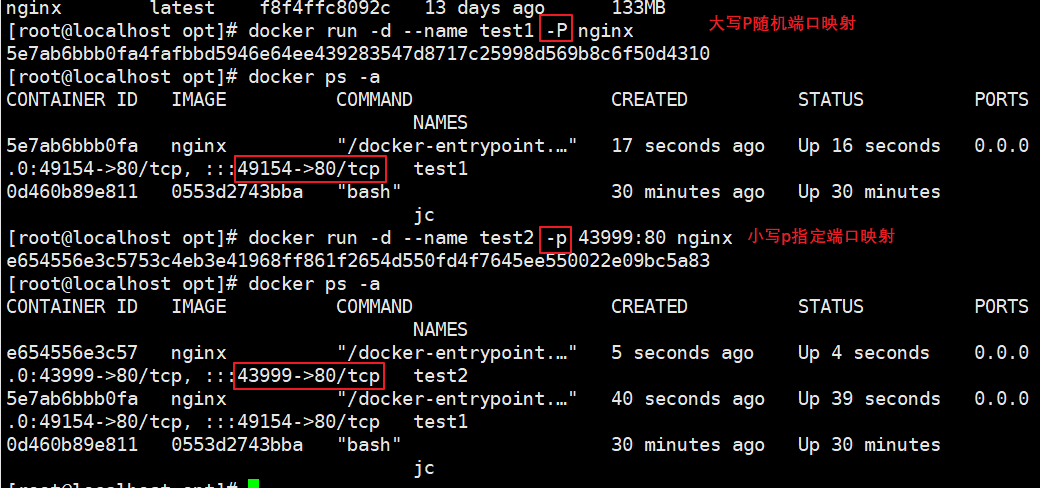
(2) Docker bridge is virtualized by the host, not a real network device. The external network cannot be addressed, which also means that the external network cannot directly access the container through container IP. If the container wants external access, it can be accessed by mapping the container port to the host host host (port mapping), that is, when docker run creates the container, it can be enabled through the - P or - P parameter, and when accessing the container, it can access the container through [host IP]: [container port]
(3) Format
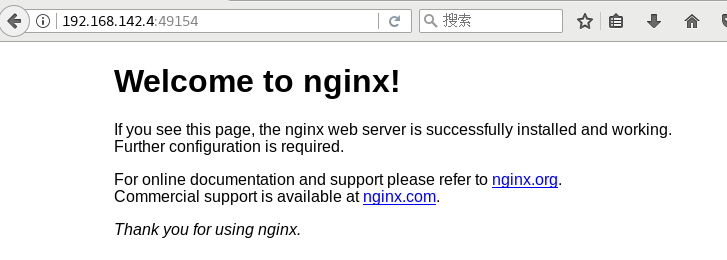
docker run -d --name test1 -P nginx           #-P do not specify, random mapping port (starting from 32768)

docker run -d --name test2 -p 43999:80 nginx  #-p specifies the mapping port
docker ps-a

Browser access∶http://192.168.142.4:49154,http://192.168.142.4:43999
2. Docker's network mode
(1) Five network modes
• Host: the container will not virtualize its own network card, configure its own IP, etc., but use the IP and port of the Host
• Container: the created Container will not create its own network card and configure its own IP, but share the IP and port range with a specified Container
• None: this mode turns off the network function of the container
• Bridge: the default mode is this mode. This mode will assign and set IP for each container, connect the container to a docker0 virtual Bridge, and communicate with the host through the docker0 Bridge and iptables nat table configuration
• custom network
(2) View docker network list
install Docker When, it automatically creates three networks, bridge(Create container (default connection to this network) none ,host
 Command: docker network ls or docker network list

(3) Specifies the network mode of the container
• host pattern:use--net=host appoint
• none pattern:use --net=none appoint
• container pattern:use--net=container∶NAME or ID appoint
• bridge pattern:use --net=bridge Specify, default, can be omitted
3, Detailed explanation of network mode
1. host mode
(1) It is equivalent to the bridge mode in Vmware. It is in the same network as the host, but there is no independent IP address
(2) Docker uses the Namespaces technology in Linux to isolate resources, such as PID namespace to isolate processes, Mount Namespace to isolate file systems, and Network Namespace to isolate networks.
(3) A Network Namespace provides an independent network environment, including network card, routing and iptable rules, which are isolated from other network namespaces
(4) A Docker container will generally allocate an independent Network Namespace, but if the host mode is used when starting the container, the container will not obtain an independent Network Namespace, but share a Network Namespace with the host. The container will not virtualize its own network card, configure its own IP, etc., but use the IP and port of the host
2. container mode
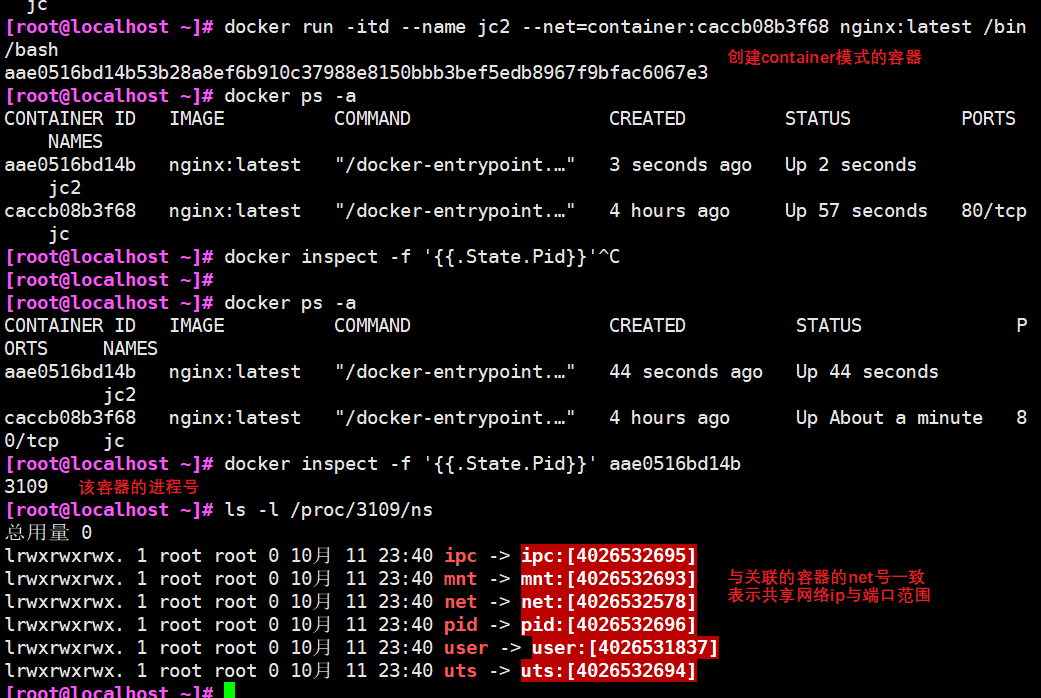
This pattern specifies that the newly created container shares a Network with an existing container
Namespace, not shared with the host. The newly created container will not create its own network card and configure its own IP, but share IP and port range with a specified container. Similarly, in addition to the network, the two containers are isolated from each other, such as file system and process list. The processes of the two containers can communicate through the lo network card device
#Create a new container
docker run -itd --name jc nginx:latest /bin/bash
docker ps -a
docker inspect -f '{{.State.Pid}}' caccb08b3f68    #View container process number

ls -l /proc/6002/ns

docker run -itd --name jc2 --net=container: caccb08b3f68 nginx:latest /bin/bash
docker ps -a
docker inspect -f '{{.State.Pid}}' 7308326d1d99
ls -l /proc/9469/ns
3. none mode
(1) Using the none mode, the Docker container has its own Network Namespace, but no network configuration is performed for the Docker container
(2) In other words, the Docker container has no network card, IP, routing and other information. In this network mode, the container has only lo loopback network and no other network card. This type of network can not be networked, but the closed network can well ensure the security of the container
4. bridge mode
(1) The bridge mode is the default network mode of docker. Without the – net parameter, it is the bridge mode
(2) Equivalent to the nat mode in Vmware, the container uses an independent network namespace and is connected to the docker0 virtual network card. Configure communication with the host through docker0 bridge and iptables nat table. This mode will assign network namespace, set IP, etc. to each container, and connect the Docker container on a host to a virtual bridge
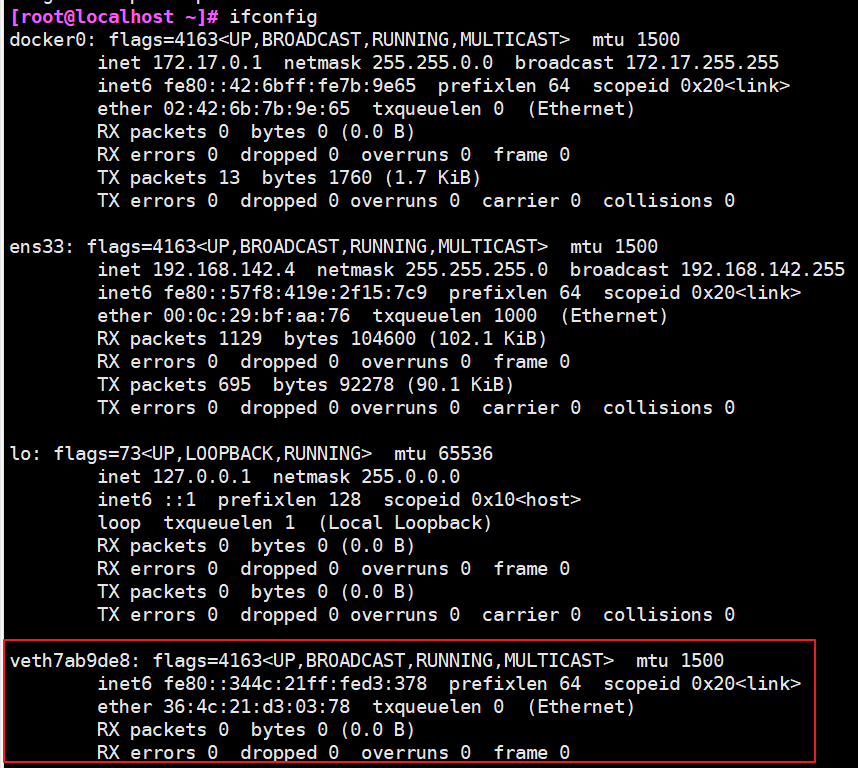
• when the Docker process starts, a virtual bridge named docker0 will be created on the host, and the Docker container started on the host will be connected to this virtual bridge. The virtual bridge works similar to the physical switch, so that all containers on the host are connected to a layer-2 network through the switch
• assign an IP to the container from the docker0 subnet, and set the IP address of docker0 as the default gateway of the container. Create a pair of virtual network card veth pair devices on the host. veth devices always appear in pairs. They form a data channel. When data enters from one device, it will come out from another device. Therefore, veth devices are often used to connect two network devices
• Docker places one end of the veth pair device in the newly created container and names it eth0 (network card of the container), and the other end in the host, named after veth *, and adds this network device to the docker0 bridge. You can view it through the brctl show command
• when using docker run -p, docker actually makes DNAT rules in iptables to realize port forwarding function. You can use iptables -t nat -vnL to view
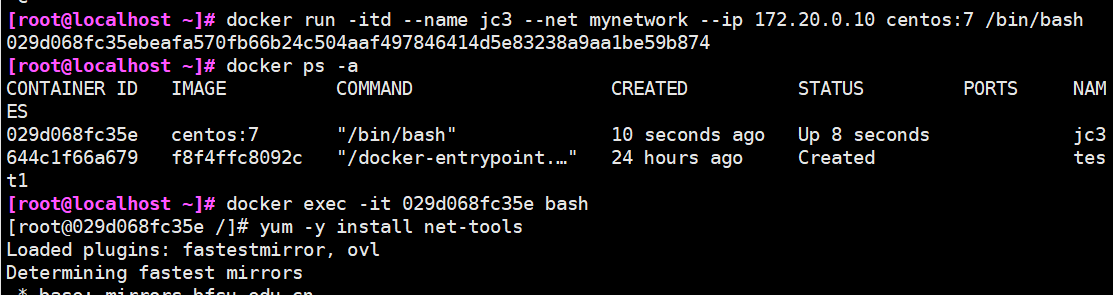
5. Custom network
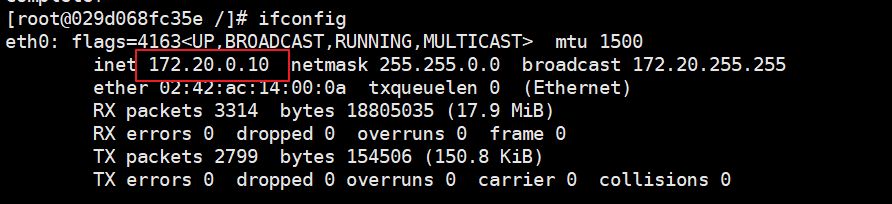
#Using the bridge mode directly cannot support the specified IP to run docker. For example, if you execute the following command, an error will be reported
docker run -itd --name jc4 --network bridge --ip 172.17.0.10 centos:7 /bin/bash

#Create custom network
#You can customize the network first, and then run docker with the specified IP
docker network create --subnet=172.20.0.0/16 --opt "com.docker.network.bridge.name"="docker1" mynetwork

#docker1 is the network card name displayed when ifconfig -a is executed. If this name is not specified with the -- opt parameter, you will see a name like br-110eb56a0b22 when you use ifconfig -a to view network information, which is obviously not easy to remember.
#mynetwork is the name of the bridge network mode displayed when the docker network list command is executed

docker run -itd --name jc4--net mynetwork --ip 172.20.0.10 centos:7 /bin/bash
ifconfig       #This command requires net tools to be installed


4, CPU resource control
1. cgroups overview
It is a very powerful linux kernel tool. It can not only limit the resources isolated by namespace, but also set weights for resources, calculate usage, control process startup and shutdown, etc. Therefore, cgroups (Control groups) implements the quota and measurement of resources
2. Four functions of cgroups
(1) Resource limit: you can limit the total amount of resources used by tasks
(2) Priority allocation: by allocating the number of cpu time slices and the disk To bandwidth, the task running priority is actually controlled
(3) Resource statistics: you can count the resource usage of the system, such as cpu duration, memory usage, etc
(4) Task control: cgroup can suspend and resume tasks
3. Set CPU usage cap
(1) – CPU period and – CPU quota
• Linux uses CFS (fully fair scheduler) to schedule the CPU usage of various processes. The default scheduling cycle of CFS is 100ms. We can set the scheduling cycle of each container process and the maximum CPU time that each container can use in this cycle
• use – CPU period to set the scheduling cycle, and use -- CPU quota to set the CPU time that the content container can use in each cycle. The two can be used together. The effective range of CFS cycle is 1ms~1s, and the corresponding value range of -- CPU period is 1000 ~ 100000 (microseconds)
• the CPU quota of the container must not be less than 1ms, that is – the value of CPU quota must be > = 1000
(2) View two quota values
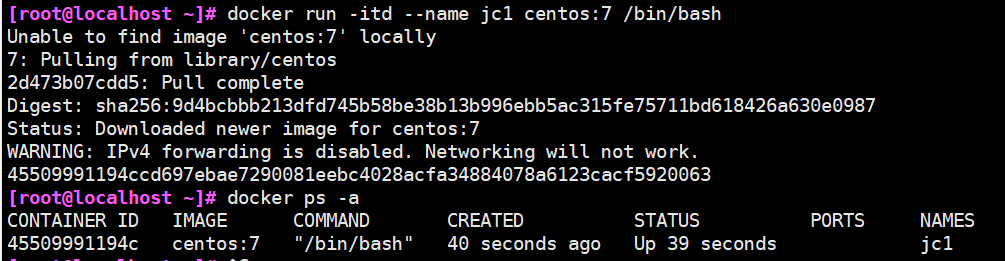
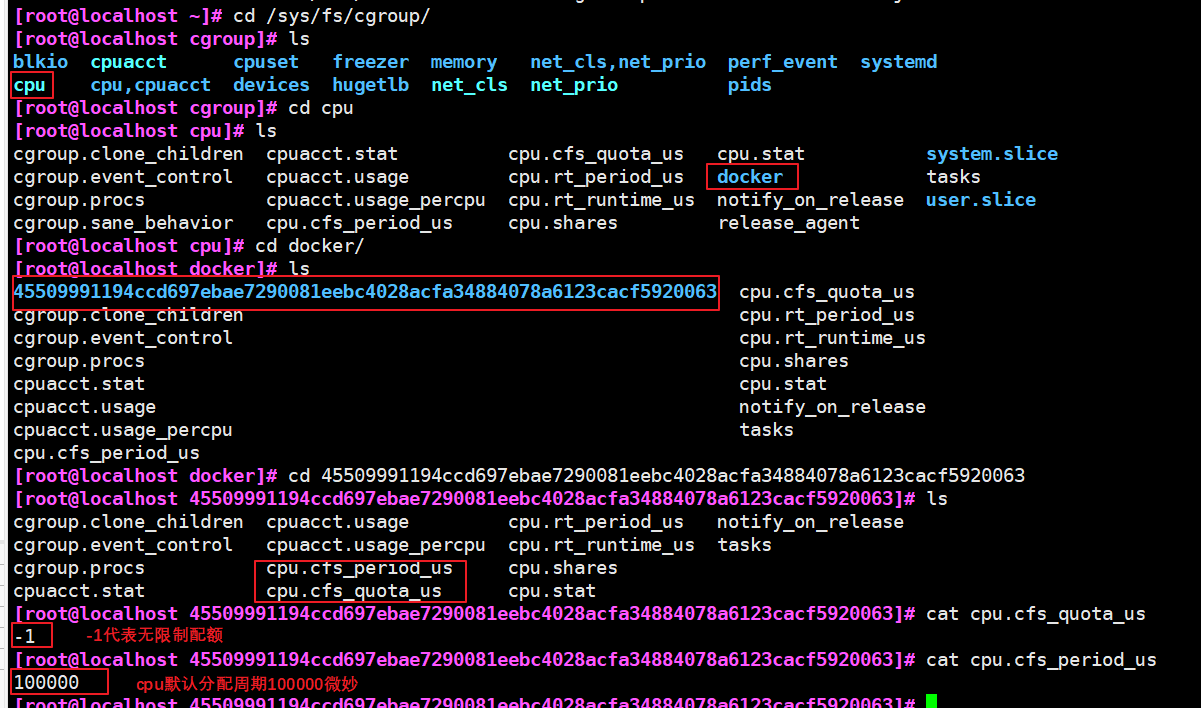
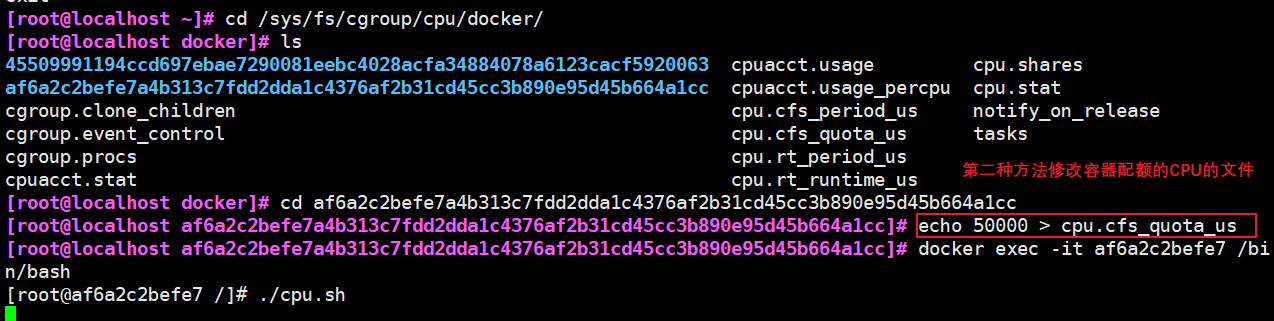
docker run -itd --name jc1 centos:7 /bin/bash   #Create a container

docker ps -a
CONTAINER ID   IMAGE      COMMAND       CREATED         STATUS        PORTS     NAMES
45509991194c   centos:7   "/bin/bash"   40 seconds ago   Up 39 second             jc1

cd /sys/fs/cgroup/cpu/docker/a8116f7815a35d43af77b661fe5846e1e550029c0034d3f84f9fdabd49996bc5/

cat cpu.cfs_quota_us
-1

cat cpu.cfs_period_us
100000
----------------------------------------------
#cpu.cfs_period_us: the cycle allocated by the CPU (microseconds, so the file name is represented by us). The default is 100000.
#cpu.cfs_quota_us: indicates that the control group limits the occupied time (microseconds). The default value is - 1, indicating no limit. If it is set to 50000, it means that 50000 / 100000 = 50% of the CPU is occupied
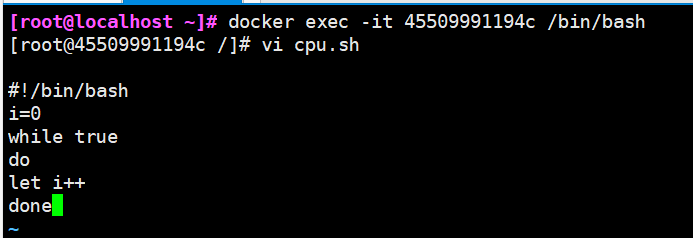
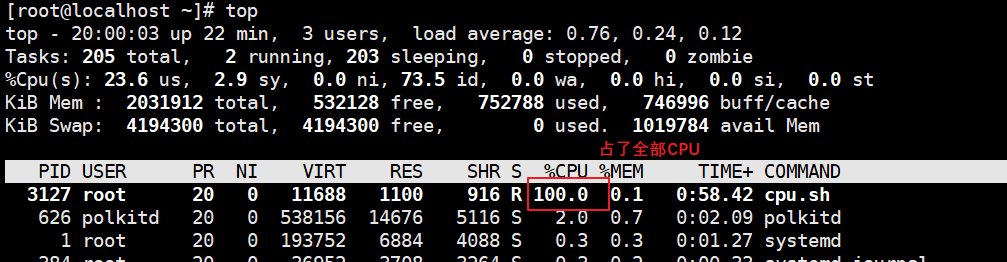
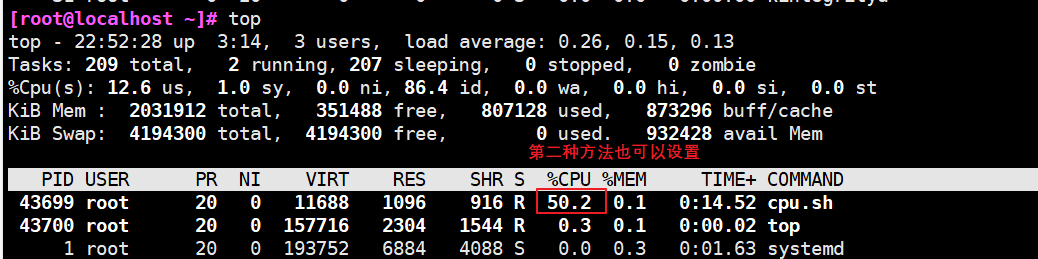
(3) Perform CPU pressure test
docker exec -it 45509991194c  /bin/bash  #Enter container
 Write an endless loop script
vi cpu.sh
#!/bin/bash
i=0
while true
do
let i++
done

chmod +x cpu.sh
./cpu.sh
 Open another terminal top Command view cpu Proportion                 #You can see that this script takes up a lot of cpu resources
(4) Set the upper limit of 50% proportional allocation CPU usage time
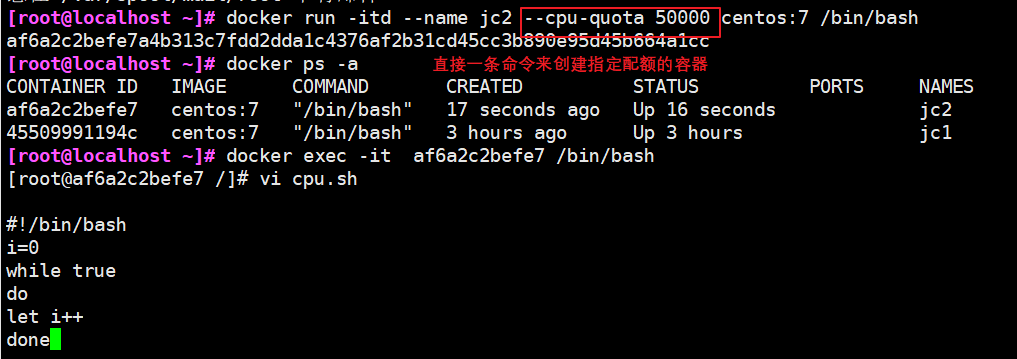
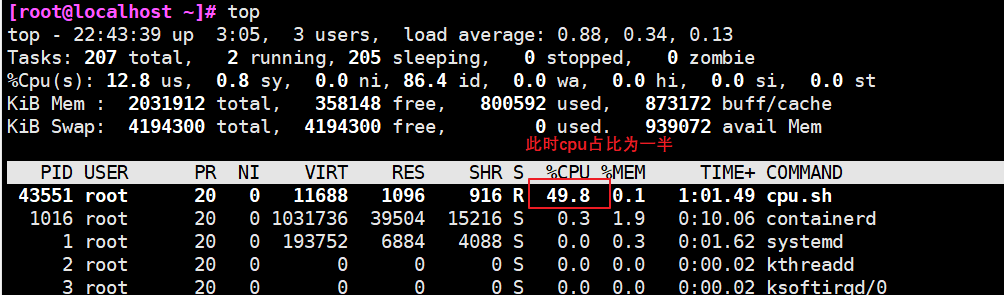
The first method:
1.docker run -itd --name jc2 --cpu-quota 50000 centos:7 /bin/bash   #You can recreate a container and set limits
2.docker exec -it  af6a2c2befe7 /bin/bash  #Enter container
3.Write an endless loop script to test
vi cpu.sh
#!/bin/bash
i=0
while true
do
let i++
done

chmod +x cpu.sh
./cpu.sh
4.Open another terminal top Command view cpu Proportion
The second method:
1.cd /sys/fs/cgroup/cpu/docker/af6a2c2befe7a4b313c7fdd2dda1c4376af2b31cd45cc3b890e95d45b664a1cc/
2.echo 50000 > cpu.cfs_quota_us
3.docker exec -it af6a2c2befe7 /bin/bash
4../cpu.sh
5.Open another terminal top Command view cpu Proportion
4. Set CPU resource utilization ratio (only valid when multiple containers are set)
(1) Format
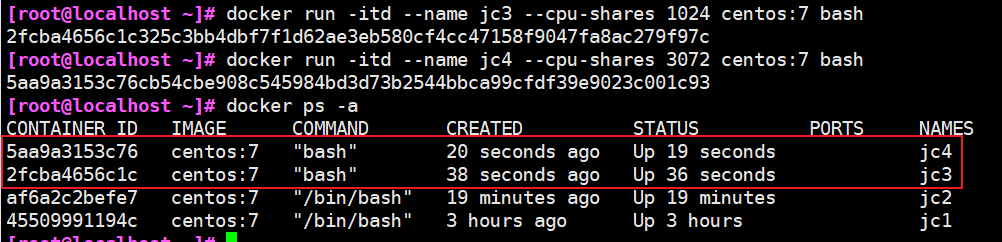
Docker adopt--cpu-shares appoint CPU Share, the default value is 1024, and the value is a multiple of 1024.
#Create two containers c1 and c2. If there are only two containers, set the weight of the container so that the CPU resources of c1 and c2 account for 1 / 3 and 2 / 3.
docker run -itd --name jc3 --cpu-shares 4096 centos:7 bash
docker run -itd --name jc4 --cpu-shares 12288 centos:7 bash
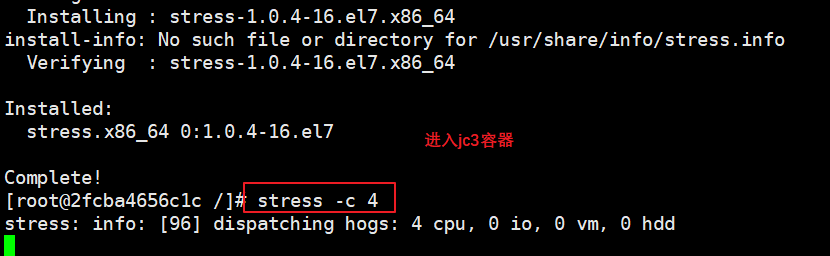
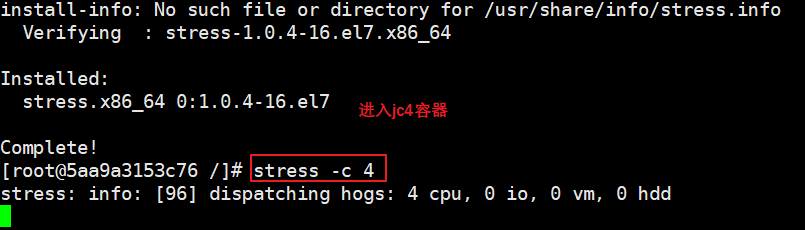
(2) Enter the vessel separately for pressure test
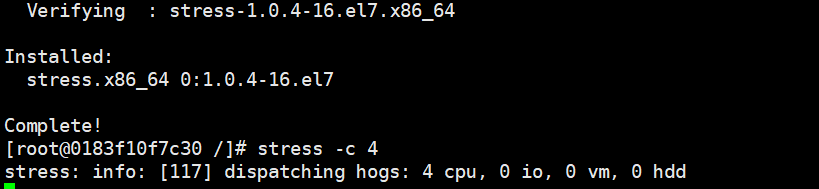
yum install -y epel-release
yum install stress -y
stress -c 4             #Four processes are generated, and each process repeatedly calculates the square root of the random number
(3) View container health status (dynamic update)
docker stats

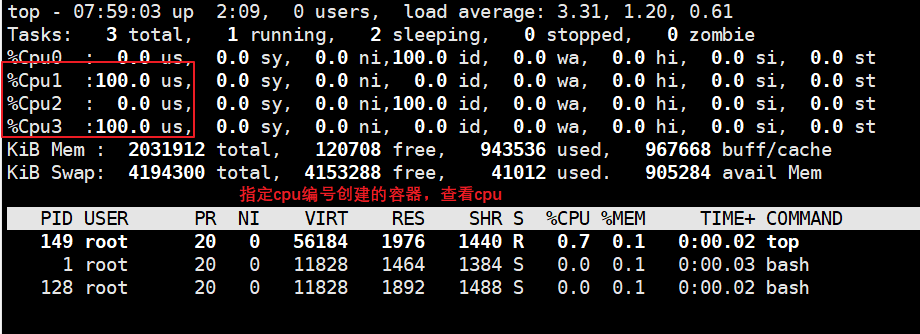
5. Sets the CPU specified by the container binding
(1) Allocate 4 CPU cores of the virtual machine first
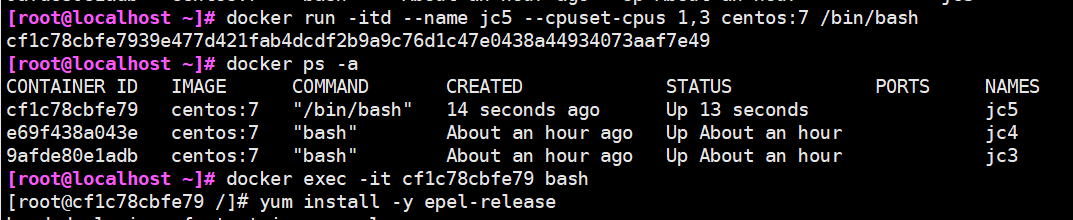
docker run -itd --name jc5 --cpuset-cpus 1,3 centos:7 /bin/bash
(2) Enter the container for pressure test
docker exec -it cf1c78cbfe79 bash

yum install -y epel-release
yum install stress -y
stress -c 4
(3) Exit the container, execute the top command, and then press 1 to check the cpu usage
5, Restrictions on memory usage
1. Creates a container for the specified physical memory
-m(--memory=)Option is used to limit the maximum memory that the container can use
docker run -itd --name jc6 -m 512m centos:7 /bin/bash

docker stats


2. Creates a container that specifies physical memory and swap
docker run -itd --name jc7 -m 512m --memory-swap 1g centos:7 /bin/bash

To emphasize,--memory-swap Yes, it must be with--memory Used together

Normally,--memory-swap The value of contains the container's available memory and available memory swap
 therefore-m 300m --memory-swap=1g Means:The container can use 300 M Physical memory, and can use 700 M (1G - 300M)of swap

If--memory-swap Set to 0 or not, the container can use swap Size-m Twice the value
 If--memory-swap Values and-m If the values are the same, the container cannot be used swap
 If--memory-Swap Value is-1,It indicates that the memory used by the container program is limited and can be used swap Unlimited space usage (how many hosts are there, swap How many containers can be used)


6, Restrictions on disk IO quota control (blkio)
1. Set restrictions
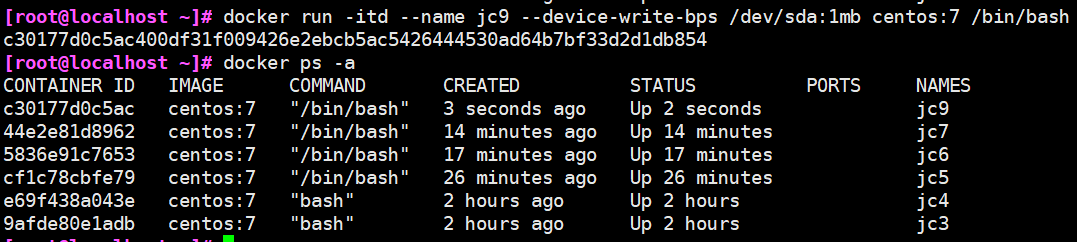
--device-read-bps: Limit the read speed on a device bps(Data quantity), the unit can be kb,mb(M)perhaps gb.
Example: docker run -itd --name jc8 --device-read-bps /dev/sda:1M  centos:7 /bin/bash

--device-write-bps :  Limit write speed on a device bps(Data quantity), the unit can be kb,mb(M)perhaps gb.
Example: docker run -itd --name jc8 --device-write-bps /dev/sda:1mb centos:7 /bin/bash

--device-read-iops : Restrict access to a device iops(Times)

--device-write-iops : Restrict writes to a device iops(Times)
2,Create containers and limit write speed
2. Create containers and limit write speed
docker run -itd --name jc9 --device-write-bps /dev/sda:1mb centos:7 /bin/bash
3. Verify the write speed through dd
docker exec -it cfa60bfee91c bash  #Enter container
dd if=/dev/zero of=test.out bs=1M count=50 oflag=direct #Add oflag parameter to avoid file system cache

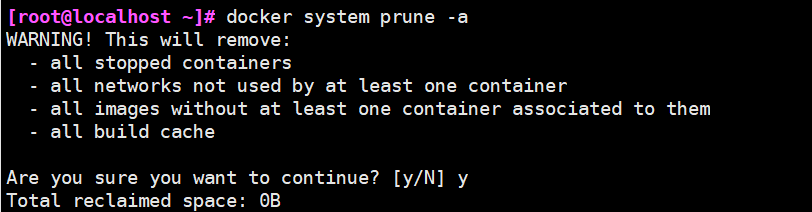
4. Clean up the disk space occupied by docker
docker system prune -a #It can be used to clean up disks and delete closed containers, useless data volumes and networks
6, Docker data management
1. How to manage Docker containers
There are two main ways to manage data in Docker container: Data Volumes and Data Volumes containers
2. Data volume
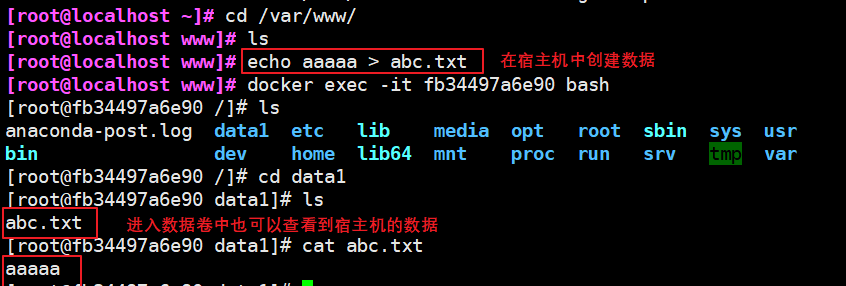
(1) Definition
A data volume is a special directory used by a container and is located in the container. The directory of the host can be mounted on the data volume, the modification of the data volume can be seen immediately, and updating the data will not affect the image, so as to realize the migration of data between the host and the container. The use of data volumes is similar to the mount operation on directories under Linux
(2) Create format
docker run -itd -v /var/www:/data1 --name web1 centos:7 /bin/bash  #The host directory / var/www is mounted to / data1 in the container

-v:Create a data volume inside a container
 be careful:The path to the local directory of the host must be an absolute path. If the path does not exist, Docker The corresponding path is automatically created

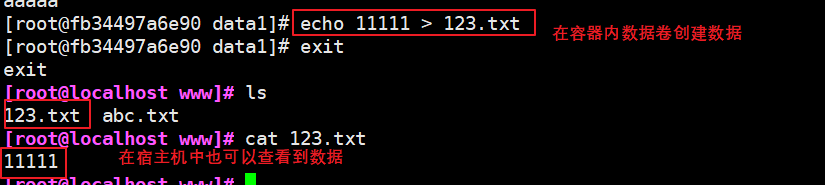
(3) Create file test
1.Create a file test data volume in the mount directory of the host
2.Create a file on the data volume to test the mount directory of the host
3. Data volume container
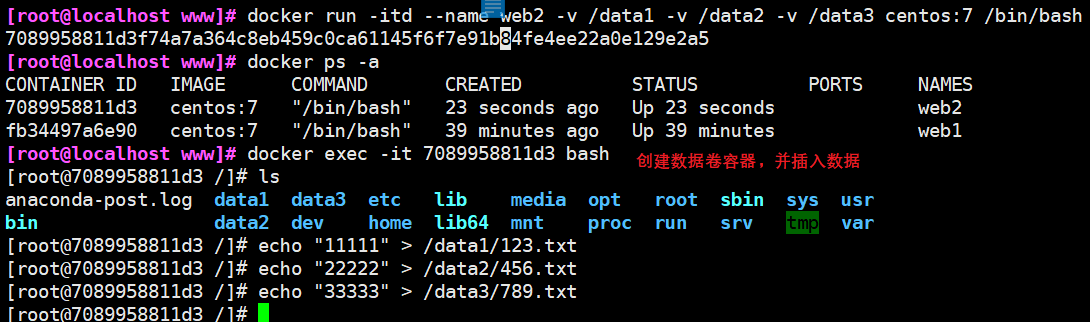
(1) Definition
If you need to share some data between containers, the easiest way is to use data volume containers. The data volume container is an ordinary container that provides data volumes for other containers to mount
(2) Create a container as a data volume container
docker run -itd --name web2 -v /data1 -v /data2 -v /data3 centos:7 /bin/bash
docker exec -it 7089958811d3 bash  #Enter data volume container
echo "11111" > /data1/123.txt
echo "22222" > /data2/456.txt
echo "33333" > /data3/789.txt
exit
(3) Mount the data volume in the data volume container to the new container
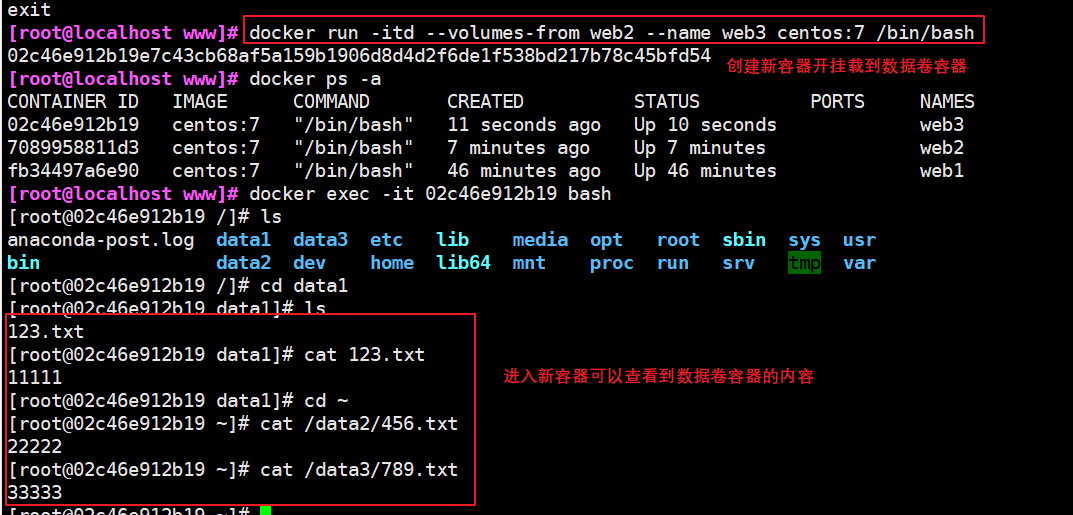
use--volumes-from To mount web2 Data volumes from container to new container

docker run -itd --volumes-from web2 --name web3 centos:7 /bin/bash
docker exec -it 02c46e912b19 bash   #Enter new container
cat /data1/123.txt
cat /data2/456.txt
cat /data3/789.txt
7, Container interconnection (using centos image)
1. Definition
Container interconnection is to establish a special network communication tunnel between containers through the name of containers. Simply put, a tunnel will be established between the source container and the receiving container, and the receiving container can see the information specified by the source container
2. Create container interconnect
1.#Create and run the source container named web1
docker run -itd -P --name web1 centos:7 /bin/bash
2.#Create and run the receiving container, name it web2, and use the -- 1ink option to specify the connection container to realize container interconnection
3.docker run -itd -P --name web2 --link web1:jc centos:7 /bin/bash      #--link container name: alias of the connection
4.#Enter web2 container and ping sb/web1
docker exec -it web2 bash
ping web1/jc

