Server domain name binding
- If the newly purchased Tencent ECS is bound with the newly purchased domain name? There are three pre steps: buying a server, buying a domain name and filing. These three steps will not be mentioned one by one.
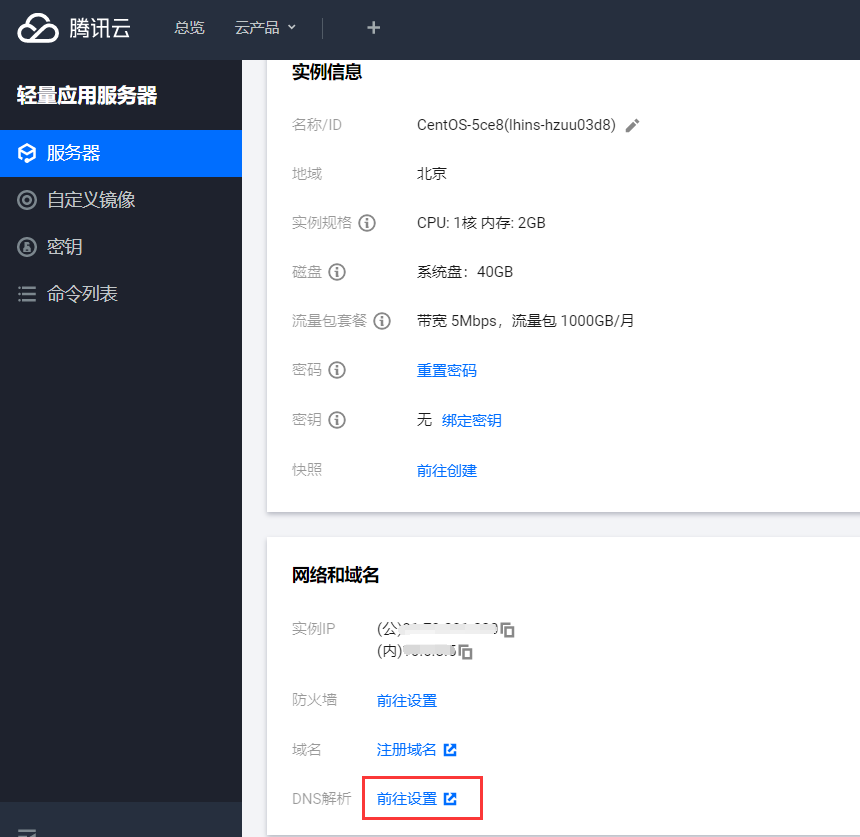
- The server binds the domain name. In other words, it is resolved to your server when the domain name is resolved. The operation steps are as follows
- Click "go to Settings" to set the parsing rules

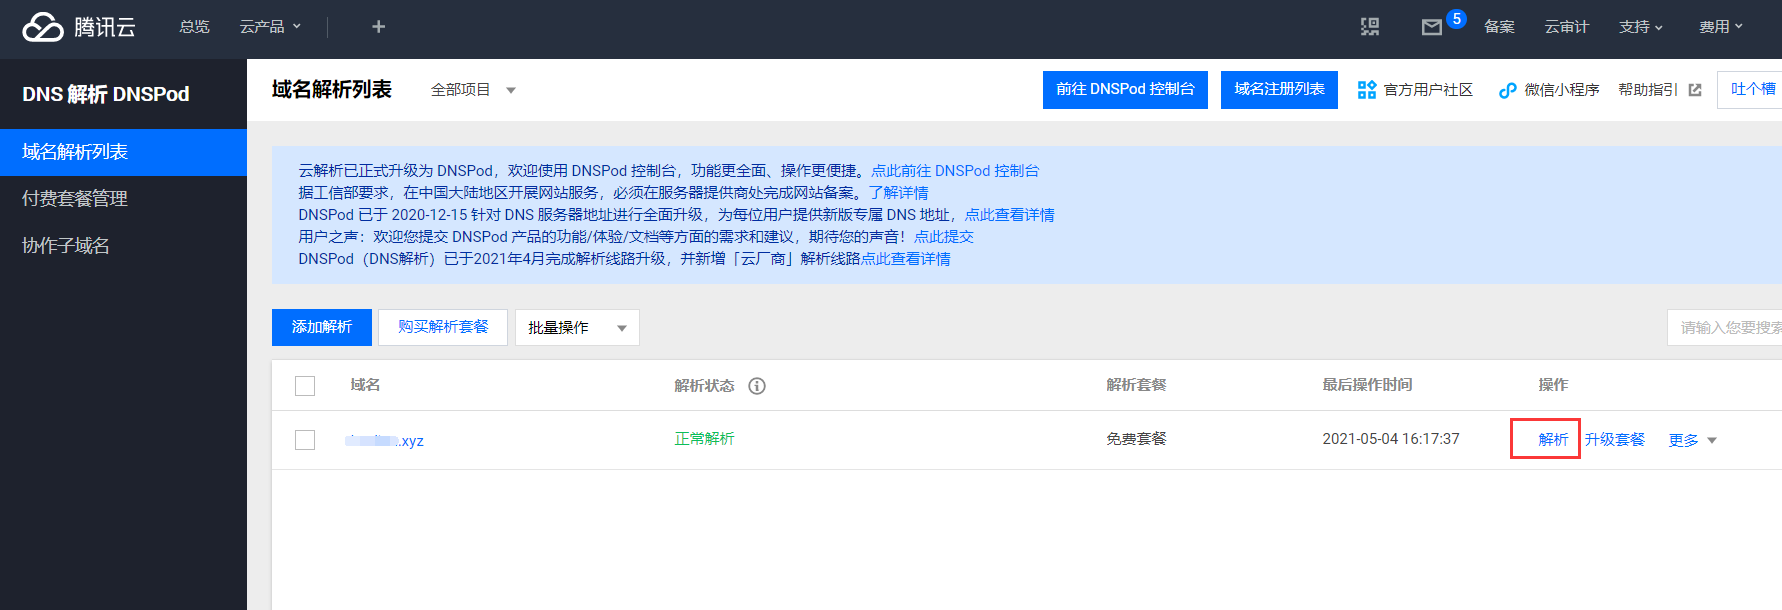
- Select the domain name you want to bind to the server in the domain name list and click "resolve" in the back

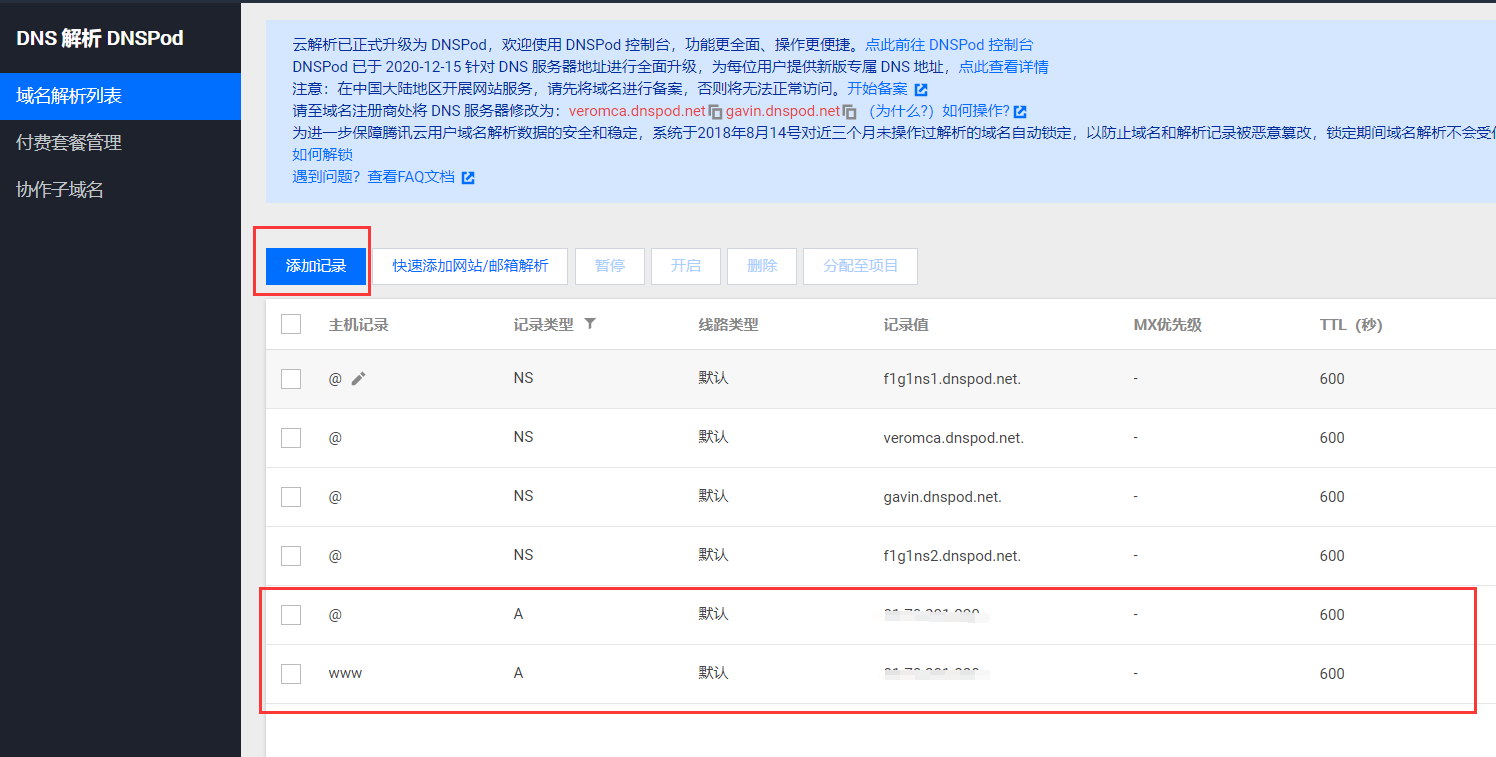
- The third and final step is to add parsing rules
Click "add record". Note: before you add it, there will be several records here. Don't worry about it (your record may be different from that in my screenshot, don't worry, my manual modification). Of the two records you add, fill in one @ for the host record and one www for the record type. Select A for the record type. The line type is default, and the record value is filled in the public network IP of the server, Then confirm directly. Note: suppose the domain name is ABC XYZ, @ means resolving ABC XYZ, www means analysis www.abc XYZ, so after adding these two records, ABC And www.xyz.abc XYZ can be resolved to the server.

Install docker
- I have centos system here. The installation steps are just those on the official website
# Uninstall the original docker sudo yum remove docker \ docker-client \ docker-client-latest \ docker-common \ docker-latest \ docker-latest-logrotate \ docker-logrotate \ docker-engine # Install Yum utils sudo yum install -y yum-utils # Specify Alibaba cloud warehouse address sudo yum-config-manager \ --add-repo \ http://mirrors.aliyun.com/docker-ce/linux/centos/docker-ce.repo # Configure cache sudo yum makecache fast # Install, install the latest version by default (one of two) sudo yum install docker-ce docker-ce-cli containerd.io # Install, install the specified version (one of two) yum list docker-ce --showduplicates | sort -r sudo yum install docker-ce-<VERSION_STRING> docker-ce-cli- <VERSION_STRING> containerd.io # start-up sudo systemctl start docker # Start and start automatically sudo systemctl enable docker - Can a system install multiple versions of docker? Will there be conflict
- sudo yum install docker-ce docker-ce-cli containerd. What is the difference between IO and sudo Yum install docker?
- After successful installation, docker is installed in / var/lib by default, and the image information downloaded by docker pull will be recorded in / var/lib / docker / image / overlay 2 / repositories JSON file
Install tomcat
-
Installing tomcat here has nothing to do with deploying the SpringBoot project. It's just fun
# Some container commands are simple to use and can be forgotten after a while. Here are a few
# View all containers and their details
docker ps -a
# Enter container
docker exec -it [Container name or container id] /bin/bash
# Exit container
exit
# Delete container
docker stop [Container name or container id]
docker rm [Container name or container id]
# delete mirror
docker rmi [Container name or container id]
# Restart the container. If you modify the configuration file in the mount directory, you can make it effective through docker stop and docker restart
docker restart [Container name or container id]
# View container startup log
docker logs [Container name or container id]


# Pull tomcat image, the default is latest
docker pull tomcat
# Run in the simplest way, - d means running in the background. There are two 8080s. The first refers to the 8080 port of the host and the second refers to the 8080 port of the container,
# Map the 8080 port of the container to the 8080 port of the host, assign the alias tomcat to the container, and then do not operate the container id every time
docker run -d -p 8080:8080 --name tomcat tomcat
# After running the container, copy the war package to be deployed to the webapps directory
# Copy mode 1: execute the docker cp command on the host
docker cp /usr/local/xxx.war [Container name or container id]:/usr/local/tomcat/webapps
# Copy mode 2: upload with rz in the container and enter the container first
apt update
apt install lrzsz
rz
# Run the container in the above way, and the data is in the container. If the container is restarted, the data will be lost. Obviously, it is not the best way
# The best way is to establish the mapping between the container and the host, that is, mount the container directory on the host. Even if the container is restarted, the data will not be lost unless it is not deleted on the host
# -v dir1:dir2 means that the directory dir2 of the container is mapped to the directory dir1 of the host, -- restart=always means that the container will restart automatically when the docker is restarted
docker run -d -p 80:80 --name tomcat -v /root/docker-data/d-tomcat/webapps:/usr/local/tomcat/webapps -v /root/docker-data/d-tomcat/conf/server.xml:/usr/local/tomcat/conf/server.xml --restart=always tomcat
-
After starting in the above way, modify / root / docker data / d-tomcat / conf / server The port in XML is 80, and URIEncoding="UTF-8" is added, and an index.xml is placed in / root / docker data / d-tomcat / webapps / root HTML, which can be accessed directly through the server domain name. However, why do you see Chinese is garbled?
- page

- index.html

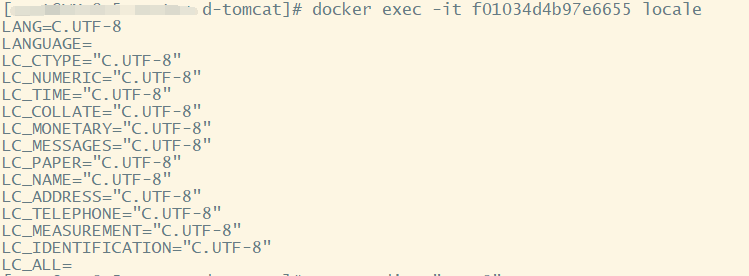
- It is said on the Internet that we should first look at the coding format of the container. If it is POSIX, it will be specified as UTF-8 through - e LANG="C.UTF-8", but here I am C.UTF-8.

- page
-
Backup container
-
Backup to local
# The backup container is a mirror
docker commit -p [container id] [New image name, assuming test-backup]
# docker images can see the new image and export it to the local directory
docker save test-backup > /Users/user name/Desktop/test-backup.tar
# To restore the container, first delete the image in docker
docker rmi test-backup
docker images
# Import
docker load < /Users/user name/Desktop/test-backup.tar
# See if docker exists
docker images
-
Backup to remote
# The backup container is a mirror
docker commit -p [container id] [New image name, assuming test-backup]
# Login to docker with user name and password
docker login
# tag the image
docker tag test-backup xxx/mytest:test-backup
# preservation
docker push xxx/mytest:test-backup
# If you want to restore, click docker pull
docker pull ...
Install MySQL
- Installing MySQL is similar to installing tomcat
# Pull mirror
docker pull mysql:5.7
# Run the container, specify the port mapping, take the alias, mount the data directory, log directory, configuration file directory, specify the password, restart automatically and run in the background
docker run -p 3306:3306 --name mysql -v /root/docker-data/d-mysql/data:/var/lib/mysql -v /root/docker-data/d-mysql/logs:/etc/mysql/logs -v /root/docker-data/d-mysql/conf:/etc/mysql/cnf.d -e MYSQL_ROOT_PASSWORD=123456 --restart=always -d mysql:5.7
# After installation, enter the container and mysql with the password of 123456
# Set up remote login
use mysql;
grant all privileges on *.* to 'root'@'%' with grant option;
flush privileges;
- The problem encountered here is that after setting MySQL remote login, the remote login on the local win10 is successful, and the login password is 123456. Then I enter the container and change the MySQL password in the container to root. Then, when executing mysql -u root -p in the container, I must enter root to enter mysql. However, the remote connection of win10 is not disconnected because the password is changed, and, When deploying the SpringBoot project later, you need to use the initially specified password 123456 instead of root to connect to MySQL in the project
Install Redis
# Pull image
docker pull redis:3.2
# Start, specify port mapping, alias, specify mount directory, auto start, specify configuration file, and start redis server
docker run -d -p 6379:6379 --name redis -v /root/docker-data/d-redis/conf/redis.conf:/usr/local/etc/redis/redis.conf -v /root/docker-data/d-redis/data:/data --restart=always redis:3.2 redis-server /usr/local/etc/redis/redis.conf
Deploy SpringBoot project
- Print the SpringBoot project into a jar package, copy it to a directory, and create a Dockfile file in that directory

- Dockfile
# The basic image uses java
FROM java:8
# Defender, author
MAINTAINER xxx
# VOLUME specifies the temporary file directory as / tmp,
# The effect is to create a temporary file in the host / var/lib/docker directory and link it to / tmp of the container
VOLUME /tmp
# Add the jar package to the container and rename it app jar
ADD express-0.0.1-SNAPSHOT.jar app.jar
# Exposed operation port
EXPOSE 80
# Specify the prod environment to run
ENTRYPOINT ["java","-Dspring.profiles.active=prod","-Duser.timezone=GMT+8","-jar","app.jar"]
- Create image and run
# When making a mirror image, notice that there is a point behind it
docker build -t app .
# Note that since MySQL and Redis are used in the project, when running the container here, you need to specify MySQL and Redis, that is, MySQL and Redis deployed above
# When the above mysql and redis execute the docker run command, I have specified aliases, namely mysql and redis, so these aliases can be used directly here, and docker will find the corresponding container through the alias
# The container can be used through the -- link parameter, such as -- link MySQL: conf mysql, MySQL is the alias, and conf MySQL is the host of MySQL I use, that is, I am in application The MySQL address in yaml is configured with jdbc:mysql://conf-mysql:3306/ [database] / xxx
docker run --link mysql:conf-mysql --link redis:conf-redis -d -p 80:80  app