1, docker network
1.1 understanding docker0
- Empty all containers in docker
docker rm -f $(docker ps -aq)
- Clear all images in docker
docker rmi -f $(docker images -aq)
- ctrl+l is the shortcut key to clear the screen, which is equivalent to clear
- ip addr view the IP address information of the server, and you can see the information of three network cards
Run a tom1.2 container
docker run -d -P --name tomcat01 tomcat
- -P. Randomly map the port number between the native and the container
[root@zhouhao ~]# docker ps -l
CONTAINER ID   IMAGE     COMMAND             CREATED          STATUS          PORTS                                         NAMES
27deb683e957   tomcat    "catalina.sh run"   16 minutes ago   Up 16 minutes   0.0.0.0:49155->8080/tcp, :::49155->8080/tcp   tomcat01
Check the internal network card information of the container. There is no ip addr command in the new version of tomcat. You need to install this command first
- Enter container installation
apt update && apt install -y iproute2
apt command
apt (Advanced Packaging Tool) is a Shell front-end package manager in Debian and Ubuntu.
apt command provides commands for finding, installing, upgrading and deleting one or a group of software packages, and the commands are simple and easy to remember.
apt command execution requires super administrator privileges (root).
View container internal network card information
root@27deb683e957:/usr/local/tomcat# ip addr
1: lo: <LOOPBACK,UP,LOWER_UP> mtu 65536 qdisc noqueue state UNKNOWN group default qlen 1000
    link/loopback 00:00:00:00:00:00 brd 00:00:00:00:00:00
    inet 127.0.0.1/8 scope host lo
       valid_lft forever preferred_lft forever
70: eth0@if71: <BROADCAST,MULTICAST,UP,LOWER_UP> mtu 1500 qdisc noqueue state UP group default
    link/ether 02:42:ac:12:00:02 brd ff:ff:ff:ff:ff:ff link-netnsid 0
    inet 172.18.0.2/16 brd 172.18.255.255 scope global eth0
       valid_lft forever preferred_lft forever
1.3 can the Linux server ping through the docker container?
[root@zhouhao ~]# ping 172.18.0.2
PING 172.18.0.2 (172.18.0.2) 56(84) bytes of data.
64 bytes from 172.18.0.2: icmp_seq=1 ttl=64 time=0.049 ms
64 bytes from 172.18.0.2: icmp_seq=2 ttl=64 time=0.060 ms
64 bytes from 172.18.0.2: icmp_seq=3 ttl=64 time=0.059 ms
64 bytes from 172.18.0.2: icmp_seq=4 ttl=64 time=0.067 ms
64 bytes from 172.18.0.2: icmp_seq=5 ttl=64 time=0.061 ms
- The conclusion is that ping can pass
- The IP address in the dockers container is 172.18.0.2, and the IP address of the Linux server docker0 is 172.18.0.1, which is the same network end
[root@zhouhao ~]# ip addr
1: lo: <LOOPBACK,UP,LOWER_UP> mtu 65536 qdisc noqueue state UNKNOWN group default qlen 1000
    link/loopback 00:00:00:00:00:00 brd 00:00:00:00:00:00
    inet 127.0.0.1/8 scope host lo
       valid_lft forever preferred_lft forever
    inet6 ::1/128 scope host
       valid_lft forever preferred_lft forever
2: eth0: <BROADCAST,MULTICAST,UP,LOWER_UP> mtu 1500 qdisc pfifo_fast state UP group default qlen 1000
    link/ether 00:16:3e:0e:ac:db brd ff:ff:ff:ff:ff:ff
    inet 172.17.139.29/20 brd 172.17.143.255 scope global dynamic eth0
       valid_lft 314555882sec preferred_lft 314555882sec
    inet6 fe80::216:3eff:fe0e:acdb/64 scope link
       valid_lft forever preferred_lft forever
3: docker0: <BROADCAST,MULTICAST,UP,LOWER_UP> mtu 1500 qdisc noqueue state UP group default
    link/ether 02:42:4c:c9:62:7c brd ff:ff:ff:ff:ff:ff
    inet 172.18.0.1/16 brd 172.18.255.255 scope global docker0
       valid_lft forever preferred_lft forever
    inet6 fe80::42:4cff:fec9:627c/64 scope link
       valid_lft forever preferred_lft forever
71: veth721544e@if70: <BROADCAST,MULTICAST,UP,LOWER_UP> mtu 1500 qdisc noqueue master docker0 state UP group default
    link/ether aa:e7:6a:71:ee:4e brd ff:ff:ff:ff:ff:ff link-netnsid 0
    inet6 fe80::a8e7:6aff:fe71:ee4e/64 scope link
       valid_lft forever preferred_lft forever
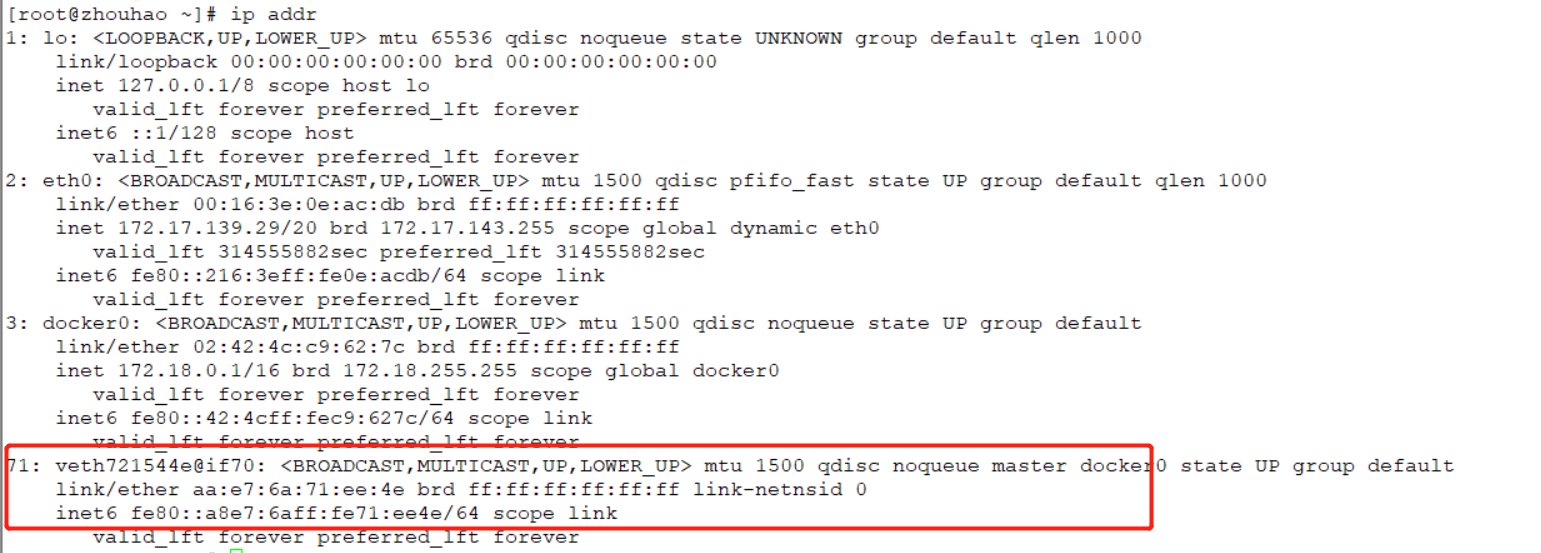 The network card numbered 71 is automatically generated after the docker container is started
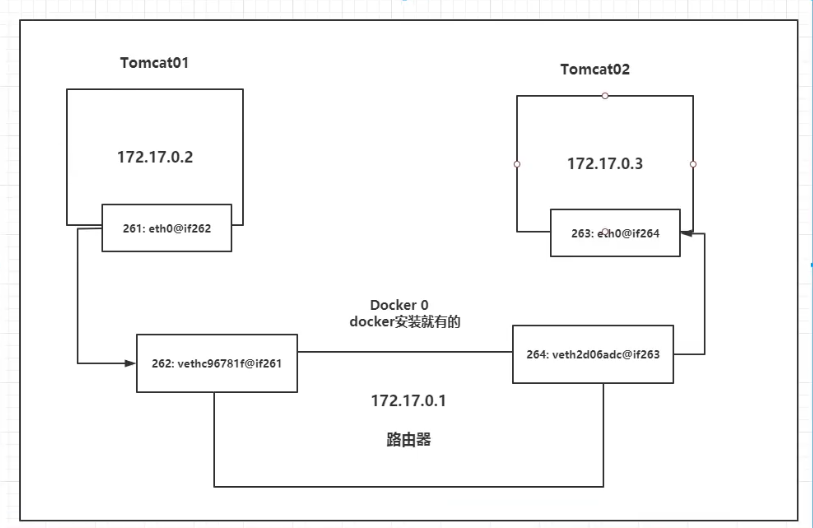
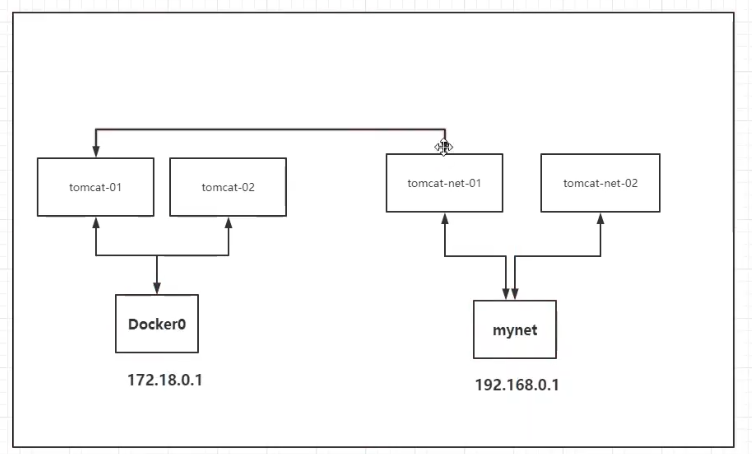
1.4 network principle
As long as docker is installed on the Linux server, there will be a docker0 network card, which is a bridge mode and uses evth pair technology. Start a docker container, and docker will assign an IP address to the docker container.
Veth pair Technology
It is found that the network card information in the Linux server corresponds to the network card information in the docker container and appears in pairs.
Veth pair technology is a virtual device interface, one is connected to the protocol, and the other is connected to each other. Veth pair acts as a bridge to connect virtual network devices.
1.5 start tomcat02 container
docker run -d -P --name tomcat02 tomcat
View started containers
[root@zhouhao ~]# docker ps
CONTAINER ID   IMAGE     COMMAND             CREATED          STATUS          PORTS                                         NAMES
6e124d494351   tomcat    "catalina.sh run"   21 seconds ago   Up 19 seconds   0.0.0.0:49156->8080/tcp, :::49156->8080/tcp   tomcat02
27deb683e957   tomcat    "catalina.sh run"   2 hours ago      Up 2 hours      0.0.0.0:49155->8080/tcp, :::49155->8080/tcp   tomcat01
Enter the tomcat02 container and install the ip addr command
docker exec -it tomcat02 /bin/bash
apt update && apt install -y iproute2
View the network card information of tomcat02 container
root@6e124d494351:/usr/local/tomcat# ip addr
1: lo: <LOOPBACK,UP,LOWER_UP> mtu 65536 qdisc noqueue state UNKNOWN group default qlen 1000
    link/loopback 00:00:00:00:00:00 brd 00:00:00:00:00:00
    inet 127.0.0.1/8 scope host lo
       valid_lft forever preferred_lft forever
72: eth0@if73: <BROADCAST,MULTICAST,UP,LOWER_UP> mtu 1500 qdisc noqueue state UP group default
    link/ether 02:42:ac:12:00:03 brd ff:ff:ff:ff:ff:ff link-netnsid 0
    inet 172.18.0.3/16 brd 172.18.255.255 scope global eth0
       valid_lft forever preferred_lft forever
Install ping command in container
apt install iputils-ping
pingtomcat01 container in tomcat02 container
root@6e124d494351:/usr/local/tomcat# ping 172.18.0.2
PING 172.18.0.2 (172.18.0.2) 56(84) bytes of data.
64 bytes from 172.18.0.2: icmp_seq=1 ttl=64 time=0.102 ms
64 bytes from 172.18.0.2: icmp_seq=2 ttl=64 time=0.078 ms
64 bytes from 172.18.0.2: icmp_seq=3 ttl=64 time=0.072 ms
64 bytes from 172.18.0.2: icmp_seq=4 ttl=64 time=0.072 ms
64 bytes from 172.18.0.2: icmp_seq=5 ttl=64 time=0.071 ms
- Containers are isolated, but can be ping ed
conclusion
tomcat01 and tomcat02 share one route, that is, docker0 route.
When all containers do not specify a network, they are routed by docker0, and docker assigns an available IP to the container.
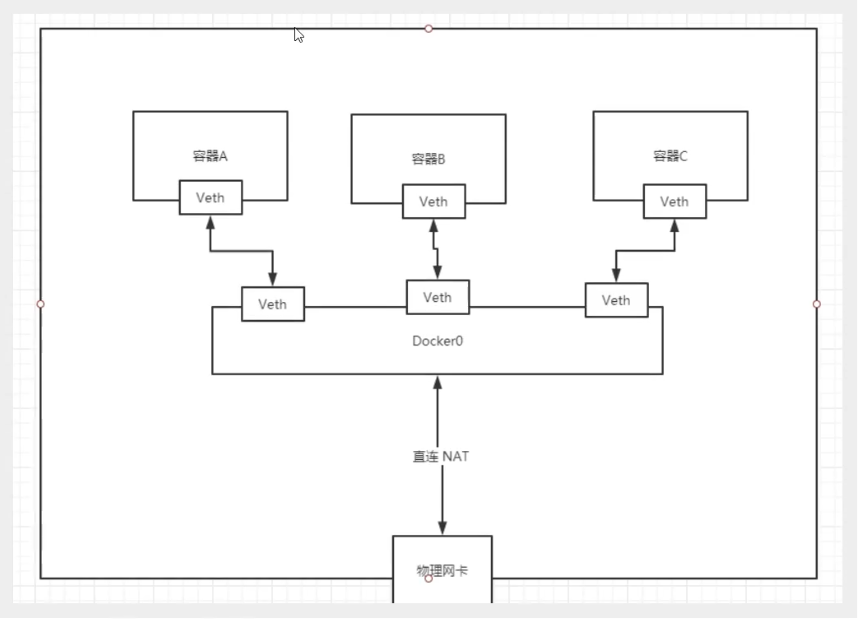
- Docker uses the bridging technology of Linux system. The host is a bridge of docker container, docker0. The core is the virtualization network technology of Linux system.
- In the docker container, all network interfaces are virtual and the forwarding efficiency is high
- As long as the container is deleted, the corresponding bridge pair is deleted
2, Container interconnection – link
2.1 start tomcat01 container
docker run -d -P --name tomcat01 tomcat
Problem: the tomcat01 container cannot be ping ed in the tomcat02 container
docker exec -it tomcat02 ping tomcat01
ping: tomcat01: Name or service not known
Start tomcat03 container and connect with tomcat02 container
docker run -d -P --name tomcat03 --link tomcat02 tomcat
There is no ping command in tomcat03 container, which needs to be installed
apt update && apt install iputils-ping
ping the tomcat02 container in the tomcat03 container to ping the
root@94c7a93d3a2f:/usr/local/tomcat# ping tomcat02
PING tomcat02 (172.18.0.3) 56(84) bytes of data.
64 bytes from tomcat02 (172.18.0.3): icmp_seq=1 ttl=64 time=0.090 ms
64 bytes from tomcat02 (172.18.0.3): icmp_seq=2 ttl=64 time=0.080 ms
64 bytes from tomcat02 (172.18.0.3): icmp_seq=3 ttl=64 time=0.069 ms
Can reverse ping pass? tomcat02 container pingtomcat03 container
[root@zhouhao ~]# docker exec -it tomcat02 ping tomcat03
ping: tomcat03: Name or service not known
- The conclusion is that reverse ping does not work
View the network information of the container
docker network ls
NETWORK ID     NAME      DRIVER    SCOPE
8332af64f234   bridge    bridge    local
7abdac590e2b   host      host      local
f0c3788f5cda   none      null      local
View the detailed network information of the specified container
docker network inspect 8332af64f234
[
    {
        "Name": "bridge",
        "Id": "8332af64f2342b019f5b0c007159cebf7ee99b8c5be0a8701fe3de99890940ff",
        "Created": "2022-02-04T14:05:43.401697636+08:00",
        "Scope": "local",
        "Driver": "bridge",
        "EnableIPv6": false,
        "IPAM": {
            "Driver": "default",
            "Options": null,
            "Config": [
                {
                    "Subnet": "172.18.0.0/16",
                    "Gateway": "172.18.0.1"
                }
            ]
        },
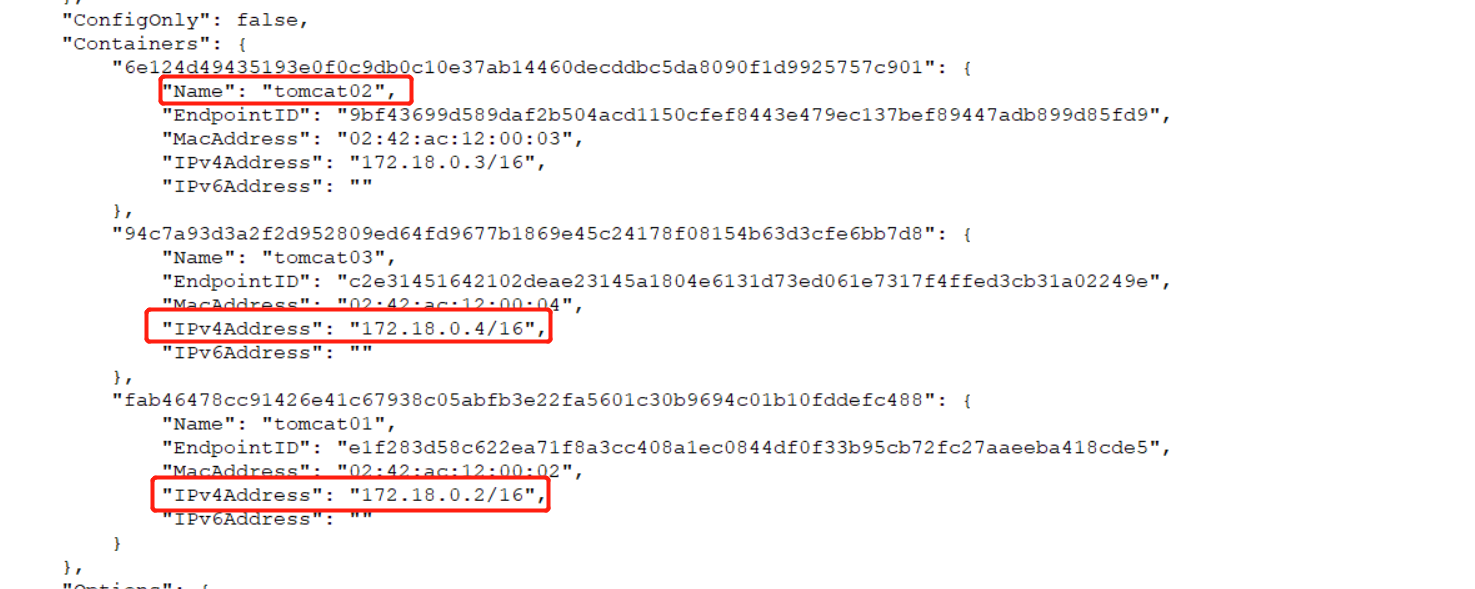
2.2 view details of specified containers
docker inspect 6e124d494351
Check the / etc/hosts file of tomcat03 container
 cat /etc/hosts
127.0.0.1	localhost
::1	localhost ip6-localhost ip6-loopback
fe00::0	ip6-localnet
ff00::0	ip6-mcastprefix
ff02::1	ip6-allnodes
ff02::2	ip6-allrouters
172.18.0.3	tomcat02 6e124d494351
172.18.0.4	94c7a93d3a2f
- In tomcat03 container, write the IP address of tomcat02 container in / etc/hosts file
- – link, the essence of which is to add the mapping of tomcat02 in the hosts file, 172.18.0.3 tomcat02 6e124d494351
2.3 view / etc/hosts file information
View the / etc/hosts file information of tomcat02 container
docker exec -it tomcat02 cat /etc/hosts
127.0.0.1	localhost
::1	localhost ip6-localhost ip6-loopback
fe00::0	ip6-localnet
ff00::0	ip6-mcastprefix
ff02::1	ip6-allnodes
ff02::2	ip6-allrouters
172.18.0.3	6e124d494351
- It is no longer recommended to use – link when playing docker. We usually use custom networks, but not for docker0.
- docker0 has its own problem. It does not support container name connection access.
3, Custom network
3.1 view all docker networks
docker network ls
NETWORK ID     NAME      DRIVER    SCOPE
8332af64f234   bridge    bridge    local
7abdac590e2b   host      host      local
f0c3788f5cda   none      null      local
3.2 network mode
- Bridge, bridge mode, docker, default
- none, no network configuration
- Host to share the network with the host
- Container, the network in the container is connected, which has great limitations and uses less
Clear all containers
docker rm -f $(docker ps -aq)
3.3 testing
docker run -d -P --name tomcat01 --net bridge tomcat And
docker run -d -P --name tomcat01 tomcat Same effect
- When the docker container is started, it has a default parameter - net bridge, which uses the network of docker0 by default,
- The docker0 network domain name cannot be accessed, and the – link can be connected
3.4 custom network
docker network command
docker network --help

Usage:  docker network COMMAND

Manage networks

Commands:
  connect     Connect a container to a network
  create      Create a network
  disconnect  Disconnect a container from a network
  inspect     Display detailed information on one or more networks
  ls          List networks
  prune       Remove all unused networks
  rm          Remove one or more networks

Run 'docker network COMMAND --help' for more information on a command.
docker network create command
docker network create --help

Usage:  docker network create [OPTIONS] NETWORK

Create a network

Options:
      --attachable           Enable manual container attachment
      --aux-address map      Auxiliary IPv4 or IPv6 addresses used by Network driver (default map[])
      --config-from string   The network from which to copy the configuration
      --config-only          Create a configuration only network
  -d, --driver string        Driver to manage the Network (default "bridge")
      --gateway strings      IPv4 or IPv6 Gateway for the master subnet
      --ingress              Create swarm routing-mesh network
      --internal             Restrict external access to the network
      --ip-range strings     Allocate container ip from a sub-range
      --ipam-driver string   IP Address Management Driver (default "default")
      --ipam-opt map         Set IPAM driver specific options (default map[])
      --ipv6                 Enable IPv6 networking
      --label list           Set metadata on a network
  -o, --opt map              Set driver specific options (default map[])
      --scope string         Control the network's scope
      --subnet strings       Subnet in CIDR format that represents a network segment
Create mynet network
docker network create --driver bridge --subnet 192.168.0.0/16 --gateway 192.168.0.1 mynet
- – subnet 192.168.0.0/16, IP address range 192.168.0.2 to 192.168.255.255.
- –gateway 192.168.0.1
View the created mynet network
docker network ls
NETWORK ID     NAME      DRIVER    SCOPE
8332af64f234   bridge    bridge    local
7abdac590e2b   host      host      local
e7525fc2fc6a   mynet     bridge    local
f0c3788f5cda   none      null      local
View the created mynet network. For details, see inspect
 docker network inspect mynet
[
    {
        "Name": "mynet",
        "Id": "e7525fc2fc6ab9a3d500b2f4c6e7670b8b532016b9d5048054777953f5bd9926",
        "Created": "2022-02-15T11:45:41.854137623+08:00",
        "Scope": "local",
        "Driver": "bridge",
        "EnableIPv6": false,
        "IPAM": {
            "Driver": "default",
            "Options": {},
            "Config": [
                {
                    "Subnet": "192.168.0.0/16",
                    "Gateway": "192.168.0.1"
                }
            ]
        },
        "Internal": false,
        "Attachable": false,
        "Ingress": false,
        "ConfigFrom": {
            "Network": ""
        },
        "ConfigOnly": false,
        "Containers": {},
        "Options": {},
        "Labels": {}
    }
]
Start tomcat01 and tomcat02 containers using custom network
docker run -d -P --name tomcat-net-01 --net mynet tomcat
docker run -d -P --name tomcat-net-02 --net mynet tomcat
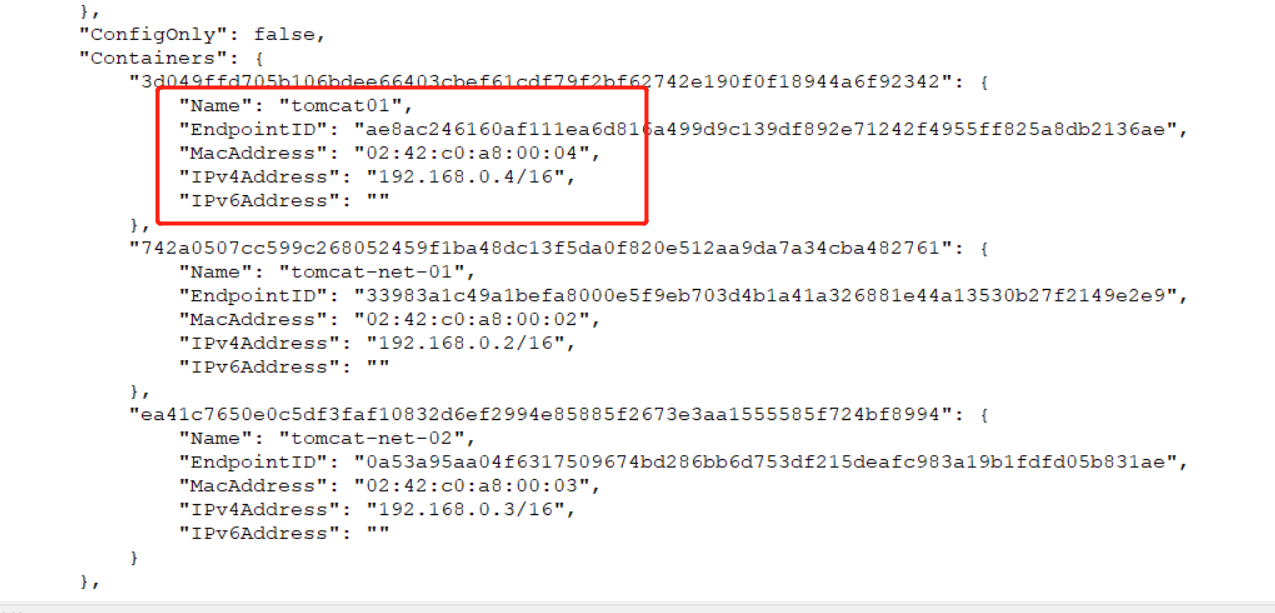
View details of custom network mynet
[root@zhouhao ~]# docker network inspect mynet
[
    {
        "Name": "mynet",
        "Id": "e7525fc2fc6ab9a3d500b2f4c6e7670b8b532016b9d5048054777953f5bd9926",
        "Created": "2022-02-15T11:45:41.854137623+08:00",
        "Scope": "local",
        "Driver": "bridge",
        "EnableIPv6": false,
        "IPAM": {
            "Driver": "default",
            "Options": {},
            "Config": [
                {
                    "Subnet": "192.168.0.0/16",
                    "Gateway": "192.168.0.1"
                }
            ]
        },
        "Internal": false,
        "Attachable": false,
        "Ingress": false,
        "ConfigFrom": {
            "Network": ""
        },
        "ConfigOnly": false,
        "Containers": {
            "742a0507cc599c268052459f1ba48dc13f5da0f820e512aa9da7a34cba482761": {
                "Name": "tomcat-net-01",
                "EndpointID": "33983a1c49a1befa8000e5f9eb703d4b1a41a326881e44a13530b27f2149e2e9",
                "MacAddress": "02:42:c0:a8:00:02",
                "IPv4Address": "192.168.0.2/16",
                "IPv6Address": ""
            },
            "ea41c7650e0c5df3faf10832d6ef2994e85885f2673e3aa1555585f724bf8994": {
                "Name": "tomcat-net-02",
                "EndpointID": "0a53a95aa04f6317509674bd286bb6d753df215deafc983a19b1fdfd05b831ae",
                "MacAddress": "02:42:c0:a8:00:03",
                "IPv4Address": "192.168.0.3/16",
                "IPv6Address": ""
            }
        },
        "Options": {},
        "Labels": {}
    }
]
You can see the detailed network information of tomcat01 and tomcat02 containers.
Tomcat-net-01 container ping tomcat-net-02 container name, tomcat-net-01 container pingtomcat-net-02 container IP address can be pinged.
docker exec -it tomcat-net-01 ping tomcat-net-02
docker exec -it tomcat-net-01 ping 192.168.0.3
- Now you can ping the container without going through – link
3.5 summary
- The user-defined network has helped us maintain the corresponding relationship. It is recommended to use the user-defined network
- For example, redis cluster and MySQL Cluster. Different clusters use different networks to ensure that the cluster is safe and healthy
4, Network connectivity
4.1 start tomcat01 and tomcat02 containers and use docker0 network by default
docker run -d -P --name tomcat01 tomcat
docker run -d -P --name tomcat02 tomcat

ping the tomcat-net-01 container in the tomcat01 container, but the ping fails. The two containers depend on different network cards and different IP network segments.
root@3d049ffd705b:/usr/local/tomcat# ping tomcat-net-01
ping: tomcat-net-01: Name or service not known
docker network connect command
Usage:  docker network connect [OPTIONS] NETWORK CONTAINER

Connect a container to a network

Options:
      --alias strings           Add network-scoped alias for the container
      --driver-opt strings      driver options for the network
      --ip string               IPv4 address (e.g., 172.30.100.104)
      --ip6 string              IPv6 address (e.g., 2001:db8::33)
      --link list               Add link to another container
      --link-local-ip strings   Add a link-local address for the container
4.2 connect tomcat01 container with mynet network card
docker network connect mynet tomcat01
View the details of mynet network card after connection
docker network inspect mynet
 Tomcat01 container network is found and has been added to mynet network card. The network segment of tomcat01 container is the same as that of mynet network card. Here, virtual IP technology is used, that is, IP mapping.
- tomcat01 container is a container with two IP addresses
- The container and network card can be connected
Tom-cat-01-tom3 container
[root@zhouhao ~]# docker exec -it tomcat01 ping tomcat-net-01
PING tomcat-net-01 (192.168.0.2) 56(84) bytes of data.
64 bytes from tomcat-net-01.mynet (192.168.0.2): icmp_seq=1 ttl=64 time=0.091 ms
64 bytes from tomcat-net-01.mynet (192.168.0.2): icmp_seq=2 ttl=64 time=0.068 ms
64 bytes from tomcat-net-01.mynet (192.168.0.2): icmp_seq=3 ttl=64 time=0.070 ms
64 bytes from tomcat-net-01.mynet (192.168.0.2): icmp_seq=4 ttl=64 time=0.072 ms
64 bytes from tomcat-net-01.mynet (192.168.0.2): icmp_seq=5 ttl=64 time=0.068 ms
64 bytes from tomcat-net-01.mynet (192.168.0.2): icmp_seq=6 ttl=64 time=0.077 ms
- Can ping through
5, redis cluster deployment
5.1 create redis network card
docker network create redis --subnet 172.38.0.0/16
View the created redis network card
docker network ls
NETWORK ID     NAME      DRIVER    SCOPE
8332af64f234   bridge    bridge    local
7abdac590e2b   host      host      local
e7525fc2fc6a   mynet     bridge    local
f0c3788f5cda   none      null      local
7cd2081215f8   redis     bridge    local
docker network inspect redis
[
    {
        "Name": "redis",
        "Id": "7cd2081215f86d013cc78e19ad2bfe134e8ad78d6cf81407fd9223f242f9eebf",
        "Created": "2022-02-15T16:16:24.942200934+08:00",
        "Scope": "local",
        "Driver": "bridge",
        "EnableIPv6": false,
        "IPAM": {
            "Driver": "default",
            "Options": {},
            "Config": [
                {
                    "Subnet": "172.38.0.0/16"
                }
            ]
        },
        "Internal": false,
        "Attachable": false,
        "Ingress": false,
        "ConfigFrom": {
            "Network": ""
        },
        "ConfigOnly": false,
        "Containers": {},
        "Options": {},
        "Labels": {}
    }
]
seq command
Used to generate all integers from one number to another
[root@zhouhao ~]# seq 1 10
1
2
3
4
5
6
7
8
9
10
Cat > file < < EOF command
Cat > file name < < EOF: used to create a file. Anything entered after that is in the file. After the input is completed, it ends with EOF.
Cat > > file name < < EOF: the same as above, but it is appended to the file, which is overwritten.
[root@zhouhao ~]# cat << EOF > 1.txt
> a
> b
> c
> d
> e
> EOF

[root@zhouhao ~]# cat 1.txt
a
b
c
d
e
cat command
cat --help
Usage: cat [OPTION]... [FILE]...
Concatenate FILE(s), or standard input, to standard output.

  -A, --show-all           equivalent to -vET
  -b, --number-nonblank    number nonempty output lines, overrides -n
  -e                       equivalent to -vE
  -E, --show-ends          display $ at end of each line
  -n, --number             number all output lines
  -s, --squeeze-blank      suppress repeated empty output lines
  -t                       equivalent to -vT
  -T, --show-tabs          display TAB characters as ^I
  -u                       (ignored)
  -v, --show-nonprinting   use ^ and M- notation, except for LFD and TAB
      --help     display this help and exit
      --version  output version information and exit

With no FILE, or when FILE is -, read standard input.

Examples:
  cat f - g  Output f's contents, then standard input, then g's contents.
  cat        Copy standard input to standard output.

GNU coreutils online help: <http://www.gnu.org/software/coreutils/>
For complete documentation, run: info coreutils 'cat invocation'
Cat is not only used to view files. Use the man cat command to view the official description of cat: output [file] or standard input (i.e. keyboard input) to standard output.
Using cat directly without option parameters is to directly output standard input (i.e. keyboard input) to standard output.
a
b
b
d
d
d^H
d
e
e
dd
dd
jj
jj
^C
5.2 writing automated scripts for creating configuration files
for port in $(seq 1 6);
do
mkdir -p /mydata/redis/node-${port}/conf
touch /mydata/redis/node-${port}/conf/redis.conf
cat << EOF > /mydata/redis/node-${port}/conf/redis.conf
port 6379
bind 0.0.0.0
cluster-enabled yes
cluster-config-file nodes.conf
cluster-node-timeout 5000
cluster-announce-ip 172.38.0.1${port}
cluster-announce-port 6379
cluster-announce-bus-port 16379
appendonly yes
EOF
done
docker run command
--ip string IPv4 address (e.g., 172.30.100.104)
Command to start redis-1 container
docker run -p 6371:6379 -p 16371:16379 --name redis-1 \
-v /mydata/redis/node-1/data:/data \
-v /mydata/redis/node-1/conf/redis.conf:/etc/redis/redis.conf \
-d --net redis --ip 172.38.0.11 redis:5.0.9-alpine3.11 redis-server /etc/redis/redis.conf
Command to start redis-2 container
docker run -p 6372:6379 -p 16372:16379 --name redis-2 \
-v /mydata/redis/node-2/data:/data \
-v /mydata/redis/node-2/conf/redis.conf:/etc/redis/redis.conf \
-d --net redis --ip 172.38.0.12 redis:5.0.9-alpine3.11 redis-server /etc/redis/redis.conf
Command to start redis-3 container
docker run -p 6373:6379 -p 16373:16379 --name redis-3 \
-v /mydata/redis/node-3/data:/data \
-v /mydata/redis/node-3/conf/redis.conf:/etc/redis/redis.conf \
-d --net redis --ip 172.38.0.13 redis:5.0.9-alpine3.11 redis-server /etc/redis/redis.conf
Command to start redis-4 container
docker run -p 6374:6379 -p 16374:16379 --name redis-4 \
-v /mydata/redis/node-4/data:/data \
-v /mydata/redis/node-4/conf/redis.conf:/etc/redis/redis.conf \
-d --net redis --ip 172.38.0.14 redis:5.0.9-alpine3.11 redis-server /etc/redis/redis.conf
Command to start redis-5 container
docker run -p 6375:6379 -p 16375:16379 --name redis-5 \
-v /mydata/redis/node-5/data:/data \
-v /mydata/redis/node-5/conf/redis.conf:/etc/redis/redis.conf \
-d --net redis --ip 172.38.0.15 redis:5.0.9-alpine3.11 redis-server /etc/redis/redis.conf
Command to start redis-5 container
docker run -p 6376:6379 -p 16376:16379 --name redis-6 \
-v /mydata/redis/node-6/data:/data \
-v /mydata/redis/node-6/conf/redis.conf:/etc/redis/redis.conf \
-d --net redis --ip 172.38.0.16 redis:5.0.9-alpine3.11 redis-server /etc/redis/redis.conf
View the started redis container
docker ps
CONTAINER ID   IMAGE                    COMMAND                  CREATED              STATUS              PORTS                                                                                      NAMES
a545cf1e7ad0   redis:5.0.9-alpine3.11   "docker-entrypoint.s..."   5 seconds ago        Up 4 seconds        0.0.0.0:6376->6379/tcp, :::6376->6379/tcp, 0.0.0.0:16376->16379/tcp, :::16376->16379/tcp   redis-6
8036afc6e674   redis:5.0.9-alpine3.11   "docker-entrypoint.s..."   About a minute ago   Up About a minute   0.0.0.0:6375->6379/tcp, :::6375->6379/tcp, 0.0.0.0:16375->16379/tcp, :::16375->16379/tcp   redis-5
5ce3258cb6c2   redis:5.0.9-alpine3.11   "docker-entrypoint.s..."   3 minutes ago        Up 3 minutes        0.0.0.0:6374->6379/tcp, :::6374->6379/tcp, 0.0.0.0:16374->16379/tcp, :::16374->16379/tcp   redis-4
dea3eecff780   redis:5.0.9-alpine3.11   "docker-entrypoint.s..."   5 minutes ago        Up 5 minutes        0.0.0.0:6373->6379/tcp, :::6373->6379/tcp, 0.0.0.0:16373->16379/tcp, :::16373->16379/tcp   redis-3
122fca28023e   redis:5.0.9-alpine3.11   "docker-entrypoint.s..."   7 minutes ago        Up 7 minutes        0.0.0.0:6372->6379/tcp, :::6372->6379/tcp, 0.0.0.0:16372->16379/tcp, :::16372->16379/tcp   redis-2
7e88c95b2a84   redis:5.0.9-alpine3.11   "docker-entrypoint.s..."   14 minutes ago       Up 14 minutes       0.0.0.0:6371->6379/tcp, :::6371->6379/tcp, 0.0.0.0:16371->16379/tcp, :::16371->16379/tcp   redis-1
5.3 start redis cluster
Enter redis-1 container
docker exec -it redis-1 /bin/sh
- There is no / bin/bash command in redis container, but there is / bin/sh command
Start redis cluster
redis-cli --cluster create 172.38.0.11:6379 172.38.0.12:6379 172.38.0.13:6379 172.38.0.14:6379 172.38.0.15:6379 172.38.0.16:6379 --cluster-repl
icas 1
Enter redis cluster
redis-cli -c
View redis cluster nodes
cluster nodes
e70fc91669d2e19929d7058c6f3cbd1227b66fe2 172.38.0.13:6379@16379 master - 0 1644933783590 3 connected 10923-16383
3c1ce8913d0285a5ac709445f0674227196272ad 172.38.0.14:6379@16379 slave e70fc91669d2e19929d7058c6f3cbd1227b66fe2 0 1644933784000 4 connected
2452bc8374d17a92a9609dff068fe22df2df5477 172.38.0.11:6379@16379 myself,master - 0 1644933782000 1 connected 0-5460
b8337f97893ee1ece43e1420c2064f6db55ea20e 172.38.0.15:6379@16379 slave 2452bc8374d17a92a9609dff068fe22df2df5477 0 1644933782189 5 connected
c5f3cb140fcc78d5754651fcb270ea17563155f2 172.38.0.16:6379@16379 slave e917bdffad645b7a4df55513252396e4e71a2cb6 0 1644933784191 6 connected
e917bdffad645b7a4df55513252396e4e71a2cb6 172.38.0.12:6379@16379 master - 0 1644933784191 2 connected 5461-10922