DockerFile
DockerFIle introduction
dockerfile is the file used to build the docker image! Command parameter script!
Construction steps:
1. Write a dockerfile file
2. Build docker build into an image
3.docker run run image
4.docker push publishing images (DockerHub, Alibaba cloud image warehouse)
See what the authorities do?
Many official images are basic packages without many functions, such as clear and ping. We usually build our own image!
DockerFIle build process
Basics:
1. Each reserved keyword (instruction) must be capitalized
2. Execute from top to bottom
3. Indicates a note
4. Each instruction will create and submit a new image layer

Dockerfile is development oriented. We need to write a dockerfile file to publish projects and mirror them in the future. This file is very simple
Docker image has gradually become the standard for enterprise delivery. In the past, we may submit a jar or war package, but now we may require to submit an image
Steps: development, deployment, operation and maintenance... not a single one can be omitted
DockerFile: build a file that defines all the steps and source code
DockerImages: the image generated through DockerFile construction, and the product finally released and run. It was originally jar and war
Docker container: a container is an image that runs to provide a server
DockerFile instruction
- RUN: execute the command and create a new Image Layer. If the command is too long, you can wrap the line with a backslash

-
WORKDIR: a cd similar to the linux command enters a certain directory
WORKDIR /test #If not, it will be created automatically
WORKDIR demo
RUN pwd  #The output should be / test/demo

Recommended: WORKDIR To specify the current working directory, do not use RUN cd,Try to use absolute directories
-
ADD and COPY: ADD or COPY in most cases, COPY is better than ADD! ADD has additional functions (decompression) in addition to COPY! To ADD a remote file / directory, please use curl or wget!
ADD hello / #Add hello to the root directory/
ADD test.tar.gz /ray #Add to the root directory and extract to / ray

WORKDIR /root
ADD hello test/  #/root/rest/helo

WORKDIR /root
COPY hello test/
-
ENV: try to use ENV to increase maintainability
ENV MYSQL_VERSION 5.6 #Set constant RUN apt-get install -y mysql-server="${MYSQL_VERSION}" \ && rm -rf /var/lib/apt/lists/* #Application constant -
CMD: sets the commands and parameters to be executed by default after the container is started
The default command to execute when the container starts
 If docker run Other commands are specified, CMD Command ignored
 If more than one is defined CMD,Only the last one will execute
-
ENTRYPOINT: sets the command to run when the container starts
Let the container run as an application or service
 It will not be ignored and will be executed
 Best practice: agreement amount shell Script as entrypoint
 example:
COPY docker-entrypoint.sh /usr/local/bin/
ENTRYPOINT ["docker-entryponit.sh"]

EXPOSE 27017
CMD ["mongod"]
FROM          #Basic image, everything starts from here
MAINTAINER    #Who wrote the image, name + email
RUN           #Commands to run during image construction
ADD           #For example, if I want to add a tomcat to my image, I need to add a tomcat compressed package
WORKDIR       #Mirrored working directory
VOLUME        #Mount to directory
EXPOSE        #Exposed port configuration
CMD           #Specify the command to run when the container starts. Only the last one will take effect and can be replaced
ENTRYPOINT	  #Specify the command to run when the container starts, and you can append the command
ONBUILD       #When an inherited DokerFIle is built, the ONBUILD instruction will be run to trigger the instruction
COPY          #Similar to ADD, copy our files to the image
ENV           #Setting environment variables during construction

Actual test centos
Create your own centos
#1. Prepare dockerfile file
[root@localhost dockerfile]# cat mydockerfile
FROM centos
MAINTAINER ray<1437927944@qq.com>

ENV MYPATH /usr/local  #working directory
WORKDIR $MYPATH

RUN yum -y install vim
RUN yum -y install net-tools

EXPOSE 80

CMD echo $MYPATH
CMD echo "-----end------"
CMD /bin/bassh
#2. Build an image from this file
#Command docker build -f dockerfile file path - t image name: [tag]
Successfully built 0cc129b3de30
Successfully tagged mycentos:0.1
#3. Test run
 Find that you can use it in the image you build vim and ipconfig command
We can list the history of changes made locally
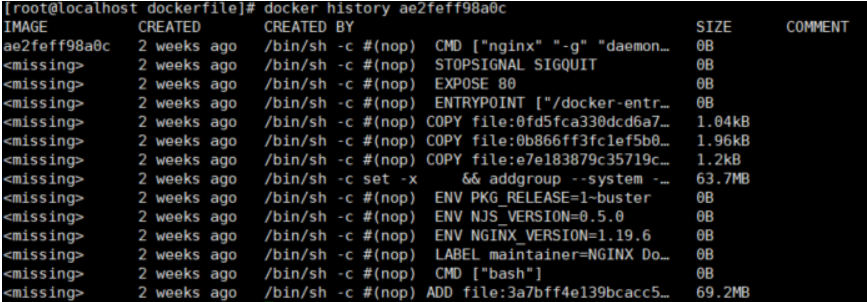
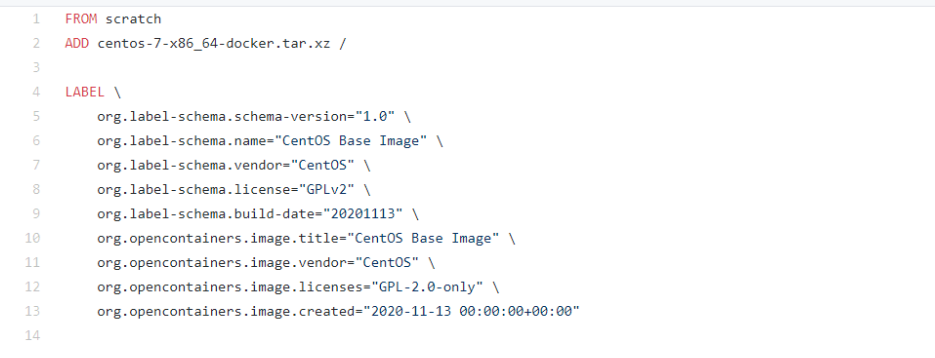
We usually get an image to study how it is done?
Difference between CMD and ENTRYPOINT
CMD          #Specify the command to run when the container starts. Only the last one will take effect and can be replaced
ENTRYPOINT   #Specify the command to run when the container starts, and you can append the command
Test cmd
#Write dockerfile file
[root@localhost dockerfile]# vi dockerfile-cmd-test
FROM centos
CMD ["ls","-a"]

#Build mirror
[root@localhost dockerfile]# docker build -f dockerfile-cmd-test -t cmdcentos .

#Run and find that the ls -a command takes effect
[root@localhost dockerfile]# docker run 10651565484d
.
..
.dockerenv
bin
dev
etc
home
lib
lib64

#Want to append a command - l, that is, let the executed command be ls -al
[root@localhost dockerfile]# docker run 10651565484d -l
docker: Error response from daemon: OCI runtime create failed: container_linux.go:370: starting container process caused: exec: "-l": executable file not found in $PATH: unknown.

#cmd, - l replaces CMD["ls","-a"] command, which is equivalent to ls -a. This command is replaced by - l, but - l is not a command, so an error is reported
Test entrypoint
#Write dockerfile file
[root@localhost dockerfile]# vi entrypoint
FROM centos
ENTRYPOINT ["ls","-a"]
#Build mirror
[root@localhost dockerfile]# docker build -f entrypoint -t entrycentos .
#Run, ls -a command takes effect
[root@localhost dockerfile]# docker run e76f9d0405a5
.
..
.dockerenv
bin
dev
etc
home
lib
#Append command -l takes effect
[root@localhost dockerfile]# docker run e76f9d0405a5 -l
total 0
drwxr-xr-x.   1 root root   6 Dec 31 08:46 .
drwxr-xr-x.   1 root root   6 Dec 31 08:46 ..
-rwxr-xr-x.   1 root root   0 Dec 31 08:46 .dockerenv
lrwxrwxrwx.   1 root root   7 Nov  3 15:22 bin -> usr/bin
drwxr-xr-x.   5 root root 340 Dec 31 08:46 dev
drwxr-xr-x.   1 root root  66 Dec 31 08:46 etc
drwxr-xr-x.   2 root root   6 Nov  3 15:22 home
lrwxrwxrwx.   1 root root   7 Nov  3 15:22 lib -> usr/lib
lrwxrwxrwx.   1 root root   9 Nov  3 15:22 lib64 -> usr/lib64
drwx------.   2 root root   6 Dec  4 17:37 lost+found
Actual test: Tomcat image ⭐
1. Standard image file, tomcat compressed package, jdk compressed package!

2. Write a dockerfile, which is officially named dockerfile. This file will be found automatically when build ing, so you don't need to -f make it
FROM centos

MAINTAINER ray<1437927944@qq.com>

COPY readme.txt /usr/local/readme.txt

ADD tomcat-9.0.tar.gz /usr/local/
ADD jdk8.tar.gz /usr/local/

RUN yum -y install vim

ENV MYPATH /usr/local
WORKDIR $MYPATH

ENV JAVA_HOME /usr/local/jdk1.8.0_261
ENV CLASSPATH $JAVA_HOME/lib/tools.jar
ENV CATALINA_HOME /usr/local/apache-tomcat-9.0.37
ENV CATALINA_BASH /usr/local/apache-tomcat-9.0.37
ENV PATH $PATH:$JAVA_HOME/bin:$CATALINA_HOME/lib:$CATALINA_HOME/bin

EXPOSE 8080

CMD /usr/local/apache-tomcat-9.0.37/bin/startup.sh && tail -F /usr/local/apache-tomcat-9.0.37/logs/catalina.out
3. Build image
Because the file name is Dockerfile Therefore, it is not specified-f The file name only needs to be used
docker build -t divtomcat .
4. Execute the image to mount the test directory and webapps in the container together
docker run -d -p 8080: 8080 --name ray -v opt/dockerfile/test:/usr/local/apache-tomcat-9.0.37/webapps 1awq2er1
5. Create the test1 folder in the test directory and the WEB-INF folder XML and create index. XML in test1 directory jsp
6. The browser accesses IP: 8080 / test1 / index JSP successfully accessed
Our next development steps: we need to master the preparation of Dockerfile! After that, we use the docker image to publish and run
Publish your own image
DockerHub
1. Register your account on Dockerhub
2. Confirm that this account can log in
3. Submit your own image on our server
[root@localhost dockerfile]# docker login --help

Usage:  docker login [OPTIONS] [SERVER]

Log in to a Docker registry.
If no server is specified, the default is defined by the daemon.

Options:
  -p, --password string   Password
      --password-stdin    Take the password from stdin
  -u, --username string   Username
4. After logging in, you can submit the image, that is, one-step docker push
#push your own image to the server! Version number is recommended
[root@localhost dockerfile]# docker push diytomcat
denied:requested access to the resource is denied #refuse

#push image problem?
docker push ray(dockerhub of dockerid)/diytomcat:1.0

#Solution: use docker tag image id image name
docker tag s13fawq1 ray/tomcat:2.0

#After changing the name, docker can push. Try to bring the version number of the image you publish
docker push ray/tomcat:2.0
Note: when submitting, it is also submitted at the image level
Alicloud image service
1. Log in to alicloud
2. Find the container image service
3. Create namespace

4. Create container image

5. Browse Alibaba cloud click in container image reference document
Summary
