Docker's Learning Notes
1. Overview of Docker
Virtual Machine Data Model:
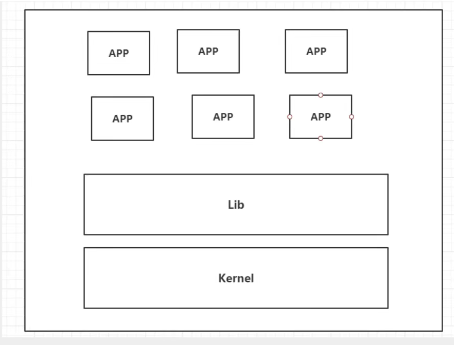
VM Data Disadvantages:
- High resource usage
- Too many redundant steps
- Start very slowly
Containerized technology model:
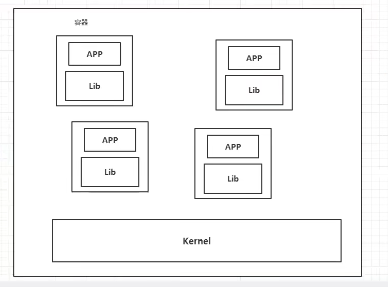
Compare Docker with virtual machine technology:
- Traditional virtual machines virtualize a piece of hardware, run a complete operating system, and then install and run software on this system.
- Applications inside containers run directly on the host's content. Containers are lightweight without their own cores or virtual hardware.
- Each container is isolated from each other, and each container has its own file system, which does not affect each other.
Docker's advantages:
- Apply faster delivery and deployment
- Tradition: a bunch of help documents, Installers
- Docker: Package the mirror publish test, run at one click
- Easier upgrade and expansion
- After using Docker, our deployment applications are just like building blocks, system upgrades require only one click to upgrade the image and the project is packaged into one image, and server extensions can be accomplished directly by running the image on new servers (larger, better-performing new servers).
- Simpler System Operations
- After containerization, our system development and test environments are highly consistent.
- More efficient use of computing resources
- Docker is kernel-level virtualization that can run many container instances on a single physical machine, and server performance can be squeezed to the extreme
Docker's schematic diagram:
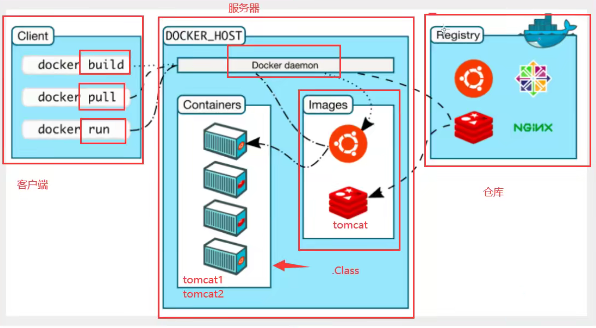
Docker related terms introduction:
- Image: A Docker image is like a template through which a container service can be created, a Tomcat image --> run --> tomcat01 container (which provides services), through which multiple containers can be created (where the final service runs or the project runs).
- Container: Docker uses container technology to run one or more application groups independently, created by mirroring. At present, this container can be understood as a simple Linux system.
- repository: Warehouses are places where mirrors are stored. They are divided into public warehouses and private warehouses. Our Docker warehouses are foreign by default and need to be changed to Ali Cloud's (with mirroring acceleration) or the download of mirrors will be particularly slow.
2. Docker Installation
1. Environmental preparation
- Need a little bit of Linux Basics
- CentOS 7
- We use Xshell to connect to remote servers for operation
2. Environment Viewing
#	The system core is more than 3.10
[root@izbp1ca5vr2fxjgbmapekkz ~]# uname -r
3.10.0-514.26.2.el7.x86_64

#	Version of the system
[root@izbp1ca5vr2fxjgbmapekkz ~]# cat /etc/os-release
NAME="CentOS Linux"
VERSION="7 (Core)"
ID="centos"
ID_LIKE="rhel fedora"
VERSION_ID="7"
PRETTY_NAME="CentOS Linux 7 (Core)"
ANSI_COLOR="0;31"
CPE_NAME="cpe:/o:centos:centos:7"
HOME_URL="https://www.centos.org/"
BUG_REPORT_URL="https://bugs.centos.org/"

CENTOS_MANTISBT_PROJECT="CentOS-7"
CENTOS_MANTISBT_PROJECT_VERSION="7"
REDHAT_SUPPORT_PRODUCT="centos"
REDHAT_SUPPORT_PRODUCT_VERSION="7"
3. Uninstall the old Docker version
Install Docker Official Documentation on Linux
[root@izbp1ca5vr2fxjgbmapekkz ~]# yum remove docker \
>                   docker-client \
>                   docker-client-latest \
>                   docker-common \
>                   docker-latest \
>                   docker-latest-logrotate \
>                   docker-logrotate \
>                   docker-engine
Loaded plugins: fastestmirror
No Match for argument: docker
No Match for argument: docker-client
No Match for argument: docker-client-latest
No Match for argument: docker-common
No Match for argument: docker-latest
No Match for argument: docker-latest-logrotate
No Match for argument: docker-logrotate
No Match for argument: docker-engine
No Packages marked for removal
4. Installation packages required (online installation)
[root@izbp1ca5vr2fxjgbmapekkz ~]# yum install -y yum-utils
Loaded plugins: fastestmirror
base                                                                                                             | 3.6 kB  00:00:00
docker-ce-stable                                                                                                 | 3.5 kB  00:00:00
epel                                                                                                             | 4.7 kB  00:00:00
extras                                                                                                           | 2.9 kB  00:00:00
updates                                                                                                          | 2.9 kB  00:00:00
(1/4): epel/x86_64/updateinfo                                                                                    | 1.0 MB  00:00:00
(2/4): updates/7/x86_64/primary_db                                                                               |  13 MB  00:00:00
(3/4): docker-ce-stable/7/x86_64/primary_db                                                                      |  70 kB  00:00:00
(4/4): epel/x86_64/primary_db                                                                                    | 7.0 MB  00:00:00
Loading mirror speeds from cached hostfile
Package yum-utils-1.1.31-54.el7_8.noarch already installed and latest version
Nothing to do
5. Set up mirror warehouse (default is foreign, change to domestic Aliyun)
[root@izbp1ca5vr2fxjgbmapekkz ~]# yum-config-manager \
>     --add-repo \
>     http://mirrors.aliyun.com/docker-ce/linux/centos/docker-ce.repo
Loaded plugins: fastestmirror
adding repo from: http://mirrors.aliyun.com/docker-ce/linux/centos/docker-ce.repo
grabbing file http://mirrors.aliyun.com/docker-ce/linux/centos/docker-ce.repo to /etc/yum.repos.d/docker-ce.repo
repo saved to /etc/yum.repos.d/docker-ce.repo
6. Update package index
[root@izbp1ca5vr2fxjgbmapekkz ~]# yum makecache fast
Loaded plugins: fastestmirror
base                                                                                                             | 3.6 kB  00:00:00
docker-ce-stable                                                                                                 | 3.5 kB  00:00:00
epel                                                                                                             | 4.7 kB  00:00:00
extras                                                                                                           | 2.9 kB  00:00:00
updates                                                                                                          | 2.9 kB  00:00:00
Loading mirror speeds from cached hostfile
Metadata Cache Created
7. Install the latest Docker engine
#	docker-ce community 	 ee 	 Enterprise Edition
yum install docker-ce docker-ce-cli containerd.io
8. Start Docker and see if the installation was successful
#	Start Docker
[root@izbp1ca5vr2fxjgbmapekkz ~]# systemctl start docker
#	Check to see if the installation was successful
[root@izbp1ca5vr2fxjgbmapekkz ~]# docker version
Client: Docker Engine - Community
 Version:           20.10.12
 API version:       1.41
 Go version:        go1.16.12
 Git commit:        e91ed57
 Built:             Mon Dec 13 11:45:41 2021
 OS/Arch:           linux/amd64
 Context:           default
 Experimental:      true

Server: Docker Engine - Community
 Engine:
  Version:          20.10.12
  API version:      1.41 (minimum version 1.12)
  Go version:       go1.16.12
  Git commit:       459d0df
  Built:            Mon Dec 13 11:44:05 2021
  OS/Arch:          linux/amd64
  Experimental:     false
 containerd:
  Version:          1.4.12
  GitCommit:        7b11cfaabd73bb80907dd23182b9347b4245eb5d
 runc:
  Version:          1.0.2
  GitCommit:        v1.0.2-0-g52b36a2
 docker-init:
  Version:          0.19.0
  GitCommit:        de40ad0
9. Test Run hello-world Mirror
[root@izbp1ca5vr2fxjgbmapekkz ~]# docker run hello-world
10. View the hello-world mirror
[root@izbp1ca5vr2fxjgbmapekkz ~]# docker images
REPOSITORY    TAG       IMAGE ID       CREATED        SIZE
hello-world   latest    feb5d9fea6a5   2 months ago   13.3kB
centos        latest    5d0da3dc9764   3 months ago   231MB
Understanding: Uninstall docker
# 1. Uninstall dependency
yum remove docker-ce docker-ce-cli containerd.io

# 2. Delete resources (/var/lib/docker docker's default working path)
rm -rf /var/lib/docker
Configure Ali Cloud Mirror Acceleration
- Log on to Aliyun account and click on Container Mirror Service
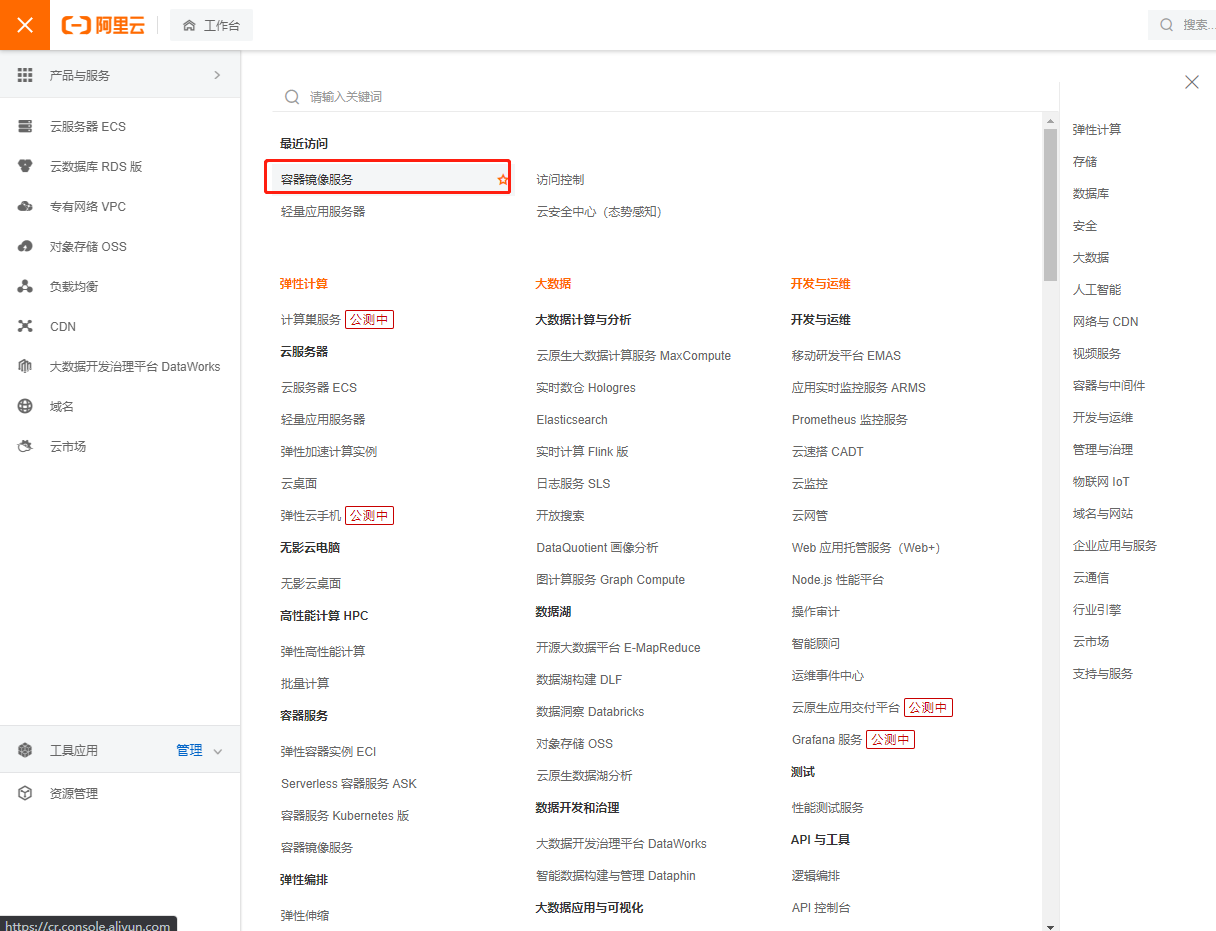
2. Find and configure mirroring acceleration addresses
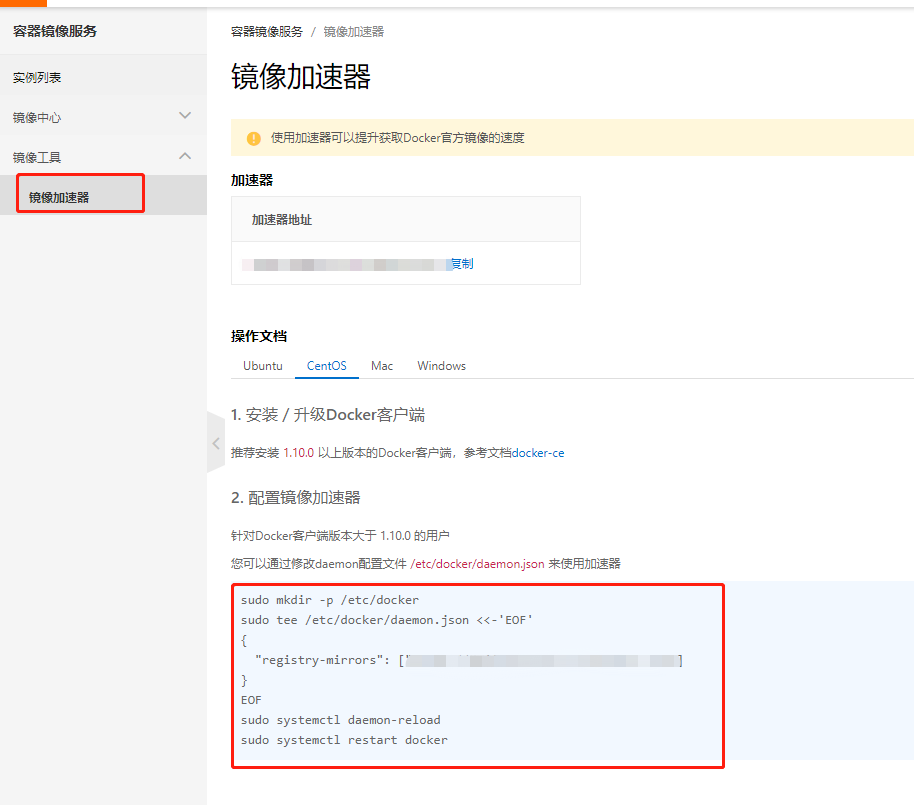
[root@izbp1ca5vr2fxjgbmapekkz ~]# sudo mkdir -p /etc/docker
[root@izbp1ca5vr2fxjgbmapekkz ~]# sudo tee /etc/docker/daemon.json <<-'EOF'
> {
>   "registry-mirrors": ["Your own address"]
> }
> EOF
{
  "registry-mirrors": ["Your own address"]
}
[root@izbp1ca5vr2fxjgbmapekkz ~]# sudo systemctl daemon-reload
[root@izbp1ca5vr2fxjgbmapekkz ~]# sudo systemctl restart docker
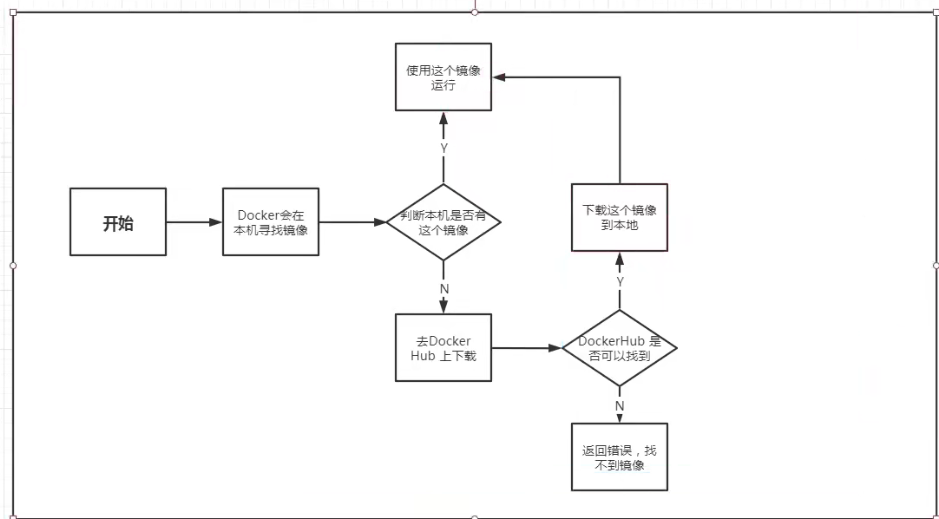
Flow diagram for running hello-world mirror
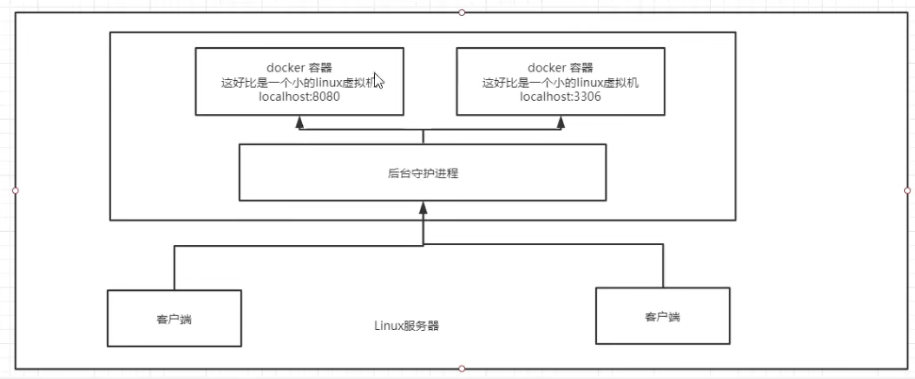
How does Docker work?
- Docker is a Client-Server structured system whose daemon runs on the host and is accessed from the client through a Socket.
- DockerServer receives instructions from Docker-Client and executes them.
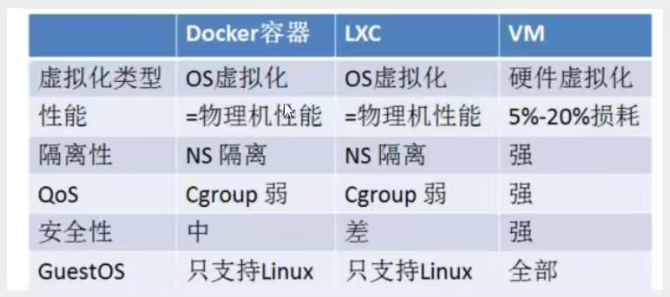
Why is Docker faster than a virtual machine? - Docker has fewer abstraction layers than virtual machines.
- Docker takes advantage of the host's kernel, and virtual machines require Guest OS.
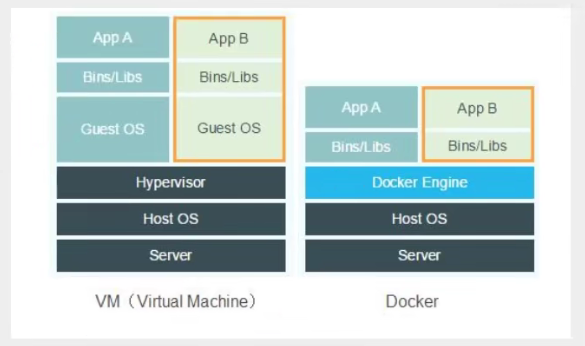
So when you create a new container, Docker doesn't need to reload an operating system kernel like a virtual machine to avoid booting. A virtual machine loads Guest OS at the minute level, while a Docker uses the host's operating system to omit this complex process, in seconds!
3. Docker Order
1. Help commands
docker version 	# Display docker version information
docker info 	# Displays docker system information, including mirror and container information
docker --help	# Help Command
Docker Command Official Document
2. Mirror commands
docker images view mirrors on all local hosts
[root@izbp1ca5vr2fxjgbmapekkz ~]# docker images
REPOSITORY    TAG       IMAGE ID       CREATED        SIZE
hello-world   latest    feb5d9fea6a5   2 months ago   13.3kB
centos        latest    5d0da3dc9764   3 months ago   231MB

#	explain
REPOSITORY	Mirrored warehouse source
TAG			Mirror Label
IMAGE ID	mirrored id
CREATED		Creation time of mirror
SIZE		The size of the mirror

#	Optional
--all , -a		# List all mirrors
--quiet , -q	# Show only the id of the mirror

[root@izbp1ca5vr2fxjgbmapekkz ~]# docker images -a
REPOSITORY    TAG       IMAGE ID       CREATED        SIZE
hello-world   latest    feb5d9fea6a5   2 months ago   13.3kB
centos        latest    5d0da3dc9764   3 months ago   231MB
[root@izbp1ca5vr2fxjgbmapekkz ~]# docker images -q
feb5d9fea6a5
5d0da3dc9764
docker search Search Search mirror
[root@izbp1ca5vr2fxjgbmapekkz ~]# docker search mysql
NAME                              DESCRIPTION                                     STARS     OFFICIAL   AUTOMATED
mysql                             MySQL is a widely used, open-source relation...   11803     [OK]
mariadb                           MariaDB Server is a high performing open sou...   4492      [OK]
mysql/mysql-server                Optimized MySQL Server Docker images. Create...   885                  [OK]

# Optional, filter by search
--filter=STARS=3000		# Searched mirror is STARS greater than 3000

[root@izbp1ca5vr2fxjgbmapekkz ~]# docker search mysql --filter=STARS=3000
NAME      DESCRIPTION                                     STARS     OFFICIAL   AUTOMATED
mysql     MySQL is a widely used, open-source relation...   11803     [OK]
mariadb   MariaDB Server is a high performing open sou...   4492      [OK]
docker pull download mirror
# Download Mirror (Download the latest by default)
[root@izbp1ca5vr2fxjgbmapekkz ~]# docker pull mysql
Using default tag: latest				# If no tag is written, the default is latest
latest: Pulling from library/mysql
ffbb094f4f9e: Pull complete 			# Hierarchical download, core of docker image, federated file system
df186527fc46: Pull complete
fa362a6aa7bd: Pull complete
5af7cb1a200e: Pull complete
949da226cc6d: Pull complete
bce007079ee9: Pull complete
eab9f076e5a3: Pull complete
8a57a7529e8d: Pull complete
b1ccc6ed6fc7: Pull complete
b4af75e64169: Pull complete
3aed6a9cd681: Pull complete
23390142f76f: Pull complete
Digest: sha256:ff9a288d1ecf4397967989b5d1ec269f7d9042a46fc8bc2c3ae35458c1a26727								 	# autograph
Status: Downloaded newer image for mysql:latest 	# Real Address
docker.io/library/mysql:latest

# Equivalent to it
docker pull mysql
docker pull docker.io/library/mysql:latest

# Specified version download
[root@izbp1ca5vr2fxjgbmapekkz ~]# docker pull mysql:5.7
5.7: Pulling from library/mysql
ffbb094f4f9e: Already exists
df186527fc46: Already exists
fa362a6aa7bd: Already exists
5af7cb1a200e: Already exists
949da226cc6d: Already exists
bce007079ee9: Already exists
eab9f076e5a3: Already exists
c7b24c3f27af: Pull complete
6fc26ff6705a: Pull complete
bec5cdb5e7f7: Pull complete
6c1cb25f7525: Pull complete
Digest: sha256:d1cc87a3bd5dc07defc837bc9084f748a130606ff41923f46dec1986e0dc828d
Status: Downloaded newer image for mysql:5.7
docker.io/library/mysql:5.7
docker rmi delete mirror
docker rmi -f container id		# Delete the specified image

[root@izbp1ca5vr2fxjgbmapekkz ~]# docker images
REPOSITORY    TAG       IMAGE ID       CREATED        SIZE
mysql         5.7       738e7101490b   12 days ago    448MB
mysql         latest    bbf6571db497   12 days ago    516MB
hello-world   latest    feb5d9fea6a5   2 months ago   13.3kB
centos        latest    5d0da3dc9764   3 months ago   231MB
[root@izbp1ca5vr2fxjgbmapekkz ~]# docker rmi -f 738e7101490b
Untagged: mysql:5.7
Untagged: mysql@sha256:d1cc87a3bd5dc07defc837bc9084f748a130606ff41923f46dec1986e0dc828d
Deleted: sha256:738e7101490b45decf606211a5437ed87aa6a82f1ff03c354564bf9375ce20f9
Deleted: sha256:addad8cfeac97b96eb6652a576269346ac96def9a6709ed2388e24fff4345837
Deleted: sha256:e288c3439a7e2f423f50bf22979a759371c51a70bbbaa450993c336978460b1a
Deleted: sha256:33ece15accaa3bb20e3dee84e2e4501469b917c3abba3d5475cd1fec8bb3e82c
Deleted: sha256:6b15390bceeca8424d82e75f5c9aca5eb4693f96849d6382168a99747877693d
[root@izbp1ca5vr2fxjgbmapekkz ~]# docker images
REPOSITORY    TAG       IMAGE ID       CREATED        SIZE
mysql         latest    bbf6571db497   12 days ago    516MB
hello-world   latest    feb5d9fea6a5   2 months ago   13.3kB
centos        latest    5d0da3dc9764   3 months ago   231MB

docker rmi -f container id	container id container id	# Delete Multiple Mirrors
docker rmi -f $(docker images -aq)	# Remove all mirrors
3. Container commands
Note: We have mirrors to create containers, Linux, download a centos image to test learning
docker pull centos
[root@izbp1ca5vr2fxjgbmapekkz ~]# docker pull centos
Using default tag: latest
latest: Pulling from library/centos
Digest: sha256:a27fd8080b517143cbbbab9dfb7c8571c40d67d534bbdee55bd6c473f432b177
Status: Image is up to date for centos:latest
docker.io/library/centos:latest
New Container and Start
docker run [Optional parameters] image
# Parameter Description
--name="Name"	Container name	tomcat01	tomcat02	Used to distinguish containers
-d				Background operation mode
-it				Run interactively for container viewing
-P				Specify the port of the container	-P	8080:8080
	-P	ip:Host Port: Container Port
	-P	Host Port: Container Port (Common)
	-P	Container Port
-p	Randomly specified port

# Test, start and enter container
[root@izbp1ca5vr2fxjgbmapekkz ~]# docker run -it centos /bin/bash
[root@7873af79c113 /]# ls	# Looking at centos inside the container, the base version, many commands are imperfect
bin  dev  etc  home  lib  lib64  lost+found  media  mnt  opt  proc  root  run  sbin  srv  sys  tmp  usr  var

# Exit from container to host
[root@cd742af46c77 /]# exit
exit
[root@izbp1ca5vr2fxjgbmapekkz /]# ls
bin  boot  data  dev  etc  home  lib  lib64  lost+found  media  mnt  opt  proc  root  run  sbin  srv  sys  tmp  usr  var
List all running containers
# docker ps command
		 # List all running containers
	-a   # List currently running containers + bring out historically run containers
	-n=? # Show recently created containers
	-q   # Display container number only

[root@izbp1ca5vr2fxjgbmapekkz /]# docker ps
CONTAINER ID   IMAGE     COMMAND   CREATED   STATUS    PORTS     NAMES
[root@izbp1ca5vr2fxjgbmapekkz /]# docker ps -a
CONTAINER ID   IMAGE         COMMAND       CREATED          STATUS                        PORTS     NAMES
cd742af46c77   centos        "/bin/bash"   49 minutes ago   Exited (0) 49 minutes ago               zealous_murdock
7873af79c113   centos        "/bin/bash"   53 minutes ago   Exited (130) 49 minutes ago             stoic_hellman
0448aa7b6032   hello-world   "/hello"      6 hours ago      Exited (0) 6 hours ago                  amazing_hellman
cf34bafc4f4b   centos        "/bin/bash"   20 hours ago     Exited (0) 20 hours ago                 vigilant_moser
b233ad3d909d   centos        "/bin/bash"   43 hours ago     Exited (0) 43 hours ago                 quizzical_ishizaka
9abf86b62b40   hello-world   "/hello"      2 days ago       Exited (0) 2 days ago                   ecstatic_jackson
[root@izbp1ca5vr2fxjgbmapekkz /]# docker ps -a -n=1
CONTAINER ID   IMAGE     COMMAND       CREATED          STATUS                      PORTS     NAMES
cd742af46c77   centos    "/bin/bash"   49 minutes ago   Exited (0) 49 minutes ago             zealous_murdock
[root@izbp1ca5vr2fxjgbmapekkz /]# docker ps -aq
cd742af46c77
7873af79c113
0448aa7b6032
cf34bafc4f4b
b233ad3d909d
9abf86b62b40
Exit Container
exit			# Direct container stops and exits
Ctrl + P + Q	# Container does not stop exiting

[root@izbp1ca5vr2fxjgbmapekkz /]# docker ps
CONTAINER ID   IMAGE     COMMAND   CREATED   STATUS    PORTS     NAMES
[root@izbp1ca5vr2fxjgbmapekkz /]# docker run -it centos /bin/bash
[root@907a070a9091 /]#          #	Ctrl + P + Q
[root@izbp1ca5vr2fxjgbmapekkz /]# docker ps
CONTAINER ID   IMAGE     COMMAND       CREATED          STATUS          PORTS     NAMES
907a070a9091   centos    "/bin/bash"   41 seconds ago   Up 40 seconds             adoring_cerf
Delete Container
docker rm container id						# Delete the specified container, not the running container, if you want to force the deletion of rm-f
docker rm -f $(docker ps -aq)		# Delete all containers
docker ps -a -q|xargs docker rm		# Delete all containers
Start and stop container operations
docker start container id		# Start Container
docker restart container id	# Restart Container
docker stop container id		# Stop the currently running container
docker kill container id		# Force stop of current container
Background startup container
# Command docker run-d mirror name
[root@izbp1ca5vr2fxjgbmapekkz /]# docker run -d centos
304a9798adeb9f85e9856063fd3b87179f57e4ef7eaf75a86d8592671d9cbc3a
[root@izbp1ca5vr2fxjgbmapekkz /]# docker ps
CONTAINER ID   IMAGE     COMMAND   CREATED   STATUS    PORTS     NAMES

# Problem docker ps found centos stopped

# Common pits, docker containers run in the background, there must be a foreground process, docker found no application, will automatically stop
# nginx, when the container starts up and finds itself not servicing, it stops immediately, or there is no program
view log
docker logs -f -t --tail Container, no log

# Write a shell script yourself
[root@izbp1ca5vr2fxjgbmapekkz /]# docker run -d centos /bin/sh -c "while true;do echo UZI;sleep 1;done"

[root@izbp1ca5vr2fxjgbmapekkz /]# docker ps
CONTAINER ID   IMAGE     COMMAND                  CREATED         STATUS         PORTS     NAMES
7c7180a2de02   centos    "/bin/sh -c 'while t..."   3 seconds ago   Up 2 seconds             angry_lewin

# Show Log
-tf 			#Show Log
--tail number	#To display the number of log entries

[root@izbp1ca5vr2fxjgbmapekkz /]# docker ps
CONTAINER ID   IMAGE     COMMAND                  CREATED         STATUS         PORTS     NAMES
7c7180a2de02   centos    "/bin/sh -c 'while t..."   3 seconds ago   Up 2 seconds             angry_lewin
[root@izbp1ca5vr2fxjgbmapekkz /]# docker logs -tf --tail 10 7c7180a2de02
2021-12-15T11:46:29.318643184Z UZI
2021-12-15T11:46:30.320057098Z UZI
2021-12-15T11:46:31.321457226Z UZI
2021-12-15T11:46:32.322890799Z UZI
2021-12-15T11:46:33.324313728Z UZI
2021-12-15T11:46:34.325861478Z UZI
2021-12-15T11:46:35.327300274Z UZI
2021-12-15T11:46:36.328808505Z UZI
2021-12-15T11:46:37.330254542Z UZI
2021-12-15T11:46:38.331815325Z UZI
2021-12-15T11:46:39.333342324Z UZI
2021-12-15T11:46:40.334873853Z UZI
2021-12-15T11:46:41.336293624Z UZI
View process information in container
# Command docker top container id

[root@izbp1ca5vr2fxjgbmapekkz /]# docker ps
CONTAINER ID   IMAGE     COMMAND                  CREATED         STATUS         PORTS     NAMES
7c7180a2de02   centos    "/bin/sh -c 'while t..."   7 minutes ago   Up 7 minutes             angry_lewin
[root@izbp1ca5vr2fxjgbmapekkz /]# docker top 7c7180a2de02
UID                 PID                 PPID                C                   STIME               TTY
root                2651                2613                0                   19:42               ?
root                3889                2651                0                   19:50               ?
View mirrored metadata
# command
docker inspect container id

# test
[root@izbp1ca5vr2fxjgbmapekkz /]# docker inspect 7c7180a2de02
[
    {
        "Id": "7c7180a2de024dce9acda6708d1187a0075ebb838fbfa65e7693385758a83dbb",
        "Created": "2021-12-15T11:42:24.764104676Z",
        "Path": "/bin/sh",
        "Args": [
            "-c",
            "while true;do echo UZI;sleep 1;done"
        ],
        "State": {
            "Status": "running",
            "Running": true,
            "Paused": false,
            "Restarting": false,
            "OOMKilled": false,
            "Dead": false,
            "Pid": 2651,
            "ExitCode": 0,
            "Error": "",
            "StartedAt": "2021-12-15T11:42:24.957721927Z",
            "FinishedAt": "0001-01-01T00:00:00Z"
        },
        "Image": "sha256:5d0da3dc976460b72c77d94c8a1ad043720b0416bfc16c52c45d4847e53fadb6",
        "ResolvConfPath": "/var/lib/docker/containers/7c7180a2de024dce9acda6708d1187a0075ebb838fbfa65e7693385758a83dbb/resolv.conf",
        "HostnamePath": "/var/lib/docker/containers/7c7180a2de024dce9acda6708d1187a0075ebb838fbfa65e7693385758a83dbb/hostname",
        "HostsPath": "/var/lib/docker/containers/7c7180a2de024dce9acda6708d1187a0075ebb838fbfa65e7693385758a83dbb/hosts",
        "LogPath": "/var/lib/docker/containers/7c7180a2de024dce9acda6708d1187a0075ebb838fbfa65e7693385758a83dbb/7c7180a2de024dce9acda6708d1187a0075ebb838fbfa65e7693385758a83dbb-json.log",
        "Name": "/angry_lewin",
        "RestartCount": 0,
        "Driver": "overlay2",
        "Platform": "linux",
        "MountLabel": "",
        "ProcessLabel": "",
        "AppArmorProfile": "",
        "ExecIDs": null,
        "HostConfig": {
            "Binds": null,
            "ContainerIDFile": "",
            "LogConfig": {
                "Type": "json-file",
                "Config": {}
            },
            "NetworkMode": "default",
            "PortBindings": {},
            "RestartPolicy": {
                "Name": "no",
                "MaximumRetryCount": 0
            },
            "AutoRemove": false,
            "VolumeDriver": "",
            "VolumesFrom": null,
            "CapAdd": null,
            "CapDrop": null,
            "CgroupnsMode": "host",
            "Dns": [],
            "DnsOptions": [],
            "DnsSearch": [],
            "ExtraHosts": null,
            "GroupAdd": null,
            "IpcMode": "private",
            "Cgroup": "",
            "Links": null,
            "OomScoreAdj": 0,
            "PidMode": "",
            "Privileged": false,
            "PublishAllPorts": false,
            "ReadonlyRootfs": false,
            "SecurityOpt": null,
            "UTSMode": "",
            "UsernsMode": "",
            "ShmSize": 67108864,
            "Runtime": "runc",
            "ConsoleSize": [
                0,
                0
            ],
            "Isolation": "",
            "CpuShares": 0,
            "Memory": 0,
            "NanoCpus": 0,
            "CgroupParent": "",
            "BlkioWeight": 0,
            "BlkioWeightDevice": [],
            "BlkioDeviceReadBps": null,
            "BlkioDeviceWriteBps": null,
            "BlkioDeviceReadIOps": null,
            "BlkioDeviceWriteIOps": null,
            "CpuPeriod": 0,
            "CpuQuota": 0,
            "CpuRealtimePeriod": 0,
            "CpuRealtimeRuntime": 0,
            "CpusetCpus": "",
            "CpusetMems": "",
            "Devices": [],
            "DeviceCgroupRules": null,
            "DeviceRequests": null,
            "KernelMemory": 0,
            "KernelMemoryTCP": 0,
            "MemoryReservation": 0,
            "MemorySwap": 0,
            "MemorySwappiness": null,
            "OomKillDisable": false,
            "PidsLimit": null,
            "Ulimits": null,
            "CpuCount": 0,
            "CpuPercent": 0,
            "IOMaximumIOps": 0,
            "IOMaximumBandwidth": 0,
            "MaskedPaths": [
                "/proc/asound",
                "/proc/acpi",
                "/proc/kcore",
                "/proc/keys",
                "/proc/latency_stats",
                "/proc/timer_list",
                "/proc/timer_stats",
                "/proc/sched_debug",
                "/proc/scsi",
                "/sys/firmware"
            ],
            "ReadonlyPaths": [
                "/proc/bus",
                "/proc/fs",
                "/proc/irq",
                "/proc/sys",
                "/proc/sysrq-trigger"
            ]
        },
        "GraphDriver": {
            "Data": {
                "LowerDir": "/var/lib/docker/overlay2/508aaa276b048c3a0fb4dd8a2d022ba19c6a19dc8a680b5e0a84d6d5139fd6df-init/diff:/var/lib/docker/overlay2/6bb58fdacfa3f03bd88b1169e1f421f7df2e22c8171994f474c17b3f4556cc48/diff",
                "MergedDir": "/var/lib/docker/overlay2/508aaa276b048c3a0fb4dd8a2d022ba19c6a19dc8a680b5e0a84d6d5139fd6df/merged",
                "UpperDir": "/var/lib/docker/overlay2/508aaa276b048c3a0fb4dd8a2d022ba19c6a19dc8a680b5e0a84d6d5139fd6df/diff",
                "WorkDir": "/var/lib/docker/overlay2/508aaa276b048c3a0fb4dd8a2d022ba19c6a19dc8a680b5e0a84d6d5139fd6df/work"
            },
            "Name": "overlay2"
        },
        "Mounts": [],
        "Config": {
            "Hostname": "7c7180a2de02",
            "Domainname": "",
            "User": "",
            "AttachStdin": false,
            "AttachStdout": false,
            "AttachStderr": false,
            "Tty": false,
            "OpenStdin": false,
            "StdinOnce": false,
            "Env": [
                "PATH=/usr/local/sbin:/usr/local/bin:/usr/sbin:/usr/bin:/sbin:/bin"
            ],
            "Cmd": [
                "/bin/sh",
                "-c",
                "while true;do echo UZI;sleep 1;done"
            ],
            "Image": "centos",
            "Volumes": null,
            "WorkingDir": "",
            "Entrypoint": null,
            "OnBuild": null,
            "Labels": {
                "org.label-schema.build-date": "20210915",
                "org.label-schema.license": "GPLv2",
                "org.label-schema.name": "CentOS Base Image",
                "org.label-schema.schema-version": "1.0",
                "org.label-schema.vendor": "CentOS"
            }
        },
        "NetworkSettings": {
            "Bridge": "",
            "SandboxID": "fbfa2f75182781284716c31d52d8fff0bb735d138716974ea281aaf3f2d27e75",
            "HairpinMode": false,
            "LinkLocalIPv6Address": "",
            "LinkLocalIPv6PrefixLen": 0,
            "Ports": {},
            "SandboxKey": "/var/run/docker/netns/fbfa2f751827",
            "SecondaryIPAddresses": null,
            "SecondaryIPv6Addresses": null,
            "EndpointID": "f6ee96c8e9055a747198d3907263c98aa8681496cfc933e9a261caf47cc63c61",
            "Gateway": "172.17.0.1",
            "GlobalIPv6Address": "",
            "GlobalIPv6PrefixLen": 0,
            "IPAddress": "172.17.0.2",
            "IPPrefixLen": 16,
            "IPv6Gateway": "",
            "MacAddress": "02:42:ac:11:00:02",
            "Networks": {
                "bridge": {
                    "IPAMConfig": null,
                    "Links": null,
                    "Aliases": null,
                    "NetworkID": "f43965cd248966c0dee0abdfc2595284feb0f522cd2df0c0245c45f34a17bc09",
                    "EndpointID": "f6ee96c8e9055a747198d3907263c98aa8681496cfc933e9a261caf47cc63c61",
                    "Gateway": "172.17.0.1",
                    "IPAddress": "172.17.0.2",
                    "IPPrefixLen": 16,
                    "IPv6Gateway": "",
                    "GlobalIPv6Address": "",
                    "GlobalIPv6PrefixLen": 0,
                    "MacAddress": "02:42:ac:11:00:02",
                    "DriverOpts": null
                }
            }
        }
    }
]
Enter the currently running container
# Usually we have containers running in the background and need to go into them and modify some configuration

# command
docker exec -it

# test
[root@izbp1ca5vr2fxjgbmapekkz /]# docker exec -it 7c7180a2de02 /bin/bash
[root@7c7180a2de02 /]# ls
bin  dev  etc  home  lib  lib64  lost+found  media  mnt  opt  proc  root  run  sbin  srv  sys  tmp  usr  var
[root@7c7180a2de02 /]# ps -ef
UID        PID  PPID  C STIME TTY          TIME CMD
root         1     0  0 11:42 ?        00:00:00 /bin/sh -c while true;do echo UZI;sleep 1;done
root      1153     0  0 12:01 pts/0    00:00:00 /bin/bash
root      1195     1  0 12:01 ?        00:00:00 /usr/bin/coreutils --coreutils-prog-shebang=sleep /usr/bin/sleep 1
root      1196  1153  0 12:01 pts/0    00:00:00 ps -ef

# Mode 2
docker attach container id
# test
[root@izbp1ca5vr2fxjgbmapekkz /]# docker attach 7c7180a2de02
 Executing current code (non-stop printing) UZI)

# docker exec   # Open a new terminal after entering the container to operate inside (commonly used)
# docker attach # Enter the terminal that the container is executing and will not start a new process
Copy files from container to host
docker cp container id: Host path for in-container path purpose

[root@izbp1ca5vr2fxjgbmapekkz home]# docker ps
CONTAINER ID   IMAGE     COMMAND       CREATED              STATUS              PORTS     NAMES
0bf351fa76f2   centos    "/bin/bash"   About a minute ago   Up About a minute             elated_sammet
f1b9afbe52ee   centos    "/bin/bash"   7 minutes ago        Up 7 minutes                  dreamy_hermann
[root@izbp1ca5vr2fxjgbmapekkz home]# docker attach 0bf351fa76f2
[root@0bf351fa76f2 /]# cd /home
[root@0bf351fa76f2 home]# ls
[root@0bf351fa76f2 home]# touch test.java
[root@0bf351fa76f2 home]# ls
test.java
[root@0bf351fa76f2 home]# exit
exit
[root@izbp1ca5vr2fxjgbmapekkz home]# docker cp 0bf351fa76f2:/home/test.java /home
[root@izbp1ca5vr2fxjgbmapekkz home]# ls
admin  staragent  test.java  UZI.java  www

#	Copying is a manual process. In the future, we will use the technology of -v volume to achieve automatic synchronization.
IV. Deployment of Nginx
- Search Mirror Search recommends you go to docker to search for help documents
Docker Search Nginx
[root@izbp1ca5vr2fxjgbmapekkz home]# docker search nginx
NAME                              DESCRIPTION                                     STARS     OFFICIAL   AUTOMATED
nginx                             Official build of Nginx.                        15928     [OK]
jwilder/nginx-proxy               Automated Nginx reverse proxy for docker con...   2101                 [OK]
richarvey/nginx-php-fpm           Container running Nginx + PHP-FPM capable of...   820                  [OK]
jc21/nginx-proxy-manager          Docker container for managing Nginx proxy ho...   288
linuxserver/nginx                 An Nginx container, brought to you by LinuxS...   160
tiangolo/nginx-rtmp               Docker image with Nginx using the nginx-rtmp...   147                  [OK]
jlesage/nginx-proxy-manager       Docker container for Nginx Proxy Manager        145                  [OK]
alfg/nginx-rtmp                   NGINX, nginx-rtmp-module and FFmpeg from sou...   111                  [OK]
nginxdemos/hello                  NGINX webserver that serves a simple page co...   79                   [OK]
privatebin/nginx-fpm-alpine       PrivateBin running on an Nginx, php-fpm & Al...   61                   [OK]
nginx/nginx-ingress               NGINX and  NGINX Plus Ingress Controllers fo...   57
nginxinc/nginx-unprivileged       Unprivileged NGINX Dockerfiles                  55
nginxproxy/nginx-proxy            Automated Nginx reverse proxy for docker con...   29
staticfloat/nginx-certbot         Opinionated setup for automatic TLS certs lo...   25                   [OK]
nginx/nginx-prometheus-exporter   NGINX Prometheus Exporter for NGINX and NGIN...   22
schmunk42/nginx-redirect          A very simple container to redirect HTTP tra...   19                   [OK]
centos/nginx-112-centos7          Platform for running nginx 1.12 or building ...   16
centos/nginx-18-centos7           Platform for running nginx 1.8 or building n...   13
bitwarden/nginx                   The Bitwarden nginx web server acting as a r...   11
flashspys/nginx-static            Super Lightweight Nginx Image                   11                   [OK]
mailu/nginx                       Mailu nginx frontend                            9                    [OK]
sophos/nginx-vts-exporter         Simple server that scrapes Nginx vts stats a...   7                    [OK]
ansibleplaybookbundle/nginx-apb   An APB to deploy NGINX                          3                    [OK]
wodby/nginx                       Generic nginx                                   1                    [OK]
arnau/nginx-gate                  Docker image with Nginx with Lua enabled on ...   1                    [OK]
- Download mirror pull
[root@izbp1ca5vr2fxjgbmapekkz home]# docker pull nginx
Using default tag: latest
latest: Pulling from library/nginx
e5ae68f74026: Pull complete
21e0df283cd6: Pull complete
ed835de16acd: Pull complete
881ff011f1c9: Pull complete
77700c52c969: Pull complete
44be98c0fab6: Pull complete
Digest: sha256:9522864dd661dcadfd9958f9e0de192a1fdda2c162a35668ab6ac42b465f0603
Status: Downloaded newer image for nginx:latest
docker.io/library/nginx:latest
[root@izbp1ca5vr2fxjgbmapekkz home]# docker images
REPOSITORY    TAG       IMAGE ID       CREATED        SIZE
mysql         latest    bbf6571db497   13 days ago    516MB
nginx         latest    f652ca386ed1   13 days ago    141MB
hello-world   latest    feb5d9fea6a5   2 months ago   13.3kB
centos        latest    5d0da3dc9764   3 months ago   231MB
- Run tests
# -d Background Run
# --name Name the container
# -p host port, container internal port
[root@izbp1ca5vr2fxjgbmapekkz home]# docker run -d --name nginx01 -p 3344:80 nginx
b1f9ba923daab45bed2beee6f4ae59611aa006e14b19ff20dabaadc12c5816e4
[root@izbp1ca5vr2fxjgbmapekkz home]# docker ps
CONTAINER ID   IMAGE     COMMAND                  CREATED          STATUS          PORTS                  NAMES
b1f9ba923daa   nginx     "/docker-entrypoint...."   5 seconds ago    Up 4 seconds    0.0.0.0:3344->80/tcp   nginx01
f1b9afbe52ee   centos    "/bin/bash"              27 minutes ago   Up 27 minutes                          dreamy_hermann
[root@izbp1ca5vr2fxjgbmapekkz home]# curl localhost:3344
<!DOCTYPE html>
<html>
<head>
<title>Welcome to nginx!</title>
<style>
html { color-scheme: light dark; }
body { width: 35em; margin: 0 auto;
font-family: Tahoma, Verdana, Arial, sans-serif; }
</style>
</head>
<body>
<h1>Welcome to nginx!</h1>
<p>If you see this page, the nginx web server is successfully installed and
working. Further configuration is required.</p>

<p>For online documentation and support please refer to
<a href="http://nginx.org/">nginx.org</a>.<br/>
Commercial support is available at
<a href="http://nginx.com/">nginx.com</a>.</p>

<p><em>Thank you for using nginx.</em></p>
</body>
</html>

# Enter Container
[root@izbp1ca5vr2fxjgbmapekkz ~]# docker exec -it nginx01 /bin/bash
root@b1f9ba923daa:/# whereis nginx
nginx: /usr/sbin/nginx /usr/lib/nginx /etc/nginx /usr/share/nginx
root@b1f9ba923daa:/# cd /etc/nginx
root@b1f9ba923daa:/etc/nginx# ls
conf.d	fastcgi_params	mime.types  modules  nginx.conf  scgi_params  uwsgi_params
The concept of port exposure
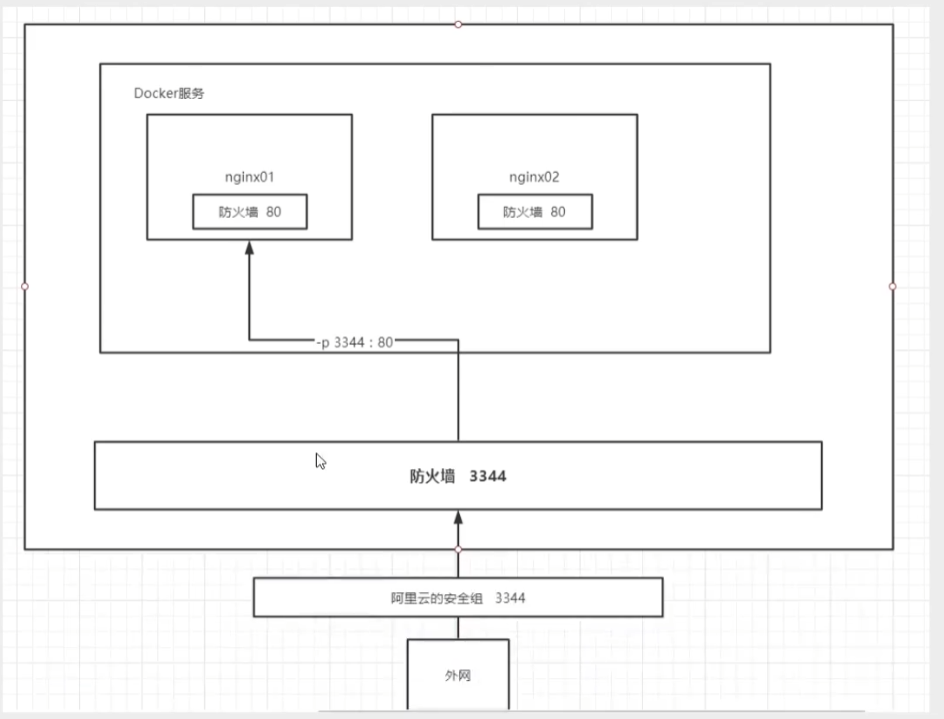
Think about it: Do we need to go inside the container every time we change the nginx configuration file? Very cumbersome, if I can provide a mapping path outside the container so that the file name can be modified inside the container automatically? - v Data Volume!
5. Deploying Tomcat
Official use:
docker run -it --rm tomcat:9.0
Our previous startups were all background, after stopping the container, the container can also be found, docker run-t-rm, commonly used for testing, delete when used up.
-
Download Mirror
- docker pull tomcat
-
Start Run
- docker run -d -p 3355:8080 --name tomcat01 tomcat
-
Access tests are OK
-
Enter Container
- d[root@izbp1ca5vr2fxjgbmapekkz ~]# docker exec -it tomcat01 /bin/bash
Problem found: 1. The Linux command is 2 less. There are no webapps.
For Ali cloud mirroring reasons, the default is the smallest mirror, all unnecessary are removed to ensure the smallest runnable environment
Think about it: Would it be a hassle for us to deploy the project in the future if we had to enter the container every time? I wish I could provide a mapping path outside the container, webapps, and we could project externally and synchronize internally automatically!
Docker container tomcat + website docker + mysql
V. Deployment of ES + Kibana
# es exposes many ports
# es10 consumes memory
# es data generally needs to be placed in a secure directory! mount

# Start elasticsearch
docker run -d --name elasticsearch -p 9200:9200 -p 9300:9300 -e "discovery.type=single-node" elasticsearch:7.6.2
# Start the elasticaserch linux card owner, because the elasticaserch takes up a lot of memory (1.xG)

# 	Doker stats checked the status of cup and found that 1.25G was used to boot light es, accounting for 35.53 memory!
CONTAINER ID   NAME             CPU %     MEM USAGE / LIMIT     MEM %     NET I/O           BLOCK I/O      PIDS
7f8f3d2f4177   elasticsearch    0.13%     1.25GiB / 3.519GiB    35.53%    0B / 0B           32MB / 729kB   43
eb22f4cb0852   tomcat01         0.07%     143.5MiB / 3.519GiB   3.98%     1.64kB / 13.9kB   65.5kB / 0B    31
f1b9afbe52ee   dreamy_hermann   0.00%     520KiB / 3.519GiB     0.01%     306B / 0B         0B / 0B        1

# Test if es succeeds
[root@izbp1ca5vr2fxjgbmapekkz ~]# curl localhost:9200
{
  "name" : "7f8f3d2f4177",
  "cluster_name" : "docker-cluster",
  "cluster_uuid" : "s9ncNoy1QtS_Wz3YilFKOA",
  "version" : {
    "number" : "7.6.2",
    "build_flavor" : "default",
    "build_type" : "docker",
    "build_hash" : "ef48eb35cf30adf4db14086e8aabd07ef6fb113f",
    "build_date" : "2020-03-26T06:34:37.794943Z",
    "build_snapshot" : false,
    "lucene_version" : "8.4.0",
    "minimum_wire_compatibility_version" : "6.8.0",
    "minimum_index_compatibility_version" : "6.0.0-beta1"
  },
  "tagline" : "You Know, for Search"
}

# Close now, increase memory limit, modify profile-e environment configuration modification
docker run -d --name elasticsearch02 -p 9200:9200 -p 9300:9300 -e "discovery.type=single-node" -e ES_JAVA_OPTS="-Xms64m -Xmx512m" elasticsearch:7.6.2
# Looking at all the es memory docker stats here, we found that they are much smaller!
CONTAINER ID   NAME              CPU %     MEM USAGE / LIMIT     MEM %     NET I/O           BLOCK I/O        PIDS
69edec2b1847   elasticsearch02   183.49%   365.3MiB / 3.519GiB   10.14%    0B / 0B           9.39MB / 471kB   43
eb22f4cb0852   tomcat01          0.06%     143.5MiB / 3.519GiB   3.98%     1.68kB / 13.9kB   65.5kB / 0B      31
f1b9afbe52ee   dreamy_hermann    0.00%     520KiB / 3.519GiB     0.01%     348B / 0B         0B / 0B          1
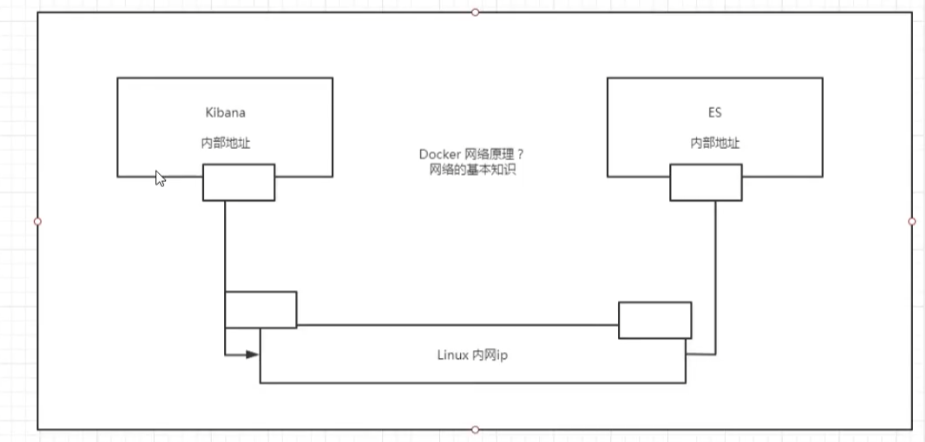
Job: Connect es using kibana? Think about how the network can connect to the past!
6. Portainer Visualization Panel Installation
What is portainer?
Docker GUI management tool! Provide a background panel for us to operate!
docker run -d -p 8088:9000 \--restart=always -v /var/run/docker.sock:/var/run/docker.sock --privileged=true portainer/portainer
The interface after starting the access is shown below
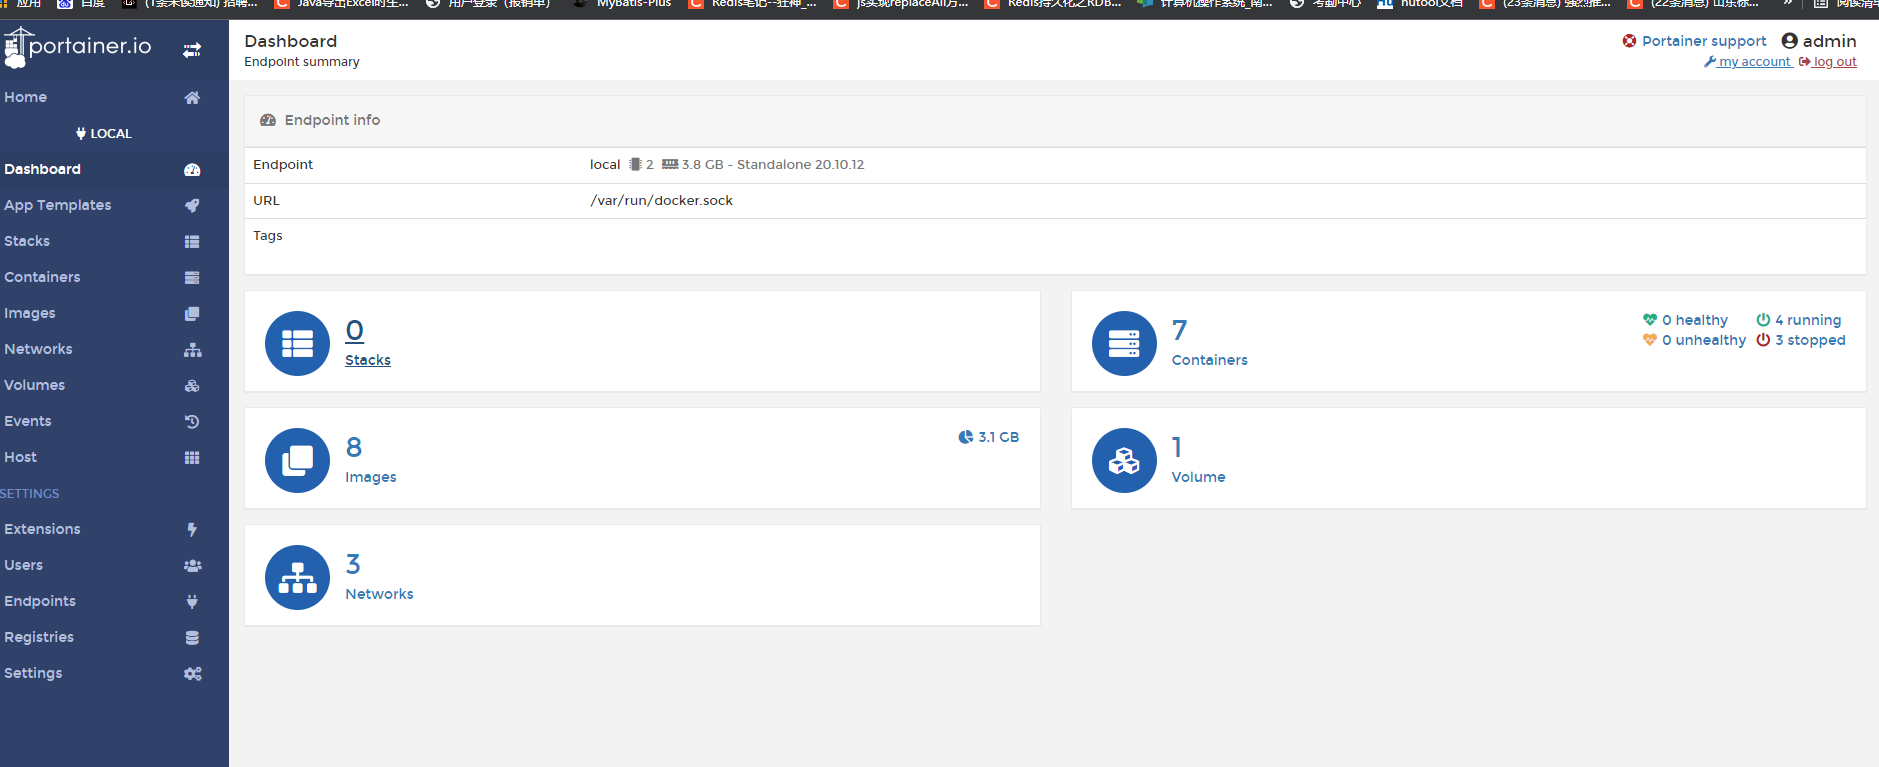
Visualization panel we do not normally use, you can test and play!
7. Docker Mirror Explanation
1. What is the mirror
Mirroring is a lightweight, executable, stand-alone package that packages software developed for both the software runtime and the basic runtime environments. It contains everything you need to run a software, including code, runtime, libraries, environment variables, and configuration files.
All applications, just pack a docker image and run!
How to get a mirror:
- Download from remote repository
- Friend's copy for you
- Make your own mirror DockerFile
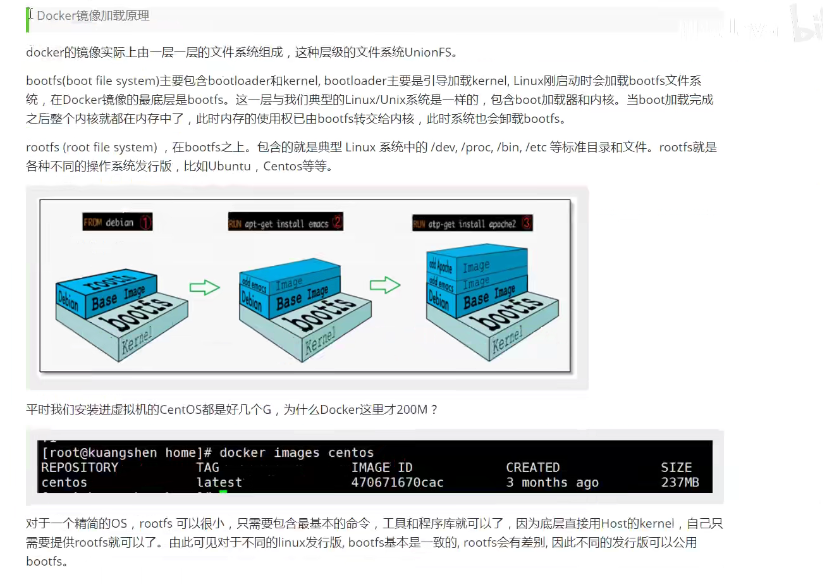
2. Docker mirror loading principle

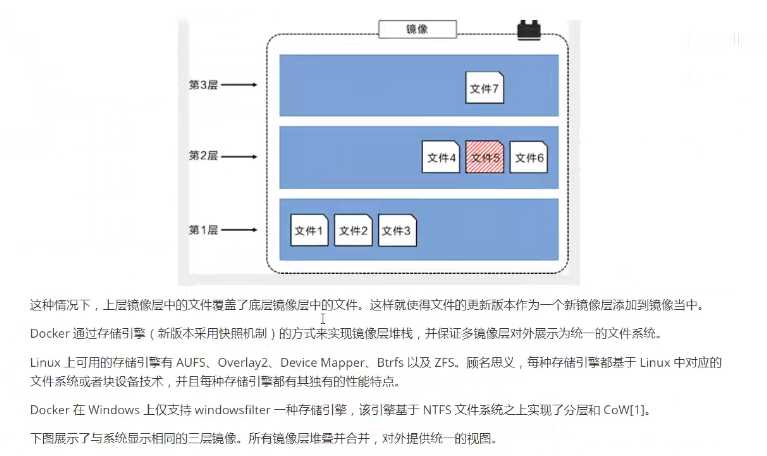
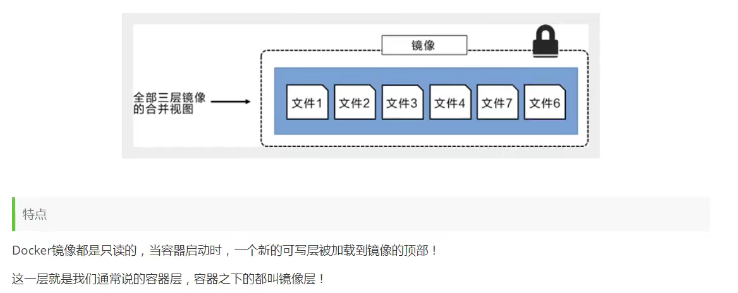
3. Hierarchical Understanding
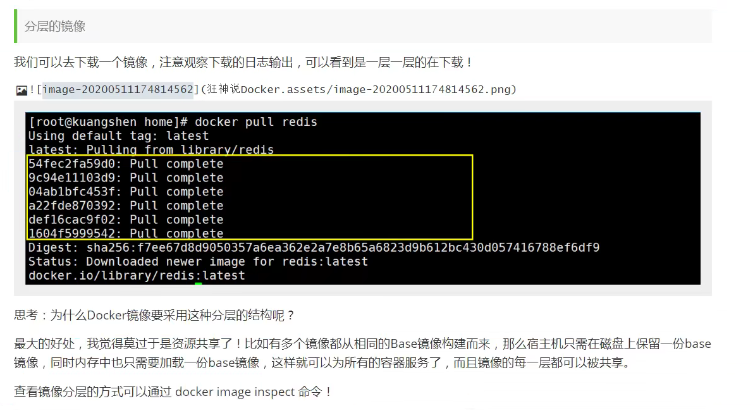
[root@iZwz99sm8v95sckz8bd2c4Z ~]# docker image inspect nginx:latest
[
    {
        "Id": "sha256:ae2feff98a0cc5095d97c6c283dcd33090770c76d63877caa99aefbbe4343bdd",
        "RepoTags": [
            "nginx:latest"
        ],
        "RepoDigests": [
            "nginx@sha256:4cf620a5c81390ee209398ecc18e5fb9dd0f5155cd82adcbae532fec94006fb9"
        ],
        "Parent": "",
        "Comment": "",
        "Created": "2020-12-15T20:21:00.007674532Z",
        "Container": "4cc5da85f27ca0d200407f0593422676a3bab482227daee044d797d1798c96c9",
        "ContainerConfig": {
            "Hostname": "4cc5da85f27c",
            "Domainname": "",
            "User": "",
            "AttachStdin": false,
            "AttachStdout": false,
            "AttachStderr": false,
            "ExposedPorts": {
                "80/tcp": {}
            },
            "Tty": false,
            "OpenStdin": false,
            "StdinOnce": false,
            "Env": [
                "PATH=/usr/local/sbin:/usr/local/bin:/usr/sbin:/usr/bin:/sbin:/bin",
                "NGINX_VERSION=1.19.6",
                "NJS_VERSION=0.5.0",
                "PKG_RELEASE=1~buster"
            ],
            "Cmd": [
                "/bin/sh",
                "-c",
                "#(nop) ",
                "CMD [\"nginx\" \"-g\" \"daemon off;\"]"
            ],
            "Image": "sha256:13bffe371b56f4aeed88218ec17d0c6f653a83b49bd3e211fc8cfa2ca5d7a3d3",
            "Volumes": null,
            "WorkingDir": "",
            "Entrypoint": [
                "/docker-entrypoint.sh"
            ],
            "OnBuild": null,
            "Labels": {
                "maintainer": "NGINX Docker Maintainers <docker-maint@nginx.com>"
            },
            "StopSignal": "SIGQUIT"
        },
        "DockerVersion": "19.03.12",
        "Author": "",
        "Config": {
            "Hostname": "",
            "Domainname": "",
            "User": "",
            "AttachStdin": false,
            "AttachStdout": false,
            "AttachStderr": false,
            "ExposedPorts": {
                "80/tcp": {}
            },
            "Tty": false,
            "OpenStdin": false,
            "StdinOnce": false,
            "Env": [
                "PATH=/usr/local/sbin:/usr/local/bin:/usr/sbin:/usr/bin:/sbin:/bin",
                "NGINX_VERSION=1.19.6",
                "NJS_VERSION=0.5.0",
                "PKG_RELEASE=1~buster"
            ],
            "Cmd": [
                "nginx",
                "-g",
                "daemon off;"
            ],
            "Image": "sha256:13bffe371b56f4aeed88218ec17d0c6f653a83b49bd3e211fc8cfa2ca5d7a3d3",
            "Volumes": null,
            "WorkingDir": "",
            "Entrypoint": [
                "/docker-entrypoint.sh"
            ],
            "OnBuild": null,
            "Labels": {
                "maintainer": "NGINX Docker Maintainers <docker-maint@nginx.com>"
            },
            "StopSignal": "SIGQUIT"
        },
        "Architecture": "amd64",
        "Os": "linux",
        "Size": 132935043,
        "VirtualSize": 132935043,
        "GraphDriver": {
            "Data": {
                "LowerDir": "/var/lib/docker/overlay2/cb791e78a08db7091bf2ce1d78603f1758f52199e57f1805156fe30e39067aae/diff:/var/lib/docker/overlay2/1e73a72b25af68ee9abf4eb443f778d31226e12e9af428fcc14c7b044c83b258/diff:/var/lib/docker/overlay2/88c9c01762f2af8327db65d0b0d4a64785e87c9c2ab76c62e7d03619db03a985/diff:/var/lib/docker/overlay2/7304ab112ac4a9cb91fc6f74730be28fecbe19f042e92d321aa9181424cc4b2e/diff",
                "MergedDir": "/var/lib/docker/overlay2/48b288740bbb2b07b41ed43a4d17a005c46b08d3357d2960b5ef7db4b2de6618/merged",
                "UpperDir": "/var/lib/docker/overlay2/48b288740bbb2b07b41ed43a4d17a005c46b08d3357d2960b5ef7db4b2de6618/diff",
                "WorkDir": "/var/lib/docker/overlay2/48b288740bbb2b07b41ed43a4d17a005c46b08d3357d2960b5ef7db4b2de6618/work"
            },
            "Name": "overlay2"
        },
        "RootFS": {
            "Type": "layers",
            "Layers": [
                "sha256:87c8a1d8f54f3aa4e05569e8919397b65056aa71cdf48b7f061432c98475eee9",
                "sha256:5c4e5adc71a82a96f02632433de31c998c5a9e2fccdcbaee780ae83158fac4fa",
                "sha256:7d2b207c26790f693ab1942bbe26af8e2b6a14248969e542416155a912fec30d",
                "sha256:2c7498eef94aef8c40d106f3e42f7da62b3eee8fd36012bf7379becc4cd639a2",
                "sha256:4eaf0ea085df254fd5d2beba4e2c11db70a620dfa411a8ad44149e26428caee4"
            ]
        },
        "Metadata": {
            "LastTagTime": "0001-01-01T00:00:00Z"
        }
    }
]
Here is the hierarchical information:
        "RootFS": {
            "Type": "layers",
            "Layers": [
                "sha256:87c8a1d8f54f3aa4e05569e8919397b65056aa71cdf48b7f061432c98475eee9",
                "sha256:5c4e5adc71a82a96f02632433de31c998c5a9e2fccdcbaee780ae83158fac4fa",
                "sha256:7d2b207c26790f693ab1942bbe26af8e2b6a14248969e542416155a912fec30d",
                "sha256:2c7498eef94aef8c40d106f3e42f7da62b3eee8fd36012bf7379becc4cd639a2",
                "sha256:4eaf0ea085df254fd5d2beba4e2c11db70a620dfa411a8ad44149e26428caee4"
            ]
        },
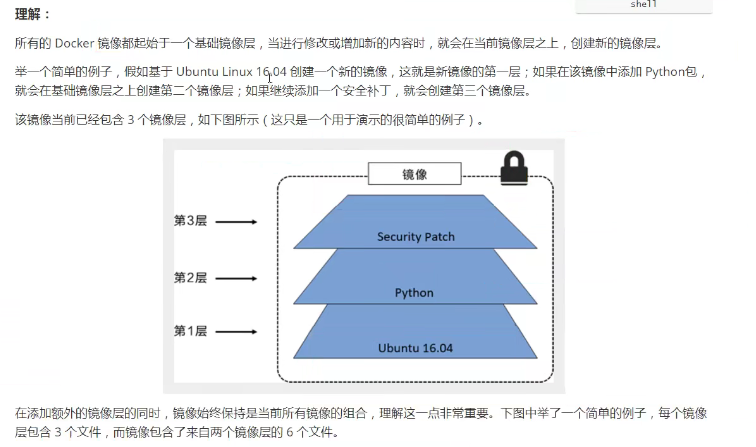
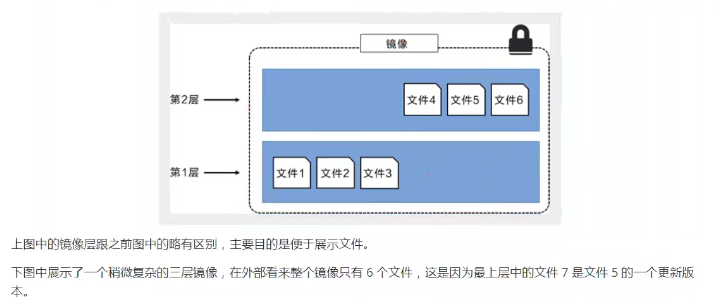

3. commit mirror
docker commit Price increase container becomes a new copy

# Commands work like GITS
docker commit -m="Descriptive information submitted" -a="author" container id Target Mirror Name:[TAG]
Field Test
# 1. Start a default tomcat

# 2. Discover that this default tomcat is not used by webapps. The reason for mirroring is that there are no files underneath the official mirror default webapps!

# 3. I copied in the basic files myself

# 4. Submit containers that we've worked with to a mirror via commit, and we'll use the mirror we've modified in the future, which is one of our own modified images
[root@izbp1ca5vr2fxjgbmapekkz ~]# docker images
REPOSITORY            TAG       IMAGE ID       CREATED         SIZE
tomcat                9.0       3f3cadde9a68   8 days ago      680MB
tomcat                latest    24207ccc9cce   8 days ago      680MB
mysql                 latest    bbf6571db497   2 weeks ago     516MB
nginx                 latest    f652ca386ed1   2 weeks ago     141MB
hello-world           latest    feb5d9fea6a5   2 months ago    13.3kB
centos                latest    5d0da3dc9764   3 months ago    231MB
portainer/portainer   latest    580c0e4e98b0   9 months ago    79.1MB
elasticsearch         7.6.2     f29a1ee41030   21 months ago   791MB
[root@izbp1ca5vr2fxjgbmapekkz ~]# docker commit -a="xiaowang" -m="add webapps app" eb22f4cb0852 tomcat02:1.0
sha256:f6500329aeb683d003f709e9a63d9da2b51cf476faf73ed3dbf6de79d72c8539
[root@izbp1ca5vr2fxjgbmapekkz ~]# docker iamges
docker: 'iamges' is not a docker command.
See 'docker --help'
[root@izbp1ca5vr2fxjgbmapekkz ~]# docker images
REPOSITORY            TAG       IMAGE ID       CREATED         SIZE
tomcat02              1.0       f6500329aeb6   9 seconds ago   684MB
tomcat                9.0       3f3cadde9a68   8 days ago      680MB
tomcat                latest    24207ccc9cce   8 days ago      680MB
mysql                 latest    bbf6571db497   2 weeks ago     516MB
nginx                 latest    f652ca386ed1   2 weeks ago     141MB
hello-world           latest    feb5d9fea6a5   2 months ago    13.3kB
centos                latest    5d0da3dc9764   3 months ago    231MB
portainer/portainer   latest    580c0e4e98b0   9 months ago    79.1MB
elasticsearch         7.6.2     f29a1ee41030   21 months ago   791MB
8. Container Data Volume
1. What is a container data volume
docker's concept review
Package applications and environments into a single image!
Data? If the data is all in containers, our containers will delete and the data will be lost! Requirement: Data can be persisted
MySql, container deleted, library deleted run! Requirement: MySQL data can be stored locally!
There can be a data sharing technology between containers! Data generated in Docker container, sync to local!
This is volume technology! Mount directories, mount directories inside our containers onto Linux!
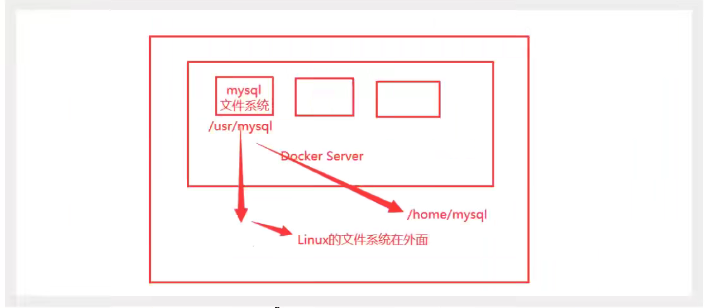
In a word: container persistence and synchronization! Containers can also share data!
2. Use data volumes
Mode 1: mount -v directly by command
docker run -it -v Host Directory: Container Directory

# test
[root@izbp1ca5vr2fxjgbmapekkz home]# docker run -it -v /home/ceshi:/home centos /bin/bash

# We started by docker inspect container id

"Mounts": [										# Mount-v Volume
            {
                "Type": "bind",
                "Source": "/home/ceshi",		# Address inside host
                "Destination": "/home",			# Address inside docker container
                "Mode": "",
                "RW": true,
                "Propagation": "rprivate"
            }
        ],
Synchronization of test files (two-way synchronization)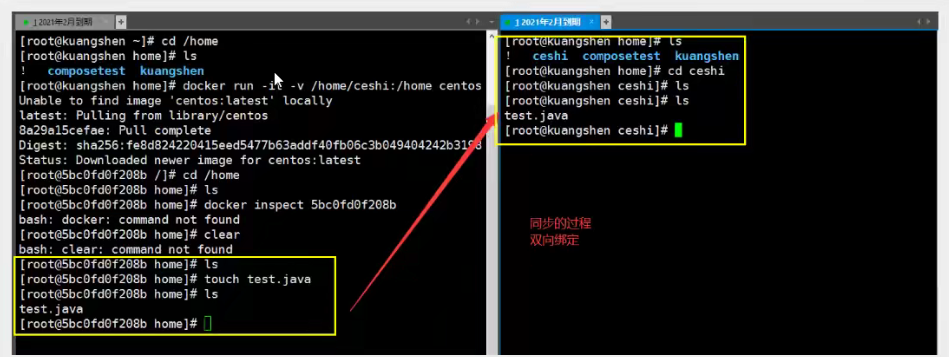
Test again!
- Stop Container
- Modify Files on Host
- Start Container
- The data in the container is still synchronized!
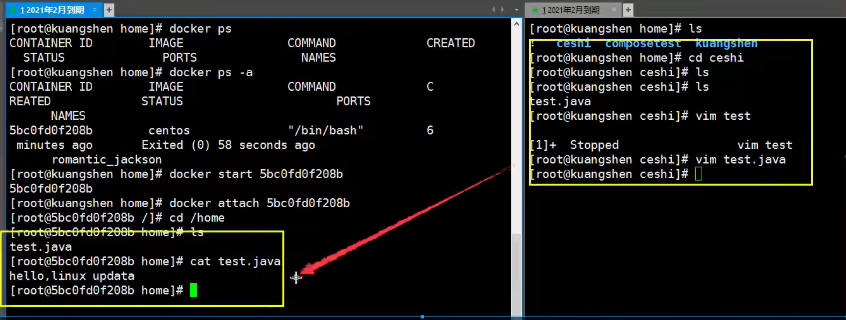
** Benefits: ** In the future, we only need to make local changes, which will synchronize automatically in the container!
3. Actual: Mysql synchronizes data
Think: MySql's data persistence problem!
# Get Mirror
[root@izbp1ca5vr2fxjgbmapekkz ceshi]# docker pull mysql:5.7

# Run the container, need to do data mount installation to start mysql, need to configure the password, just pay attention! Official test: docker run-name some-mysql-e MYSQL_ ROOT_ PASSWORD=my-secret-pw-d mysql:tag

# Start our mysql
-d Background running
-p Port Mapping
-v Volume mount
-e Environment Configuration
--name Container name
[root@izbp1ca5vr2fxjgbmapekkz ceshi]# docker run -d -p 3310:3306 -v /home/mysql/conf:/etc/mysql/conf.d -v /home/mysql/data:/var/lib/mysql -e MYSQL_ROOT_PASSWORD=123456 --name mysql101 mysql:5.7

# After successful startup, we used Navicat locally to connect to the test
# Navicat -- 3310 - 3310 connected to the server and 3306 mapping inside the container, then we can connect! As follows

# Create a database in a local test to see if our mapped path is ok!
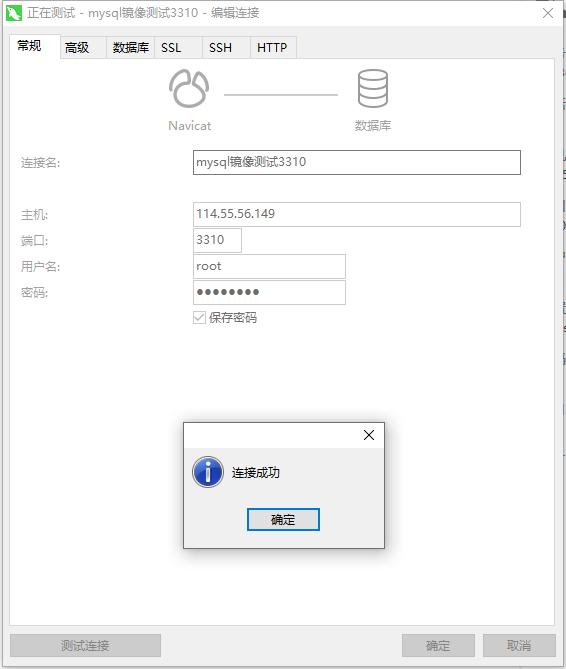
When we delete the container, we find that the volume we mounted locally is still not lost, which makes the container data persistent.
4. Named and anonymous mounts
# Anonymous mount
-v Path inside container!
docker run -d --name nginx -v /etc/nginx nginx

# View all volume s
DRIVER    VOLUME NAME
local     d5f431ccd26ebe8ca0f27051419ac7ff4ec60eec176ee7f96e2d49d0cbe85017
local     e977864fb9b5123ab7dc675c61e51031417d9c83ec38826b400a3e6215b681e6

#We found here that this is an anonymous mount. We only wrote paths inside the container at -v, not outside!

# Named Mount
[root@izbp1ca5vr2fxjgbmapekkz ~]# docker run -d -P --name nginx03 -v juming-nginx:/etc/nginx nginx
cd0d95d4e296fe0bbccd4050f9cf7553ec3bb538216a82fbfebed45f90d62b9b
[root@izbp1ca5vr2fxjgbmapekkz ~]# docker volume ls
DRIVER    VOLUME NAME
local     d5f431ccd26ebe8ca0f27051419ac7ff4ec60eec176ee7f96e2d49d0cbe85017
local     e977864fb9b5123ab7dc675c61e51031417d9c83ec38826b400a3e6215b681e6
local     juming-nginx

# Pass-v Volume Name: Path in Container
# Check out this volume
[root@izbp1ca5vr2fxjgbmapekkz ~]# docker volume inspect juming-nginx
[
    {
        "CreatedAt": "2021-12-18T12:48:59+08:00",
        "Driver": "local",
        "Labels": null,
        "Mountpoint": "/var/lib/docker/volumes/juming- nginx/_data", # !!
        "Name": "juming-nginx",
        "Options": null,
        "Scope": "local"
    }
]
# Volumes in all docker containers, without a specified directory, are in/var/lib/docker/volumes/xxx/_data
We can easily find one of our volumes by using named mounts, most of the time using named mounts.
# How to determine whether to mount anonymously or with a named path
-v Path inside container				# Hang Anonymously
-v Volume Name:Path inside container			# Named Mount
-v /Host Path::Path inside container	# Specify the path to mount!
Expand:
# Change Read and Write Permissions by Path in-v Container: ro rw
ro readonly	 #read-only
rw readwrite # Read-write

# Once this has set container permissions, containers have limits on what we can mount!
docker run -d -P --name nginx02 -v juming-nginx:/etc/nginx:ro nginx
docker run -d -P --name nginx02 -v juming-nginx:/etc/nginx:rw nginx.

# When ro sees ro, it means that this path can only be operated on by the host machine. It cannot be operated on inside the container!
9. DockerFile
1. Initial DockerFile
DockerFile is the build file used to build the docker image! Command script, try it first! Through this script, mirrors can be produced one layer at a time, scripts command by command, and each command is a layer!
# Create a dockerfile with a name that randomly suggests a Dockerfile
# Content directive (uppercase) parameters in file
FROM centos

VOLUME ["volume01","volume02"]

CMD echo "----end-----"

CMD /bin/bash

# Every command here is the mirror floor! As follows
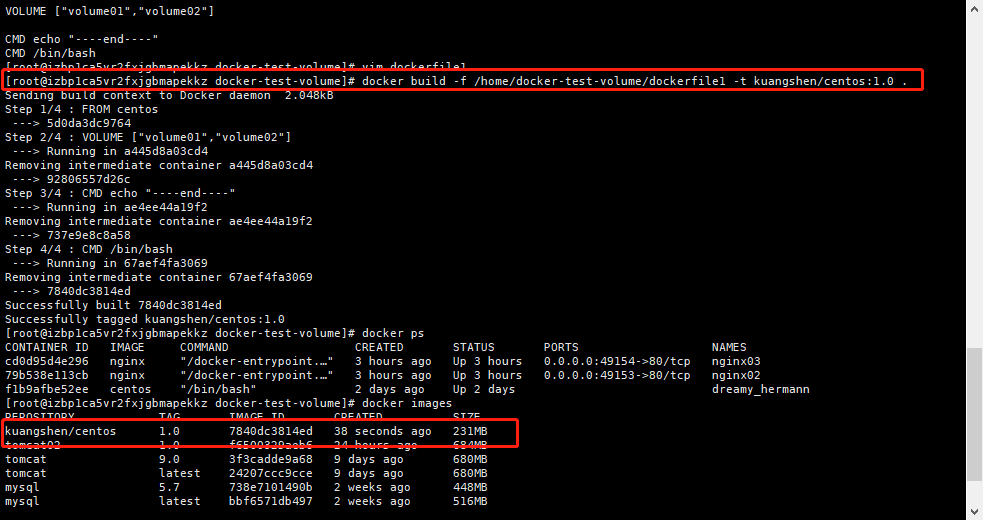
Start your own write container:
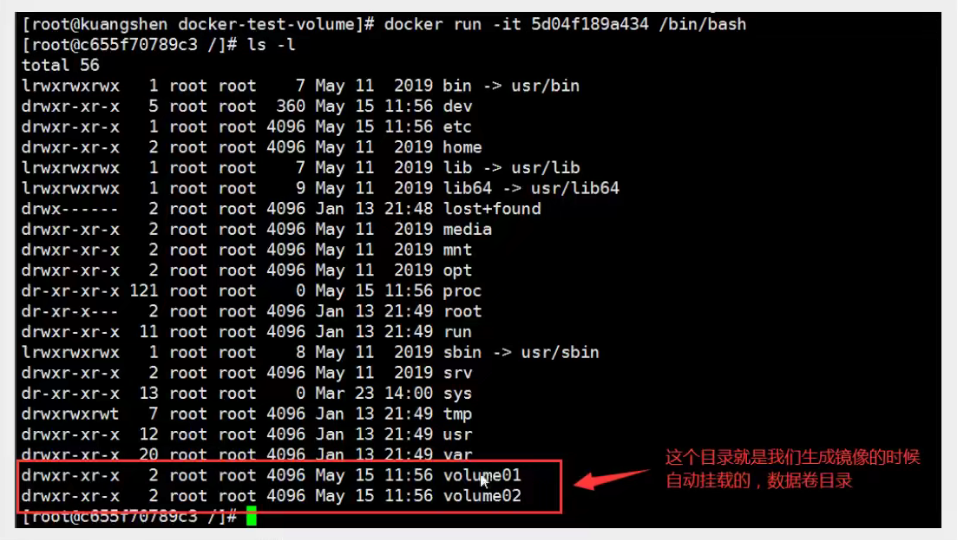
There must be a synchronized directory outside this volume!

Check the path of the volume mount:
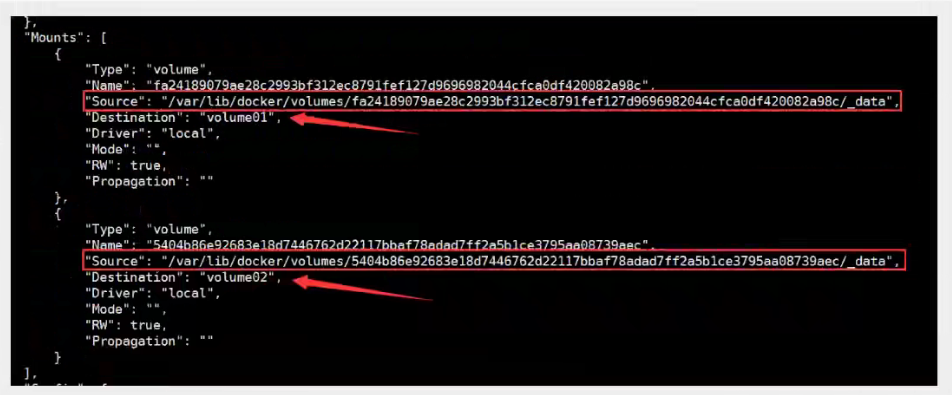
This way we will use a lot in the future, because we usually build our own mirrors! Assuming the volume was not mounted when the mirror was built, mount the-v volume name manually: path inside the container
2. Data Volume Container
Synchronize data with multiple mysql s!

Start three containers, starting with the mirror we just wrote

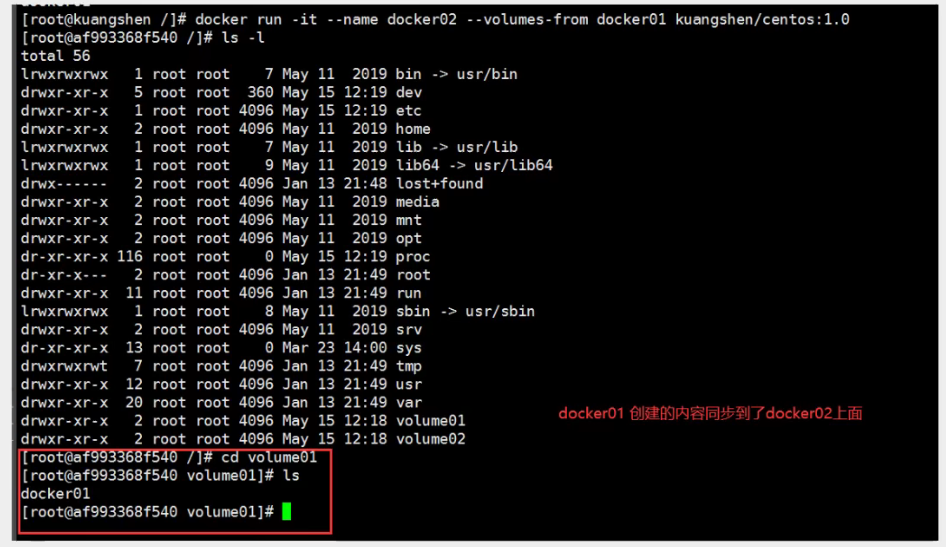
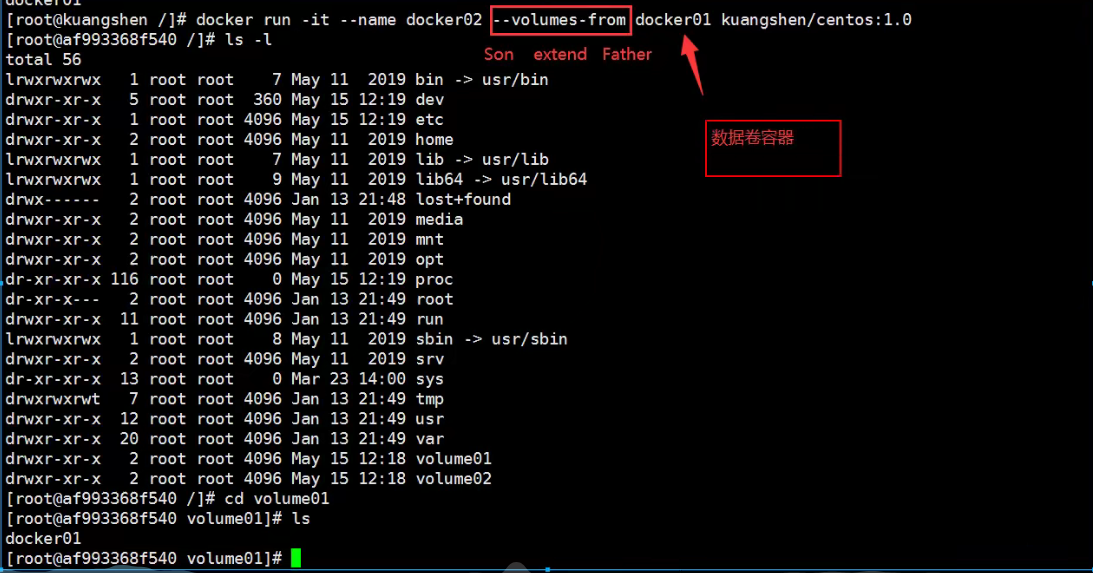
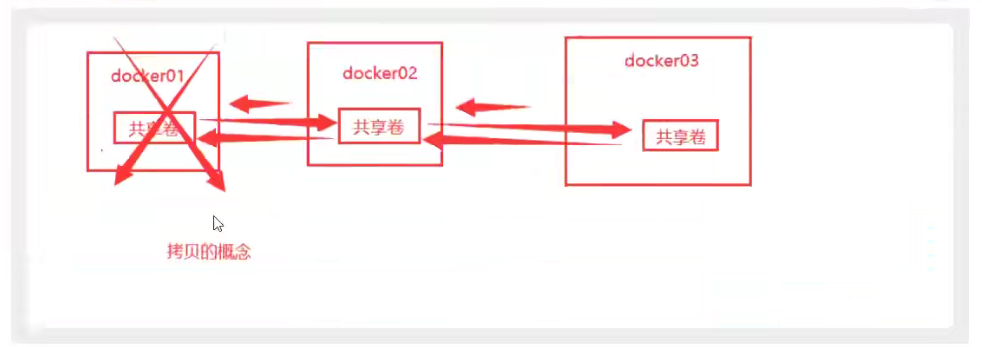
Test to see if docker02 and docker01 can access this file by deleting docker01
Tested, still accessible
Multiple mysql s for data sharing
docker run -d -p 3310:3306 -v /etc/mysql/conf.d -v /var/lib/mysql -e MYSQL_ROOT_PASSWORD=123456 --name mysql01 mysql:5.7
docker run -d -p 3310:3306 -e MYSQL_ROOT_PASSWORD=123456 --name mysql02 --volumes-from mysql01 mysql:5.7
Conclusion:
Configuration information is passed between containers, and the life cycle of a data volume container lasts until no containers are used.
But once you persist locally, the local data will not be deleted at this time.
3. Introduction to DockerFile
The dockerfile is the file used to build the docker image! Command parameter script name!
Construction steps:
- Write a dockerfile
- Docker builds into a mirror
- docker run run mirror
- docker push Release Mirror (DockerHub, Ali Cloud Mirror Warehouse!)
Check what the authorities are doing?
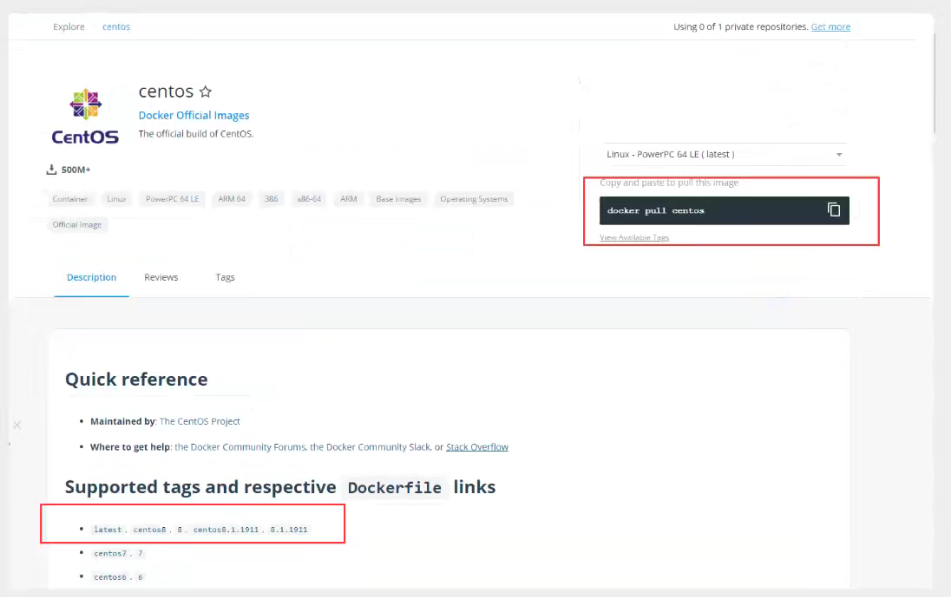
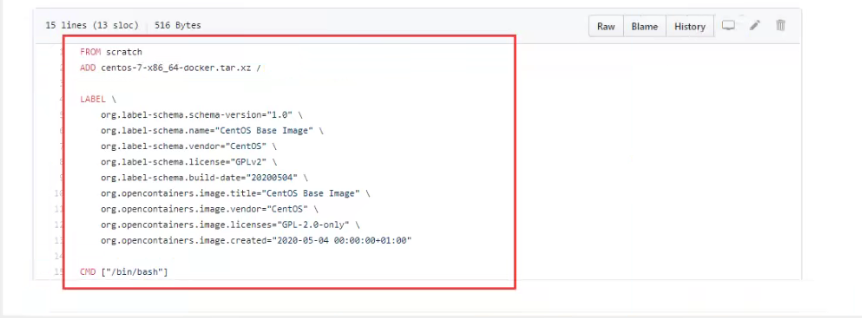
Many official mirrors are basic packages, many functions are not, we usually build our own mirrors! Now that the authorities can make mirrors, so can we!
Fundamentals:
- Each reserved keyword (instruction) must be an uppercase letter
- Execute from top to bottom
- #indicates a comment
- Each instruction creates a new mirror layer for the price increase and submits it!
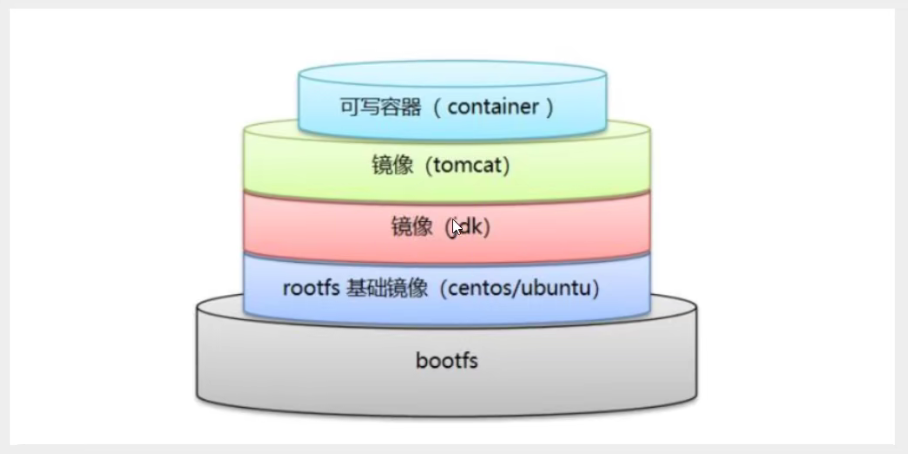
The dockerfile is for development. To publish projects for mirroring in the future, we need to write a dockerfile, which is very simple!
Docker mirroring is becoming the standard for enterprise delivery and must be mastered!
DockerFile: Build the file, define all the steps, source code.
DockerImages: Build a generated image through DockerFile and ultimately publish and run the product, originally the jar, war package.
Docker container: A container is one that runs as a mirror to provide services.
4. DockerFile directives
We used to use someone else, but now that we know these instructions, let's practice writing a mirror for ourselves!
FROM 			# Basic Mirror, everything built from here
MAINTAINER 		# Who wrote the mirror, name + mailbox
RUN				# Commands to run when building a mirror
ADD				# Step, tomcat image, this tomcat compressed package adds content
WORKDIR			# Mirrored Working Directory
VOLUME			# Mounted Directory
EXPOST			# Keep Port Configuration
CMD				# Specifies the command to run when this container starts. Only the last one will take effect and can be replaced
ENTRYPOINT		# Specifies that commands to run when this container starts can be appended
ONBUILD			# When an inherited DockerFile is built, the ONBUILD directive is run, triggering the directive
COPY			# Like ADD, copy our files into a mirror
ENV				# Set environment variables when building
5. Field Test
99% of the mirrors in Docker Hub are FROM scratch es mirrored from this base, then configured with the software and configuration needed to build them.
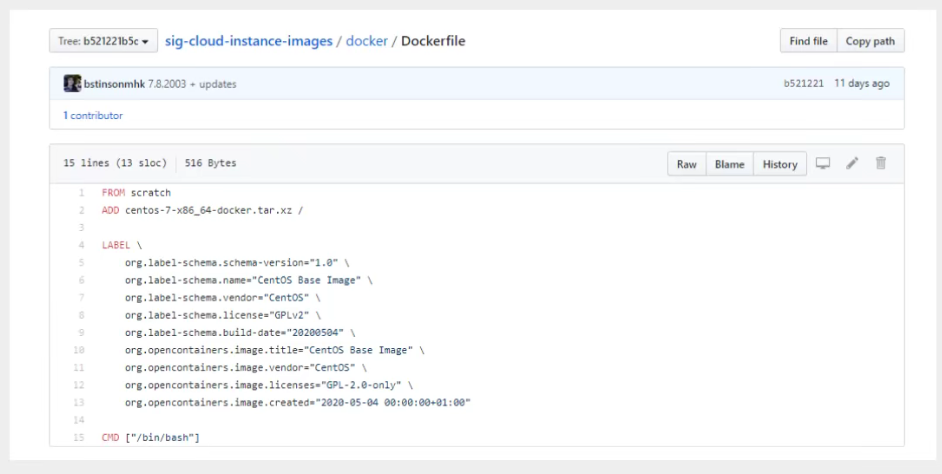
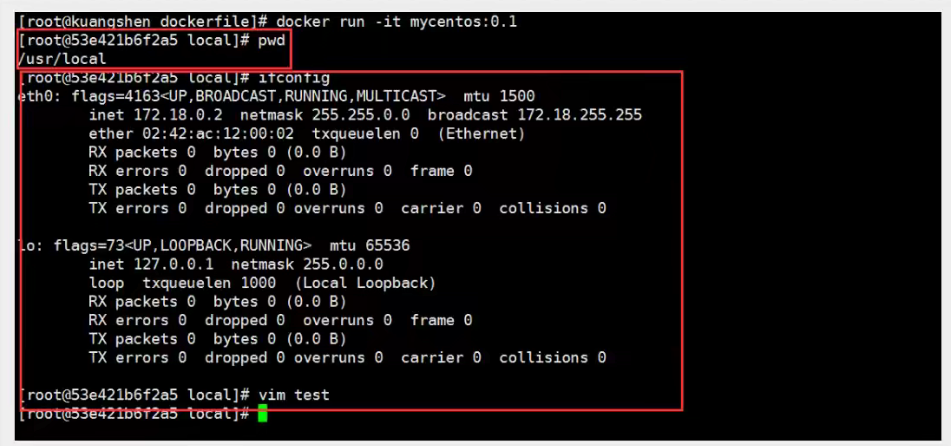
Create your own centos
#  1. Write DockerFile files
FROM centos
MAINTAINER wangjian<571376264@qq.com>

ENV MYPATH /usr/local
WORKDIR $MYPATH

RUN yum -y install vim
RUN yum -y install net-tools

EXPOSE 80

CMD echo $MYPATH
CMD echo "-----end-----"
CMD /bin/bash

# 2. Build a mirror from this file
# Command docker build-f dockerfile file file path-t mirror name: [tag]
Successfully built a33e391002e6
Successfully tagged mycentos:0.1

# 3. Under Test Run
Contrast: Previous native centos

Our added mirror
We can list the history of local mirroring changes

We usually get a mirror, you can study how it does the following?
6. Differences between CMD and ENTRYPOINT
CMD				# Specifies the command to run when this container starts. Only the last one will take effect and can be replaced
ENTRYPOINT		# Specifies that commands to run when this container starts can be appended
Test cmd
# Write dockerfile file
[root@izbp1ca5vr2fxjgbmapekkz dockerfile]# vim dockefile-cmd-test
FROM centos
CMD ["ls","-a"]

# Build Mirror
[root@izbp1ca5vr2fxjgbmapekkz dockerfile]# docker build -f dockefile-cmd-test -t cmdtest .

# run runs and finds our ls-a command in effect
[root@izbp1ca5vr2fxjgbmapekkz dockerfile]# docker run 24bf9aa5c445
.
..
.dockerenv
bin
dev
etc
home
lib
lib64
lost+found
media
mnt
opt
proc
root
run
sbin
srv
sys
tmp
usr
var

# To append a command, -l 	 Ls-al
[root@izbp1ca5vr2fxjgbmapekkz /]# docker run 24bf9aa5c445 -l
docker: Error response from daemon: OCI runtime create failed: container_linux.go:380: starting container process caused: exec: "-l": executable file not found in $PATH: unknown.
ERRO[0000] error waiting for container: context canceled

# Clean-up of cmd-l replaces the CMD ['ls', -a'] command, -l is not a command and therefore errors
Test ENTRYPOINT
[root@izbp1ca5vr2fxjgbmapekkz dockerfile]# vim dockerfile-cmd-entrypoint
FROM centos
CMD ["ls","-a"]

[root@izbp1ca5vr2fxjgbmapekkz dockerfile]# docker build -f dockerfile-cmd-entrypoint -t entrypoint-test .
Sending build context to Docker daemon  18.43kB

[root@izbp1ca5vr2fxjgbmapekkz dockerfile]# docker build -f dockerfile-cmd-entrypoint -t entrypoint-test .
Sending build context to Docker daemon  18.43kB
Step 1/2 : FROM centos
 ---> 5d0da3dc9764
Step 2/2 : ENTRYPOINT ["ls","-a"]
 ---> Running in 020e6f08f0e1
Removing intermediate container 020e6f08f0e1
 ---> 968a3b950425
Successfully built 968a3b950425
Successfully tagged entrypoint-test:latest

# Our appended command is directly cleaned after our ENTRYPOINT command!
[root@izbp1ca5vr2fxjgbmapekkz dockerfile]# docker run 968a3b950425 -l
total 56
drwxr-xr-x   1 root root 4096 Dec 19 11:59 .
drwxr-xr-x   1 root root 4096 Dec 19 11:59 ..
-rwxr-xr-x   1 root root    0 Dec 19 11:59 .dockerenv
lrwxrwxrwx   1 root root    7 Nov  3  2020 bin -> usr/bin
drwxr-xr-x   5 root root  340 Dec 19 11:59 dev
drwxr-xr-x   1 root root 4096 Dec 19 11:59 etc
drwxr-xr-x   2 root root 4096 Nov  3  2020 home
lrwxrwxrwx   1 root root    7 Nov  3  2020 lib -> usr/lib
lrwxrwxrwx   1 root root    9 Nov  3  2020 lib64 -> usr/lib64
drwx------   2 root root 4096 Sep 15 14:17 lost+found
drwxr-xr-x   2 root root 4096 Nov  3  2020 media
drwxr-xr-x   2 root root 4096 Nov  3  2020 mnt
drwxr-xr-x   2 root root 4096 Nov  3  2020 opt
dr-xr-xr-x 104 root root    0 Dec 19 11:59 proc
dr-xr-x---   2 root root 4096 Sep 15 14:17 root
drwxr-xr-x  11 root root 4096 Sep 15 14:17 run
lrwxrwxrwx   1 root root    8 Nov  3  2020 sbin -> usr/sbin
drwxr-xr-x   2 root root 4096 Nov  3  2020 srv
dr-xr-xr-x  13 root root    0 Dec 19 11:59 sys
drwxrwxrwt   7 root root 4096 Sep 15 14:17 tmp
drwxr-xr-x  12 root root 4096 Sep 15 14:17 usr
drwxr-xr-x  20 root root 4096 Sep 15 14:17 var
Many of the commands in Dockerfile are very similar. We need to understand their differences. Our best way to learn is to compare them and test the results!
7. Actual Warfare: Tomcat Mirror
-
Prepare a tomcat zip package for the mirror file, a jdk zip package!

-
Write a dockerfile, officially name the Dockerfile, build will automatically find this file, do not need to specify -f!
FROM centos
MAINTAINER wangjian<571376264@qq.com>

COPY readme.txt /usr/local/readme.txt

ADD jdk-8u301-linux-x64.tar.gz /usr/local/
ADD apache-tomcat-9.0.56.tar.gz /usr/local/

RUN yum -y install vim

ENV MYPATH /usr/local
WORKDIR $MYPATH

ENV JAVA_HOME /usr/local/jdk1.8.0_301
ENV CLASSPATH $JAVA_HOME/lib/dt.jar:$JAVA_HOME/lib/tools.jar
ENV CATALINA_HOME /usr/local/apache-tomcat-9.0.56
ENV CATALINA_BASH /usr/local/apache-tomcat-9.0.56
ENV PATH $PATH:$JAVA_HOME/bin:$CATALINA_HOME/lib:$CATALINA_HOME/bin

EXPOSE 8080

CMD /usr/local/apache-tomcat-9.0.56/bin/startup.sh && tail -F /usr/local/apache-tomcat-9.0.56/bin/logs/catalina.out
- Build Mirror
# docker build -t diytomcat .
- Boot Mirror
[root@izbp1ca5vr2fxjgbmapekkz tomcat]# docker run -d -p 9090:8080 --name kuangshentomcat -v /home/kuangshen/build/tomaca/test:/usr/local/apache-tomcat-9.0.56/webapps/test -v /home/kuangshen/build/tomcat/tomcatlogs/:/usr/local/apache-tomcat-9.0.56/logs diytomcat
8289664b6082b079faa98aecc3b0483d6318decb1d165ad29f51d8354667a934
- Access Test
- No items to post (we can publish directly by writing projects locally because of volume mounting!)


Discovery: Project deployment is successful, you can access ok directly!

Steps for future development: Dockerfile writing is required! After that, all of us use the docker image to publish and run!
8. Publish your own image
- address https://hub.docker.com/ Register your own account
- Make sure this account is logged in
- Submit our own mirror on our server
[root@izbp1ca5vr2fxjgbmapekkz ~]# docker login --help

Usage:  docker login [OPTIONS] [SERVER]

Log in to a Docker registry.
If no server is specified, the default is defined by the daemon.

Options:
  -p, --password string   Password
      --password-stdin    Take the password from stdin
  -u, --username string   Username
[root@izbp1ca5vr2fxjgbmapekkz ~]# docker login -u 571376264
Password:
WARNING! Your password will be stored unencrypted in /root/.docker/config.json.
Configure a credential helper to remove this warning. See
https://docs.docker.com/engine/reference/commandline/login/#credentials-store

Login Succeeded
- Once you've logged in, you can raise the price mirror, which is a docker push
# push's own mirror on the server!
[root@izbp1ca5vr2fxjgbmapekkz ~]# docker push diytomcat
Using default tag: latest
The push refers to repository [docker.io/library/diytomcat]
fd740bc0e32a: Preparing
ea73d22b8ff1: Preparing
4e549b25c75d: Preparing
8e974a7551e0: Preparing
74ddd0ec08fa: Preparing
denied: requested access to the resource is denied

# push mirror problem?
[root@izbp1ca5vr2fxjgbmapekkz ~]# docker push kuangshen/diytomcat:1.0
The push refers to repository [docker.io/kuangshen/diytomcat]
An image does not exist locally with the tag: kuangshen/diytomcat

# Resolve, add a tag 571376264-digit account name, and it must be the account name otherwise error will occur
[root@izbp1ca5vr2fxjgbmapekkz ~]# docker tag 9db79fb71c38 571376264/diytomcat:1.0

# docker push up! Publish your own images with version numbers whenever possible
[root@izbp1ca5vr2fxjgbmapekkz ~]# docker push 571376264/diytomcat:1.0
The push refers to repository [docker.io/571376264/diytomcat]
fd740bc0e32a: Pushed
ea73d22b8ff1: Pushed
4e549b25c75d: Pushed
8e974a7551e0: Pushed
74ddd0ec08fa: Pushed
1.0: digest: sha256:6e67022eb83001e991ae70e18dd73226b506813d2c4715d01795c97a6482d726 size: 1373

# Submitted at the same level as the mirror
9. Publish on Ali Cloud Mirror
-
Landing in Ali Yun
-
Find Container Mirror Service
-
Create Namespace

-
Create Container Mirror

-
Browse Ali Cloud
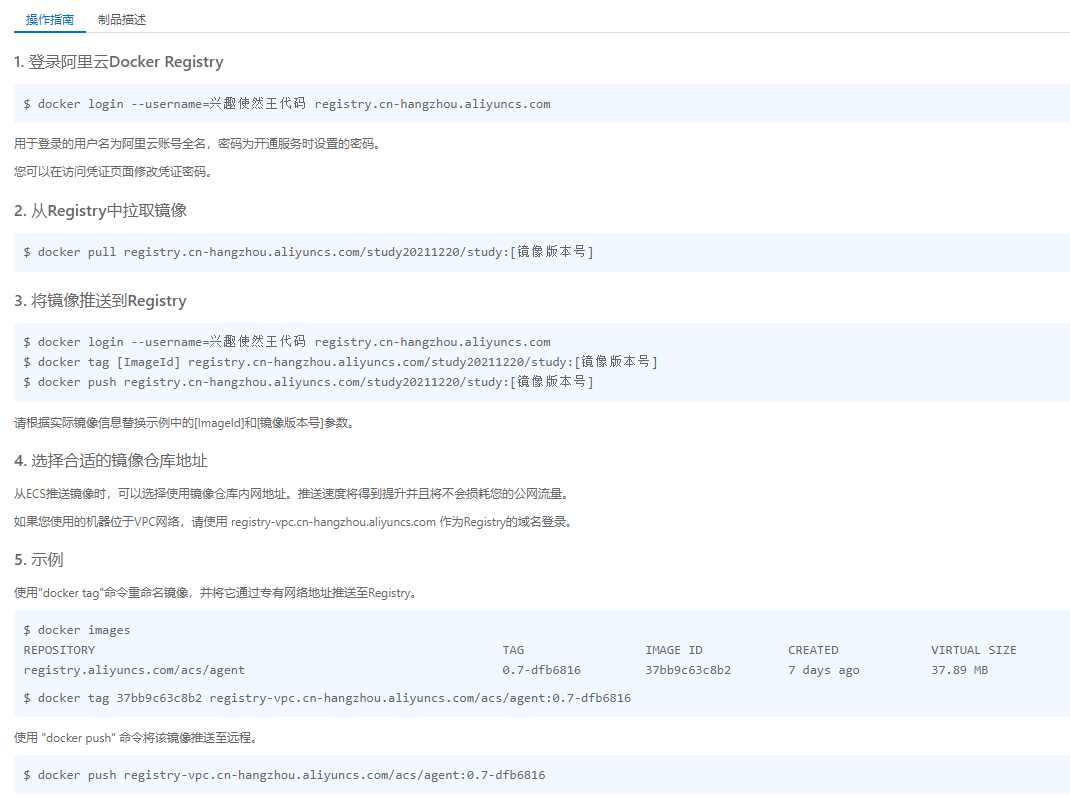
Ali cloud container mirror refers to the official address!
10. Summary
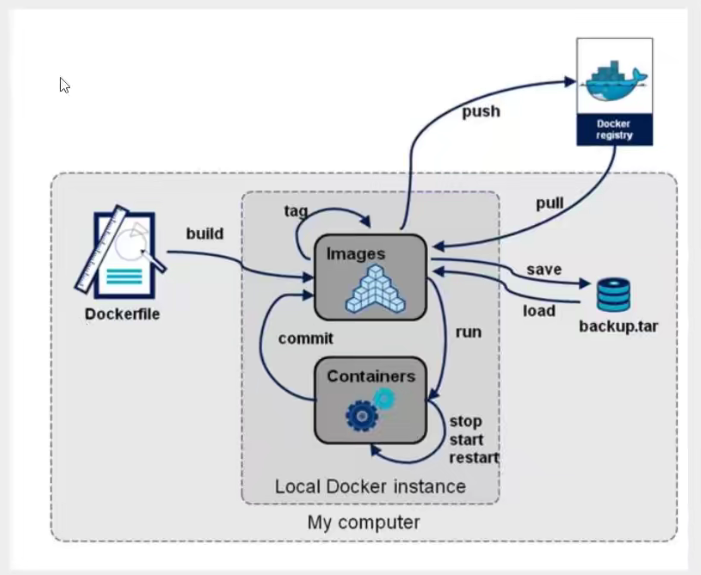
10. Docker Network
1. Understand Docker0
test

Three networks, how does docker handle container network access?

# [root@izbp1ca5vr2fxjgbmapekkz ~]# docker run -d -P --name tomcat01 tomcat

# Look at the internal network address ip addr of the container, where there is no command for ip addr. Just execute apt update && apt install -y iproute2 to install it.
[root@izbp1ca5vr2fxjgbmapekkz ~]# docker exec -it tomcat01 ip addr
1: lo: <LOOPBACK,UP,LOWER_UP> mtu 65536 qdisc noqueue state UNKNOWN group default qlen 1
    link/loopback 00:00:00:00:00:00 brd 00:00:00:00:00:00
    inet 127.0.0.1/8 scope host lo
       valid_lft forever preferred_lft forever
134: eth0@if135: <BROADCAST,MULTICAST,UP,LOWER_UP> mtu 1500 qdisc noqueue state UP group default
    link/ether 02:42:ac:11:00:02 brd ff:ff:ff:ff:ff:ff link-netnsid 0
    inet 172.17.0.2/16 brd 172.17.255.255 scope global eth0
       valid_lft forever preferred_lft forever

# There eth0@if135 ip address is docker assigned

# Think: can linux ping through the inside of the container?
[root@izbp1ca5vr2fxjgbmapekkz ~]# ping 172.17.0.2
PING 172.17.0.2 (172.17.0.2) 56(84) bytes of data.
64 bytes from 172.17.0.2: icmp_seq=1 ttl=64 time=0.034 ms
64 bytes from 172.17.0.2: icmp_seq=2 ttl=64 time=0.043 ms
64 bytes from 172.17.0.2: icmp_seq=3 ttl=64 time=0.036 ms
^C
--- 172.17.0.2 ping statistics ---
3 packets transmitted, 3 received, 0% packet loss, time 2000ms
rtt min/avg/max/mdev = 0.034/0.037/0.043/0.008 ms

# linux can ping through the docker container interior
Principle:
-
Each time we start a docker container, the docker will assign an ip to the docker container. As long as the docker is installed, there will be a docker 0 bridge mode for the network card. The technology used is evth-pair technology!
Test ip addr again on the host

-
Starting a container test, I found another network card~!

We find that this container brings network cards in pairs, evth-pair is a pair of virtual device interfaces. They appear in pairs, one-to-one connectivity protocol, one-to-one connectivity. Because of this feature, evth-pari acts as a bridge to connect various virtual network devices. OpenStac, connections between Docker containers, and OVS connections all use evth-pair technology. -
Let's test if tomcat01 and tomcat02 can ping!

Draw a network model diagram:
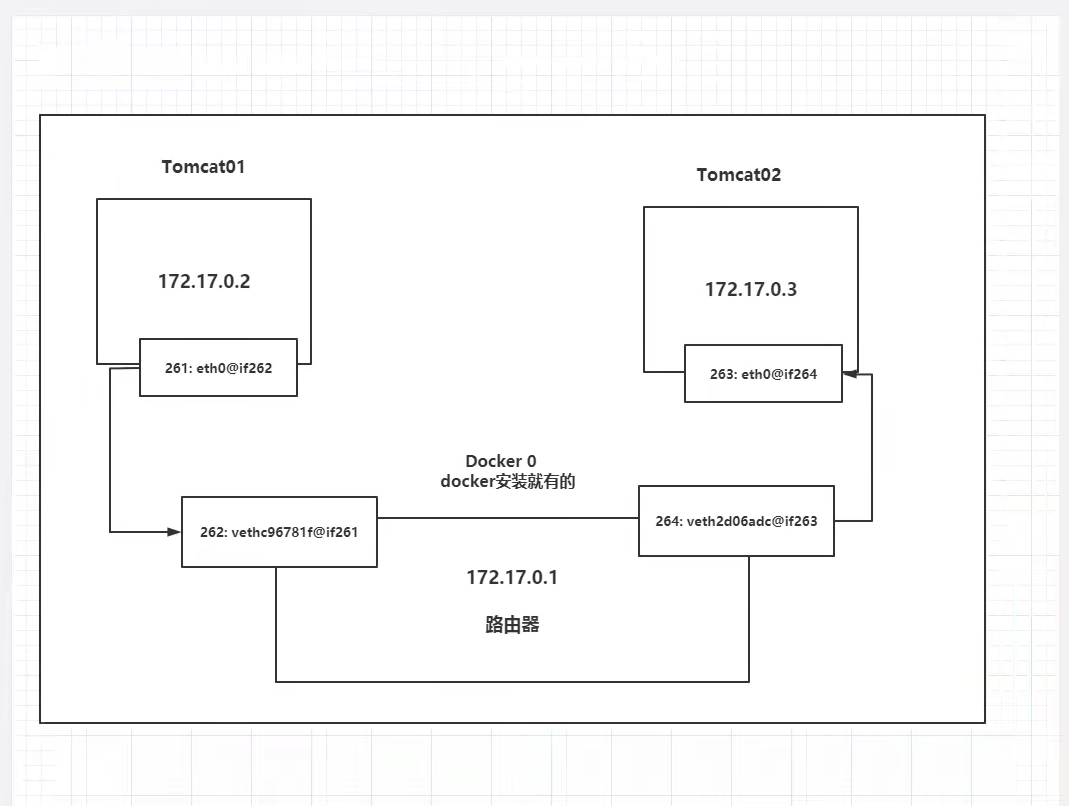
Conclusion: tomcat01 and tomcat02 are public routers, docker0.
All containers are routed by docker0 without specifying a network, and docker assigns our containers a default available IP
Summary: Docker uses a Linux bridge, and docker0 is the bridge for a Docker container in the host.
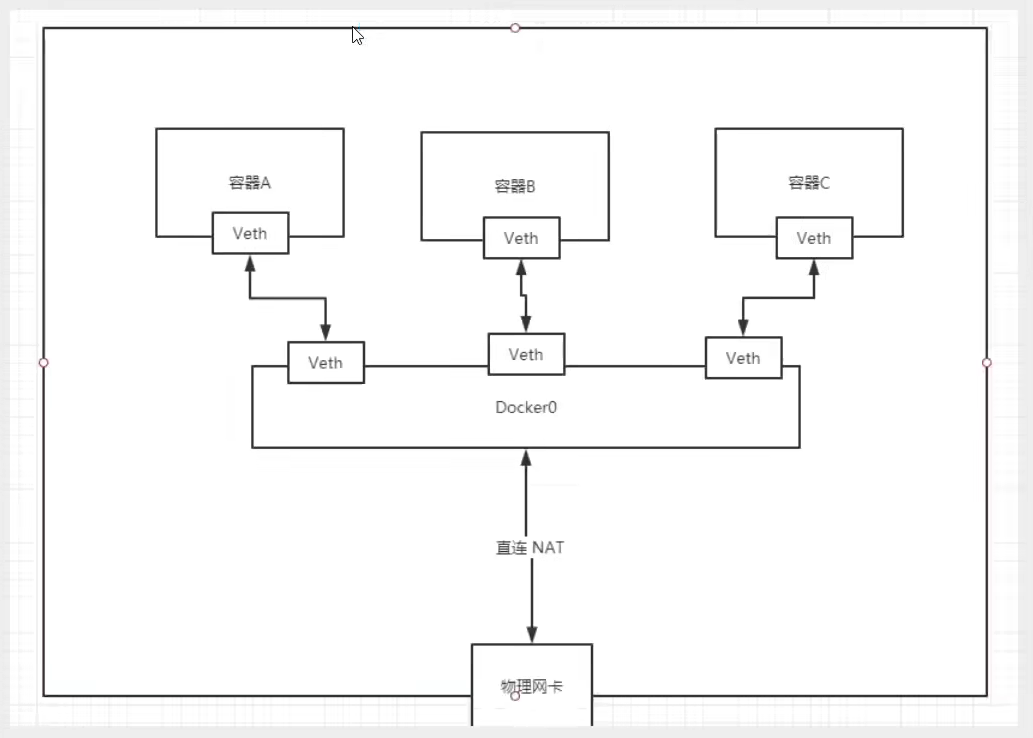
All network interfaces in the Docker are virtual amounts. Virtual transfer efficiency! (Intranet Delivery Files!)
As long as the container is deleted, the corresponding pair of bridges will be gone!
–link
Consider a scenario where we write a microservice, database url = ip:, the project does not restart, the database IP is replaced, and we want to be able to address this issue by name to access the container?
2. Container interconnection - link
[root@izbp1ca5vr2fxjgbmapekkz ~]# docker exec -it tomcat02 ping tomcat01
ping: tomcat01: Name or service not known

#How can I solve it?

# --link solves the problem of network connectivity
[root@izbp1ca5vr2fxjgbmapekkz ~]# docker run -d -P --name tomcat03 --link tomcat02 tomcat

# Can directions be ping? Discovery is not possible, as shown below:

Explore: insepct!
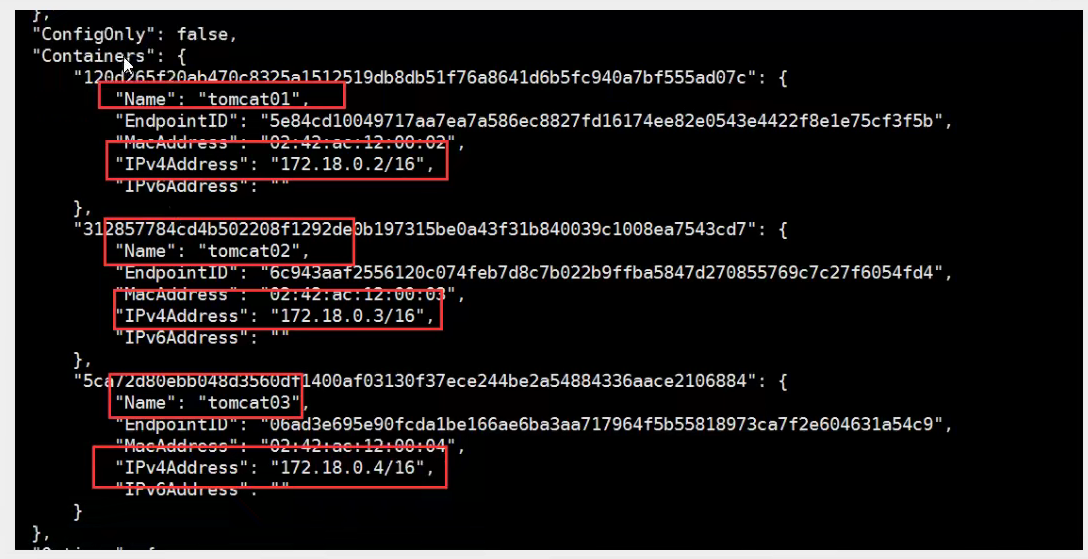
Actually, this tomcat03 configures tomcat02 locally?

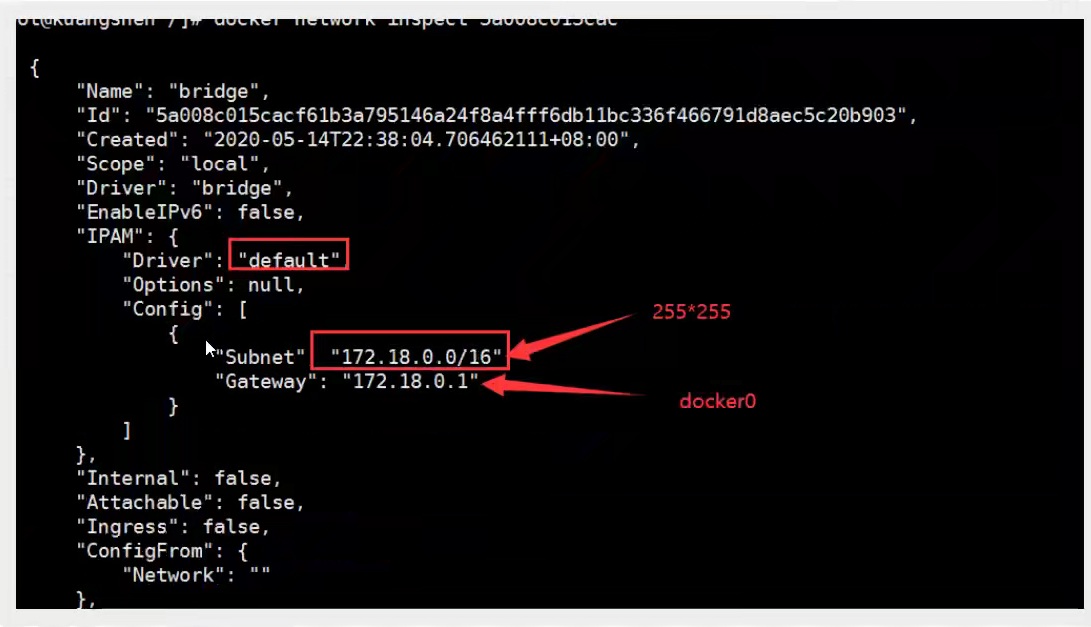
Essential Exploration: - link is the addition of 172.18 to the host configuration. 0.3 tomcat02 312857784cd4
Docker is no longer recommended for us to use now - link!
Customize the network! Doker0 does not apply!
docker0 problem: it does not support container name connection access!
3. Custom network
View all docker networks

Network mode
- Bridge: Bridge docker (default, self-created also uses bridge mode)
- none: do not configure network
- Host: host mode, share network with host
- Container: the network inside the container is connected! (rarely used! Limited)
test
# The command we started directly--net bridge, which is our docker0
docker run -d -P --name tomcat01 tomcat
docker run -d -P --name tomcat01 --net bridge tomcat

# docker0 features: by default, the domain name is not accessible, --link can make a connection!

# We can customize a network!
# --driver bridge
# --subnet 192.168.0.0/16
# --gateway 192.168.0.1
[root@izbp1ca5vr2fxjgbmapekkz ~]# docker network create --driver bridge --subnet 192.168.0.0/16 --gateway 192.168.0.1 mynet
2a4e1f32c4f6f33a0e9c7138bcf49af47f2102e8f583d31eece9c6d3dbdd874d
[root@izbp1ca5vr2fxjgbmapekkz ~]# docker network ls
NETWORK ID     NAME      DRIVER    SCOPE
f43965cd2489   bridge    bridge    local
99a84946d527   host      host      local
2a4e1f32c4f6   mynet     bridge    local
0d8ed1ed056b   none      null      local


[root@izbp1ca5vr2fxjgbmapekkz ~]# docker run -d -P --name tomcat-net-01 --net mynet tomcat
c65ed90c296b7dc3c2dce7d1583b19906bb726ea4e5b0a21370a43865f68c3f2
[root@izbp1ca5vr2fxjgbmapekkz ~]# docker run -d -P --name tomcat-net-02 --net mynet tomcat
d5aaa4f721adca2f88302c7cae322ff76014ad977ce7f0251aba308a2cab3c90
[root@izbp1ca5vr2fxjgbmapekkz ~]# docker network inspect mynet
[
    {
        "Name": "mynet",
        "Id": "2a4e1f32c4f6f33a0e9c7138bcf49af47f2102e8f583d31eece9c6d3dbdd874d",
        "Created": "2021-12-20T20:49:04.527045377+08:00",
        "Scope": "local",
        "Driver": "bridge",
        "EnableIPv6": false,
        "IPAM": {
            "Driver": "default",
            "Options": {},
            "Config": [
                {
                    "Subnet": "192.168.0.0/16",
                    "Gateway": "192.168.0.1"
                }
            ]
        },
        "Internal": false,
        "Attachable": false,
        "Ingress": false,
        "ConfigFrom": {
            "Network": ""
        },
        "ConfigOnly": false,
        "Containers": {
            "c65ed90c296b7dc3c2dce7d1583b19906bb726ea4e5b0a21370a43865f68c3f2": {
                "Name": "tomcat-net-01",
                "EndpointID": "837474d235b3693616cc2be7b630e61391da4518d3ec773d7dd9c24f9c7c956d",
                "MacAddress": "02:42:c0:a8:00:02",
                "IPv4Address": "192.168.0.2/16",
                "IPv6Address": ""
            },
            "d5aaa4f721adca2f88302c7cae322ff76014ad977ce7f0251aba308a2cab3c90": {
                "Name": "tomcat-net-02",
                "EndpointID": "d7c9af6e5e46f099bdad716db9e25dce9c6a83becae3d5588ddaa1226b1e53f4",
                "MacAddress": "02:42:c0:a8:00:03",
                "IPv4Address": "192.168.0.3/16",
                "IPv6Address": ""
            }
        },
        "Options": {},
        "Labels": {}
    }
]

# Test the ping connection in the book as follows:

# Don't use it now--link can also ping!

Find that all can ping!!!
Our customized web docker s have helped us maintain a good relationship. We recommend using the web as usual.
Benefits:
redis - Different clusters use different networks to ensure that the cluster is safe and healthy
mysql - Different clusters use different networks to ensure that the cluster is safe and healthy
4. Network Connectivity
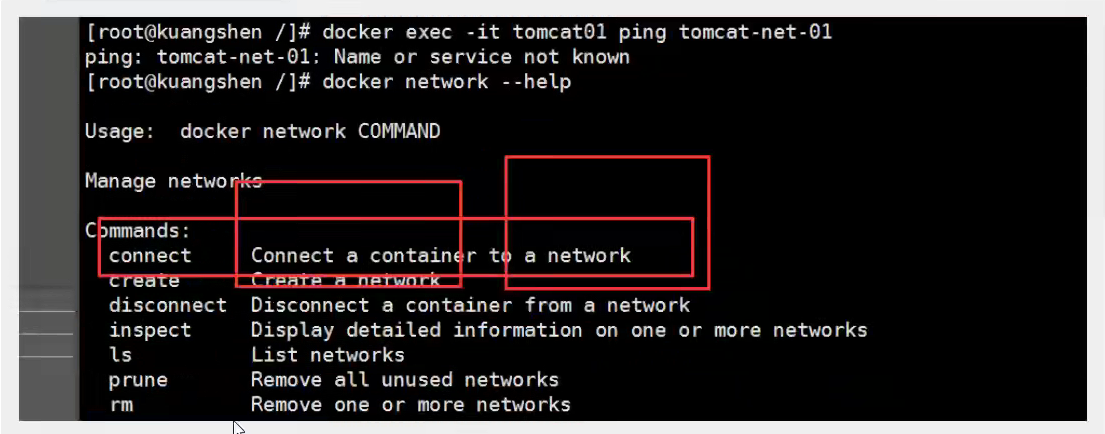

# Test to get through tomcat01 -> mynet
docker network connect mynet tomcat01
# Once connected, tomcat01 is placed on the mynet network

# Is a container with two IP addresses, listed as Ali Cloud Service, a public ip, a private IP
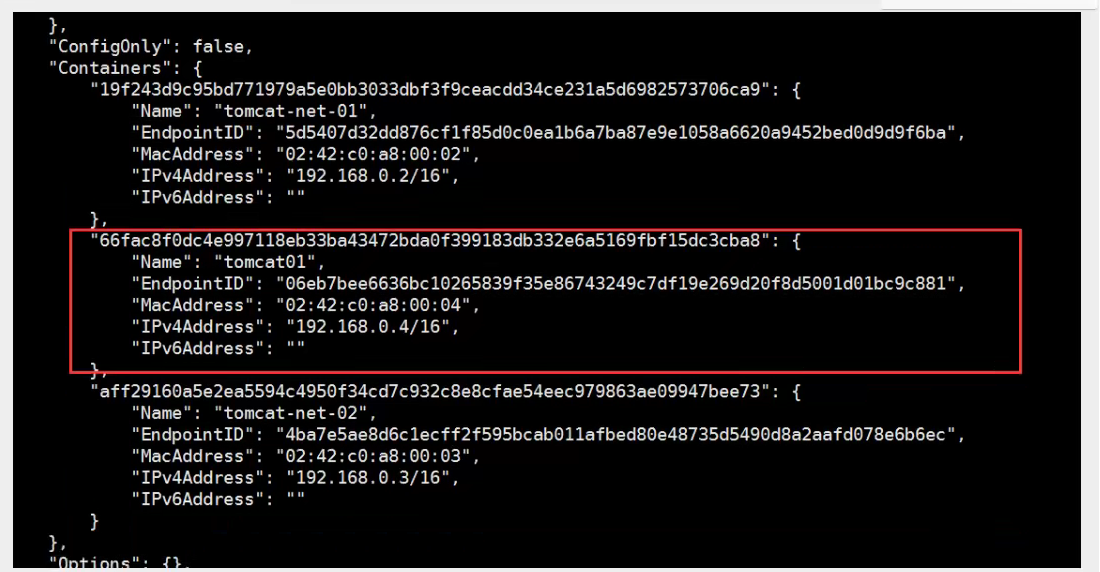
tomcat01 is connected to ok

tomcat02 was found to be inappropriate. Repeat tomcat01 operation
 Conclusion: If you want to operate across networks, you need to use docker network connect ion to connect!
5. Actual Warfare: Deploying Redis Clusters
The following figure shows three hosts and three slave redis clusters
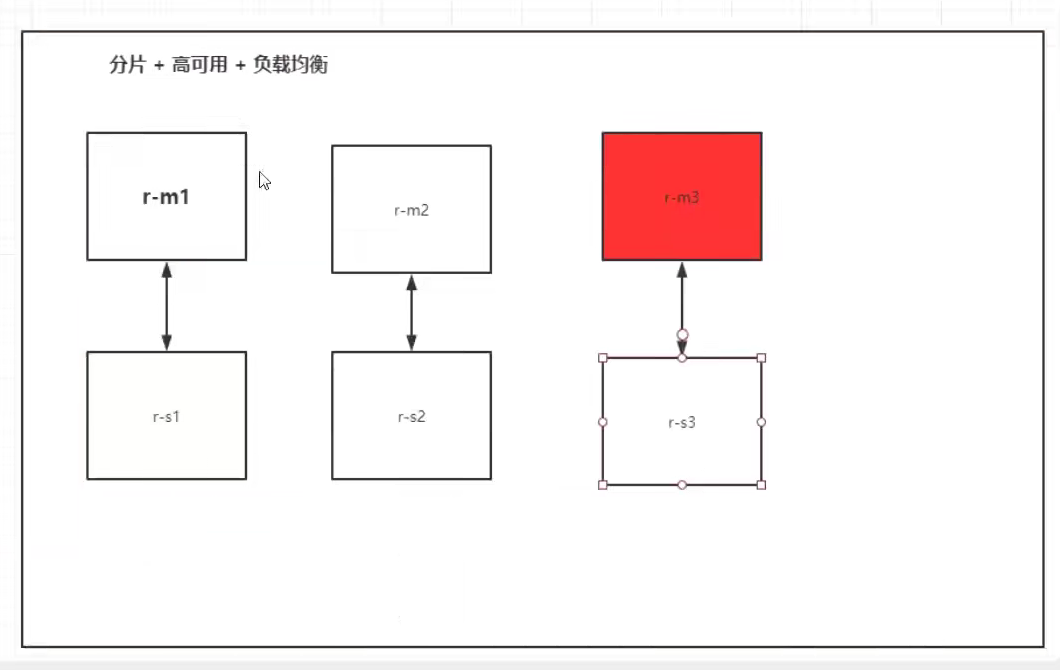
Create a custom network named redis
docker network create redis --subnet 172.38.0.0/16
Create six Redis configuration information using the following script:
for port in $(seq 1 6); \
do \
mkdir -p /mydata/redis/node-${port}/conf
touch /mydata/redis/node-${port}/conf/redis.conf
cat << EOF >/mydata/redis/node-${port}/conf/redis.conf
port 6379
bind 0.0.0.0
cluster-enabled yes
cluster-config-file nodes.conf
cluster-node-timeout 5000
cluster-announce-ip 172.38.0.1${port}
cluster-announce-port 6379
cluster-announce-bus-port 16379
appendonly yes
EOF
done
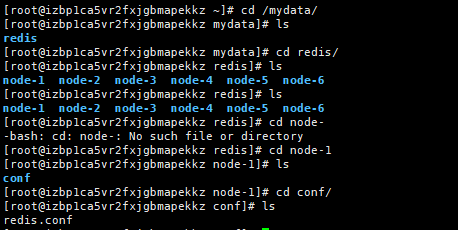
Start six Redis containers below to set the corresponding container data volume mount
#First Redis Container
docker run -p 6371:6379 -p 16371:16379 --name redis-1 \
    -v /mydata/redis/node-1/data:/data \
    -v /mydata/redis/node-1/conf/redis.conf:/etc/redis/redis.conf \
    -d --net redis --ip 172.38.0.11 redis:5.0.9-alpine3.11 redis-server /etc/redis/redis.conf
#Second Redis Container
docker run -p 6372:6379 -p 16372:16379 --name redis-2 \
    -v /mydata/redis/node-2/data:/data \
    -v /mydata/redis/node-2/conf/redis.conf:/etc/redis/redis.conf \
    -d --net redis --ip 172.38.0.12 redis:5.0.9-alpine3.11 redis-server /etc/redis/redis.conf
#Third Redis Container
docker run -p 6373:6379 -p 16373:16379 --name redis-3 \
    -v /mydata/redis/node-3/data:/data \
    -v /mydata/redis/node-3/conf/redis.conf:/etc/redis/redis.conf \
    -d --net redis --ip 172.38.0.13 redis:5.0.9-alpine3.11 redis-server /etc/redis/redis.conf
#4th Redis Container
docker run -p 6374:6379 -p 16374:16379 --name redis-4 \
    -v /mydata/redis/node-4/data:/data \
    -v /mydata/redis/node-4/conf/redis.conf:/etc/redis/redis.conf \
    -d --net redis --ip 172.38.0.14 redis:5.0.9-alpine3.11 redis-server /etc/redis/redis.conf
#5th Redis Container
docker run -p 6375:6379 -p 16375:16379 --name redis-5 \
    -v /mydata/redis/node-5/data:/data \
    -v /mydata/redis/node-5/conf/redis.conf:/etc/redis/redis.conf \
    -d --net redis --ip 172.38.0.15 redis:5.0.9-alpine3.11 redis-server /etc/redis/redis.conf
#6th Redis Container
docker run -p 6376:6379 -p 16376:16379 --name redis-6 \
    -v /mydata/redis/node-6/data:/data \
    -v /mydata/redis/node-6/conf/redis.conf:/etc/redis/redis.conf \
    -d --net redis --ip 172.38.0.16 redis:5.0.9-alpine3.11 redis-server /etc/redis/redis.conf
Or start six Redis containers at once through a script:
for port in $(seq 1 6); \
do
docker run -p 637${port}:6379 -p 1637${port}:16379 --name redis-${port} \
-v /mydata/redis/node-${port}/data:/data \
-v /mydata/redis/node-${port}/conf/redis.conf:/etc/redis/redis.conf \
-d --net redis --ip 172.38.0.1${port} redis:5.0.9-alpine3.11 redis-server /etc/redis/redis.conf; \
done
Execute the above script with the following results:

Enter below to create a cluster in the redis-1 container
redis-cli --cluster create 172.38.0.11:6379 172.38.0.12:6379 172.38.0.13:6379 172.38.0.14:6379 172.38.0.15:6379 172.38.0.16:6379 --cluster-replicas 1
View cluster information
redis-cli -c
cluster info
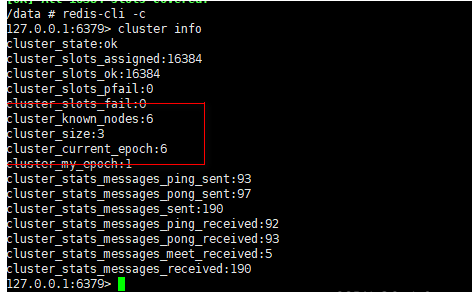
Looking at the node information cluster nodes, you can clearly see the master-slave relationship of the Redis node.

To test whether master-slave replication works, set a key and you can see that we have redirected to the Redis-3 node, which handles the operation.

Create a new session, stop the Redis-3 container service, reconnect the Redis-cli client, retrieve k1 again, and redirect the processing from node Redis-4 to the Redis-3 node.

6. SpringBoot Micro Services Package Docker Mirrors
- Build a springboot project, write an interface, and start the project for local testing
@RestController
public class HelloController {

    @GetMapping("/hello")
    public String hello(){
        return "Hello World!";
    }
}
-
Package applications, package Spring Boot projects with Maven's package, and generate jar packages

-
Write Dockerfile
FROM java:8
COPY *.jar /app.jar
CMD ["--server.port=8080"]
EXPOSE 8080
ENTRYPOINT ["java","-jar","/app.jar"]
-
Build a mirror to send the packaged generated jar package and the written Dockerfile to the server

Use the build command to build the image:
docker build -t demo .
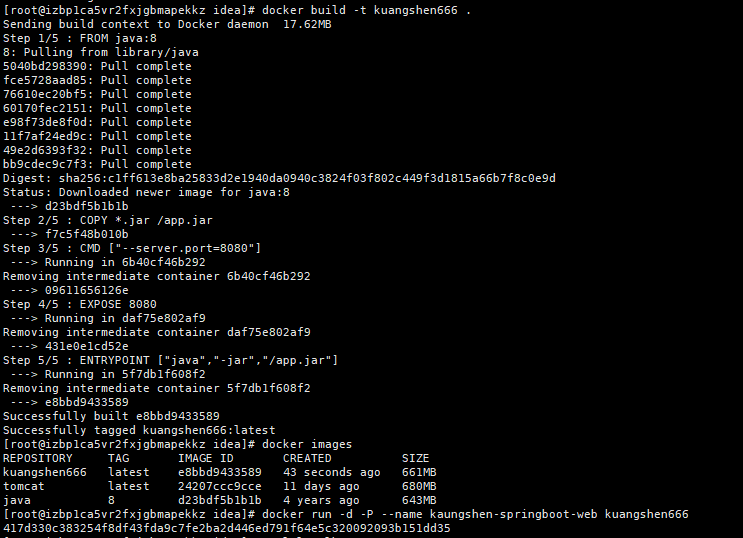
-
Publish Run! After you have finished building the mirror, run the mirror to test whether the / hello interface can be accessed properly. (Ports mapped by the host are randomly generated because -P was used for the previous run image)

-
After we use Docker in the future, delivering it to others is a mirror!