About Docker Swarm
Docker Swarm consists of two parts:
- Docker Cluster: Organize one or more Docker nodes so that users can manage them in a cluster;
- Application orchestration: There is a set of API s for deploying and managing containers;
Official information: https://docs.docker.com/swarm/
network diagram
The following is a typical Docker Swarm cluster deployment diagram from the Docker website: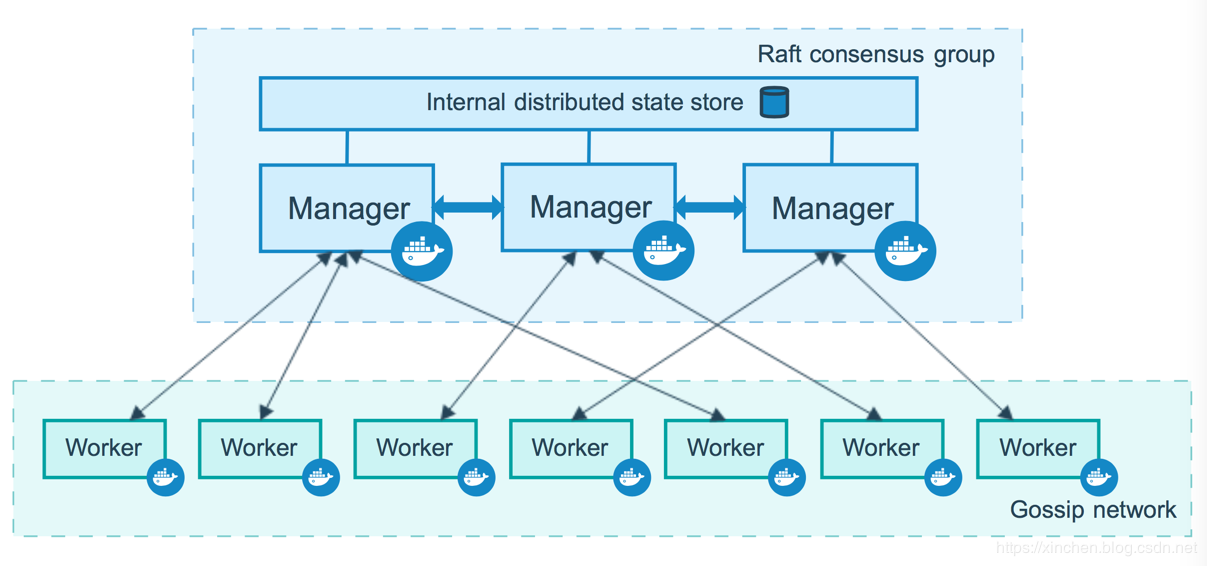
Next, follow the diagram above to build a Docker Swarm cluster.
Dead work
There are five machines in this battle. The configuration information is the same as the following:
- Operating System: CentOS Linux release 7.6.1810
- Docker service version: 1.13.1
- The firewall is off;
The machine information is shown in the following table:
| IP Address | Host Name | Identity |
|--|--|--|
| 192.168.121.142 | m0 | Management Node |
| 192.168.121.139 | m1 | Management Node |
| 192.168.121.140 | m2 | Management Node |
| 192.168.121.141 | w0 | Work Node |
| 192.168.121.138 | w1 | Work Node |
Why three management nodes?
As can be seen from the official diagram, the Raft consensus algorithm is used for internal management coordination between management node clusters, which ensures that management nodes are highly available (HA), and generally refers to the following two principles:
- Deploy an odd number of management nodes to help reduce the incidence of fissures;
- Don't deploy too many management nodes, because more management nodes mean more time to reach a consensus;
Introduction to the steps for deploying a cluster
The next deployment process is divided into the following steps:
- Initialize the first management node (m0);
- Join a new management node (m1, m2);
- Join working nodes (w0, w1);
Let's get started formally.
Initialize the first management node (m0)
- The IP address of the m0 node is 192.168.121.142, so execute the following commands at the m0 node:
docker swarm init \
--advertise-addr 192.168.121.142:2377
--listen-addr 192.168.121.142:2377
For advertise-addr and listen-addr, the former specifies the address of other nodes when they connect to m0, and the latter specifies the IP and port hosting swarm traffic. A more detailed and in-depth distinction between them can be found in the following articles: https://boxboat.com/2016/08/17/whats-docker-swarm-advertise-addr/
- The console returns the following information, indicating that the Swarm cluster initialized successfully:
Swarm initialized: current node (7585zt09o2sat82maef0ocf42) is now a manager.

To add a worker to this swarm, run the following command:

    docker swarm join \
    --token SWMTKN-1-5huefb5501cv7p8i2op1am2oevasoqu4te8vpvapndkudvszb4-e8l6755jstd7urpdo5smyi8fv \
    192.168.121.142:2377

To add a manager to this swarm, run 'docker swarm join-token manager' and follow the instructions.- List all the nodes of the current Swarm cluster to see the status and identity of the unique node m0:
[root@m0 ~]# docker node ls
ID                           HOSTNAME  STATUS  AVAILABILITY  MANAGER STATUS
7585zt09o2sat82maef0ocf42 *  m0        Ready   Active        Leader
Now that the cluster is set up, we need to add more management and work nodes.
How do I join a new node?
- The new node join policy for Docker Swarm is to get a long list of commands from the management node, called join token, which can be executed by any machine that wants to join the cluster itself.
- If a new management node needs to be joined, execute the command docker swarm join-token manager at m0 to get the join token of the management node, as follows:
[root@m0 ~]# docker swarm join-token manager
To add a manager to this swarm, run the following command:

    docker swarm join \
    --token SWMTKN-1-5huefb5501cv7p8i2op1am2oevasoqu4te8vpvapndkudvszb4-5tz9d4w7nwzu8r4ozd0ff2aiu \
192.168.121.142:2377- If a new work node needs to be joined, execute the command docker swarm join-token worker at m0 to get the join token of the work node, as follows:
[root@m0 ~]# docker swarm join-token worker
To add a worker to this swarm, run the following command:

    docker swarm join \
    --token SWMTKN-1-5huefb5501cv7p8i2op1am2oevasoqu4te8vpvapndkudvszb4-e8l6755jstd7urpdo5smyi8fv \
    192.168.121.142:2377
Both join token s are ready, and the next step is to join the new node.
Join management nodes m1, m2
- Execute the previously acquired management node join token on m1:
[root@m1 ~]# docker swarm join \
>     --token SWMTKN-1-5huefb5501cv7p8i2op1am2oevasoqu4te8vpvapndkudvszb4-5tz9d4w7nwzu8r4ozd0ff2aiu \
>     192.168.121.142:2377
This node joined a swarm as a manager.
- Do the same on m2;
- Execute the command docker node ls on either m0, m1, or m2 to see the status of the Swarm cluster. As shown in the following figure, the three management nodes are in normal state. The ID field with an asterisk suffix indicates that the machine currently executing the command is m1:
[root@m1 ~]# docker node ls
ID                           HOSTNAME  STATUS  AVAILABILITY  MANAGER STATUS
0isfyre69mdu1hm11esf1q3dk    m2        Ready   Active        Reachable
7585zt09o2sat82maef0ocf42    m0        Ready   Active        Leader
slc0hjbs7jh2hdi8ai3wohy23 *  m1        Ready   Active        Reachable
Join working nodes w0, w1
- Perform the join token of the previously obtained work node on w0:
[root@w0 ~]# docker swarm join \
>     --token SWMTKN-1-5huefb5501cv7p8i2op1am2oevasoqu4te8vpvapndkudvszb4-e8l6755jstd7urpdo5smyi8fv \
>     192.168.121.142:2377
This node joined a swarm as a worker.
- Do the same on w1;
- Execute the command docker node ls on either of m0, m1, or m2 to see the status of the Swarm cluster and see that the working nodes are all ready:
[root@m0 ~]# docker node ls
ID                           HOSTNAME  STATUS  AVAILABILITY  MANAGER STATUS
0isfyre69mdu1hm11esf1q3dk    m2        Ready   Active        Reachable
7585zt09o2sat82maef0ocf42 *  m0        Ready   Active        Leader
i71bcxt1auc804syybroajtan    w1        Ready   Active
slc0hjbs7jh2hdi8ai3wohy23    m1        Ready   Active        Reachable
wqcwcccva3d3mxgi5p423d4fv    w0        Ready   Active
So far, the Swarm cluster environment has been set up, which can be verified next.
Validate Swarm Cluster Environment
- Create an Overlay Netowork called tomcat-net, a two-tier network in which docker containers can access each other even if the hosts are different:
docker network create -d overlay tomcat-net
- Create a service named tomcat that uses the overlay network you just created:
docker service create --name tomcat \
--network tomcat-net \
-p 8080:8080 \
--replicas 3 \
tomcat:7.0.96-jdk8-openjdk
- Execute the command docker services to view all current services:
[root@m0 ~]# docker service ls
ID            NAME    MODE        REPLICAS  IMAGE
kguawc4b5th4  tomcat  replicated  3/3       tomcat:7.0.96-jdk8-openjdk
- Execute the command docker service ps tomcat to view the service named tomcat, and you can see that three containers are deployed on m0, m2, and w1 machines:
[root@m0 ~]# docker service ps tomcat
ID            NAME      IMAGE                       NODE  DESIRED STATE  CURRENT STATE           ERROR  PORTS
n1gs9f1plce2  tomcat.1  tomcat:7.0.96-jdk8-openjdk  w1    Running        Running 19 minutes ago
q8jyg088ci21  tomcat.2  tomcat:7.0.96-jdk8-openjdk  m2    Running        Running 19 minutes ago
h9ww33dpw56m  tomcat.3  tomcat:7.0.96-jdk8-openjdk  m0    Running        Running 19 minutes ago
- Execute the command docker service inspect --pretty tomcat to see the details of the service named tomcat (remove--pretty to see the more complete):
[root@m0 ~]# docker service inspect --pretty tomcat

ID:     kguawc4b5th4qlwlsv183qtai
Name:       tomcat
Service Mode:   Replicated
 Replicas:  3
Placement:
UpdateConfig:
 Parallelism:   1
 On failure:    pause
 Max failure ratio: 0
ContainerSpec:
 Image:     tomcat:7.0.96-jdk8-openjdk@sha256:91eadffb59d9a35ada2d39fcd616a749ac580aa5e834499b7128f27be2e46623
Resources:
Networks: tomcat-net
Endpoint Mode:  vip
Ports:
 PublishedPort 8080
  Protocol = tcp
  TargetPort = 8080
-
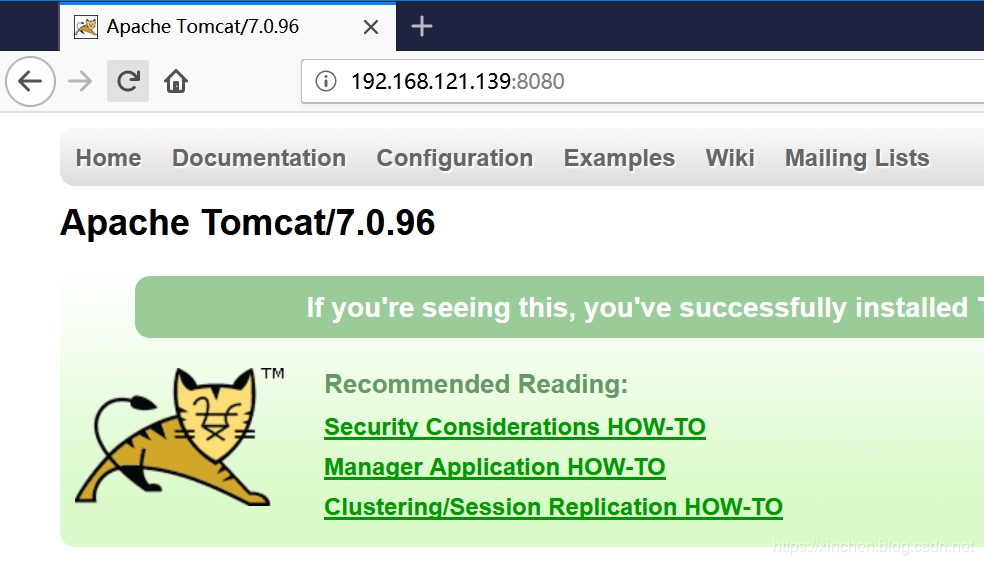
Open your browser and try to access port 8080 of five machines: m0, m1, m2, w0, w1. You can successfully access the tomcat home page:
Service mode
- There are two service modes: Ingress and Host, and if not specified, Ingress is the default;
- In Ingress mode, traffic to port 8080 of any Swarm node maps to the internal port 80 of any service replica, even if there is no tomcat service replica on that node.
- In Host mode, ports are only opened on machines running copies of containers, and commands using Host mode are as follows:
docker service create --name tomcat \
--network tomcat-net \
--publish published=8080,target=8080,mode=host \
--replicas 3 \
tomcat:7.0.96-jdk8-openjdk
Service scaling
- Execute the command docker service scale tomcat=5 to adjust the number of copies from 3 to 5:
[root@m0 ~]# docker service scale tomcat=5
tomcat scaled to 5
- Execute the command docker service ps tomcat to see the service named tomcat and see that a container is distributed on each machine:
[root@m0 ~]# docker service ps tomcat
ID            NAME      IMAGE                       NODE  DESIRED STATE  CURRENT STATE               ERROR  PORTS
w32tjahze2fk  tomcat.1  tomcat:7.0.96-jdk8-openjdk  m2    Running        Running 42 minutes ago
yj5czwwhrrsh  tomcat.2  tomcat:7.0.96-jdk8-openjdk  m0    Running        Running 42 minutes ago
pq40995nbd0k  tomcat.3  tomcat:7.0.96-jdk8-openjdk  w1    Running        Running 42 minutes ago
y1y6z1jczel1  tomcat.4  tomcat:7.0.96-jdk8-openjdk  m1    Running        Running about a minute ago
w0dcii8f79os  tomcat.5  tomcat:7.0.96-jdk8-openjdk  w0    Running        Running about a minute ago
Rolling Upgrade
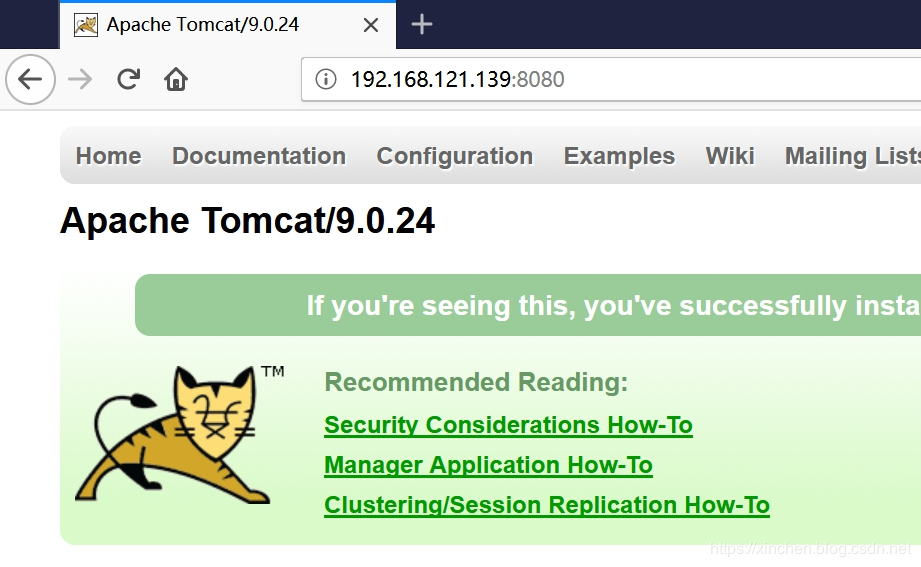
- In the current tomcat service, the tag of the tomcat image is 7.0.96-jdk8-openjdk. Let's try to upgrade to 9.0.24-jdk11-openjdk and execute the following commands:
docker service update \
--image tomcat:9.0.24-jdk11-openjdk \
--update-parallelism 1 \
--update-delay 10s tomcat
There are several points to note about the above commands:
a. update-parallelism: The number of containers per update, set here to 1, indicates that each container will not be upgraded until it has been upgraded successfully.
b. update-delay: After each batch of upgrades is successful, the wait time before the next batch is upgraded. This means that after upgrading a container, wait 10 seconds before upgrading the next batch;
- Executing the command docker service ps tomcat to view the service during the upgrade process, you can see that the new version container starts one by one:
[root@m0 ~]# docker service ps tomcat
ID            NAME          IMAGE                        NODE  DESIRED STATE  CURRENT STATE                ERROR  PORTS
w32tjahze2fk  tomcat.1      tomcat:7.0.96-jdk8-openjdk   m2    Running        Running 56 minutes ago
yj5czwwhrrsh  tomcat.2      tomcat:7.0.96-jdk8-openjdk   m0    Running        Running 56 minutes ago
semuna9awsn7  tomcat.3      tomcat:9.0.24-jdk11-openjdk  w1    Running        Running 15 seconds ago
pq40995nbd0k   \_ tomcat.3  tomcat:7.0.96-jdk8-openjdk   w1    Shutdown       Shutdown about a minute ago
y1y6z1jczel1  tomcat.4      tomcat:7.0.96-jdk8-openjdk   m1    Running        Running 15 minutes ago
oot3yex74v4t  tomcat.5      tomcat:9.0.24-jdk11-openjdk  w0    Running        Preparing 5 seconds ago
w0dcii8f79os   \_ tomcat.5  tomcat:7.0.96-jdk8-openjdk   w0    Shutdown       Shutdown 3 seconds ago
-
Upon completion of the upgrade, browser access to the service, you can see that the tomcat version has been upgraded:
Delete Service
The service can be deleted by executing the command docker service rm tomcat:
[root@m0 ~]# docker service rm tomcat
tomcat
[root@m0 ~]# docker service ls
ID  NAME  MODE  REPLICAS  IMAGE
At this point, Docker Swarm has experienced basic operations from deployment to deployment, and I hope you can get some reference when setting up your environment.