Doker Mirror Management Foundation
The concept of mirroring
Mirroring can be understood as an application container, while docker is used to load and unload containers.
The docker image contains the file system and its contents needed to start the container, so it is used to create and start the container.
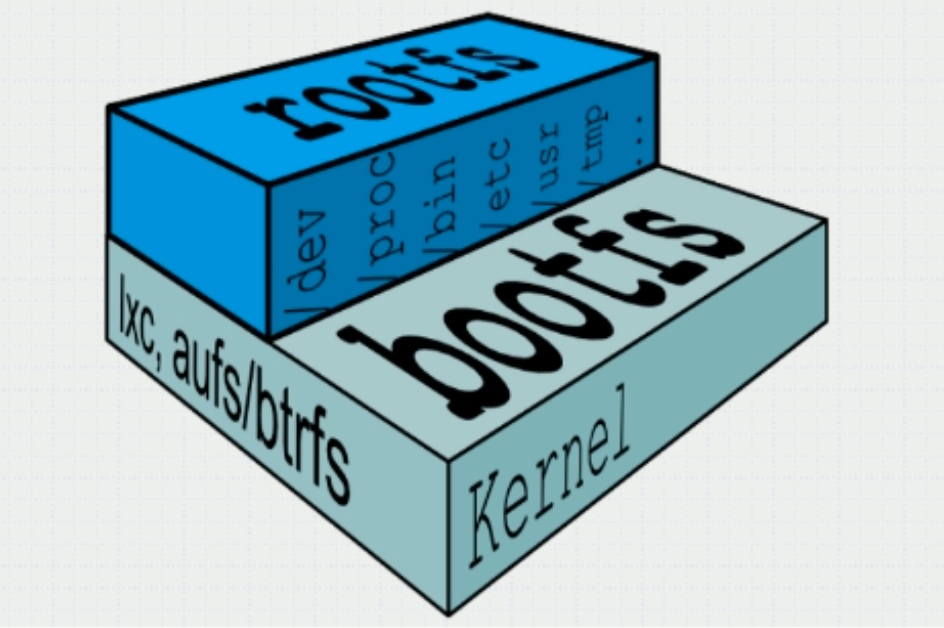
The docker image uses a hierarchical construction mechanism, with bootfs at the bottom and rootfs above it
- bootfs: A file system for system boot, including bootloader and kernel, that will be unloaded when the container is started to save memory resources
- rootfs: on top of bootfs, as the root file system of the docker container
- In traditional mode, when the system starts, the kernel mounts rootfs to read-only mode first, and then reloads them to read-write mode after completing the integrity self-check
- In docker, rootfs are mounted in "read-only" mode by the kernel, then an additional "writable" layer is mounted through "joint mounting" Technology
Note: When a container is deleted, its own Writable layer is deleted together
docker mirror layer
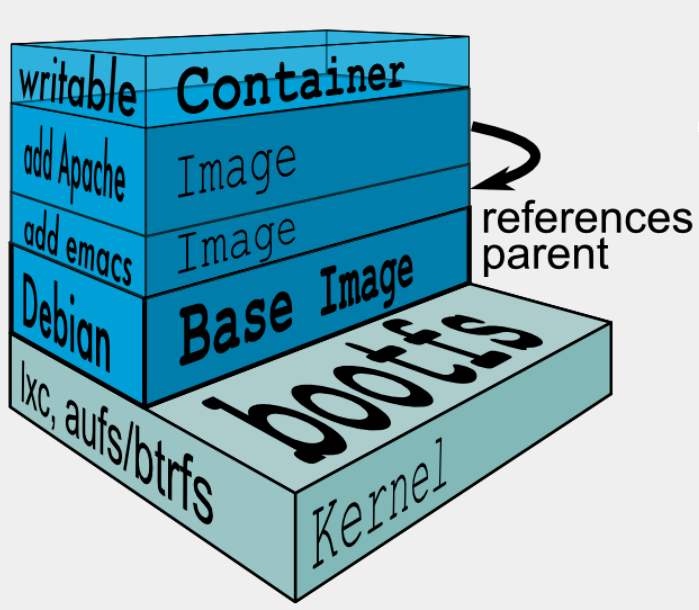
The mirror at the bottom is called the parrent image, and the bottom is called the base image.
At the top is the Read-Write layer, and below it are the Read-Only layer.
docker storage driver
Doker provides a variety of storage drivers to store mirrors in different ways. Here are several common storage drivers:
- AUFS
- OverlayFS
- Devicemapper
- Btrfs
- VFS
AUFS
AUFS (AnotherUnionFS) is a Union FS and is a file-level storage driver. AUFS is a layered file system that transparently covers one or more existing file systems, combining layers into a single representation of the file system. Simply put, it supports mounting different directories to a file system under the same virtual file system. This file system can overlay modified files one by one. No matter how many layers are read-only below, only the top file system is writable. When a file needs to be modified, AUFS creates a copy of the file, uses CoW to copy the file from the read-only layer to the writable layer for modification, and the results are saved in the writable layer. In Docker, the bottom read-only layer is image, and the writable layer is Container.
The AUFS filesystem is said to have 3W lines of code, whereas the ext4 filesystem only has around 4000-5000 lines of code to be integrated into the kernel. When the AUFS application was later merged into the kernel code, linuz rejected the code because it was too bloated. So AUFS is not always the file system in the linux kernel. If you want to use AUFS, you have to patch the kernel and compile and use it yourself. But the operating systems of the redhats are known for their stability and will not do this extraordinary thing, so it is impossible to use AUFS in the redhats. The docker on ubuntu uses AUFS by default.
OverlayFS
Overlay is supported after the Linux kernel 3.18 and is also a Union FS. Unlike AUFS, there are only two layers of Overlay: an upperfile system and a lower file system, representing the mirror and container layers of Docker, respectively. When a file needs to be modified, use CoW to copy the file from a read-only lower to a writable upper for modification, and the result is saved at the upper layer. In Docker, the bottom read-only layer is image, and the writable layer is Container. The latest OverlayFS is Overlay2.
AUFS and Overlay are both federated file systems, but AUFS has multiple layers, while Overlay has only two, so AUSF is slower when copying large files with lower layers when writing. And Overlay incorporates the linux kernel mainline, which AUFS does not. At present, AUFS has been basically eliminated.
DeviceMapper
Device mapper is supported after Linux kernel 2.6.9. It provides a mapping framework mechanism from logical devices to physical devices, under which users can easily formulate management strategies to implement storage resources according to their needs. AUFS and OverlayFS are file-level storage, while Device mapper is block-level storage, and all operations operate directly on blocks, not files. The Device mapper driver first creates a resource pool on the block device, then creates a basic device with a file system on the resource pool. All mirrors are snapshots of this basic device, while containers are snapshots of mirrors. So you see in the container that the file system is a snapshot of the file system of the basic device on the resource pool, and no space is allocated to the container. When a new file is to be written, a new block is allocated to it within the mirror of the container and data is written. This is called time-of-use allocation. When you want to modify an existing file, use CoW to allocate block space for the container snapshot, and copy the modified data into a new block in the container snapshot before making the modification.
OverlayFS is file-level storage, Device mapper is block-level storage. When a file is very large and the content modified is small, Overlay copies the entire file regardless of the size of the content modified. It obviously takes more time to modify a large file than a small one. Block-level copies only the blocks that need to be modified, not the entire file. In this scenario, apparently the device mapper is faster. Because the block level has direct access to the logical disk, it is suitable for IO-intensive scenarios. Overlay is relatively better for scenarios with complex internal programs, large concurrencies, but less IO.
docker registry
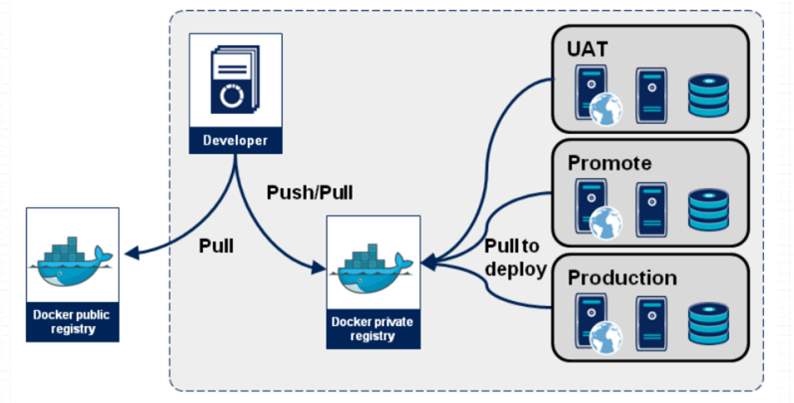
When the container is started, docker daemon attempts to get the associated image locally, which is downloaded from Registry and saved locally when the local image does not exist.
Registry is used to save docker images, including the hierarchy and metadata of the images. Users can build their own Registry or use the official Docker Hub.
Classification of docker registry:
- Sponsor Registry: Third-party Registry for use by customers and the Docker community
- Mirror Registry: Third-party Registry, for customer use only
- Vendor Registry: Regisry provided by vendor publishing docker image
- Private Registry: registry provided through a private entity with a firewall and additional security layer
Composition of docker registry:
- Repository
- A mirror repository consisting of all iterated versions of a particular docker image
- Multiple Repositories may exist in a Registry
- Repository can be divided into Top Warehouse and User Warehouse
- User repository name format is User/Repository Name
- Each warehouse can contain multiple Tags, each with a mirror image
- Index
- Maintain information about user accounts, mirror checks, and public namespaces
- Equivalent to providing Registry with a retrieval interface that performs functions such as user authentication
Mirrors in a Docker Registry are usually created by developers and then pushed to a Public or Private Registry for other people to use, such as "deploying" to a production environment.
Making docker image
In most cases, we do mirroring based on an existing basic image of someone else, which we call a base image. For example, a clean version of the minimal centos, ubuntu, or debian.
So where does this minimal centos image come from? In fact, this basic image is usually manually created by the relevant maintainers of Docker Hub, the official Docker. This basic image is easy for Docker's official professionals, but not for end users.
Docker Hub
Docker Hub is a cloud-based registration service that allows you to link to code libraries, build and test your mirrors, store manually pushed mirrors, and link to Docker Cloud so you can deploy your mirrors on your host.
It provides centralized resources for container image discovery, distribution and change management, user and team collaboration, and workflow automation throughout the development pipeline.
[root@localhost ~]# docker images
REPOSITORY   TAG       IMAGE ID   CREATED   SIZE
[root@localhost ~]#
[root@localhost ~]#
[root@localhost ~]# docker pull centos
Using default tag: latest
latest: Pulling from library/centos
a1d0c7532777: Pull complete
Digest: sha256:a27fd8080b517143cbbbab9dfb7c8571c40d67d534bbdee55bd6c473f432b177
Status: Downloaded newer image for centos:latest
docker.io/library/centos:latest
[root@localhost ~]# docker run --name centos01 -it centos
[root@0b9a530c25c2 /]# useradd -r -M -s /sbin/nologin nginx
[root@0b9a530c25c2 /]# id nginx
uid=998(nginx) gid=996(nginx) groups=996(nginx)

[root@0b9a530c25c2 /]# yum -y install pcre-devel openssl openssl-devel gd-devel gcc gcc-c++ make
[root@0b9a530c25c2 /]# yum -y groups mark install 'Development Tools'

[root@0b9a530c25c2 /]# mkdir -p /var/log/nginx
[root@0b9a530c25c2 /]# chown -R nginx.nginx /var/log/nginx


[root@localhost ~]# docker cp /usr/local/nginx-1.20.1.tar.gz centos01:/usr/src
[root@0b9a530c25c2 ~]# ls /usr/src/
debug  kernels  nginx-1.20.1.tar.gz

[root@0b9a530c25c2 src]# tar xf nginx-1.20.1.tar.gz
[root@0b9a530c25c2 src]# cd nginx-1.20.1
[root@0b9a530c25c2 nginx-1.20.1]# ./configure \
>  --prefix=/usr/local/nginx \
>  --user=nginx \
>  --group=nginx \
>  --with-debug \
>  --with-http_ssl_module \
>  --with-http_realip_module \
>  --with-http_image_filter_module \
>  --with-http_gunzip_module \
>  --with-http_gzip_static_module \
>  --with-http_stub_status_module \
>  --http-log-path=/var/log/nginx/access.log \
>  --error-log-path=/var/log/nginx/error.log

[root@0b9a530c25c2 nginx-1.20.1]# make -j $(grep 'processor' /proc/cpuinfo | wc -l) && make install


[root@0b9a530c25c2 nginx-1.20.1]# echo 'export PATH=/usr/local/nginx/sbin:$PATH' > /etc/profile.d/nginx.sh
[root@0b9a530c25c2 nginx-1.20.1]# source /etc/profile.d/nginx.sh
[root@0b9a530c25c2 nginx-1.20.1]# nginx
[root@0b9a530c25c2 nginx-1.20.1]# ss -anlt
State  Recv-Q Send-Q  Local Address:Port   Peer Address:Port Process
LISTEN 0      128           0.0.0.0:80          0.0.0.0:*
Docker Hub offers the following main features:
- Mirror warehouse
- Find and extract mirrors from community and official repositories, and manage, push, and extract mirrors from private repositories that you can access.
- Automation Construction
- Automatically create a new image when you change the source code repository.
- Webhooks
- A webhook is a feature of automated build that allows you to trigger actions when successfully pushed to a mirror repository.
- organization
- Create a workgroup to manage access to the mirror warehouse.
- GitHub and Bitbucket Integration
- Add hub and Docker images to the current workflow.
Obtaining docker image
To get a Docker image from a remote registry, such as your own Docker registry, and add it to your local system, use the Docker pull command
docker pull <registry>[:<port>]/[<namespace>/]<name>:<tag>
Host providing docker distribution service over TCP (default 5000).
Identify specific images controlled by the registry
- The registry also supports raw; Raw is optional for these registries
- When included, the additional hierarchy provided is useful for distinguishing mirrors with the same functionality
Additional Hierarchy Levels
| Namespace | Examples(/) |
|---|---|
| organization | redhat/kubernetes, google/kubernetes |
| login(username) | Alice/application, bob/application |
| role | devel/database, test/database, prod/database |
Mirror Generation
The generation of mirrors:
- Dockerfile
- Container-based manufacturing
- Docker Hub automated builds
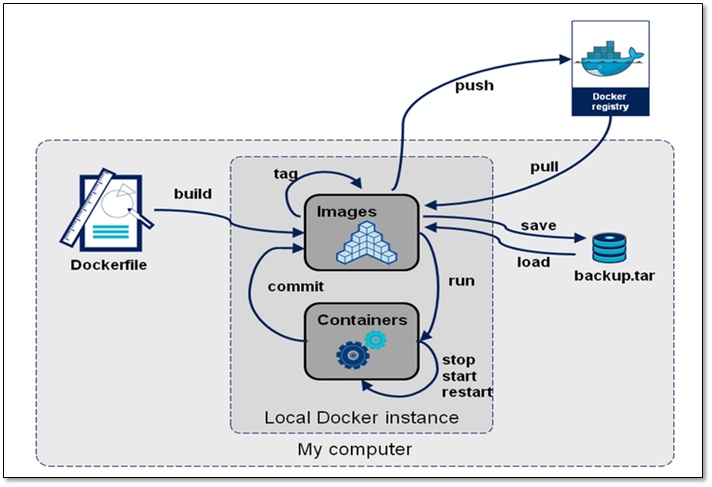
Container-based mirroring
Create a new image based on container changes
Usage:
docker commit [OPTIONS] CONTAINER [REPOSITORY[:TAG]]
| Options | Default | Description |
|---|---|---|
| —author, -a | Author (e.g., "John Hannibal Smith hannibal@a-team.com") | |
| -c, --change list | Apply Dockerfile instruction to the created image | |
| -m, --message string | Commit message | |
| -p, --pause | true | Pause container during commit |
Pull the official image of centos
[root@localhost ~]# docker pull centos
Using default tag: latest
latest: Pulling from library/centos
Digest: sha256:a27fd8080b517143cbbbab9dfb7c8571c40d67d534bbdee55bd6c473f432b177
Status: Downloaded newer image for centos:latest
docker.io/library/centos:latest

[root@localhost ~]# docker images
REPOSITORY   TAG       IMAGE ID       CREATED        SIZE
centos       latest    5d0da3dc9764   2 months ago   231MB
Run container using centos image
[root@localhost ~]# docker run -d --name centos01 -it centos /bin/bash
e7e164c48aaad085e7cd9e1dee327c0ac322cb62bd8ed847d0e35436165b6d6e
[root@localhost ~]# docker ps -a
CONTAINER ID   IMAGE     COMMAND       CREATED         STATUS         PORTS     NAMES
e7e164c48aaa   centos    "/bin/bash"   6 seconds ago   Up 5 seconds             centos01
Use the docker exec command to enter the centos2 container
[root@localhost ~]# docker run -d --name centos01 -it centos /bin/bash
e7e164c48aaad085e7cd9e1dee327c0ac322cb62bd8ed847d0e35436165b6d6e
[root@localhost ~]# docker ps -a
CONTAINER ID   IMAGE     COMMAND       CREATED         STATUS         PORTS     NAMES
e7e164c48aaa   centos    "/bin/bash"   6 seconds ago   Up 5 seconds             centos01
[root@localhost ~]# docker exec -it e7e164c48aaa /bin/bash
[root@e7e164c48aaa /]# ls
bin  etc   lib    lost+found  mnt  proc  run   srv  tmp  var
dev  home  lib64  media       opt  root  sbin  sys  usr
[root@e7e164c48aaa /]# ip a
1: lo: <LOOPBACK,UP,LOWER_UP> mtu 65536 qdisc noqueue state UNKNOWN group default qlen 1000
    link/loopback 00:00:00:00:00:00 brd 00:00:00:00:00:00
    inet 127.0.0.1/8 scope host lo
       valid_lft forever preferred_lft forever
4: eth0@if5: <BROADCAST,MULTICAST,UP,LOWER_UP> mtu 1500 qdisc noqueue state UP group default
    link/ether 02:42:ac:11:00:02 brd ff:ff:ff:ff:ff:ff link-netnsid 0
    inet 172.17.0.2/16 brd 172.17.255.255 scope global eth0
       valid_lft forever preferred_lft forever
After the container is working properly, upload the nginx source package from the local machine to the directory specified by the container
[root@localhost ~]# docker cp /usr/src/nginx-1.20.1.tar.gz e7e164c48aaa:/usr/src
Use the docker exec command to enter the container and compile nginx
Download compilation tools
[root@e7e164c48aaa ~]# yum -y install pcre-devel openssl openssl-devel gd-devel gcc gcc-c++ make

Establish nginx user
[root@e7e164c48aaa ~]# useradd -r -M -s /sbin/nologin nginx
[root@e7e164c48aaa ~]# id nginx
uid=998(nginx) gid=996(nginx) groups=996(nginx)

Establish nginx Log Directory
[root@e7e164c48aaa ~]# mkdir -p /var/log/nginx
[root@e7e164c48aaa ~]# chown -R nginx.nginx /var/log/nginx/

Compile Installation nginx
[root@e7e164c48aaa ~]# cd /usr/src/
[root@e7e164c48aaa src]# ls
debug  kernels  nginx-1.20.1.tar.gz
[root@e7e164c48aaa src]# tar xf nginx-1.20.1.tar.gz
[root@e7e164c48aaa src]# cd nginx-1.20.1
[root@b19e7e164c48aaa nginx-1.20.1]# ./configure \
>  --prefix=/usr/local/nginx \
>  --user=nginx \
>  --group=nginx \
>  --with-debug \
>  --with-http_ssl_module \
>  --with-http_realip_module \
>  --with-http_image_filter_module \
>  --with-http_gunzip_module \
>  --with-http_gzip_static_module \
>  --with-http_stub_status_module \
>  --http-log-path=/var/log/nginx/access.log \
>  --error-log-path=/var/log/nginx/error.log

[root@e7e164c48aaa nginx-1.20.1]# make && make install

Configuring environment variables
[root@e7e164c48aaa ~]# echo 'export PATH=/usr/local/nginx/sbin:$PATH' > /etc/profile.d/nginx.sh
[root@e7e164c48aaa ~]# source /etc/profile.d/nginx.sh
[root@e7e164c48aaa ~]# nginx
[root@e7e164c48aaa ~]# ss -anlt
State  Recv-Q Send-Q Local Address:Port  Peer Address:Port Process
LISTEN 0      128          0.0.0.0:80         0.0.0.0:*
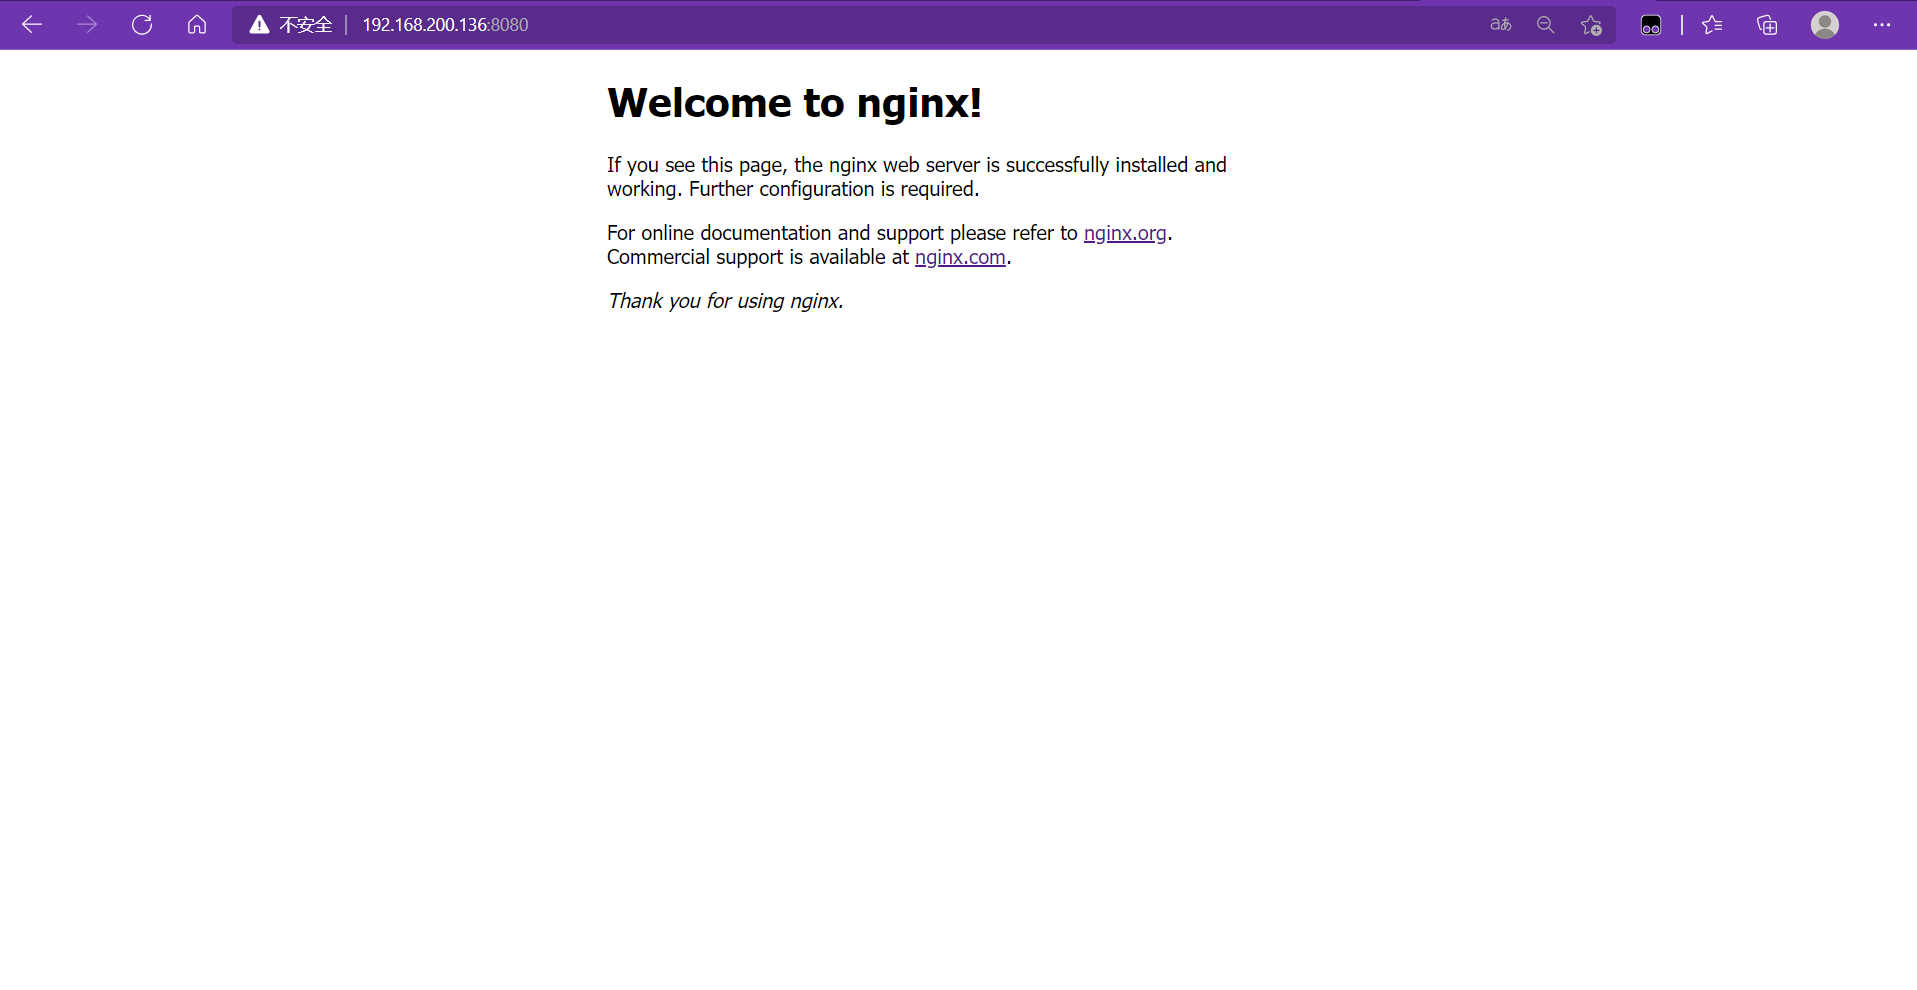
Local access
[root@localhost ~]# curl 172.17.0.2:80
<!DOCTYPE html>
<html>
<head>
<title>Welcome to nginx!</title>
<style>
    body {
        width: 35em;
        margin: 0 auto;
        font-family: Tahoma, Verdana, Arial, sans-serif;
    }
</style>
</head>
<body>
<h1>Welcome to nginx!</h1>
<p>If you see this page, the nginx web server is successfully installed and
working. Further configuration is required.</p>

<p>For online documentation and support please refer to
<a href="http://nginx.org/">nginx.org</a>.<br/>
Commercial support is available at
<a href="http://nginx.com/">nginx.com</a>.</p>

<p><em>Thank you for using nginx.</em></p>
</body>
</html>
Edit a self-start script
[root@e7e164c48aaa ~]# cd /
[root@e7e164c48aaa /]# vi start.sh
#!/bin/bash
/usr/local/nginx/sbin/nginx -c /usr/local/nginx/conf/nginx.conf
/bin/bash
[root@e7e164c48aaa /]# chmod +x start.sh
[root@e7e164c48aaa /]# exit
Once set up, make a mirror of this container
[root@localhost ~]# docker commit -p e7e164c48aaa
sha256:f4fe4bec94e8feb6c589f2b47ca3d95672bf0f4d5aeede8ea17793ed251ac027
[root@localhost ~]# docker images
REPOSITORY   TAG       IMAGE ID       CREATED         SIZE
<none>       <none>    f4fe4bec94e8   8 seconds ago   549MB
centos       latest    5d0da3dc9764   2 months ago    231MB
[root@localhost ~]# docker tag f4fe4bec94e8 syb1978974056:v0.2
[root@localhost ~]# docker images
REPOSITORY      TAG       IMAGE ID       CREATED          SIZE
syb1978974056   v0.2      f4fe4bec94e8   42 seconds ago   549MB
centos          latest    5d0da3dc9764   2 months ago     231MB
Run a container with the newly generated image
[root@localhost ~]# docker run -itd --name centos02 -p 8080:80 f4fe4bec94e8 /start.sh
ce2c73d304c7de2ef6974475260608147e1f0a0870f4f9b7cba904a9faae68b0
[root@localhost ~]# docker ps -a
CONTAINER ID   IMAGE          COMMAND       CREATED          STATUS          PORTS                                   NAMES
ce2c73d304c7   f4fe4bec94e8   "/start.sh"   46 seconds ago   Up 44 seconds   0.0.0.0:8080->80/tcp, :::8080->80/tcp   centos02
e7e164c48aaa   centos         "/bin/bash"   15 minutes ago   Up 15 minutes                                           centos01
Enter Container to View
[root@localhost ~]# docker exec -it e7e164c48aaa /bin/bash
[root@e7e164c48aaa /]# ss -anlt
State  Recv-Q Send-Q  Local Address:Port   Peer Address:Port Process
LISTEN 0      128           0.0.0.0:80          0.0.0.0:*
Browser Test
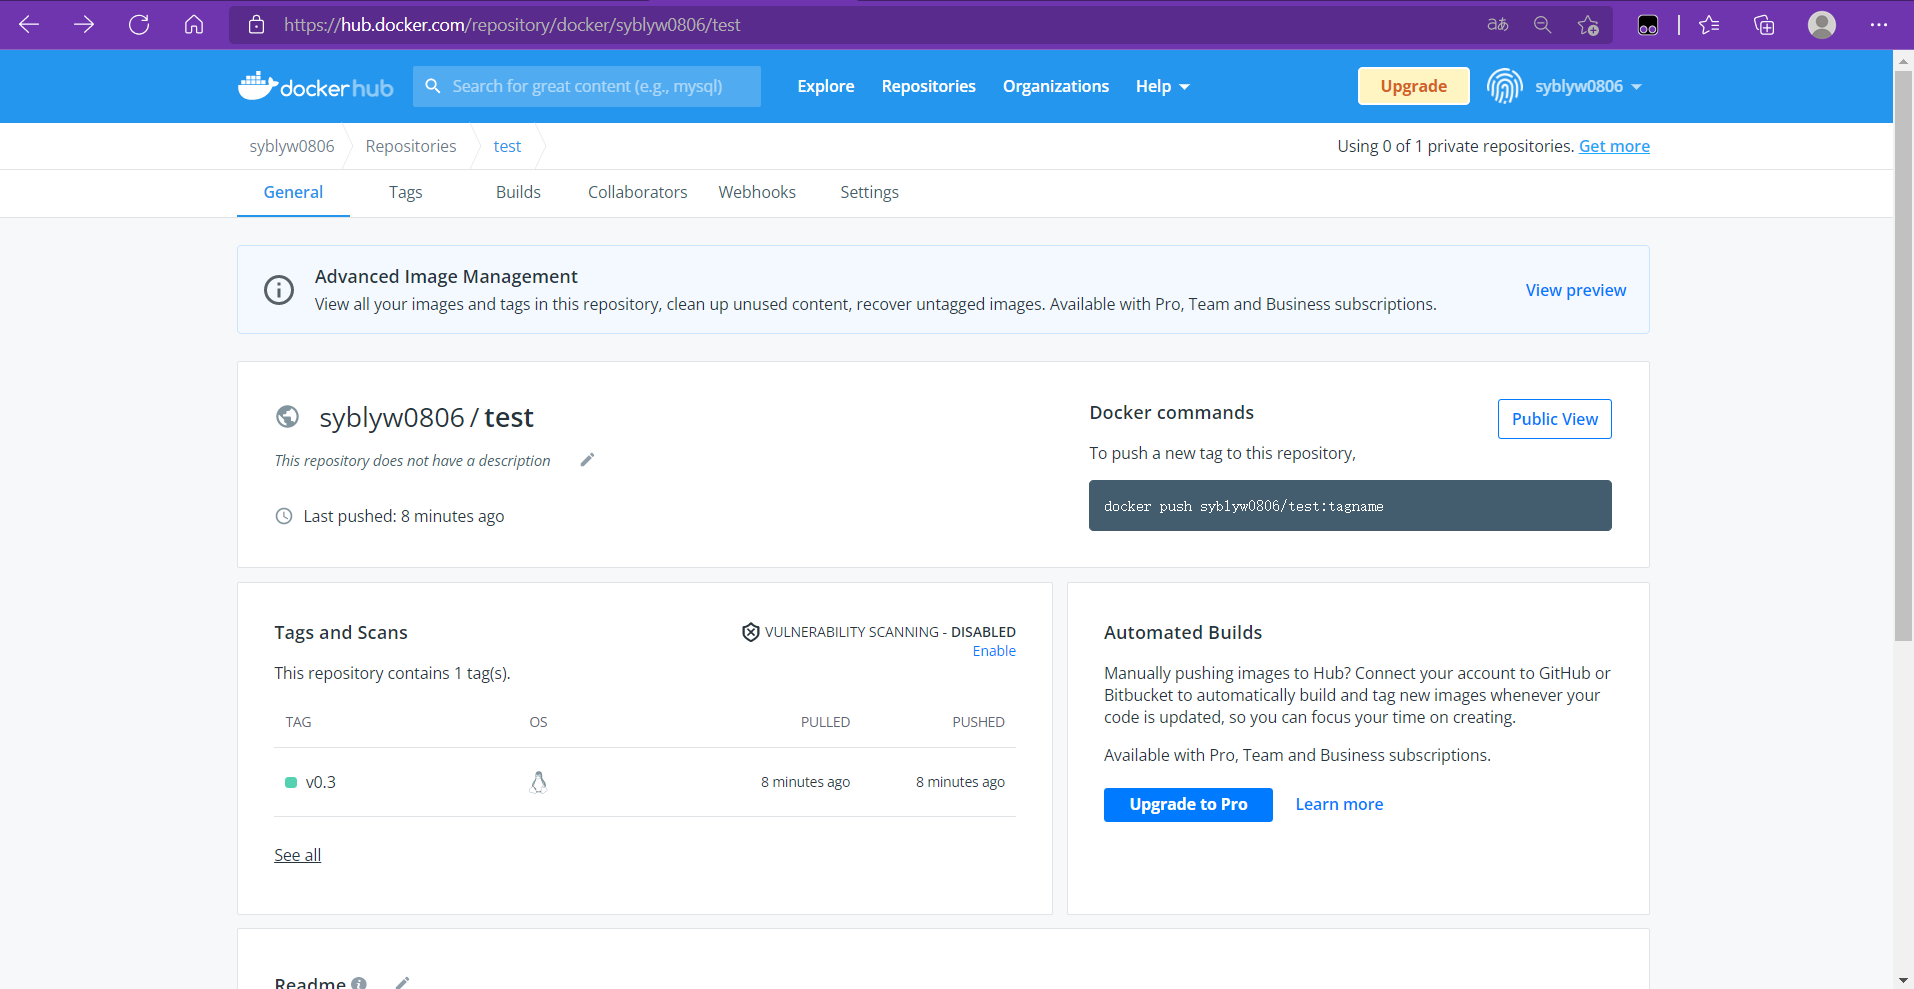
Upload mirror to docker hub repository
Access and login docker hub Official
Create warehouse

The warehouse name here corresponds to the mirror name one-to-one

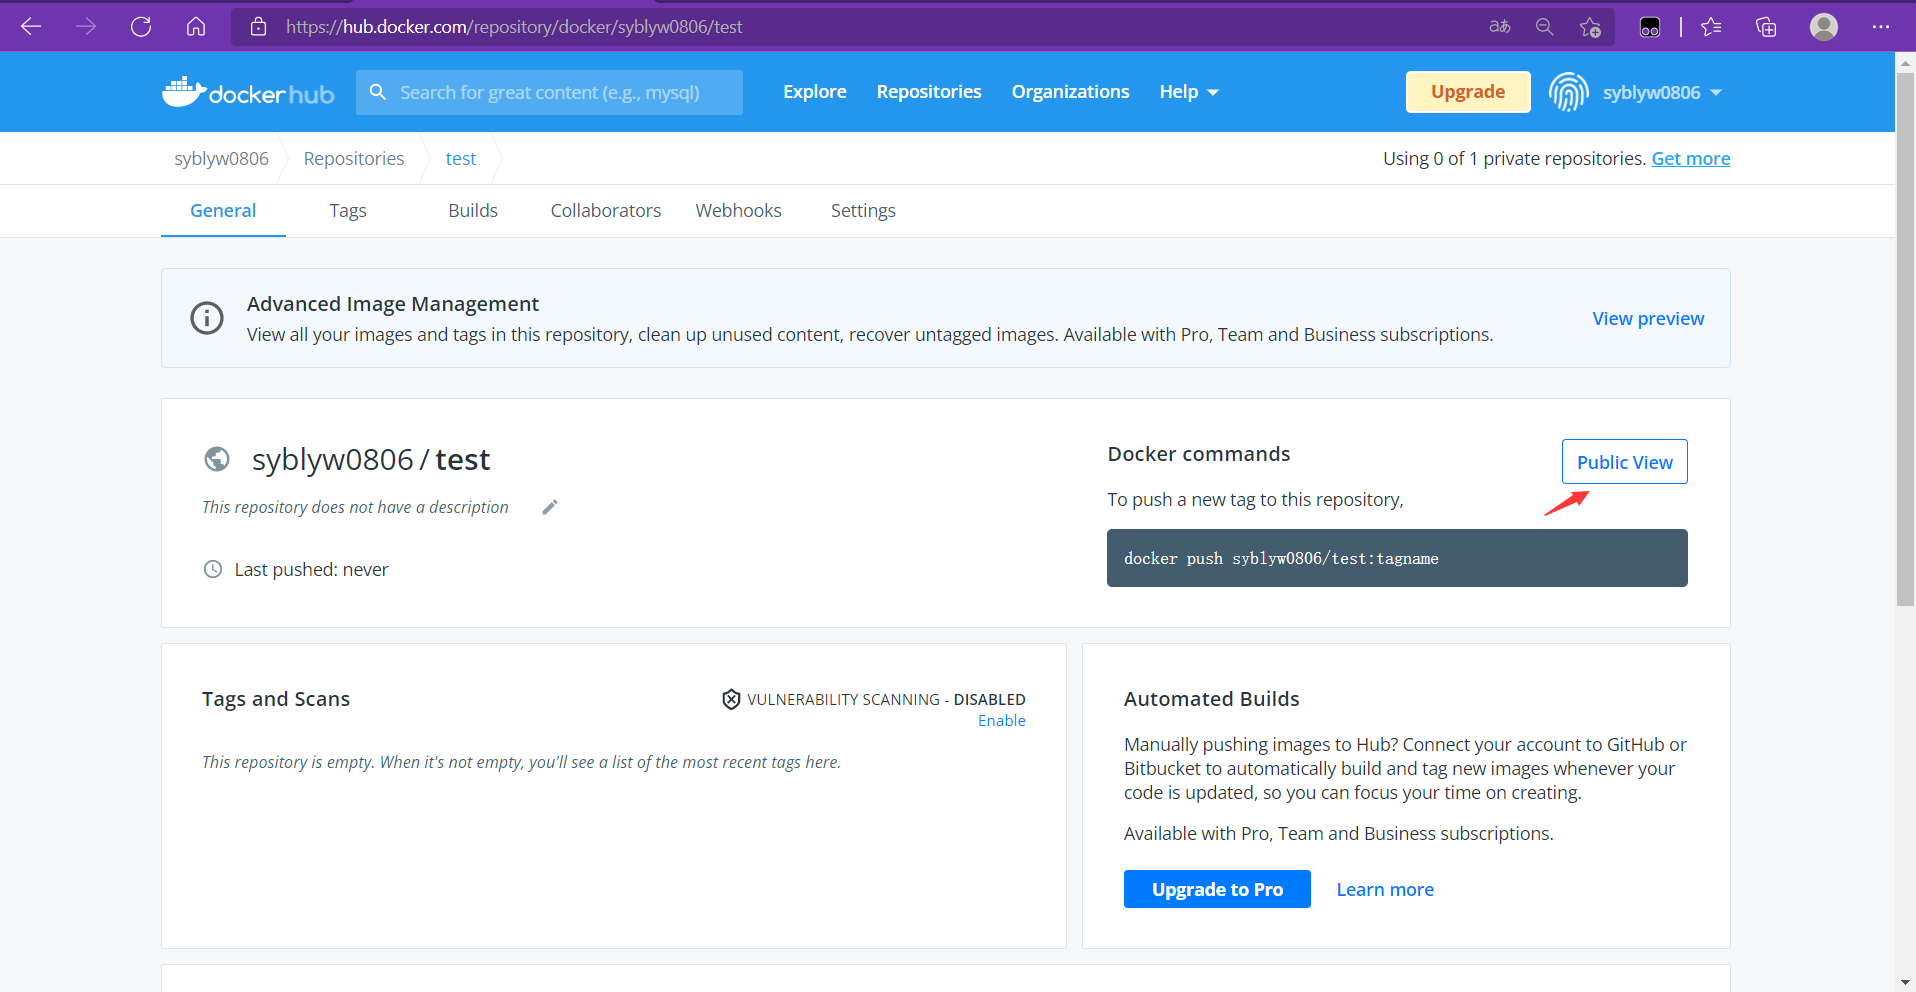
After the warehouse is created, log in to docker hub locally and push to mirror it in the docker hub warehouse
[root@localhost ~]# docker login
Login with your Docker ID to push and pull images from Docker Hub. If you don't have a Docker ID, head over to https://hub.docker.com to create one.
Username: syblyw0806
Password:
WARNING! Your password will be stored unencrypted in /root/.docker/config.json.
Configure a credential helper to remove this warning. See
https://docs.docker.com/engine/reference/commandline/login/#credentials-store
[root@localhost ~]# docker images
REPOSITORY        TAG       IMAGE ID       CREATED          SIZE
syblyw0806/test   v0.3      f4fe4bec94e8   39 minutes ago   549MB
centos            latest    5d0da3dc9764   2 months ago     231MB

[root@localhost ~]# docker push syblyw0806/test:v0.3
The push refers to repository [docker.io/syblyw0806/test]
eb596e259ddf: Pushed
74ddd0ec08fa: Mounted from library/centos
v0.3: digest: sha256:b9c4bbc468350c60ccabb654e16e7ae664acb88fc72ead41356b1ef63c8f4a46 size: 742
Import and Export of Mirrors
If there are 2 hosts, we have made a mirror on host 1. What do host 2 want to do with this mirror?
We can push the image into the mirror warehouse on Host 1, then pull the image down on Host 2, which is a bit of a hassle. If I'm just testing it, I can run on another host after I've finished mirroring on one host. There's no need to push it onto the warehouse and pull it back locally.
At this point, we can package the image into a compressed file based on the existing image and copy it to another host to import it. This is the import and export function of the image.
In docker we use docker save for export and docker load for import.
Execute docker save export mirror on the host where the mirror has been generated
docker save -o myimages.gz syblyw0806/test
Perform docker load import mirroring on another host that is not mirrored
docker load -i myimages.gz