In this paper, Apollo will introduce ten "little helpers" for your little buddies, each with unique skills such as blurring, compressing, cropping, rotating, synthesizing, and comparing.I'm sure you'll be able to cope with most picture processing scenarios easily once you know them.
But before introducing Little Help, Arborgo will first introduce some picture-related basics.In addition, in order to allow your little buddies to learn more about pictures, Apollo has prepared the chapter "Apollo talks".In this chapter you will learn the following:
- How to distinguish the type of picture (non-file suffix name);
- How to get the size of the picture (not right-click to view picture information);
- How to preview local pictures (not picture readers);
- How to achieve picture compression (not a picture compression tool);
- How to operate bitmap data (non-PS image processing software etc.);
- How to achieve picture stenciling (not visible to the naked eye).
Ten image processing "helpers" can't wait to see you. What are you still hesitating about?Let's get going!
1. Basic knowledge
1.1 Bitmap
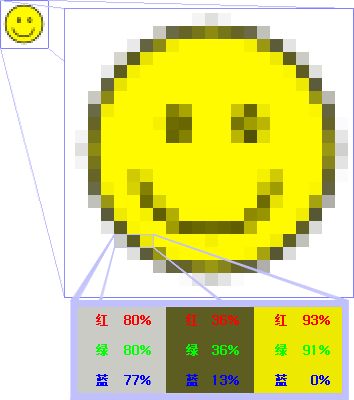
Bitmap images, also known as bitmap or raster images, consist of a single point called a pixel (picture element).These points can be arranged and stained differently to form a pattern.When you zoom in on a bitmap, you can see the countless individual squares that make up the entire image.The effect of enlarging the size of a bitmap is to increase the size of a single pixel, resulting in uneven lines and shapes.
Pictures taken with digital cameras, scanners, and computer screenshots are all bitmaps.Bitmaps are characterized by the ability to represent color changes and subtle transitions of colors, resulting in realistic results. The disadvantage is that each pixel's position and color value need to be recorded when saving, which takes up a large storage space.Common bitmap processing software includes Photoshop, Painter, and the drawing tools that come with the Windows system.
Resolution is an insurmountable barrier to bitmaps. When scaling and rotating bitmaps, new pixels cannot be produced, so the original pixels will be enlarged to fill in the blanks, which will make the picture unclear.
(Image source:https://zh.wikipedia.org/wiki/%E4%BD%8D%E5%9B%BE)
The small squares in the image are called pixels, and they all have a specific location and assigned color values that determine what the image will look like.
Pixels can be considered as indivisible units or elements in the entire image.The indivisible meaning is that it can no longer be cut into smaller units or elements, it exists as a single color grid.Each dot-matrix image contains a certain number of pixels that determine the size of the image presented on the screen.
1.2 Vector Graph
The so-called vector graph refers to the graphics described by straight lines and curves. The elements that make up these graphics are points, lines, rectangles, polygons, circles and arcs, which are calculated by mathematical formulas and have the feature of no distortion after editing.For example, a vector graphic in a picture is actually a line segment that forms the outline of the outer frame, and the color of the outer frame and the closed color of the outer frame determine the color that the picture displays.
Vector graphics are dominated by geometric graphics, which can be enlarged indefinitely without color change or blurring.It is often used in design of patterns, symbols, VI, text, etc.Common software are: CorelDraw, Illustrator, Freehand, XARA, CAD, etc.
Here we're familiar with Web developers SVG (Scalable Vector Graphics - Scalable Vector Graphics) For example, take a look at the structure of SVG:
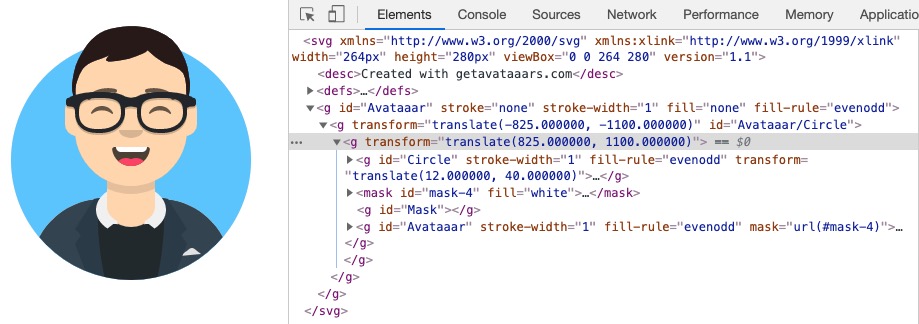
Scalable Vector Graphics (SVG) is a graphical format based on Extensible Markup Language (XML) for describing two-dimensional vector graphics.SVG is an open standard formulated by W3C.
SVG mainly supports the following display objects:
- Vector display object, basic vector display object includes rectangle, circle, ellipse, polygon, straight line, arbitrary curve, etc.
- Embedded external images, including PNG, JPEG, SVG, etc.
- Text object.
After understanding the differences between bitmaps and vector maps, let's talk about the mathematical representation of bitmaps.
Mathematical representation of 1.3 bitmap
Pixels of bitmaps are assigned specific location and color values.The color information of each pixel is represented by an RGB combination or a gray value.
according to Bit Depth Bitmaps can be divided into 1, 4, 8, 16, 24, and 32 bits.The more bits of information each pixel uses, the more colors are available, the more realistic the color representation, and the larger the corresponding amount of data.
1.3.1 Binary Image
A pixel bitmap with a bit depth of 1 has only two possible values (black and white), so it is also called a binary image.There are only black and white pixel points in a binary image, so each pixel point can be represented by 0 and 1.
For example, a 4 * 4 binary image:
1 1 0 1
1 1 0 1
1 0 0 0
1 0 1 0
1.3.2 RGB Image
RGB image consists of three color channels, in which RGB represents the color of red, green and blue channels.Each channel in an 8-bit/channel RGB image has 256 possible values, which means that the image has more than 16 million possible color values.RGB images with 8-bit/channel (bpc) are sometimes referred to as 24-bit images (8-bit x 3 channel = 24-bit data/pixel).Bitmaps represented by 24-bit RGB combined data bits are often referred to as true color bitmaps.
RGB color images can be represented by three matrices: one representing the intensity of red in the pixels, one representing green, and the other representing blue.
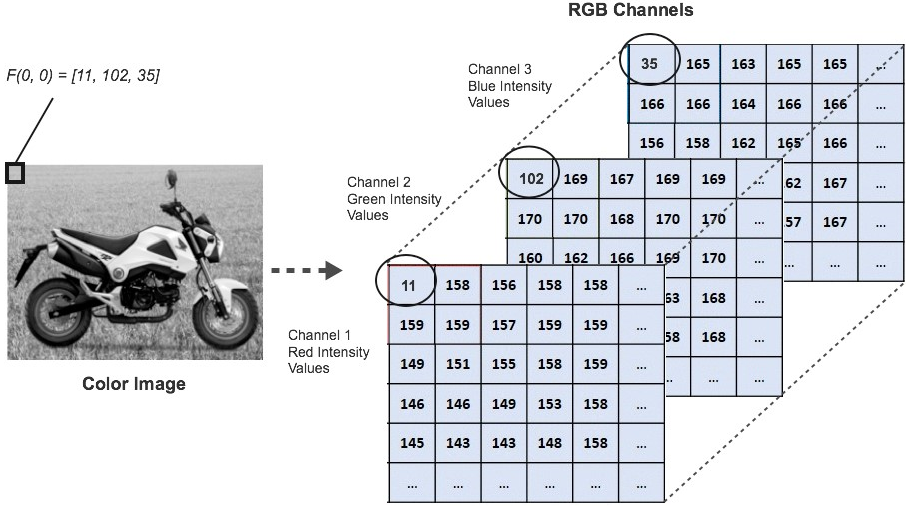
(Image source:https://freecontent.manning.com/the-computer-vision-pipeline-part-2-input-images/)
The essence of image processing is to calculate these pixel matrices.In addition to binary and RGB images, there are grayscale, index and YUV images.We don't give much information here. Interested partners can check the relevant information by themselves.
2. Picture Processing Library
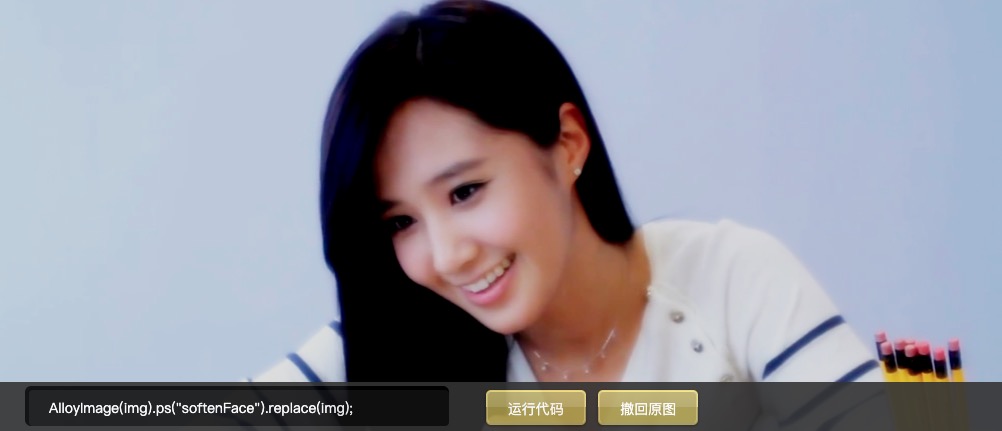
2.1 AlloyImage
Professional image processing open source engine based on HTML 5.
https://github.com/AlloyTeam/AlloyImage
AlloyImage Professional image processing library based on HTML5 technology, from Tencent AlloyTeam team.It has the following functional features:
- Multilayer-based operations - processing of one layer does not affect other layers;
- 17 layer blending modes corresponding to PS - for seamless migration of PS processing tutorials;
- A variety of basic filter treatment effects - basic filters continue to enrich and expand;
- Basic image adjustment functions - hue, saturation, contrast, brightness, curve, etc.
- Simple and fast API - chain processing, simple and easy to use API, flexible parameter transfer;
- Encapsulation of multiple combinations - one sentence of code easily implements one style;
- Interface-consistent single-threaded and multithreaded support - Single-threaded and multithreaded switching maintains fast API features without changing a single line of code.
The following scenarios are recommended for use by the AlloyTeam team for this library:
- Desktop software client embedded web pages run >> Package Webkit kernel: user large avatar upload style processing, user album style processing (average processing time < 1s);
- Win8 Metro Application >> User upload avatar, smaller picture style processing upload (IE 10 under Win8 supports multiple threads);
- Mobile APP >>> Andriod platform, iOS platform small picture style Web processing needs, such as PhoneGap applications, online avatar upload style processing, Mobile Web share picture style processing, and so on.
Use examples
// $AI or AlloyImage initializes an AlloyImage object
var ps = $AI(img, 600).save('jpg', 0.6);

// save saves synthetic pictures to a base64 format string
var string = AlloyImage(img).save('jpg', 0.8);

// saveFile downloads synthetic pictures locally
img.onclick = function(){
  AlloyImage(this).saveFile('Processed image.jpg', 0.8);
}
http://alloyteam.github.io/AlloyImage/
(Image source:http://alloyteam.github.io/AlloyImage/)
2.2 blurify
blurify.js is a tiny(~2kb) library to blurred pictures, support graceful downgrade from
cssmode tocanvasmode.https://github.com/JustClear/blurify
blurify.js Is a small JavaScript library (about 2 kb) for blurring pictures and supports elegant downgrades from CSS mode to Canvas mode.The plug-in supports three modes:
- css mode: use filter property, default mode;
- Canvas mode: use canvas to export base64;
- auto mode: use css mode first, otherwise switch to canvas mode automatically.
Use examples
import blurify from 'blurify';

new blurify({
    images: document.querySelectorAll('.blurify'),
    blur: 6,
    mode: 'css',
});

// or in shorthand

blurify(6, document.querySelectorAll('.blurify'));
https://justclear.github.io/blurify/
(Image source:https://justclear.github.io/blurify/)
See if some of your little buddies think it's just a blur, just addiction, can you do something cooler?Hey hey, there's a demand!Abogo Lima's "cool bite" library: midori , which is used to create animations for background maps, using3.jsWrite and use WebGL.Originally, I wanted to give a demo motion picture, but a single Gif was too big, so I could only put an experiential address, and the interested partner would do it by himself experience Once.
Midori example address:https://aeroheim.github.io/midori/
2.3 cropperjs
JavaScript image cropper.
https://github.com/fengyuanchen/cropperjs
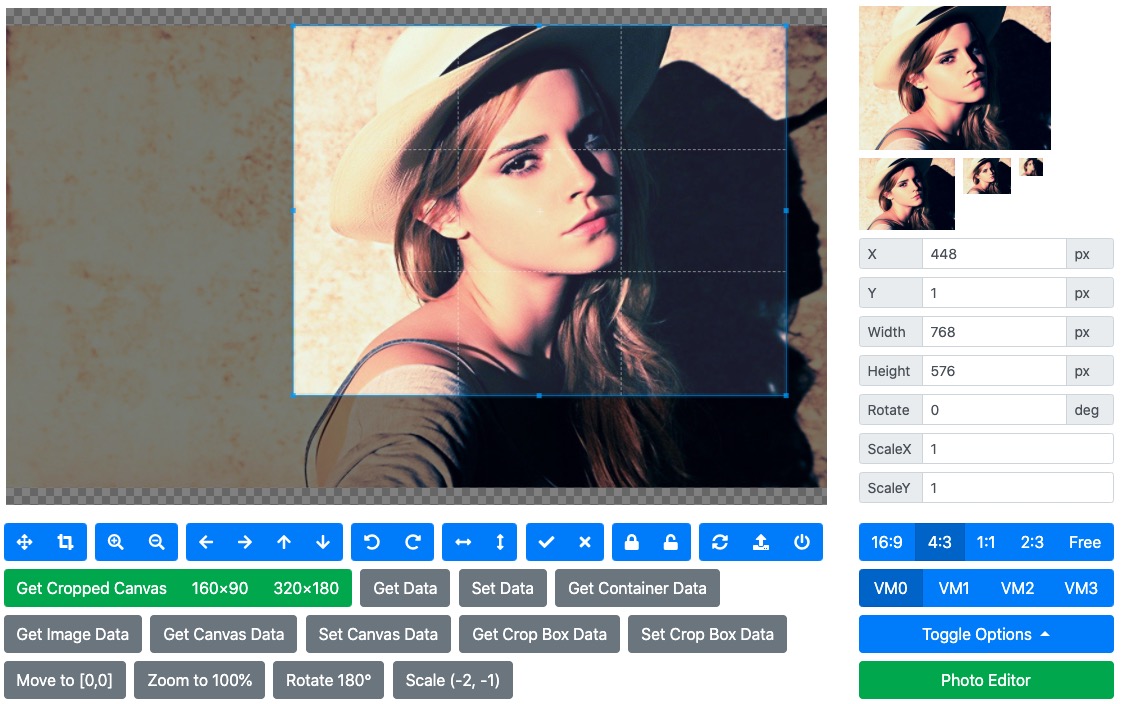
Cropper.js It is a very powerful and simple picture clipping tool, which can be very flexible to configure, support mobile use, and support modern browsers including IE9 and above.It can be used to meet such needs as cropped Avatar upload, merchandise picture editing.
Cropper.js The following features are supported:
- Support 39 configuration options;
- Support 27 methods;
- Support 6 events;
- Support touch (mobile);
- Support zooming, rotating and flipping;
- Supports clipping on canvas;
- Supports image clipping through canvas on the browser side;
- Supports processing Exif direction information;
- Cross-browser support.
Exchangeable image file format (English: Exchangeable image file format, official short for Exif) is a file format specially designed for digital camera photos, which can record the attribute information and shooting data of digital photos.Exif can be attached to files such as JPEG, TIFF, RIFF, etc. to add information about the content of the digital camera shooting information and the version information of the index chart or image processing software.
Exif information starts with 0xFFE1 and the last two bytes indicate the length of Exif information.Therefore, the maximum Exif information is 64 kB, while the internal TIFF format is used.
Use examples
// import 'cropperjs/dist/cropper.css';
import Cropper from 'cropperjs';

const image = document.getElementById('image');
const cropper = new Cropper(image, {
  aspectRatio: 16 / 9,
  crop(event) {
    console.log(event.detail.x);
    console.log(event.detail.y);
    console.log(event.detail.width);
    console.log(event.detail.height);
    console.log(event.detail.rotate);
    console.log(event.detail.scaleX);
    console.log(event.detail.scaleY);
  },
});
https://fengyuanchen.github.io/cropperjs/
2.4 compressorjs
JavaScript image compressor.
https://github.com/fengyuanchen/compressorjs
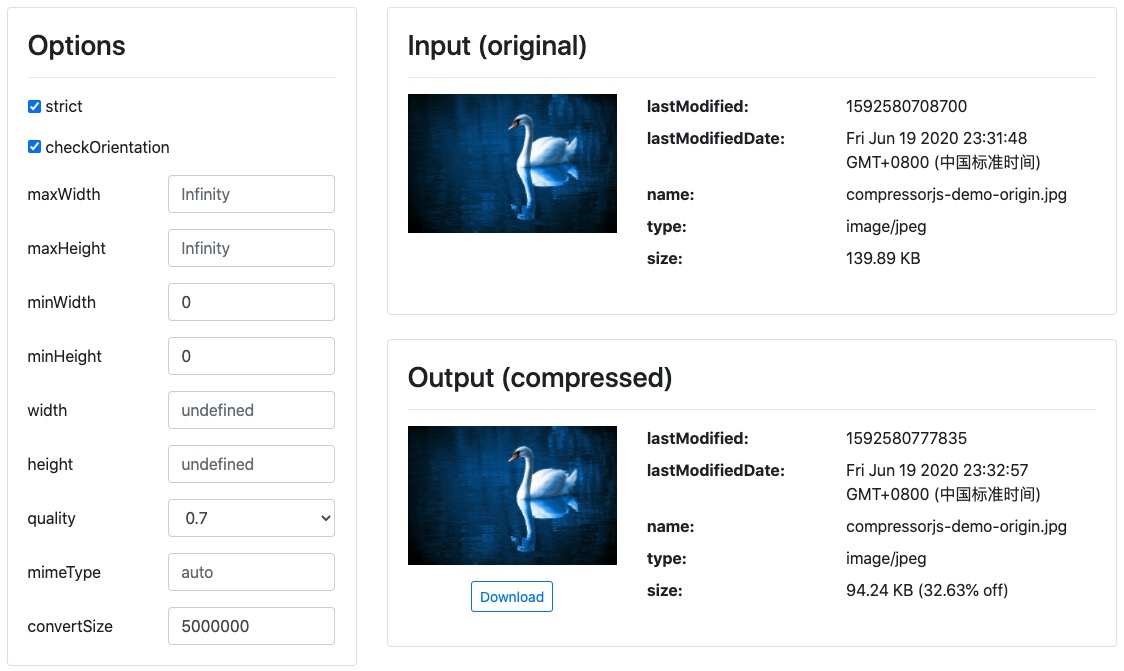
compressorjs Is a JavaScript image compressor.Use native browserCanvas.toBlobThe API does compression work, which means it is lossy compression.A common scenario is to pre-compress a browser-side picture before uploading it.
To achieve picture compression on the browser side, except by usingCanvas.toBlobIn addition to the API, you can use another API provided by Canvas, the toDataURL API, which receives two optional parameters, type and encoderOptions.
Where type represents the picture format and defaults to image/png.encoderOptions, on the other hand, is used to represent the quality of a picture. When the picture format is specified as image/jpeg or image/webp, the quality of the picture can be selected from a range of 0 to 1.If it is outside the range, the default value of 0.92 will be used and other parameters will be ignored.
ComparisonCanvas.toDataURLFor the API,Canvas.toBlobThe API is asynchronous, so there are more callback parameters. The first default parameter of this callback method is the converted blob file information.Canvas.toBlobThe signatures are as follows:
canvas.toBlob(callback, mimeType, qualityArgument)
Use examples
import axios from 'axios';
import Compressor from 'compressorjs';

// <input type="file" id="file" accept="image/*">
document.getElementById('file').addEventListener('change', (e) => {
  const file = e.target.files[0];

  if (!file) {
    return;
  }
  new Compressor(file, {
    quality: 0.6,
    success(result) {
      const formData = new FormData();
      // The third parameter is required for server
      formData.append('file', result, result.name);

      // Send the compressed image file to server with XMLHttpRequest.
      axios.post('/path/to/upload', formData).then(() => {
        console.log('Upload success');
      });
    },
    error(err) {
      console.log(err.message);
    },
  });
});
https://fengyuanchen.github.io/compressorjs/
2.5 fabric.js
Javascript Canvas Library, SVG-to-Canvas (& canvas-to-SVG) Parser.
https://github.com/fabricjs/fabric.js
Fabric.js Is a framework that allows you to easily use HTML5 Canvas elements.It is an interactive object model on top of the Canvas element and is also a parser for SVG-to-canvas.
Use Fabric.js You can create and fill objects on the canvas.Objects can be simple geometric shapes, such as rectangles, circles, ellipses, polygons, or more complex shapes, containing hundreds or thousands of simple paths.You can then use the mouse to zoom, move, and rotate these objects.And modify their properties - color, transparency, z-index, and so on.You can also manipulate these objects together by grouping them with a simple mouse selection.
Fabric.js All mainstream browsers are supported with the following specific compatibility scenarios:
- Firefox 2+
- Safari 3+
- Opera 9.64+
- Chrome (all versions)
- IE10,IE11,Edge
Use examples
<!DOCTYPE html>
<html>
<head></head>
<body>
    <canvas id="canvas" width="300" height="300"></canvas>
    <script src="lib/fabric.js"></script>
    <script>
        var canvas = new fabric.Canvas('canvas');
        var rect = new fabric.Rect({
            top : 100,
            left : 100,
            width : 60,
            height : 70,
            fill : 'red'
        });

        canvas.add(rect);
    </script>
</body>
</html>
http://fabricjs.com/kitchensink
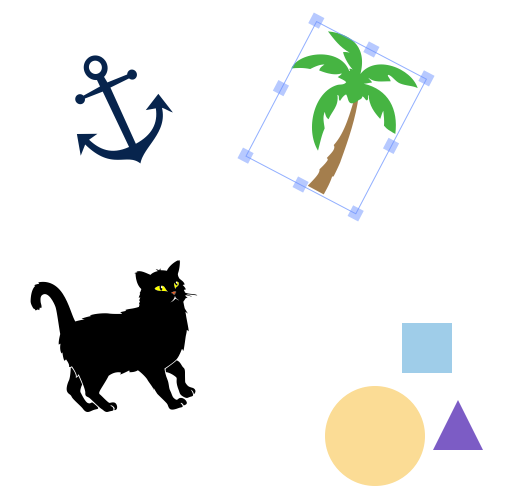
(Image source:Https://github.com/fabric js/fabric.js)
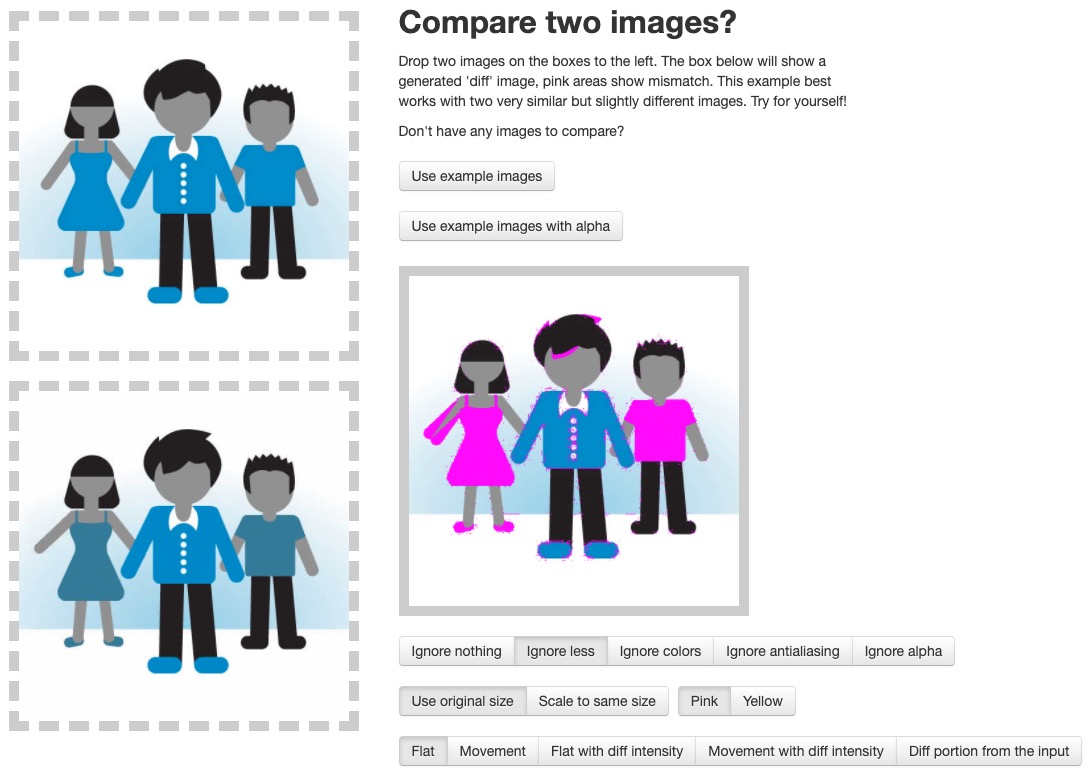
2.6 Resemble.js
Image analysis and comparison
https://github.com/rsmbl/Resemble.js
Resemble.js Use HTML Canvas and JavaScript to analyze and compare pictures.Compatible with more than 8.0Node.js Edition.
Use examples
// Compare two pictures
var diff = resemble(file)
    .compareTo(file2)
    .ignoreColors()
    .onComplete(function(data) {
        console.log(data);
     /*
	    {
	       misMatchPercentage : 100, // %
	       isSameDimensions: true, // or false
	       dimensionDifference: { width: 0, height: -1 },
	       getImageDataUrl: function(){}
	    }
	   */
});
http://rsmbl.github.io/Resemble.js/
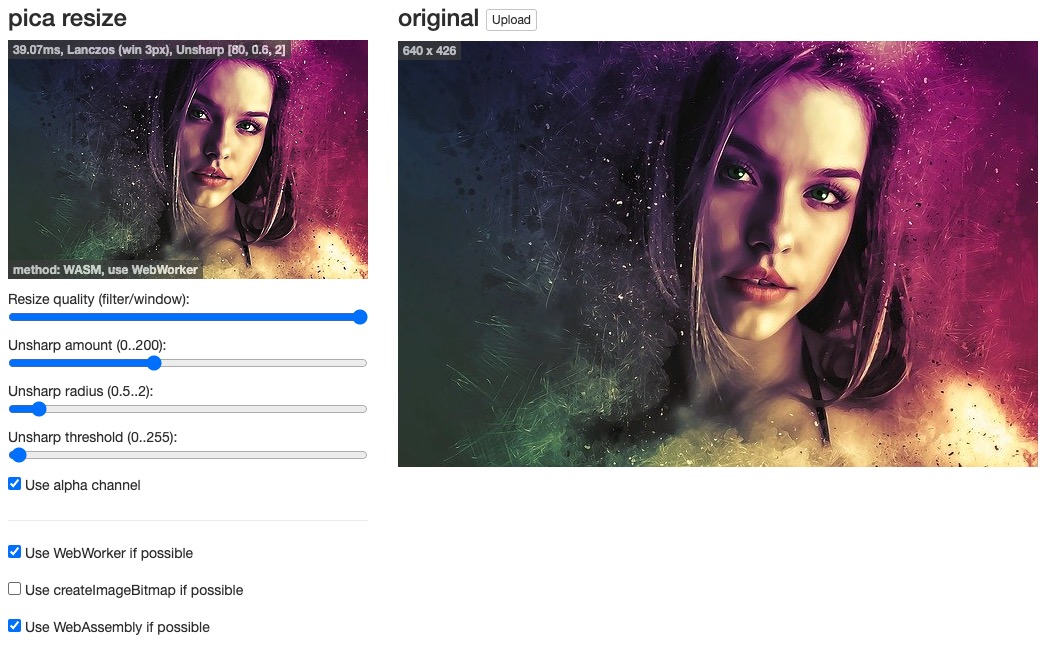
2.7 Pica
Resize image in browser with high quality and high speed
https://github.com/nodeca/pica
Pica It can be used to resize images in a browser without pixelization and is fairly fast.It automatically selects the best available technology: webworkers, webassembly, createImageBitmap, pure JS.
With Pica, you can do the following:
- Reduce the upload size of large images and save upload time;
- Save server resources on image processing;
- Generate thumbnails in the browser.
Use examples
const pica = require('pica')();

// Resize Canvas/Picture
pica.resize(from, to, {
  unsharpAmount: 80,
  unsharpRadius: 0.6,
  unsharpThreshold: 2
})
.then(result => console.log('resize done!'));

// Resize and Convert to Blob
pica.resize(from, to)
  .then(result => pica.toBlob(result, 'image/jpeg', 0.90))
  .then(blob => console.log('resized to canvas & created blob!'));
http://nodeca.github.io/pica/demo/
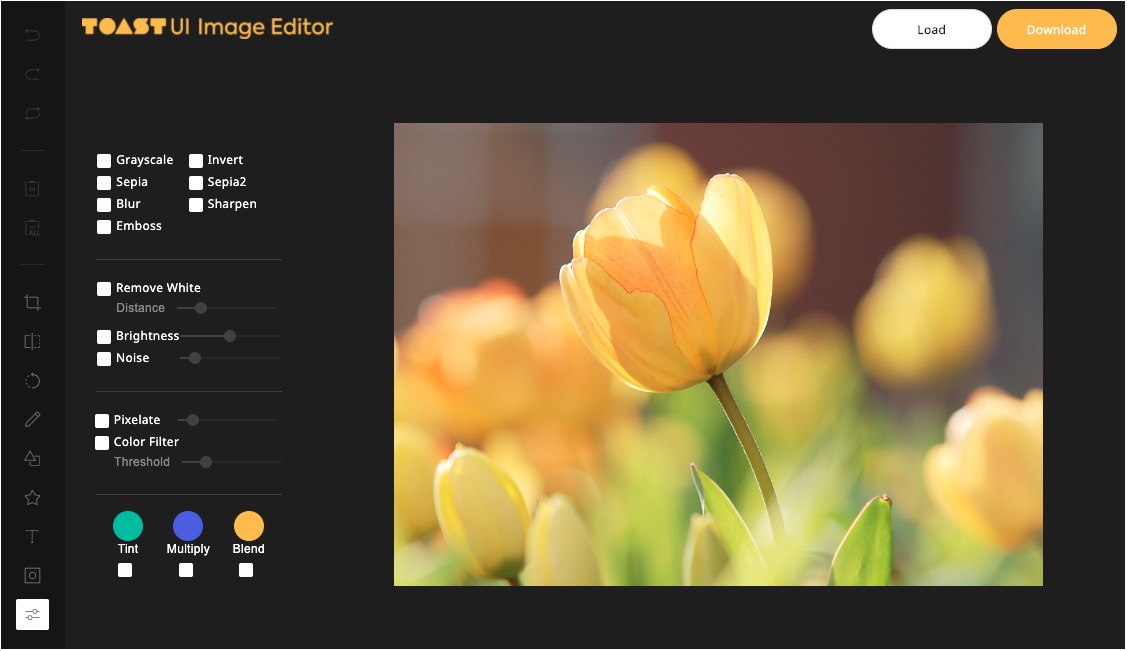
2.8 tui.image-editor
🍞🎨 Full-featured photo image editor using canvas. It is really easy, and it comes with great filters.
https://github.com/nhn/tui.image-editor
tui.image-editor Is a full-featured image editor using HTML5 Canvas.It is easy to use and provides a powerful filter.It also supports cropping, flipping, rotating, drawing, shape, text, mask, and image filtering.
Tui.image-Edor's browser compatibility is as follows:
- Chrome
- Edge
- Safari
- Firefox
- IE 10+
Use examples
// Image editor
var imageEditor = new tui.ImageEditor("#tui-image-editor-container", {
     includeUI: {
       loadImage: {
         path: "img/sampleImage2.png",
         name: "SampleImage",
       },
       theme: blackTheme, // or whiteTheme
         initMenu: "filter",
         menuBarPosition: "bottom",
       },
       cssMaxWidth: 700,
       cssMaxHeight: 500,
       usageStatistics: false,
});

window.onresize = function () {
  imageEditor.ui.resizeEditor();
};
https://ui.toast.com/tui-image-editor/
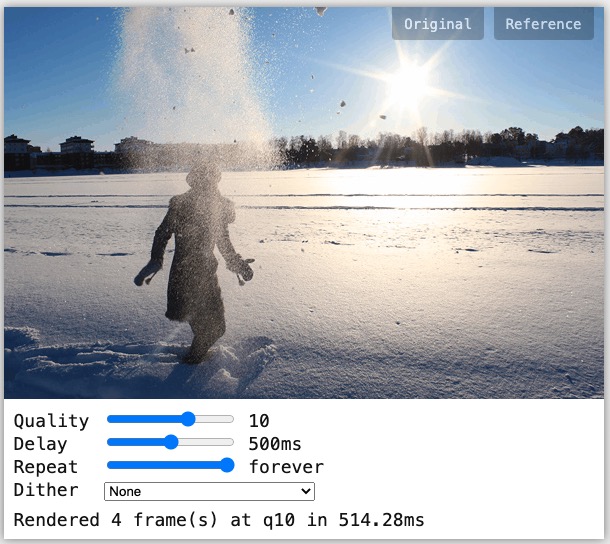
2.9 gif.js
JavaScript GIF encoding library
https://github.com/jnordberg/gif.js
gif.js Is a JavaScript GIF encoder running on the browser side.It uses typed arrays and Web Worker to render each frame in the background, which is really fast.The library works in browsers that support: Web Workers, File API, and Typed Arrays.
Gif.jsThe browser compatibility of is as follows:
- Google Chrome
- Firefox 17
- Safari 6
- Internet Explorer 10
- Mobile Safari iOS 6
Use examples
var gif = new GIF({
  workers: 2,
  quality: 10
});

// add an image element
gif.addFrame(imageElement);

// or a canvas element
gif.addFrame(canvasElement, {delay: 200});

// or copy the pixels from a canvas context
gif.addFrame(ctx, {copy: true});

gif.on('finished', function(blob) {
  window.open(URL.createObjectURL(blob));
});

gif.render();
http://jnordberg.github.io/gif.js/
2.10 Sharp
High performance Node.js image processing, the fastest module to resize JPEG, PNG, WebP and TIFF images. Uses the libvips library.
https://github.com/lovell/sharp
Sharp Typical scenarios for applications are converting large images in common formats to smaller, network-friendly JPEG, PNG, and WebP formats.Because of its internal use libvips This makes resizing the image typically 4-5 times faster than using ImageMagick and GraphicsMagick settings.In addition to resizing images, Sharp supports rotation, extraction, synthesis, and gamma correction.
Sharp supports reading JPEG, PNG, WebP, TIFF, GIF and SVG images.The output image can be in JPEG, PNG, WebP, and TIFF formats or uncompressed raw pixel data.
Use examples
// Change image size
sharp(inputBuffer)
  .resize(320, 240)
  .toFile('output.webp', (err, info) => { ... });

// Rotate the input image and change its size
sharp('input.jpg')
  .rotate()
  .resize(200)
  .toBuffer()
  .then( data => { ... })
  .catch( err => { ... });
https://segmentfault.com/a/1190000012903787
This example was written by Abergo in 18 years. Sharp Knife Trial Generates Exclusive Shared Pictures "This article mainly uses the picture synthesis function provided by Sharp to generate a dedicated sharing poster for each user. Interested partners can read the original text.
const sharp = require("sharp");
const TextToSVG = require("text-to-svg");
const path = require("path");

// Load Font File
const textToSVG = TextToSVG.loadSync(path.join(__dirname, "./simhei.ttf"));

// Create a circular SVG for Avatar clipping
const roundedCorners = new Buffer(
  '<svg><circle r="90" cx="90" cy="90"/></svg>'
);

// Setting SVG text element related parameters
const attributes = { fill: "white" };
const svgOptions = {
  x: 0,
  y: 0,
  fontSize: 32,
  anchor: "top",
  attributes: attributes
};

/**
 * Generating SVG using text
 * @param {*} text
 * @param {*} options
 */
function textToSVGFn(text, options = svgOptions) {
  return textToSVG.getSVG(text, options);
}

/**
 * Layer overlay to generate shared pictures
 * @param {*} options
 *
 */
async function genShareImage(options) {
  const { backgroudPath, avatarPath, qrcodePath,
    userName, words, likes, outFilePath
  } = options;

  // Background picture
  const backgroudBuffer = sharp(path.join(__dirname, backgroudPath)).toBuffer({
    resolveWithObject: true
  });

  const backgroundImageInfo = await backgroudBuffer;
  // Avatar picture
  const avatarBuffer = await genCircleAvatar(path.join(__dirname, avatarPath));

  // QR Code Picture
  const qrCodeBuffer = await sharp(path.join(__dirname, qrcodePath))
    .resize(180)
    .toBuffer({
      resolveWithObject: true
    });

  // User name
  const userNameSVG = textToSVGFn(userName);
  // user data
  const userDataSVG = textToSVGFn(`Write${words}Word harvest${likes}Praise`);
  const userNameBuffer = await sharp(new Buffer(userNameSVG)).toBuffer({
    resolveWithObject: true
  });
  const userDataBuffer = await sharp(new Buffer(userDataSVG)).toBuffer({
    resolveWithObject: true
  });

  const buffers = [avatarBuffer, qrCodeBuffer, userNameBuffer, userDataBuffer];
  // Layer overlay parameter list
  const overlayOptions = [
    { top: 150, left: 230 },
    { top: 861, left: 227 },
    {
      top: 365,
      left: (backgroundImageInfo.info.width - userNameBuffer.info.width) / 2
    },
    {
      top: 435,
      left: (backgroundImageInfo.info.width - userDataBuffer.info.width) / 2
    }
  ];

  // Combine multiple layers: picture + text layers
  return buffers
    .reduce((input, overlay, index) => {
      return input.then(result => {
        console.dir(overlay.info);
        return sharp(result.data)
          .overlayWith(overlay.data, overlayOptions[index])
          .toBuffer({ resolveWithObject: true });
      });
    }, backgroudBuffer)
    .then((data) => {
      return sharp(data.data).toFile(outFilePath);
    }).catch(error => {
      throw new Error('Generate Share Image Failed.');
    });
}

/**
 * Create a circular Avatar
 * @param {*} avatarPath Avatar Path
 */
function genCircleAvatar(avatarPath) {
  return sharp(avatarPath)
    .resize(180, 180)
    .overlayWith(roundedCorners, { cutout: true })
    .png()
    .toBuffer({
      resolveWithObject: true
    });
}

module.exports = {
  genShareImage
};
3. Abogo has something to say
3.1 How to distinguish the type of picture
Computers do not distinguish different types of pictures by their suffix names, but by Magic Number.For some types of files, the contents of the first few bytes are fixed, and you can judge the type of file by the contents of these bytes.
The magic numbers for common picture types are shown in the following table:
| file type | file extension | magic number |
|---|---|---|
| JPEG | jpg/jpeg | 0xFFD8FF |
| PNG | png | 0x89504E47 |
| GIF | gif | 0x47494638(GIF8) |
| BMP | bmp | 0x424D |
Here we have the avatar of Apollo.abao.png) For example, verify that the picture is of the correct type:
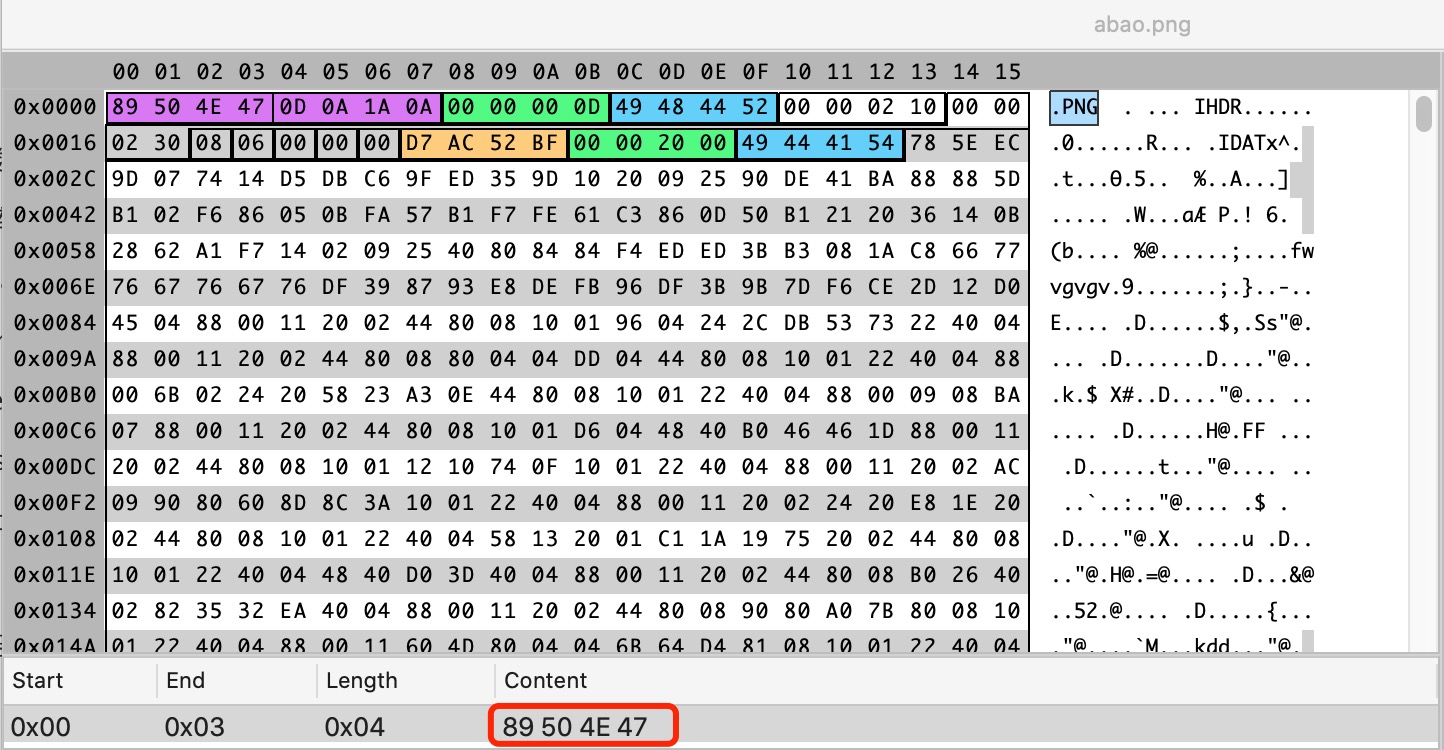
In the daily development process, if we encounter scenes that detect the type of picture, we can directly use some existing third-party libraries.For example, if you want to determine if a picture is of PNG type, you can use is-png This library, which supports both browsers and Node.js, as follows:
Node.js
// npm install read-chunk
const readChunk = require('read-chunk');
const isPng = require('is-png');
const buffer = readChunk.sync('unicorn.png', 0, 8);

isPng(buffer);
//=> true
Browser
(async () => {
	const response = await fetch('unicorn.png');
	const buffer = await response.arrayBuffer();

	isPng(new Uint8Array(buffer));
	//=> true
})();
3.2 How to get the size of a picture
Picture sizes, bit depths, color types, and compression algorithms are all stored in the file's binary data, and we continue with the avatar of Abergo.abao.png) For example, to see the actual situation:
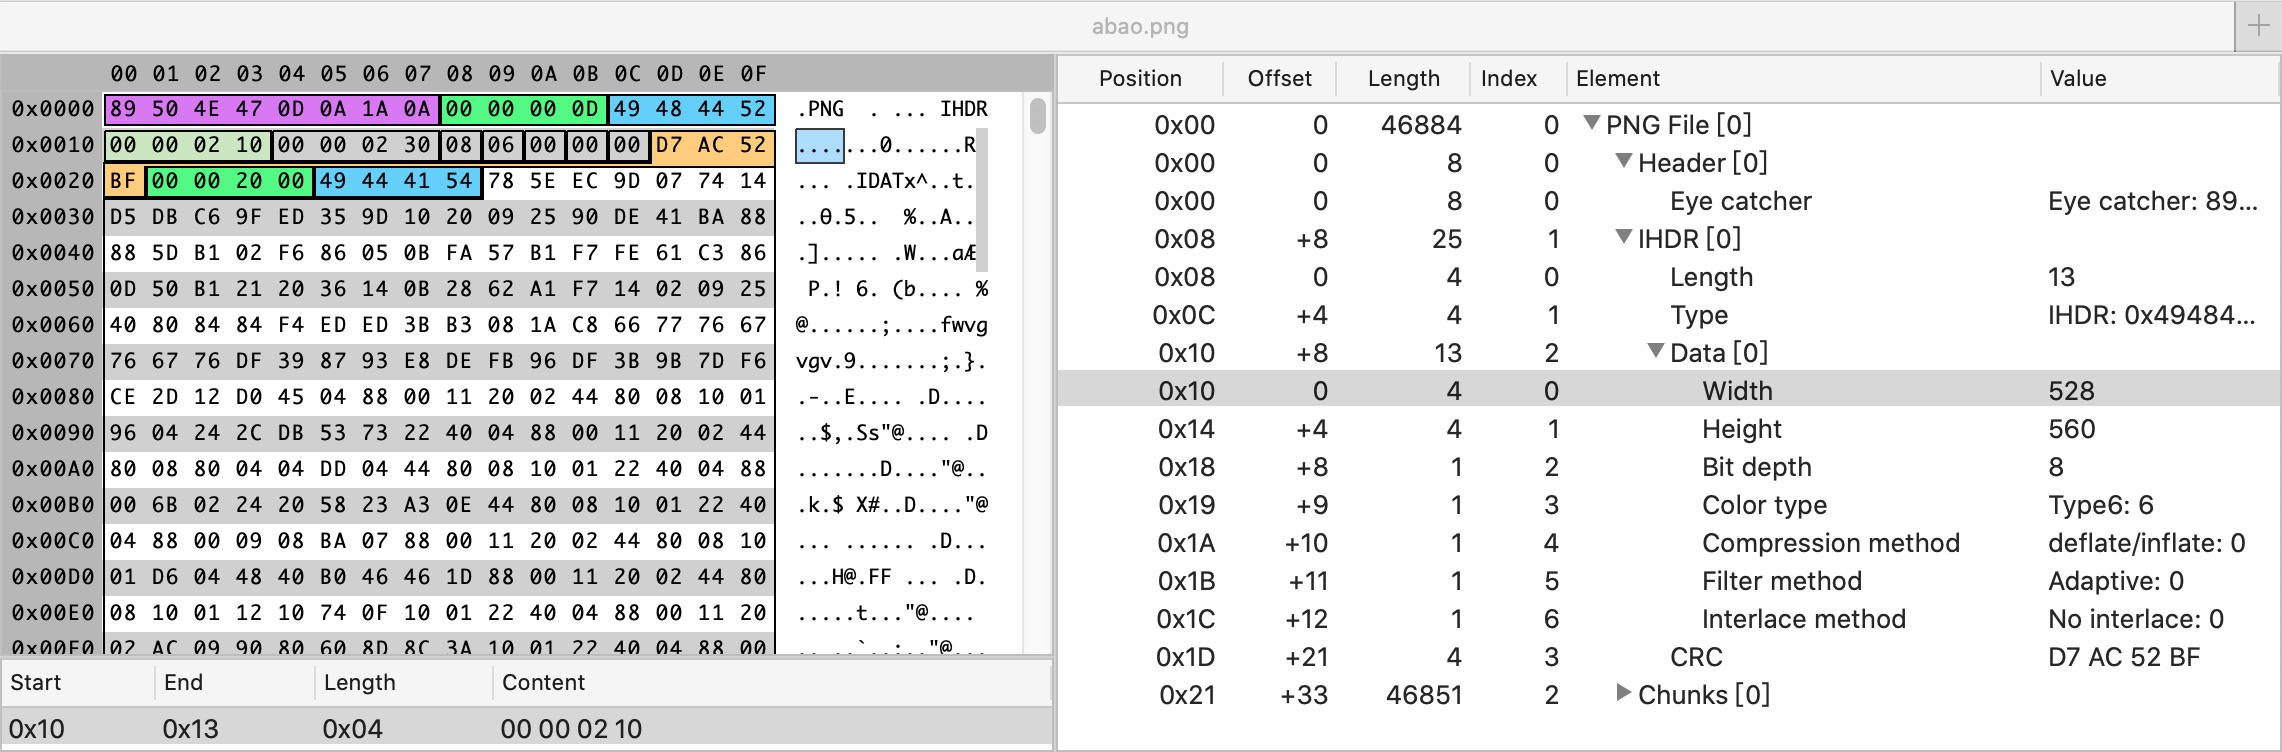
528 (decimal) => 0x0210
560 (decimal) => 0x0230
Therefore, if you want to get the size of the picture, we need to parse the binary data of the picture according to different picture formats.Fortunately, we don't need to do it by ourselves. image-size this Node.js The library has helped us to obtain file sizes for the mainstream picture types:
Synchronization method
var sizeOf = require('image-size');

var dimensions = sizeOf('images/abao.png');
console.log(dimensions.width, dimensions.height);
Asynchronous mode
var sizeOf = require('image-size');

sizeOf('images/abao.png', function (err, dimensions) {
  console.log(dimensions.width, dimensions.height);
});
image-size This library is quite powerful, supporting formats such as BMP, GIF, ICO, JPEG, SVG, WebP, and so on, in addition to PNG formats.
3.3 How to preview local pictures
Using the HTML FileReader API, we can also easily implement the local preview of pictures, the code is as follows:
<input type="file" accept="image/*" onchange="loadFile(event)">
<img id="output"/>
<script>
  const loadFile = function(event) {
    const reader = new FileReader();
    reader.onload = function(){
      const output = document.querySelector('output');
      output.src = reader.result;
    };
    reader.readAsDataURL(event.target.files[0]);
  };
</script>
After you have finished previewing the local picture, you can submit the Data URLs corresponding to the picture directly to the server.In this case, the server needs to do something to save the uploaded pictures properly. Here, the Express For example, the code is as follows:
const app = require('express')();

app.post('/upload', function(req, res){
    let imgData = req.body.imgData; // Get base64 picture data from POST request
    let base64Data = imgData.replace(/^data:image\/\w+;base64,/, "");
    let dataBuffer = Buffer.from(base64Data, 'base64');
    fs.writeFile("image.png", dataBuffer, function(err) {
        if(err){
          res.send(err);
        }else{
          res.send("Pictures uploaded successfully!");
        }
    });
});
3.4 How to Compress Pictures
In some cases, we want to reduce the amount of data transferred by compressing the pictures before submitting them to the server when uploading local pictures.To achieve image compression on the front end, we can use the toDataURL() method provided by the Canvas object, which receives two optional parameters, type and encoderOptions.
Where type represents the picture format and defaults to image/png.encoderOptions, on the other hand, is used to represent the quality of a picture. When the picture format is specified as image/jpeg or image/webp, the quality of the picture can be selected from a range of 0 to 1.If it is outside the range, the default value of 0.92 will be used and other parameters will be ignored.
Let's see how to compress pictures:
function compress(base64, quality, mimeType) {
  let canvas = document.createElement("canvas");
  let img = document.createElement("img");
  img.crossOrigin = "anonymous";
  return new Promise((resolve, reject) => {
    img.src = base64;
    img.onload = () => {
      let targetWidth, targetHeight;
      if (img.width > MAX_WIDTH) {
        targetWidth = MAX_WIDTH;
        targetHeight = (img.height * MAX_WIDTH) / img.width;
      } else {
        targetWidth = img.width;
        targetHeight = img.height;
      }
      canvas.width = targetWidth;
      canvas.height = targetHeight;
      let ctx = canvas.getContext("2d");
      ctx.clearRect(0, 0, targetWidth, targetHeight); // Clear Canvas
      ctx.drawImage(img, 0, 0, canvas.width, canvas.height);
      let imageData = canvas.toDataURL(mimeType, quality / 100);
      resolve(imageData);
    };
  });
}
For returned picture data in Data URL format, to further reduce the amount of data transferred, we can convert it to a Blob object:
function dataUrlToBlob(base64, mimeType) {
  let bytes = window.atob(base64.split(",")[1]);
  let ab = new ArrayBuffer(bytes.length);
  let ia = new Uint8Array(ab);
  for (let i = 0; i < bytes.length; i++) {
    ia[i] = bytes.charCodeAt(i);
  }
  return new Blob([ab], { type: mimeType });
}
After the conversion is complete, we can encapsulate the Blob object corresponding to the compressed picture in the FormData object and submit it it to the server via AJAX:
function uploadFile(url, blob) {
  let formData = new FormData();
  let request = new XMLHttpRequest();
  formData.append("image", blob);
  request.open("POST", url, true);
  request.send(formData);
}
3.5 How to manipulate bitmap data
If you want to manipulate picture pixel data, we can use getImageData provided by Canvas RenderingContext2D to get picture pixel data, where getImageData() returns an ImageData object to describe the implied pixel data in the canvas area, which is represented by a rectangle with a starting point of (sx, sy), a width of sw, and a height of sh.The syntax of the getImageData method is as follows:
ctx.getImageData(sx, sy, sw, sh);
The corresponding parameters are described as follows:
- sx: The upper left x coordinate of the rectangular area of the image data to be extracted.
- sy: The y-coordinate of the upper left corner of the rectangular area of the image data to be extracted.
- sw: The width of the rectangular area of the image data to be extracted.
- sh: The height of the rectangular area of the image data to be extracted.
Once the pixel data of the picture is obtained, we can process the acquired pixel data, such as grayscale or inversion.When processing is complete, to show the results on the page, we need to use putImageData, another API provided by Canvas RenderingContext2D.
This API is the way the Canvas 2D API draws data from an existing ImageData object to a bitmap.If a drawn rectangle is provided, only the pixels of the rectangle are drawn.This method is not affected by the canvas conversion matrix.The syntax of the putImageData method is as follows:
void ctx.putImageData(imagedata, dx, dy);
void ctx.putImageData(imagedata, dx, dy, dirtyX, dirtyY, dirtyWidth, dirtyHeight);
The corresponding parameters are described as follows:
- imageData: ImageData , an array object containing pixel values.
- dx: The position offset of the source image data in the target canvas (offset in the x-axis direction).
- dy: The offset of the position of the source image data in the target canvas (offset in the y-axis direction).
- dirtyX (optional): In source image data, the position of the upper left corner of the rectangular area.The default is the upper left corner (x coordinate) of the entire image data.
- dirtyY (optional): In source image data, the position of the upper left corner of the rectangular area.The default is the upper left corner (y-coordinate) of the entire image data.
- dirtyWidth (optional): The width of a rectangular area in the source image data.The default is the width of the image data.
- dirtyHeight (optional): The height of a rectangular area in the source image data.The default is the height of the image data.
After describing the API, let's take a real example:
<!DOCTYPE html>
<html lang="zh-CN">
  <head>
    <meta charset="UTF-8" />
    <meta name="viewport" content="width=device-width, initial-scale=1.0" />
    <title>Picture Inversion and Grayscale Processing</title>
  </head>
  <body onload="loadImage()">
    <div>
      <button id="invertbtn">Inverse color</button>
      <button id="grayscalebtn">Grayscale</button>
    </div>
    <canvas id="canvas" width="800" height="600"></canvas>
    <script>
      function loadImage() {
        var img = new Image();
        img.crossOrigin = "";
        img.onload = function () {
          draw(this);
        };
        // This is the avatar of Apollo.
        img.src = "https://avatars3.githubusercontent.com/u/4220799";
      }

      function draw(img) {
        var canvas = document.getElementById("canvas");
        var ctx = canvas.getContext("2d");
        ctx.drawImage(img, 0, 0);
        img.style.display = "none";
        var imageData = ctx.getImageData(0, 0, canvas.width, canvas.height);
        var data = imageData.data;

        var invert = function () {
          for (var i = 0; i < data.length; i += 4) {
            data[i] = 255 - data[i]; // red
            data[i + 1] = 255 - data[i + 1]; // green
            data[i + 2] = 255 - data[i + 2]; // blue
          }
          ctx.putImageData(imageData, 0, 0);
        };

        var grayscale = function () {
          for (var i = 0; i < data.length; i += 4) {
            var avg = (data[i] + data[i + 1] + data[i + 2]) / 3;
            data[i] = avg; // red
            data[i + 1] = avg; // green
            data[i + 2] = avg; // blue
          }
          ctx.putImageData(imageData, 0, 0);
        };

        var invertbtn = document.getElementById("invertbtn");
        invertbtn.addEventListener("click", invert);
        var grayscalebtn = document.getElementById("grayscalebtn");
        grayscalebtn.addEventListener("click", grayscale);
      }
    </script>
  </body>
</html>
It is important to note that you may encounter cross-domain issues when calling the getImageData method to obtain picture pixel data, such as:
Uncaught DOMException: Failed to execute 'getImageData' on 'CanvasRenderingContext2D': The canvas has been tainted by cross-origin data.
For this question, you can read about Zhang Xinxu Dashen. Solve the cross-domain problem of canvas picture getImageData,toDataURL "This article.
3.6 How to Stereotype Pictures
Steganography is a skill and science about information hiding, which means that no one other than the intended recipient is aware of the event or content of the transmission of information.Steganography, an English name for steganography, comes from Steganographia, Tritmius'book on cryptography and steganography, which is named after Greek and means "steganographia".
Here is the result of using an online image steganography tool to hide the six words "The Road to the Full Stack of Immortals" in the original image, and then using the corresponding decryption tool to decrypt the hidden information:

(Online Picture Steganography Experience Address:https://c.p2hp.com/yinxietu/)
There are currently several schemes for picture stenciling. Here are several common schemes:
- Additional picture stenciling;
- Picture stenciling based on file structure;
- Picture stenciling based on LSB principles;
- JPG picture stenciling based on DCT domain;
- Stealth of digital watermarking;
- Initialization of picture tolerances.
With limited space, we won't go on here, introducing each option separately so that interested partners can read " Picture steganography in steganography (1) "This article.
4. Reference Resources
- Baike-Vector Graph
- Wiki - Scalable Vector Graphics
- Picture steganography in steganography (1)
- Untellable Secret - Photo Steganography that Front End Plays
- Two Generations Evolution and Underlying Principles of Search System for Picture Stewardship Billion-Level Images
- image-manipulation-libraries-for-javascript
Join the entire stack of Xiuxian Road Exchange Group, Ali, Tencent and Jingdong Dalai are in the group, Note 3.