This article tells you how to read the PPT file, put the entry and exit and emphasized animation of the main animation sequence MainSequence, and the storage method in OpenXML
For example, the following courseware content adds an entry and exit animation to an element. There is no relevant impact between the animations. Click to trigger the animation, as shown in the figure below
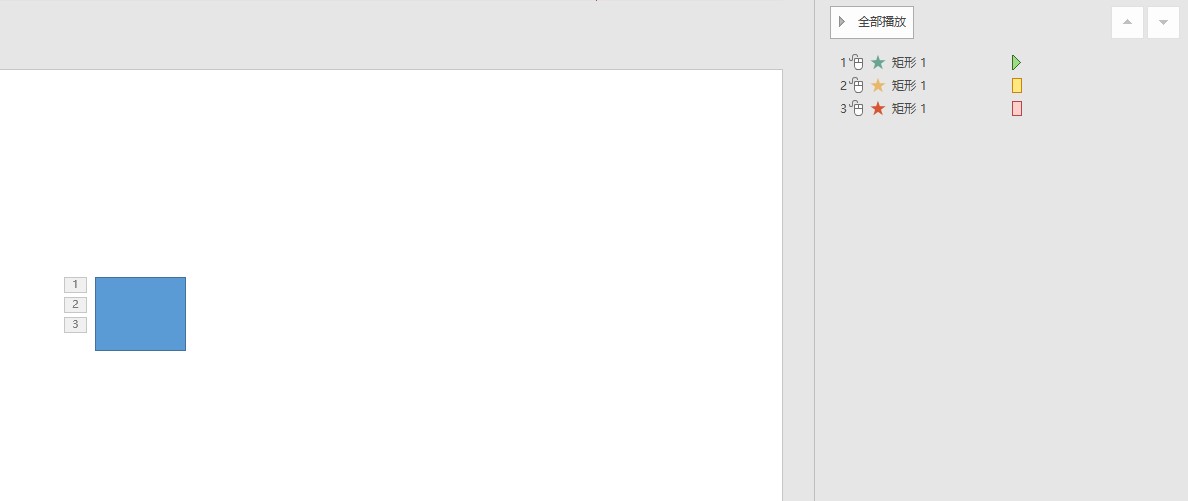
The general animation content is as follows
  <p:timing>
    <p:tnLst>
      <p:par>
        <p:cTn id="1" dur="indefinite" restart="never" nodeType="tmRoot">
          <p:childTnLst>
            <p:seq concurrent="1" nextAc="seek">
              <p:cTn id="2" dur="indefinite" nodeType="mainSeq">
                <p:childTnLst>
                  <p:par>
                    <p:cTn id="3" fill="hold">
                      <p:stCondLst>
                        <p:cond delay="indefinite" />
                      </p:stCondLst>
                      <p:childTnLst>
                        <p:par>
                          <p:cTn id="4" fill="hold">
                            <p:stCondLst>
                              <p:cond delay="0" />
                            </p:stCondLst>
                            <p:childTnLst>
                              <p:par>
                                <p:cTn id="5" presetID="1" presetClass="entr" presetSubtype="0" fill="hold" grpId="0" nodeType="clickEffect">
                                  <p:stCondLst>
                                    <p:cond delay="0" />
                                  </p:stCondLst>
                                  <p:childTnLst>
                                    <!-- Ignore code-->
                                  </p:childTnLst>
                                </p:cTn>
                              </p:par>
                            </p:childTnLst>
                          </p:cTn>
                        </p:par>
                      </p:childTnLst>
                    </p:cTn>
                  </p:par>
                  <p:par>
                    <p:cTn id="7" fill="hold">
                      <p:stCondLst>
                        <p:cond delay="indefinite" />
                      </p:stCondLst>
                      <p:childTnLst>
                        <p:par>
                          <p:cTn id="8" fill="hold">
                            <p:stCondLst>
                              <p:cond delay="0" />
                            </p:stCondLst>
                            <p:childTnLst>
                              <p:par>
                                <p:cTn id="9" presetID="25" presetClass="emph" presetSubtype="0" fill="hold" grpId="2" nodeType="clickEffect">
                                  <p:stCondLst>
                                    <p:cond delay="0" />
                                  </p:stCondLst>
                                  <p:childTnLst>
                                     <!-- Ignore code-->
                                  </p:childTnLst>
                                </p:cTn>
                              </p:par>
                            </p:childTnLst>
                          </p:cTn>
                        </p:par>
                      </p:childTnLst>
                    </p:cTn>
                  </p:par>
                  <p:par>
                    <p:cTn id="14" fill="hold">
                      <p:stCondLst>
                        <p:cond delay="indefinite" />
                      </p:stCondLst>
                      <p:childTnLst>
                        <p:par>
                          <p:cTn id="15" fill="hold">
                            <p:stCondLst>
                              <p:cond delay="0" />
                            </p:stCondLst>
                            <p:childTnLst>
                              <p:par>
                                <p:cTn id="16" presetID="10" presetClass="exit" presetSubtype="0" fill="hold" grpId="1" nodeType="clickEffect">
                                    <!-- Ignore code-->
                                </p:cTn>
                              </p:par>
                            </p:childTnLst>
                          </p:cTn>
                        </p:par>
                      </p:childTnLst>
                    </p:cTn>
                  </p:par>
                </p:childTnLst>
              </p:cTn>
              <!-- Ignore code-->
            </p:seq>
          </p:childTnLst>
        </p:cTn>
      </p:par>
    </p:tnLst>
    <!-- Ignore code-->
  </p:timing>
According to the PresetClass attribute of the CommonTimeNode type defined by cTn, that is, the OpenXML sdk, you can know that the animation id of 5 is the entry animation, the animation id of 9 is the emphasis animation, and the animation id of 10 is the exit animation
You can see that there are many different animations in the PPT. These animations are not related, that is, they are triggered by clicking after the last playback. The contents of the animation placed in the main sequence are as follows
  <p:timing>
    <p:tnLst>
      <p:par>
        <p:cTn id="1" dur="indefinite" restart="never" nodeType="tmRoot">
          <p:childTnLst>
            <p:seq concurrent="1" nextAc="seek">
              <p:cTn id="2" dur="indefinite" nodeType="mainSeq">
                <p:childTnLst>
                  <p:par>
                    <!-- Enter animation-->
                  </p:par>
                  <p:par>
                    <!-- Emphasize animation-->
                  </p:par>
                  <p:par>
                    <!-- Exit animation-->
                  </p:par>
                </p:childTnLst>
              </p:cTn>
              <!-- Ignore code-->
            </p:seq>
          </p:childTnLst>
        </p:cTn>
      </p:par>
    </p:tnLst>
    <!-- Ignore code-->
  </p:timing>
As mentioned above, you can probably understand the storage method, but in the PPT, there are multiple paralleltimenodes and commontimenodes nested. The actual entry animation obtained from the main animation sequence of mainSeq, that is, MainSequence, can only be obtained through the following path
cTn (mainSeq) -> childTnLst -> par -> cTn (id="3") -> childTnLst -> par -> cTn (id="4") -> childTnLst -> par -> cTn (id="5" presetClass="entr")
You can use the following code to read
        static void Main(string[] args)
        {
            using var presentationDocument =
                DocumentFormat.OpenXml.Packaging.PresentationDocument.Open("Test.pptx", false);
            var presentationPart = presentationDocument.PresentationPart;
            var slidePart = presentationPart!.SlideParts.First();
            var slide = slidePart.Slide;
            var timing = slide.Timing;
            // There is only one item in the first level by default
            var commonTimeNode = timing?.TimeNodeList?.ParallelTimeNode?.CommonTimeNode;

            if (commonTimeNode?.NodeType?.Value == TimeNodeValues.TmingRoot)
            {
                // This is in accordance with the agreement
                // nodeType="tmRoot"
            }

            if (commonTimeNode?.ChildTimeNodeList == null) return;
            // Theoretically, there is only one term, and it must be of type SequenceTimeNode
            var sequenceTimeNode = commonTimeNode.ChildTimeNodeList.GetFirstChild<SequenceTimeNode>();

            var mainSequenceTimeNode = sequenceTimeNode.CommonTimeNode;
            if (mainSequenceTimeNode?.NodeType?.Value == TimeNodeValues.MainSequence)
            {
                // [timeline object (PowerPoint) | Microsoft docs]( https://docs.microsoft.com/zh-cn/office/vba/api/PowerPoint.TimeLine  )
                //  MainSequence main animation sequence
                var mainParallelTimeNode = mainSequenceTimeNode.ChildTimeNodeList;

                foreach (var openXmlElement in mainParallelTimeNode)
                {
                    // Parallel relational
                    if (openXmlElement is ParallelTimeNode parallelTimeNode)
                    {
                        var timeNode = parallelTimeNode.CommonTimeNode.ChildTimeNodeList
                            .GetFirstChild<ParallelTimeNode>().CommonTimeNode.ChildTimeNodeList
                            .GetFirstChild<ParallelTimeNode>().CommonTimeNode;

                        switch (timeNode.PresetClass.Value)
                        {
                            case TimeNodePresetClassValues.Entrance:
                                // Enter animation
                                break;
                            case TimeNodePresetClassValues.Exit:
                                // Exit animation
                                break;
                            case TimeNodePresetClassValues.Emphasis:
                                // Emphasize animation
                                break;
                            case TimeNodePresetClassValues.Path:
                                // Path animation
                                break;
                            case TimeNodePresetClassValues.Verb:
                                break;
                            case TimeNodePresetClassValues.MediaCall:
                                // Play animation
                                break;
                            default:
                                throw new ArgumentOutOfRangeException();
                        }
                    }
                }
            }

            // The document stipulates that there must be an AttributeNameList list, and there must be an AttributeName element. If there are multiple, only the first element will be taken.
            // See "[MS-OI 29500].PDF section 2.1.1137 (g option)"
        }
The code above this article is placed in github and gitee Welcome to visit
You can obtain the source code of this article in the following ways. First create an empty folder, then use the command line cd command to enter this empty folder, and enter the following code on the command line to obtain the code of this article
git init
git remote add origin https://gitee.com/lindexi/lindexi_gd.git
git pull origin 2c06ddf74e45c31ad7842dd06dc09bcc67b6142e
The above uses the source of gitee. If gitee cannot access it, please replace it with the source of github
git remote remove origin
git remote add origin https://github.com/lindexi/lindexi_gd.git
After obtaining the code, enter the PptxDemo folder
The PPT courseware used for the above tests is also placed in this folder
The attribute of this paper is to rely on dotnet OpenXML decompress document to folder tool This tool is an open source and free tool. Welcome to use it
This article will be updated frequently. Please read the original text: https://blog.lindexi.com/post/dotnet-OpenXML-%E8%AF%BB%E5%8F%96-PPT-%E4%B8%BB%E5%BA%8F%E5%88%97%E8%BF%9B%E5%85%A5%E9%80%80%E5%87%BA%E5%BC%BA%E8%B0%83%E5%8A%A8%E7%94%BB.html In order to avoid the misleading of old wrong knowledge and have a better reading experience.
This work adopts Knowledge sharing Attribution - non-commercial use - sharing in the same way 4.0 international license agreement License. Welcome to reprint, use and republish, but be sure to keep the signed Lin Dexi (including link: https://blog.lindexi.com ), shall not be used for commercial purposes, and the works modified based on this article must be distributed under the same license.