What did you learn?
Complete the cluster construction, deploy Venus worker on multiple machines and cooperate with Venus sealer (close to the production environment)
Overall objectives:
1. Implement multiple worker sealed sectors
2. Mining
Test server configuration
Server system: Ubuntu 20.0.14
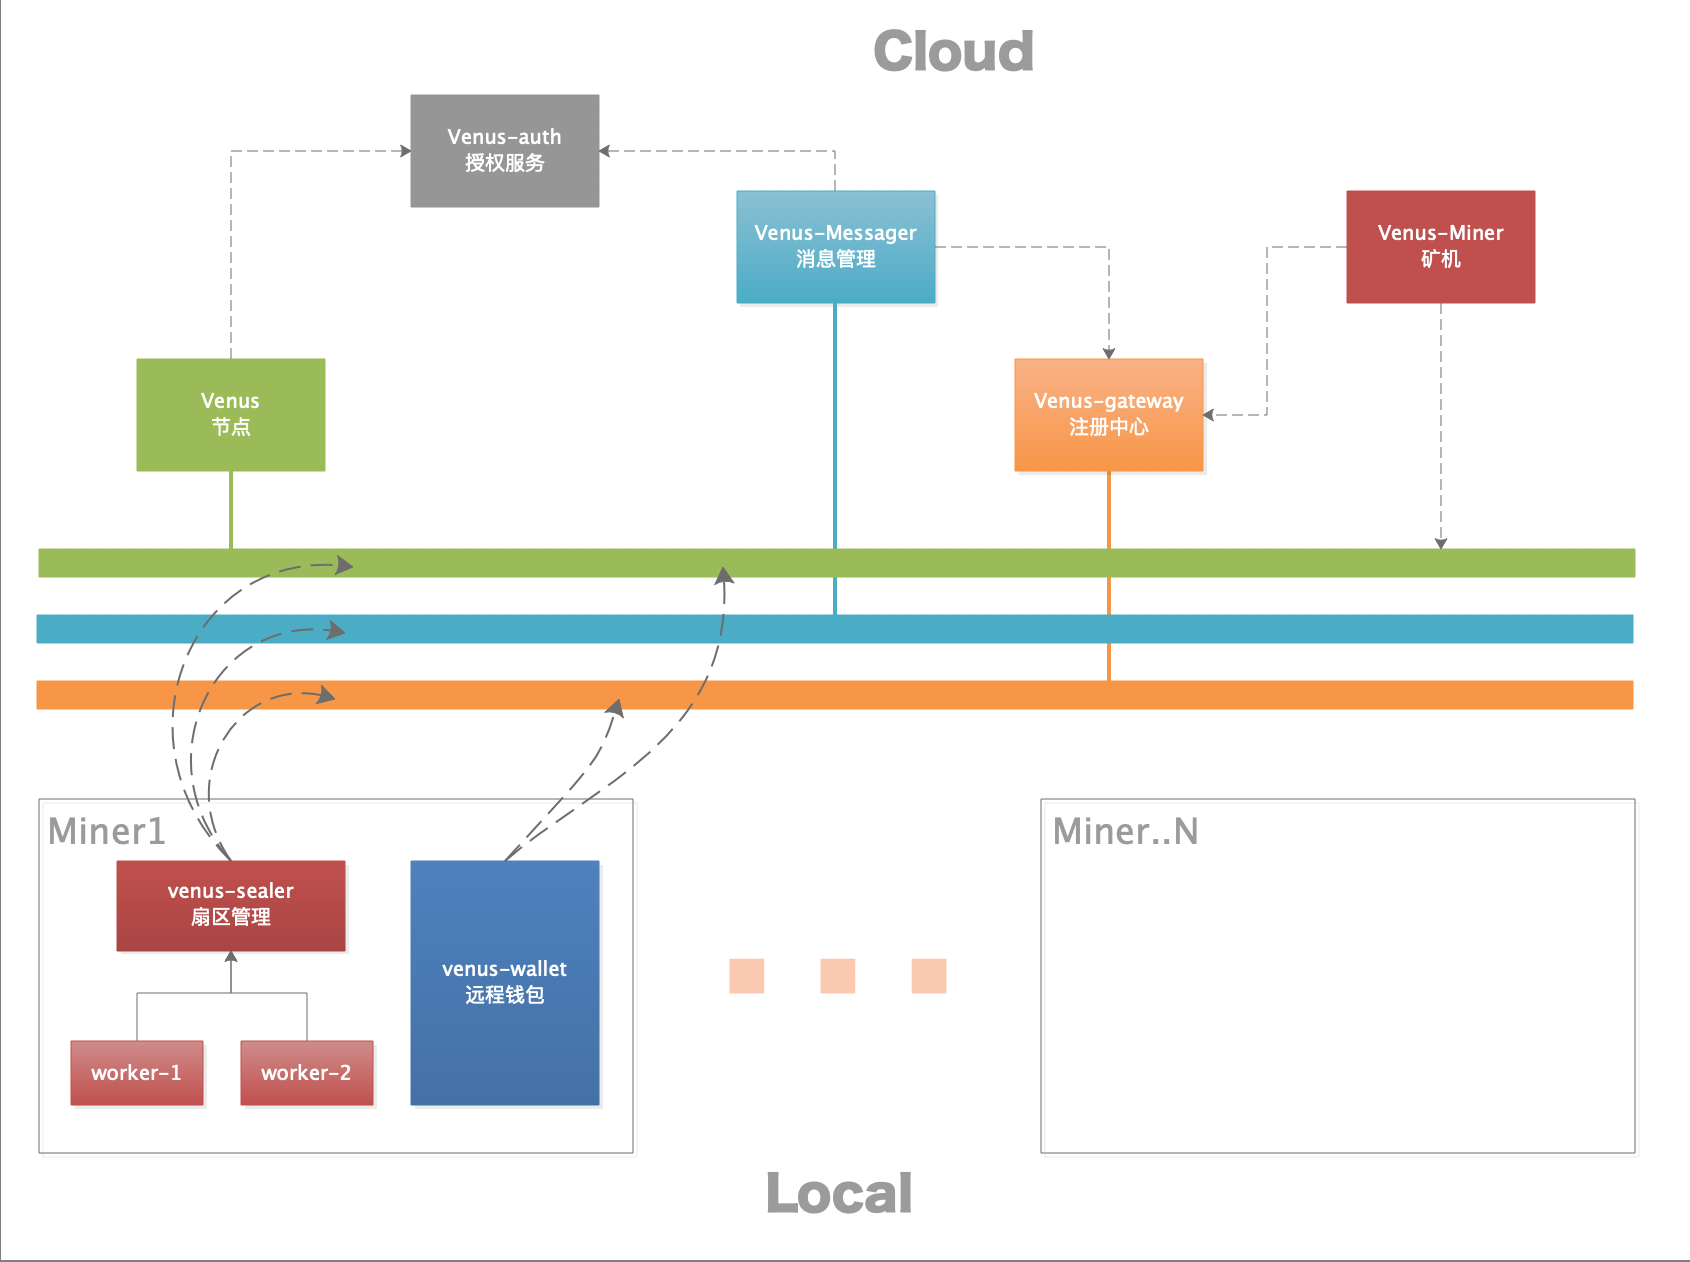
| Server cross reference table | |||||
|---|---|---|---|---|---|
| Serial number | IP address | service | port | remarks | Independent sharing |
| 1 | 192.168.8.100 | venus-auth | 8989 | Authorization services | Share (cloud) |
| venus-gateway | 45132 | Registry Services | |||
| venus-messager | 39812 | Message management service | |||
| 2 | 192.168.8.107 | venus | 3453 | Node (to be synchronized) | |
| 3 | 192.168.8.101 | venus-miner | 12308 | Mining machinery service | |
| 4 | 192.168.8.112 | venus-wallet | 5678 | Remote Wallet | Independent (local) |
| venus-sealer | 2345 | Sector management | |||
| 5 | 192.168.8.108 | venus-worler(01) | 3455 | Miner 01 | |
| 6 | 192.168.8.114 | venus-worler(02) | 3455 | Miner 02 | |
Objectives of this study:
1, Understand Venus architecture
2, Preliminary preparation
|----- 1. Installation related dependencies
|----- 2. Install Rust
|----- 3. Install golang
|----- 4. Install the Screen session tool and basic usage
|----- 5. Increase swap space
1, Understand Venus architecture
Venus refers to one of the common implementations of Filecoin, and Venus refers to one of the components of Venus. Venus is committed to helping small and medium-sized miners to more easily join the construction of Filecoin ecological network.
At present, Venus has realized the support of Filecoin distributed ore pool through Venus, Venus sealer, Venus miner, Venus wallet, Venus messager and Venus auth components. In the future, Venus will continue to improve itself and jointly promote the development of open source Filecoin and ecological development.

2, Preliminary preparation
1. Installation dependency
# Step 1
sudo apt-get update

# Step 2
sudo apt install mesa-opencl-icd ocl-icd-opencl-dev gcc git bzr jq pkg-config curl clang build-essential hwloc libhwloc-dev wget -y && sudo apt upgrade -y
2. Install Rust
# Step 1
curl --proto '=https' --tlsv1.2 -sSf https://sh.rustup.rs | sh

# Step 2
source $HOME/.cargo/env
3. Install golang
Version requirements: 1.16 or above
# Baidu cloud Download
 link:https://pan.baidu.com/s/1RBbAV16TV4XnrKnfd3emtg password: sum8
Execute the following command in the current directory:
① . resolve to directory: / usr/local/
sudo tar -zxvf go1.16.6.linux-amd64.tar.gz -C /usr/local/
② . setting environment variables
echo "export PATH=$PATH:/usr/local/go/bin" >> ~/.bashrc && source ~/.bashrc
Official download and installation
wget -c https://golang.org/dl/go1.16.2.linux-amd64.tar.gz -O - | sudo tar -xz -C /usr/local
4. Install Screen session tool and basic usage
① . installation
sudo apt install screen -y
② , create a session
# Create a session: screen -S [session name]
screen -S worker
③ . temporarily exit the session
Shortcut keys: Ctrl + A + D
Then you can enter the session again according to the session ID or session name
④ , view session list
# View session list
screen -ls

⑤ . enter the session
# Enter the session according to the name. If the name is duplicate, enter the session according to the session ID
screen -r worker

# Enter session based on session ID
screen -r 146403
⑥ . forced entry into the session
# Force into session
screen -d woker
The following prompts appear:

⑦ , destroy session
# After entering the session, exit the command
 exit
screen session is mainly used to perform long background work tasks
5. Increase swap space
① View swap partition size
# View swap partition size
free -m

You can see that Swap is only 2G. Let's expand it to 4G
② Create a swap file
# Create a folder for swap files
mkdir /swap

# Enter the / swap folder
cd /swap

# Create a 2G swap file named: swap file
sudo dd if=/dev/zero of=swapfile bs=1024 count=2000000

# View current file
ll

③ Convert the generated file into a Swap file
# Modify file permissions to 0600
sudo chmod 0600 swapfile

# Convert file
sudo mkswap -f swapfile

④ Activate Swap file
# Activate Swap file
sudo swapon swapfile

# View the Swap partition again
free -m

At this time, the partition size has increased by about 4G
Note: it needs to be reactivated after restart
⑤ Advanced level 1: uninstall swap
# Switch to the / swap directory
cd /swap

# Uninstall the specified swap file
sudo swapoff swapfile
⑥ Advanced level 2:
If you need to keep this swap all the time, you can write it to the / etc/fstab file
/swap/swapfile /swap swap defaults 0 0
The following section:
Install Venus auth
