In "dry goods | Nginx I really don't believe you can't learn (Part I)", we probably have a general impression of Nginx: we know what Nginx is for, what reverse proxy and forward proxy are, and what load balancing is.
Today, let's really get started. As the saying goes, "practice is the only standard for testing truth". If you just listen to theory but don't get started, you'll never understand it.
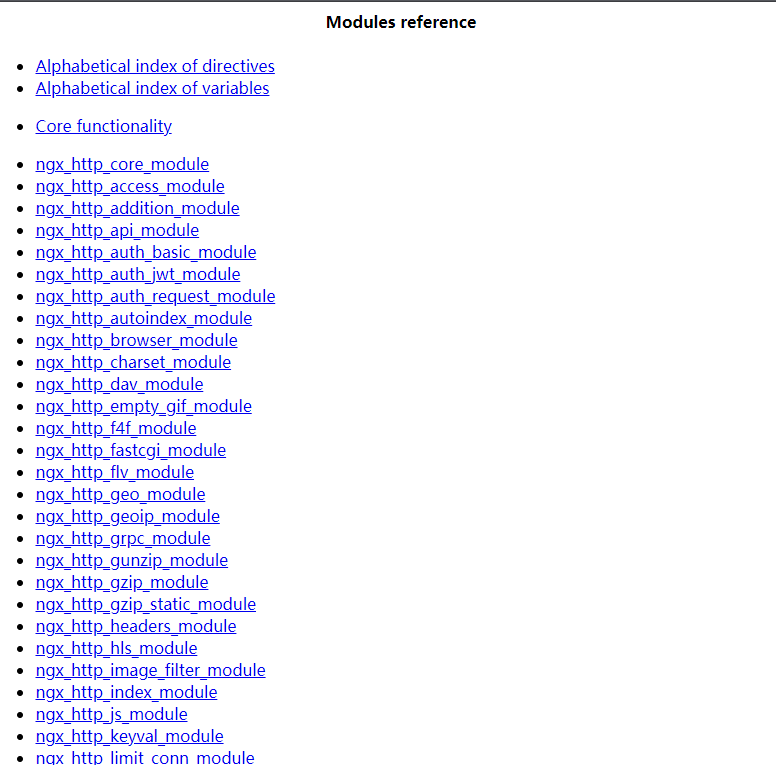
In fact, there are many contents about Nginx, especially the module part. If I list all of them, I can't finish the five articles, so I'll give you the link to the official document of Nginx, which has a detailed tutorial. As a geek, we should learn to read the official website documents when we encounter problems we don't understand.
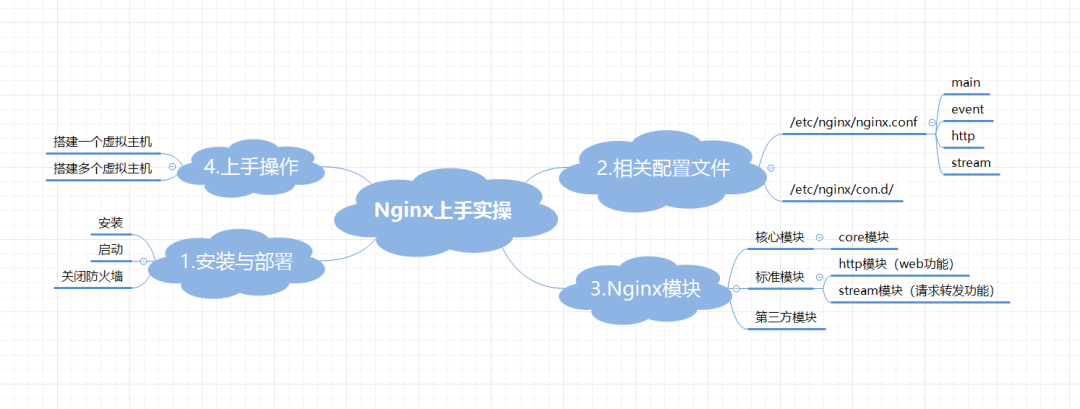
Now I've made a mind map of what I'm going to talk about today:
Initial experience of Nginx
First, open our machine. The following is the configuration of my machine:
System: CentOS 7.6
Processor: 1
Memory: 1G
We use yum to install Nginx
yum install -y nginx
Start Nginx after installation
systemctl start nginx
Set to startup and self startup
systemctl enable nginx
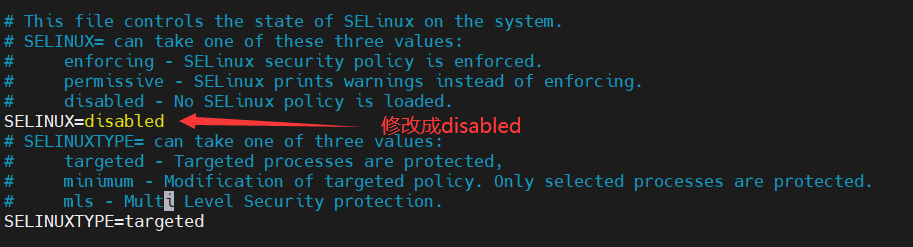
Close our firewall and SELinux, or you won't be able to access our Nginx website later
#Turn off the firewall
systemctl stop firewalld.service

#Temporarily shut down SELinux
setenforce 0
We can also enter the SELinux configuration file and permanently close it
vim /etc/selinux/config
In fact, there is another command to start nginx, which is provided by nginx. It is recommended to use the command provided by nginx
nginx
After startup, let's visit it, because the configuration file has indicated that the default port is 80. It's OK not to write the port number behind the website. It accesses the default page.
Access local address:80
Related configuration files
Let's take a look at some configuration files of nginx
nginx master profile
/etc/nginx/nginx.conf
This configuration file stores the basic configuration related to nginx, such as default port, log format, default website, management user of worker process, etc
configure directory
/etc/nginx/conf.d/
This is a directory, which usually stores some configurations of the virtual host. For example, if we want to build a blog website and a forum website, we can define the configuration files of the two websites respectively, and then store them in this directory. You don't have to write the configuration into the main configuration file, which is more concise and beautiful
After introducing these two, let's take a look at the specific contents of the main configuration file
The main configuration file is actually divided into several areas: main area, event area, etc
main area:
The main configuration segment, that is, the global configuration segment
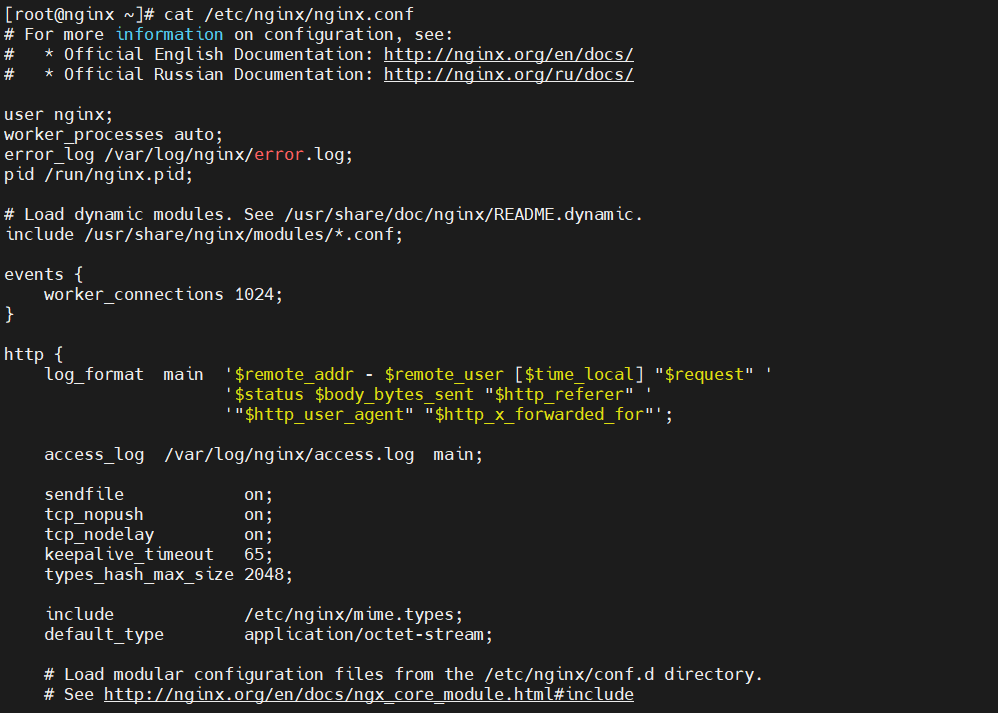
cat /etc/nginx/nginx.conf
=====================The first part is the main area of the configuration file======================
user nginx; # Define the administrative user of the worker process
worker_processes auto; # Define the number of worker processes, and auto will automatically adjust to the number of cpu cores
worker_cpu_affinity auto [cpumask] #Improve cache hit rate and bind worker to cpu
CPU MASK: 00000001: first CPU
00000010: the second CPU
worker_cpu_affinity 0001 0010 0100 1000;
worker_priority number
#Specify the nice value of worker process and set the priority of worker process: [- 20,20] (max. 19)
worker_rlimit_ nofile number #The maximum number of files that the worker process can open, such as 65535
error_log /var/log/nginx/error.log; # Define error log
pid /run/nginx.pid; # Specifies the path to the PID file where the nginx main process is stored
include /usr/share/nginx/modules/*.conf; #Indicates other profile fragments included
daemon on|off #Run nginx as a daemon
master_ process on|off #Whether to run nginx in the master/worker model. The default is on
Event area
Event driven configuration
Because nginx is based on event driven architecture and uses asynchronous network IO model
...
events {
worker_connections 1024;
# Define a worker process that can accept 1024 requests at the same time
#Total maximum concurrent number: worker_processes * worker_ connections
use method #Indicates the processing method of concurrent connection requests. The default is epoll
use poll;
accept_mutex on|off
#New connection request processing method; on means that each worker handles new requests in turn, and Off means that the arrival of each new request will notify (wake up) all worker processes, but only one process can get connected, causing "group shock" and affecting performance
}
http area
The configuration related to http protocol also includes the configuration of server, that is, virtual host
...
http {
log_format main '$remote_addr - $remote_user [$time_local] "$request" '
'$status $body_bytes_sent "$http_referer" '
'"$http_user_agent" "$http_x_forwarded_for"';
# Define log format
access_log /var/log/nginx/access.log main; # Specify log file path
sendfile on; # Allow sendfile transfer
tcp_nopush on; # Under sendfile startup, TCP is used_ Cork socket
tcp_nodelay on; # The ground connection remains active
keepalive_timeout 65; # Timeout
types_hash_max_size 2048;# Connection timeout
include /etc/nginx/mime.types; # File extension and file type mapping table
default_type application/octet-stream; # The default file type is text/plain
include /etc/nginx/conf.d/*.conf; #Virtual Host Directory
server {
listen 80 default_server; # Specify the port to listen on
listen [::]:80 default_server;
server_name _; # Specify the site host name
root /usr/share/nginx/html; # Define the location of the site directory
include /etc/nginx/default.d/*.conf; # Define home page file
location / {
}
error_page 404 /404.html; # Define elegant display page information
location = /40x.html {
}
error_page 500 502 503 504 /50x.html;
location = /50x.html {
}
}
We can modify the configuration file according to different needs. It's best to carefully look at the specific meaning of each field in the above configuration file. The interviewer may ask
Let's talk about the HTTP module in the core module of nginx
Module introduction
Among the core modules of nginx, there is such a module. It is the specific implementation of nginx's website service. It is the HTTP module.
The HTTP module is divided into many small modules to realize different specific functions, such as redirection, access control, logging, etc
Today we will mainly talk about nginx in HTTP module_ http_ core_ Module module
nginx_http_core_module
This module is used to configure the virtual host. The following is its overall content
server{
  listen adress[:PORT]PORT;
  server_name SERVER_NAME;
  root /PATH/TO/DOCUMENT_ROOT;
}
For example, our virtual host monitors port 80, the host name is www.a.com, and the path of the web page is / data/web1. We can configure it like this
server{
  listen 80;
  server_name www.a.com;
  root /data/web1;
  location / {
  }
}
We can also set the default listening port, just add default after the listen field_ Server is OK. In this case, the web address is the default port 80
listen 80 default_ server;
We can also listen to different ports on different virtual hosts
listen 80
listen 8080
listen 8888
You can also set the ip addresses of different virtual hosts
listen 192.168.1.1:80
listen 192.168.1.2:80
After configuring the listening port, let's configure the host name
- The host name of the virtual host can be followed by multiple strings separated by white space characters
- Support wildcards
- Support regular expression pattern matching for starting characters
For example, we set a host name as www.xxoo.com com
server_name www.xxoo.com;
You can give it two names
server_name www.xxoo.com www.ooxx.com;
Let's briefly introduce the priority of name matching. The level is from high to low
(1) The first is string exact matching, such as: www.xxoo.com
(2) left*Wildcards such as: *.xxoo.com
(3) Right wildcard, such as: www.xxoo.
(4) Regular expressions such as: ~^.*\.xxoo.com$
(5) Default host default_ server
Let's go on to talk about the content related to the path
- Used to set the path mapping of web resources and web resources
- Used to indicate the directory path of the document corresponding to the requested URL
- It can be configured in the fields of HTTP, server and location
For example, we want users to enter www.xxoo.com COM is the / www/html / directory of my server
server{
server_name www.xxoo.com;
root /www/html;
}
http://www.xxoo.com/index.html ----> /www/html/index.html
In fact, we can also configure multiple locations to realize the path mapping from multiple URIs to the file system. ngnix will check all the locations defined according to the URI requested by the user and find a best match
For example, I want users to enter www.xxoo.com com/1. When accessing HTML, you can access 1.0 in the / www/html directory on my server HTML file
server{
server_name www.xxoo.com;
root /www/html;
location / {
/www/html/;
}
}
http://www.xxoo.com/1.html ----> /www/html/1.html
Or want users to enter www.xxoo.com com/images/1.jpg accesses 1.0 in the / data/images directory on my server JPG file
server{
server_name www.xxoo.com;
root /www/html;
location /images{
/data/images
}
}
http://www.xxoo.com/images ----> /data/images/1.jpg
In addition, we can also use path aliases
server{
  listen 80;
  server_name www.salted.com;
  location /bbs/{
    alias /web/forum/;
 }

 http: //www.salted.com/bbs/index.html ----> /web/forum/index.html
Path alias is another mechanism of document mapping. Let's compare it together
Path alias:
server{
listen 80;
server_name www.salted.com;
location /bbs/{
alias /web/forum/;
http://www.salted.com/bbs/index.html ----> /web/forum/index.html
Path mapping
server{
listen 80;
server_name www.salted.com;
location /bbs/{
root /web/forum/;
}
http://www.salted.com/bbs/index.html ----> /web/forum/bbs/index.html
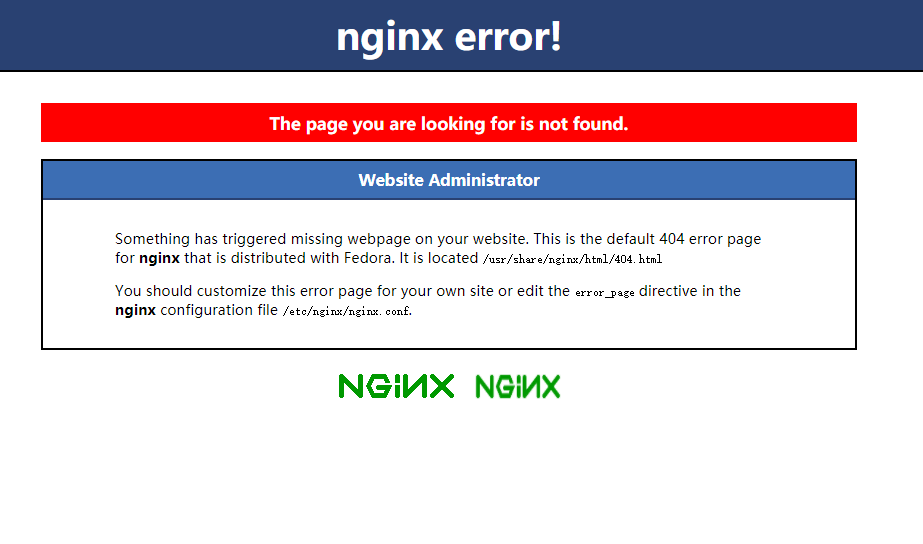
Sometimes when an error occurs when visiting a website, the general error page is not very friendly. At this time, we can define the error page.
server{
  listen 80;
  server_name www.salted.com;
  error_page 404 /404.html;
  location /404.html {
    root /data/error/;
  }
}
In this way, if we encounter 404 errors after visiting, the error page specified by us will be displayed.
In addition, we can also specify the response status code. For example, we encounter 404 error when visiting the website, but we don't want to return 404 to the user. We can specify other status codes. In this case, other status codes are returned to the user, but the page is still 404
server{
  listen 80;
  server_name www.salted.com;
  error_page 404=200 /404.htmL;
  location /404.html {
    root /data/error/;
  }
}
In fact, in Nginx_ http_ core_ There are many other configuration fields in module, which will not be introduced in detail here. Those interested can visit the official website of Nginx to view the official documents. The article has been attached at the beginning.
Now we will really start to build our virtual host (website)
Nginx practice
First, build a virtual host. The machines I use in this case are as follows:
CentOS7.6
CPU: 1
Memory: 1G
Local ip address: 192.168.244.128
Remember the / etc / nginx / con D / directory? We need to put the configuration file of the virtual host (website) into it. When nginx starts or restarts, it will scan the configuration file.
First, write the relevant configuration of our website
The virtual host monitors port 8080, and the domain name of the website is www.salted COM, the accessed network resources are in the directory of / usr/share/nginx/html on the server
vim /etc/nginx/conf.d/www.conf
server {
listen 8080;
server_name www.xxoo.com;
location / {
root /usr/share/nginx/html;
index my_index.html;
}
}
After modifying the configuration file every time, remember to restart nginx. The following commands can make nginx restart smoothly
nginx -s reload
Next, we will write our html file
vim /usr/share/nginx/html/my_index.html
Next, we write the hosts file to realize domain name resolution. In this way, you can access the website directly by accessing the domain name.
vim /etc/hosts
192.168.244.128  www.xxoo.com
If you want to access the website by accessing the domain name on Windows, we need to set up domain name resolution on Windows
The hosts file address of Windows is: C:\Windows\System32\drivers\etc
Next, let's verify it
Use the following command on linux system:
Remember to write port 8080, otherwise you will visit the default page
curl www.xxoo.com:8080

Enter the ip address or domain name directly on Windows

In this way, our first virtual host is configured!
If we want to access multiple resources, we need to configure multiple file paths
server{
    listen 8080 ;
    server_name www.xxoo.com;
    root /usr/share/nginx/html;
    location / {
        index my_index.html;
    }
    location /data {
        root /web/;
    }
    location /web/images {
        root /web/;
    }
}
Don't forget to restart every time you update the configuration file
nginx -s reload
Next, create the relevant directory where we store the files and write the contents respectively
mkdir -pv /web/{data,images}
echo "this is /web/data" > /web/data/index.html
echo "this is /web/images" > /web/images/index.html```

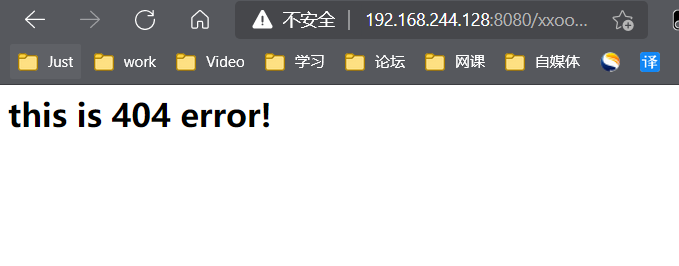
Let's visit to verify:

For example, we visit a non-existent web page,
Like www.xxoo.com com:8080/xxoo/index. html
The following error page will be displayed
This page is actually not very friendly. We can customize an error page
server{
    listen 8080 ;
    server_name www.xxoo.com;
    root /usr/share/nginx/html;
    error_page 404 /404.html;
    location / {
        index my_index.html;
    }
    location /data {
        root /web/;
    }
    location /images {
        root /web/;
    }
    location /404.html {
        root /web/pages/;
    }
}```
Create a directory to store error pages
mkdir /web/pages
Create error page
vim /web/pages/404.html
<h1>
this is 404 error!
</h1>```
The verification is as follows
Finally, let's talk about how to configure multiple virtual hosts
First, in / etc / nginx / con Create and configure our virtual host configuration files in the D / directory
touch /etc/nginx/conf.d/{bbs,blog,www}.conf
#First virtual host
vim /etc/nginx/conf.d/bbs.conf
server {
listen 8080;
server_name bbs.com;
location / {
root /html/bbs;
index index.html;
}
}
#Second virtual host
vim /etc/nginx/conf.d/blog.conf
server {
listen 8080;
server_name blog.com;
location / {
root /html/blog;
index index.html;
}
}
#Third virtual host
vim /etc/nginx/conf.d/www.conf
server {
listen 8080;
server_name www.com;
location / {
root /html/www;
index index.html;
}
}
Directory to store network resources
mkdir -p /html/{www,bbs,blog}
for name in {www,bbs,blog};do echo "<h1> $name </h1>" >
/html/$name/index.html;done;;
Add domain name resolution
vim /etc/hosts
192.168.33.133 www.eagle.com bbs.eagle.com blog.eagle.com
Smooth restart after profile update
nginx -s reload
Final verification
curl www.com:8080
<h1> www </h1>

curl bbs.com:8080
<h1> bbs </h1>

curl blog.com:8080
<h1> blog </h1>