E-commerce background management system - authority management module
The authority management module of the e-commerce background management system is divided into two parts: role list and authority list. The flow chart of the two parts is roughly as follows
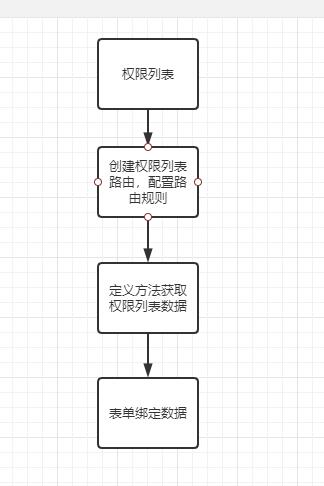
1. Implementation process of permission list
Create routing component, configure Routing - layout basic breadcrumb navigation card view - form binding data providing method to obtain permission list data
The form has three columns of data: permission name, path, permission level, permission level. The user-defined format is realized by putting El tag into the scope and slot, and then the tag of which level is displayed is judged according to the level of the data
Form structure:
<el-card>
      <el-table :data="rightList" border stripe>
          <el-table-column type="index"></el-table-column>
          <el-table-column label="Permission name" prop="authName"></el-table-column>
          <el-table-column label="route" prop="path"></el-table-column>
          <el-table-column label="privilege level" prop="level">
            <template slot-scope="scope">
             <el-tag v-if="scope.row.level==='0'">class a</el-tag>
             <el-tag type="success" v-else-if="scope.row.level==='1'">second level</el-tag>
             <el-tag type="warning" v-else>Tertiary</el-tag>
             </template>
          </el-table-column>
      </el-table>
  </el-card>
Method: get data by sending a get request
methods:{
        //Get permission list
      async  getRightList(){
            const {data:res}=await this.$http.get('rights/list')
            if(res.meta.status!==200){
                return this.$message.error('Failed to get permission list')
            }
            this.rightList=res.data
        }
    }
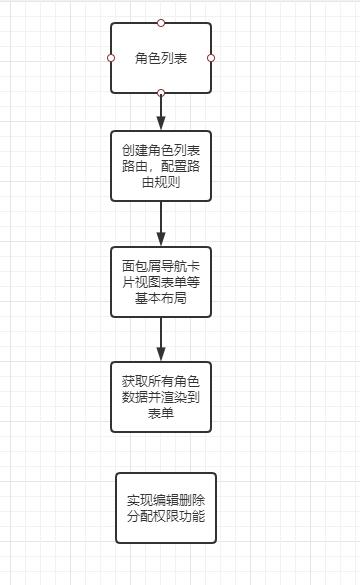
2. Role list implementation process
The whole page has the function of adding roles and a form. The form has three columns of data: role name, role description and operation. The operation implements layout editing, deletion and permission allocation buttons through the scope slot.
Implementation process: add role list component, configure Routing - layout basic bread crumbs, navigation card view, form, etc. - form binding data providing method to obtain permission list data - Implementation of operation function module
Difficulties:
1. The expanded column implementation of the form also needs to generate a drop-down list through a triple nested for loop
By using grid layout in scope and slot, El row (row) and El col (column) are divided into 24 columns
Through scope row. Children get the first level permission data and set the key value to the id of the obtained data item
<el-tag closable @close="removeRightById(scope.row, item1.id)">{{item1.authName}}</el-tag>
Nesting render secondary permissions through the for loop
`<el-row :class="[i2 === 0 ? '' : 'bdtop', 'vcenter']" v-for="(item2, i2) in item1.children" :key="item2.id">`
i2 is the index
Continue rendering Level 3 permissions with for
<el-tag type="warning" v-for="(item3, i3) in item2.children" :key="item3.id" closable @close="removeRightById(scope.row, item3.id)">{{item3.authName}}</el-tag>
2. Assign permissions
Assign permission button dialog box (pop-up window in tree structure) - assign permission button bind click event - render all permission data level 1 default selected data to page tree structure - assign permission dialog box OK button bind assign permission event
<el-tree :data="rightslist" :props="treeProps" show-checkbox node-key="id" default-expand-all :default-checked-keys="defKeys" ref="treeRef"></el-tree>
All permission data acquisition methods are consistent with the previous data acquisition methods. The default data selects the attributes that need to pass through the El tree: default checked keys = "defaultkeys" defaultkeys.
The idea is to save all the three-level permission IDs of the current role into defkeys when clicking the assign permission button. The id of the current role is passed into scope through the click Assign permission button event row
getLeafKeys(node, arr) {
      // If the current node does not contain the children attribute, it is a level 3 node
      if (!node.children) {
        return arr.push(node.id)
      }

      node.children.forEach(item => this.getLeafKeys(item, arr))
    },
The above code block obtains the IDs of all three-level permissions under the role in the form of recursion and saves them in the defKeys array (judge whether the child attribute is included, if it is not a three-level node, let the child nodes of the node cycle through and call the function recursively)
Note that you need to listen to the event of closing the dialog box, because you need to reset the defkeys array. If it is not empty, the previous roles will be saved in the array every time.
Determine button binding events:
getCheckedKeys(),getHalfCheckedKeys() of El tree can obtain all and half selected arrays, post the data into the background, and then call the get role method again.
async allotRights() {
      const keys = [
        ...this.$refs.treeRef.getCheckedKeys(),
        ...this.$refs.treeRef.getHalfCheckedKeys()
      ]

      const idStr = keys.join(',')

      const { data: res } = await this.$http.post(
        `roles/${this.roleId}/rights`,
        { rids: idStr }
      )

      if (res.meta.status !== 200) {
        return this.$message.error('Failed to assign permissions!')
      }

      this.$message.success('Permission assignment succeeded!')
      this.getRolesList()
      this.setRightDialogVisible = false
    }