###Today's goal
1. Initialize project
2. Project development based on Vue technology stack
3. Use Vue's third-party components for project development
4. Understand the front and rear end separation development mode
###1. Overview of e-commerce business
Business services used by customers: PC, applet, mobile web, mobile app
Business services used by administrators: PC background management end.
Functions of PC background management end: manage user account (login, exit, user management, authority management), commodity management (commodity classification, classification parameters, commodity information, order), data statistics
The e-commerce background management system adopts the development mode of front and rear end separation
The front-end project is a Vue based SPA (single page application) project
Front end technology stack: Vue, Vue router, element UI, Axios, echarts
Backend technology stack: node JS, express, JWT (simulated session), mysql, serialize (framework for operating database)
###2. Project initialization
A. Installation of Vue scaffold
B. Create project from scaffolding
C. Configure routing
D. Configure element UI: install in plug-in, search Vue client plugin element
E. Configure Axios: install in dependencies, search for Axios (run dependencies)
F. Initialize git warehouse
G. Hosting local projects in github or code cloud
###3. Code cloud related operations
A. Registered login code cloud account

B. Install Git and use Git on Windows. You can download the installer directly from Git's official website for installation.
Test command: git --version
C. Click "login" in the upper right corner of the website to login the code cloud and set the account

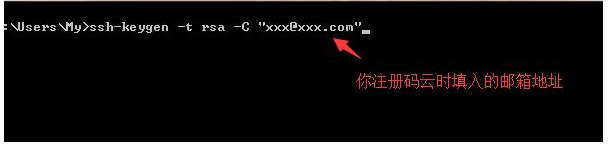
D. Create public key locally: run on the terminal: SSH keygen - t RSA - C“ xxx@xxx.com"
E. Find the public key address: your identification has been saved in / C / users / my / ssh/id_ rsa. Your public key has been saved in /c/Users/My/. ssh/id_rsa.pub. After creating the public key, please pay attention to the printed information "your public key has been saved in" / C / users / my / ssh/id_rsa.pub: users under Disk C, my under disk C ID under SSH_ rsa. Pub is the public key we created
E. Open id_rsa.pub file, copy all the codes in the file, click the SSH public key in the code cloud, and copy the generated public key to the public key


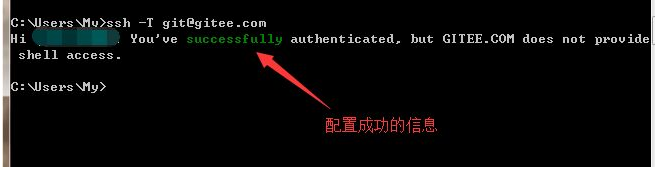
G. Test public key: open the terminal and enter the command ssh -T git@gitee.com
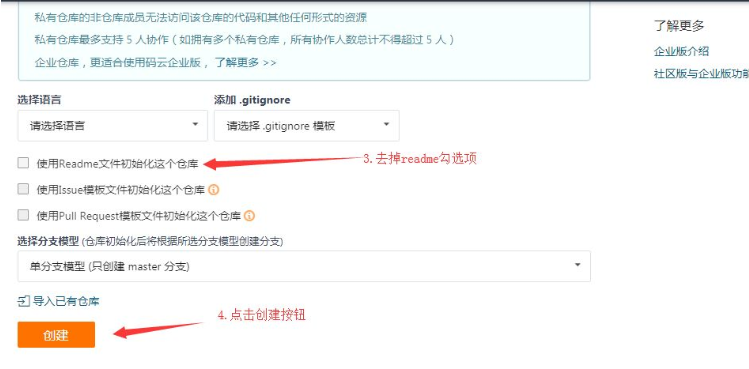
H. trust the local code into the code cloud and click the + sign in the upper right corner of the code cloud - > new warehouse

1. git configuration:

Open the terminal where the project is located and associate git warehouse

###4. Configure background project A. install phpStudy and import mysql database data

B. Install nodeJS, configure the background project, and open the background project Vue from the terminal_ api_ Server, then enter the command in the terminal to install the project dependency package: npm install
C. Testing api interfaces using postman

###5. Realize the login function A. maintain the login status. If the server and the client are of the same origin, it is recommended to use cookie s or session s to maintain the login status. If the client and the server cross domains, it is recommended to use token s to maintain the login status.
B. Login logic: enter the account and password on the login page to log in, and send the data to the server. The server returns the login result. If the login is successful, the returned data contains a token. The client gets the token and saves it. Subsequent requests need to send the token to the server, and the server will verify the token to ensure the user's identity.
C. Add a new branch login and develop the current project Vue in the login branch_ Shop: open vue_shop terminal, use git status to determine the current project status. After confirming that the current working directory is clean, create a branch for development. After development, merge it into master git checkout -b login, and then check the newly created branch: git branch confirm that we are using the login branch for development

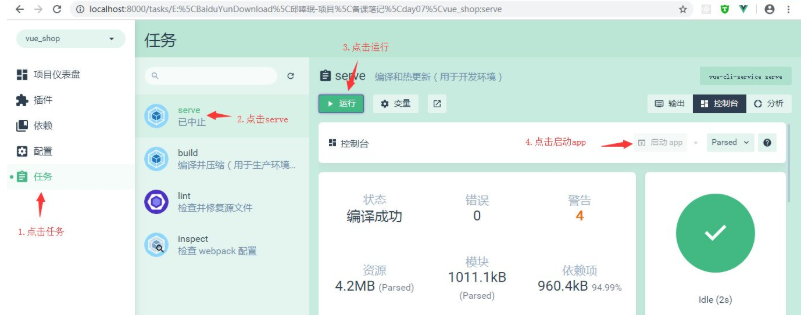
Then execute the vue ui command to open the ui interface, run serve and run app to view the effect of the current project
It is found that it is now a default page. We need to change it. Open the src directory of the project and click main JS file (entry file)
import Vue from 'vue'
import App from './App.vue'
import router from './router'
import './plugins/element.js'

Vue.config.productionTip = false


new Vue({
  router,
  render: h => h(App)
}).$mount('#app')
Open app Vue (root component), sort out the contents of the root component (leave the root node in the template, leave the default export in the script, remove the component, and remove all styles in the style)
<template>
  <div id="app">
    <router-view></router-view>
  </div>
</template>

<script>
export default {
  name: 'app'
}
</script>

<style>
</style>
Then open router JS (routing), clear the routing rules in the routes array, delete views, and delete HelloWorld. JS in components Vue delete
import Vue from 'vue'
import Router from 'vue-router'

Vue.use(Router)

export default new Router({
  routes: [

  ]
})
Create a new login in the components folder For Vue components, add template, script and style tags. Scoped in the style tag can prevent style conflicts between components. Without scoped, the style is global
<template>
    <div class="login_container">

    </div>
</template>

<script>
export default {

}
</script>

<style lang="less" scoped>
.login_container {
  background-color: #2b5b6b;
  height: 100%;
}

</style>
In router JS and set the rules in app Add route placeholder to Vue
const router = new Router({
routes: [
{ path: '/', redirect: '/login' },
{ path: '/login', component: Login }
]
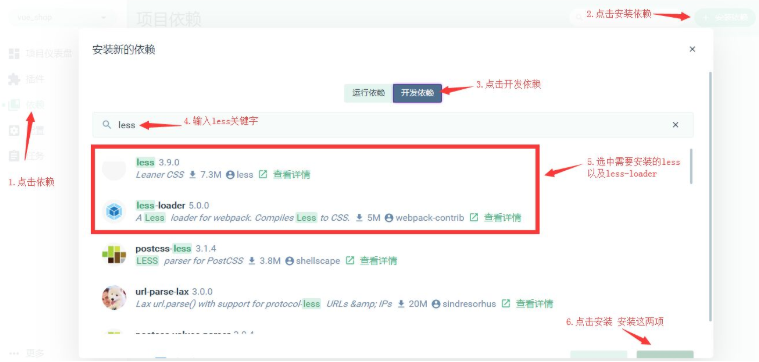
})When we give login When adding styles to the content in Vue, it will report an error "lack of less loader". It is necessary to configure less loader (development dependency) and install less (development dependency)
Then you need to add a public style, add a css folder under the assets folder, and create a global css files, adding global styles
/* Global style sheet */
html,body,#app{
    width: 100%;
    height: 100%;
    margin: 0;
    padding: 0;
}
In main JS CSS to make the global style effective import "./assets/css/global.css" and then login The root element in Vue also needs to be set to fill the full screen (height:100%), and the code in the final Login.vue file is as follows
<template>
    <div class="login_container">
        <!-- Login box  -->
        <div class="login_box">
            <!-- head portrait -->
            <div class="avatar_box">
                <img src="../assets/logo.png" alt="">
            </div>
            <!-- login form  -->
            <el-form :model="loginForm" ref="LoginFormRef" :rules="loginFormRules" label-width="0px" class="login_form">
                <!-- user name -->
                <el-form-item prop="username">
                    <el-input v-model="loginForm.username" prefix-icon="iconfont icon-user" ></el-input>
                </el-form-item>
                <!-- password -->
                <el-form-item prop="password">
                    <el-input type="password" v-model="loginForm.password" prefix-icon="iconfont icon-3702mima"></el-input>
                </el-form-item>
                <!-- Button -->
                <el-form-item class="btns">
                    <el-button type="primary" @click="login">Sign in</el-button>
                    <el-button type="info" @click="resetLoginForm">Reset</el-button>
                </el-form-item>
            </el-form>
        </div>
    </div>
</template>

<script>
export default {
  data() {
    return {
      //Data binding
      loginForm: {
        username: 'admin',
        password: '123456'
      },
      //Form validation rules
      loginFormRules: {
        username: [
          { required: true, message: 'Please enter login', trigger: 'blur' },
          {
            min: 3,
            max: 10,
            message: 'The login name is between 3 and 10 characters long',
            trigger: 'blur'
          }
        ],
        password: [
          { required: true, message: 'Please input a password', trigger: 'blur' },
          {
            min: 6,
            max: 15,
            message: 'The password is between 6 and 15 characters long',
            trigger: 'blur'
          }
        ]
      }
    }
  },
  //Add behavior,
  methods: {
    //Add form reset method
    resetLoginForm() {
      //This = > the current component object, in which the attribute $refs contains the set form ref
      //   console.log(this)
      this.$refs.LoginFormRef.resetFields()
    },
    login() {
      //When clicking login, first call the validate method to verify whether the form content is correct
      this.$refs.LoginFormRef.validate(async valid => {
        console.log(this.loginFormRules)
        //If the valid parameter is true, the validation passes
        if (!valid) {
          return
        }

        //Send a request to log in
        const { data: res } = await this.$http.post('login', this.loginForm)
        //   console.log(res);
        if (res.meta.status !== 200) {
          return this.$message.error('Login failed:' + res.meta.msg) //console.log("login failed:" + res.meta.msg)
        }

        this.$message.success('Login succeeded')
        console.log(res)
        //Save token
        window.sessionStorage.setItem('token', res.data.token)
        // Navigate to / home
        this.$router.push('/home')
      })
    }
  }
}
</script>

<style lang="less" scoped>
.login_container {
  background-color: #2b5b6b;
  height: 100%;
}
.login_box {
  width: 450px;
  height: 300px;
  background: #fff;
  border-radius: 3px;
  position: absolute;
  left: 50%;
  top: 50%;
  transform: translate(-50%, -50%);
  .avatar_box {
    height: 130px;
    width: 130px;
    border: 1px solid #eee;
    border-radius: 50%;
    padding: 10px;
    box-shadow: 0 0 10px #ddd;
    position: absolute;
    left: 50%;
    transform: translate(-50%, -50%);
    background-color: #fff;
    img {
      width: 100%;
      height: 100%;
      border-radius: 50%;
      background-color: #eee;
    }
  }
}
.login_form {
  position: absolute;
  bottom: 0;
  width: 100%;
  padding: 0 20px;
  box-sizing: border-box;
}
.btns {
  display: flex;
  justify-content: flex-end;
}
</style>
Among them, we have the following contents, which need to be further processed:
A. Add the form component of element UI and open element in the plugins folder JS file, import Vue from 'Vue' import {button} from 'element UI' import {form, formitem} from 'element UI' import {input} from 'element UI'
Vue.use(Button) Vue.use(Form) Vue.use(FormItem) Vue.use(Input)
B. Add a third-party font and copy the fonts folder in the material to assets in the entry file main Import 'in JS/ assets/fonts/iconfont. CSS' and then add the login box directly in < El input prefix icon = "iconfont icon-3702mima" > < / El input >
C. Step 1) of adding form validation Add attributes to < El form >: rules="rules", which are a bunch of validation rules defined in script and 2) Add rules: export default {data() {return {..., rules: {Name: [{required: true, message: 'please enter the activity name', trigger: 'blur'}, {Min: 3, Max: 5, message: 'length between 3 and 5 characters', trigger:' blur '}], region: [{required: true, message:' please select the activity area ', trigger:' change '}]}]} 3). Set the validation rule through the prop attribute of < El form item > < El form item label = "activity name" prop = "name" >
4. Import Axios to send ajax request and open main js,import axios from 'axios'; Set the root path of the request: Axios defaults. baseURL = ' http://127.0.0.1:8888/api/private/v1/ '; Mount Axios: Vue prototype.$ http = axios;
5. Configure pop-up prompt: open element in plugins folder JS file, import {message} from 'element UI' for global mount: Vue prototype.$ message = Message; In login Write pop-up code in Vue component: this$ message. Error ('login failed ')
###6. Operations after successful login A. after successful login, you need to save the token returned in the background to sessionStorage. After the operation, you need to jump to / home
login() {
      //When clicking login, first call the validate method to verify whether the form content is correct
      this.$refs.LoginFormRef.validate(async valid => {
        console.log(this.loginFormRules)
        //If the valid parameter is true, the validation passes
        if (!valid) {
          return
        }

        //Send a request to log in
        const { data: res } = await this.$http.post('login', this.loginForm)
        //   console.log(res);
        if (res.meta.status !== 200) {
          return this.$message.error('Login failed:' + res.meta.msg) //console.log("login failed:" + res.meta.msg)
        }

        this.$message.success('Login succeeded')
        console.log(res)
        //Save token
        window.sessionStorage.setItem('token', res.data.token)
        // Navigate to / home
        this.$router.push('/home')
      })
    }
Add a component home Vue and add rules to it
<template>
    <div>
        this is home
        <el-button type="info" @click="logout"> sign out </el-button>
    </div>
</template>

<script>
export default {
  methods: {
    logout() {
      window.sessionStorage.clear()
      this.$router.push('/login')
    }
  }
}
</script>

<style lang='less' scoped>
</style>
Add routing rule
const router = new Router({
  routes: [
    { path: '/', redirect: '/login' },
    { path: '/login', component: Login },
    { path: '/home', component: Home }
  ]
})
Add a routing guard. If the user does not log in, he cannot access / home. If the user accesses directly through the url address, he will be forced to jump to the login page to open the router js
import Vue from 'vue'
import Router from 'vue-router'
import Login from './components/Login.vue'
import Home from './components/Home.vue'

Vue.use(Router)

const router = new Router({
  routes: [
    { path:'/', redirect:'/login'},
    { path:'/login' , component:Login },
    { path:'/home' , component:Home}
  ]
})

//Mount route navigation guard. To indicates the path to be accessed, from indicates where it comes from, and next is the next operation to be done
router.beforeEach((to,from,next)=>{
  if(to.path === '/login')
    return next();

  //Get token
  const tokenStr = window.sessionStorage.getItem('token');

  if(!tokenStr)
    return next('/login');

  next();

})

export default router
To realize the exit function, add an exit function button in the Home component, add a click event to the exit button, and add the event processing code as follows:
export default {
    methods:{
        logout(){
            window.sessionStorage.clear();
            this.$router.push('/login');
        }
    }
}
###Supplement A. handle the ESLint warning, open the scaffold panel and view the warning information [picture] by default, ESLint and vscode format have conflicts, and a configuration file needs to be added to resolve the conflicts. Add in the project root directory Pretierrc file
{
    "semi":false,
    "singleQuote":true
}
Open eslintrc.js file, disable the check of space before function paren:
 rules: {
    'no-console': process.env.NODE_ENV === 'production' ? 'error' : 'off',
    'no-debugger': process.env.NODE_ENV === 'production' ? 'error' : 'off',
    'space-before-function-paren' : 0
  },
B. Merge element UI imported on demand
import Vue from 'vue'
import { Button, Form, FormItem, Input, Message } from 'element-ui'

Vue.use(Button)
Vue.use(Form)
Vue.use(FormItem)
Vue.use(Input)
// To mount globally:
Vue.prototype.$message = Message
C. Submit the code to the code cloud, create a new project terminal, enter the command 'git status' to view the modified and newly added file contents, and add all files to the temporary storage area: git add Submit all codes to the local warehouse: git commit -m "add login function and basic structure of / home" view branch: git branch found that all codes were submitted to the login branch, and merged the login branch codes into the master main branch, First switch to the master: git checkout master. Perform code merging in the master branch: git merge login. Push the local master to the remote code cloud: git push
Push the local sub branch to the code cloud. First switch to the sub branch: git checkout branch name, and then push to the code cloud: git push -u origin remote branch name