1, Singleton mode
1. What is singleton mode
The definition of singleton pattern is to ensure that a class has only one instance and provide a global access point to access it.
For some objects, such as thread pool / global cache / window object in browser, we only need one instance.
The following will be introduced according to the actual scene.
2. Actual scene
1. Login floating window
When we click the login button, a login floating window will appear in the page, and this login floating window is unique. No matter how many times we click the login button, this floating window will only be created once, so this login floating window is suitable for creating in singleton mode.
1.1 traditional practices
Traditionally, the login floating window is created when the page is loaded. When the user clicks the login button, the login floating window is displayed. The implementation code is as follows:
<button id="loginBtn">Sign in</button>
var loginLayer = (() => {
    let div = document.createElement('div')
    div.innerHTML = 'I'm the login pop-up'
    div.style.display = 'none'

    document.body.appendChild(div)

    return div
})()

document.getElementById('loginBtn').onclick = () => {
    loginLayer.style.display = 'block'
}
The above code has the following disadvantages:
- When there is no need to log in, the DOM node of the login floating window will also be added, wasting performance.
Now optimize the code to add the DOM node of the login floating window after the user clicks the login button.
The code is as follows:
var createLoginLayer = () => {
    let div = document.createElement('div')
    div.innerHTML = 'I'm the login pop-up'
    div.style.display = 'none'

    document.body.appendChild(div)

    return div
}

document.getElementById('loginBtn').onclick = () => {
    const loginLayer = createLoginLayer()
    loginLayer.style.display = 'block'
}
The above code also has defects, as follows:
- Every time you click the login button, a login floating window will be created. Frequent creation of DOM nodes will waste performance.
In fact, we only need to create a login floating window once.
1.2 single instance mode
Refactor the above code through the singleton mode.
const createLoginLayer = () => {
    const div = document.createElement('div')
    div.innerHTML = 'I'm the login pop-up'
    div.style.display = 'none'
    console.log(123)

    document.body.appendChild(div)
    return div
}

const createSingle = (function () {
    var instance = {}
    return function (fn) {
        if (!instance[fn.name]) {
            instance[fn.name] = fn.apply(this, arguments)
        }
        return instance[fn.name]
    }
})()

const createIframe = function () {
    const iframe = document.createElement('iframe')
    document.body.appendChild(iframe)
    iframe.style.display = 'none'
    return iframe
}

const createSingleLoginLayer = createSingle(createLoginLayer)
const createSingleIframe = createSingle(createIframe)

document.getElementById('loginBtn').onclick = () => {
    const loginLayer = createSingleLoginLayer
    const iframe = createSingleIframe
    loginLayer.style.display = 'block'
    iframe.style.display = 'block'
}
After refactoring, the code is optimized as follows:
- Separate the responsibility of creating the instance object createLoginLayer / createIframe from the responsibility of managing the singleton object createsinger, which conforms to the principle of single responsibility;
- Store instances through closures and make judgments. No matter how many times you click the login button, only one login floating window instance will be created;
- It is easy to expand. When the only iframe / script and other tags in the page need to be created next time, the logic can be reused directly.
3. Summary
Singleton mode is a simple but very practical mode, especially the inert singleton technology. It creates objects only when appropriate, and only creates a unique one. What's more wonderful is that the responsibilities of creating objects and managing singletons are distributed in two different methods. Only when the two methods are combined can they have the power of singleton mode.
2, Strategy mode
1. What is the strategic model
When we plan to go out to play on the national day, in terms of transportation mode, we can choose expensive and fast aircraft, medium but slightly slower bullet trains, cheap but super slow trains, choose the corresponding transportation mode according to different people, and change the transportation mode at will. This is the strategic mode.
The definition of policy pattern is to define a series of algorithms, encapsulate them one by one, and make them replace each other.
2. Actual scene
1. Calculate year-end bonus
1.1 traditional practices
There is A need to calculate the year-end bonus of employees. Suppose that the year-end bonus of employees with performance S is 4 times the salary, the year-end bonus of employees with performance A is 3 times the salary, and the year-end bonus of employees with performance B is 2 times the salary. Let'S calculate the year-end bonus of employees.
var calculateBonus = function(performanceLevel, salary) {
    if (performanceLevel === 'S') {
        return salary * 4;
    }
    if (performanceLevel === 'A') {
        return salary * 3;
    }
    if (performanceLevel === 'B') {
        return salary * 2;
    }
};

calculateBonus('B', 20000); // Output: 40000
calculateBonus( 'S', 6000 ); // Output: 24000
The above code has the following disadvantages:
- If else statements are used to describe logic, and the code is huge;
- Lack of flexibility. If you need to modify the bonus coefficient of performance S, you must modify the calculateBonus function, which violates the open closed principle;
- It cannot be reused again. When this set of logic is needed elsewhere, it can only be copied again.
1.2 strategy mode and Practice
After using the improved strategy mode
const strategies = {
    S: salary => {
        return salary * 4
    },
    A: salary => {
        return salary * 3
    },
    B: salary => {
        return salary * 2
    }
}

const calculateBonus = (level, salary) => {
    return strtegies[level](salary)
}

console.log(calculateBonus('s', 20000))
console.log(calculateBonus('a', 10000))
You can see that the following changes have been made to the above code:
- strategies encapsulate the specific algorithm and calculation process (the calculation rules of each performance);
- Environment calculateBonus accepts the request and delegates the request to strategy (employee performance and salary);
- Separate the use of the algorithm from the implementation of the algorithm, with clear code and clear responsibilities;
- Eliminate a large number of if else statements.
1.3 summary
The policy pattern makes the code more readable and easy to expand more policy algorithms. When the performance coefficient changes or the performance level increases, we only need to adjust or add algorithms for strategies to comply with the open closed principle.
2. Form verification
When the form on the web page needs to verify the rules such as input box / check box, how to implement it?
Now there is a form requirement for registered users. Before submitting the form, you need to verify the following rules:
- User name cannot be empty
- The password length cannot be less than 6 digits
- The mobile phone number must conform to the format
2.1 traditional practices
Use the if else statement to judge whether the form input conforms to the corresponding rules. If not, the error reason will be prompted.
<!DOCTYPE html>
<html>
<head>
    <title></title>
</head>
<body>
    <form id='registerForm' action="xxx" method="post">
        user name:<input type="text" name="userName">
        password:<input type="text" name="password">
        cell-phone number:<input type="text" name="phone">
        <button>Submit</button>
    </form>
    <script type="text/javascript">
        let registerForm = document.getElementById('registerForm')

        registerForm.onsubmit = () => {
                if (registerForm.userName.value) {
                        alert('User name cannot be empty')
                        return false
                }

                if (registerForm.password.value.length < 6) {
                        alert('Password length cannot be less than 6')
                        return false
                }

                if (!/(^1[3|5|8][0-9]$)/.test(registerForm.phone.value)) {
                        alert('Incorrect mobile number format')
                        return false
                }
        }
        </script>
</body>
</html>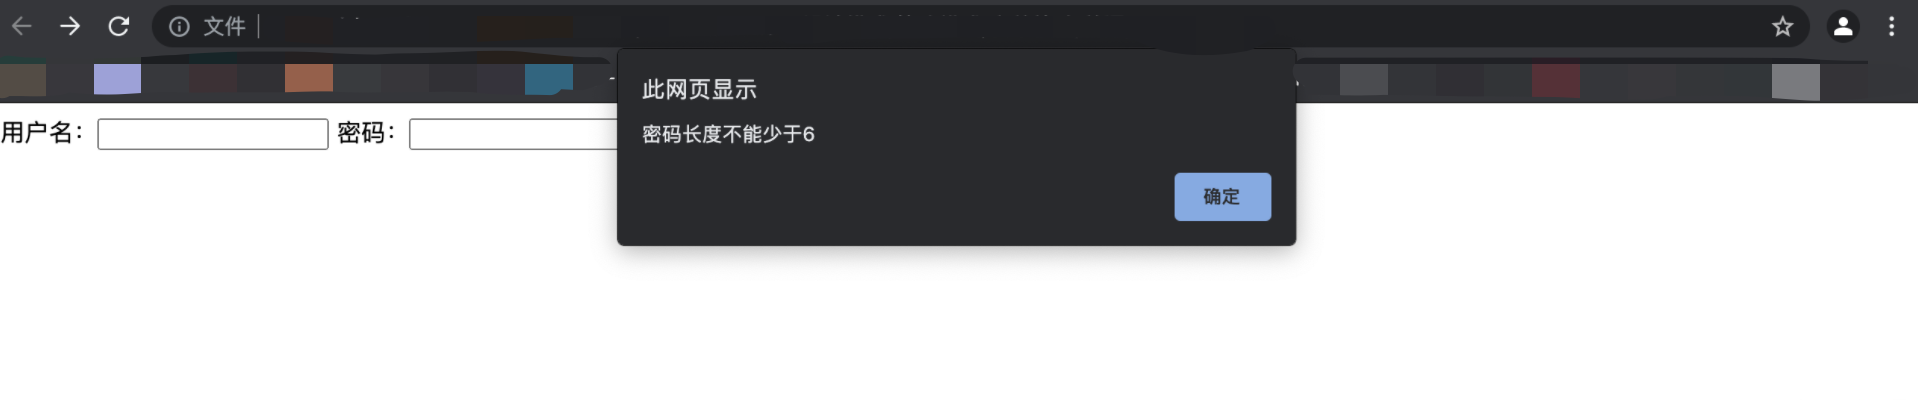
The above code has the following disadvantages:
- The onsubmit function is huge and contains a large number of if else statements;
- Onsubmit lacks flexibility. When rules need to be adjusted or new rules need to be added, the interior of onsubmit function needs to be changed, which violates the open closed principle;
- The algorithm has poor reusability and can only be copied and reused to other forms.
2.2 strategy mode and Practice
Refactor the above code using the policy pattern.
<!DOCTYPE html>
<html>
<head>
    <title></title>
</head>
<body>

    <form action="http://xxx.com/register" id="registerForm" method="post">
         Please enter user name:
        <input type="text" name="userName" />
         Please input a password:
        <input type="text" name="password" />
         Please enter your mobile number:
        <input type="text" name="phoneNumber" />
        <button>
            Submit
        </button>
    </form>
    <script type="text/javascript" src="index.js">

    </script>
</body>
</html>
// Form dom
const registerForm = document.getElementById('registerForm')
// Form rules
const rules = {
userName: [
{
strategy: 'isNonEmpty',
errorMsg: 'User name cannot be empty'
},
{
strategy: 'minLength:10',
errorMsg: 'The length of user name cannot be less than 10 characters'
}
],
password: [
{
strategy: 'minLength:6',
errorMsg: 'Password length cannot be less than 6 digits'
}
],
phoneNumber: [
{
strategy: 'isMobile',
errorMsg: 'Incorrect mobile number format'
}
]
}
// Policy class
var strategies = {
isNonEmpty: function(value, errorMsg) {
if (value === '') {
return errorMsg;
}
},
minLength: function(value, errorMsg, length) {
console.log(length)
if (value.length < length) {
return errorMsg;
}
},
isMobile: function(value, errorMsg) {
if (!/(^1[3|5|8][0-9]{9}$)/.test(value)) {
return errorMsg;
}
}
};
// Validation class
const Validator = function () {
this.cache = []
}
// Add validation method
Validator.prototype.add = function ({ dom, rules}) {
rules.forEach(rule => {
const { strategy, errorMsg } = rule
console.log(rule)
const [ strategyName, strategyCondition ] = strategy.split(':')
console.log(strategyName)
const { value } = dom
this.cache.push(strategies[strategyName].bind(dom, value, errorMsg, strategyCondition))
})
}
// Start validation
Validator.prototype.start = function () {
let errorMsg
this.cache.some(cacheItem => {
const _errorMsg = cacheItem()
if (_errorMsg) {
errorMsg = _errorMsg
return true
} else {
return false
}
})
return errorMsg
}
// Verification function
const validatorFn = () => {
const validator = new Validator()
console.log(validator.add)
Object.keys(rules).forEach(key => {
console.log(2222222, rules[key])
validator.add({
dom: registerForm[key],
rules: rules[key]
})
})
const errorMsg = validator.start()
return errorMsg
}
// Form submission
registerForm.onsubmit = () => {
const errorMsg = validatorFn()
if (errorMsg) {
alert(errorMsg)
return false
}
return false
}The above code defines the rule algorithm through strategies and the validation algorithm through Validator to separate the rule and algorithm. We can complete the verification of the form only through configuration. These verification rules can also be reused anywhere in the program and can be easily transplanted to other projects as an insert.
3. Summary
Strategy mode is a common and effective design mode. Through the above examples, we can summarize some advantages of strategy mode:
- The strategy pattern can effectively avoid multiple conditional choice statements by using the technologies and ideas of combination / delegation and polymorphism;
- The policy pattern provides perfect support for the open closed principle, encapsulating the algorithm in an independent policy class, making them easy to switch / understand / expand;
- In the policy mode, combination and delegation are used to make the Context have the ability to execute algorithms, which is also a lighter alternative to inheritance.
3, Agent mode
1. What is the agency model
Proxy mode is to provide a substitute or placeholder for an object to control access to it.
The key of proxy mode is to provide a substitute object to control the access to an object when the customer is inconvenient to directly access an object or does not meet the needs. In fact, the customer accesses the substitute object.
2. Simulation scenario
1. Xiaoming sends flowers to Xiaobai
1.1 traditional practices
The traditional method is that Xiaoming directly sends the flowers to Xiaobai, who receives the flowers. The code is as follows:
const Flower = function () {
    return 'rose🌹'
}

const xiaoming = {
    sendFlower: target => {
        const flower = new Flower()
        target.receiveFlower(flower)
    }
}

const xiaobai = {
    receiveFlower: flower => {
        console.log('Received flowers', flower)
    }
}

xiaoming.sendFlower(xiaobai)
1.2 agent mode
However, Xiaoming doesn't know Xiaobai. He wants to help him find out about Xiaobai through xiaodai and send flowers when Xiaobai is in a good mood. In this way, the success rate is higher. The code is as follows:
const Flower = function () {
    return 'rose🌹'
}

const xiaoming = {
    sendFlower: target => {
        const flower = new Flower()
        target.receiveFlower(flower)
    }
}

const xiaodai = {
    receiveFlower: flower => {
        xiaobai.listenGoodMood().then(() => {
            xiaobai.receiveFlower(flower)
        })
    }
}

const xiaobai = {
    receiveFlower: flower => {
        console.log('Received flowers', flower)
    },
    listenGoodMood: fn => {
        return new Promise((reslove, reject) => {
            // After 10 seconds, the mood gets better
            reslove()
        })
    }
}

xiaoming.sendFlower(xiaodai)
Above, Xiaoming monitors Xiaobai's mood changes through xiaodai and chooses to send flowers to Xiaobai when Xiaobai is in a good mood. Not only that, xiaodai can also do the following things:
- Help Xiaobai filter out some requests for flowers, which is called protection agent;
- Help Xiaoming to buy flowers when Xiaobai is in a good mood. This is called virtual agent. Virtual agents delay the creation of expensive objects until they are really needed.
3. Actual scene
1. Picture preloading
Image preloading is a common technology. If you directly set src attribute to img tag node, the location of the image is often white for a period of time because the image is too large or the network is poor.
1.1 traditional practices
const myImage = (() => {
    const imgNode = document.createElement('img')
    document.body.appendChild(imgNode)

    return {
        setSrc: src => {
            imgNode.src = src
        }
    }
})()

myImage.setSrc('https://img30.360buyimg.com/ling/jfs/t1/187775/5/8271/435193/60c8117eE7d79ef41/1d21db2c4dca9a90.png')
When you set the network speed to 5kb/s through the developer tool, you will find that the picture position is blank for a long time.
1.2 virtual agent
Next, the virtual agent is used to optimize the function, and the operation of loading the picture is handed over to the agent function. When the picture is loaded, a loading graph is used to occupy the space. When the picture is loaded successfully, it is filled into the img node.
The code is as follows:
const myImage = (() => {
    const imgNode = document.createElement('img')
    document.body.appendChild(imgNode)

    return {
        setSrc: src => {
            imgNode.src = src
        }
    }
})()

const loadingSrc = '../../../../img/loading.gif'
const imgSrc = 'https://img30.360buyimg.com/ling/jfs/t1/187775/5/8271/435193/60c8117eE7d79ef41/1d21db2c4dca9a90.png'

const proxyImage = (function () {
    const img = new Image()
    img.onload = () => {
        myImage.setSrc(img.src)
    }

    return {
        setSrc: src => {
            myImage.setSrc(loadingSrc)
            img.src = src
        }
    }
})()

proxyImage.setSrc(imgSrc)
The above code has the following advantages:
Access to MyImage is controlled through proxyImage. Before MyImage is successfully loaded, the loading diagram is used to occupy the space;
Practice the principle of single responsibility. Set the img node with the src function MyImage and the preloaded image function proxyImage, which have only one responsibility;
Practice the open close principle, set src and preload image functions for img nodes, and isolate them in two objects. They can change each other without affecting each other.
2. Merge HTTP requests
Suppose we want to realize the function of synchronizing files. Through the check box, when the check box is selected, the id corresponding to the check box is transmitted to the server to tell the server that the file corresponding to the id needs to be synchronized.
If you think about it, you will find that if you select each check box, you will request the interface once. Assuming that 10 check boxes are selected within 1s, you will send 10 requests.
2.1 virtual agent
You can optimize the above practices through a virtual agent. Add an agent to help the check box initiate the request to synchronize files, collect the requests within 1s, and send these file IDs to the server together after 1s.
The code is as follows:
<!DOCTYPE html>
<html>
<meta charset="utf-8" />
<head>
    <title></title>
</head>
<body>
  a <input type="checkbox" value="a" />
  b <input type="checkbox" value="b" />
  c <input type="checkbox" value="c" />
  d <input type="checkbox" value="d" />
    <script type="text/javascript" src="index.js">
    </script>
</body>
</html>
const synchronousFile = cache => {
console.log('Start synchronizing files, id For:'+ cache.join('/'))
}
const proxySynchronousFile = (() => {
const cache = []
let timer
return id => {
console.log(id)
cache.push(id)
if (timer) {
return
}
timer = setTimeout(() => {
synchronousFile(cache)
clearTimeout(timer)
timer = null
cache.length = 0
}, 2000)
}
})()
const checkbox = document.getElementsByTagName('input')
Array.from(checkbox).forEach(i => {
console.log(i)
i.onclick = () => {
if (i.checked) {
proxySynchronousFile(i.value)
}
}
})
3. ajax requests data asynchronously
When the list needs paging, the data of the same page only needs to be pulled in the background once in theory. These pulled data can be cached and directly used in the next request.
3.1 cache agent
The cache agent is used to realize the above functions, and the code is as follows:
(async function () {
  function getArticle (currentPage, pageSize) {
    console.log('getArticle', currentPage, pageSize)
    // Simulate an ajax request
    return new Promise((resolve, reject) => {
      resolve({
        ok: true,
        data: {
          list: [],
          total: 10,
          params: {
            currentPage,
            pageSize
          }
        }
      })
    })
  }

  const proxyGetArticle = (() => {
    const caches = []

    return async (currentPage, pageSize) => {

      const cache = Array.prototype.join.call([currentPage, pageSize],',')

      if (cache in caches) {
        return caches[cache]
      }
      const { data, ok } = await getArticle(currentPage, pageSize)

      if (ok) {
        caches[cache] = data
      }

      return caches[cache]
    }
  })()

  // Search first page
  await proxyGetArticle(1, 10)

  // Search page 2
  await proxyGetArticle(2, 10)

  // Search the first page again
  await proxyGetArticle(1, 10)

})()
Through the cache agent, when the data of the first page is requested for the second time, it is directly pulled from the cache data without requesting data from the server again.
4. Summary
The above describes the practice of virtual agent and cache agent according to the actual scenario.
When it is inconvenient for us to directly access an object, find a proxy method to help us access the object, which is the proxy mode.
Can pass github source code Practice.
I hope this article can help you. Thank you for reading ❤️~
Welcome to the lab blog: aotu.io
Or focus on the official account of bump Laboratory (AOTULabs).