Learning objectives
Familiar with BRVAH for adapter requirements
Summary
BRVAH It's a great open source project on Github. Its main function is to help us use Recyclerview control more efficiently and to deal with the Adapter of common requirements in the project. It's very convenient to use. More introduction can be given. BRVAH official website See.
BRVAH is mainly designed for Adapter.
BRVAH provides us with BaseQuick Adapter in general, and Adapter in several specific requirements, BaseMultiItemQuick Adapter for complex class layout lists, BaseItemDraggable Adapter for dragging and dropping class lists, and BaseSection QuickAdapter for lists with Section Header View.
build.gradle configuration instructions
Add a repository
allprojects {
    repositories {
        ...
        maven { url "https://jitpack.io" }
    }
}
Adding dependencies
dependencies {
        compile 'com.github.CymChad:BaseRecyclerViewAdapterHelper:VERSION_CODE'
}
The latest version of VERSION_CODE is available for reference. Here.
Functional outline
1. Implementing the list loading animation effect of Recyclerview

We only need to inherit the self-built xxAdapter corresponding to BRVAH to meet the needs of the Adapter, and then instantiate in Activity, through the openLoad Animation () method to complete a specific animation effect.
BRVAH Support 5 animations
BaseQuickAdapter.ALPHAIN fades in;
SLIDEIN_BOTTOM enters from the bottom;
BaseQuickAdapter.SLIDEIN_LEFT enters from the left;
BaseQuickAdapter.SLIDEIN_RIGHT enters from the right;
And custom animation.
For custom animations, you can override them by implementing the BaseAnimation class
The getAnimators(View view) method completes the custom animation.
2. Implementing Recyclerview's Complex Layout List
In practical application, we often encounter various types of lists, palaces and lists coexist, classification lists and so on.
2.1 Effect of Recyclerview Multiple item Arrangement
For multiple lists, create type entity classes to implement MultiItemEntity. xxAdapter inherits the BaseMultiItemQuickAdapter class, calls the addItemType () method in the constructor to add the defined itemType and corresponding layout, and instantiates it in Activity.
2.2 Mixed Arrangement Style of Recyclerview Palace and List

With regard to the mixed-row style of Grid and List, the Grid style has more than one row, while the List style has only one row. We can think of the List style as a Grid style, which is equivalent to stretching a Grid item.
With the layout effect of mixing list and grid, we can create xxAdapter to inherit BaseMultiItemQuickAdapter to add layout file of corresponding item type, create GridLayoutManager object in Activity, set spanSize attribute, and set spanSize corresponding to each item type through the setSpanSizeLookup method of Adapter. Set the addItemDecoration() method of Recyclerview to add splitting lines or set item spacing.
Code snippet:
...
gridLayoutManager = new GridLayoutManager(this,3);
        mRecyclerView.setLayoutManager(gridLayoutManager);
        mAdapter = new GridManagerAdapter(getDataType());
        // Set up span
        // 1: That's one third across.
        // 2: That's 2/3 across.
        // 3: It's across a whole line.
        mAdapter.setSpanSizeLookup(new BaseQuickAdapter.SpanSizeLookup() {
            @Override
            public int getSpanSize(GridLayoutManager gridLayoutManager, int position) {
                return getDataType().get(position).getSpanSize();
            }
        });
        mRecyclerView.setAdapter(mAdapter);
        mRecyclerView.addItemDecoration(new RecyclerView.ItemDecoration() {
            @Override
            public void getItemOffsets(Rect outRect, View view, RecyclerView parent, RecyclerView.State state) {
                super.getItemOffsets(outRect, view, parent, state);
                GridLayoutManager.LayoutParams layoutParams = (GridLayoutManager.LayoutParams)
                        view.getLayoutParams();
                int spanSize = layoutParams.getSpanSize();
                int spanIndex = layoutParams.getSpanIndex();// From left to right 0~
                if (spanSize == gridLayoutManager.getSpanCount()) {
                    outRect.top = 20;
                }
            }
        });
// Assumed data
    private List<MultipleItem> getDataType() {
        int type = 0;
        for (int i = 0;i < 13;i++) {
            if (i < 9) {
                type = 1;
            }  else {
                type = 2;
            }
            types.add(i,type);
        }
        List<MultipleItem> list = new ArrayList<>();
        for (int j = 0;j < types.size();j++) {
            if (types.get(j) == 1) {
                list.add(new MultipleItem(1,1));
            } else if (types.get(j) == 2) {
                list.add(new MultipleItem(2,3));
            }
        }
        return list;
    }
...
When creating a GridLayoutManager object, there is a parameter spanSize that needs to be set to make the original item fill one line into a maximum of three items fill one line.
The setSpanSizeLookup() method returns the specific span size for each item type. For example, the item of TYPE_GRID type in the code above is set to spanSize 1, while the spanSize set by GridLayout Manager is set to 3, so this type of item will fill one line with three items, equivalent to one third of each item.
When we use addItemDecoration() to add partitioning lines to set item spacing for this mixed list, in getItemOffsets() method, spanSize is obtained by GridLayoutManager.LayoutParams to determine the corresponding spacing for item type settings, where spanIndex represents the subscript position for the current line item, starting from left to right.
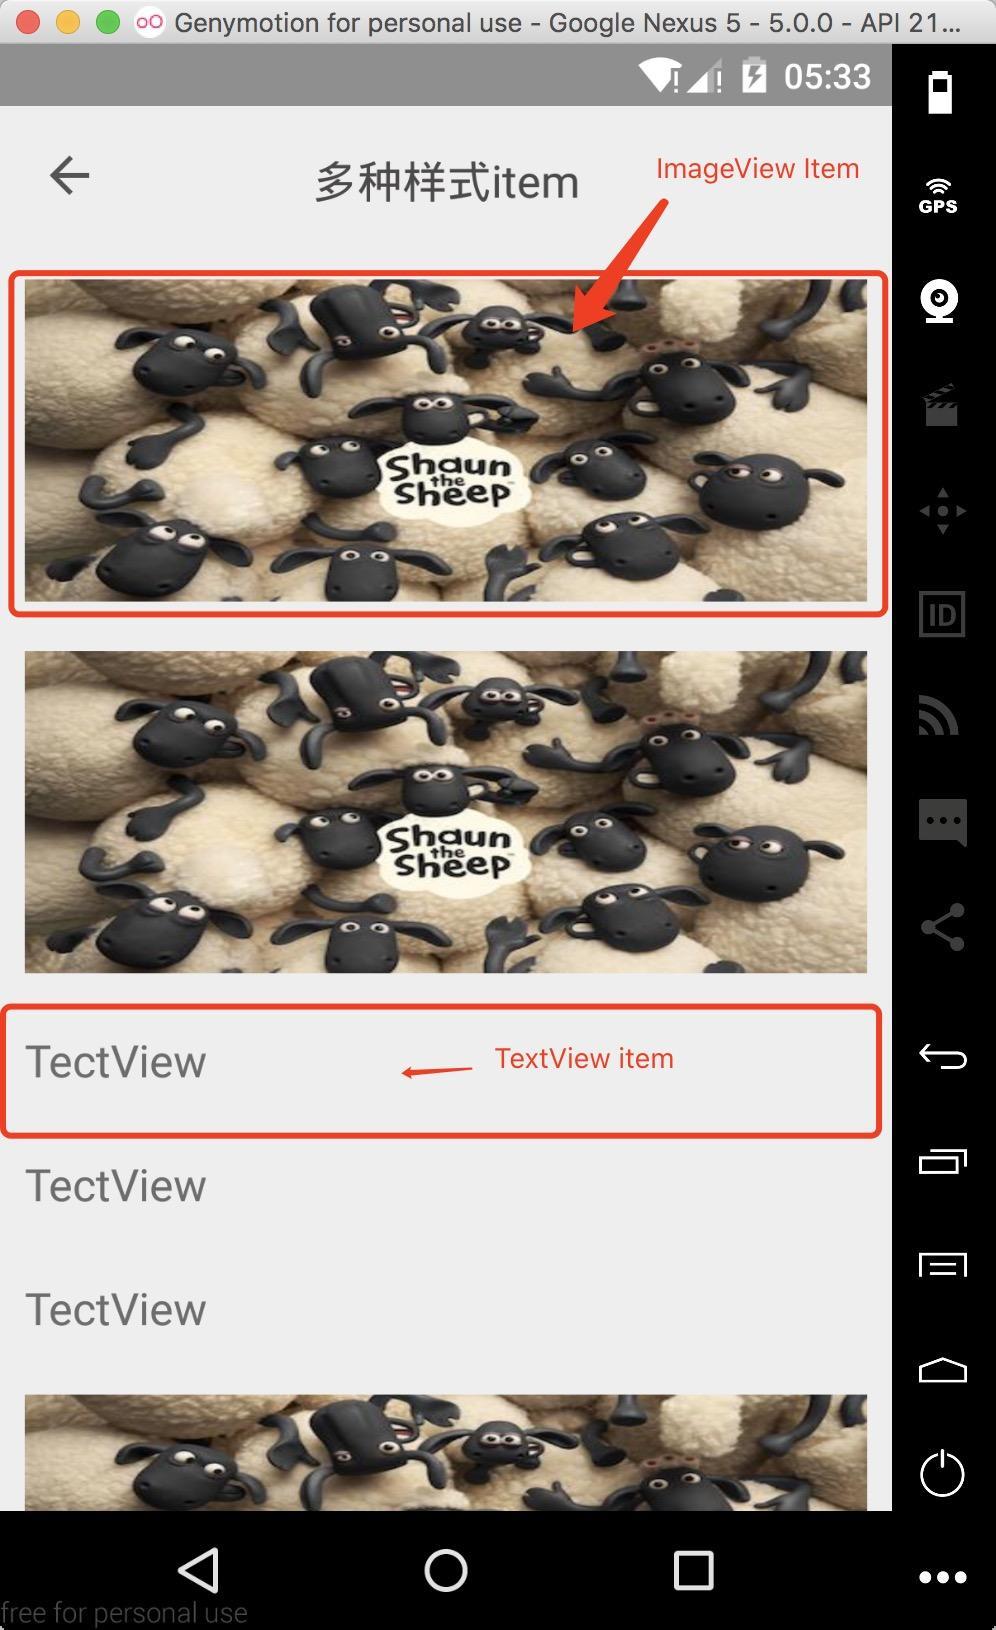
2.3 Complex layout of Recyclerview nested Recyclerview

Simply analyze the layout style of the interface in the figure below, the outermost Recycler View, the layout style of each item in it, and the top one is the Recycler View. Banner Roadmap control, the following is a list of various styles of items in the form of a left-right sliding item, which is a nested Recycler View.
Using BaseMultiItemQuickAdapter to instantiate the sub-Recyclerview in the rewritten convert() method, the same step is to set the sub-Recyclerview. It should be noted that the sub-Recyclerview nested Recyclerview will grab the focus, resulting in the extrusion of the top part of the interface control, which only needs to set properties in the package container of the outermost Recyclerview. Android: descendant Focusability= "blocks Descendants" is fine. The header layout is set by the addHeaderView() method of BRVAH.
Code snippet:
@Override
    protected void convert(BaseViewHolder helper, MultiItemEntity item) {
        switch (helper.getItemViewType()) {
           ...
            case MultipleItem.DOUBANTIME:
                RecyclerView recyclerView = helper.getView(R.id.recyclerview_item_view);
                recyclerView.setLayoutManager(new LinearLayoutManager(mContext,
                        LinearLayoutManager.HORIZONTAL,false));
                recyclerView.setHasFixedSize(true);
                recyclerView.setAdapter(new RrecyclerViewAdapter(DataServer.getReItemData()));
                break;
        }
    }
2. Achieve drag-and-drop deletion of Recyclerview

Dragging and sliding removal of RecyclerView is very simple. Just xxAdapter inherits the BaseItemDraggable Adapter class. In Activity, add OnItemDragListener and OnItemSwipeListener interfaces, configure basic properties through xxAdapter.
Code snippet:
OnItemDragListener listener = new OnItemDragListener() {
            @Override
            public void onItemDragStart(RecyclerView.ViewHolder viewHolder, int pos) {
                // Starting position of item drag
                Log.d(TAG,"drag start");
            }
            @Override
            public void onItemDragMoving(RecyclerView.ViewHolder source, int from, RecyclerView.ViewHolder target, int to) {
                 // Position change of item dragging process
                Log.d(TAG, "move from: " + source.getAdapterPosition() + " to: " + target.getAdapterPosition());
            }
            @Override
            public void onItemDragEnd(RecyclerView.ViewHolder viewHolder, int pos) {
                 // Endpoint of item drag
                Log.d(TAG, "drag end");
            }
        };

OnItemSwipeListener onItemSwipeListener = new OnItemSwipeListener() {
            @Override
            public void onItemSwipeStart(RecyclerView.ViewHolder viewHolder, int pos) {
                 // Starting position of item sliding
                Log.d(TAG, "view swiped start: " + pos);
            }
            @Override
            public void clearView(RecyclerView.ViewHolder viewHolder, int pos) {
                 // Restoring position of item after sliding
                Log.d(TAG, "View reset: " + pos);
            }
            @Override
            public void onItemSwiped(RecyclerView.ViewHolder viewHolder, int pos) {
                 // Removal position of item sliding
                Log.d(TAG, "View Swiped: " + pos);
            }
            @Override
            public void onItemSwipeMoving(Canvas canvas, RecyclerView.ViewHolder viewHolder,
                                          float dX, float dY, boolean isCurrentlyActive) {
                 // item sliding process
                canvas.drawColor(ContextCompat.getColor(ItemDragAndSwipUseActivity.this,R.color.colorKbtt));
            }
        };
ItemDragAndSwipeCallback itemDragAndSwipeCallback = new ItemDragAndSwipeCallback(mAdapter);
ItemTouchHelper itemTouchHelper = new ItemTouchHelper(itemDragAndSwipeCallback);
itemTouchHelper.attachToRecyclerView(mRecyclerView);
mItemDragAndSwipeCallback.setSwipeMoveFlags(ItemTouchHelper.START | ItemTouchHelper.END);
// open slide to delete
mAdapter.enableSwipeItem();
mAdapter.setOnItemSwipeListener(onItemSwipeListener);
// open drag
mAdapter.enableDragItem(itemTouchHelper);
mAdapter.setOnItemDragListener(listener);
mRecyclerView.setAdapter(mAdapter);3. Implementing Recyclerview to listen for events

BRVAH To provide us with a comprehensive item and item sub-View monitoring events, we only need to inherit the Adapter provided by BRVAH, and call the corresponding listener through xxAdapter. We need to register the corresponding listener events in the corresponding item sub-View in xxAadapter before setting up the listener view.
Code snippet:
3.1 Handling of Monitoring Events for item
Add directly to Activity
item click event
adapter.setOnItemClickListener(new BaseQuickAdapter.OnItemClickListener() {
            @Override
            public void onItemClick(BaseQuickAdapter adapter, View view, int position) {
                Log.d(TAG, "onItemClick: ");
                Toast.makeText(ItemClickActivity.this, "onItemClick" + position, Toast.LENGTH_SHORT).show();
            }
        });
item monitor events
adapter.setOnItemLongClickListener(new BaseQuickAdapter.OnItemLongClickListener() {
            @Override
            public boolean onItemLongClick(BaseQuickAdapter adapter, View view, int position) {
                Log.d(TAG, "onItemLongClick: ");
                Toast.makeText(ItemClickActivity.this, "onItemLongClick" + position, Toast.LENGTH_SHORT).show();
                return false;
            }
        });
3.2 Handling of Monitoring Events for item Neutron View
First, you need to register the listening events for the child View in the xxAdapter.
Click on the listening event
 @Override
    protected void convert(BaseViewHolder viewHolder, Status item) {
        viewHolder.setText(R.id.tweetName, item.getUserName())
                .setText(R.id.tweetText, item.getText())
                .setText(R.id.tweetDate, item.getCreatedAt())
                .setVisible(R.id.tweetRT, item.isRetweet())
                .addOnClickListener(R.id.tweetAvatar)
                .addOnClickListener(R.id.tweetName)
                .linkify(R.id.tweetText);

    }
Chang Ying Monitoring Event
 @Override
    protected void convert(BaseViewHolder helper, Status item) {
        helper.setText(R.id.tweetName, item.getUserName())
                .setText(R.id.tweetText, item.getText())
                .setText(R.id.tweetDate, item.getCreatedAt())
                .setVisible(R.id.tweetRT, item.isRetweet())
                .addOnLongClickListener(R.id.tweetText)
                .linkify(R.id.tweetText);

    }
Then set the corresponding sub-View listening event in Activity
Click Events
adapter.setOnItemChildClickListener(new BaseQuickAdapter.OnItemChildClickListener() {
            @Override
            public boolean onItemChildClick(BaseQuickAdapter adapter, View view, int position) {
                Log.d(TAG, "onItemChildClick: ");
                Toast.makeText(ItemClickActivity.this, "onItemChildClick" + position, Toast.LENGTH_SHORT).show();
                return false;
            }
        });
Sub View Long by Event
adapter.setOnItemChildLongClickListener(new BaseQuickAdapter.OnItemChildLongClickListener() {
            @Override
            public void onItemChildLongClick(BaseQuickAdapter adapter, View view, int position) {
                Log.d(TAG, "onItemChildLongClick: ");
                Toast.makeText(ItemClickActivity.this, "onItemChildLongClick" + position, Toast.LENGTH_SHORT).show();
            }
        });
4. Realize Recyclerview refresh

List drop-down refresh and upload are the most commonly used. Although BRVAH also provides refresh function, it only uploads more, and the style is fixed. Swipe Refresh Layout is also used to implement the drop-down refresh, which is easy to understand, because BRVAH is mainly for the service of Adapter, so here it is simply said that download BRVAH is more used about upload.
After setting up xxAdapter according to BRVAH, in Activity, let the class implement BaseQuickAdapter.RequestLoadMoreListener interface, rewrite the onLoadMoreRequested() method, call mAdapter.addData() in the method to add new data, and then set mAdapter.loadMoreComplete(), after loading all the data, set mAdapter.loadMoreEnd(false) to display data loading. Complete.
@Override
    public void onLoadMoreRequested() {
        mSwipeRefreshLayout.setEnabled(false);
        if (loadCount < 2) {
            final  List<MultipleItem> data = DataServer.getRefreshItemData(getServerData());
            mAdapter.addData(data);
            mAdapter.loadMoreComplete();
            loadCount+=1;
        } else {
            mAdapter.loadMoreEnd(false); // Display loaded
        }
        // Setting drop-down refresh effect
        mSwipeRefreshLayout.setEnabled(true);
    }
There is also the pull-down refresh, so that the pull-up load more failure.
mAdapter.setEnableLoadMore(true);5. Implement Recyclerview to add Section Header View
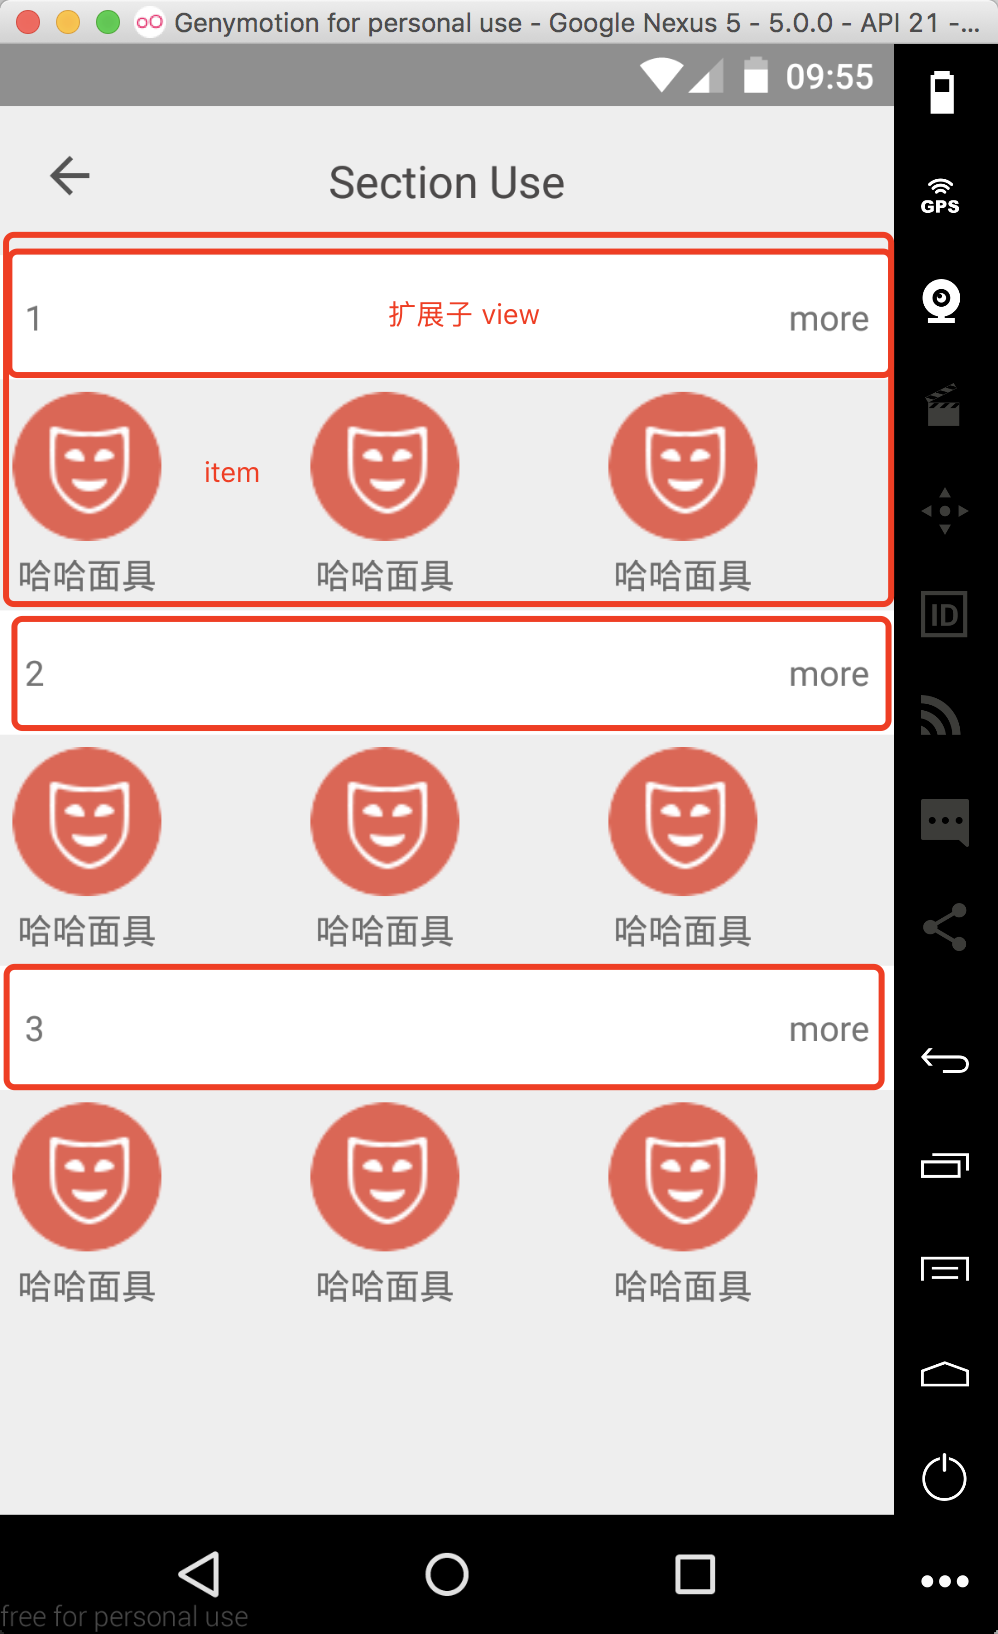
Set the MySection class to inherit SectionEntity and create different constructors to set whether the item has a header. In adapter, the convertHead() method is added to load the headdata. In Activity, different MySection objects are created according to the data to join the collection and set to adapter.
public class MySection  extends SectionEntity<String>{
    private boolean isMore;
    public MySection(boolean isHeader, String header,boolean isMore) {
        super(isHeader, header);
        this.isMore = isMore;
    }
    public MySection(String s) {
        super(s);
    }
    public void setMore(boolean more) {
        isMore = more;
    }
}
In adapter, the construction method needs to pass in two different layout ids, the first is the layout id of item, the second is the head. The data of item is loaded in the convert() method, and the data of head is loaded in the convertHead() method.
public class SectionAdpater extends BaseSectionQuickAdapter<MySection,BaseViewHolder> {

    public SectionAdpater(int layoutResId, int sectionHeadResId, List<MySection> data) {
        super(layoutResId, sectionHeadResId, data);
    }
    // Loading head data
    @Override
    protected void convertHead(BaseViewHolder helper, MySection item) {
        helper.setText(R.id.title_tv,item.header);
        helper.addOnClickListener(R.id.more_btn);
    }
     // Loading item data
    @Override
    protected void convert(BaseViewHolder helper, MySection item) {

    }
}
In Activity
...
// Part of the code
mRecyclerView = (RecyclerView) findViewById(R.id.recyclerview);
        mRecyclerView.setLayoutManager(new GridLayoutManager(this,3));
        mData = getData(3);
SectionAdpater sectionAdpater = new SectionAdpater(R.layout.item_section_content,
                R.layout.def_section_head, mData);

...
    // False data
    private List<MySection> getData(int size) {
        ArrayList<MySection> data = new ArrayList<>(size);
        data.add(new MySection(true,"1",true));
        for (int i =0;i < size;i++) {
            data.add(new MySection("haha"));
        }
        data.add(new MySection(true,"2",true));
        for (int i =0;i < size;i++) {
            data.add(new MySection("haha"));
        }
        data.add(new MySection(true,"3",true));
        for (int i =0;i < size;i++) {
            data.add(new MySection("haha"));
        }
        return data;
    }
Different styles are determined according to the data, and item layout is set by different construction methods.
Important reference: BRVAH