
Build a high performance + high availability ES architecture by separating the data, ingest, master roles of elasticsearch
Author: "The Wolf of Britain", welcome to reprint and submit
Catalog
_Purpose
_Architecture
_Step description
_elasticsearch-data deployment
_elasticsearch-ingest deployment
_elasticsearch-master deployment
purpose
In the first "EFK Tutorial-Quick Start Guide", the installation and deployment of EFK is described. The architecture of ES is three nodes, master, ingest, data roles are deployed on three servers at the same time.
In this article, roles are deployed separately and three nodes are deployed for each role to maximize performance while ensuring high availability.
_elasticsearch master node: for scheduling, deployed with a normal performance server
_elasticsearch ingest node: for data preprocessing, deployed with a good performance server
_elasticsearch data node: for data storage on the ground, deployed on servers with good storage performance
If you don't know where to look for EFK Tutorials - Quick Start Guide, search in mainstream search engines:
Quick Start Guide for Slow Brother EFK Tutorials
 perhaps
 Small Slow Column EFK Tutorial EFK Installation Deployment Configuration Based on Multi-Node ES
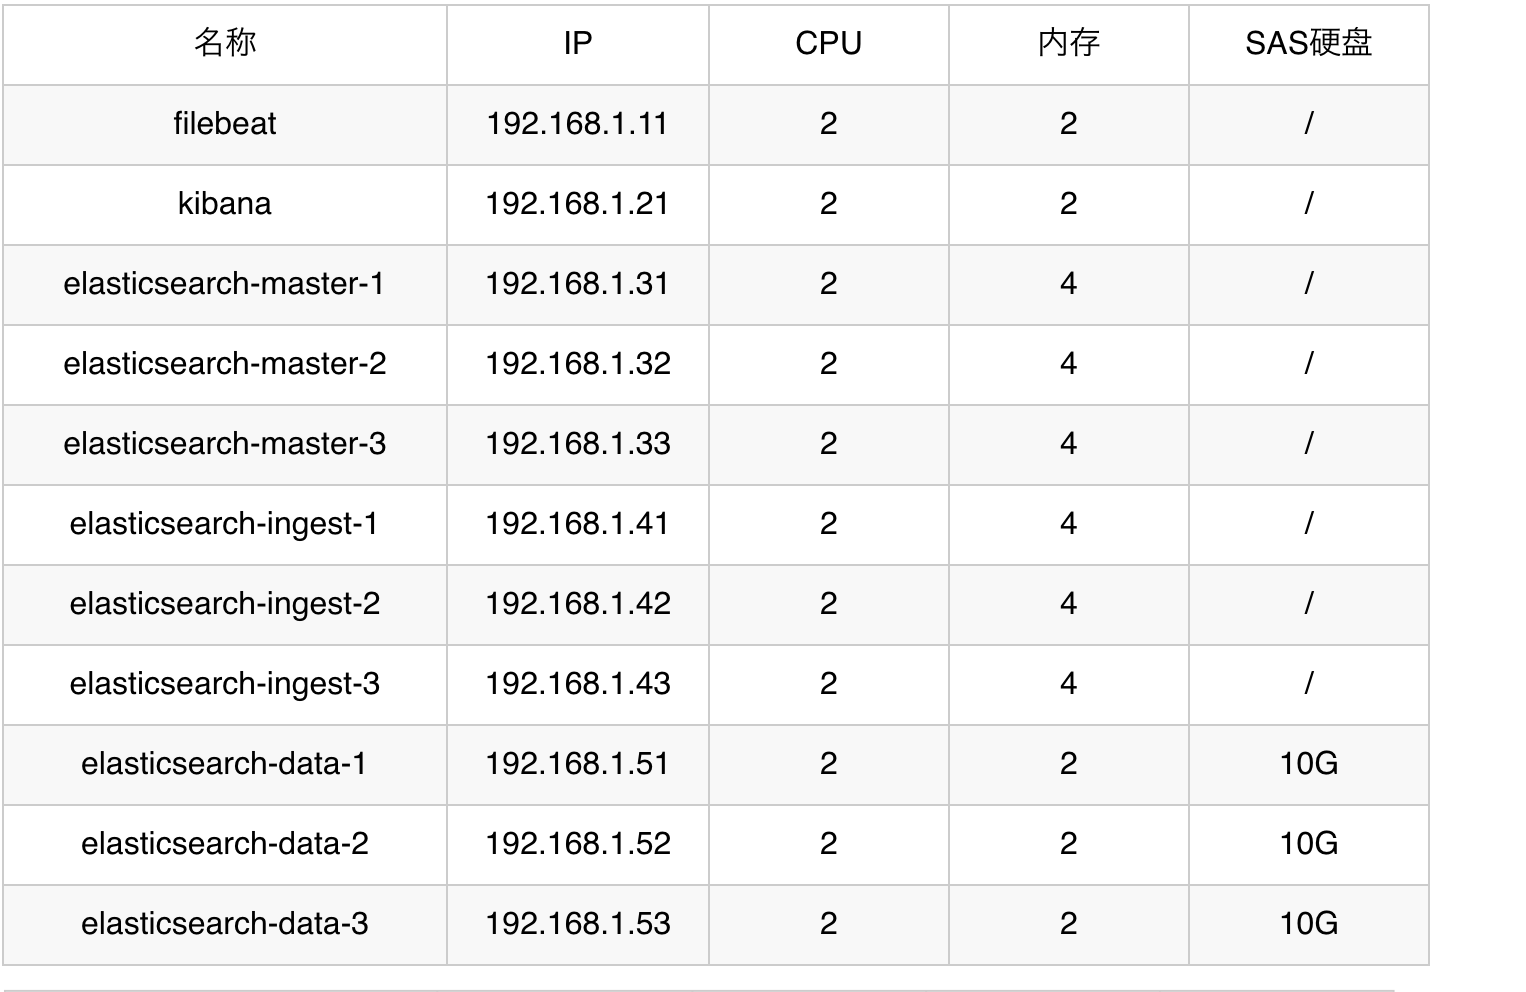
Framework

Server Configuration
Note: The architecture here is an extension of the previous article EFK Tutorial-Quick Start Guide, so please follow the EFK Tutorial-Quick Start Guide to complete the deployment first
Step description
1_Deploy 3 data nodes to join the original cluster
2_Deploy 3 ingest nodes to join the original cluster
3_Migrate the original es index to the data node
4_Transform the original es node to master node
elasticsearch-data deployment
Previously, the underlying elasticsearch architecture was completed, and now three additional storage nodes need to be added to the cluster, with master and ingest turned off
elasticsearch-data installation: all three perform the same installation steps
tar -zxvf elasticsearch-7.3.2-linux-x86_64.tar.gz
mv elasticsearch-7.3.2 /opt/elasticsearch
useradd elasticsearch -d /opt/elasticsearch -s /sbin/nologin
mkdir -p /opt/logs/elasticsearch
chown elasticsearch.elasticsearch /opt/elasticsearch -R
chown elasticsearch.elasticsearch /opt/logs/elasticsearch -R
# Data Disk Requires Elicsearch Write Permission
chown elasticsearch.elasticsearch /data/SAS -R

# Limit the number of VMAs a process can have (virtual memory regions) to more than 262144, or elasticsearch will report max virtual memory areas vm.max_map_count [65535] is too low, increase to at least [262144]
echo "vm.max_map_count = 655350" >> /etc/sysctl.conf
sysctl -p
elasticsearch-data configuration
▷ 192.168.1.51 /opt/elasticsearch/config/elasticsearch.yml
cluster.name: my-application
node.name: 192.168.1.51
# Data Disk Location, if there are multiple hard disk locations, separated by ","
path.data: /data/SAS
path.logs: /opt/logs/elasticsearch
network.host: 192.168.1.51

discovery.seed_hosts: ["192.168.1.31","192.168.1.32","192.168.1.33"]
cluster.initial_master_nodes: ["192.168.1.31","192.168.1.32","192.168.1.33"]
http.cors.enabled: true
http.cors.allow-origin: "*"

# Turn off master function
node.master: false
# Turn off ingest function
node.ingest: false
# Turn on data functionality
node.data: true
▷ 192.168.1.52 /opt/elasticsearch/config/elasticsearch.yml
cluster.name: my-application
node.name: 192.168.1.52
# Data Disk Location, if there are multiple hard disk locations, separated by ","
path.data: /data/SAS
path.logs: /opt/logs/elasticsearch
network.host: 192.168.1.52

discovery.seed_hosts: ["192.168.1.31","192.168.1.32","192.168.1.33"]
cluster.initial_master_nodes: ["192.168.1.31","192.168.1.32","192.168.1.33"]
http.cors.enabled: true
http.cors.allow-origin: "*"

# Turn off master function
node.master: false
# Turn off ingest function
node.ingest: false
# Turn on data functionality
node.data: true
▷ 192.168.1.53 /opt/elasticsearch/config/elasticsearch.yml
cluster.name: my-application
node.name: 192.168.1.53
# Data Disk Location, if there are multiple hard disk locations, separated by ","
path.data: /data/SAS
path.logs: /opt/logs/elasticsearch
network.host: 192.168.1.53

discovery.seed_hosts: ["192.168.1.31","192.168.1.32","192.168.1.33"]
cluster.initial_master_nodes: ["192.168.1.31","192.168.1.32","192.168.1.33"]
http.cors.enabled: true
http.cors.allow-origin: "*"

# Turn off master function
node.master: false
# Turn off ingest function
node.ingest: false
# Turn on data functionality
node.data: true
elasticsearch-data startup
sudo -u elasticsearch /opt/elasticsearch/bin/elasticsearch
elasticsearch cluster state
curl "http://192.168.1.31:9200/_cat/health?v"

elasticsearch-data status
curl "http://192.168.1.31:9200/_cat/nodes?v"

Elicsearch-data parameter description
status: green  # Cluster health state
node.total: 6  # There are six submachines in the cluster
node.data: 6  # Storage with 6 nodes
node.role: d  # Only have data roles
node.role: i  # Only ingest role
node.role: m  # Only have master role
node.role: mid  # Supporting master, ingest, data roles
elasticsearch-ingest deployment
Three new ingest nodes need to be added to the cluster, while turning off master and data functionality
elasticsearch-ingest installation: all 3 es perform the same installation steps
tar -zxvf elasticsearch-7.3.2-linux-x86_64.tar.gz
mv elasticsearch-7.3.2 /opt/elasticsearch
useradd elasticsearch -d /opt/elasticsearch -s /sbin/nologin
mkdir -p /opt/logs/elasticsearch
chown elasticsearch.elasticsearch /opt/elasticsearch -R
chown elasticsearch.elasticsearch /opt/logs/elasticsearch -R

# Limit the number of VMAs a process can have (virtual memory regions) to more than 262144, or elasticsearch will report max virtual memory areas vm.max_map_count [65535] is too low, increase to at least [262144]
echo "vm.max_map_count = 655350" >> /etc/sysctl.conf
sysctl -p
elasticsearch-ingest configuration
▷ 192.168.1.41 /opt/elasticsearch/config/elasticsearch.yml
cluster.name: my-application
node.name: 192.168.1.41
path.logs: /opt/logs/elasticsearch
network.host: 192.168.1.41

discovery.seed_hosts: ["192.168.1.31","192.168.1.32","192.168.1.33"]
cluster.initial_master_nodes: ["192.168.1.31","192.168.1.32","192.168.1.33"]
http.cors.enabled: true
http.cors.allow-origin: "*"

# Turn off master function
node.master: false
# Turn on ingest function
node.ingest: true
# Turn off data functionality
node.data: false
▷ 192.168.1.42 /opt/elasticsearch/config/elasticsearch.yml
cluster.name: my-application
node.name: 192.168.1.42
path.logs: /opt/logs/elasticsearch
network.host: 192.168.1.42

discovery.seed_hosts: ["192.168.1.31","192.168.1.32","192.168.1.33"]
cluster.initial_master_nodes: ["192.168.1.31","192.168.1.32","192.168.1.33"]
http.cors.enabled: true
http.cors.allow-origin: "*"

# Turn off master function
node.master: false
# Turn on ingest function
node.ingest: true
# Turn off data functionality
node.data: false
▷ 192.168.1.43 /opt/elasticsearch/config/elasticsearch.yml
cluster.name: my-application
node.name: 192.168.1.43
path.logs: /opt/logs/elasticsearch
network.host: 192.168.1.43

discovery.seed_hosts: ["192.168.1.31","192.168.1.32","192.168.1.33"]
cluster.initial_master_nodes: ["192.168.1.31","192.168.1.32","192.168.1.33"]
http.cors.enabled: true
http.cors.allow-origin: "*"

# Turn off master function
node.master: false
# Turn on ingest function
node.ingest: true
# Turn off data functionality
node.data: false
elasticsearch-ingest startup
sudo -u elasticsearch /opt/elasticsearch/bin/elasticsearch
elasticsearch cluster state
curl "http://192.168.1.31:9200/_cat/health?v"
elasticsearch-ingest status

curl "http://192.168.1.31:9200/_cat/nodes?v"

Explanation of the elasticsearch-ingest parameter
status: green  # Cluster health state
node.total: 9  # Cluster with 9 subcomputers
node.data: 6  # Storage with 6 nodes
node.role: d  # Only have data roles
node.role: i  # Only ingest role
node.role: m  # Only have master role
node.role: mid  # Supporting master, ingest, data roles
elasticsearch-master deployment
First, change the three es (192.168.1.31, 192.168.1.32, 192.168.1.33) deployed in the previous EFK Tutorial-Quick Start Guide to master-only functionality, so you need to migrate the indexed data on these three sets to the data node you are doing this time.
1_Index migration: Be sure to do this by placing the previous index on the data node
curl -X PUT "192.168.1.31:9200/*/_settings?pretty" -H 'Content-Type: application/json' -d'
{
  "index.routing.allocation.include._ip": "192.168.1.51,192.168.1.52,192.168.1.53"
}'
2_Confirm the current index storage location: Confirm that all indexes are not on 192.168.1.31, 192.168.1.32, 192.168.1.33 nodes
curl "http://192.168.1.31:9200/_cat/shards?h=n"

elasticsearch-master configuration
Important: To modify the configuration and restart the process, you need to execute one by one. To ensure that the first one succeeds, you need to execute the next one.How to restart the process: Since in the previous article, EFK Tutorial - Quick Start Guide, you ran in the foreground to execute a command, so just exit and start ctrl - c. The start command is as follows
sudo -u elasticsearch /opt/elasticsearch/bin/elasticsearch
▷ 192.168.1.31 /opt/elasticsearch/config/elasticsearch.yml
cluster.name: my-application
node.name: 192.168.1.31
path.logs: /opt/logs/elasticsearch
network.host: 192.168.1.31

discovery.seed_hosts: ["192.168.1.31","192.168.1.32","192.168.1.33"]
cluster.initial_master_nodes: ["192.168.1.31","192.168.1.32","192.168.1.33"]
http.cors.enabled: true
http.cors.allow-origin: "*"

#Turn on master function
node.master: true
#Turn off ingest function
node.ingest: false
#Turn off data functionality
node.data: false
▷ 192.168.1.32 /opt/elasticsearch/config/elasticsearch.yml
cluster.name: my-application
node.name: 192.168.1.32
path.logs: /opt/logs/elasticsearch
network.host: 192.168.1.32

discovery.seed_hosts: ["192.168.1.31","192.168.1.32","192.168.1.33"]
cluster.initial_master_nodes: ["192.168.1.31","192.168.1.32","192.168.1.33"]
http.cors.enabled: true
http.cors.allow-origin: "*"

#Turn on master function
node.master: true
#Turn off ingest function
node.ingest: false
#Turn off data functionality
node.data: false
▷ 192.168.1.33 /opt/elasticsearch/config/elasticsearch.yml
cluster.name: my-application
node.name: 192.168.1.33
path.logs: /opt/logs/elasticsearch
network.host: 192.168.1.33

discovery.seed_hosts: ["192.168.1.31","192.168.1.32","192.168.1.33"]
cluster.initial_master_nodes: ["192.168.1.31","192.168.1.32","192.168.1.33"]
http.cors.enabled: true
http.cors.allow-origin: "*"

#Turn on master function
node.master: true
#Turn off ingest function
node.ingest: false
#Turn off data functionality
node.data: false
elasticsearch cluster state
curl "http://192.168.1.31:9200/_cat/health?v"

elasticsearch-master status
curl "http://192.168.1.31:9200/_cat/nodes?v"

At this point, when "mid" no longer appears on all servers in the node.role, everything is done successfully.