1. Download the installation package
wget https://artifacts.elastic.co/downloads/elasticsearch/elasticsearch-6.8.3.tar.gz
After downloading, decompress.
The address I decompressed is: / usr / local / elastic search 6.8.3
2. Creating Users
- es cannot run as root, so you need to create users
adduser elastic #Create elastic users
- Create esdata in the es installation directory
cd /usr/local/elasticsearch6.8.3
mkdir -p  esdata/data
mkdir -p  esdata/log
- Grant elastic User Rights
chown -R elastic elasticsearch6.8.3
3. Configuring es nodes
- Modify configuration files
vi /usr/local/elasticsearch6.8.3/config/elasticsearch.yml
- The specific configuration is as follows
# ======================== Elasticsearch Configuration =========================
#
# NOTE: Elasticsearch comes with reasonable defaults for most settings.
#       Before you set out to tweak and tune the configuration, make sure you
#       understand what are you trying to accomplish and the consequences.
#
# The primary way of configuring a node is via this file. This template lists
# the most important settings you may want to configure for a production cluster.
#
# Please consult the documentation for further information on configuration options:
# https://www.elastic.co/guide/en/elasticsearch/reference/index.html
#
# ---------------------------------- Cluster -----------------------------------
#
# Use a descriptive name for your cluster:
#
cluster.name: htkj-es #The name of the cluster
#
# ------------------------------------ Node ------------------------------------
#
# Use a descriptive name for the node:
#
node.name: htkj101 #Name of node
#
# Add custom attributes to the node:
#
#node.attr.rack: r1
#
# ----------------------------------- Paths ------------------------------------
#
# Path to directory where to store the data (separate multiple locations by comma):
#
path.data: /usr/local/elasticsearch6.8.3/esdata/data #data Path
#
# Path to log files:
#
path.logs: /usr/local/elasticsearch6.8.3/esdata/log  #log Path
#
# ----------------------------------- Memory -----------------------------------
#
# Lock the memory on startup:
#
bootstrap.memory_lock: true #ES performs poorly in memory switching. Setting this prevents memory switching
#
# Make sure that the heap size is set to about half the memory available
# on the system and that the owner of the process is allowed to use this
# limit.
#
# Elasticsearch performs poorly when the system is swapping the memory.
#
# ---------------------------------- Network -----------------------------------
#
# Set the bind address to a specific IP (IPv4 or IPv6):
#
network.host: htkj101 #ip address of node
#
# Set a custom port for HTTP:
#
http.port: 9200   #Port number
http.cors.enabled: true #head plug-in discovery node
http.cors.allow-origin: "*" #head plug-in discovery node
#
# For more information, consult the network module documentation.
#
# --------------------------------- Discovery ----------------------------------
#
# Pass an initial list of hosts to perform discovery when new node is started:
# The default list of hosts is ["127.0.0.1", "[::1]"]
#
discovery.zen.ping.unicast.hosts: ["htkj102", "htkj103"]#The other nodes of the cluster, ip, have only one node to write native ip
#
# Prevent the "split brain" by configuring the majority of nodes (total number of master-eligible nodes / 2 + 1):
#
discovery.zen.minimum_master_nodes: 2 #To prevent brain fissure, the number of nodes allocated is the number of clusters / 2 + 1. I have three nodes allocated, so it is 3/2 + 1 = 2.
#
# For more information, consult the zen discovery module documentation.
#
# ---------------------------------- Gateway -----------------------------------
#
# Block initial recovery after a full cluster restart until N nodes are started:
#
gateway.recover_after_nodes: 3  #Initial recovery is prevented after the cluster is fully restarted until three nodes are started
#
# For more information, consult the gateway module documentation.
#
# ---------------------------------- Various -----------------------------------
#
# Require explicit names when deleting indices:
#
action.destructive_requires_name: true #When deleting an index, you need to have a clear name
4. Configuring System Parameters
- Modify/etc/security/limits.conf
vi /etc/security/limits.conf

#Modify the following items and add those that do not.
* soft nofile 65536
* hard nofile 131072
* soft nproc 2048
* hard nproc 4096
-
Modify / etc/sysctl.conf, add the following line, and restart the machine
vm.max_map_count=262144
5. boot
- After restarting the machine, start the nodes of es
su elastic #es startup does not use root by default
cd /usr/local/elasticsearch6.8.3/bin
./elasticsearch -d
- The browser accesses the ip:port and the following information indicates that the installation was successful
{
  "name" : "htkj101",
  "cluster_name" : "htkj-es",
  "cluster_uuid" : "_na_",
  "version" : {
    "number" : "6.8.3",
    "build_flavor" : "default",
    "build_type" : "tar",
    "build_hash" : "0c48c0e",
    "build_date" : "2019-08-29T19:05:24.312154Z",
    "build_snapshot" : false,
    "lucene_version" : "7.7.0",
    "minimum_wire_compatibility_version" : "5.6.0",
    "minimum_index_compatibility_version" : "5.0.0"
  },
  "tagline" : "You Know, for Search"
}
6. Deploy the head plug-in
- Download the head plug-in
#The head plug-in only needs to be deployed on one node to select the htkj101 node here
wget https://github.com/mobz/elasticsearch-head/archive/master.zip
unzip elasticsearch-head-master.zip
- Installation environment
cd /usr/local/elasticsearch-head-master
#The following operations are performed in the elastic search-head-master directory
su root #Under the root role
curl -sL https://rpm.nodesource.com/setup_8.x | bash -
sudo yum install gcc-c++ make
curl -sL https://dl.yarnpkg.com/rpm/yarn.repo | sudo tee /etc/yum.repos.d/yarn.repo
yum -y install yarn nodejs git
npm install -g grunt-cli
- Install grunt
npm install grunt --save-dev
npm install
- Modify Gruntfile.js
vi /usr/local/elasticsearch-head-master/Gruntfile.js
#Amend the following paragraph:
        connect: {
          server: {
          options: {
            port: 9100,
            hostname: '*', #Add the line hostname
            base: '.',
            keepalive: true
            }
          }
        }
- Start the head service
#Start the service under the elastic search-head-master directory
cd /usr/local/elasticsearch-head-master
grunt server &
- The following information appears
Running "connect:server" (connect) task
Waiting forever...
Started connect web server on http://localhost:9100
- Open browser, access http://ip:9100 (ip is the node IP that installs the head plug-in)
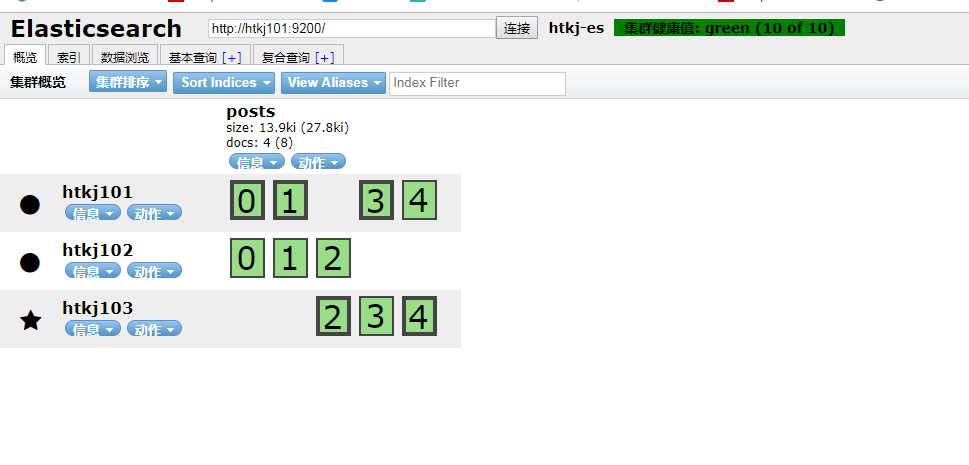
- Successful installation