start
Hello everyone, I believe that if you use Vue ecological development project, you should have heard of or are using Pinia state management library. If you haven't contacted Pinia, this article can help you get started quickly and how to use it more gracefully in enterprise projects.
This article first explains how to understand and use Pinia, and finally how to integrate Pinia into the project, which is suitable for most readers. As for studying Pinia's source code and other advanced popular science, another article will be opened for detailed description. In addition, all the demo s in this article are specially opened GitHub project To save, students in need can take it down and practice it. 🌹🌹
Meet Pinia
Pinia pronunciation: ['pi ː n ə], It is a lightweight state management library recommended by Vue's official team to replace Vuex. Its original design idea was to let Vue Store have one Composition API State management library, and can support vue2 The Option API of version x and the setup Composition API development mode of version Vue3 are fully compatible with Typescript writing (which is also one of the important factors superior to Vuex), and are applicable to all Vue projects.
Compared with Vuex, Pinia has the following advantages:
- Full TypeScript support: adding typescripts is easier than adding typescripts in Vuex
- Extremely lightweight (about 1KB)
- store actions are scheduled as regular function calls instead of using the dispatch method or MapAction helper functions, which is common in Vuex
- Support multiple stores
- Support Vue devtools, SSR and webpack code splitting
Pinia and Vuex code segmentation mechanism
Part of the above Pinia lightness is reflected in its code segmentation mechanism.
For example, a project has three stores "user, job and pay", and another two routing pages "home page and personal center page". The home page uses the job store and the personal center page uses the user store. Pinia and Vuex are used to manage their status respectively.
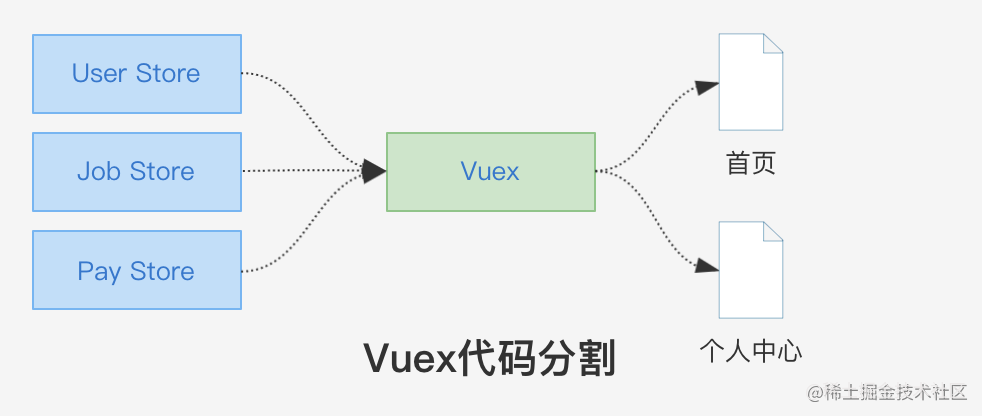
Let's first look at the code segmentation of vuex: when packaging, vuex will combine and package three stores. When vuex is used on the home page, this package will be introduced into the home page for packaging, and finally output a js chunk. The problem is that the home page only needs one store, but the other two unrelated stores are also packaged, resulting in a waste of resources.
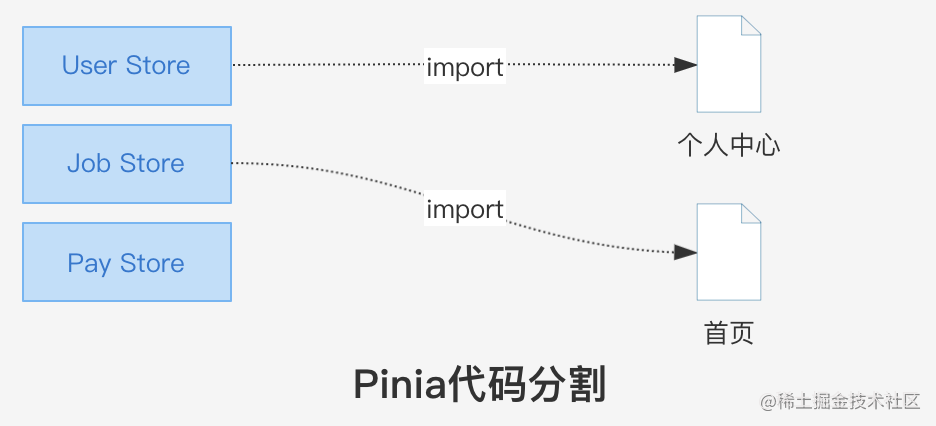
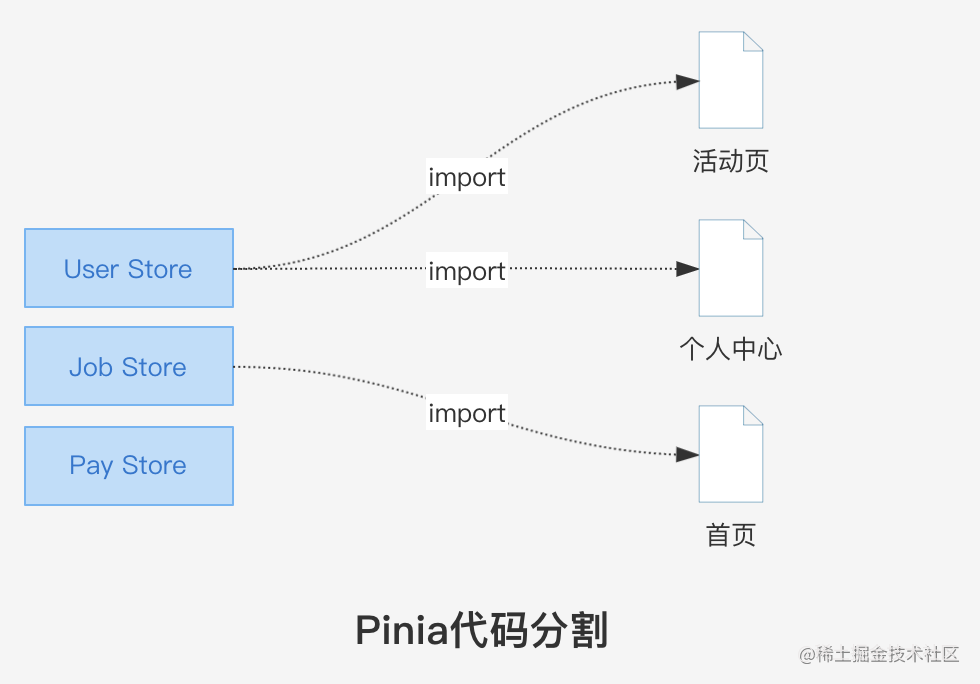
Pinia's code segmentation: when packaging, Pinia will check the reference dependency. When the job store is used on the home page, packaging will only merge the used store and the page and output one js chunk, and the other two stores are not coupled in it. Pinia can do this because its design is separated from the store, which solves the coupling problem of the project.
General usage of Pinia
Without delay, start using Pinia "this article uses Vue3's setup Composition API development mode by default".
If you are familiar with Pinia, you can skip this part 👻
1. Installation
yarn add pinia
# or with npm
npm install pinia
2. Mount global instance
import { createPinia } from 'pinia'

app.use(createPinia())
3. Create the first store
In Src / store / counterforoptions TS create your store. There are two store modes defined:
Using the options API mode definition, this mode is similar to the component model of vue2, and it is also a more friendly programming mode for vue2 technology stack developers.
import { defineStore } from 'pinia';

// Using the options API schema definition
export const useCounterStoreForOption = defineStore('counterForOptions', {
  // Define state
  state: () => {
    return { count1: 1 };
  },
  // Define action
  actions: {
    increment() {
      this.count1++;
    }
  },
  // Define getters
  getters: {
    doubleCount(state) {
      return state.count1 * 2;
    }
  }
});
The use of setup mode definition conforms to the Vue3 setup programming mode to make the structure more flat. I recommend this method.
import { ref } from 'vue';
import { defineStore } from 'pinia';

// Using setup mode definition
export const useCounterStoreForSetup = defineStore('counterForSetup', () => {
  const count = ref<number>(1);
  function increment() {
    count.value++;
  }

  function doubleCount() {
    return count.value * 2;
  }

  return { count, increment, doubleCount };
});
The effect of the above two definitions is the same. We use the defineStore method to define a store, which defines a state of count, an increment action and a getters of doubleCount respectively. The entry is used to get the state of the business, and the state of the call is used to get the result of the global state.
The reason why the first method is used is to write the getters and action keywords to distinguish, because it can be defined through the options API mode mapState(),mapActions() And other methods to obtain corresponding items; But the second method can be obtained directly (described in detail below).
4. Calling store by business component
In Src / components / piniabasicsetup Create a component under the Vue directory.
<script setup lang="ts" name="component-PiniaBasicSetup">
import { storeToRefs } from 'pinia';
import { useCounterStoreForSetup } from '@/store/counterForSetup';

// setup composition API mode
const counterStoreForSetup = useCounterStoreForSetup();
const { count } = storeToRefs(counterStoreForSetup);
const { increment, doubleCount } = counterStoreForSetup;
</script>

<template>
  <div class="box-styl">
    <h1>Setup pattern</h1>
    <p class="section-box">
      Pinia of state: count = <b>{{ count }}</b>
    </p>
    <p class="section-box">
      Pinia of getters: doubleCount() = <b>{{ doubleCount() }}</b>
    </p>
    <div class="section-box">
      <p>Pinia of action: increment()</p>
      <button @click="increment">Point me</button>
    </div>
  </div>
</template>

<style lang="less" scoped>
  .box-styl {
    margin: 10px;
    .section-box {
      margin: 20px auto;
      width: 300px;
      background-color: #d7ffed;
      border: 1px solid #000;
    }
  }
</style>- Pinia's calling mechanism in setup mode is to install first and then call.
- install reads as follows: const counterStoreForSetup = useCounterStoreForSetup();, useCounterStoreForSetup is the variable you define the store;
- Call directly with counterstoreforsetup xxx (xxx includes: state, getters and action).
- The state in the code is obtained by deconstruction assignment. In order to maintain the responsive nature of state, it needs to be wrapped with storeToRefs.
Vue2 compatible Options API can be called in here.
5. Good programming habits
The change of state is handled by action: in the above example, counterStoreForSetup has a pinia instance attribute called $state, which can directly change the value of state, but it is not recommended to do so. First, it is difficult to maintain. When there are many components, a hidden state change is made, and the whole development team helps you check it; The second is to destroy the store encapsulation, which is difficult to transplant to other places. Therefore, for the sake of your reputation and safety, please stop coding 😇😇.
Replace pinia instance attribute with hook: there are many methods starting with $in the counter storeforsetup object after install ation. In fact, most of these methods can be introduced and replaced through hook.
Other thoughts to add
Enterprise project packaging strategy
1. Global registration machine
Duplicate packaging problem
In the above example, we can know that when using store, we should first import the definition of store, and then execute the definition function to instantiate. However, after the project becomes larger and larger, should each component be instantiated when it needs to be used? As mentioned at the beginning of the article, pinia's code segmentation mechanism is to merge and package the pages that reference it. There will be problems like the following example. The user is referenced by multiple pages, and finally the user store is repeatedly packaged.
To solve this problem, we can introduce the concept of "global registration". The method is as follows:
Create main entrance
Create an entry index. In the src/store directory TS, which contains a registration function registerStore(), whose function is to register the stores of the whole project in advance, and finally hang all store instances to the appStore for transparent transmission. In this way, when any component of the project wants to use pinia, just import appStore and get the corresponding store instance.
// src/store/index.ts
import { roleStore } from './roleStore';
import { useCounterStoreForSetup } from '@/store/counterForSetup';
import { useCounterStoreForOption } from '@/store/counterForOptions';

const appStore: any = {};

/**
 * Register app status Library
 */
export const registerStore = () => {
  appStore.roleStore = roleStore();
  appStore.useCounterStoreForSetup = useCounterStoreForSetup();
  appStore.useCounterStoreForOption = useCounterStoreForOption();
};

export default appStore;
Bus registration
In Src / main The TS project bus performs the registration operation:
import { createApp } from 'vue';
import App from './App.vue';
import { createPinia } from 'pinia';
import { registerStore } from '@/store';

const app = createApp(App);

app.use(createPinia());
// Register pinia state management library
registerStore();

app.mount('#app');
Directly used in business components
// src/components/PiniaBasicSetup.vue
<script setup lang="ts" name="component-PiniaBasicSetup">
import { storeToRefs } from 'pinia';
import appStore from '@/store';

// setup composition API mode
const { count } = storeToRefs(appStore.useCounterStoreForSetup);
const { increment, doubleCount } = appStore.useCounterStoreForSetup;
</script>

<template>
  <div class="box-styl">
    <h1>Setup pattern</h1>
    <p class="section-box">
      Pinia of state: count = <b>{{ count }}</b>
    </p>
    <p class="section-box">
      Pinia of getters: doubleCount() = <b>{{ doubleCount() }}</b>
    </p>
    <div class="section-box">
      <p>Pinia of action: increment()</p>
      <button @click="increment">Point me</button>
    </div>
  </div>
</template>
Packaging decoupling
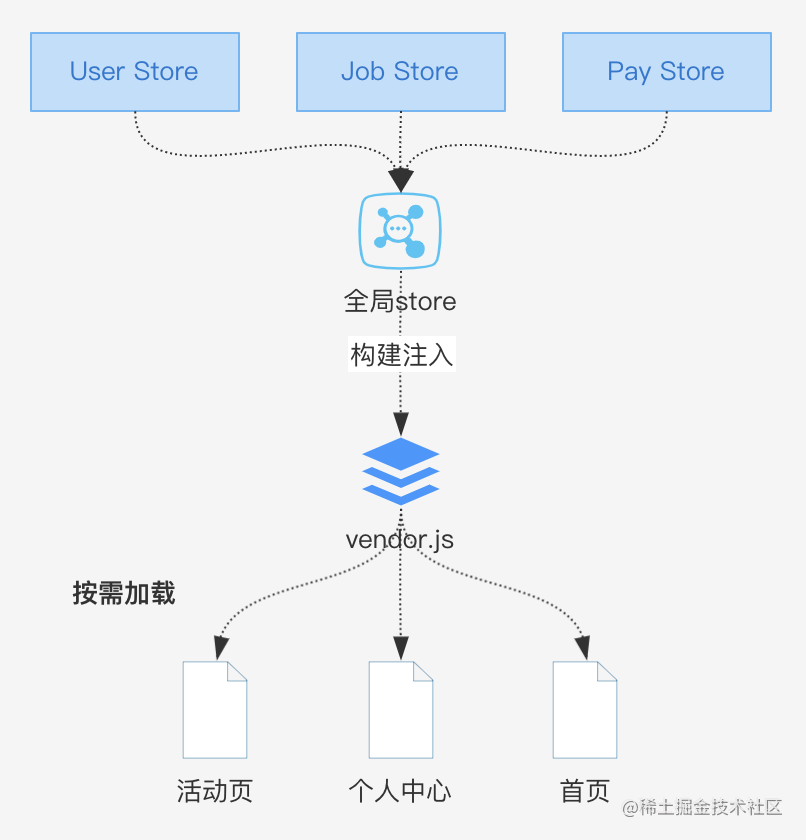
This is not enough. In order to decouple the appStore instance from the project, the appStore should be extracted to the public chunk in vite config. The TS is configured as follows
export default defineConfig(({ command }: ConfigEnv) => {
  return {
    // ... Other configurations

    build: {
      // ... Other configurations

      rollupOptions: {
        output: {
          manualChunks(id) {
            // Package the global library instance of pinia into the vendor to avoid the repeated introduction of resources caused by packaging with the page
            if (id.includes(path.resolve(__dirname, '/src/store/index.ts'))) {
              return 'vendor';
            }
          }
        }
      }
    }
  };
});
After such encapsulation, pinia state library is decoupled. The final project structure diagram is as follows:
2. Store group management
Scene analysis
Do you often encounter the situation that a method needs to update multiple stores in the project? For example, if you want to play a game, there are three classes "warrior, mage and Taoist". In addition, the player character has three stores to control "character attributes, equipment and skills". There is a "transfer" button on the page, which can transfer to other classes. When the player changes his class, the state of the three stores should be changed. How to do it?
- Method 1: create a function in the business component. When you click "transfer", get three store s and update their values.
- Method 2: abstract a new pinia store. There is a "transfer" action in the store. When players change jobs, respond to this action and update the values of the three stores in the action.
In contrast, method 2 is obviously better in terms of encapsulation or business decoupling. To do this, we also benefit from pinia's store independent management feature. We only need to take the abstract store as the parent store and the three stores of "character attributes, equipment and skills" as the unit store, and let the action of the parent store manage its own unit store.
Group level Store creation
Continue on talent, parent store: Src / store / rolestore / index ts
import { defineStore } from 'pinia';
import { roleBasic } from './basic';
import { roleEquipment } from './equipment';
import { roleSkill } from './skill';
import { ROLE_INIT_INFO } from './constants';

type TProfession = 'warrior' | 'mage' | 'warlock';

// The role group gathers three store s of "character attributes, equipment and skills" for unified management
export const roleStore = defineStore('roleStore', () => {
  // Register intra group store s
  const basic = roleBasic();
  const equipment = roleEquipment();
  const skill = roleSkill();

  // Transfer to occupation
  function changeProfession(profession: TProfession) {
    basic.setItem(ROLE_INIT_INFO[profession].basic);
    equipment.setItem(ROLE_INIT_INFO[profession].equipment);
    skill.setItem(ROLE_INIT_INFO[profession].skill);
  }

  return { basic, equipment, skill, changeProfession };
});
Unit Store
3 unit store s:
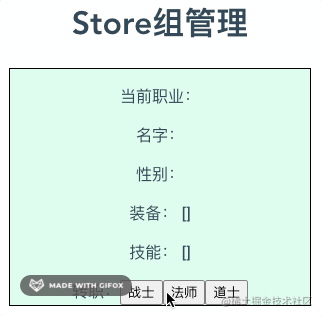
Business component call
<script setup lang="ts" name="component-StoreGroup">
import appStore from '@/store';
</script>

<template>
  <div class="box-styl">
    <h1>Store Group management</h1>
    <div class="section-box">
      <p>
        Current occupation: <b>{{ appStore.roleStore.basic.basic.profession }}</b>
      </p>
      <p>
        name: <b>{{ appStore.roleStore.basic.basic.name }}</b>
      </p>
      <p>
        Gender: <b>{{ appStore.roleStore.basic.basic.sex }}</b>
      </p>
      <p>
        Equipment: <b>{{ appStore.roleStore.equipment.equipment }}</b>
      </p>
      <p>
        skill: <b>{{ appStore.roleStore.skill.skill }}</b>
      </p>
      <span>Transfer:</span>
      <button @click="appStore.roleStore.changeProfession('warrior')">
        warrior
      </button>
      <button @click="appStore.roleStore.changeProfession('mage')">master</button>
      <button @click="appStore.roleStore.changeProfession('warlock')">
        Taoist priest
      </button>
    </div>
  </div>
</template>

<style lang="less" scoped>
.box-styl {
  margin: 10px;
  .section-box {
    margin: 20px auto;
    width: 300px;
    background-color: #d7ffed;
    border: 1px solid #000;
  }
}
</style>
effect
End
For a project, a good state management scheme plays an important role, which can not only make the project thinking clear, but also facilitate the future maintenance and iteration of the project.
Project portal
Finally, all the demo s of this article are specially opened GitHub project To save, students in need can take it down and practice. 🌹🌹