1. Preface
This article is the second part of the introduction of UBOOT command, and then the last article introduces the usage of the remaining commands.
The main commands involved are: disk partition, disk file loading, kernel boot, binary file loading, jump command, disk file system format, etc.
2. UBOOT command
2.1 fatls – lists the files in the specified directory
View help:
TINY4412 # ? fatls
fatls - list files in a directory (default /)
         List a catalog file

Usage:
fatls <interface> <dev[:part]> [directory]

   - list files from 'dev' on 'interface' in a 'directory'
Parameter Description:
<interface>:  mmc or usb;
dev:  Equipment number;
part:  Equipment partition number;
[directory]:  Directory is optional. It can be left blank. Default / catalogue
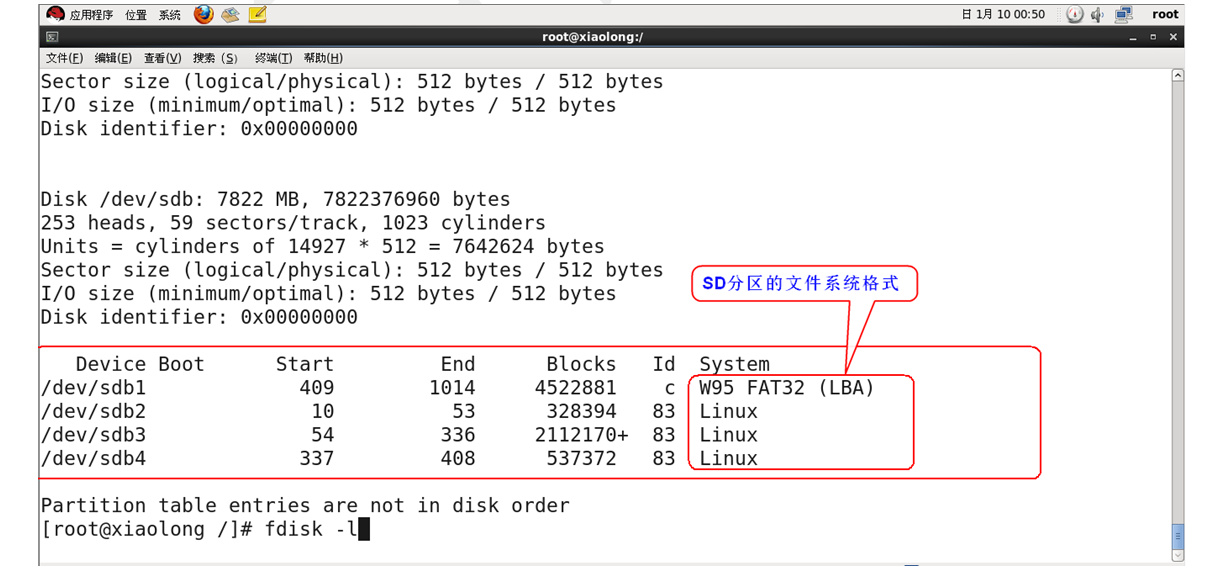
Check the file list in the SD card (before checking, SD needs to have a good partition. You can partition through fdisk, starting after the U-BOOT and kernel address to prevent clearing the U-BOOT and kernel)
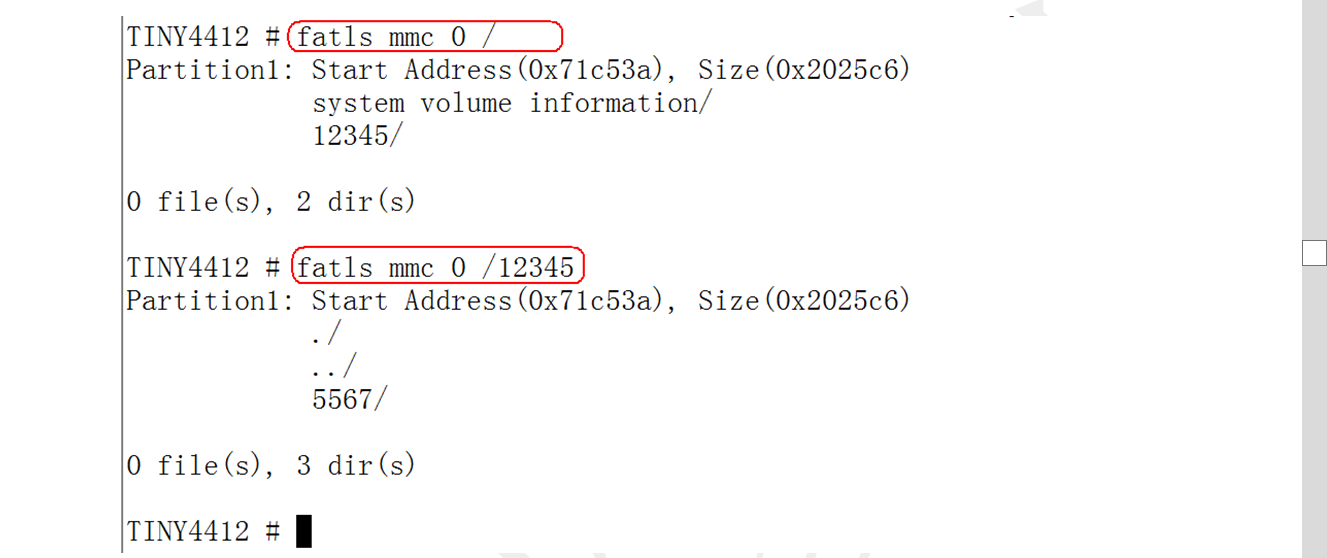
TINY4412 # fatls mmc 0 /
Partition1: Start Address(0x71c53a), Size(0x2025c6)
            system volume information/
            12345/

0 file(s), 2 dir(s)    Share two directories, 0 files----Check the correct
View files in subdirectories:
TINY4412 # fatls mmc 0 /12345
Partition1: Start Address(0x71c53a), Size(0x2025c6)
            ./
            ../
            5567/

0 file(s), 3 dir(s)
2.2 loading a binary file from an MMC file system (fat) to DDR
View help:
TINY4412 # help fatload
fatload - fatload - load binary file from a dos filesystem


Usage:
fatload <interface> <dev[:part]>  <addr> <filename> [bytes]
    - load binary file 'filename' from 'dev' on 'interface'
      to address 'addr' from dos filesystem
Parameter Description:
<interface>:  mmc or usb;
dev:        Equipment number(You can view or list the memory at startup);
part:        Equipment partition number;
<addr>:      DDR Memory address
<filename>:  Binary file to load (including full path)
[bytes]: The size of the data to be loaded, in bytes. Optional. You can not write. When not writing, it is equal to the file size by default.
Loading files requires SD perhaps EMMC Have a sound file system.

First take the SD card out of the development board (do not power off the development board), insert it into the PC through the card reader, copy some files to the card, and then re insert it into the development board
(the development board should not be powered off when the SD card is pulled out. The purpose is to test the function of mmc rescan command). After the SD card is unplugged, UBOOT can also run, because the program has been copied to DDR for operation. As long as the U-BOOT is powered on continuously, it can run normally.

After copying the file, put the SD card back to the development board. Don't scan the mmc device again. If you directly enter fatls, an error will occur:
TINY4412 # fatls mmc 0
 /* The error message is printed because the development board is not powered off and the device 0 is an SD card*/
count: 1
# Tx: Inverter delay / Rx: Inverter delay

count: 2
## Tx: Basic delay / Rx: Inverter delay

count: 3
## Tx: Inverter delay / Rx: Basic delay

count: 4
### Tx: Basic delay / Rx: Basic delay

count: 5
# Tx: Disable / Rx: Basic delay

count: 6
## Tx: Disable / Rx: Inverter delay

count: 7
### Tx: Basic delay / Rx: Disable

count: 8
### Tx: Inverter delay / Rx: Disable
mmc read failed ERROR: -19
data.dest: 0xc3cfbbdc
data.blocks: 1
data.blocksize: 512
MMC_DATA_READ
** Can't read from device 0 **

** Unable to use mmc 0:1 for fatls **
TINY4412 #
Scan device 0 and read out the information:
TINY4412 # mmc rescan 0 scanning device
TINY4412 # fatls mmc 0 lists the file directory of the device

/* Successfully listed the SD card file directory information*/
Partition1: Start Address(0xa203d2), Size(0x2037b2)
            system volume information/
  4783928   zimage
   277108   u-boot.bin
   127245   Source/u-boot.pdf
     5268   2015-12-30txt
   731729   shell,
                   - a.pdf

5 file(s), 1 dir(s)

Start testing the fatload command:
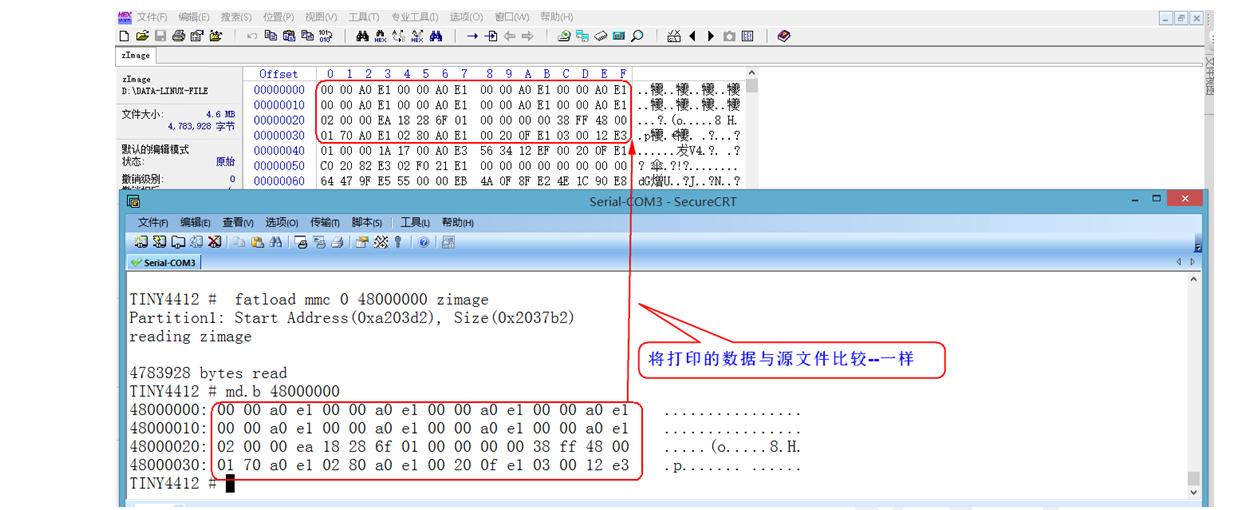
TINY4412 #  fatload mmc 0 48000000 zimage loads the zimage file to the address of the DDR at 48000000
Partition1: Start Address(0xa203d2), Size(0x2037b2)
reading zimage

4783928 bytes read  Size of file successfully loaded(Byte unit)
TINY4412 # md.b 48000000 print out the data at DDR 48000000 address
48000000: 00 00 a0 e1 00 00 a0 e1 00 00 a0 e1 00 00 a0 e1    ................
48000010: 00 00 a0 e1 00 00 a0 e1 00 00 a0 e1 00 00 a0 e1    ................
48000020: 02 00 00 ea 18 28 6f 01 00 00 00 00 38 ff 48 00    .....(o.....8.H.
48000030: 01 70 a0 e1 02 80 a0 e1 00 20 0f e1 03 00 12 e3    .p....... ......
2.3 cmp -- compare whether the memory data is the same
view help
TINY4412 # ? cmp
cmp - memory compare   Memory comparison

Usage:
cmp [.b, .w, .l] addr1 addr2 count  format         be careful: count Is expressed in hexadecimal
cmp .b :In 1 byte mode
cmp .w :In 2 bytes
cmp .l :In 4 bytes

Format:
Cmp.b Number of address 1 and address 2 comparison data

① compare DRR Are the two address data equal
TINY4412 # cmp.b 48000000 49000000 10 compare two address data - the number is 10
byte at 0x48000000 (0x00) != byte at 0x49000000 (0xff)
Total of 0 bytes were the same  A total of 0 bytes are the same
TINY4412 #


② from MMC Read the data of 1 sector to DDR Two addresses of
TINY4412 #  mmc read 0 48000000 1 1

MMC read: dev # 0, block # 1, count 1 ... 1 blocks read: OK
TINY4412 #  mmc read 0 49000000 1 1

MMC read: dev # 0, block # 1, count 1 ... 1 blocks read: OK

③ Compare the data of the two addresses again
TINY4412 # cmp.b 48000000 49000000 10 (Note: 10 here is hexadecimal 10, and converted to decimal is 16)
Total of 16 bytes were the same  A total of 16 bytes are the same.
2.4 mm -- the address modifies the memory data in the way of automatic increase
View help:
TINY4412 # ? mm
mm - memory modify (auto-incrementing address)  Modify memory(Added address)

Usage:
mm [.b, .w, .l] address   Format: address Address to modify

① First DDR Print out the data somewhere to facilitate the comparison after modification
TINY4412 # md.b 48000000 10
48000000: a3 69 d3 18 e9 7d b9 66 d1 6b d5 6e d4 79 a6 79    .i...}.f.k.n.y.y

② Modify data
TINY4412 # mm.b 48000000
48000000: a3 ? 5   //Change a3 to 5
48000001: 69 ? 6   //Amend 69 to 6
48000002: d3 ? 7
48000003: 18 ? 8
48000004: e9 ?       Don't want to modify, just press<enter key>skip
48000005: 7d ? 9
48000006: b9 ? TINY4412 # < interrupt > press ctrl+c to finish the modification

③ View data again
TINY4412 # md.b 48000000 10
48000000: 05 06 07 08 e9 09 b9 66 d1 6b d5 6e d4 79 a6 79    .......f.k.n.y.y  Modified data

Compare the data before modification with the data after modification and find that it has been modified successfully!
Other similar commands:
mm.w: Modify 2 bytes at a time
mm.l: Modify 4 bytes at a time
2.5 cp - memory copy
View help:
TINY4412 # ? cp
cp - memory copy   Memory copy

Usage:  Usage format
cp [.b, .w, .l] source target count   Note that the number here is expressed in hexadecimal
 Format: cp.b Number of source and destination addresses
① read out DDR The data of the two addresses is convenient for later comparison
TINY4412 # md.b 45000000 10 display data
45000000: ff ff ff ff ff ff ff ff ff ff ff ff ff ff ff ff     ................
TINY4412 # Md.b 490000000 10 display data
49000000: a3 69 d3 18 e9 7d b9 66 d1 6b d5 6e d4 79 a6 79    .i...}.f.k.n.y.y


② take DDR Copy the first 10 bytes of the 4.9 million address to the 45 million address
TINY4412 # cp 49000000 45000000 10

③ Display the data of the two addresses again
TINY4412 # md.b 45000000 10
45000000: a3 69 d3 18 e9 7d b9 66 d1 6b d5 6e d4 79 a6 79    .i...}.f.k.n.y.y
TINY4412 # md.b 49000000 10
49000000: a3 69 d3 18 e9 7d b9 66 d1 6b d5 6e d4 79 a6 79    .i...}.f.k.n.y.y
 After copying, compare the two address data again, and the data on both sides is the same.
2.6 load - use serial port to download binary data into memory
Serial port transmission mode supported by U-BOOT:
loadb   - load binary file over serial line (kermit mode)
loads   - load S-Record file over serial line
loady   - load binary file over serial line (ymodem mode)
Download files from serial port to DDR. The above is U-BOOT, which supports three transmission modes of serial port.
Protocols supported by CRT serial port terminal:

View help:
TINY4412 # ? loady
Unknown command '' - try 'help' without arguments for list of all known commands

loady - load binary file over serial line (ymodem mode)
Used to load binary files on the serial line(ymodem pattern)

Usage:
loady [ off ] [ baud ]
    - load binary file over serial line with offset 'off' and baudrate 'baud'
Parameter Description:
[ off ]:  DDR Memory address, optional.
[ baud ]: How fast baud rate to download is optional. If it is not filled in, it means the default 115200 baud rate.
Example:
loady 0x40000000 115200
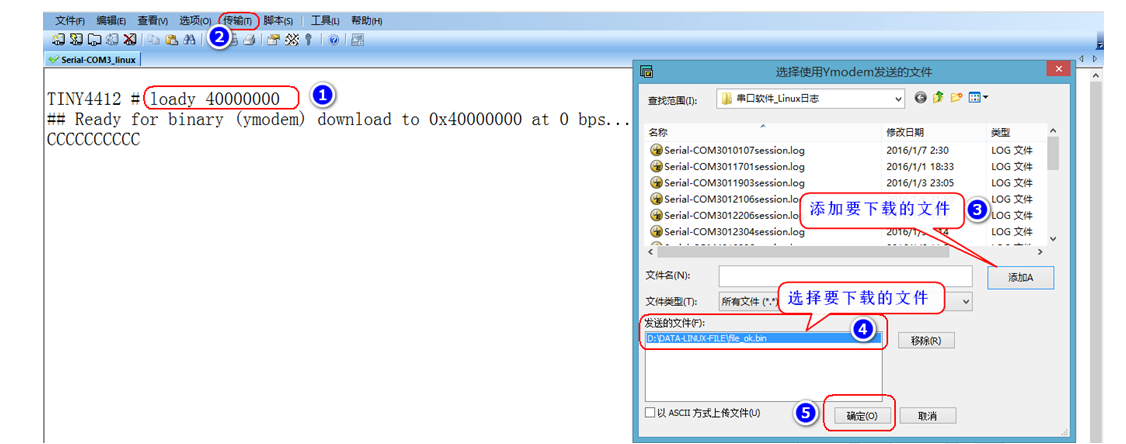
Test the loady command:
(1) Download files to memory
TINY4412 # loady 40000000 	 Download files to DDR 40000000 address
## Ready for binary (ymodem) download to 0x40000000 at 0 bps...

(2) Content of comparison data
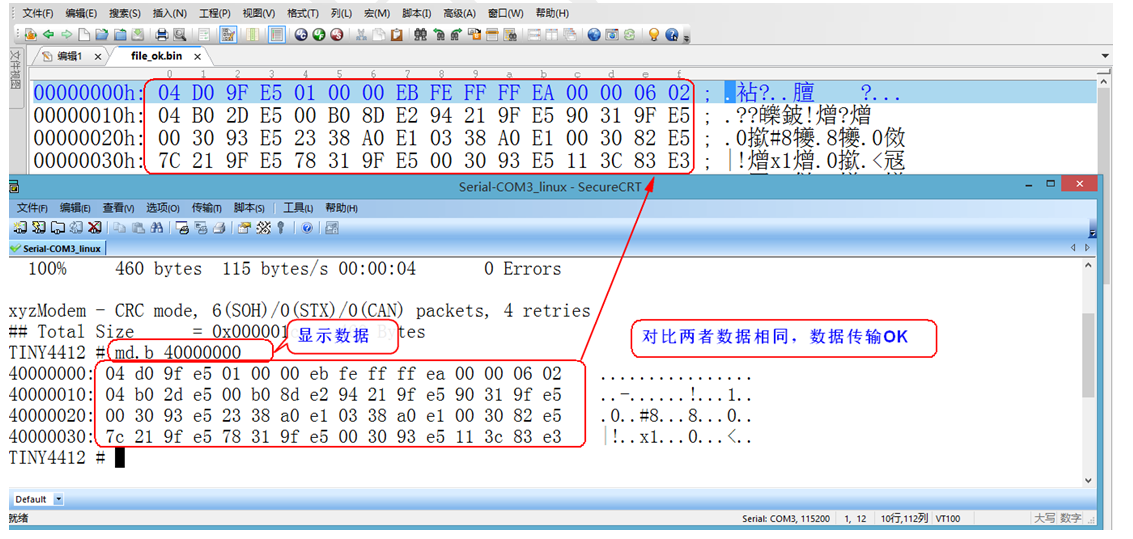
(3) Execute code
The bin file downloaded above is a bare metal program with keys. You can jump to the specified address with the go command to execute the downloaded code.
TINY4412 # go 40000000
## Starting application at 0x40000000 ...
After the jump, press the key to test! The test results are normal, and the key program can be executed normally.
2.7 go – the CPU jumps to the specified address to execute the code
Once the go instruction is executed, the CPU will execute the code at the specified address.
View help:
TINY4412 # ? go
go - start application at address 'addr'
     stay addr Start application at

Usage:
go addr [arg ...]
    - start application at address 'addr'
      passing 'arg' as arguments Parameters passed as parameters
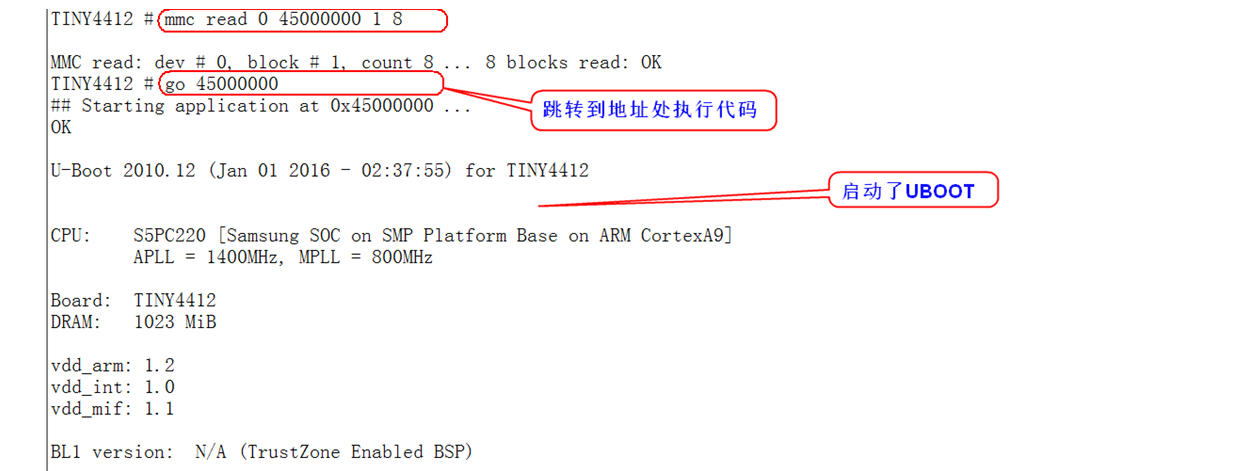
Test go command
take SD Read the data of the first sector of the card DDR Waiting for execution in memory. Read 8 sectors
TINY4412 # mmc read 0 45000000 1 8

MMC read: dev # 0, block # 1, count 8 ... 8 blocks read: OK

Jump to 45000000 address to execute the program
TINY4412 # go 45000000
## Starting application at 0x45000000 ...    Start to execute the code at the address, because sector 1 starts to store BL1 code, and restart UBOOT
OK

U-Boot 2010.12 (Jan 01 2016 - 02:37:55) for TINY4412

CPU:    S5PC220 [Samsung SOC on SMP Platform Base on ARM CortexA9]
        APLL = 1400MHz, MPLL = 800MHz

Board:  TINY4412
DRAM:   1023 MiB
...........................................................................................................
2.8 opening and closing emmc device boot partition
View help:
TINY4412 # ? emmc
emmc - Open/Close eMMC boot Partition  open/close emmc Boot partition

Usage:
emmc open <device num>
emmc close <device num>

To read and write to the device, you need to open it first, read and write it, and then close it.
Example:
emmc close 1    Open device 1
emmc open 1    Turn off device 1

emmc close 0    Open device 0
emmc open 0    Turn off device 0
2.9 movi subsystem -- read and write data from MMC to DDR
This instruction is needed during product release to solidify the kernel and UBOOT.
View help:
TINY4412 # ? movi
movi - movi     - sd/mmc r/w sub system for SMDK board

Usage:
movi init - Initialize moviNAND and show card info
movi read zero {fwbl1 | u-boot} {device_number} {addr} - Read data from sd/mmc  Read data from sd / mmc
movi write zero {fwbl1 | u-boot} {device_number} {addr} - Read data from sd/mmc  Read data from sd / mmc
movi read {u-boot | kernel} {device_number} {addr} - Read data from sd/mmc      Read data from sd / mmc
movi write {fwbl1 | u-boot | kernel} {device_number} {addr} - Write data to sd/mmc Write data to sd / mmc
movi read rootfs {device_number} {addr} [bytes(hex)] - Read rootfs data from sd/mmc by size       from sd/mmc read rootfs data size
movi write rootfs {device_number} {addr} [bytes(hex)] - Write rootfs data to sd/mmc by size        write rootfs sd/mmc Data size
movi read {sector#} {device_number} {bytes(hex)} {addr} - instead of this, you can use "mmc read"
movi write {sector#} {device_number} {bytes(hex)} {addr} - instead of this, you can use "mmc write"
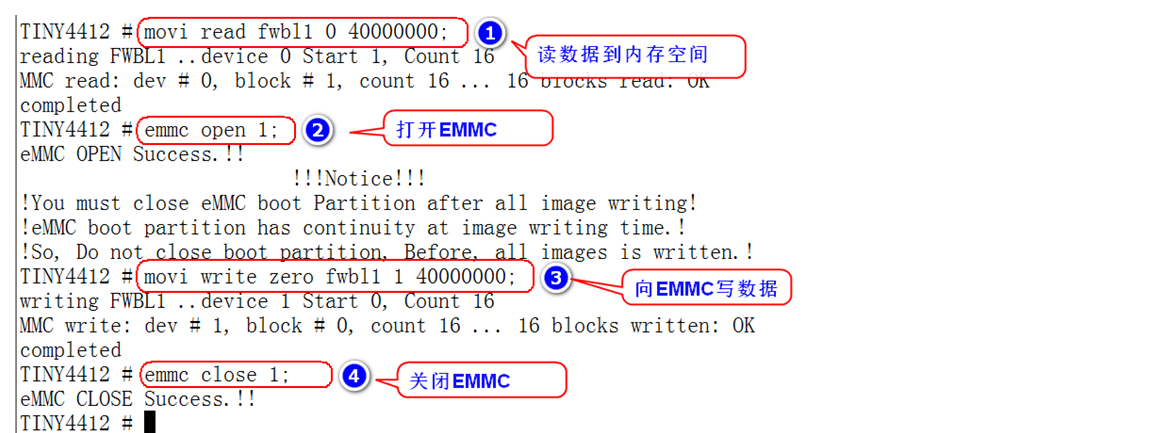
(1) Copy the bl1 data of the first stage of u-boot in sd card to memory, and then write it to the corresponding position of emmc
movi read fwbl1 0 40000000;       //Copy bl1 from SD (device number) to DDR memory address
emmc open 1;                   //Turn on the EMMC device
movi write zero fwbl1 1 40000000;   //Write the data at DDR address to the corresponding position of EMMC
emmc close 1;                    //Turn off EMMC equipment
Usage example:
TINY4412 # movi read fwbl1 0 40000000;
reading FWBL1 ..device 0 Start 1, Count 16
MMC read: dev # 0, block # 1, count 16 ... 16 blocks read: OK start reading from the first sector of the SD card and read 16 sectors continuously
completed
TINY4412 # emmc open 1;
eMMC OPEN Success.!!
                        !!!Notice!!!
!You must close eMMC boot Partition after all image writing!
!eMMC boot partition has continuity at image writing time.!
!So, Do not close boot partition, Before, all images is written.!
TINY4412 # movi write zero fwbl1 1 40000000;
writing FWBL1 ..device 1 Start 0, Count 16
MMC write: dev # 1, block # 0, count 16 ... 16 blocks written: OK write from sector 0 of EMMC and write 16 sectors continuously
completed
TINY4412 # emmc close 1;
eMMC CLOSE Success.!!

because SD Due to the characteristics of the card, sector 0 cannot be used, and data can only be stored from sector 1.
EMMC Data can be stored directly from sector 0.
therefore-----EMMC Sector 0 of is equivalent to SD The first sector of the card
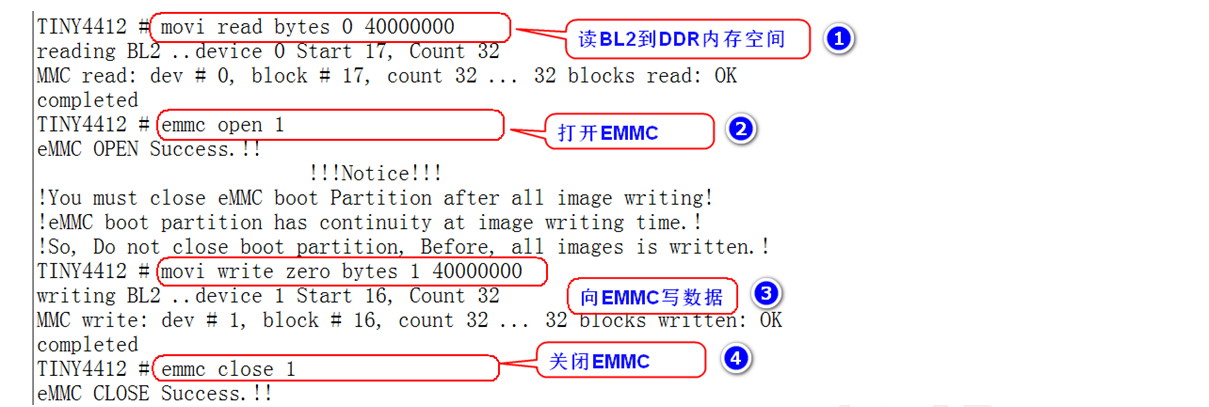
(2) Copy the BL2 data of u-boot in sd card to memory, and then write it to the corresponding position of emmc
movi read bl2 0 40000000;     //Copy bl2 from SD (device number 0) to DDR memory address
emmc open 1;                 //Turn on the EMMC device
movi write zero bl2 1 40000000; //Write the data at DDR address to the corresponding position of EMMC
emmc close 1;                 //Turn off EMMC equipment
Example:
TINY4412 # movi read bl2 0 40000000
reading BL2 ..device 0 Start 17, Count 32
MMC read: dev # 0, block # 17, count 32 ... 32 blocks read: OK / / start reading from the 17th sector of the SD card and read 32 sectors continuously.
                                                    //From the UBOOT burning script, we can see that BL2 starts from sector 17 of SD card
completed
TINY4412 # emmc open 1
eMMC OPEN Success.!!
                        !!!Notice!!!
!You must close eMMC boot Partition after all image writing!
!eMMC boot partition has continuity at image writing time.!
!So, Do not close boot partition, Before, all images is written.!
TINY4412 # movi write zero bl2 1 40000000
writing BL2 ..device 1 Start 16, Count 32
MMC write: dev # 1, block # 16, count 32 ... 32 blocks written: OK / / start writing to the 17th sector of EMMC and write 32 sectors in succession.
completed
TINY4412 # emmc close 1
eMMC CLOSE Success.!!
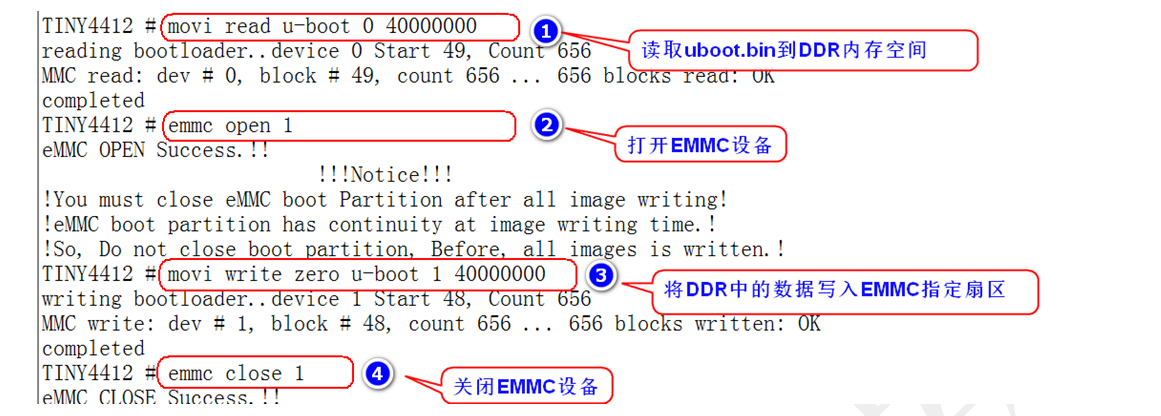
(3) Copy the u-boot in sd card to memory, and then write it to the corresponding location of emmc
movi read u-boot 0 40000000;      take SD Card U-BOOT.Bin get to read DDR Memory space
emmc open 1;                   open EMMC equipment
movi write zero u-boot 1 40000000;  take DDR Data writing for EMMC equipment
emmc close 1;                    close EMMC
Example:
TINY4412 # movi read u-boot 0 40000000
reading bootloader..device 0 Start 49, Count 656
MMC read: dev # 0, block # 49, count 656 ... 656 blocks read: OK start from the 49th sector of SD card and read 656 sectors to DDR memory
completed
TINY4412 # emmc open 1
eMMC OPEN Success.!!
                        !!!Notice!!!
!You must close eMMC boot Partition after all image writing!
!eMMC boot partition has continuity at image writing time.!
!So, Do not close boot partition, Before, all images is written.!
TINY4412 # movi write zero u-boot 1 40000000
writing bootloader..device 1 Start 48, Count 656
MMC write: dev # 1, block # 48, count 656 ... 656 blocks written: OK write 656 sectors to the 49th sector of EMMC to DDR memory
completed
TINY4412 # emmc close 1
eMMC CLOSE Success.!!
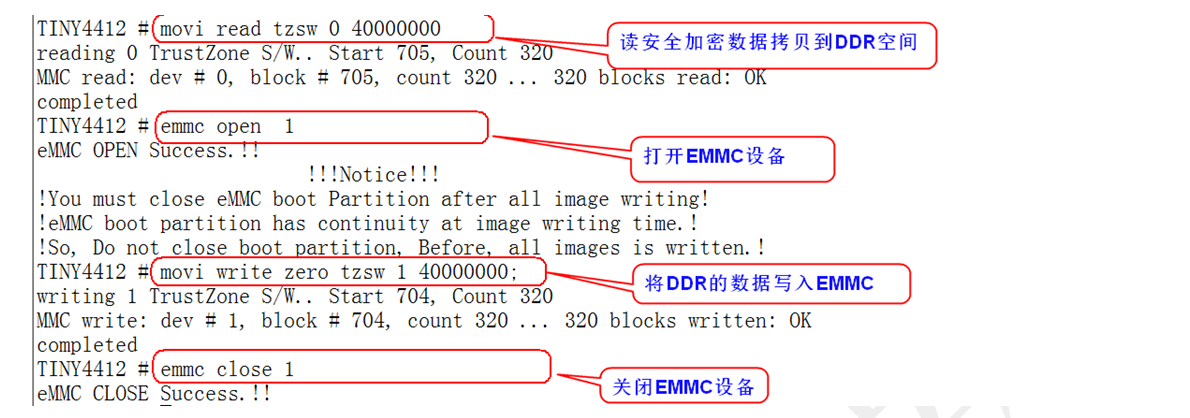
(4) Copy the u-boot secure encrypted data in sd card to memory, and then write it to the corresponding location of emmc
movi read tzsw 0 40000000;      Copy secure encrypted data to DDR
emmc open  1;                open EMMC equipment
movi write zero tzsw 1 40000000;  take DDR Data writing EMMC
emmc close 1;                  close EMMC equipment
Example:
TINY4412 # movi read tzsw 0 40000000
reading 0 TrustZone S/W.. Start 705, Count 320
MMC read: dev # 0, block # 705, count 320 ... 320 blocks read: OK start from the 705th sector of SD card and read 320 sectors to DDR continuously
Completed                                              Secure encrypted data is from SD Stored in 705 sectors
TINY4412 # emmc open  1
eMMC OPEN Success.!!
                        !!!Notice!!!
!You must close eMMC boot Partition after all image writing!
!eMMC boot partition has continuity at image writing time.!
!So, Do not close boot partition, Before, all images is written.!
TINY4412 # movi write zero tzsw 1 40000000;
writing 1 TrustZone S/W.. Start 704, Count 320
MMC write: dev # 1, block # 704, count 320 ... 320 blocks written: OK write to EMMC
completed
TINY4412 # emmc close 1
eMMC CLOSE Success.!!

(5) Copy the kernel data in sd card to memory, and then write it to the corresponding location of emmc
movi read kernel 0 40000000;     take SD Read the kernel data of the card DDR In memory
movi write kernel 1 40000000;     take DDR Data writing for EMMC in
Example:
TINY4412 # movi read kernel 0 40000000
reading kernel..device 0 Start 1057, Count 12288
MMC read: dev # 0, block # 1057, count 12288 ... 12288 blocks read: OK start from sector 1057 of SD card and read 12288 sectors to DDR continuously
completed
TINY4412 # movi write kernel 1 40000000
writing kernel..device 1 Start 1057, Count 12288
MMC write: dev # 1, block # 1057, count 12288 ... 12288 blocks written: OK write DDR data to EMMC, starting from 1057, and write 12288 sectors continuously
completed

2.10 movi compact command - one click Copy
Solidify UBOOT and kernel data to EMMC compact command:
movi r f 0 40008000;emmc open 1;movi w z f 1 40008000;emmc close 1;
movi r b 0 40008000;emmc open 1;movi w z b 1 40008000;emmc close 1;
movi r u 0 40008000;emmc open 1;movi w z u 1 40008000;emmc close 1;
movi r t 0 40008000;emmc open 1;movi w z t 1 40008000;emmc close 1;
movi r k 0 40008000;movi w k 1 40008000;
2.11 use of bootcmd command
The bootcmd command is the command code to be executed after the U-BOOT is successfully started.
Example:
set bootcmd 'mmc read 0 40000000 421 1;md.b 40000000'

Format: setenv  ' Commands to execute'
      Save  //Save settings
2.12 execute binary file – > bootm command
The boot command is used to boot the kernel image packaged by the U-Boot tool mkimage.
View help:
TINY4412 # ? bootm
bootm - boot application image from memory  //bootm starts the application from memory

Usage:
bootm [addr [arg ...]]
    - boot application image stored in memory
        passing arguments 'arg ...'; when booting a Linux kernel,
        'arg' can be the address of an initrd image
//Pass parameter; When booting the Linux kernel, "parameter" can be the address of the image file

Sub-commands to do part of the bootm sequence.  The sub-commands must be
issued in the order below (it's ok to not issue all sub-commands):
        start [addr [arg ...]]
        loados  - load OS image  Load operating system image
        cmdline - OS specific command line processing/setup Operating system specific command line processing/set up
        bdt     - OS specific bd_t processing Operating system specific bd_t handle
        prep    - OS specific prep before relocation or go
        go      - start OS Start the operating system
Example:
(1) Direct boot kernel
TINY4412 # mmc read 0 40007fc0 421 3000
take SD The card core reads DDR Memory space----The kernel image is from SD When the 1057 sector of the card is stored, 12288 sectors are occupied continuously
(Note: 421 is 0 x421  3000 Is 0 x3000)
MMC read: dev # 0, block # 1057, count 12288 ... 12288 blocks read: OK

TINY4412 # bootm 40007fc0 executes the binary file at DDR--40007fc0 address
Boot with zImage

Starting kernel ...

Uncompressing Linux... done, booting the kernel.

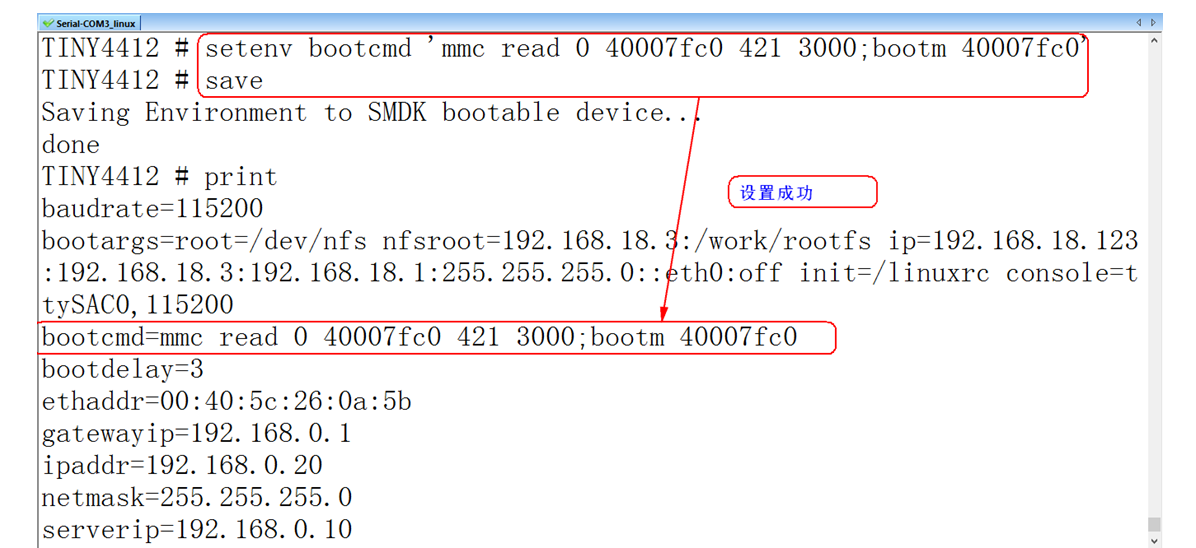
(2) Set UBOOT to boot successfully and boot the kernel automatically
TINY4412 # setenv bootcmd 'mmc read 0 40007fc0 421 3000; Bootm 40007fc0 'is automatically executed after the u-boot is successfully started
TINY4412 # Save save settings
 Or use bootcmd=movi read kernel 0 40008000;movi read rootfs 0 41000000 100000;bootm 40008000 41000000
2.13 partition command - fdisk
View help:
TINY4412 # ? fdisk
fdisk - fdisk for sd/mmc. //Hard disk partition tool
Usage:
fdisk -p <device_num>   - print partition information    //Print partition information
fdisk -c <device_num> [<sys. part size(MB)> <user data part size> <cache part size>]
        - create partition  //Create partition (partition unit is M)
(1) Example of viewing partition information
TINY4412 # fdisk -p 0 / / view SD card partition information

partition          size        Sector start address        Number of sectors(512 Byte a sector)         partition ID name
partion #    size(MB)        block start #             block count                        partition_Id
   1          1028          7456058              2106822                           0x06
   4             0         28049408               441                              0x00

(2) Example of partitioning SD card
(when partitioning – it will start partitioning in the space about 66M after the beginning of the SD card, because the beginning part needs to be used to store the kernel and U-BOOT)
TINY4412 # fdisk -c 0 320 2057 520 / / partition SD card, - c indicates partition
fdisk is completed     //Prompt partition completion

partition          size        Sector start address        Number of sectors(512 Byte a sector)         partition ID name
partion #    size(MB)     block start #               block count                     partition_Id
   1          4416          6090216              9045762                        0x0C
   2           320           134343              656788                         0x83
   3          2062           791131              4224341                        0x83
   4           524          5015472              1074744                        0x83

2.14 specify the partition file system format of EMMC
U-BOOT supports formatted file system formats:
fatformat- fatformat - disk format by FAT32
ext3format- ext3format - disk format by ext3
ext2format- ext2format - disk format by ext2
View help for using the fatformat command:
TINY4412 # ? fatformat
fatformat - fatformat - disk format by FAT32
            Specifies the format bit of the disk FAT32

Usage:
fatformat <interface(only support mmc)> <dev:partition num>  Usage format
        - format by FAT32 on 'interface'

The usage of the other two commands is the same!
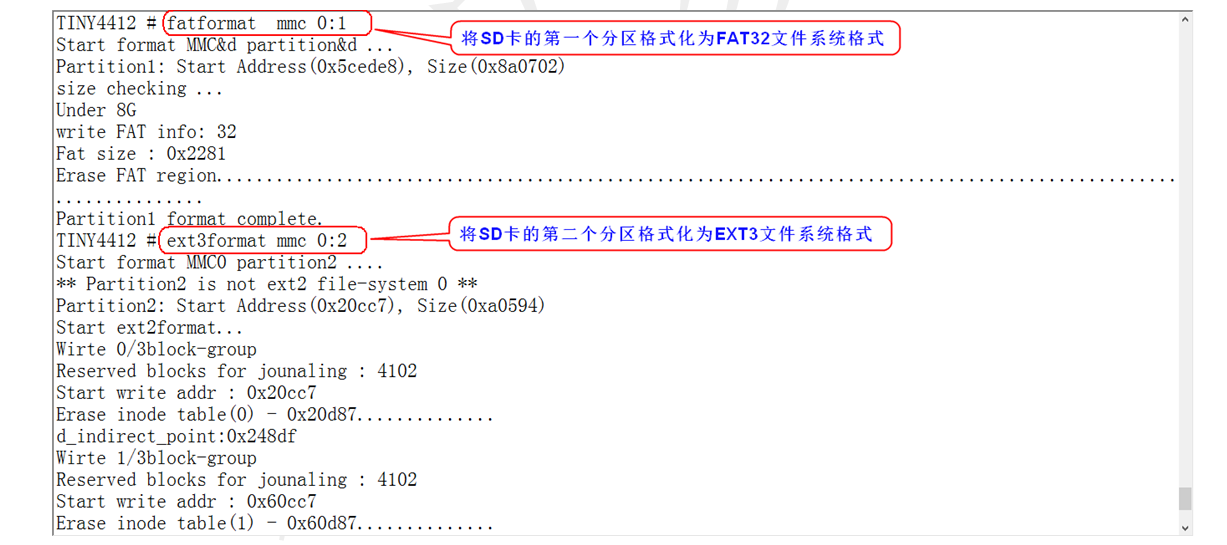
(1) Specify partition command - usage example
fatformat  mmc 0:1 	    //Indicates that the first partition of disk 0 is initialized to fat
ext3format mmc 0:2 	    //Indicates that the second partition of disk 0 is initialized to ext3
ext2format mmc 0:3       //Indicates that the third partition of disk 0 is initialized to ext2
ext3format mmc 0:4	    //Indicates that the fourth partition of disk 0 is initialized to ext3
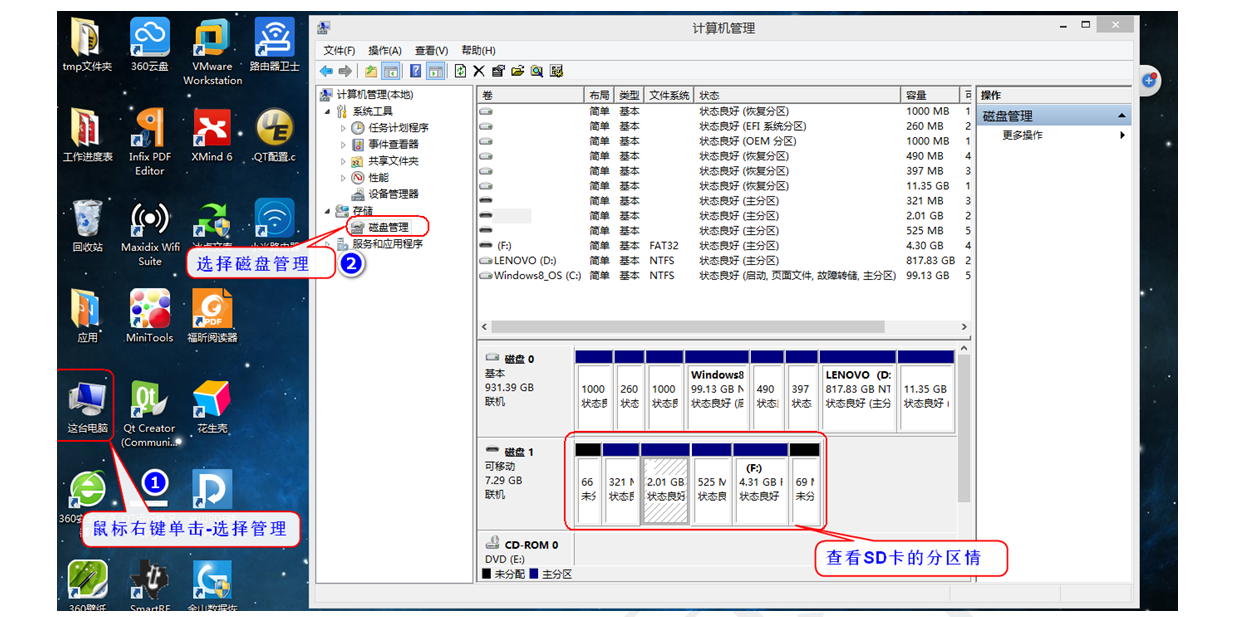
(2) After the SD card partition file system is formatted, insert the SD card into the computer to view the partition information of the SD card
(3) Mount the SD card into the virtual machine and view the device node.

