1, Introduction
- Dealing with the boundary of components: knowledge points about components
- Rapid prototyping provided in Vue cli: it is convenient for us to develop components and run single file components separately
- Component development: step bar, form component
- The best way to develop components Storybook: isolate the development components to facilitate the management of components and component testing
- Monorepo: a way of organizing the project, which is conducive to managing the project structure of the component library
- Plop: in order to quickly develop components, use plop to generate the basic structure of components based on templates
- How Lerna + yarn workspaces works: it is convenient to manage package dependencies and submit and publish all components
- Component testing: use js to test components
- Rollup packaging
2, Dealing with component boundary problems
- $ r o o t : stay m a i n . j s in plus enter d a t a number according to , son group piece can through too root: in main Add data into JS, and the sub components can Root: in main Add data data into JS, and the sub components can be accessed through root Data accesses and modifies data. Small projects are more convenient to use, and too many states are difficult to maintain
//main.js
import Vue from 'vue'
import App from './App.vue'
Vue.config.productionTip = false
new Vue({
  render: h => h(App),
  data: {
    title: 'Root instance - Root'
  },
  methods: {
    handle () {
      console.log(this.title)
    }
  }
}).$mount('#app')
// root.vue
<template>
<div>
<!--
In small applications, you can vue Shared data in root instance
Components can be $root Access root instance
-->
$root.title: {{ $root.title }}
<br>
<button @click="$root.handle">obtain title</button>
<button @click="$root.title = 'Hello $root'">change title</button>
</div>
</template>
<script>
export default {
}
</script>
<style>
</style>
- $
p
a
r
e
n
t
:
father
son
group
piece
Inlay
set
,
can
stay
son
group
piece
in
through
too
Parent: parent-child components are nested and can be passed in child components
Parent: parent-child components are nested, which can be used in child components through parent Data obtains and modifies the data of the parent component, which can also be used in the sub components of the sub component
p
a
r
e
n
t
.
parent.
parent.parent.data gets the parent component data and modifies it, but props is not allowed to modify it
This method is too nested and difficult to maintain
// parent.vue
<template>
  <div class="parent">
    parent
    <child></child>
  </div>
</template>

<script>
import child from './02-child'
export default {
  components: {
    child
  },
  data () {
    return {
      title: 'Get parent component instance'
    }
  },
  methods: {
    handle () {
      console.log(this.title)
    }
  }
}
</script>

<style>
.parent {
  border: palegreen 1px solid;
}
</style>
// child.vue
<template>
  <div class="child">
    child<br>
    $parent.title: {{ $parent.title }}<br>
    <button @click="$parent.handle">obtain $parent.title</button>
    <button @click="$parent.title = 'Hello $parent.title'">change $parent.title</button>

    <grandson></grandson>
  </div>
</template>

<script>
import grandson from './03-grandson'
export default {
  components: {
    grandson
  }
}
</script>

<style>
.child {
  border:paleturquoise 1px solid;
}
</style>
// grandson.vue
<template>
  <div class="grandson">
    grandson<br>
    $parent.$parent.title: {{ $parent.$parent.title }}<br>
    <button @click="$parent.$parent.handle">obtain $parent.$parent.title</button>
    <button @click="$parent.$parent.title = 'Hello $parent.$parent.title'">change $parent.$parent.title</button>
  </div>
</template>

<script>
export default {
}
</script>

<style>
.grandson {
  border:navajowhite 1px solid;
}
</style>
- $ c h i l d r e n : father group piece in can can Save stay many individual son group piece , because this children: there may be multiple child components in the parent component, so Children: there may be multiple child components in the parent component, so children is an array, which can be accessed through $children [0] Data obtains the data of the first sub component and modifies it. This method is not flexible and requires index. It is generally used to obtain the data of all sub components
// PARENT.VUE
<template>
  <div>
    <children1></children1>
    <children2></children2>

    <button @click="getChildren">Get subcomponents</button>
  </div>
</template>

<script>
import children1 from './02-children1'
import children2 from './03-children2'
export default {
  components: {
    children1,
    children2
  },
  methods: {
    getChildren () {
      console.log(this.$children)
      console.log(this.$children[0].title)
      console.log(this.$children[1].title)

      this.$children[0].handle()
      this.$children[1].handle()
    }
  }
}
</script>

<style>

</style>
// children1.vue
<template>
  <div>children1</div>
</template>

<script>
export default {
  data () {
    return {
      title: 'children1 Get subcomponents - title'
    }
  },
  methods: {
    handle () {
      console.log(this.title)
    }
  }
}
</script>

<style>

</style>
// children2.vue
<template>
  <div>children2</div>
</template>

<script>
export default {
  data () {
    return {
      title: 'children2 Get subcomponents - title'
    }
  },
  methods: {
    handle () {
      console.log(this.title)
    }
  }
}
</script>

<style>

</style>
- $ r e f s : discharge stay universal through H T M L mark sign upper can through too refs: it can be placed on ordinary HTML tags through Refs: it can be placed on ordinary HTML tags through refs*** Operate the DOM and put it on the sub component to obtain the values and methods defined by the sub component
// parent.vue
<template>
  <div>
    <myinput ref="mytxt"></myinput>

    <button @click="focus">Get focus</button>
  </div>
</template>

<script>
import myinput from './02-myinput'
export default {
  components: {
    myinput
  },
  methods: {
    focus () {
      this.$refs.mytxt.focus()
      this.$refs.mytxt.value = 'hello'
    }
  }
  // mounted () {
  //   this.$refs.mytxt.focus()
  // }
}
</script>

<style>

</style>
// myinput.vue
<template>
  <div>
    <input v-model="value" type="text" ref="txt">
  </div>
</template>

<script>
export default {
  data () {
    return {
      value: 'default'
    }
  },
  methods: {
    focus () {
      this.$refs.txt.focus()
    }
  }
}
</script>

<style>

</style>
- $ p r o v i d e / provide/ provide/inject: obtain the members in the parent component through dependency injection. First provide the dependent value in the parent component through the provide function, and then obtain the value in the child component through inject, but the value injected through inject cannot be modified
// PARENT.VUE
<template>
  <div class="parent">
    parent
    <child></child>
  </div>
</template>

<script>
import child from './02-child'
export default {
  components: {
    child
  },
  provide () {
    return {
      title: this.title,
      handle: this.handle
    }
  },
  data () {
    return {
      title: 'Parent component provide'
    }
  },
  methods: {
    handle () {
      console.log(this.title)
    }
  }
}
</script>

<style>
.parent {
  border: palegreen 1px solid;
}
</style>
// CHILD.VUE
<template>
  <div class="child">
    child<br>
    title: {{ title }}<br>
    <button @click="handle">obtain title</button>
    <button @click="title='xxx'">change title</button>
    <grandson></grandson>
  </div>
</template>

<script>
import grandson from './03-grandson'
export default {
  components: {
    grandson
  },
  inject: ['title', 'handle']
}
</script>

<style>
.child {
  border:paleturquoise 1px solid;
}
</style>
// GRANDSON.VUE
<template>
  <div class="grandson">
    grandson<br>
    title: {{ title }}<br>
    <button @click="handle">obtain title</button>
    <button @click="title='yyy'">change title</button>
  </div>
</template>

<script>
export default {
  inject: ['title', 'handle']
}
</script>

<style>
.grandson {
  border:navajowhite 1px solid;
}
</style>
2, Attrs listeners
$attrs binds the non prop attribute in the parent component to the internal component
l
i
s
t
e
n
e
r
s
hold
father
group
piece
in
of
D
O
M
yes
as
of
primary
living
matter
piece
Bind
set
reach
within
Department
group
piece
stay
father
group
piece
in
pass
genus
nature
to
son
group
piece
,
as
r
e
q
u
i
r
e
d
,
p
l
a
c
e
h
o
l
d
e
r
etc.
,
Silence
recognize
meeting
stay
son
group
piece
of
root
element
element
of
upper
add
plus
,
if
need
plus
reach
his
he
element
element
upper
,
be
need
want
stay
son
group
piece
in
need
want
add
plus
of
element
element
add
plus
v
−
b
i
n
d
=
"
listeners bind the native events of the DOM object in the parent component to the internal component, and pass the attributes in the parent component to the child component, such as required and placeholder. By default, they will be added to the root element of the child component. If they need to be added to other elements, they need to add v-bind to the elements to be added in the child component=“
listeners bind the native events of the DOM object in the parent component to the internal component, and pass attributes to the child component in the parent component, such as required and placeholder. By default, they will be added to the root element of the child component. If they need to be added to other elements, they need to add V − bind="attrs" to the element to be added in the child component, so that attributes can be added to the element. Similarly, If you add v-on to this element=“
l
i
s
t
e
n
e
r
s
"
,
be
can
take
father
group
piece
pass
of
square
method
enter
that 's ok
transfer
use
,
suitable
use
to
father
group
piece
pass
enter
many
individual
square
method
Time
,
no
use
write
many
individual
"listeners", you can call the methods passed by the parent component, which is applicable to multiple methods passed by the parent component without writing multiple methods
listeners ", you can call the method passed by the parent component. It is applicable to the event that the dom element itself does not need to write multiple emit s when the parent component passes in multiple methods
// parent.vue
<template>
  <div>
    <!-- <myinput
      required
      placeholder="Enter your username"
      class="theme-dark"
      data-test="test">
    </myinput> -->


    <myinput
      required
      placeholder="Enter your username"
      class="theme-dark"
      @focus="onFocus"
      @input="onInput"
      data-test="test">
    </myinput>
    <button @click="handle">Button</button>
  </div>
</template>

<script>
import myinput from './02-myinput'
export default {
  components: {
    myinput
  },
  methods: {
    handle () {
      console.log(this.value)
    },
    onFocus (e) {
      console.log(e)
    },
    onInput (e) {
      console.log(e.target.value)
    }
  }
}
</script>

<style>

</style>
// myinput.vue
<template>
  <!--
    1. The attribute passed from the parent component to the self defined child component, if not prop receive
       Automatically set to the outermost label inside the subcomponent
       If it is class and style If so, the outermost labels will be merged class and style
  -->
  <!-- <input type="text" class="form-control" :placeholder="placeholder"> -->

  <!--
    2. If the child component does not want to inherit the non information passed in by the parent component prop Property, you can use inheritAttrs Disable inheritance
       Then pass v-bind="$attrs" Transfer external non prop Property to the desired label

       But that won't change class and style
  -->
  <!-- <div>
    <input type="text" v-bind="$attrs" class="form-control">
  </div> -->


  <!--
    3. Registration event
  -->

  <!-- <div>
    <input
      type="text"
      v-bind="$attrs"
      class="form-control"
      @focus="$emit('focus', $event)"
      @input="$emit('input', $event)"
    >
  </div> -->


  <!--
    4. $listeners
  -->

  <div>
    <input
      type="text"
      v-bind="$attrs"
      class="form-control"
      v-on="$listeners"
    >
  </div>
</template>

<script>
export default {
  // Props: ['placeholder', 'style', 'class'] / /' style ',' class' is reserved attribute setting, and an error will be reported
  // props: ['placeholder']
  inheritAttrs: false
}
</script>

<style>

</style>
3, Rapid prototyping
VueCli provides plug-ins for rapid prototype development and global installation of @ Vue / cli service global
Use vue serve to quickly view the running effect of components,
- vue serve if no parameter is specified, it will find main in the current directory by default js,index.js,APP. vue,app. Vue as entry file
- You can also specify the path followed by the component to be loaded
- vue serve ./src/login.vue
4, Rapid prototyping - ElementUI
Install ElementUI
- Initialize package json
- npm init -y
- Install ElementUI
- vue add element in addition to installing elementUI, babel and some dependent plug-ins will also be installed in package Generate the necessary configuration in JSON
- Load the elementUI and use Vue Use() install plug-ins
new Vue({...})
5, Component development - step bar component
Classification: third party component, basic component and business component
// STEPS.VUE
<template>
  <div class="lg-steps">
    <div class="lg-steps-line"></div>
    <div
      class="lg-step"
      v-for="index in count"
      :key="index"
      :style="{ color: active >= index ? activeColor : defaultColor }"
    >
      {{ index }}
    </div>
  </div>
</template>

<script>
import './steps.css'
export default {
  name: 'LgSteps',
  props: {
    count: {
      type: Number,
      default: 3
    },
    active: {
      type: Number,
      default: 0
    },
    activeColor: {
      type: String,
      default: 'red'
    },
    defaultColor: {
      type: String,
      default: 'green'
    }
  }
}
</script>

<style>

</style>
// STEPS-TEST.VUE
<template>
  <div>
    <steps :count="count" :active="active"></steps>
    <button @click="next">next step</button>
  </div>
</template>

<script>
import Steps from './Steps.vue'
export default {
  components: {
    Steps
  },
  data () {
    return {
      count: 4,
      active: 0
    }
  },
  methods: {
    next () {
      this.active++
    }
  }
}
</script>

<style>

</style>
6, Component development - form component
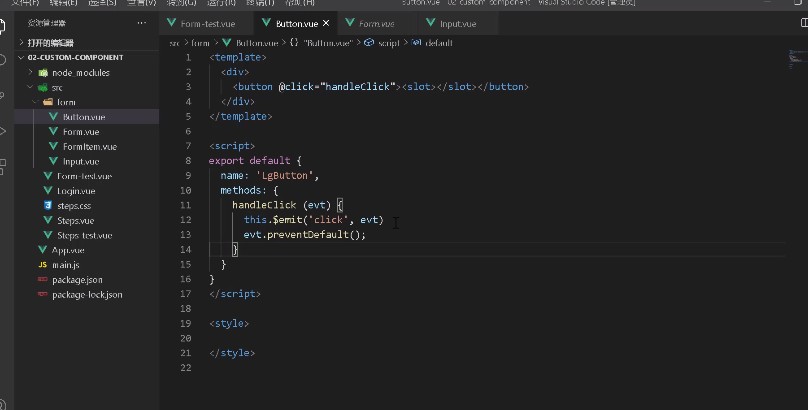
Overall structure: Form, FormItem, Input and Button

1. slot is written inside each component. When calling, you can add content in the tag and add relevant attributes in props according to the example
2. Nesting problem: because stFormItem must be a child element of stForm, dependency injection can be used in stForm and stFormItem to obtain the values of model and rules in stForm, so as to complete form verification; stInput may be a child element of stFormItem, or it can be used alone. Therefore, it is not suitable for the dependency injection method to obtain the value of the parent component. You can use the while method to obtain its parent element. If the parent element has a name of stInputItem, you can obtain the label and prop of the parent component
<template>
  <div>
    <input v-bind="$attrs" :type="type" :value="value" @input="handleInput">
  </div>
</template>

<script>
export default {
  name: 'LgInput',
  inheritAttrs: false,
  props: {
    value: {
      type: String
    },
    type: {
      type: String,
      default: 'text'
    }
  },
  methods: {
    handleInput (evt) {
      this.$emit('input', evt.target.value)
      const findParent = parent => {
        while (parent) {
          if (parent.$options.name === 'LgFormItem') {
            break
          } else {
            parent = parent.$parent
          }
        }
        return parent
      }
      const parent = findParent(this.$parent)
      if (parent) {
        parent.$emit('validate')
      }
    }
  }
}
</script>

<style>

</style>
3. Validation problem: install async validator and call the validation rules in rules through validator
// FORMiTEM.VUE
<template>
  <div>
    <label>{{ label }}</label>
    <div>
      <slot></slot>
      <p v-if="errMessage">{{ errMessage }}</p>
    </div>
  </div>
</template>

<script>
import AsyncValidator from 'async-validator'
export default {
  name: 'LgFormItem',
  inject: ['form'],
  props: {
    label: {
      type: String
    },
    prop: {
      type: String
    }
  },
  mounted() {
    this.$on('validate', () => {
      this.validate()
    })
  },
  data () {
    return {
      errMessage: ''
    }
  },
  methods: {
    validate () {
      if (!this.prop) return
      const value = this.form.model[this.prop]
      const rules = this.form.rules[this.prop]

      const descriptor = { [this.prop]: rules }
      const validator = new AsyncValidator(descriptor)
      return validator.validate({ [this.prop]: value }, errors => {
        if (errors) {
          this.errMessage = errors[0].message
        } else {
          this.errMessage = ''
        }
      })
    }
  }
}
</script>

<style>

</style>
4. Add methods to stForm. By default, stFormItem is the first level sub component of stForm. Use this$ Children get all the sub components and find the sub level with prop, then traverse and call the validate method of the sub component
...
methods: {
  login () {
    console.log('button')
    this.$refs.form.validate(valid => {
      if (valid) {
        alert('Verification successful')
      } else {
        alert('Validation failed')
        return false
      }
    })
  }
}
...
// FORM.VUE
<template>
  <form>
    <slot></slot>
  </form>
</template>

<script>
export default {
  name: 'LgForm',
  provide () {
    return {
      form: this
    }
  },
  props: {
    model: {
      type: Object
    },
    rules: {
      type: Object
    }
  },
  methods: {
    validate (cb) {
      const tasks = this.$children
        .filter(child => child.prop)
        .map(child => child.validate())

      Promise.all(tasks)
        .then(() => cb(true))
        .catch(() => cb(false))
    }
  }
}
</script>

<style>

</style>
7, Monorepo
It is mainly used to manage components
Two types of project organization
Multirepo -- each package corresponds to a project (multiple repositories)
Monorepo - one project warehouse manages multiple modules / packages
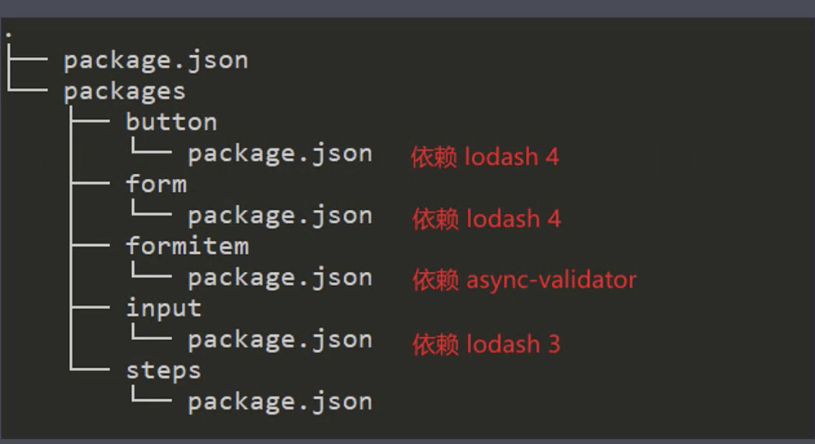
Generally, in the project, each module is placed in the packages folder, and each module has an independent folder. The directory structure is as follows
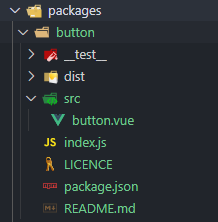
Including index JS is an entry file, which can be used as Vue Use to import
import Button from './src/button.vue'
// Vue can be used directly by others Use to register the plug-in
Button.install = Vue => {
  // Register a global component and write the name of the component
  Vue.component(Button.name, Button)
}
export default Button
8, Storybook
Visual component display platform
- Display components interactively in an isolated development environment
- Develop components independently
- Support a variety of frameworks, such as Vue, React, Angular, etc
Installation method:
- npx -p @storybook/cli sb init --type vue
- yarn add vue
- yarn add vue-loader vue-template-compiler --dev
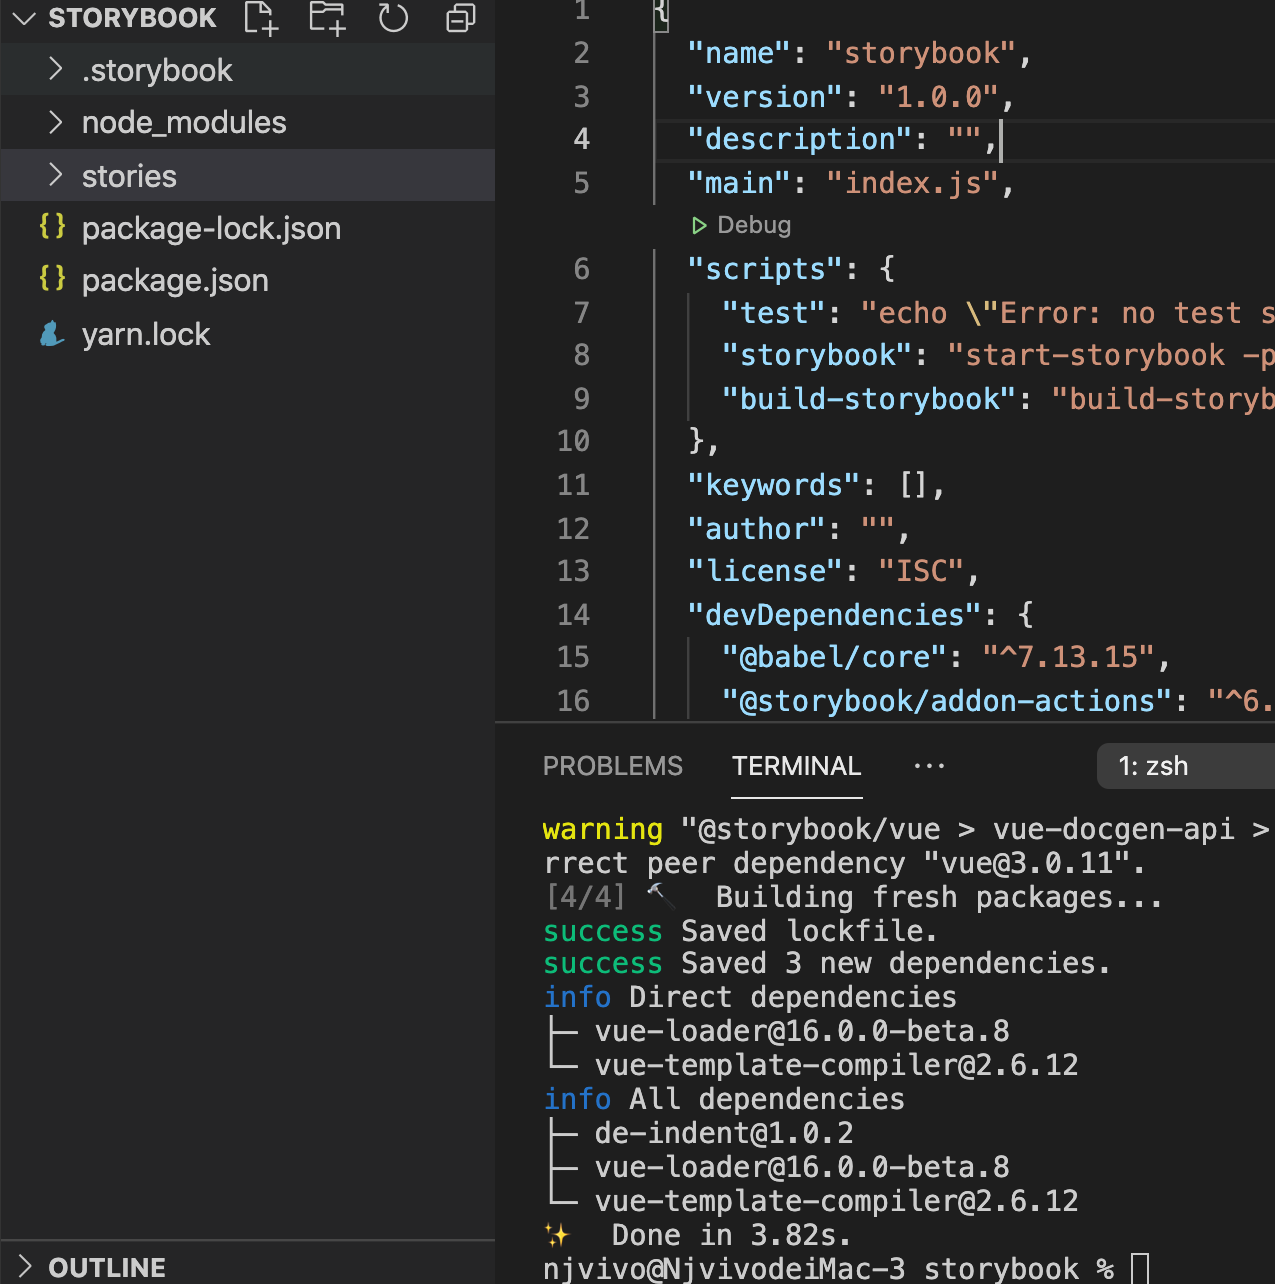
Start yarn storybook
Package and generate a static website, yarn build storybook
module.exports = {
  "stories": [
    "../stories/**/*.stories.mdx", // **Match folders at any level
    "../stories/**/*.stories.@(js|jsx|ts|tsx)"
  ],
  "addons": [
    "@storybook/addon-links",
    "@storybook/addon-essentials"
  ]
}
.storybook/main.js is equivalent to the configuration file of storybook, which sets the path of stories
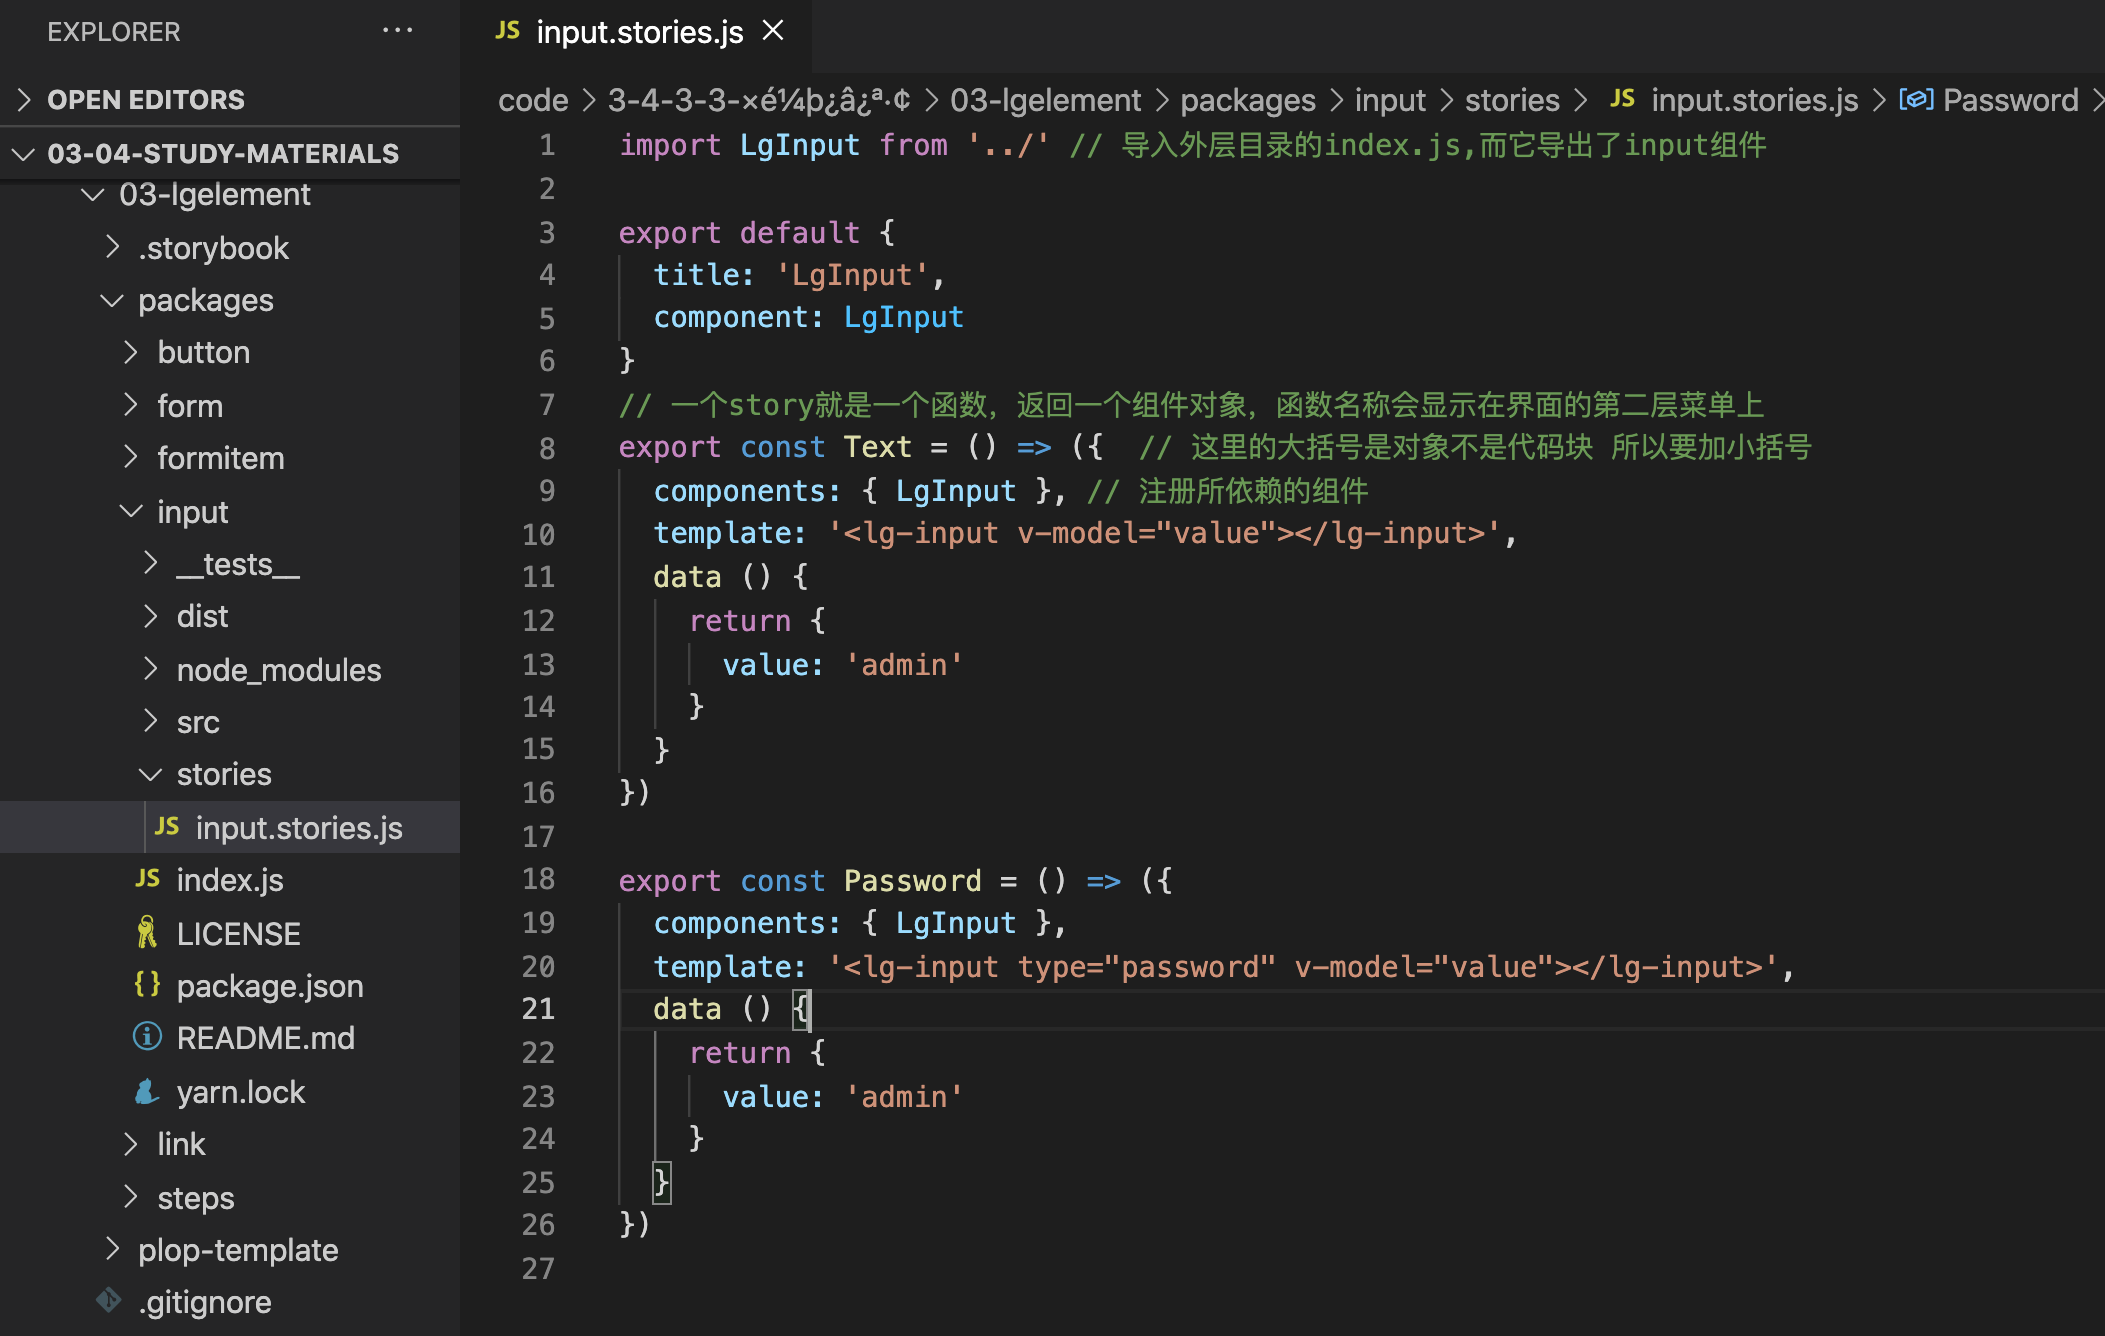
storybook is a collection of stories, which is used to create the content to be presented on the interface
addons is a plug-in
use:
Add file to path * * stories.js
.stories/main.js to modify the path of the stories file
 module.exports = {
 // In the future, all stories will be stored in stories.js at the end of the file
  stories: ['../packages/**/*.stories.js'],
  addons: ['@storybook/addon-actions', '@storybook/addon-links'],
};
yarn storybook running
cd packages
cd formitem
yarn add async-validator
packages/form/stories/form.stories.js
import LgForm from '../'
import LgFormItem from '../../formitem'
import LgInput from '../../input'
import LgButton from '../../button'
export default {
title: 'LgForm',
component: LgForm
}
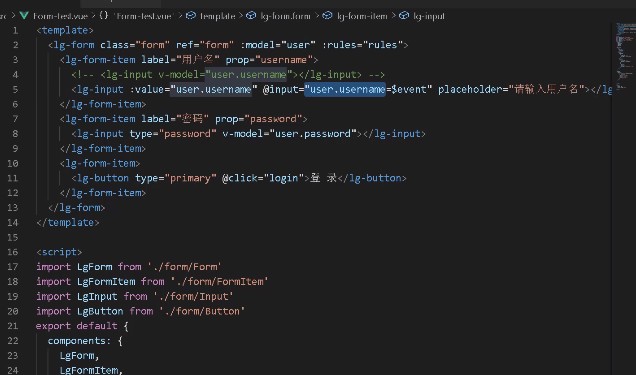
export const Login = () => ({
components: { LgForm, LgFormItem, LgInput, LgButton },
template: `
<lg-form class="form" ref="form" :model="user" :rules="rules">
<lg-form-item label="user name" prop="username">
<!-- <lg-input v-model="user.username"></lg-input> -->
<lg-input :value="user.username" @input="user.username=$event" placeholder="enter one user name"></lg-input>
</lg-form-item>
<lg-form-item label="password" prop="password">
<lg-input type="password" v-model="user.password"></lg-input>
</lg-form-item>
<lg-form-item>
<lg-button type="primary" @click="login">Sign in</lg-button>
</lg-form-item>
</lg-form>
`,
data () {
return {
user: {
username: '',
password: ''
},
rules: {
username: [
{
required: true,
message: 'enter one user name'
}
],
password: [
{
required: true,
message: 'Please input a password'
},
{
min: 6,
max: 12,
message: 'Please enter 6-12 Bit cipher'
}
]
}
}
},
methods: {
login () {
console.log('button')
this.$refs.form.validate(valid => {
if (valid) {
alert('Verification successful')
} else {
alert('Validation failed')
return false
}
})
}
}
})
9, yarn workspaces
Project dependency
npm does not support workspaces
There are dependent plug-ins in multiple modules, which can be managed uniformly through yarn workspaces
Open the workspace of yarn:
- Package. Of the project root directory JSON
- "private": true, / / the root directory of the workspace is generally scaffolding and does not need to be published. Here to prevent accidental exposure of content
- "workspaces": ["packages / *"] / / set the subdirectory of the workspace, and use * to specify any package in the packages directory
yarn workspaces use
- Install development dependencies to the workspace root directory
- yarn add jest -D -W jest is a unit testing tool developed by facebook
- Dependent workspace assigned to installation
- yarn workspace lg-button add loadsh@4 The package name here is our package Set in JSON
- Install dependencies for all workspaces
- yarn install
You can use yarn add * * * to install dependencies on all files, or you can use yarn workspace name add * * * to install dependencies on a single component named name, which may cause duplicate dependent components in each package. Therefore, you can add nodes in packages_ Modules are deleted, and then the dependencies required by multiple packages can be installed to the root directory through yarn install in the root directory, and the dependencies required by a single package can be installed to the current package
Monorepo's project structure generally cooperates with yarn workspaces to manage package dependencies. Package of vue3 and react JSON has enabled workspaces to facilitate dependency management
10, Lerna
lerna is a project that babel uses to maintain its Monorepo and open source
- lerna is a workflow tool that optimizes the use of git and npm to manage multi package warehouses
- Used to manage javascript projects with multiple packages
- It can submit code to git and npm warehouses with one click
It can also be used to manage package dependencies. You can choose whether to use npm or yarn to manage dependencies. It needs to be configured separately. If yarn is used, you can also open yarn workspaces. Generally, lerna and yarn workspaces are used together
javascript projects used to manage multiple packages can submit code to git and npm warehouses at one click. Generally, workspaces are used to manage package dependencies and Lerna is used to publish packages
Installation and use
yarn add lerna -g
lerna init -- initialize and execute git init
If the current project is not managed by git, it will initialize GIT and create a lerna.exe in the root directory of the project The configuration file of JSON (recording the initialization version of the current project and the path of the package to be managed) is in package Add development dependencies to JSON
lerna publish -- log in to npm, publish to npm and transfer to git
npm whoami view the user name to log in to the npm website
npm config get registry view the current image source
yarn lerna execute lerna publish
11, Unit testing of Vue components
Unit test is to test the input and output of a function, and use the way of assertion to judge whether the actual output is the same as the predicted output according to the input
Benefits of component unit testing
reference resources: https://vue-test-utils.vuejs.org/zh/guides/#%E8%B5%B7%E6%AD%A5
Provide documentation describing component behavior
Save time for manual testing
Reduce bug s when developing new features
Improved design
Promote reconstruction
Installation dependency
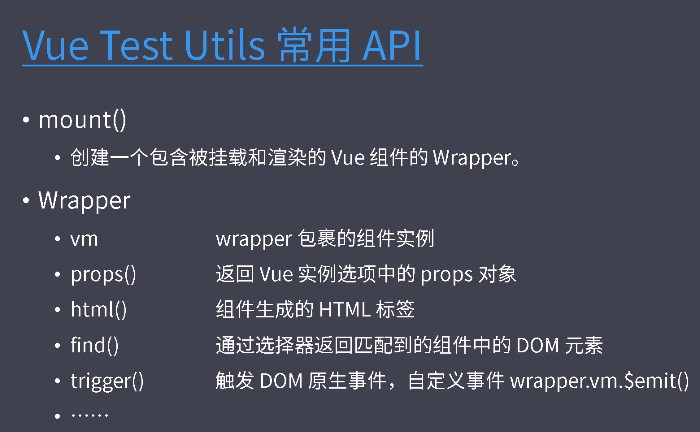
Vue Test Utils vue official library of component unit tests
The jest unit test framework is easy to combine with vue and has the least configuration, but it does not support file components. Therefore, a preprocessor is needed to hand over the js code, which is the result of compiling the single file component of vue, to jest for processing. vue officially provides a preprocessor vue jest for jest
Vue jest supports most of the functions of the file component. esmodule syntax and syntax of some es new features will be used in the test file. At this time, the Babel jest plug-in is required to downgrade the test code
babel-jest
yarn add jest @vue/test-utils vue-jest babel-jest -D -W
to configure
Package. Under the root directory json
// package.json
"scripts": {
   "test": "jest"
  ...
}
Jest. In the root directory config. js
// jest.config.js
module.exports = {
  "testMatch": ["**/__tests__/**/*.[jt]s?(x)"],// Matching path
  "moduleFileExtensions": [
    "js",
    "json",
    // Tell Jest to handle ` * vue ` file
    "vue"
  ],
  "transform": {
    // Use 'vue jest' to process ` * vue ` file
    ".*\\.(vue)$": "vue-jest",
    // Handle js with 'Babel jest'
    ".*\\.(js)$": "babel-jest"
  }
}
Babel. In the root directory config. js
module.exports = {
  presets: [
    [
      '@babel/preset-env'
    ]
  ]
}
Finally, when running, you will be prompted that babel cannot be found.
Reason: Vue test relies on babel6 and currently babel7
Babel bridge yarn add babel-core@bridge -D -W
-D is development dependency - W is installed in the root directory of the workspace. If it is not added, an error will be reported
Unit testing of Vue components
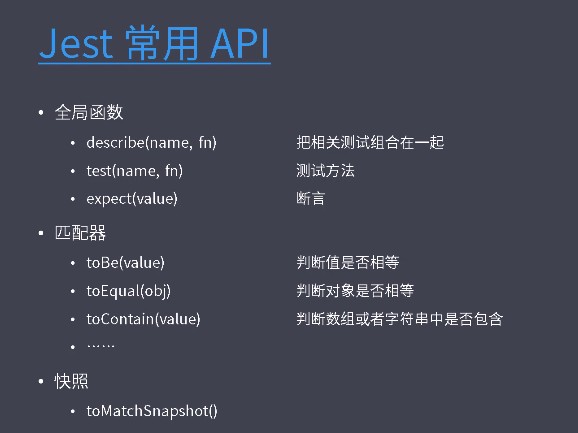
Basic API
JEST reference https://www.jestjs.cn/
// packages/input/__tests__/input.test.js
import input from '../src/input.vue'
import { mount } from '@vue/test-utils' // The API mounting component provided in it is required
// Jest does not need to import because the test file is loaded and executed by jest
// describe creates a code block and puts the relevant tests of input into this code block
// Does the test include
describe('lg-input', () => {
  test('input-text', () => {
    const wrapper = mount(input) // Mount components
    // Get the html tag generated by this component and judge whether it contains
    expect(wrapper.html()).toContain('input type="text"')
  })
  // Set the type to password and test at the same time
  test('input-password', () => {
    const wrapper = mount(input, {
      propsData: { // Set props
        type: 'password'
      }
    })
    expect(wrapper.html()).toContain('input type="password"')
  })
// Test whether value is admin
  test('input-password', () => {
    const wrapper = mount(input, {
      propsData: {
        type: 'password',
        value: 'admin'
      }
    })
    // wrapper.props this method can obtain the props object of the generated component. If value is passed, it obtains the value of the value attribute of the props of the generated component
    expect(wrapper.props('value')).toBe('admin')
  })
// Snapshot is a method provided in jest
// First run: save the text content to a specific file in the same directory as the current file/__ snapshots__
// The second run: compared with the first run, the same is successful
// yarn test -u command to delete and regenerate the snapshot
  test('input-snapshot', () => {
    const wrapper = mount(input, {
      propsData: {
        type: 'text',
        value: 'admin'
      }
    })
    // Take a snapshot of the dom object corresponding to the mounted component, and put it into a specific text file to record the first call
    expect(wrapper.vm.$el).toMatchSnapshot()
  })
})
12, Rollup
Rollup is a module packer
Rollup supports tree shaking
The result of packaging is smaller than that of Webpack
Rollup is more appropriate when developing framework / component libraries
pack
Installation dependency
Rollup
Rollup plugin tester compression
rollup-plugin-vue@5.1.9 Compile vue2 single file component into js
vue-template-compiler
Create rollup in the input directory config. js
import { terser } from 'rollup-plugin-terser'
import vue from 'rollup-plugin-vue'
module.exports = [
  {
    input: 'index.js',
    output: [
      {
        file: 'dist/index.js',
        format: 'es'//The packaging mode of the configuration module is es for es6 and cjs for Commonjs
      }
    ],
    plugins: [
      vue({
        css: true, //Insert the style in the single file component into the style tag in html
        compileTemplate: true // Convert component into render function
      }),
      terser() // Compress code
    ]
  }
]
Find the package in the input package scripts configuration of JSON
When you enter the rollup command, you load rollup by default config. JS this file
"build": "rollup -c"
Run package / single package
yarn workspace lg-input run build
Pack multiple packages
In addition to the above several dependencies
yarn add @rollup/plugin-json rollup-plugin-postcss @rollup/plugin-node-resolve -D -W
@Rollup / plugin json: enables rollup to load json files as modules, which will be used in configuration files
rollup-plugin-postcss :
@Rollup / plugin node resolve: package the dependent third-party packages in the packaging process
Create rollup from the project root directory config. The function of this package configuration file is to generate the next package JSP for all packages
import fs from 'fs'
import path from 'path'
import json from '@rollup/plugin-json'
import vue from 'rollup-plugin-vue'
import postcss from 'rollup-plugin-postcss'
import { terser } from 'rollup-plugin-terser'
import { nodeResolve } from '@rollup/plugin-node-resolve'

const isDev = process.env.NODE_ENV !== 'production'

// Public plug-in configuration
const plugins = [
  vue({
    // Dynamically inject css as a <style> tag
    css: true,
    // Explicitly convert template to render function
    compileTemplate: true
  }),
  json(),
  nodeResolve(),
  postcss({
    // Insert css into style
    // inject: true,
    // Put css in the same directory as js
    extract: true
  })
]

// If it is a development environment, add the compression plug-in to the plug-in array to start compression
isDev || plugins.push(terser())

// packages folder path. As the following path of processing
const root = path.resolve(__dirname, 'packages')

module.exports = fs.readdirSync(root) // Read everything in the directory
  // Filter, keep only folders
  .filter(item => fs.statSync(path.resolve(root, item)).isDirectory()) // And filter out the directory, that is, the folder of the package to be processed
  // Create a corresponding configuration for each folder
  .map(item => {
    const pkg = require(path.resolve(root, item, 'package.json')) // Find the package. In each directory JSON file
    return { // Configuration of rollup corresponding to each package
      input: path.resolve(root, item, 'index.js'),
      output: [
        {
          exports: 'auto',
          file: path.resolve(root, item, pkg.main),
          format: 'cjs'
        },
        {
          exports: 'auto',
          file: path.join(root, item, pkg.module),
          format: 'es'
        },
      ],
      plugins: plugins // Configure the plug-in. When the map ends, it returns an array, and each object in the array represents the configuration of a package
    }
  })
Set package. In each package main and module fields in JSON
"main": "dist/cjs/index.js",
"module": "dist/es/index.js"
Package. Of the root directory Configuring scripts in JSON
"build": "rollup -c" **
13, Setting environment variables
Delete unused content in the item
stories is generated when the storybook is initialized
Storybook static is generated when storybook is packaged
- yarn add cross-env -D -W
- Package. Of the root directory The scripts build command in JSON is modified to
"build:prod": "cross-env NODE_ENV=production rollup -c",
"build:dev": "cross-env NODE_ENV=development rollup -c" - When running, you will find that the code is compressed in build:prod mode
14, Clean up
remove directory specified
yarn add rimraf -D -W
Each package is configured
"scripts": {
    "del": "rimraf dist"
}
yarn workspaces run del

Clear all packages node_modules
 Configuration under root directory
"scripts": {
    "clean": "lerna clean",
  }
15, Basic structure of component generation based on template
yarn add plop -W -D
16, Release
yarn build:prod
npm whoami
yarn lerna