1, Create a private CA and apply for a certificate.
1.1 create CA related directories and files
[root@Centos8 ~]# mkdir /etc/pki/CA/{certs,crl,newcerts,private}
[root@Centos8 ~]# tree /etc/pki/CA/
/etc/pki/CA/
├── certs
├── crl
├── newcerts
└── private
The index.txt and serial files need to be used when issuing certificates. If they do not exist, the creation will fail. You need to create the definition yourself
[root@Centos8 ~]# touch /etc/pki/CA/index.txt #Generate certificate index data file
[root@Centos8 ~]# echo 0F > /etc/pki/CA/serial # Specifies that the serial number of the first certificate issued is 0
1.2 create CA key
[root@Centos8 ~]# cd /etc/pki/CA/
[root@Centos8 CA]# (umask 066; openssl genrsa -out private/cakey.pem 2048)
1.3 issue self signed certificate to CA
[root@Centos8 private]# openssl req  -new -x509  -key /etc/pki/CA/private/cakey.pem  -days 3650 -out /etc/pki/CA/cacert.pem

-new: Generate a new certificate signing request
-x509: Dedicated to CA Generate self signed certificate
-key: The private key file used to generate the request
-days n: Validity period of certificate
-out /PATH/TO/SOMECERTFILE: Save path of certificate
[root@Centos8 CA]# sz cacert.pem
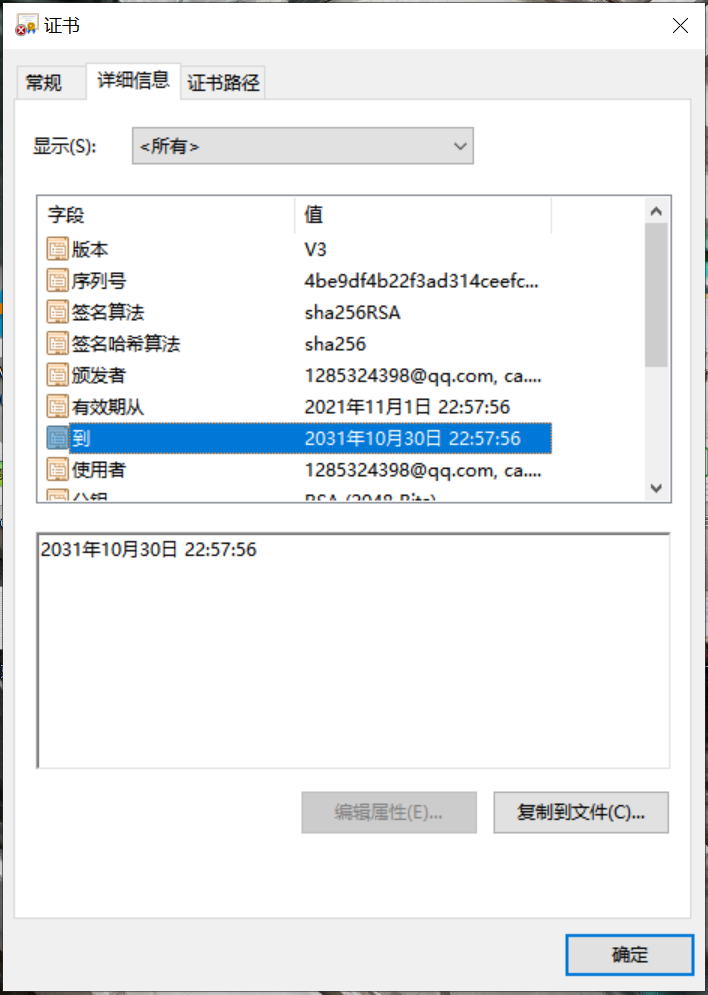
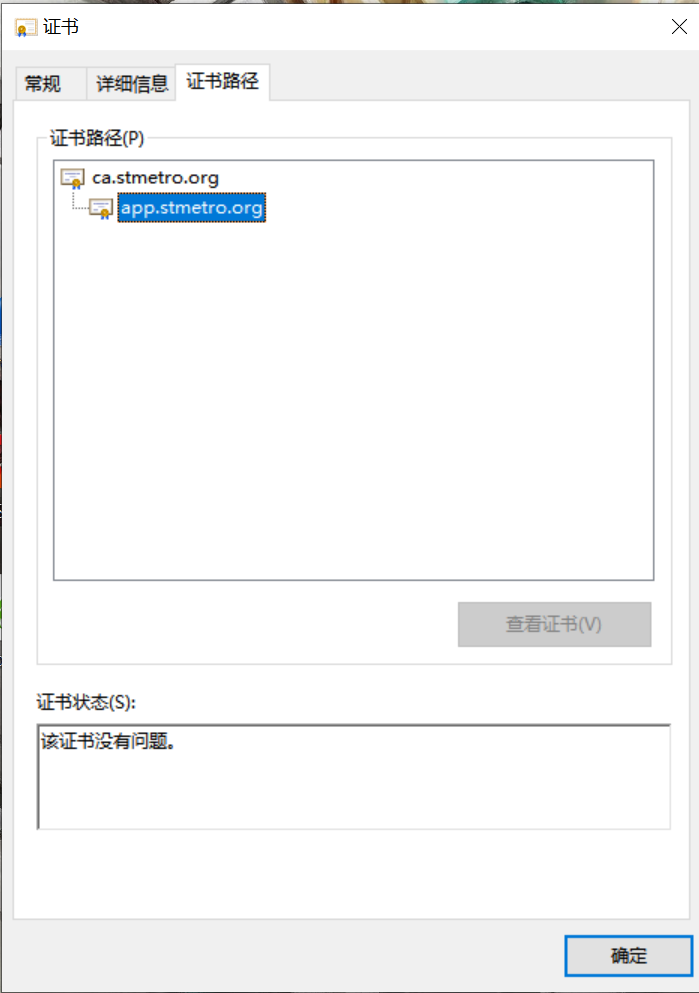
Transfer the file to windows with the file extension cacert.pem.crt. Open it to view the details of the CA certificate.
1.4 user generated private key and certificate application
Generate user private key storage path
[root@Centos8 ~]# mkdir /data/app
[root@Centos8 ~]# (umask 066; openssl genrsa -out /data/app/app.key 2048)
1.5 generate certificate application documents
[root@Centos8 ~]# openssl req -new -key /data/app1/app1.key -out /data/app1/app1.csr
By default, country, province and company name must be consistent with CA
1.6 certificate issued by Ca
[root@Centos8 CA]# openssl ca -in /data/app/app.csr -out /etc/pki/CA/certs/app.crt -days 1000
[root@Centos8 CA]# tree
.
├── cacert.pem
├── certs
│   ├── app1.crt
│   └── app.crt
├── crl
├── index.txt
├── index.txt.attr
├── index.txt.attr.old
├── index.txt.old
├── newcerts
│   ├── 0F.pem
│   └── 10.pem
├── private
│   └── cakey.pem
├── serial
└── serial.old
4 directories, 12 files
1.7 send certificate related files to the client for use
[root@Centos8 CA]# cp /etc/pki/CA/certs/app.crt /data/app/
[root@Centos8 CA]# tree /data/app/
/data/app/
├── app.crt
├── app.csr
└── app.key
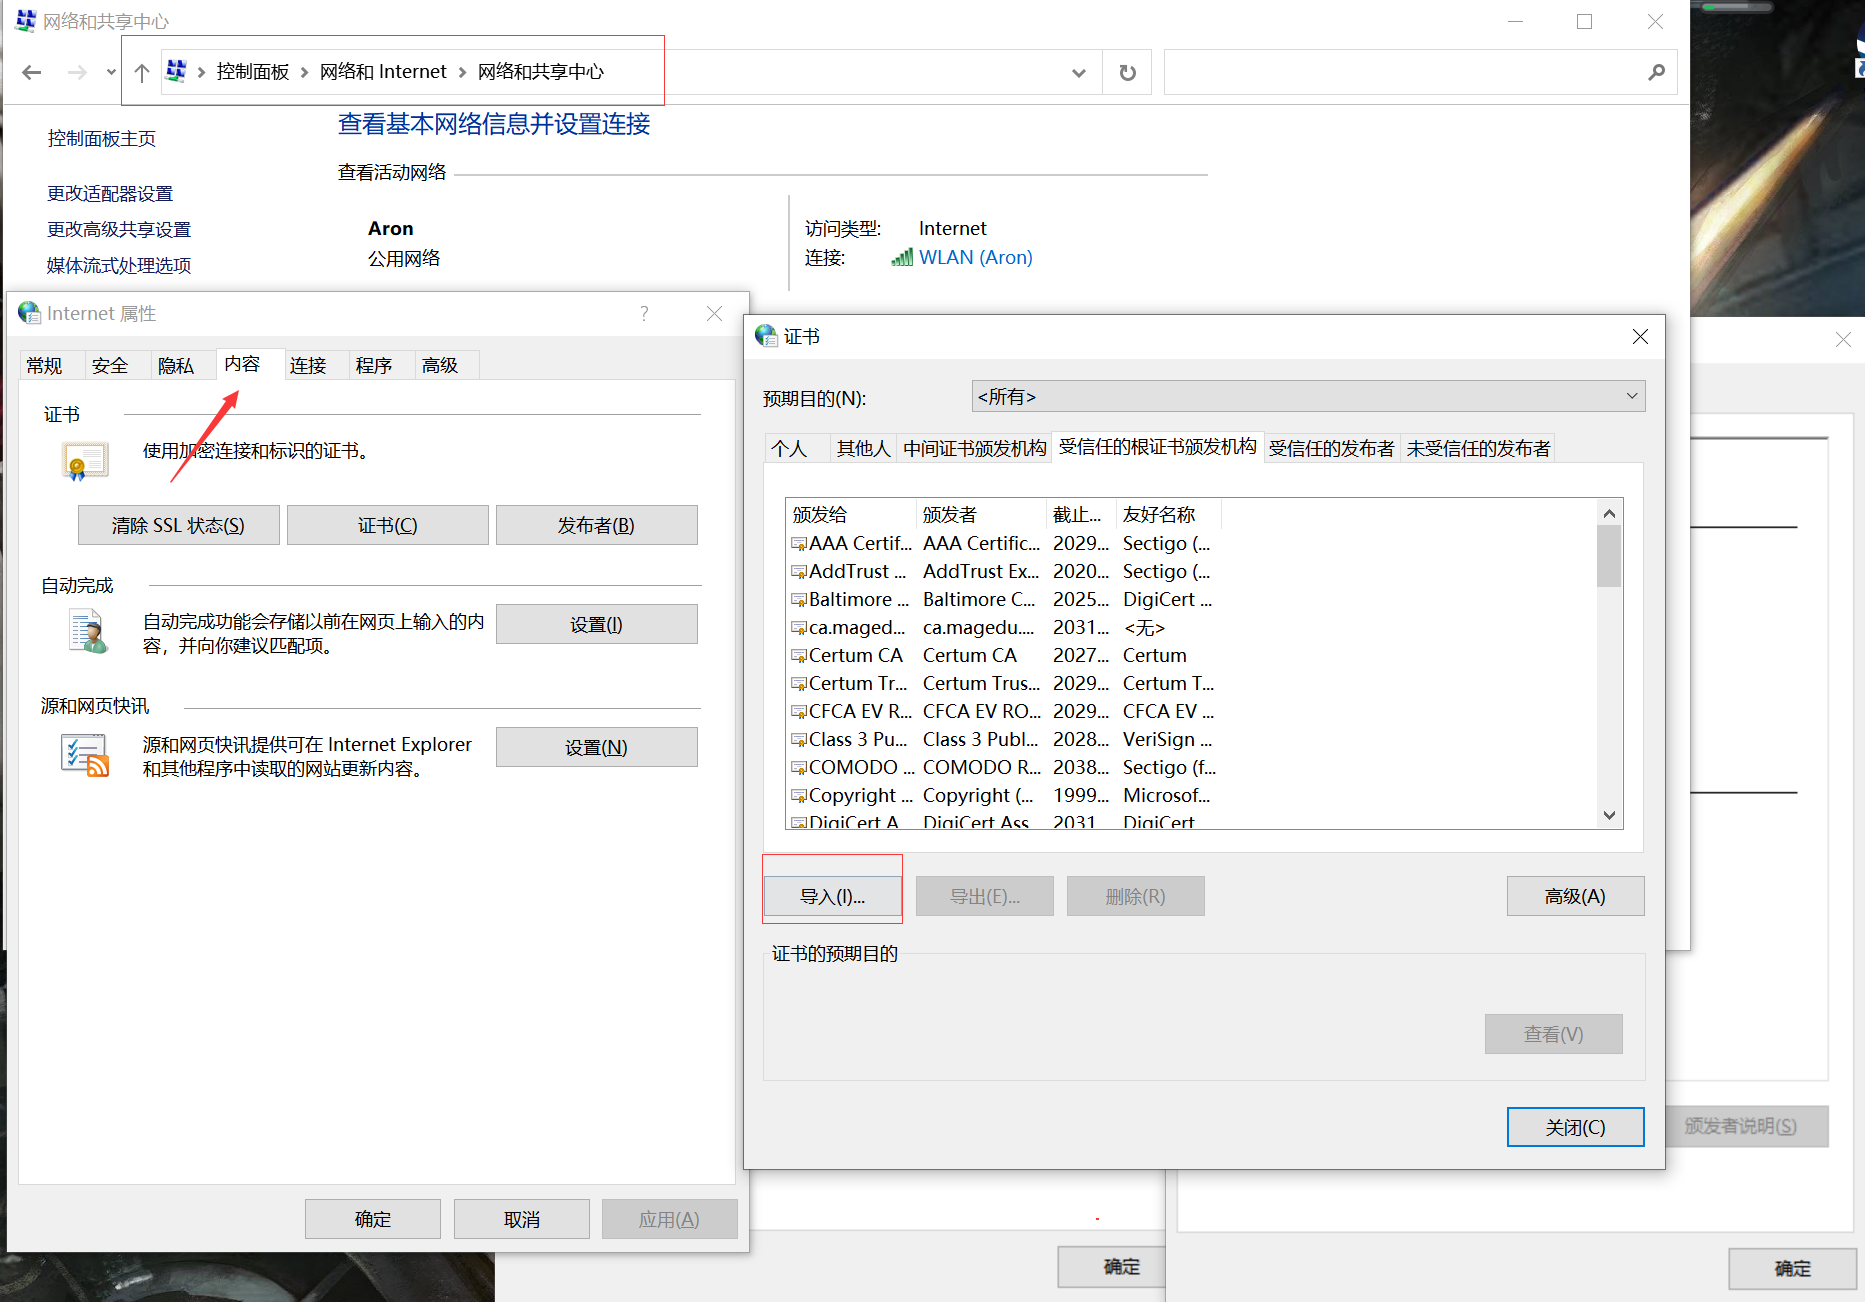
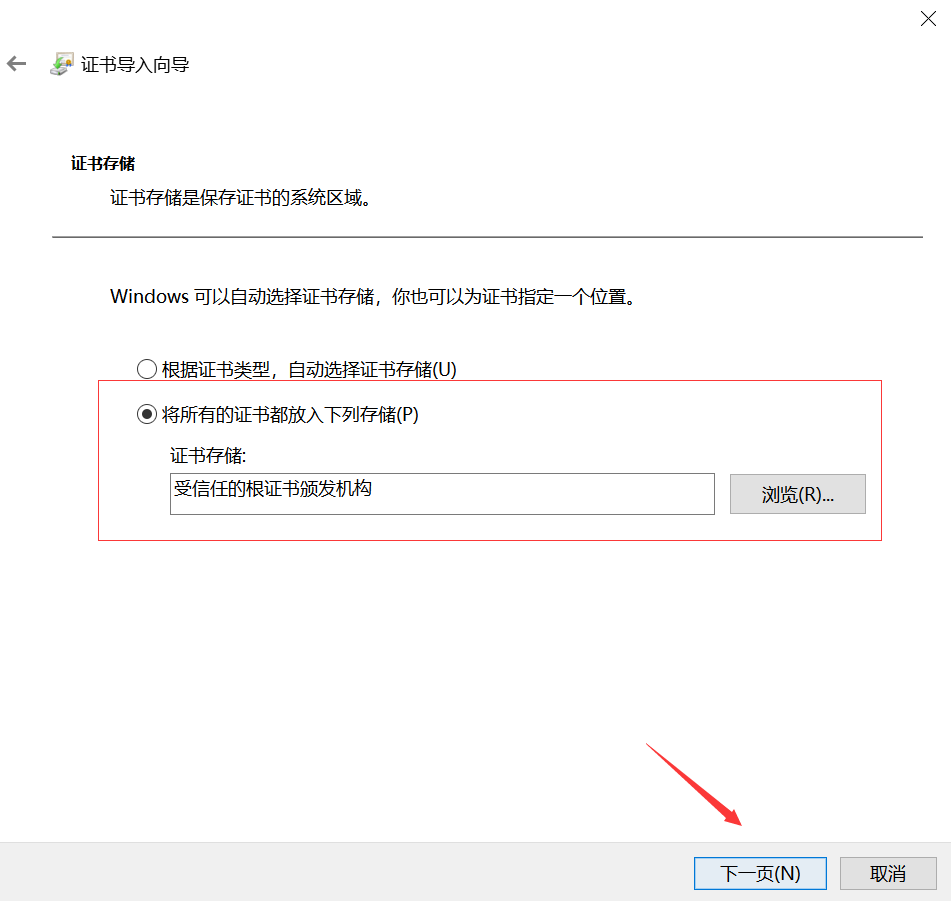
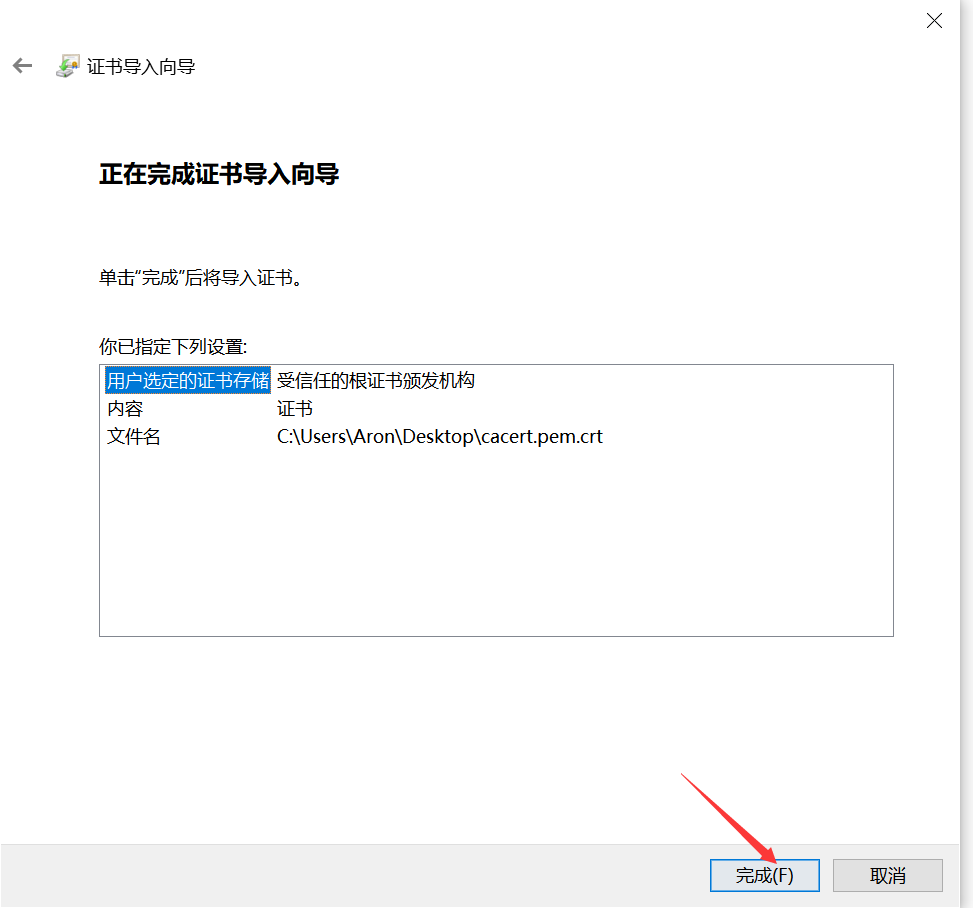
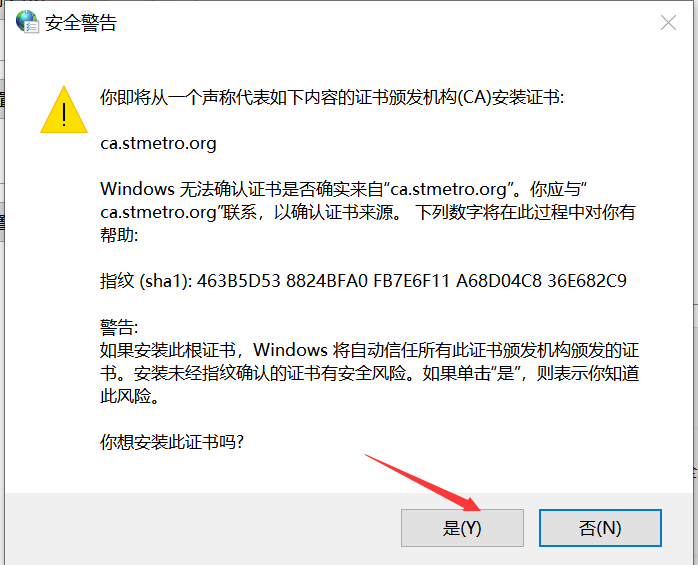
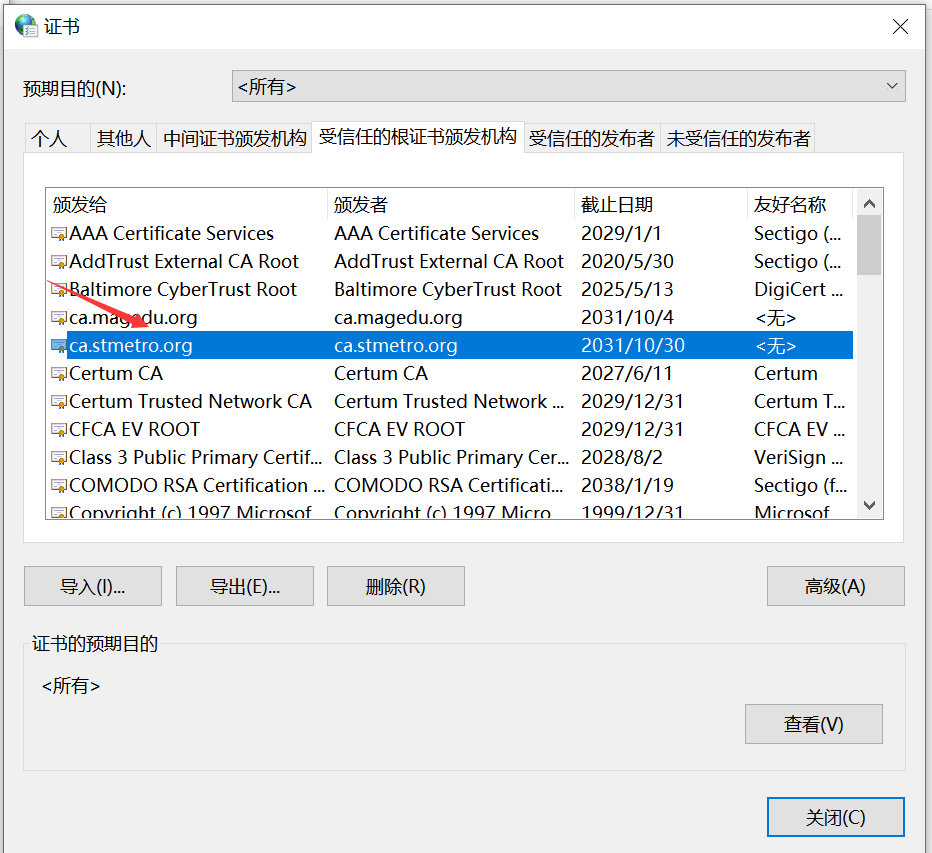
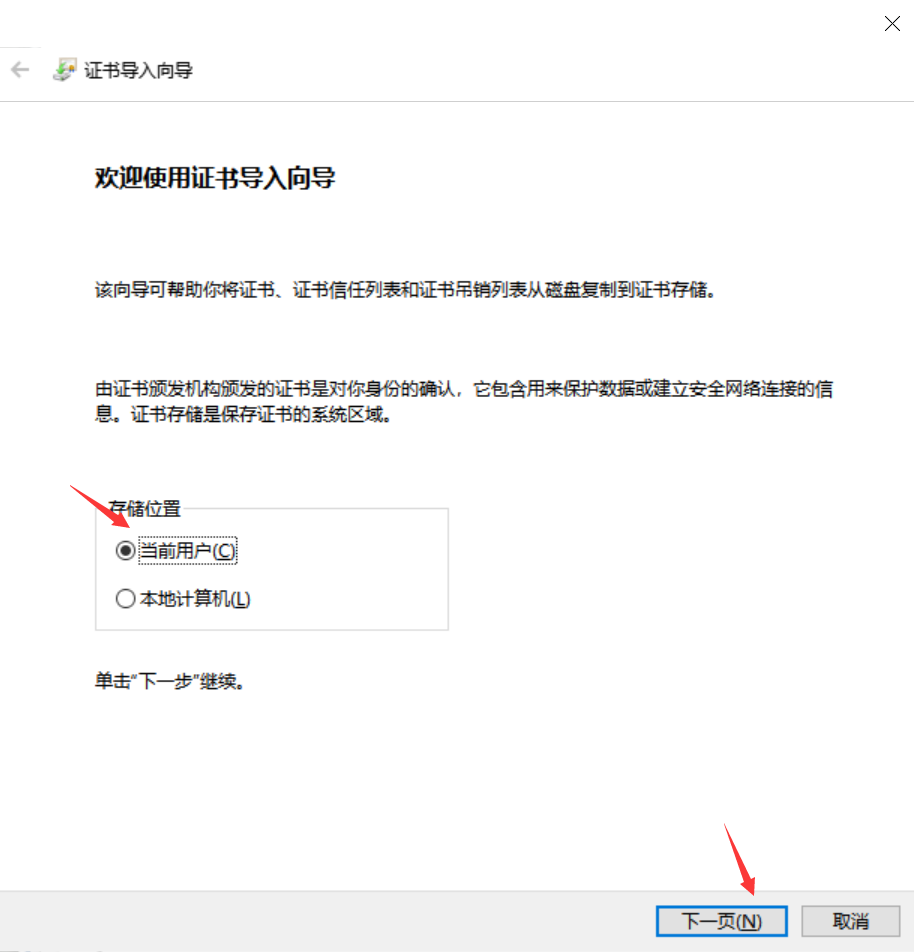
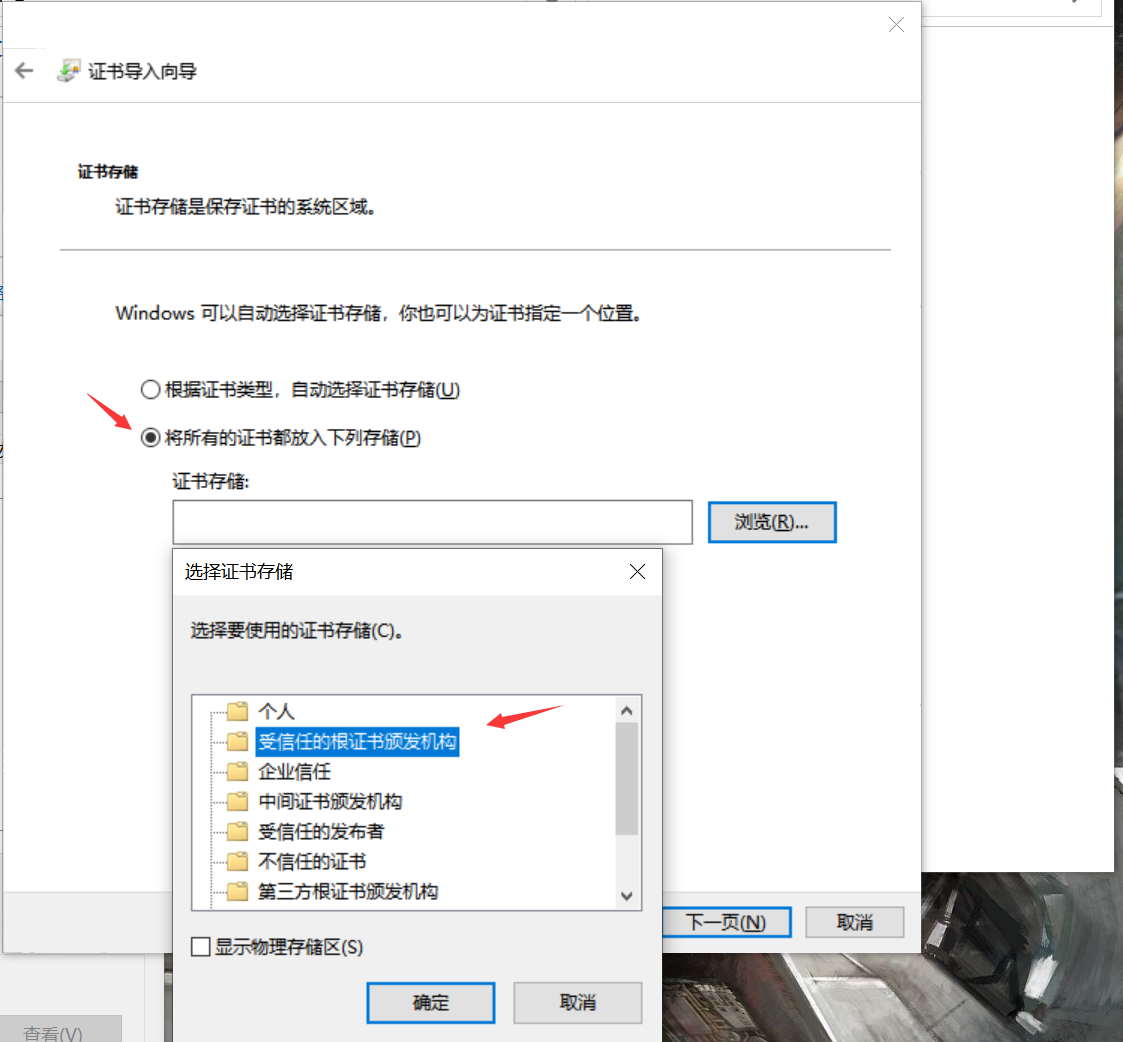
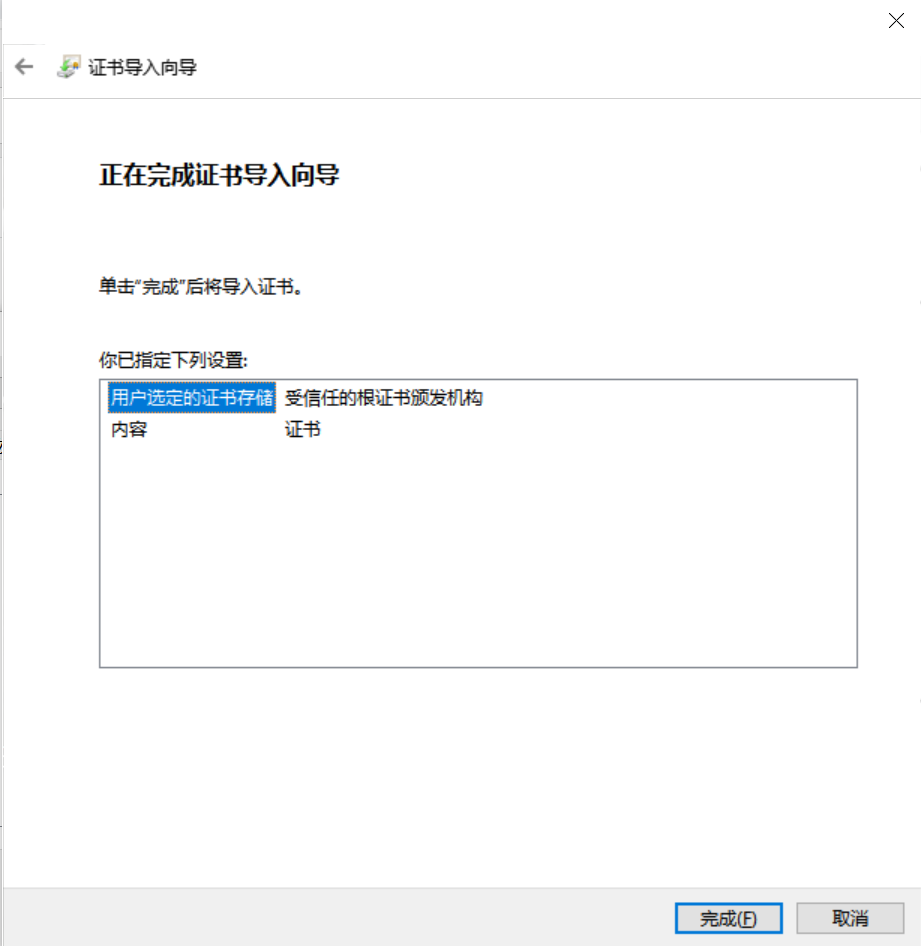
1.8 certificate trust
The default certificate was not trusted at the beginning of windows


2, ssh common parameters and usage
2.1. ssh service introduction
ssh: secure shell protocol, 22/tcp, secure remote login, encrypted communication, replacing the traditional telnet protocol
Specific software implementation:
OpenSSH: the open source implementation of ssh protocol. CentOS is installed by default
dropbear: another open source project implementation of ssh protocol
SSH protocol version
v1: MAC based on CRC-32 is not safe; man-in-middle
v2: the host protocol of both parties selects the secure MAC mode, performs key exchange based on DH algorithm, and realizes identity authentication based on RSA or DSA
2.1.1 principle of public key exchange

Client initiated link request
The server returns its own public key and a session ID (in this step, the client gets the server's public key)
Client generated key pair
The client calculates a value Res with its own public key XOR session ID, and encrypts it with the public key of the server
The client sends the encrypted value to the server, and the server decrypts it with the private key to obtain Res
The server uses the decrypted value Res XOR session ID to calculate the client's public key (in this step, the server obtains the client's public key)
Finally: each party holds three secret keys, namely its own pair of public and private keys and the other party's public key. All subsequent communications will be encrypted
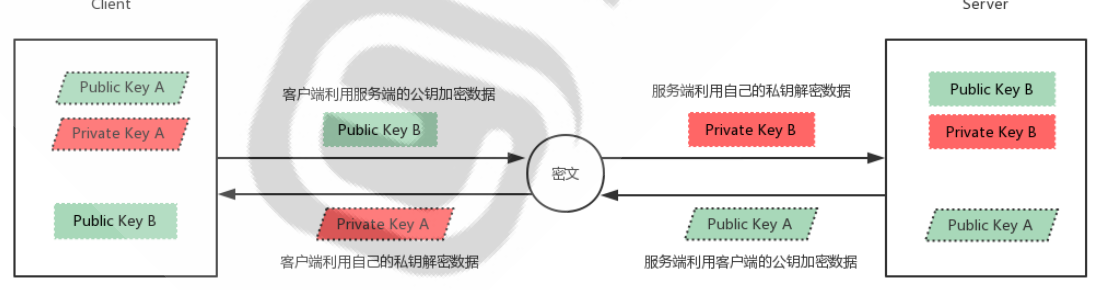
2.1.2 ssh encrypted communication principle
2.2 client ssh command
The ssh command is an ssh client that allows authenticated encrypted secure access to remote systems.
When the user connects to the ssh server remotely, the ssh server / etc / SSH / SSH is copied_ The public key in the host * key.pub file is to ~ /. SSH / know of the client_ Hosts. The corresponding private key will be automatically matched during the next connection. If it cannot be matched, the connection will be rejected.
ssh client configuration file: / etc/ssh/ssh_config
format
ssh [user@]host [COMMAND]
ssh [-l user] host [COMMAND]
Common options
-p port #Port on which the remote server listens
-b #Specify the source IP of the connection
-v #Debug mode
-C #Compression mode
-X #Support x11 forwarding
-t #Force pseudo tty allocation, such as SSH - t remoteserver1 SSH - t remoteserver2 SSH
remoteserver3
-o option   For example:-o StrictHostKeyChecking=no
-i <file>  #Specify the path of the private key file to implement key based authentication. The default file is ~ /. ssh/id_dsa,
~/.ssh/id_ecdsa, ~/.ssh/id_ed25519,~/.ssh/id_rsa etc.
2.2.1 example
[root@Centos8 ~]# ssh -t 10.0.0.7 ssh 10.0.0.6 #Forced pseudo tty allocation, centos6 shows that the remote terminal is centos7, but actually logs in from 8.
[root@Centos7 ~]# who
root     pts/0        2021-11-02 20:29 (10.0.0.1)
root     pts/1        2021-11-02 20:29 (10.0.0.8)
[root@Centos6 ~]# who
root     pts/0        2021-11-03 04:28 (10.0.0.1)
root     pts/1        2021-11-03 04:29 (10.0.0.7)
Remote command execution
[root@Centos8 ~]# ssh 10.0.0.7 "sed -i.bak '/StrictHostKeyChecking/s/.*/StrictHostKeyChecking no/' /etc/ssh/ssh_config" #Check is not prompted for the first login. Check is enabled by default
root@10.0.0.7's password:
Execute local script on remote host
[root@Centos8 ~]# cat /root/test.sh
#!/bash/bin
hostname -I
[root@Centos8 ~]# bash /root/test.sh
10.0.0.8
[root@Centos8 ~]# ssh 10.0.0.18 /bin/bash < test.sh
root@10.0.0.18's password:
10.0.0.18
2.2.2 ssh authentication login
Common authentication methods for ssh service login
User / password
Key based
Login authentication based on user and password
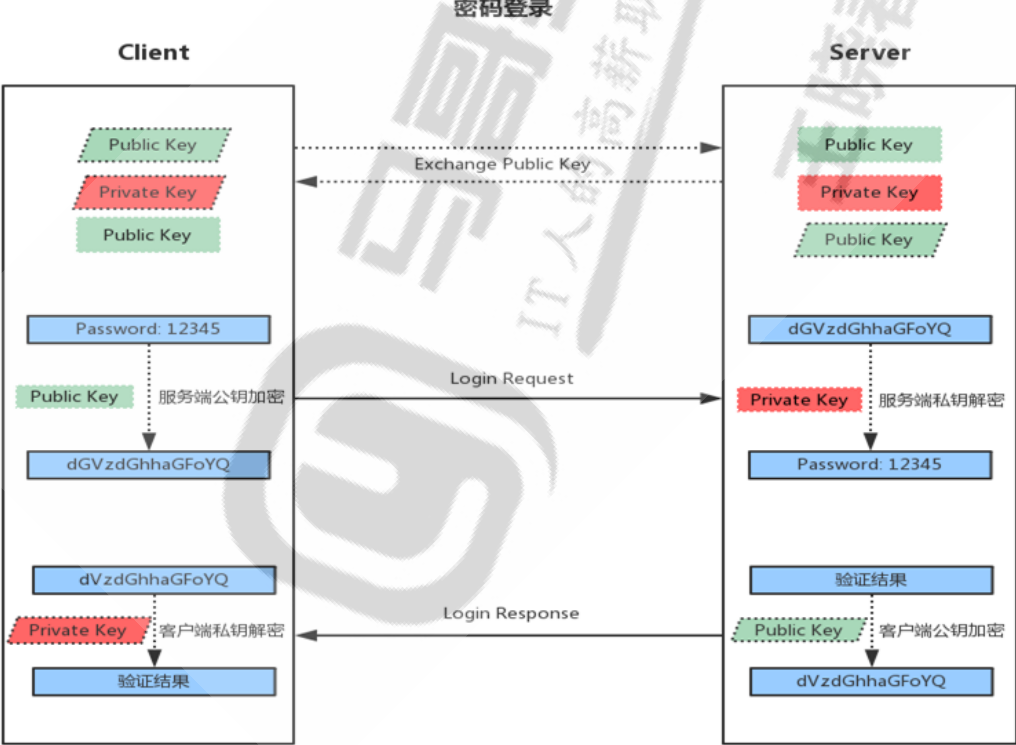
- When the client initiates an ssh request, the server will send its public key to the user
- The user will encrypt the password according to the public key sent by the server
- The encrypted information is sent back to the server, which decrypts it with its own private key. If the password is correct, the user logs in successfully
Key based login
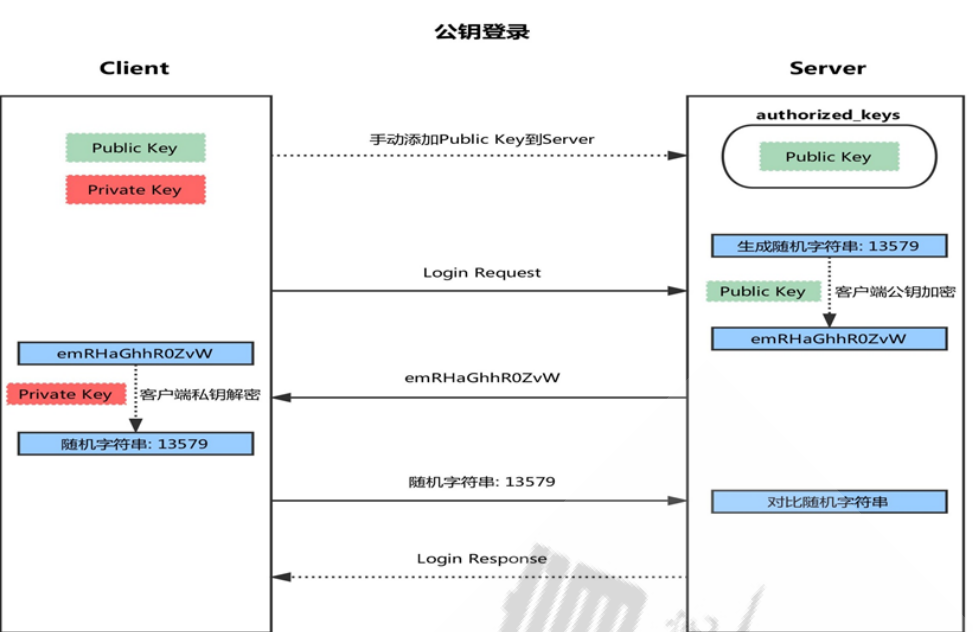
4. First, generate a pair of keys (SSH keygen) on the client
5. Copy the client's public key SSH copy ID to the server
6. When the client sends a connection request again, including ip and user name
7. After receiving the request from the client, the server will go to authorized_keys. If there are responding IP addresses and users, a random string will be generated, such as 13579.
8. The server will use the public key copied from the client for encryption, and then send it to the client
9. After receiving the message from the server, the client will decrypt it with the private key, and then send the decrypted string to the server
10. After receiving the string sent by the client, the server compares it with the previous string. If it is consistent, it is allowed to log in without password.
2.2.3 implementation of key based login
Generate key pair on client
ssh-keygen -t rsa [-P 'password'] [-f "~/.ssh/id_rsa"]
 [root@Centos8 ~]# ssh-keygen
Generating public/private rsa key pair.
Enter file in which to save the key (/root/.ssh/id_rsa): # Enter, accept the default value, and the file location where the key is stored.
Created directory '/root/.ssh'.
Enter passphrase (empty for no passphrase): # Enter, accept the empty password, and the key security will be reduced.
Enter same passphrase again:
Your identification has been saved in /root/.ssh/id_rsa.#Private key
Your public key has been saved in /root/.ssh/id_rsa.pub.#Public key
[root@Centos8 ~]# ll .ssh/
total 8
-rw------- 1 root root 2622 Nov  2 20:52 id_rsa
-rw-r--r-- 1 root root  581 Nov  2 20:52 id_rsa.pub
Transfer the public key file to the home directory of the corresponding user of the remote server
[root@Centos8 ~]# ssh-copy-id root@10.0.0.7
[root@Centos7 ~]# ll .ssh/
total 4
-rw------- 1 root root 581 Nov  2 21:03 authorized_keys
Authentication without password authentication·
[root@Centos8 ~]# ssh 10.0.0.7
Last login: Tue Nov  2 20:49:20 2021 from 10.0.0.1
Encrypt private key
[root@Centos8 ~]# ssh-keygen -p
Enter file in which the key is (/root/.ssh/id_rsa):
Key has comment 'root@Centos8.3.1-magedu.org'
Enter new passphrase (empty for no passphrase):
Enter same passphrase again:
Your identification has been saved with the new passphrase.
[root@Centos8 ~]# ssh 10.0.0.7
Enter passphrase for key '/root/.ssh/id_rsa':
Last login: Tue Nov  2 21:04:52 2021 from 10.0.0.8
[root@Centos7 ~]#
When ssh agent is enabled, the authentication agent only needs to enter the secret decrypted key once. In GNOME, the agent is automatically provided to the root user.
[root@Centos8 ~]# ssh-agent bash
[root@Centos8 ~]# ps aux|grep agent
root        1922  0.0  0.0  27420   520 ?        Ss   21:11   0:00 ssh-agent bash
root        1940  0.0  0.0  12132  1124 pts/1    S+   21:11   0:00 grep --color=auto agent
[root@Centos8 ~]# ssh-add
Enter passphrase for /root/.ssh/id_rsa:
Identity added: /root/.ssh/id_rsa (root@Centos8.3.1-magedu.org)
[root@Centos8 ~]# ssh 10.0.0.7
Last login: Tue Nov  2 21:08:53 2021 from 10.0.0.8
[root@Centos7 ~]#
2.2.4 other common ssh client tools
scp command
scp [options] SRC... DEST/
Method:
scp [options] [user@]host:/sourcefile /destpath
scp [options] /sourcefile [user@]host:/destpath
scp [options] [user@]host1:/sourcetpath [user@]host2:/destpath
Common options:
-C Compressed data stream
-r Recursive replication
-p Keep the attribute information of the original file
-q silent mode
-P PORT to specify remote host Listening port
rsync command
rsync tool can efficiently copy files between remote systems based on ssh and rsync protocols. It uses a secure shell connection as the transmission mode, which is faster than scp. It is based on incremental data synchronization, that is, only two different files are copied. This tool comes from rsync package.
Note: rsync software needs to be installed on hosts at both ends of the communication
rsync  -av /etc server1:/tmp #Copy directory and files under directory
rsync  -av /etc/ server1:/tmp #Copy only files in the directory
Common options
-n Simulate replication process
-v Show detailed process
-r Recursively copy directory tree
-p Reserved permissions
-t Retain modification timestamp
-g Keep group information
-o Keep owner information
-l Copy the soft link file itself (default)
-L Copy the file pointed to by the soft link file
-u If the recipient's file is newer than the sender's file, synchronization is ignored
-z Compress and save network bandwidth
-a Archive, equivalent to-rlptgoD,But not reserved ACL(-A)and SELinux Attributes(-X)
--delete When the source data is deleted, the target data is automatically deleted synchronously
sftp command
The usage of interactive file transfer tool is similar to that of traditional ftp tools. ssh service is used to realize safe file upload and download. ls cd mkdir rmdir pwd get put and other instructions can be used to obtain help information.
sftp [user@]host
[root@Centos8 ~]# sftp -help
usage: sftp [-46aCfpqrv] [-B buffer_size] [-b batchfile] [-c cipher]
          [-D sftp_server_path] [-F ssh_config] [-i identity_file]
          [-J destination] [-l limit] [-o ssh_option] [-P port]
          [-R num_requests] [-S program] [-s subsystem | sftp_server]
          destination
2.2.5 ssh advanced applications
SSH will automatically encrypt and decrypt the network data between all SSH clients and servers. In addition, SSH can forward the network data of other TCP ports through SSH connection, and automatically provides corresponding encryption and decryption services. This process is also called "tunneling", which is named because SSH provides a secure channel for other TCP links to transmit. For example, TCP applications such as Telnet, SMTP and LDAP can benefit from it, avoiding the clear text transmission of user name, password and privacy information. At the same time, if the firewall in the working environment restricts the use of some network ports, but allows SSH connections, you can also use SSH for communication by forwarding the TCP port.
SSH port forwarding can provide two functions: encrypting the communication data between SSH Client and SSH Server, breaking through the restrictions of firewall and completing some TCP connections that could not be established before.
SSH local port forwarding
ssh -L localport:remotehost:remotehostport sshserver
Options:
-f Background enable
-N Do not open remote shell,Waiting state
-g Enable gateway function
example:
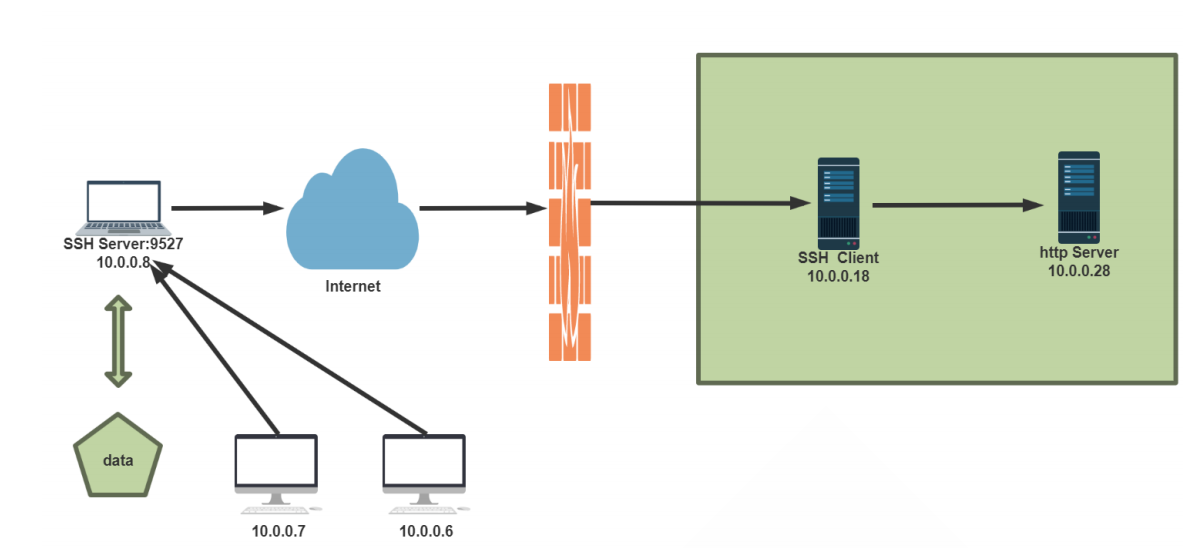
#When accessing the port 9527 of the local machine, it is encrypted and forwarded to the ssh service of sshsrv, and then decrypted and forwarded to telnetsrv:23
#data<-->localhost:9527 <-->localhost:XXXXX<-->sshsrv:22<-->sshsrv:YYYYY<--
>telnetsrv:23
ssh -L  9527:telnetsrv:23 -Nfg sshsrv
telnet 127.0.0.1 9527

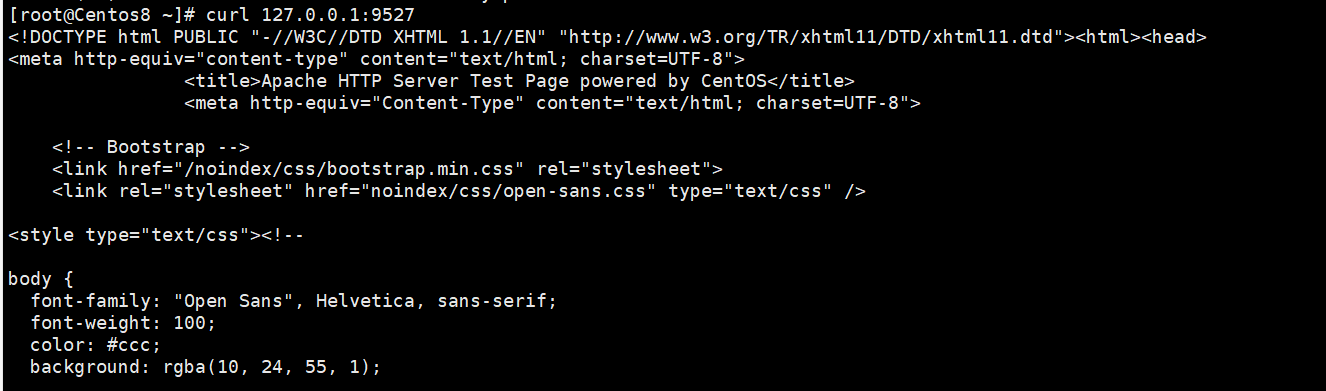
[root@Centos8 ~]# ssh -fNL 9527:10.0.0.7:80 10.0.0.18
SSH Remote port forwarding
ssh -R sshserverport:remotehost:remotehostport sshserver
Example:
#Let ssh SRV listen to the access of port 9527. If there is access, encrypt it and forward the request to the local ssh client through ssh service, and then the local ssh client will decrypt it
 Forward to after encryption telnetsrv:23
#Data<-->sshsrv:9527<-->sshsrv:22<-->localhost:XXXXX<-->localhost:YYYYY<--
>telnetsrv:23
ssh -R 9527:telnetsrv:23 -Nf sshsrv
Example: remote port forwarding and gateway function
[root@Centos8 ~]# yum -y install httpd;systemctl start httpd;echo website On 10.0.0.28 > /var/www/html/index.html #10.0.0.28 as http server.
[root@Centos8 ~]# vim /etc/ssh/sshd_config #Modify ssh server configuration
GatewayPorts yes #The gateway function must be turned on first, otherwise all ports corresponding to IP cannot be opened
[root@Centos8 ~]# systemctl restart sshd
[root@Centos8 ~]# ssh -fNgR 9527:10.0.0.28:80 10.0.0.8 #Specify the IP and port of the remote forwarding server in the ssh client
[root@Centos6 ~]# curl 10.0.0.8:9527
website On 10.0.0.28
[root@Centos7 ~]# curl 10.0.0.8:9527
website On 10.0.0.28
3, Build dhcp service and realize ip address application distribution
DHCP implementation
Note: before implementing the DHCP service, first turn off the existing DHCP service in the network, such as DHCP in vmware, and stop the access conflict.
Implementation software of DHCP service:
dhcp (version before CentOS 7) or dhcp server (package name in CentOS 8)
dnsmasq: small service software that can provide dhcp and dns functions.
3.1DHCP server configuration file
be careful:
The DHCP server itself adopts static IP
The subnet segment of the network segment where the static IP of the DHCP network card is located must be configured, otherwise the DHCP service cannot be started
/etc/dhcp/dhcpd.conf format
 Global configuration
subnet {
 ...
 }
host {
}
3.3 setting up DHCP server with CentOS 8 as an example
#Download and install DHCP service server
[root@Centos8 ~]# yum install -y dhcp-server.x86_64
#The yum installed DHCP service cannot be started. You need to define your own configuration file and modify it with the example configuration file
cp /usr/share/doc/dhcp-server/dhcpd.conf.example /etc/dhcp/dhcpd.conf
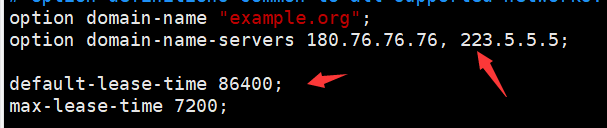
Configure DNS resolution address and lease term aging (in s)
Configure the DHCP service distribution IP address value range and gateway address
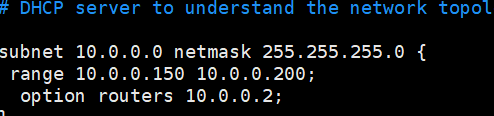
#Client requesting DHCP server to distribute IP address
[root@Centos7 ~]# cat /etc/sysconfig/network-scripts/ifcfg-eth0
DEVICE=eth0
NAME=eth0
BOOTPROTO=dhcp
ONBOOT=yes
#Restart the network card
[root@Centos7 ~]# nmcli connection reload
[root@Centos7 ~]# nmcli connection up eth0
#View the obtained IP address
[root@Centos7 ~]# ip add
1: lo: <LOOPBACK,UP,LOWER_UP> mtu 65536 qdisc noqueue state UNKNOWN group default qlen 1000
    link/loopback 00:00:00:00:00:00 brd 00:00:00:00:00:00
    inet 127.0.0.1/8 scope host lo
       valid_lft forever preferred_lft forever
    inet6 ::1/128 scope host
       valid_lft forever preferred_lft forever
2: eth0: <BROADCAST,MULTICAST,UP,LOWER_UP> mtu 1500 qdisc pfifo_fast state UP group default qlen 1000
    link/ether 00:0c:29:4e:16:42 brd ff:ff:ff:ff:ff:ff
    inet 10.0.0.150/24 brd 10.0.0.255 scope global noprefixroute dynamic eth0
       valid_lft 7102sec preferred_lft 7102sec
    inet6 fe80::20c:29ff:fe4e:1642/64 scope link
       valid_lft forever preferred_lft forever
              valid_lft forever preferred_lft forever
[root@Centos7 ~]# ping www.baidu.com
PING www.a.shifen.com (112.80.248.76) 56(84) bytes of data.
64 bytes from 112.80.248.76 (112.80.248.76): icmp_seq=1 ttl=128 time=14.6 ms
64 bytes from 112.80.248.76 (112.80.248.76): icmp_seq=2 ttl=128 time=18.6 ms
64 bytes from 112.80.248.76 (112.80.248.76): icmp_seq=3 ttl=128 time=15.1 ms
View DHCP server log
[root@Centos8 ~]# cat /var/lib/dhcpd/dhcpd
dhcpd6.leases  dhcpd.leases   dhcpd.leases~
[root@Centos8 ~]# cat /var/lib/dhcpd/dhcpd.leases
# The format of this file is documented in the dhcpd.leases(5) manual page.
# This lease file was written by isc-dhcp-4.3.6

# authoring-byte-order entry is generated, DO NOT DELETE
authoring-byte-order little-endian;

server-duid "\000\001\000\001)\024\016\302\000\014)eO\270";

lease 10.0.0.150 {
  starts 2 2021/11/02 15:04:00;
  ends 2 2021/11/02 17:04:00;
  cltt 2 2021/11/02 15:04:00;
  binding state active;
  next binding state free;
  rewind binding state free;
  hardware ethernet 00:0c:29:4e:16:42;
  client-hostname "Centos7";
}