k8s access control
Authentication
There are 8 authentication methods. One or more authentication methods can be enabled. As long as one authentication method passes, other authentication methods will not be carried out. X509 Client Certs and Service Accout Tokens are usually enabled.
There are two types of users in Kubernetes cluster: Service Accounts and Users Accounts managed by Kubernetes. The concept of account in k8s is not an account we understand, it does not really exist, it just exists in form.
Authorization
The authorization request can be received only after the authentication stage. The request is allowed or rejected by matching the request resource attributes according to all authorization policies. There are six authorization methods: AlwaysDeny, AlwaysAllow, ABAC, RBAC, Webhook and Node. RBAC is forced on by default cluster.
Admission Control
A method used to intercept requests. It runs after authentication and authorization. It is the last link in the authority authentication chain. It modifies and verifies the request API resource object.
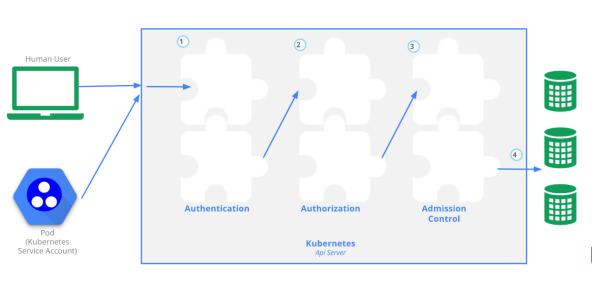

API access, authentication and authorization
Clients accessing k8s the API Server mainly fall into two categories:
Kubectl: in the user's home directory kube/config stores the key related information of the client accessing the API Server, so that when kubectl accesses k8s, it will automatically read the configuration file, initiate authentication to the API Server, and then complete the operation request.
Pod: the process in the pod needs to access the API Server. If it is accessed by a person or a script, the account used for such access is: UserAccount; When the pod connects to the API Server itself, the account used is ServiceAccount, which is mostly used in production.
kubectl sends the command to apiserver in http mode, which is actually to add, delete, modify and query the URL
The access api port is 8888 and enters the background
kubectl  proxy --port=8888 &
curl http://localhost:8888/api/v1/namespaces/default


curl http://localhost:8888/apis/apps/v1/namespaces/default/deployments
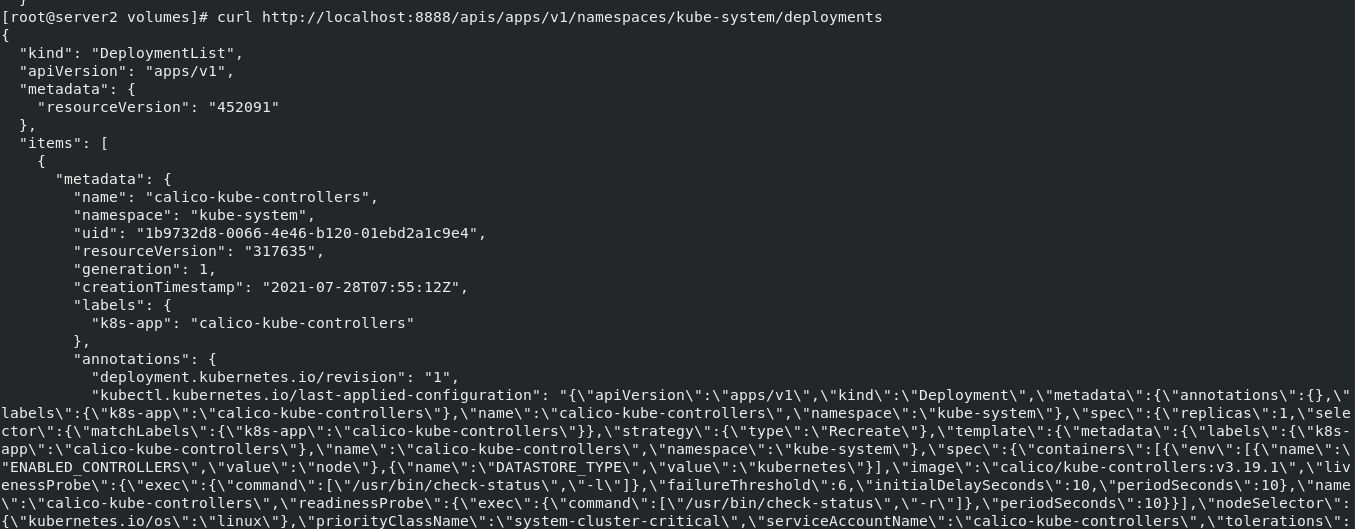
When the test is completed, shut down the background process
fg open the background process, and then ctrl+c end the process.
UserAccount and serviceaccount:
User accounts are for people. The service account is for the process running in the pod.
User accounts are global. Its name is globally unique in all namespaces of the cluster. Future user resources will not be subject to namespace isolation, and service accounts will be namespace isolated.
Usually, the user accounts of the cluster may be synchronized from the enterprise database, which requires special permissions and involves complex business processes. The purpose of service account creation is to reduce the weight and allow cluster users to create service accounts for specific tasks (i.e. the principle of permission minimization).
Create serviceaccount:
kubectl create serviceaccount admin
kubectl describe sa admin

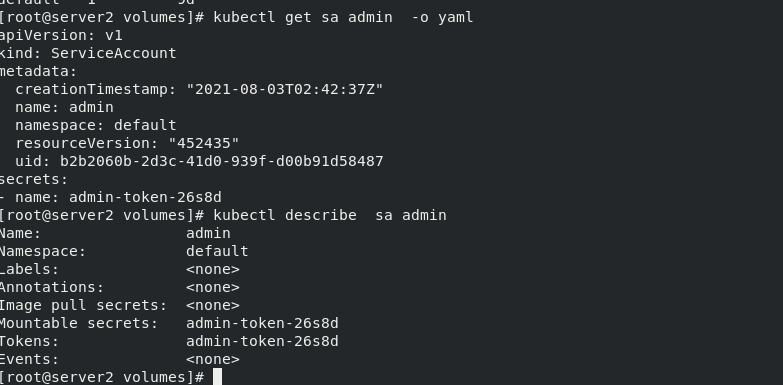
Check whether the previous myregistrykey exists
kubectl get secret

Add secrets to the default image pull of serviceaccount
kubectl patch serviceaccount admin -p '{"imagePullSecrets": [{"name": "myregistrykey"}]}'
After viewing the changed information of sa admin, you can see that the default image pull key has been changed
kubectl describe sa admin

Bind serviceaccount and pod
vim registry.yaml
apiVersion: v1
kind: Pod
metadata:
name: mypod
spec:
containers:
- name: game2048
image: reg.westos.org/westos/game2048:latest
imagePullSecrets:
- name: myregistrykey
serviceAccountName: admin
Adding authentication information to the serviceAccount is much safer than directly specifying imagePullSecrets in the Pod.
Pull up the resource list and view the nodes
kubectl apply -f registry.yaml
kubectl get pod

View the node details to see the detailed serviceAccount information
kubectl describe pod mypod

Create UserAccount
Enter the authentication folder for operation
cd /etc/kubernetes/pki/

Generate keys and authentication
openssl genrsa -out test.key 2048
openssl req -new -key test.key -out test.csr -subj "/CN=test"
openssl  x509 -req -in test.csr -CA ca.crt -CAkey ca.key  -CAcreateserial -out test.crt -days 365
openssl x509 -in test.crt -text -noout

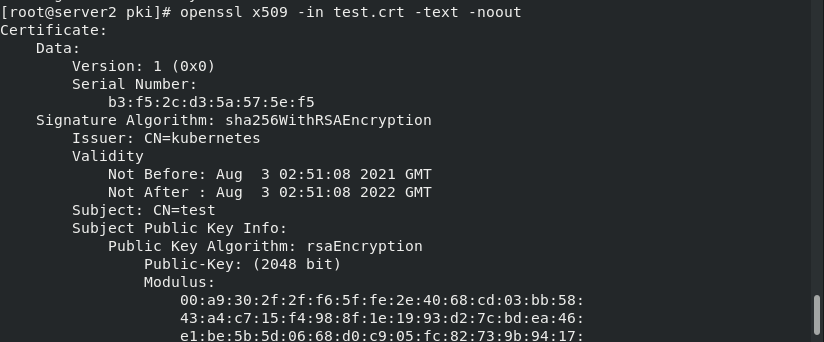
Set test User authentication
kubectl config set-credentials test --client-certificate=/etc/kubernetes/pki/test.crt --client-key=/etc/kubernetes/pki/test.key --embed-certs=true
kubectl  config view ## view permissions and specific operations
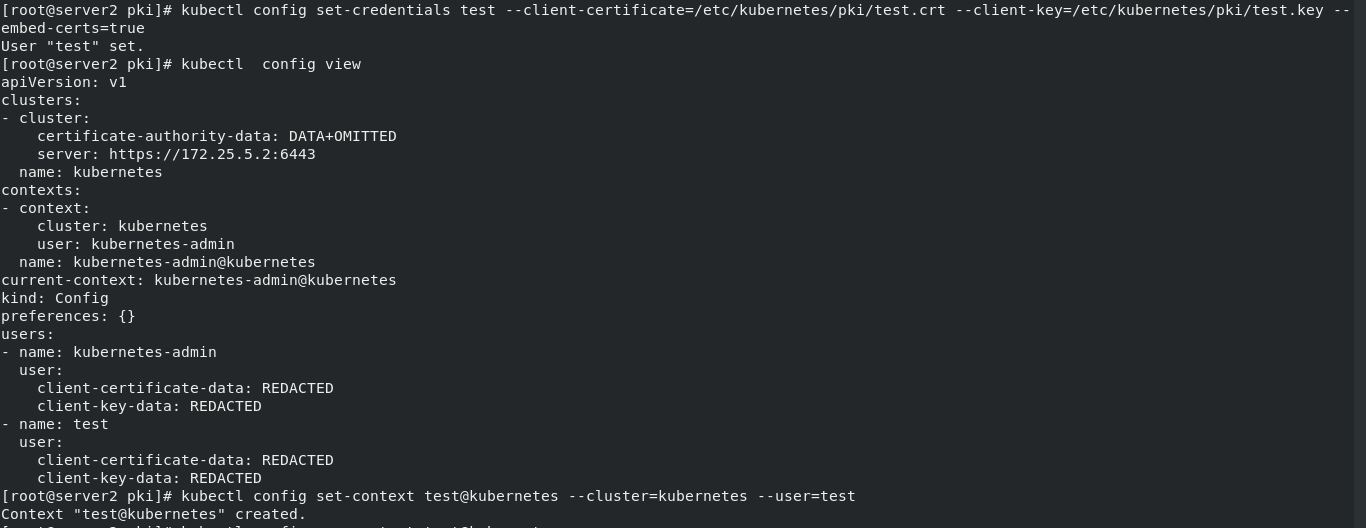
Create test useraccount
kubectl config set-context test@kubernetes --cluster=kubernetes --user=test

Switch to test User
kubectl config use-context test@kubernetes
kubectl  get pod

Error reason: at this time, the user has passed the authentication, but has not been granted the permission to operate the cluster resources. You need to continue weighting.
Switch to initial admin User
kubectl config use-context kubernetes-admin@kubernetes

RBAC – role based access control authorization
RBAC (Role Based Access Control): Role Based Access Control authorization.
Allows administrators to dynamically configure authorization policies through the Kubernetes API. RBAC means that users are associated with permissions through roles.
RBAC only authorizes and does not refuse authorization, so it only needs to define what the user is allowed to do.
RBAC includes four types: Role, ClusterRole, RoleBinding and ClusterRoleBinding.

Create working directory
mkdir roles
cd roles/
Write a Role example
vim role.yaml
kind: Role
apiVersion: rbac.authorization.k8s.io/v1
metadata:
namespace: default
name: myrole
rules:
- apiGroups: [""]
resources: ["pods"]
verbs: ["get", "watch", "list", "create", "update", "patch", "delete"]
If shown, grant all permissions to add, delete, modify and query the pod node of the myrole role role.
Pull up roles and view
kubectl apply -f role.yaml
kubectl get role

View role details
kubectl describe role myrole

Create RoleBinding example:
vim rolebinding.yaml
kind: RoleBinding
apiVersion: rbac.authorization.k8s.io/v1
metadata:
  name: test-read-pods
  namespace: default
subjects:
- kind: User
  name: test
  apiGroup: rbac.authorization.k8s.io
roleRef:
  kind: Role
  name: myrole
  apiGroup: rbac.authorization.k8s.io

---
apiVersion: rbac.authorization.k8s.io/v1
kind: RoleBinding
metadata:
  name: rolebind-myclusterrole
  namespace:  default
roleRef:
  apiGroup: rbac.authorization.k8s.io
  kind: ClusterRole
  name: myclusterrole
subjects:
- apiGroup: rbac.authorization.k8s.io
  kind: User
  name: test
Pull up the list and view it
kubectl apply -f rolebinding.yaml
kubectl get rolebindings.rbac.authorization.k8s.io

Switch to test User to test whether you can view the pod
kubectl config use-context test@kubernetes
kubectl get pod

By default, viewing the pod belongs to the default in ns. Viewing other namespace s requires cluster role authorization. Switch to the default admin for authorization.
kubectl get pod -n kube-system
kubectl config use-context kubernetes-admin@kubernetes

Create a clustered role ClusterRole example:
vim clusterrole.yaml
kind: ClusterRole
apiVersion: rbac.authorization.k8s.io/v1
metadata:
name: myclusterrole
rules:
- apiGroups: [""]
resources: ["pods"]
verbs: ["get", "watch", "list", "delete", "create", "update"]
- apiGroups: ["extensions", "apps"]
resources: ["deployments"]
verbs: ["get", "list", "watch", "create", "update", "patch", "delete"]
Pull up the list and check whether the cluster role is created
kubectl apply -f clusterrole.yaml
kubectl get clusterrole |grep mycluster

Cluster role binding
vim rolebinding.yaml
kind: RoleBinding
apiVersion: rbac.authorization.k8s.io/v1
metadata:
name: test-read-pods
namespace: default
subjects:
- kind: User
name: test
apiGroup: rbac.authorization.k8s.io
roleRef:
kind: Role
name: myrole
apiGroup: rbac.authorization.k8s.io
---
apiVersion: rbac.authorization.k8s.io/v1
kind: RoleBinding
metadata:
name: rolebind-myclusterrole
namespace:
default
roleRef:
apiGroup: rbac.authorization.k8s.io
kind: ClusterRole
name: myclusterrole
subjects:
- apiGroup: rbac.authorization.k8s.io
kind: User
name: test
Pull up the list and enter test to test
kubectl apply -f rolebinding.yaml
kubectl config use-context test@kubernetes
kubectl get deployments.apps

Similarly, cluster roles also have cluster binding methods,
Create clusterrolebinding:
vim clusterbinding.yaml
kind: ClusterRole
apiVersion: rbac.authorization.k8s.io/v1
metadata:
name: myclusterrole
rules:
- apiGroups: [""]
resources: ["pods"]
verbs: ["get", "watch", "list", "delete", "create", "update"]
- apiGroups: ["extensions", "apps"]
resources: ["deployments"]
verbs: ["get", "list", "watch", "create", "update", "patch", "delete"]
- apiGroups: [""]
resources: ["services","endpoints"]
verbs: ["get", "list", "watch", "create" , "delete"]
Pull up the resource list and view the permissions after binding the cluster role
kubectl apply -f clusterbinding.yaml kubectl config use-context test@kubernetes kubectl get pod -n kube-system ```