Distributed data storage solution for 100 million users 1
1. Introduction
MySQL Cluster is a high-performance, scalable and clustered database product. Its original intention of R & D and design is to meet the most severe application requirements in many industries. In these applications, the reliability of database operation is often required to reach 99.999%.
Since MySQL Cluster was released in 2004, its new features have been constantly updated and enhanced. This increases the demand of MySQL Cluster in new application fields, markets and industries. MySQL Cluster is not only used in traditional telecom services, such as HLR(Home Locator Registry) or SLR (subscriber locator Registry), but also widely used in VOIP, network billing, conference management, e-commerce websites, search engines, and even traditional background applications.
c?o;kd&5YLDT
vTw8&01niyek
ERROR 1820 (HY000): You must reset your password using ALTER USER statement before executing this statement.
alter user user() identified by "123456789";
characteristic:
- High availability: after the primary server fails, it can automatically switch to the backup server
- Scalability: it is convenient to add DB servers through scripts
- Load balancing: it supports manually switching the data requests of a company to another server. It can configure which company's data services access which server
2. Build Mysql Cluster (based on Alibaba cloud intranet deployment, the same instance region)
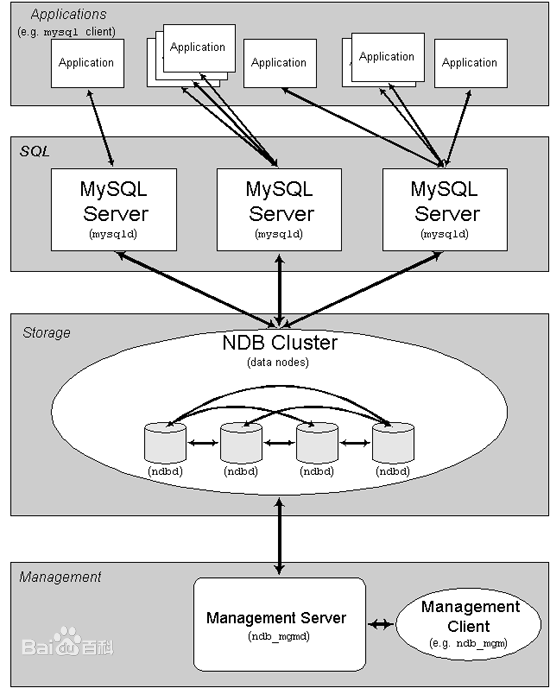
MySQL structure consists of three types of nodes (computers or processes), namely:
- Management node: used to provide configuration, management, arbitration and other functions for other nodes in the whole cluster.
- Data node: the core of MySQL Cluster, which stores data and logs and provides various data management services.
- SQL node (API): used to access MySQL Cluster data and provide external application services.
The installation path in each node must be the same, and the configuration environment always!!!
-
If MySQL server is installed on the machine, uninstall it first
First delete MySQL server:
sudo apt-get remove mysql-*
Then clean up the residual data
dpkg -l |grep ^rc|awk '{print $2}' |sudo xargs dpkg -PIt will pop up a dialog box. Just select yes
-
When building on the server, the servers in the same area (configured using intranet, fast)
Modify the vi /etc/hosts file and use the ip address of the intranet
172.16.184.33	slave1
172.16.0.243	slave2
172.16.232.76	master
- Modify the name in the corresponding host (or modify the name of the hosts file. It is recommended to modify the name for later use)
hostnamectl set-hostname master
hostnamectl set-hostname slave1
hostnamectl set-hostname slave2
-
Set mutual secret free login between hosts (set public key)
-
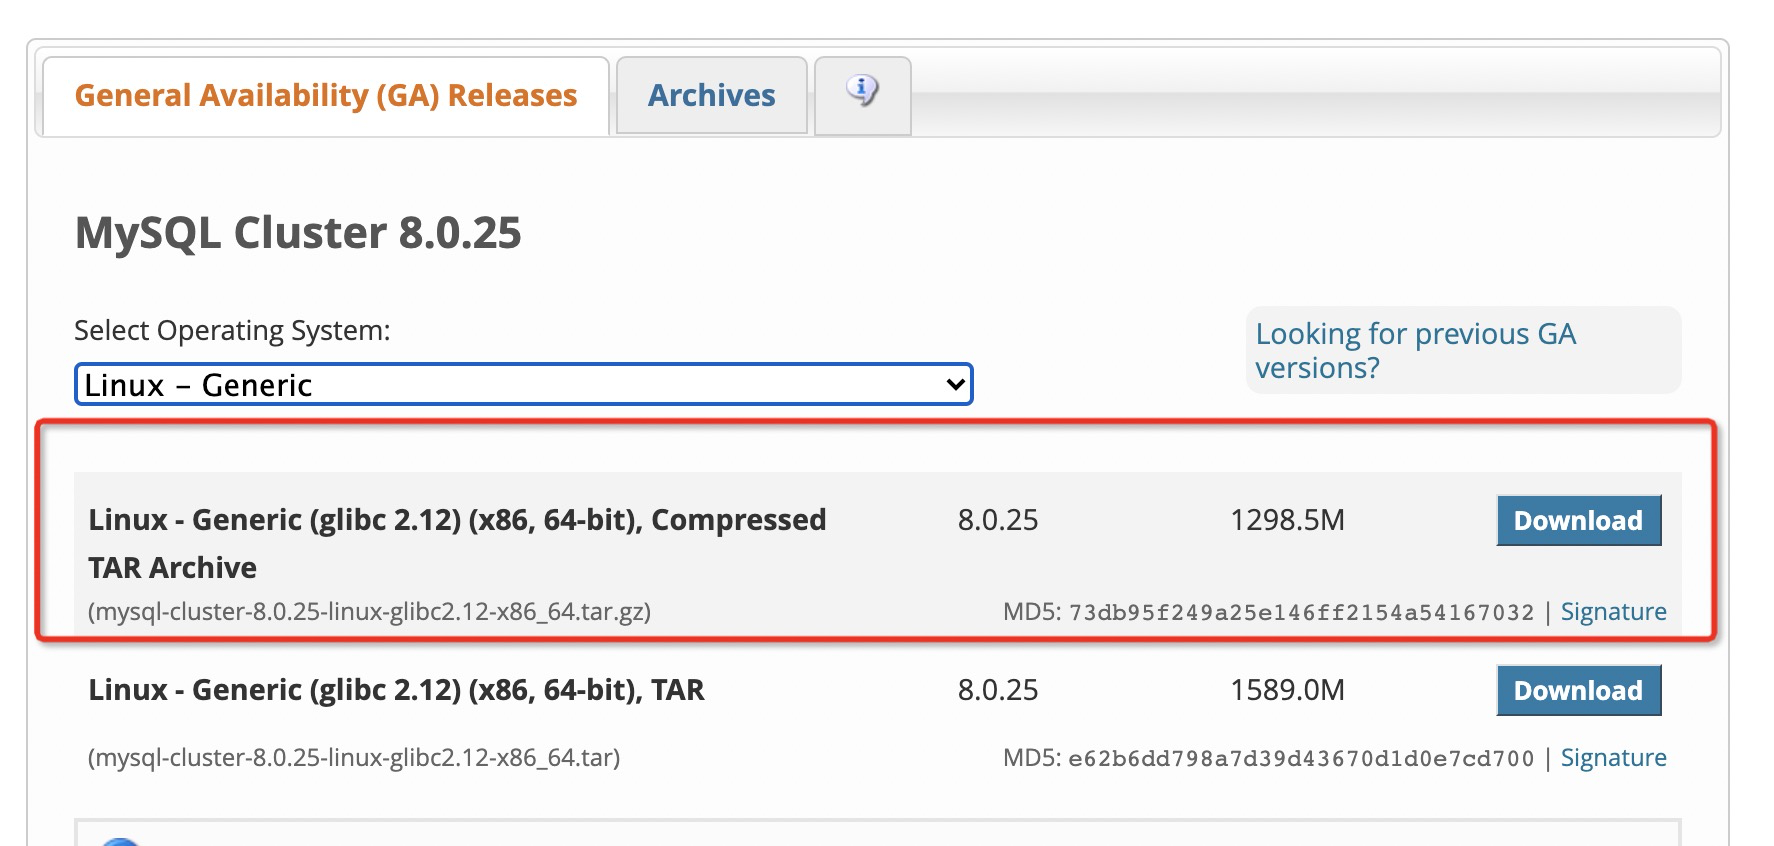
Download installation package, download website 4
-
Move the compressed package to / usr/local/mysql. After decompression, modify the path. Each node is located in the same path

-
The default port of the cluster is 1186
2.1 installing the configuration management node (GMG)
- Upload and unzip files
mkdir -p /usr/local/mysql (establish mysql Table of contents)
cd /usr/local/mysql
tar -zxvf mysql-cluster-gpl-7.6.12-linux-glibc2.12-x86_64.tar
mv mysql-cluster-8.0.25-linux-glibc2.12-x86_64 mysql-cluster (Extract it to the directory and rename it)
- Create management directory
mkdir -p /var/log/mysql-cluster
mkdir -p /etc/mysql-cluster
- configure directory
vi /etc/mysql-cluster/config.ini
[ndbd default]
NoOfReplicas=2                  #Number of data writes. 2 means two copies, two data nodes
DataMemory=80M                  #Configure the memory available for the data store
IndexMemory=18M                 #Index to 100M


[ndb_mgmd]
nodeid=1
datadir=/var/log/mysql-cluster      #Log of management node
HostName=172.16.232.76              #IP address of the management node. Native IP


###### data node options:           #Storage node
[ndbd]
HostName=172.16.0.243
DataDir=/data/mysql                 #mysql data storage path
nodeid=2


[ndbd]
HostName=172.16.184.33
DataDir=/data/mysql                 #mysql data storage path
nodeid=3


# SQL node options:                 #About SQL nodes
[mysqld]
HostName=172.16.184.34
nodeid=4


[mysqld]
HostName=172.16.64.223
nodeid=5
- Initialize management node
/usr/local/mysql/mysql-cluster/bin/ndb_mgmd -f /etc/mysql-cluster/config.ini
- View the status of the cluster
/usr/local/mysql/mysql-cluster/bin/ndb_mgm
ndb_mgm> show
#Or use
./ndb_mgm -e show
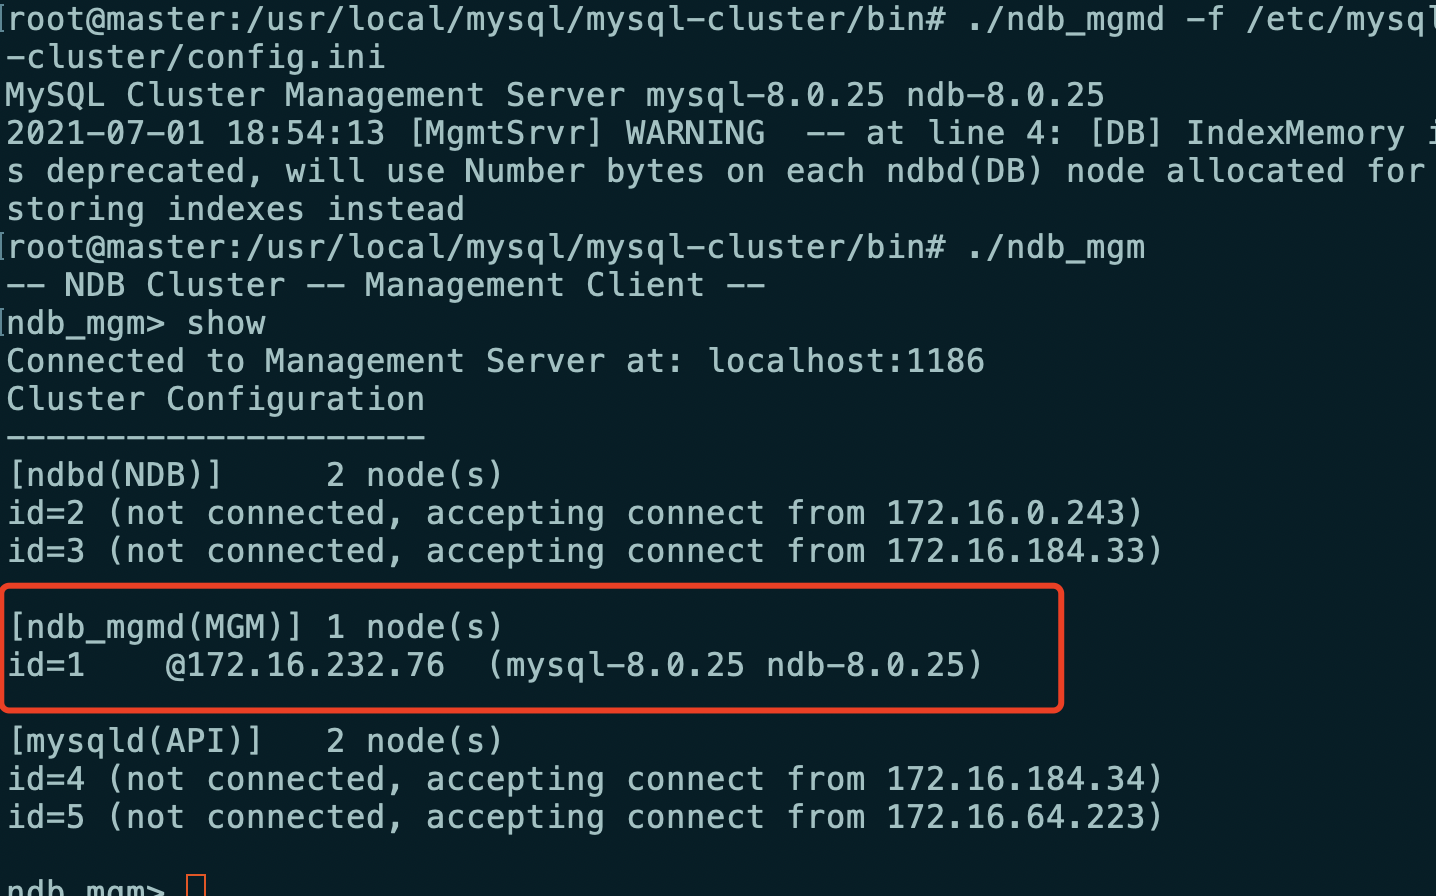
It is found that the management node has been started. When the data node and SQL node are not started, it displays not connected
2.2 installing the configuration data node (NDB)
Synchronize the following configuration to the remaining configuration data nodes
- Upload and unzip files
mkdir -p /usr/local/mysql (establish mysql Table of contents)
cd /usr/local/mysql
tar -zxvf mysql-cluster-gpl-7.6.12-linux-glibc2.12-x86_64.tar
mv mysql-cluster-8.0.25-linux-glibc2.12-x86_64 mysql-cluster (Extract it to the directory and rename it)
- Create mysql user and run
useradd -M -s /sbin/nologin mysql
- Create mysql directory and authorize
mkdir -p /etc/mysql
mkdir -p /data/mysql
chown -R mysql:mysql /data/mysql/
- Configure data node
vi /etc/mysql/my.cnf
[mysqld]
datadir=/data/mysql                     #mysql data storage path
ndbcluster                              #Start the ndb engine
ndb-connectstring=172.16.232.76         #Management node IP address

[mysql_cluster]
ndb-connectstring=172.16.232.76         #Management node IP address
- Start data node
#Only when it is added for the first time -- intital is added, otherwise the data will be lost
/usr/local/mysql/mysql-cluster/bin/ndbd --initial
- View status


2.3 installing and configuring the SQL node (NDB)
Synchronize the following configuration to the remaining SQL nodes of the installation configuration
- Upload and unzip files
mkdir -p /usr/local/mysql (establish mysql Table of contents)
cd /usr/local/mysql
tar -zxvf mysql-cluster-gpl-7.6.12-linux-glibc2.12-x86_64.tar
mv mysql-cluster-8.0.25-linux-glibc2.12-x86_64 mysql-cluster (Extract it to the directory and rename it)
- Create mysql directory and authorize
mkdir -p /etc/mysql
mkdir -p /data/mysql
chown -R mysql:mysql /data/mysql/
- Create SQL node profile
vi /etc/mysql/my.cnf
[mysqld]
user=mysql
ndbcluster                                                              #Start the ndb engine
ndb-connectstring=172.16.232.76                       #Management node IP address

[mysql_cluster]
ndb-connectstring=172.16.232.76                     #Management node IP address
- Configure mysql service
cp /usr/local/mysql/mysql-cluster/support-files/mysql.server /etc/init.d/mysqld
chmod +x /etc/init.d/mysqld
update-rc.d mysqld defaults
- Edit mysqld service
vi /etc/init.d/mysqld
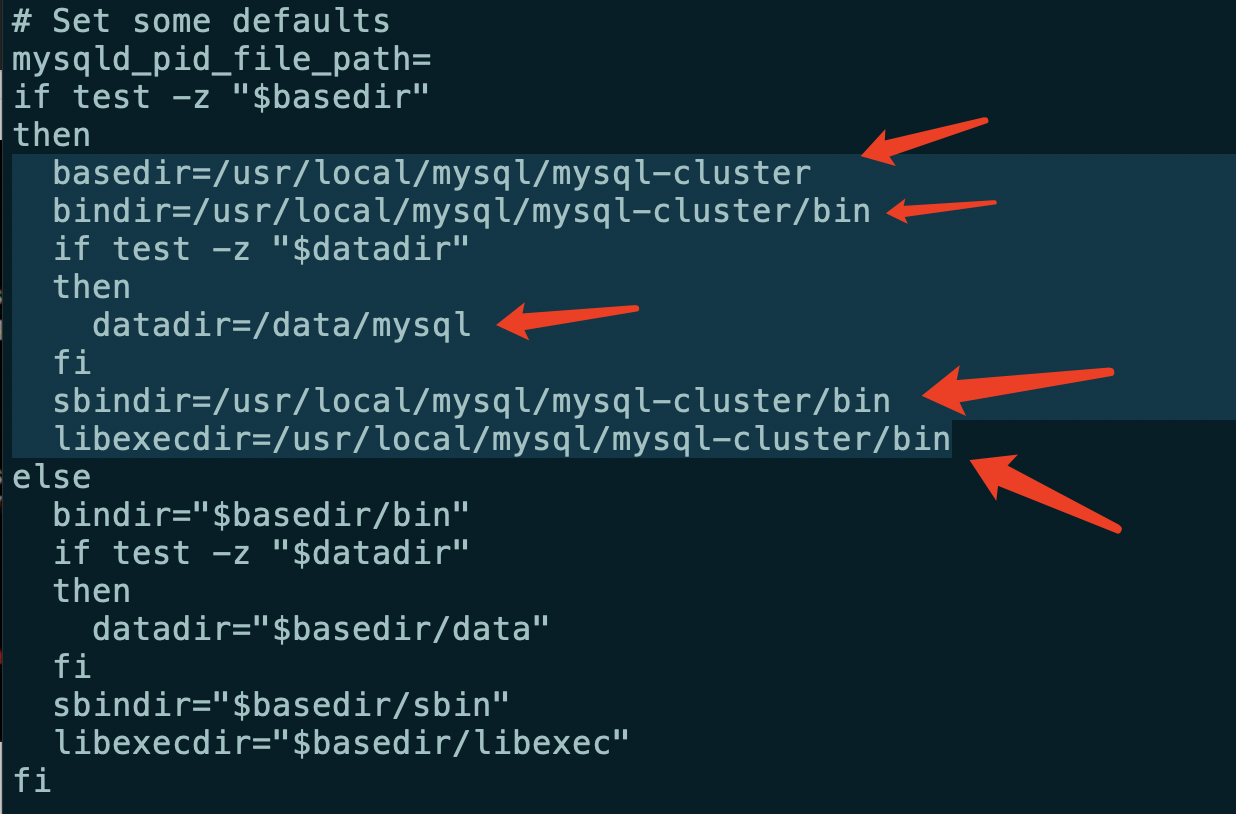 Replace with your own installation directory
  basedir=/usr/local/mysql/mysql-cluster
  bindir=/usr/local/mysql/mysql-cluster/bin
  if test -z "$datadir"
  then
    datadir=/data/mysql
  fi
  sbindir=/usr/local/mysql/mysql-cluster/bin
  libexecdir=/usr/local/mysql/mysql-cluster/bin
- Initialize mysql database
Go to / usr / local / MySQL / MySQL Cluster / bin
#Remember to save the randomly generated password after executing the command
cd /usr/local/mysql/mysql-cluster/bin
./mysqld --initialize --user=mysql --basedir=/usr/local/mysql/mysql-cluster --datadir=/data/mysql/
Slave3 (save randomly generated password)

Slave4 (save randomly generated password)

- service mysql start
systemctl daemon-reload
systemctl start mysqld
Slave3, it is found that the 3306 port of mysql has been started, and a red warning appears. You can use systemctl daemon reload to try to solve it. The following screenshot does not add systemctl daemon reload, but it can be started normally

Slave4, it is found that the 3306 port of mysql has been started

2.4 cluster status
Enter into
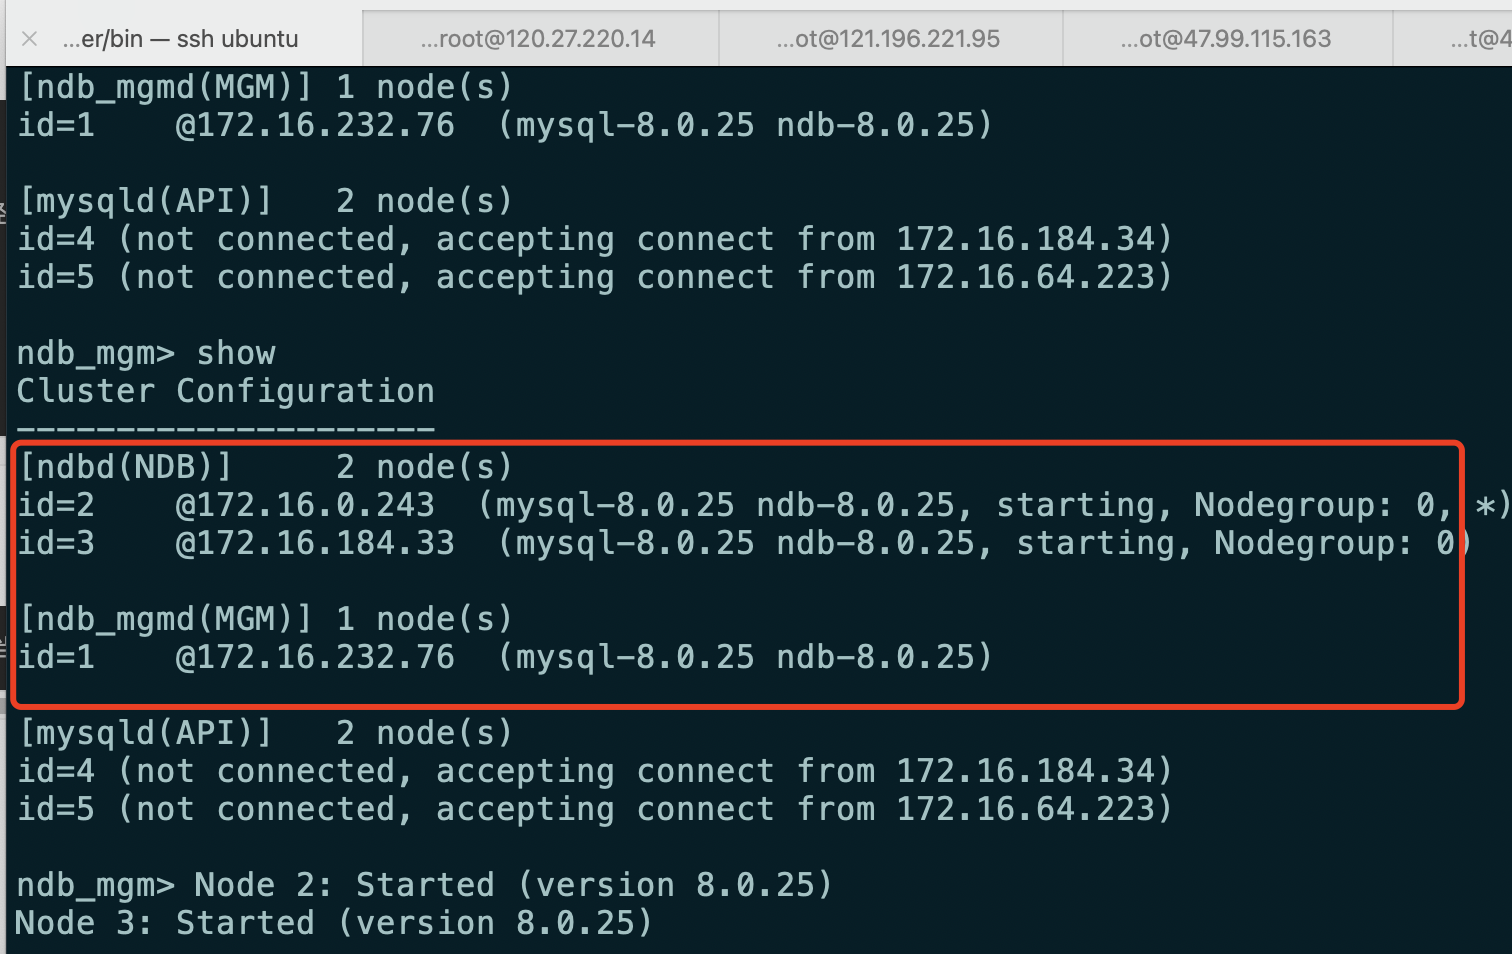
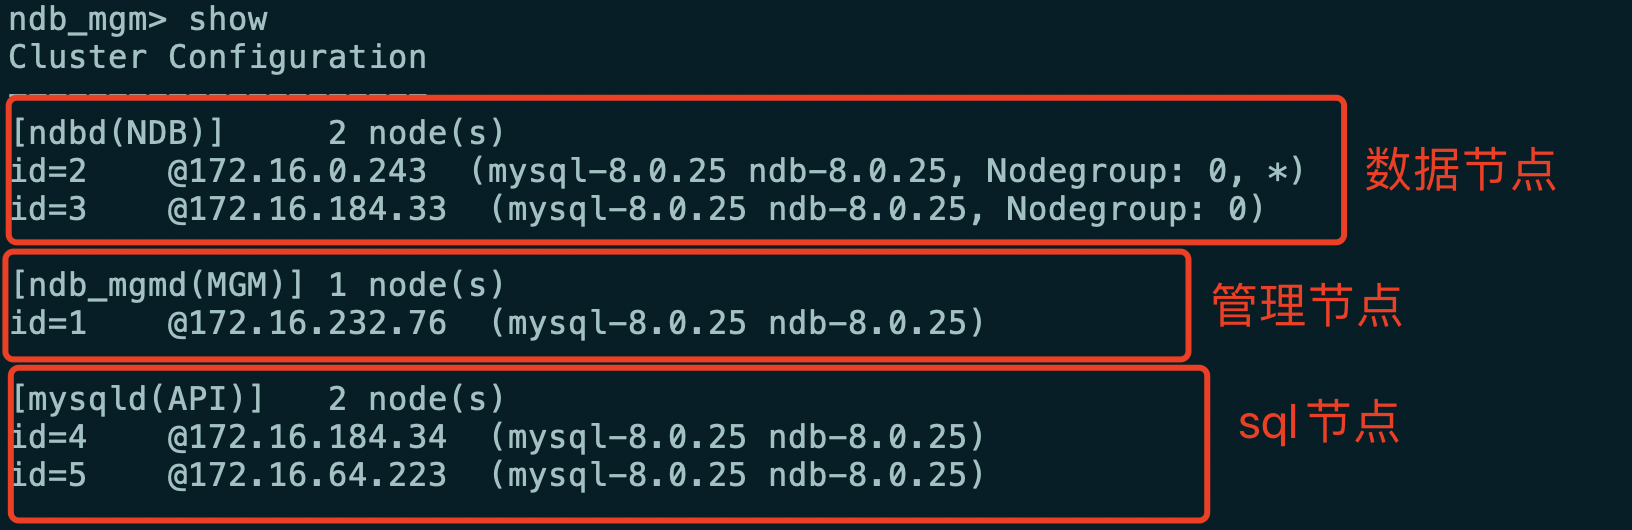
cd /usr/local/mysql/mysql-cluster/bin
./ndb_mgm
Enter the following interface and use show = = * * * to view that all 5 nodes are started, indicating that the construction is completed***==
3. Operating Mysql Cluster
- Use the operation database in the SQL node (slave3, slave4) and enter the random password saved earlier into the database
cd /usr/local/mysql/mysql-cluster/bin
./mysql -uroot -p
-
Operation database
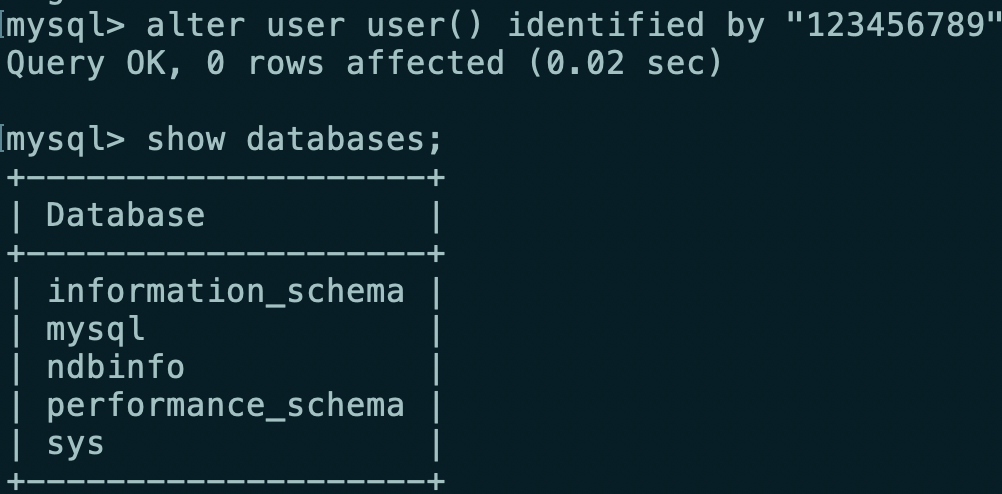
You need to modify the password of the database before using the command, otherwise the following error will appear

Use the following command to change the password to 123456789
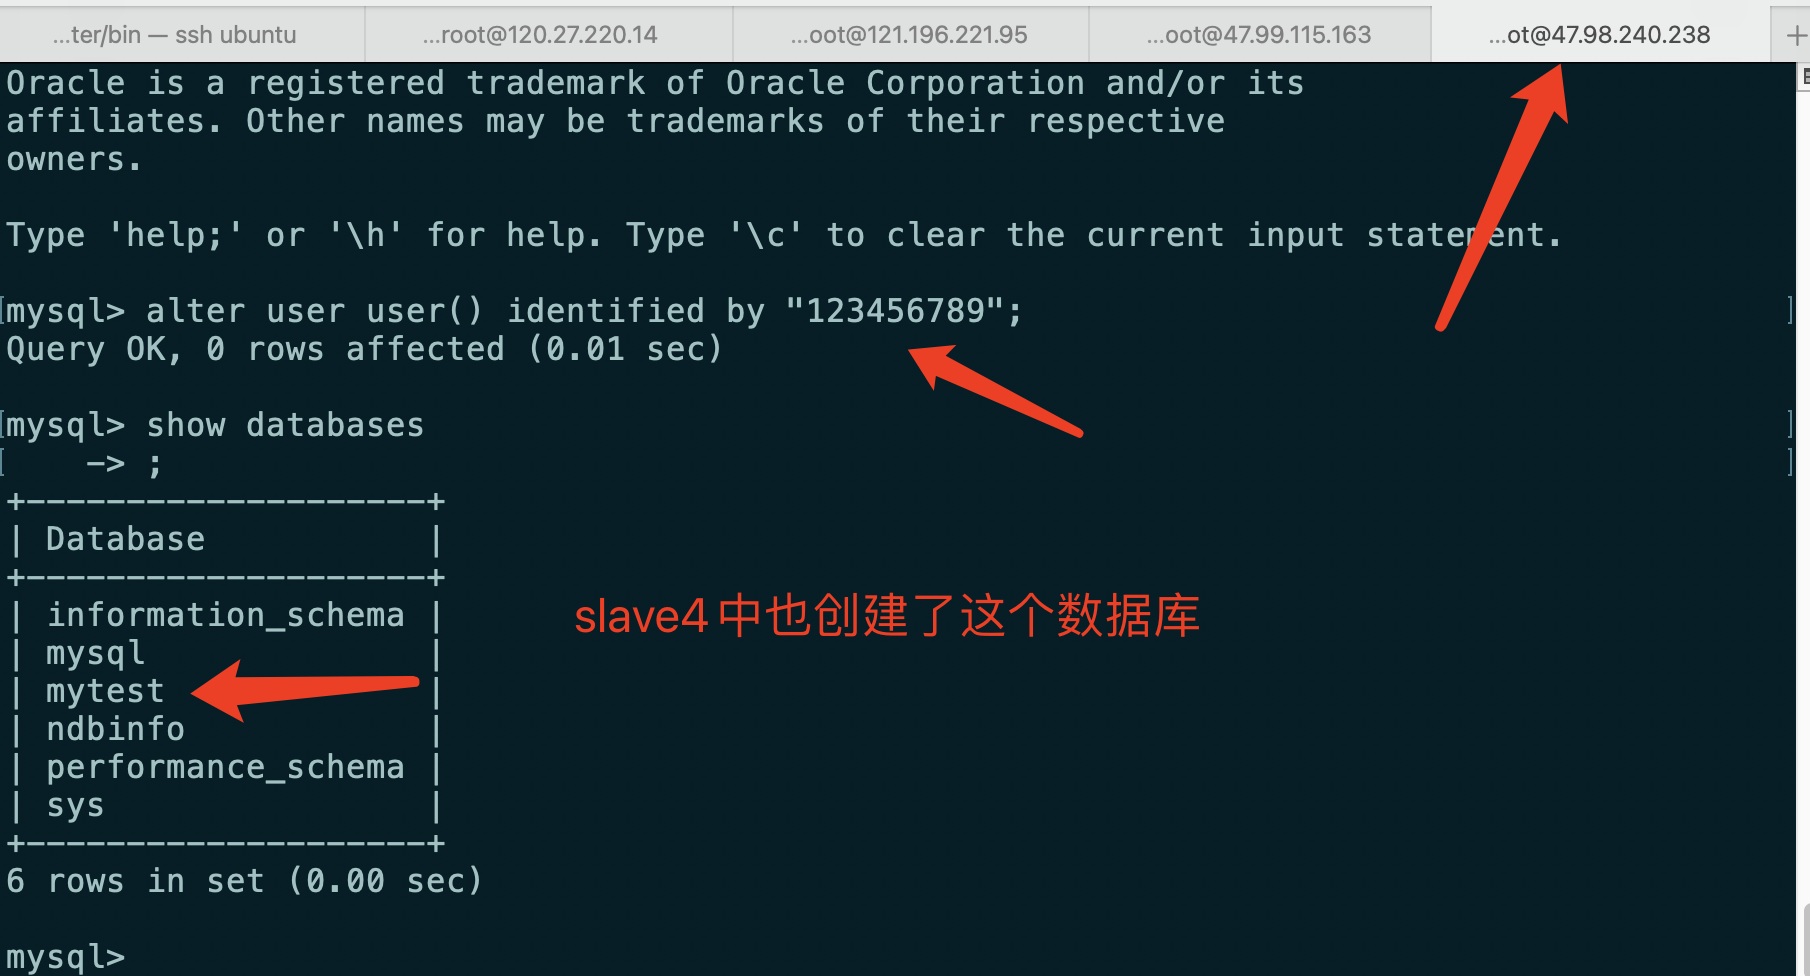
alter user user() identified by "123456789";
-
Create database
Create mytest database in slave3
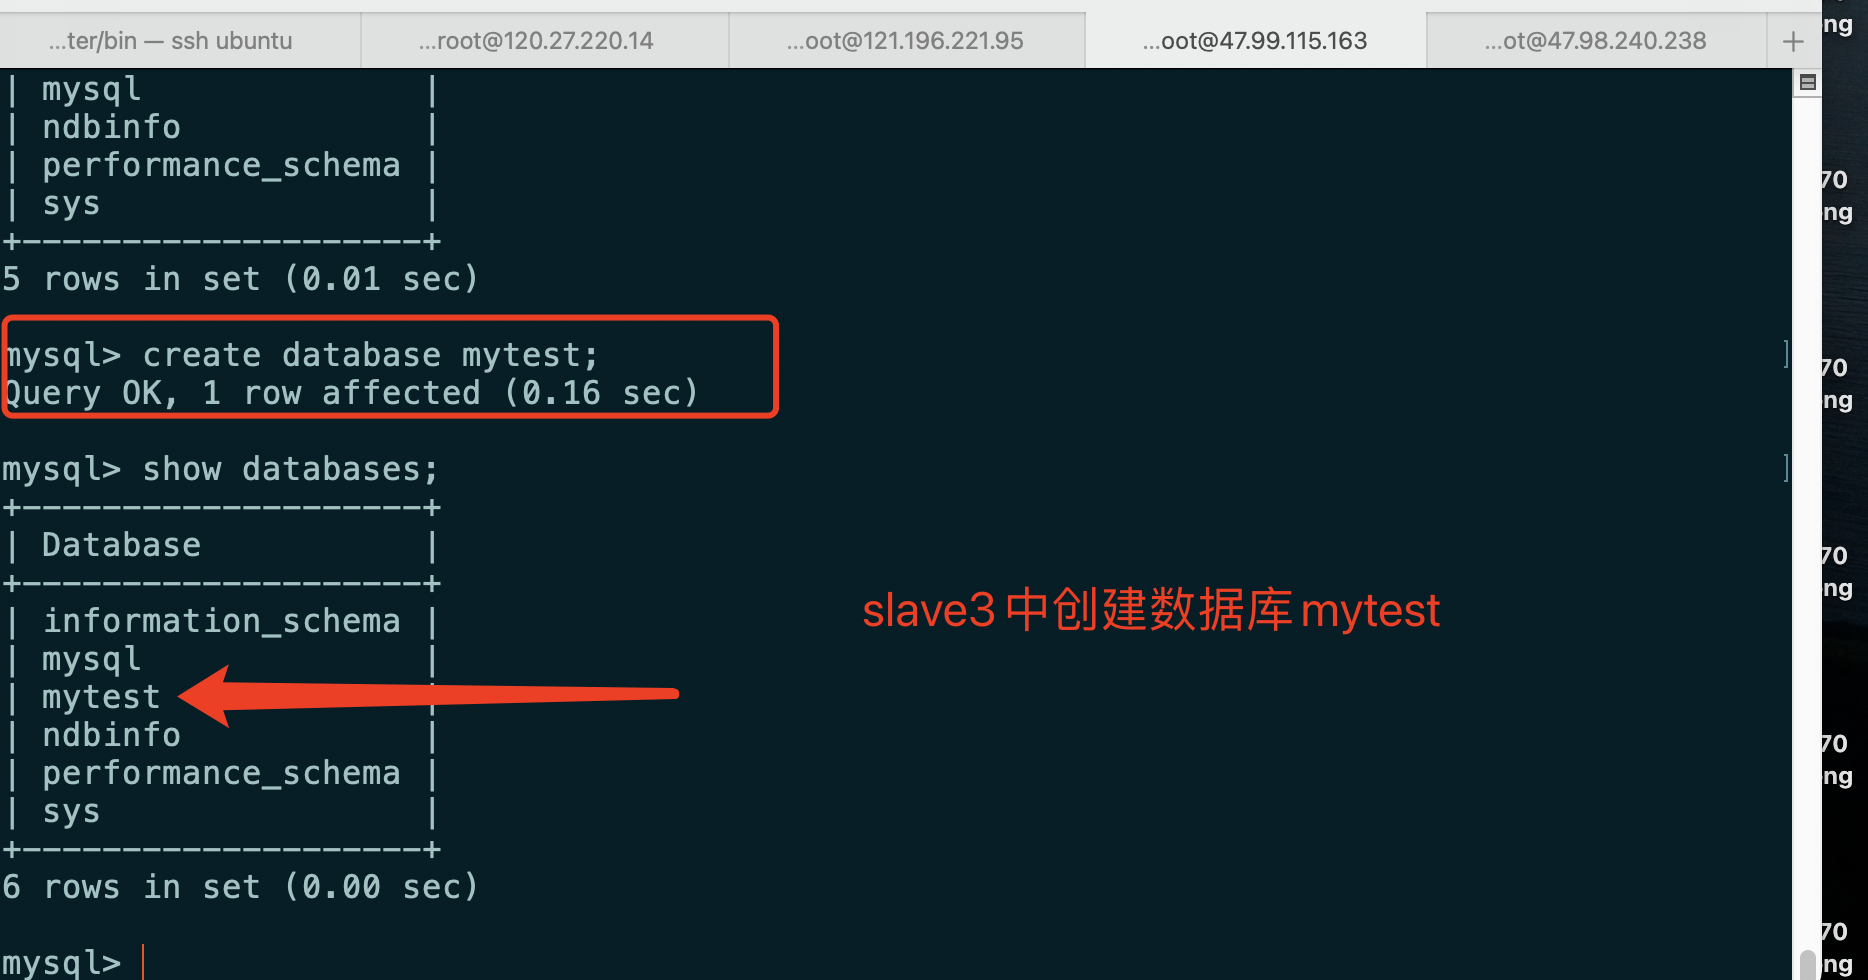
Log in to the database in slave4 and change the password. When you view the database, you find that the mytest database is created synchronously
-
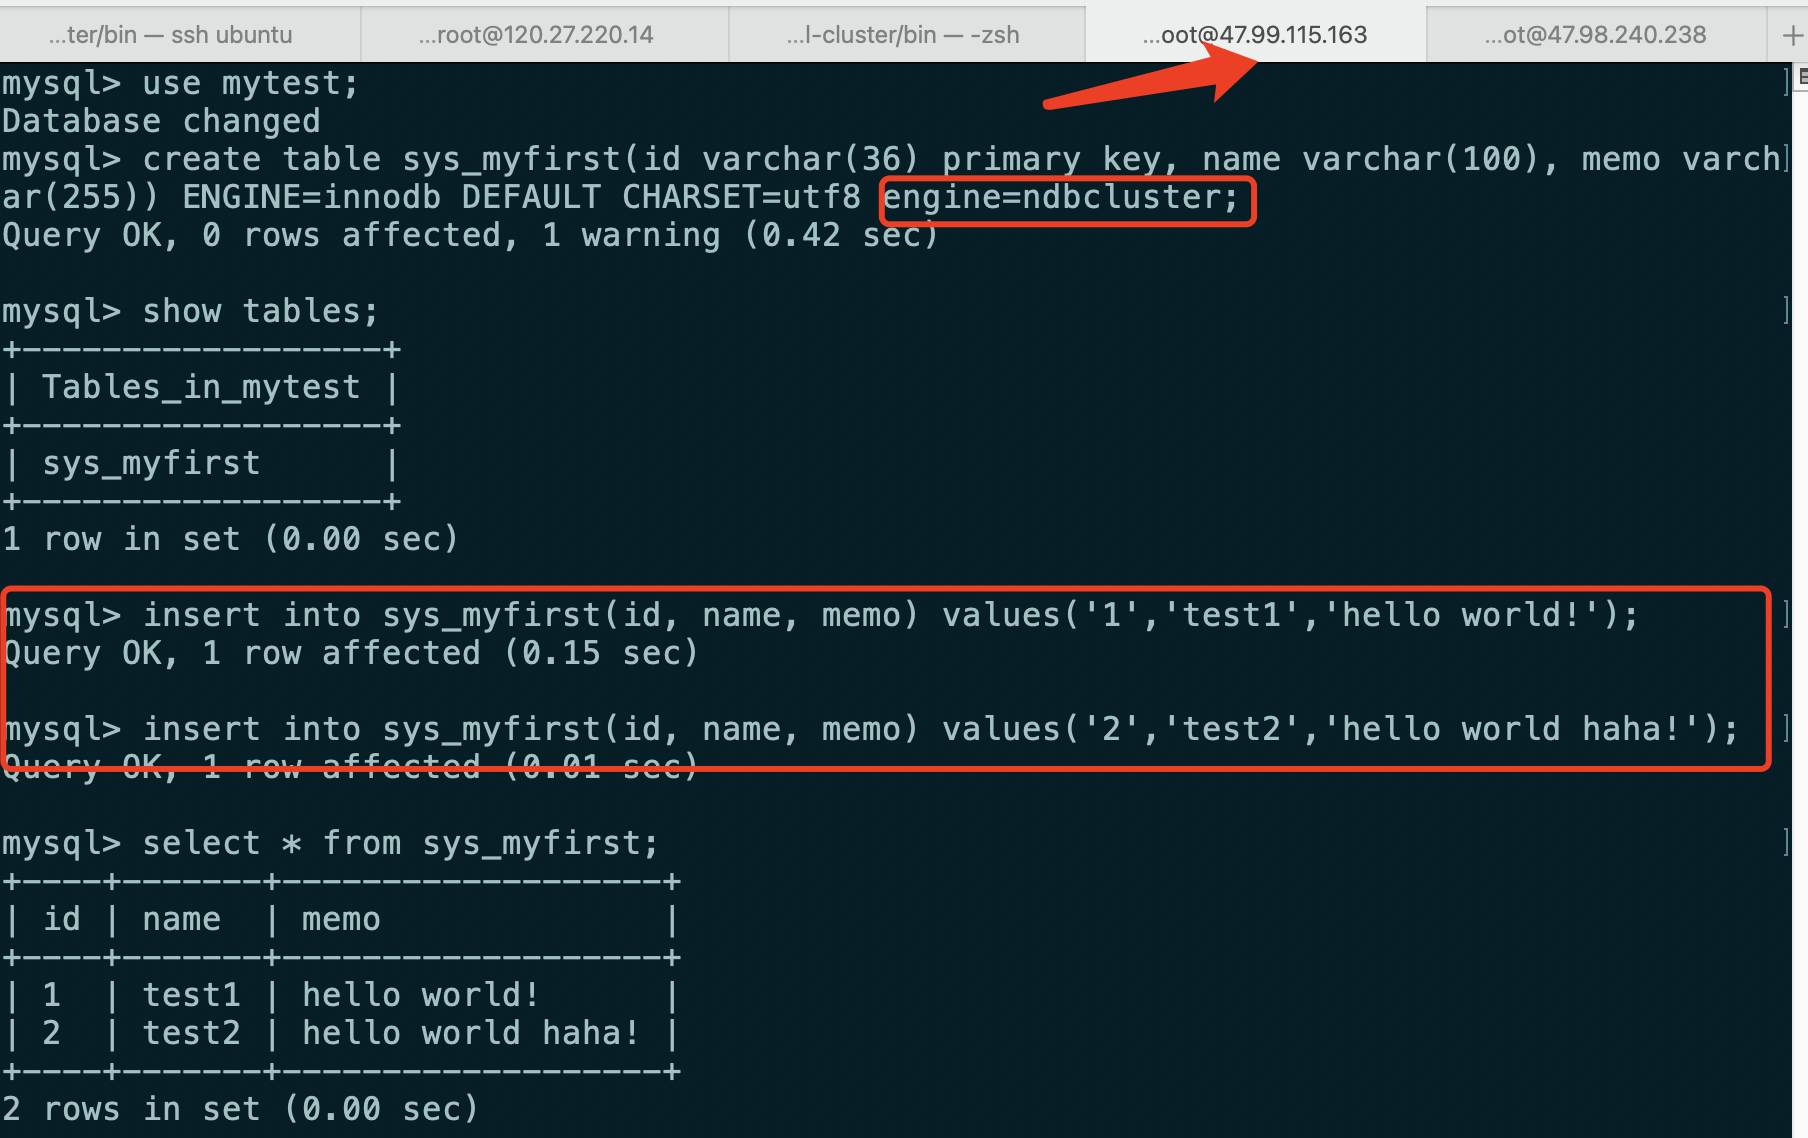
Create a data table and add data
Add engine = ndbcuster or engine=ndb (mysql cluster can only synchronize tables of ndb engine)
create table sys_myfirst(id varchar(36) primary key, name varchar(100), memo varchar(255)) ENGINE=innodb DEFAULT CHARSET=utf8 engine=ndbcluster;
Query OK, 0 rows affected, 1 warning (0.42 sec)
Create a data table in slave3 and add two pieces of data
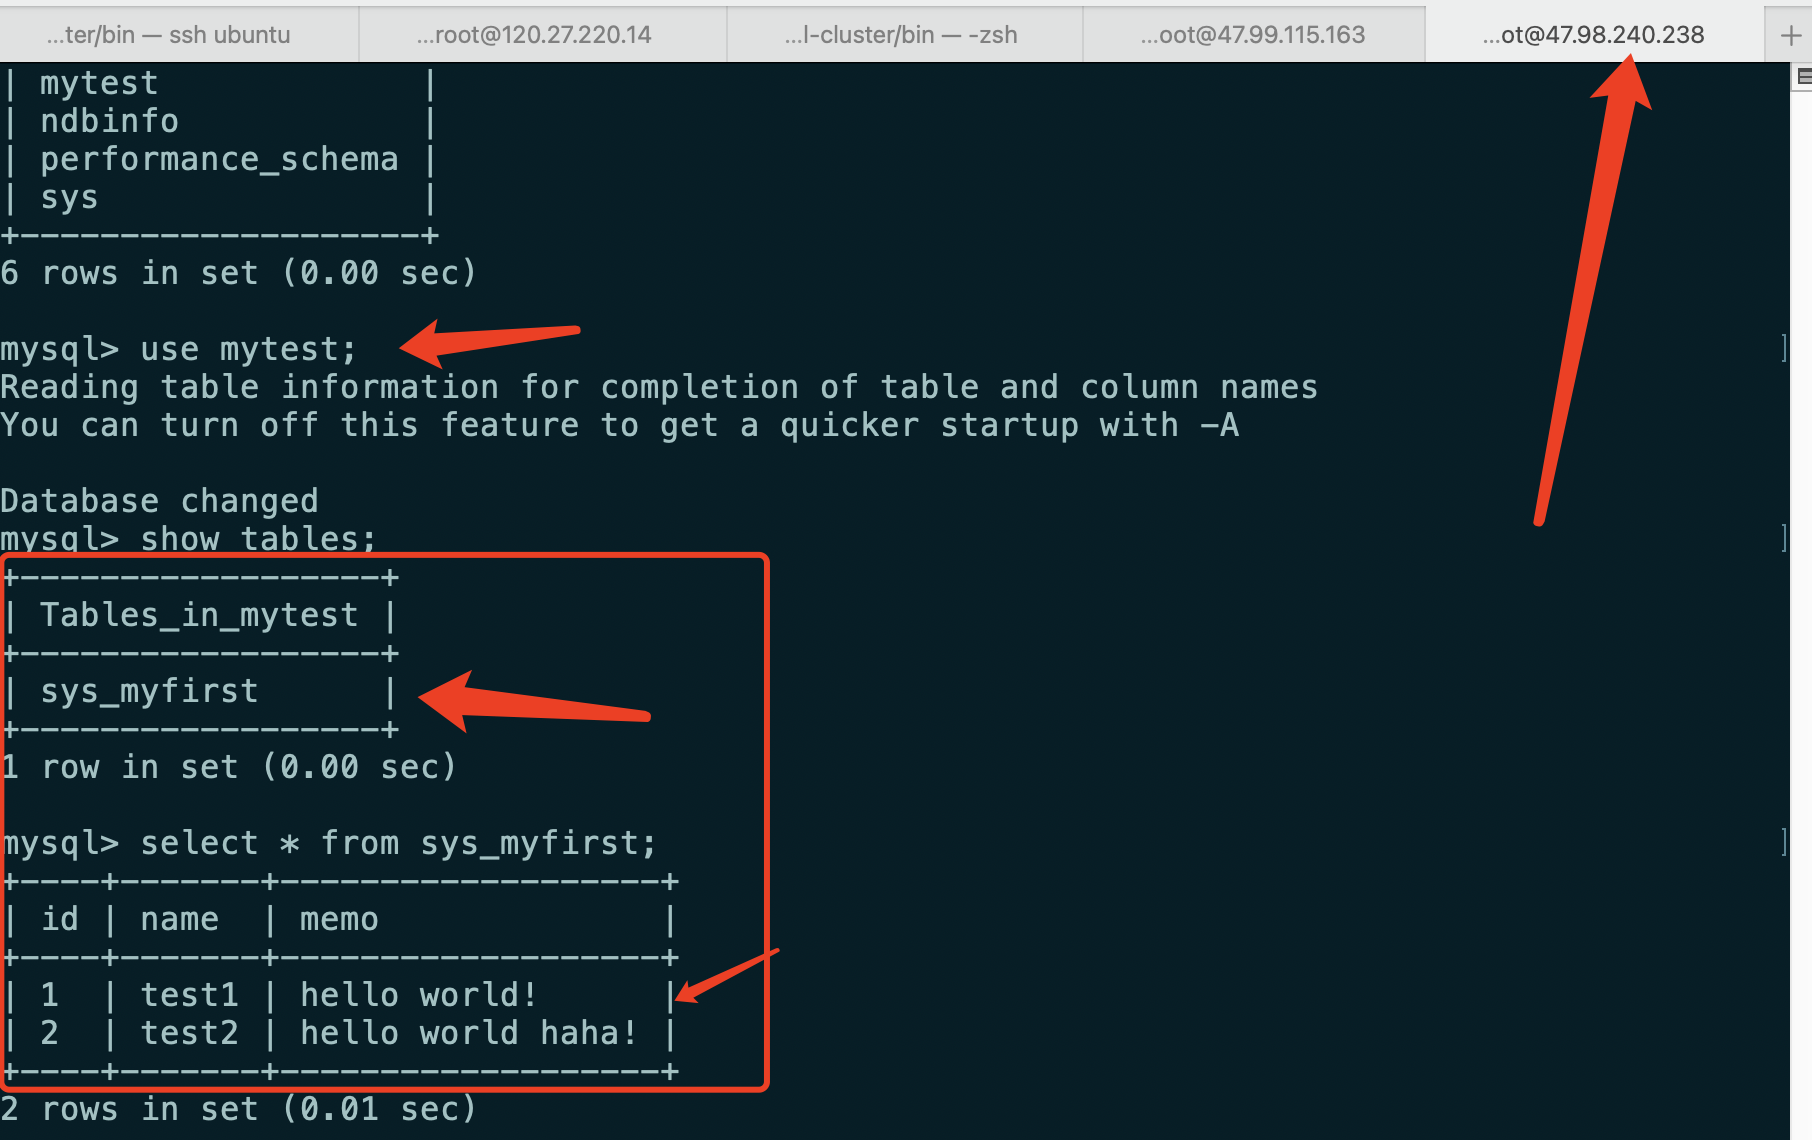
The tables and data created in slave3 can be viewed in slave4
4. MySQL Cluster shutdown sequence and single point of failure test
Shutdown sequence and single point of failure reference 5
Closing order: SQL node - > data node - > management node (in the MySQL Cluster Environment, the NDB node and the management node can be closed in the management program of the management node, or by node, but the SQL node has no way. Therefore, when closing the entire MySQL Cluster Environment or a SQL node, you must first close the SQL node program on the SQL node host. The closing method is the same as that of MySQL Server Closed.)
-
SQL node shutdown
systemctl stop mysqld
root@slave3:/usr/local/mysql/mysql-cluster/bin# lsof -i:3306
COMMAND  PID  USER   FD   TYPE DEVICE SIZE/OFF NODE NAME
mysqld  1319 mysql   40u  IPv6  24436      0t0  TCP *:mysql (LISTEN)
root@slave3:/usr/local/mysql/mysql-cluster/bin# systemctl stop mysqld
Warning: The unit file, source configuration file or drop-ins of mysqld.service changed on disk. Run 'systemctl daemon-reload' to reload units.
root@slave3:/usr/local/mysql/mysql-cluster/bin# lsof -i:3306
root@slave3:/usr/local/mysql/mysql-cluster/bin# systemctl start mysqld
Warning: The unit file, source configuration file or drop-ins of mysqld.service changed on disk. Run 'systemctl daemon-reload' to reload units.
###Or use it in / etc/init.d
root@slave4:/etc/init.d# ./mysqld stop
-
Data node (NDB) shutdown

cd /usr/local/mysql/mysql-cluster/bin
./ndbd stop
2018-01-16 18:30:51 [ndbd] INFO     -- Angel connected to '192.168.0.30:1186'
2018-01-16 18:30:51 [ndbd] INFO     -- Angel allocated nodeid: 2
#Or use pkill -9 ndbd
#Start using (no need to add -- initial)
./ndbd
-
The management node is closed (the data node will be closed together after the management node is closed)

ndb_mgm> shutdown
Node 2: Cluster shutdown initiated
Node 3: Cluster shutdown initiated
3 NDB Cluster node(s) have shutdown.
Disconnecting to allow management server to shutdown.
Node 3: Node shutdown completed.
ndb_mgm>
#Or use
/usr/local/mysql/mysql-cluster/bin# ./ndb_mgm -e shutdown
5. Mysql Cluster remote connection
-
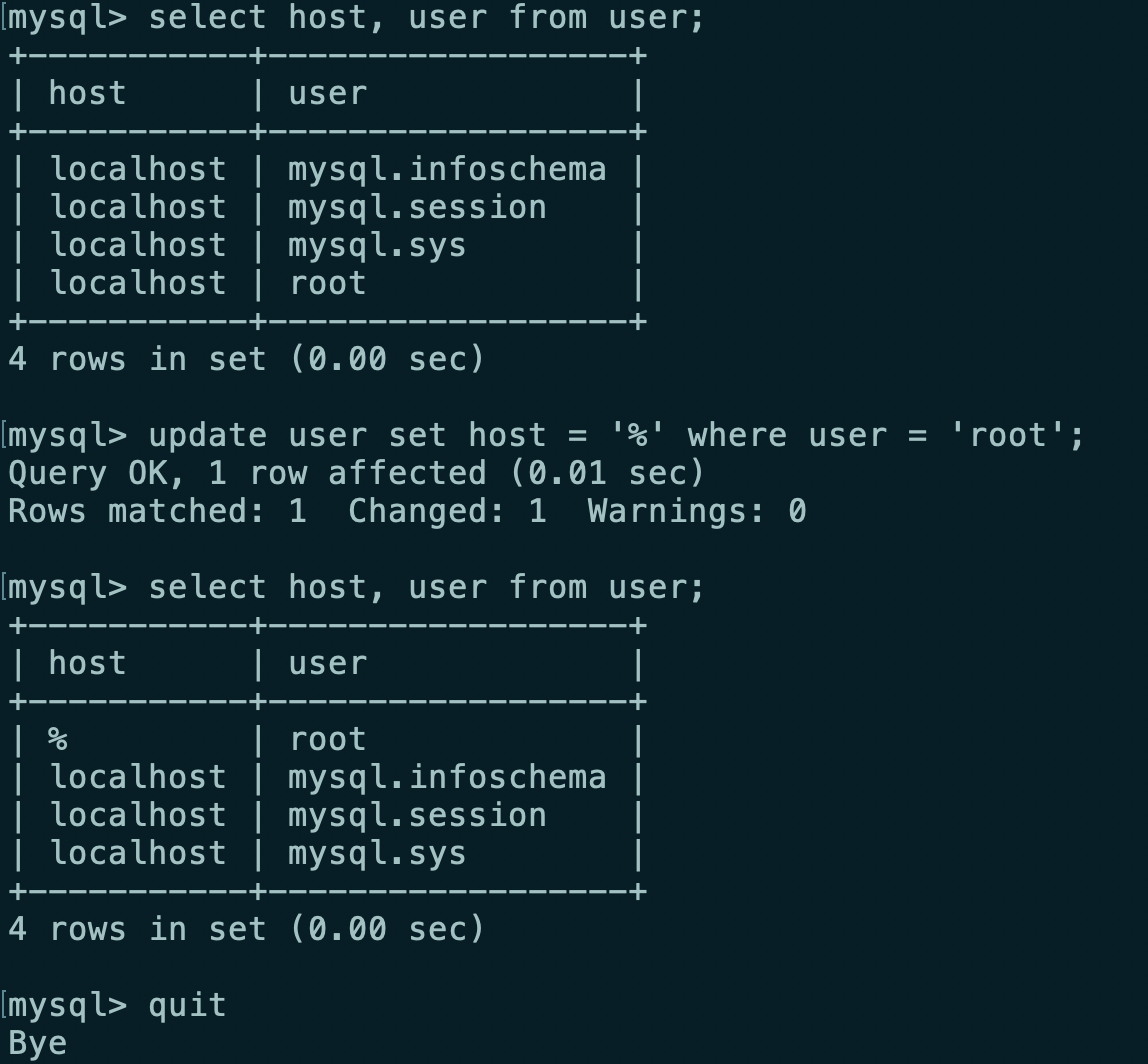
This table method
use mysql;
select host, user from user;
update user set host = '%' where user = 'root';
select host, user from user;
#Restart mysql after modification
-
Authorization law
GRANT ALL PRIVILEGES ON *.* TO 'root'@'%'IDENTIFIED BY '123456789' WITH GRANT OPTION;
FLUSH PRIVILEGES  #Just make the modification effective
6. Test single point of failure (high availability)
- When one of the two data nodes is stopped, the SQL node can be used for normal operation
- When one of the two SQL nodes is stopped, the other SQL node can also be used for normal operation
- When two data nodes and one of the two SQL nodes are stopped respectively, only one SQL node and one data node are left, which can also serve normally
7. Used in SpringBoot
springboot jpa connection mysql database cluster (NDBCLUSTER) engine settings6
Main references: Implementation of Spring Boot MyBatis database cluster access 7
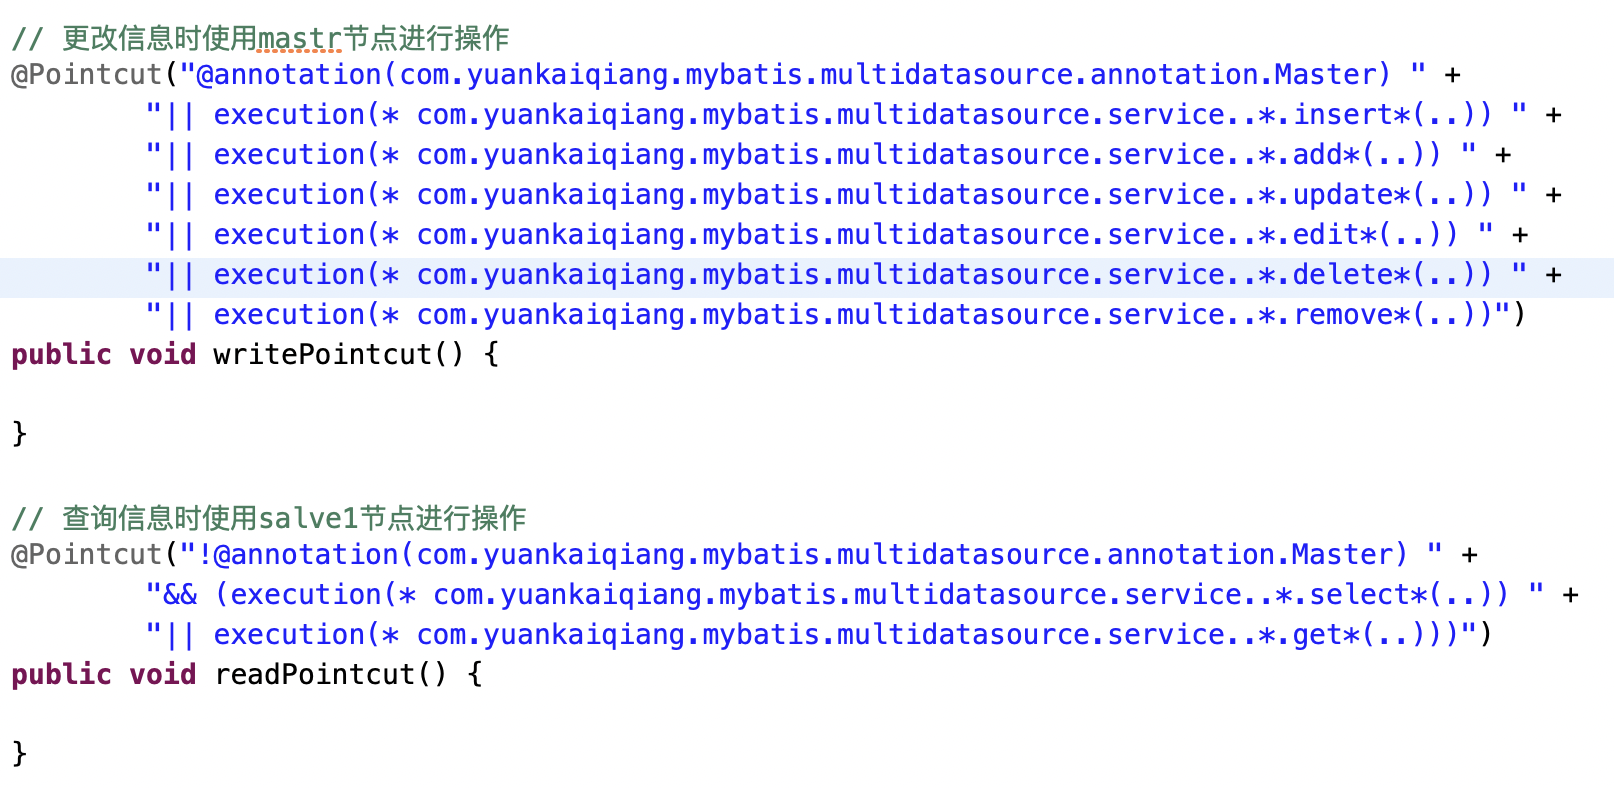
Code path 8: Language bird
Reference website
https://www.pianshen.com/article/51641527056/ ↩︎
https://www.jianshu.com/p/37525ae8dee4 ↩︎
https://www.cnblogs.com/zzdbullet/p/11475641.html ↩︎
https://dev.mysql.com/downloads/cluster/ ↩︎
https://blog.csdn.net/mashuai720/article/details/79126360 ↩︎
https://blog.csdn.net/xyzdwf/article/details/102482393 ↩︎
https://github.com/smltq/spring-boot-demo/tree/master/mybatis-multi-datasource ↩︎
https://www.yuque.com/yuankaiqiang/file/19961453 ↩︎