Write before
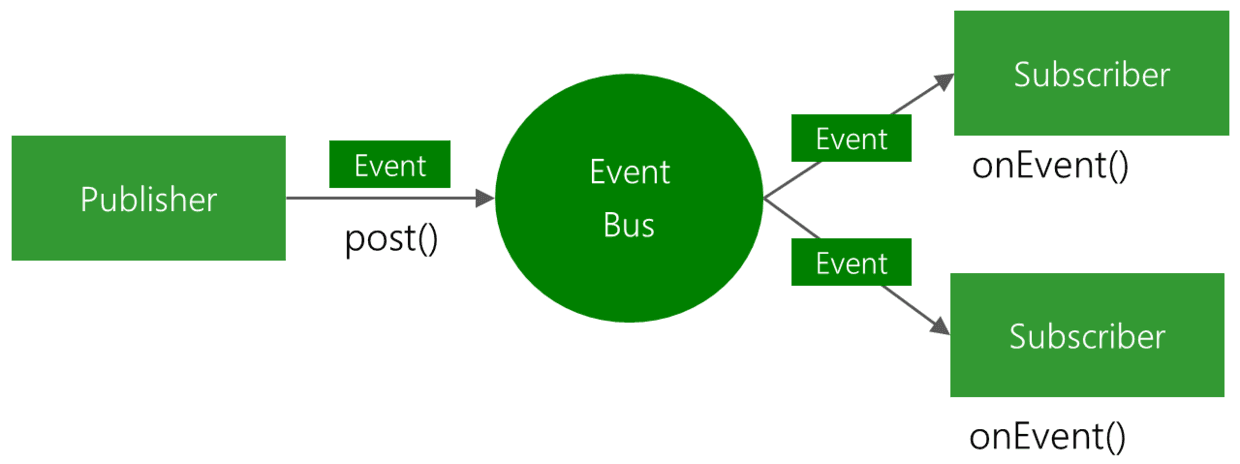
For Android programmers, I'm sure everyone has heard the name of EventBus.EventBus is a lightweight framework for event publishing and subscription based on the Android platform that decouples publishers and subscribers and simplifies event delivery for Android.As officially stated, its advantages:
- Simplified communication between components
- Sender and Receiver of Decoupling Events
- Good performance in Activity, Fragment, and Background Threads
- Avoid complex and error-prone dependencies and life cycle problems
- Make your code simpler
- Fast and lightweight
Next, let's take a look at this lightweight but powerful open source framework from the use of EventBus to source code interpretation.
EventBus project: EventBus GitHub
text
This article starts with the simple use of EventBus, introduces the basic configuration and simple use of EventBus, and then uses a Demo to illustrate the use and advantages of EventBus.
Configuration and Simple Use
build.gradle configuration under app:
compile 'org.greenrobot:eventbus:3.0.0'
Yes, just add this sentence. It's very simple.Indexing can also be configured, as described in the Advanced Usage article.
Define an event class:
public static class MessageEvent { /* Additional fields if needed */ }
Define a method in the subscriber class with a comment'@Subscribe'tag and an argument to the event class:
@Subscribe
public void onMessageEvent(MessageEvent event) {/* Do something */};
Then register and unregister in the Subscriber class, which is typically handled in the life cycle of an Activity or Fragment on Android:
@Override
 public void onStart() {
     super.onStart();
     EventBus.getDefault().register(this); // register
 }

 @Override
 public void onStop() {
     super.onStop();
     EventBus.getDefault().unregister(this); // Logout, when the subscriber no longer subscribes to events, must log out, otherwise memory leaks may occur
 }
Finally, send events, and each event registered by the subscriber receives a message (calling the method marked'@Subscribe'):
EventBus.getDefault().post(new MessageEvent());
Give an example
Now lift a chestnut to show off the charm of EventBus!Think about a scenario where you read App books: on the left is a list of book selections, and on the right is the contents of books.At this point, most of our cases are handled with Fragments, that is, both left and right sides are fragments, which involves the communication between the two fragments.Our usual approach is to add interface callbacks to Fragments, then Activity acts as a communication bridge between the two Fragments.
Perhaps some people say that it's easier to interact by getting the controls in Fragments directly from Activity.This is simple, but the responsibility of the activity becomes heavy, and one of Fragments'roles is to share the responsibility of the activity, so this is not desirable.
Okay, let's start with an example of using callbacks to implement Fragment communication without EventBus.
First, define two Fragments, Fragment1 on the left, and the layout has only one ListView (layout code is not pasted, followed by source code). Define an interface in Fragment1. When you click on the item of ListView, call back the book you clicked to the outside:
public class Fragment1 extends Fragment {

    private final static String[] BOOKS = new String[] {
            "First line of code",
            "Java Programming ideas",
            "Android Exploring Development Art",
            "Android Source Design Mode",
            "algorithm",
            "Grinding Design Mode"
    };

    ListView listView;

    @Nullable
    @Override
    public View onCreateView(LayoutInflater inflater, @Nullable ViewGroup container,
                             @Nullable Bundle savedInstanceState) {
        View view = inflater.inflate(R.layout.fragment1, container, false);
        listView = (ListView) view.findViewById(R.id.lv_catalogue);
        ArrayAdapter arrayAdapter = new ArrayAdapter<String>(getActivity(),
                android.R.layout.simple_list_item_1, BOOKS);
        listView.setAdapter(arrayAdapter);
        listView.setOnItemClickListener(new AdapterView.OnItemClickListener() {
            @Override
            public void onItemClick(AdapterView<?> parent, View view, int position, long id) {
                // Callback
                if (listener != null) {
                    listener.onCLickBook(BOOKS[position]);
                }
            }
        });
        return view;
    }

    private OnClickBookListener listener;

    public void setOnClickBookListener(OnClickBookListener listener) {
        this.listener = listener;
    }

    /**
     * Click on the book listening interface
     */
    public interface OnClickBookListener {
        void onCLickBook(String book);
    }
}
Fragment2 on the right is simpler, with a single TextView on the layout to show the contents of the book:
public class Fragment2 extends Fragment {

    TextView textView;

    @Nullable
    @Override
    public View onCreateView(LayoutInflater inflater, @Nullable ViewGroup container, @Nullable Bundle savedInstanceState) {
        View view = inflater.inflate(R.layout.fragment2, container, false);
        textView = (TextView) view.findViewById(R.id.tv_content);
        return view;
    }

    /**
     * The interface needs to be exposed to the outside for interaction
     */
    public void readBook(String book) {
        textView.setText(book);
    }
}
Finally, MainActivity serves as a communication bridge between two Fragments to achieve the communication between the two Fragments:
public class MainActivity extends AppCompatActivity {

    Fragment1 fragment1;
    Fragment2 fragment2;

    @Override
    protected void onCreate(Bundle savedInstanceState) {
        super.onCreate(savedInstanceState);
        setContentView(R.layout.activity_main);

        fragment1 = (Fragment1) getSupportFragmentManager().findFragmentById(R.id.fragment1);
        // Set up monitoring
        fragment1.setOnClickBookListener(new Fragment1.OnClickBookListener() {
            @Override
            public void onCLickBook(String book) {
                // Update reading books for fragment2
                fragment2.readBook(String.format("I am reading%s", book));
            }
        });
        fragment2 = (Fragment2) getSupportFragmentManager().findFragmentById(R.id.fragment2);
    }
}
As you can see from the code above, the communication between the two Fragments is very simple, and the responsibilities of the Activity are significantly reduced. Just as a bridge, do we still need EventBus?The answer is necessary!This is just an example, but it is almost impossible for two Fragments to interact with each other in real-world development, often in a crisscross fashion. Do you define multiple listening interfaces on a Fragment and then process these logic on an Activity?This in turn leads to an excessive responsibility of the activity and a significant increase in coupling.So callback communication seems to work well for two fragments with less interaction, but once there's too much interaction, there's nothing you can do about it.Let's see how EventBus can communicate with Fragments.
First, define an event class for reading a Book (note that it's best to decorate it with public, otherwise you may fail to generate the index, which will be explained in a subsequent article, remember now):
public class ReadBookEvent {

    private String book;

    ReadBookEvent(String book) {
        this.book = book;
    }

    public String getBook() {
        return book;
    }
}
Obviously, since Fragment2 is an update response that listens for Fragment1 clicks, Fragment2 is a subscriber here (note: like event classes, subscribers are best declared public, otherwise they may fail to generate the index):
public class Fragment2 extends Fragment {

    TextView textView;

    @Nullable
    @Override
    public View onCreateView(LayoutInflater inflater, @Nullable ViewGroup container, @Nullable Bundle savedInstanceState) {
        View view = inflater.inflate(R.layout.fragment2, container, false);
        textView = (TextView) view.findViewById(R.id.tv_content);
        return view;
    }

    @Override
    public void onStart() {
        super.onStart();
        EventBus.getDefault().register(this); // Registered Subscribers
    }

    @Override
    public void onStop() {
        super.onStop();
        EventBus.getDefault().unregister(this); Unsubscriber
    }

    /**
     * Listen for reading events
     */
    @Subscribe
    public void onReadBook(ReadBookEvent event) {
        textView.setText(String.format("I am reading%s", event.getBook()));
    }
}
Instead of defining a callback interface, Fragment1 simply sends an event when it clicks on a book:
public class Fragment1 extends Fragment {

    private final static String[] BOOKS = new String[] {
            "First line of code",
            "Java Programming ideas",
            "Android Exploring Development Art",
            "Android Source Design Mode",
            "algorithm",
            "Grinding Design Mode"
    };

    ListView listView;

    @Nullable
    @Override
    public View onCreateView(LayoutInflater inflater, @Nullable ViewGroup container,
                             @Nullable Bundle savedInstanceState) {
        View view = inflater.inflate(R.layout.fragment1, container, false);
        listView = (ListView) view.findViewById(R.id.lv_catalogue);
        ArrayAdapter arrayAdapter = new ArrayAdapter<String>(getActivity(),
                android.R.layout.simple_list_item_1, BOOKS);
        listView.setAdapter(arrayAdapter);
        listView.setOnItemClickListener(new AdapterView.OnItemClickListener() {
            @Override
            public void onItemClick(AdapterView<?> parent, View view, int position, long id) {
                EventBus.getDefault().post(new ReadBookEvent(BOOKS[position])); // Send Events
            }
        });
        return view;
    }
}
In addition, in MainActivity, you no longer have to deal with Fragment interaction, or even create instances of Fragments, to decouple them directly:
public class MainActivity extends AppCompatActivity {

    @Override
    protected void onCreate(Bundle savedInstanceState) {
        super.onCreate(savedInstanceState);
        setContentView(R.layout.activity_main);
    }
}
As you can see from the code above, EventBus decouples the two Fragments very well, and elegantly achieves communication between them, while reducing the coupling between Fragments and Activity, which is really a lot more!Consider the communication between two activities. We usually use Intent as a carrier to transfer data. EventBus allows us to get rid of Intent and communicate directly between activities.There are no more examples here. Believe that smart people can do the same thing.
So far, I believe you have a basic understanding of EventBus.
Write at the end
Did EventBus shock you with its convenience and simplicity?Don't be too early to be satisfied. EventBus is so popular, and of course she's great.Subsequent articles will introduce the use of compile-time processing to generate indexes to improve the efficiency of event sending, as well as advanced configuration of EventBus, so look forward to it!