Introduction: how to use the Serverless architecture to realize the application of full duplex communication and how to use the database in the Serverless architecture. This article will reveal the answer for you
Author | Han Xie (head of Alibaba cloud native middleware front end)
The concept of Serverless is real-time flexibility, running out of time. The service does not run for a long time, which means that the long link request mode like websocket does not seem to be suitable for Serverless.
Is there any other way to meet the long connection mode request and make use of the characteristics of Serverless itself?
The answer is yes. In the last article, we talked about the key role of gateway, so this time we also solve the problem of full duplex communication through gateway. This time, we will take the bullet screen scenario as an example to show you how we use the Serverless architecture to realize this scenario.
Apply effect preview
There are many practical scenarios for bullet screen application, such as operation promotion, annual conference activities, etc. However, it usually takes a long time to implement a set of controlled processes and deploy the release. This actual battle allows you to deploy your barrage application in 2 minutes. At the same time, support colorful and bullet screen content control. You can use it to enrich the form of the company's annual meeting. The source code will also be pasted at the end of the article for your reference and secondary customization.
Architecture Overview
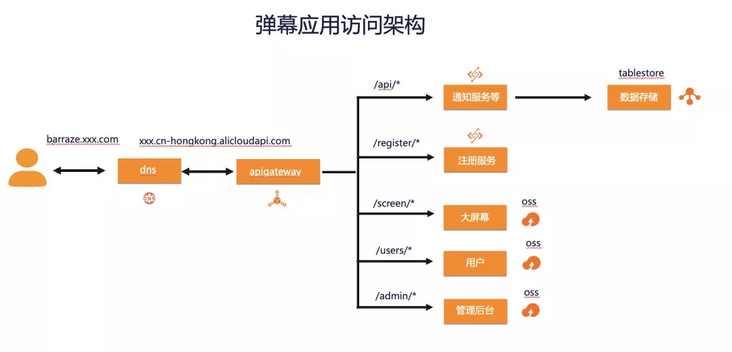
The overall architecture still adopts dns resolution - > Gateway - > OSS | FC. The difference is that the project is divided into three static resources. The function part adopts the combination of event driven and http, and the api part adopts tablestore for data persistence.
Process description
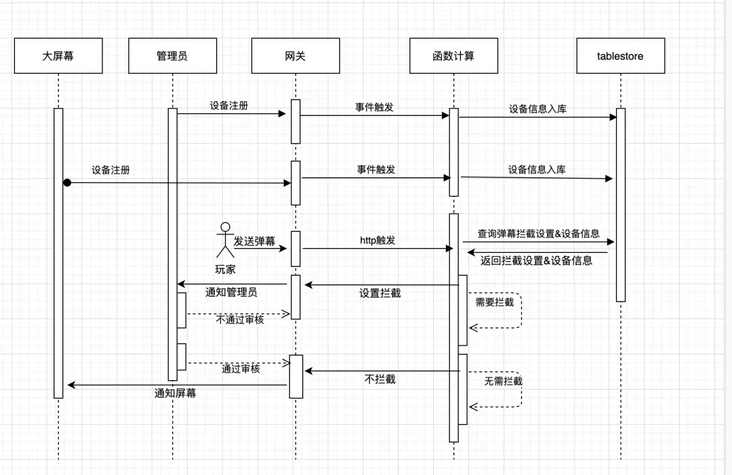
The chief engineer of bullet screen application consists of three clients: large screen, individual user and administrator, as well as an API service for registering devices. The long link between the client and the server is carried by the gateway. Every time the client connects to the gateway, the gateway will store the device number, trigger a registration function, and store the device number in the tablestore.
When the user initiates the barrage, he will go to the api service through the gateway, and the api service will make a query. First, it will judge whether the barrage is controlled. If it is not controlled, it will directly find the current large screen device id and make the downlink call of the gateway. The gateway will send it to the front-end page and display the data. If it is controlled, query the online administrator equipment and notify the gateway of the barrage downlink, and the gateway sends it to the front-end page of the administrator.
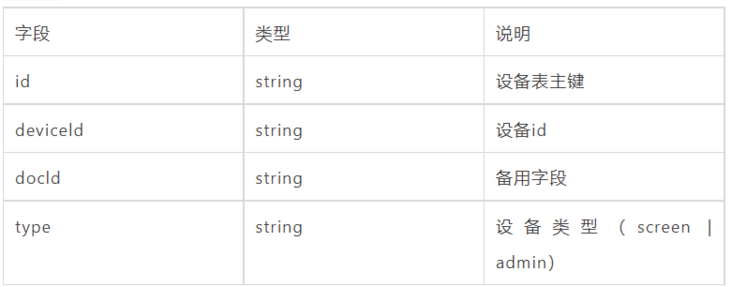
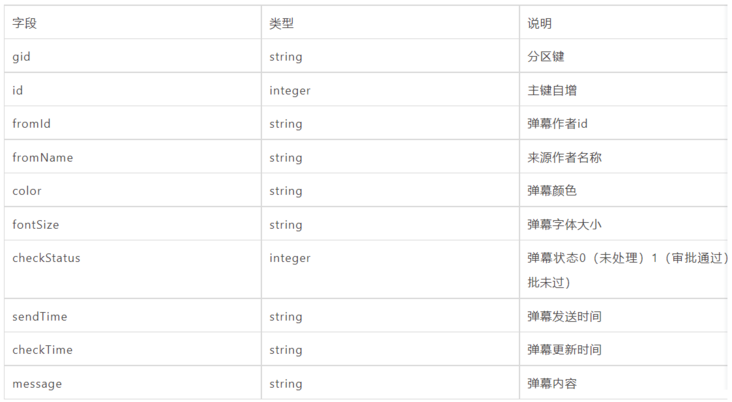
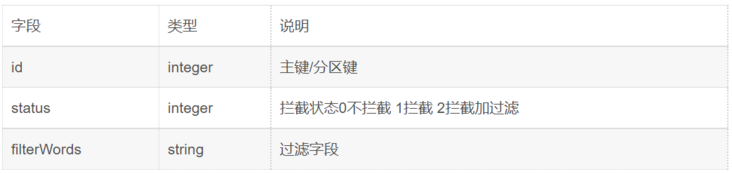
Data sheet design
equipment
barrage
interceptor
1. Preparatory work
As in the previous article "everyone is a Serverless architect 𞓜 modern Web application development practice", you need to prepare the domain name in advance, install the Serverless Devs developer tool, and the following products:
- Cloud resolution DNS
- API gateway
- Function calculation
- Object storage OSS
- Tablestore
This time, we introduced the persistence function of the database memory data of the tablestore. We also need to create a database instance for standby.
2. Operation steps
In order to better show the effect, this demonstration uses Serverless Desktop to show you how to deploy a complex barrage application in 2 minutes. You can choose Serverless Devs Cli or Serverless Desktop to initialize, deploy and build the barrage application according to your own needs.
1) Secret key configuration
Refer to the key acquisition document:
http://www.serverless-devs.co...
2) Initialize
In addition to downloading the application template locally, this initialization will also help initialize the tables and data of the tablestore. Therefore, several parameters need to be pre configured:
- Secret key alias - corresponds to your alicloud account
- Domain name - custom domain name
- Bucket name - the bucket name of the OSS
- endpoint - the public network access address of the corresponding tablestore instance
- Instance - the instance name of the corresponding tablestore
After writing the preconfigured parameters, click "OK", and the next work will be called Serverless Devs, which will help us initialize the table of the barrage application.
3) Build deployment
After initialization, we re-enter the configuration page to deploy the project. After clicking configuration information - > full operation - > deploy, the rest will be handed over to Serverless Devs, which will help us complete:
- Large screen, manage the front-end deployment of background and players;
- Deployment of registration functions and api functions
- And the routing settings of the gateway and the domain name binding of the gateway
4) Deployment effect view
gateway
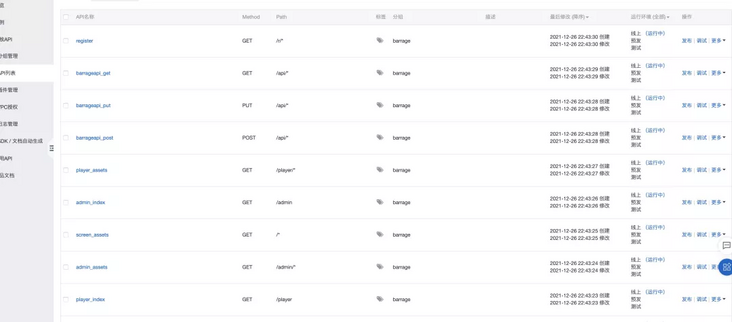
Function calculation

Oss

DNS

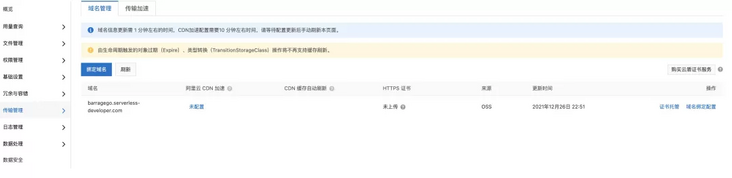
Visit barragego serverless-developer. Com found that the access is different. The reason is that the domain name of apigateway and oss domain name are not bound successfully. Let's deal with it manually:
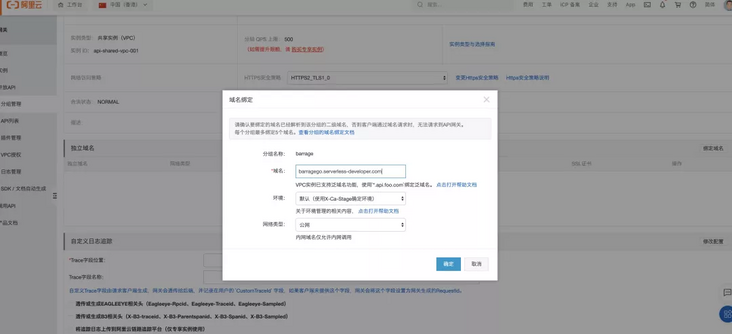
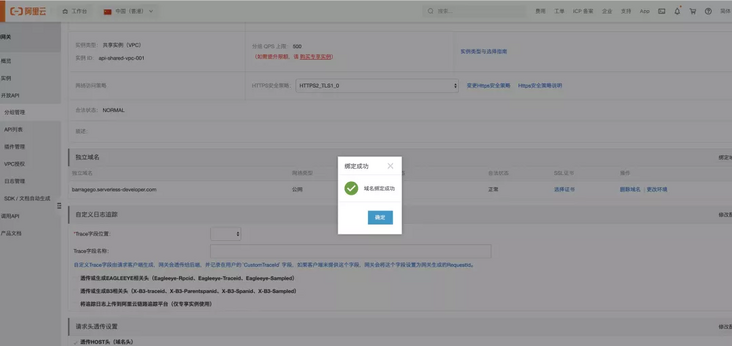
Next, visit barragego serverless-developer. Com to see the effect:
2. Database details
In terms of database, I want to say that the database used this time is really new, that is, tablestore.
1) Database configuration delivery
It can be seen that when initializing the application, we fill in the public network access address and instance name information of the database. During initialization, the user's input configuration will be written into s.yaml. If it is sensitive information, it is recommended to extract it from s.yaml and put it in env environment, and ignore this file to reduce the risk of database information being leaked to the code warehouse.
Finally, Devs will put these two basic information into the environment variables calculated by the function, and then each runtime can get these values through the environment variables. For example, if this is the running environment of nodejs, process env. Instance get.
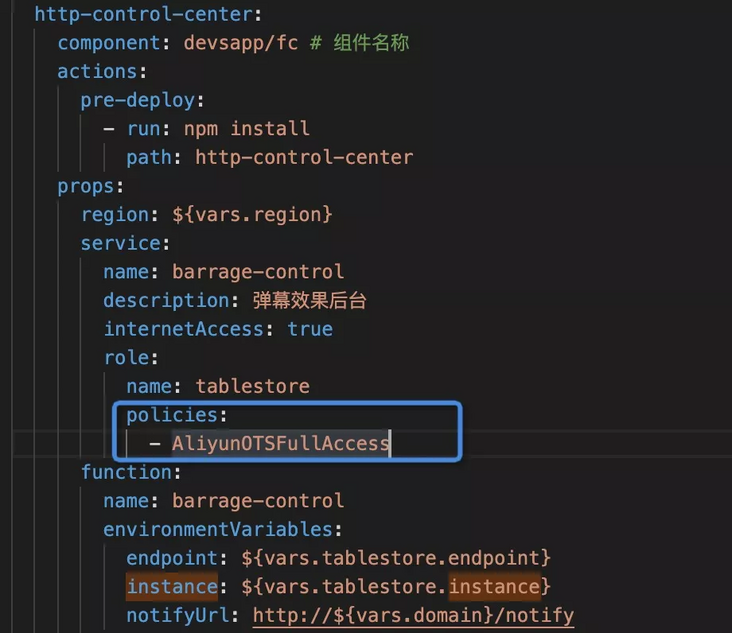
In addition to the instance name and public network access address, the initialization of the database also requires the user's secret key information. In view of the high sensitivity of the secret key information, it is not recommended to directly configure the secret key information into s.yaml. Instead, it is recommended to authorize the tablestore role permission to the function service to build in the temporary secret key information.
The function service authorization configuration is as follows:
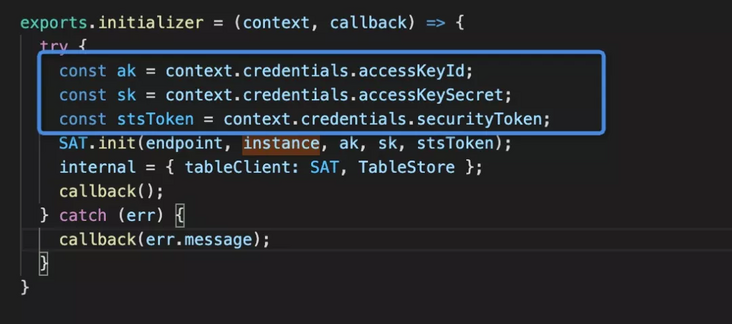
The secret key information obtained in the function is as follows:
2) Database initialization
In order to reduce the number of database initialization, we can initialize in the initializer method of the function. When the function is not released, we can directly use the instance of the database without reconnecting. This can reduce request response time. It is more practical in the case of single instance and multi concurrency.
exports.initializer = (context, callback) => {

  try {

    const ak = context.credentials.accessKeyId;

    const sk = context.credentials.accessKeySecret;

    const stsToken = context.credentials.securityToken;

    SAT.init(endpoint, instance, ak, sk, stsToken);

    internal = { tableClient: SAT, TableStore };

    callback();

  } catch (err) {

    callback(err.message);

  }

}
After the database instance is initialized, we obtain the instance from other methods by assigning a value to the global variable for subsequent operations.
3)CRUD
The tablestore native api is not friendly enough for CRUD operation. The tablestore community provides a good encapsulated SAT. It will be very convenient for us to add, delete, modify and check the basic code, and the code looks very neat.
// Single primary key query

const getInterceptor = async (ctx) => {

  const { tableClient } = ctx.req.requestContext.internal;

  const res = await tableClient.table('interceptor').get(1, cols = []);

  return res;

}


// Query all

const getAllEquipment = async (tableClient,TableStore) => {

  const res = await tableClient.table('equipment').getRange(TableStore.INF_MIN, TableStore.INF_MAX, cols = [])

  return Object.keys(res).map((key)=> res[key]);

}

// Insertion of double primary keys (one partition key and one auto increment key)

const addBarrage = async (ctx) => {

  const { tableClient, TableStore } = ctx.req.requestContext.internal;

  const { fromId, fromName, color, fontSize = '28px', checkStatus = 0, message } = ctx.request.body;

  const currentTime = Date.now().toString();

  const newData = Object.assign({}, { fromId, fromName, color, fontSize, checkStatus: parseInt(checkStatus), message }, { sendTime: currentTime, checkTime: currentTime });

  const res = await tableClient.table('barrage', ['gid', 'id']).put([1, TableStore.PK_AUTO_INCR], newData, c = 'I');

  return res;

}

// to update

const updateBarrage = async (ctx) => {

  const { tableClient } = ctx.req.requestContext.internal;

  const { checkStatus } = ctx.request.body;

  const { id } = ctx.request.params;

  const currentTime = Date.now().toString();

  const res = await tableClient.table('barrage', ['gid', 'id']).update([1, parseInt(id)], { checkStatus: parseInt(checkStatus), checkTime: currentTime }, c = 'I')

  return res;

}

// Condition query

const getBarrageByCondition = async (ctx) => {

  const { tableClient, TableStore } = ctx.req.requestContext.internal;

  const res = await tableClient.table('barrage').search('index', ['checkStatus', 0])

  return res;

}
Of course, if you want to make more advanced queries, you need to consult the official website documents yourself.
summary
The project itself is an example of how Serverless uses websocket. You can turn it into any similar form of application, such as chat room, multiplayer collaboration platform and so on.
There is also a lot of room for improvement in the application itself, such as adding the like effect, and the login and registration of administrators can be added to the control part. In short, you can customize more advanced functions according to your own needs. The relevant source code has been provided for your reference. In the next chapter, I will continue to talk about Serverless and low code scenarios, and share a recent practice we have done.
Original link
This article is the original content of Alibaba cloud and cannot be reproduced without permission.