Write in front
This article is for reference, thanks for the original:
https://blog.csdn.net/weixin_45606067/article/details/109962484
https://blog.csdn.net/secyb/article/details/78697976
https://blog.csdn.net/smart9527_zc/article/details/85174102
https://blog.csdn.net/weixin_45842014/article/details/108779004
https://blog.csdn.net/zqwzlanbao/article/details/83987570
http://thisis.yorven.site/blog/index.php/2020/12/06/openpbs-install-instructions/
Copyright notice: the above articles are original articles of bloggers and follow CC 4.0 BY-SA copyright agreement. Please attach the source link of the original text and this notice for reprint.
In addition, there is openpbs Official manual , address: https://www.altair.com/pbs-works-documentation/
Installation package involved:
MPICH:
https://www.mpich.org/static/downloads/3.3/mpich-3.3.tar.gz
Openpbs: https://github.com/openpbs/openpbs/releases/download/v19.1.3/pbspro_19.1.3.centos_7.zip
preparation
1. Install virtual machine
The Linux version I use here is centos 7. Other Linux operating systems such as Ubuntu and Fredora are similar to centos, but some commands and files are located in different locations, such as installation commands. You can download the system image iso file to the Tsinghua image website https://mirrors.tuna.tsinghua.edu.cn/
The virtual machine platform I use is VMware Workstation. I can also use free VMware Player for installation. Please refer to the specific installation steps
Detailed steps for installing Centos7 in VM (picture and text)
It is recommended to put the virtual machine and virtual hard disk in the same folder that you can find, such as D:/centos7 /, so that the virtual machine can be copied later.
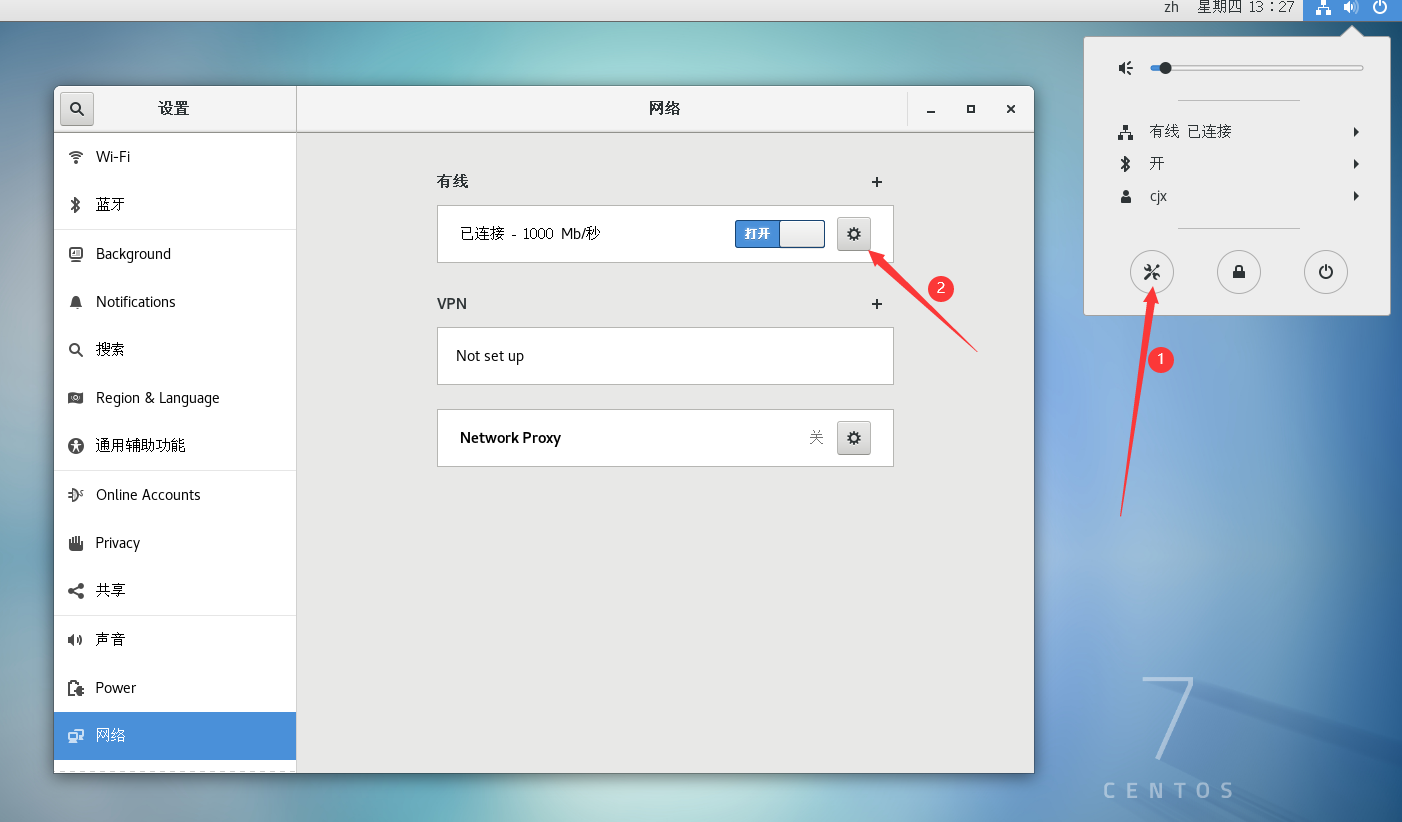
When configuring the virtual machine network, you can directly view the DHCP option in the virtual machine settings and check it directly. If DHCP is turned on, the virtual machine should be connected to the Internet. You can ping Baidu on the terminal to see if it can connect, or open Firefox directly.
ping www.baidu.com
2. Create a virtual machine cluster
The following table is my configuration when creating a cluster
| host | IP | remarks |
|---|---|---|
| master | 192.68.45.131 | Master node |
| host1 | 192.68.45.132 | Child node |
| host2 | 192.68.45.133 | Child node |
When building a pbs cluster, I select a master node and two child nodes. I can create multiple virtual machines on the vm to simulate the cluster. Here I use replication virtual machines.
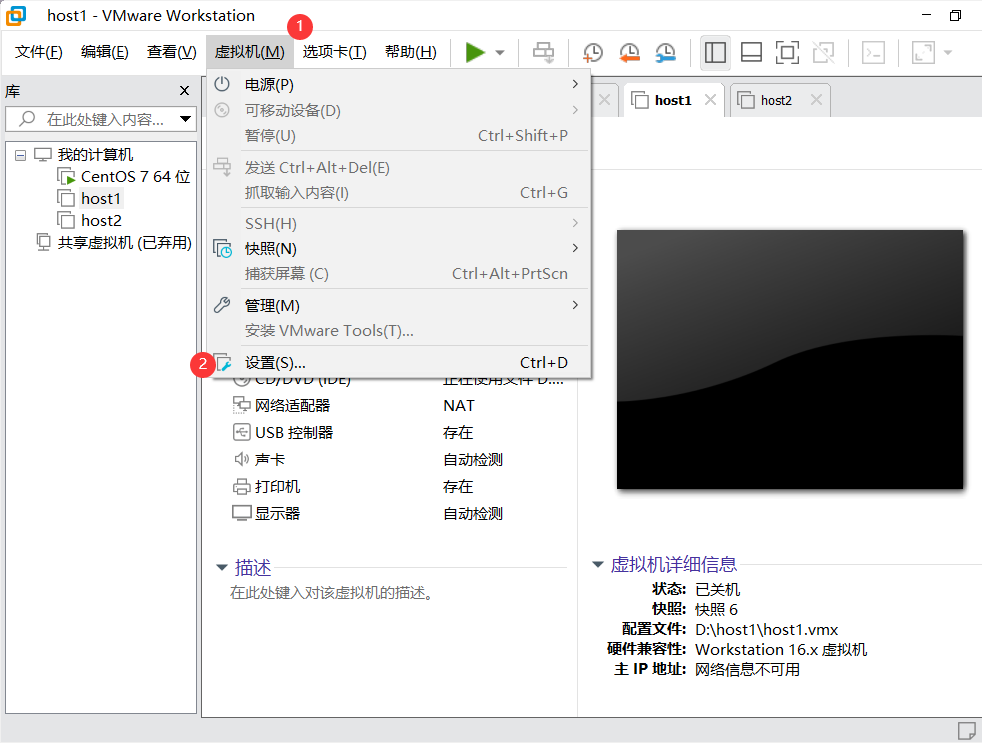
Since some of the contents of the primary node and the child node are the same, you can configure some of them first and then copy them. Refer to the specific steps for copying virtual machines
Copy virtual machine related articles
(you can also clone the virtual machine directly in the VM. The configuration to be changed after cloning is the same as that in the above article.)
It should be noted that the virtual machine and the virtual hard disk are placed in the same folder, which can be copied directly, and then the virtual machine can be copied according to the above article.
According to the above article, it is found that the copied and copied virtual machines cannot be opened at the same time because the two virtual machines occupy the same virtual hard disk. You can solve this problem by changing the virtual hard disk of the virtual machine.
- Shut down the virtual machine master and host1
- Open the virtual machine settings for host1
- Remove existing virtual hard disk
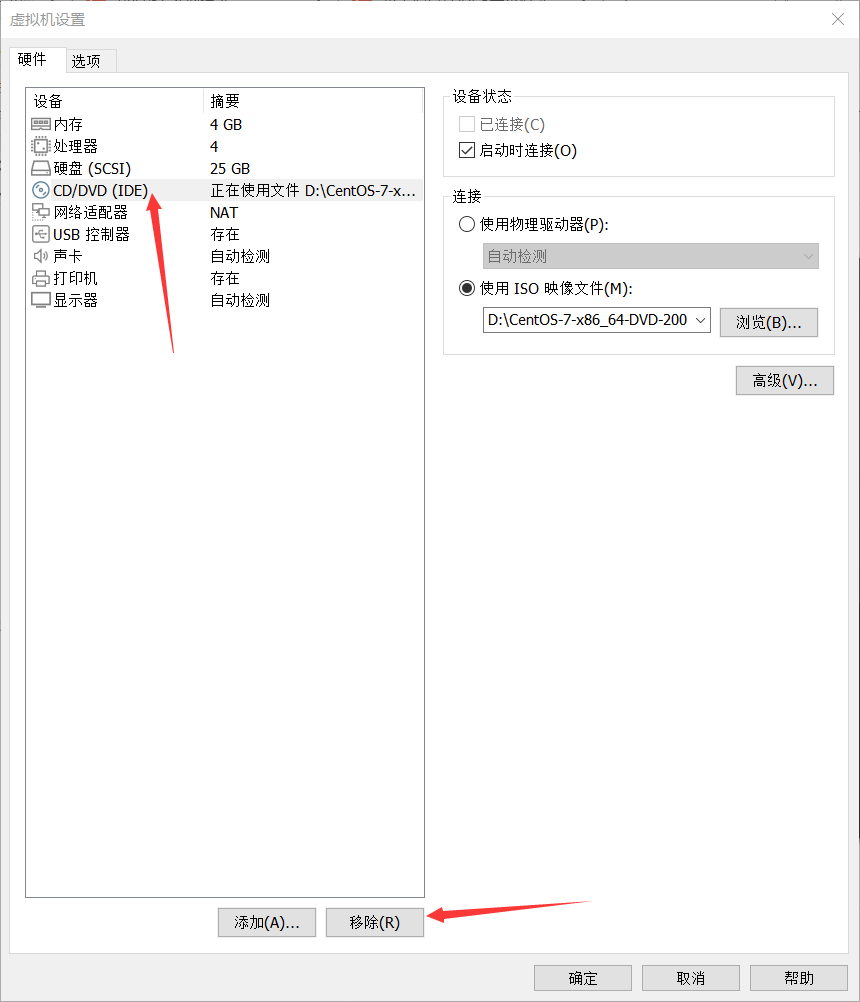
- Add a new hard disk
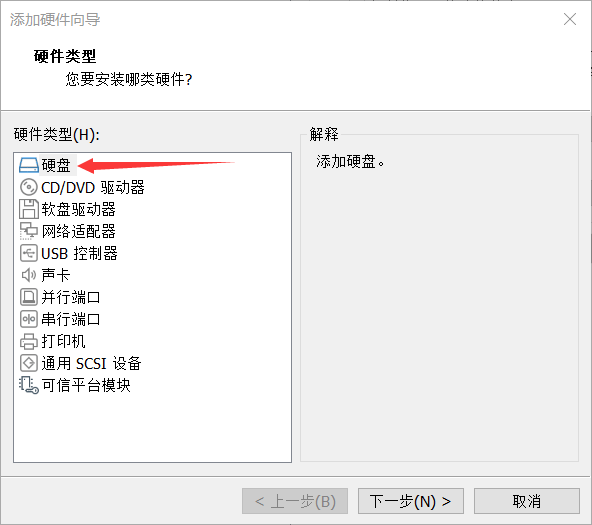
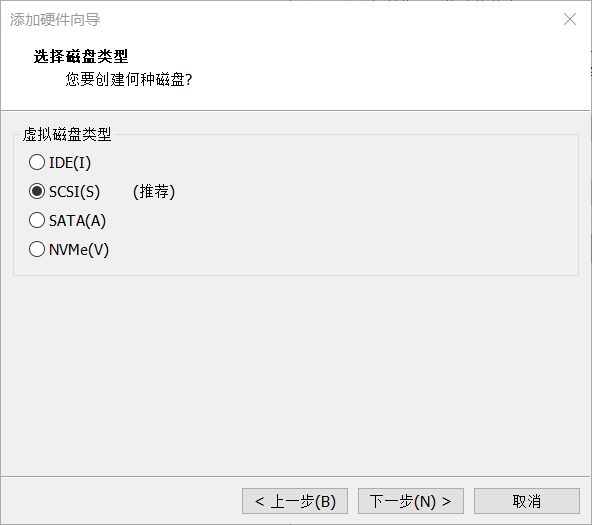
Select SCSI
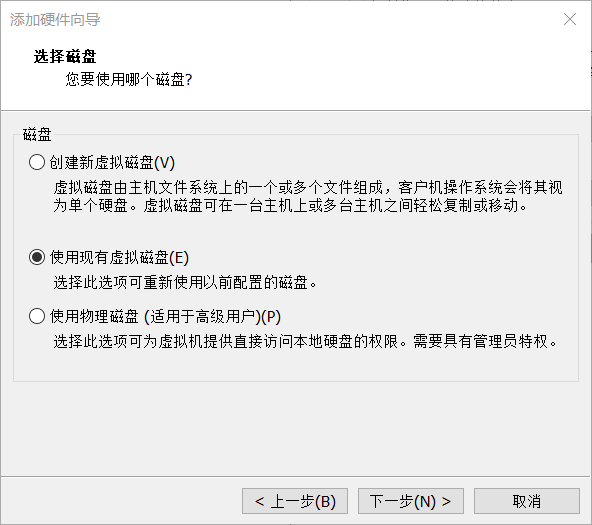
Choose to use an existing virtual disk
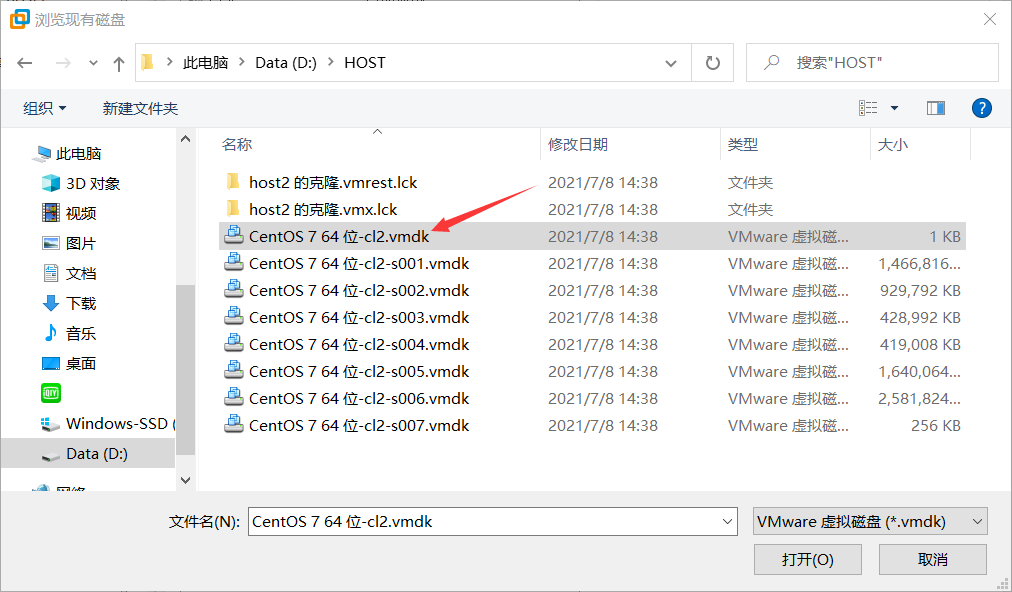
Select the vmdk file with no s00x suffix. Finish.
SSH password free login
Network environment configuration
The configuration operations of the two child nodes are the same. The following operations take master and host1 as examples. Since the root user cannot be used for some operations later, it is recommended to log in with ordinary users throughout the process. Open two terminals under the graphical interface. It is more convenient to log in with one su root.
Configure the hosts files of the two machines respectively. Previously, DHCP was used for virtual machine network settings. The IP address of the machine can be found with ifconfig command, but it is not fixed. You can "fix" the IP by modifying the ifcfg-ens33 file. (I couldn't fix the fixed IP address of the virtual machine before, so the virtual machine couldn't connect to the Internet. I simply ignored it and directly changed the system configuration file. I didn't expect that this can not only maintain the network, but also ensure the subsequent installation.)
sudo vim /etc/sysconfig/network-scripts/ifcfg-ens33
#Add at the end of the file
IPADDR=192.68.45.131
DNS1=114.114.114.114
#It is also configured on host1, and the IP address is changed to 192.68.45.132
#Restart the network
sudo systemctl restart network
#Check whether the change is successful
ifconfig
When you check the IP address after restarting the network, you may sometimes find that inet is different from the IPADDR added in the file, but it does not affect my subsequent installation. You can ignore it first.
Edit the hosts file in master and host1 respectively.
sudo vim /etc/hosts
#Write the IP and machine names of all nodes in the file, such as
192.68.45.131 master
192.68.45.132 host1
 To change the machine name, you can use
hostnamectl set-hostname <Machine name>((angle brackets are not included in the command)
#After setting hosts and host, you'd better restart
At this time, the two machines should be able to ping (master ping host1)
ssh password free login
(1) Install ssh service on each node
sudo yum install ssh
sudo systemctl start sshd
#Start ssh
(2) Each node (master node and child node) generates a private key and a public key
ssh-keygen -t rsa
#The generated key file is in ~ / ssh / down
cat ~/.ssh/id_rsa.pub >> ~/.ssh/authorized_keys
#Authentication. After this step, you can log in the machine without secret and use ssh master to test
(3) The ID of each child node_ rsa. Pub to master node
scp id_rsa.pub <user name>@master:~/.ssh/id_rsa.pub.host1
(4) Operate authentication at master node
cat ~/.ssh/id_rsa.pub.host1 >> ~/.ssh/authorized_keys
cd ~/.ssh/
(5) Pass the authentication file of the master node back to the child node
scp authorized_keys <user name>@host1:~/.ssh/authorized_key
sudo systemctl restart sshd
Note that ssh password free login is user to user, so in operation, it is necessary to ensure that the terminals of the main node and the terminals of the child nodes are corresponding.
Create NFS shared directory
Close the firewall and Selinux of each node
Turn off firewall
 Start:       systemctl start firewalld
 close:       systemctl stop firewalld
 Power on disable:    systemctl disable firewalld
 Boot enable:    systemctl enable firewalld
 close Selinux
 Temporarily Closed
 On:    setenforce 1
 close:    setenforce 0
Server (master)
yum install nfs-utils rpcbind
#Install software
mkdir -p /home/mpi_share
#Create shared directory
chmod 777 /home/mpi_share -R
#Grant permissions
vim /etc/exports
#Modify configuration
 write in:
/home/mpi_share 192.68.45.132(rw,sync,no_root_squash) <Other child node addresses>(rw,sync,no_root_squash)
#192.68.45.132 is the address of the child node or the host name. rw in the permission option indicates that reading and writing are allowed; ro is read-only; sync means synchronous write, no_root_squash means to grant local root permission when the client accesses as root.
systemctl start rpcbind
systemctl start nfs
#Start nfs or set it to boot
systemctl enable rpcbind
systemctl enable nfs
showmount -e
#View shared directories on NFS server side
Client (host1)
yum install nfs-utils rpcbind

mkdir -p /home/mpi_share
#Set the shared directory location and name of each node to the same

systemctl start rpcbind

systemctl start nfs
#You can also set startup
showmount -e 192.68.45.131
#Displays the shared directory of the server
mount -t nfs 192.68.45.131:/home/mpi_share /home/mpi_share
#The former is the shared directory of the server, and the latter is the directory of the client
#Mount the shared directory to the local folder

Test:
cd /home/mpi_share
touch test.txt
#Create txt file

On the server:
cd /home/mpi_share
ls
#Check whether txt files are generated
The mount command is temporary and fails after the machine is restarted. The following methods can be used for permanent mounting:
vim /etc/fstab
 add to
192.68.45.131:/home/mpi_share /home/mpi_share nfs rw 0 0
In this way, the server needs to be turned on each time it is used. Otherwise, the client cannot mount the shared directory. There is an attempt time of 1 minute and 35 seconds. You can press Ctrl+Alt+2 on the startup page to view it under the command line. It can be started, but the shared directory is not available.
Installing and configuring mpich
Install compiler
yum install gcc g++
#The default compilers of mpich are gcc,g + + and gfortran, but the installation package of gfortran cannot be found by yum command
#You can find your own way to install the gfortran compiler
Decompress and compile
Here I put the installation package under ~ / download /
cd ~/download
tar -zxvf mpich-3.3.tar.gz
#Unzip the package
cd ./mpi-3.3
#After entering the extracted directory, there is a README file with detailed installation steps
./configure --disable-fortran
#The suffix here will cancel the configuration of Fortran, which is described in README
make
make install
#Configuration compilation takes a long time
#You can set the installation path by yourself
mpich is installed under each node. You can put the tar compressed package under the previously set shared directory.
Configuration environment
- New profile
At / home / MPI_ Create a new file under share: servers, which indicates how many cores each machine has.
cd /home/mpi_share

sudo vim mpi_config_file
 write in:
master:4
host1:4
host2:4
- Test case procedure
There is an executable file cpi in the examples directory under the previously unzipped mpich-3.3 directory. We can run it.
Copy the executable to the shared directory / home / MPI_ In share /, switch to the shared directory
cd /home/mpi_share

mpiexec -n 8 -f ./servers ./cpi
#-n represents the number of cores required by the character, - f represents the reference configuration file, and finally the executable file
The successful results are as follows:
[cjx@master mpi_share]$ mpiexec -n 8 -f servers ./cpi
Process 4 of 8 is on host1
Process 5 of 8 is on host1
Process 6 of 8 is on host1
Process 7 of 8 is on host1
Process 0 of 8 is on master
Process 3 of 8 is on master
Process 1 of 8 is on master
Process 2 of 8 is on master
pi is approximately 3.1415926544231247, Error is 0.0000000008333316
wall clock time = 0.001251
Openpbs installation
Configuration environment
Here I will compress the file pbspro_19.1.3.centos_7.zip under ~ / download /
unzip pbspro_19.1.3.centos_7.zip
There are four rpm installation packages in the extracted directory. You can infer their purpose according to the name. Here we only need two packages
pbspro-server-19.1.3-0.x86_64.rpm is the package that the server node (master node) needs to install
pbspro-execution-19.1.3-0.x86_64.rpm is the package that the compute node (child node) needs to install
Some environments need to be configured before installation. The following is the environment variable diagram given in the official manual, but I haven't understood it for a long time. Here are the methods for my success.
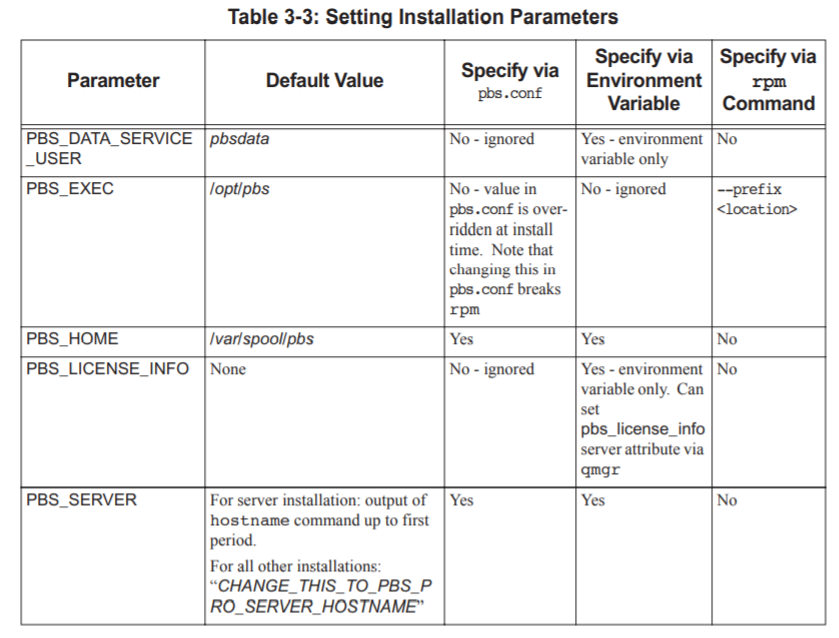
You do not need to set these environment variables on the master node
On child nodes, you need to set environment variables before installation
export PBS_SERVER=master
export PBS_EXEC=/opt/pbs
export PBS_HOME=/var/spool/pbs
install
-Master node
Enter the extracted directory
yum install pbspro-server-19.1.3-0.x86_64.rpm
After installation, generate a configuration file / etc / PBS conf
Open it with vim and find PBS in it_ START_ Mom, which indicates whether the current machine undertakes computing tasks, 1 indicates undertaking, and 0 indicates not undertaking.
Next, open pbs and check the status
systemctl start pbs

/etc/init.d/pbs status
#View running status
 There will be the following similar outputs:
pbs_server is pid 6661
pbs_mom is pid 6270
pbs_sched is pid 6282
pbs_comm is 6242
 If there are mistakes, you can su root Try again later
To use root on the server, you also need to enter the following command
qmgr -c"set server flatuid=true"
qmgr -c "set server schduling=true"
qmgr -c "set server job_history_enable=1"
At this point, the server configuration and installation are complete.
-Child node
Enter the extracted directory
export PBS_SERVER=master
export PBS_EXEC=/opt/pbs
export PBS_HOME=/var/spool/pbs

yum install pbspro-execution-19.1.3-0.x86_64.rpm

systemctl start pbs

/etc/init.d/pbs status
 Display the following similar content
pbs_mom is pid 6270
-Add node
At this time, the primary node server cannot call the child nodes for operation, so you need to add a calculation node to the primary node
su root
#Operate with root user
qmgr -c "create node host1"
#host1 is the compute node you want to add
pbsnodes -a     perhaps   pbsnodes -aSj
#Output information of all nodes
#Node state displays free, indicating that the node is available
-Testing
Under normal users, submit tasks on the master
echo "sleep 600" | qsub
#Submit the simplest task
qstat -a
#View the status of running tasks
qstat -H
#View historical tasks
In practice, commands are often submitted in the form of scripts,
Run mpich. In the script with mpiexec or mpirun