prerequisite
- Install redis, I'm from Redis official website Download the latest version of redis-5.0.5
- linux environment, centos 7.7 I use, VM environment
# redis preparation
$ cd /opt
$ wget http://download.redis.io/releases/redis-5.0.5.tar.gz
$ tar xzf redis-5.0.5.tar.gz
$ cd redis-5.0.5
$ make
$ make install
A cluster in a production environment usually uses multiple independent hosts. Here is a demonstration of running multiple nodes on a virtual machine at the same time. Please pay attention to this.
Master-slave replication
There are two main steps
- Prepare master/slave configuration file
- Start the master and then the slave for verification
configuration file
# redis6379.conf master # Contains commands, which means a bit of reuse include /opt/redis-5.0.5/redis.conf pidfile /var/run/redis_6379.pid port 6379 dbfilename dump6379.rdb logfile "my-redis-6379.log" # redis6380.conf slave1 include /opt/redis-5.0.5/redis.conf pidfile /var/run/redis_6380.pid port 6380 dbfilename dump6380.rdb logfile "my-redis-6380.log" # The last line sets the ip port of the master node replicaof 127.0.0.1 6379 # redis6381.conf slave2 include /opt/redis-5.0.5/redis.conf pidfile /var/run/redis_6381.pid port 6381 dbfilename dump6381.rdb logfile "my-redis-6381.log" # The last line sets the ip port of the master node replicaof 127.0.0.1 6379 ## Pay attention to redis Conf needs to adjust one item and set the background operation, which is friendly to our operation daemonize yes
Start node
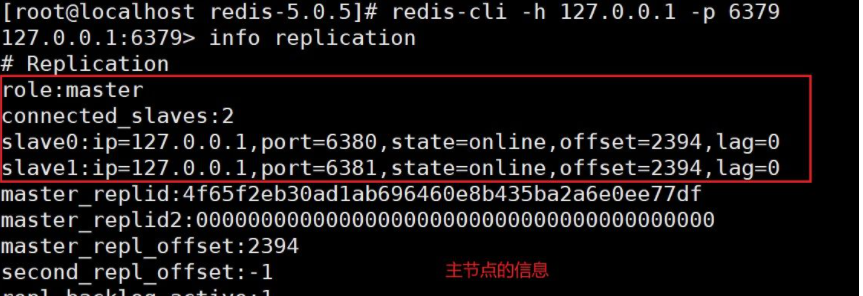
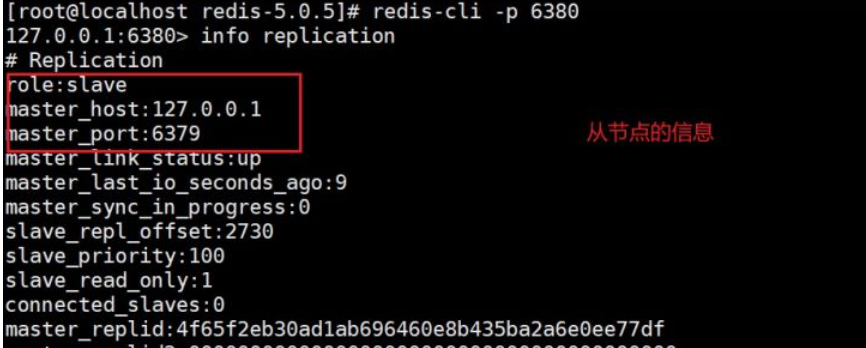
Start the node and view the node information
# Sequential start node $ redis-server redis6379.conf $ redis-server redis6380.conf $ redis-server redis6381.conf # Enter the redis client and open multiple windows for easier viewing $ redis-cli -p 6379 $ info replication
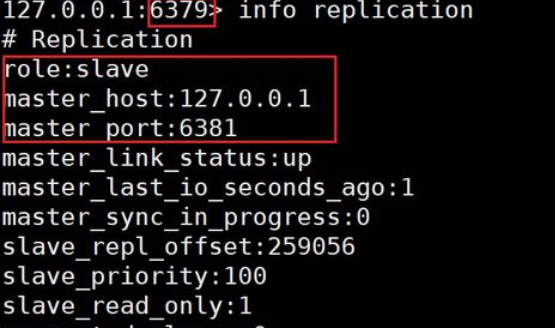
The info replication command can view the information of other databases connected to the database. You can see that there are two slave connected to the master
Data synchronization verification
Set the value in the master node and view the data synchronization in the slave1/slave2 node
# master $ redis-cli -p 6379 127.0.0.1:6379> set k1 v1 OK # slave1 $ redis-cli -p 6380 127.0.0.1:6380> get k1 "v1"
Sentinel mode
It is also said that sentinels are actually automatic versions of active replication, so master-slave replication needs to be configured first. The difference is that several sentinels need to be added for monitoring.
There are two main steps:
- Prepare the master-slave replication cluster and start it
- Add sentry configuration and start verification
Sentry configuration
The configuration of Sentry is actually the same as that of redis Conf is a bit like. You can take a look at the sentinel conf
Here we create three sentinel files. The difference between sentinel files lies in the different startup ports
# Document content
# sentinel1.conf
port 26379
sentinel monitor mymaster 127.0.0.1 6379 1
# sentinel2.conf
port 26380
sentinel monitor mymaster 127.0.0.1 6379 1
# sentinel3.conf
port 26381
sentinel monitor mymaster 127.0.0.1 6379 1

Activate the sentry
Start the master slave first!
Then, start all three one by one
$ redis-sentinel sentinel1.conf
$ redis-sentinel sentinel2.conf
$ redis-sentinel sentinel3.conf
After startup, the log is as follows. You can see the monitored master / slave nodes and sentinel clusters

Master node offline simulation
We execute shutdown on the master(6379) node, and then observe what the Sentry will do for me?
It can be seen that the sentinel scanned the master offline, and then re elected the master(6381) node through a series of judgment, voting and other operations
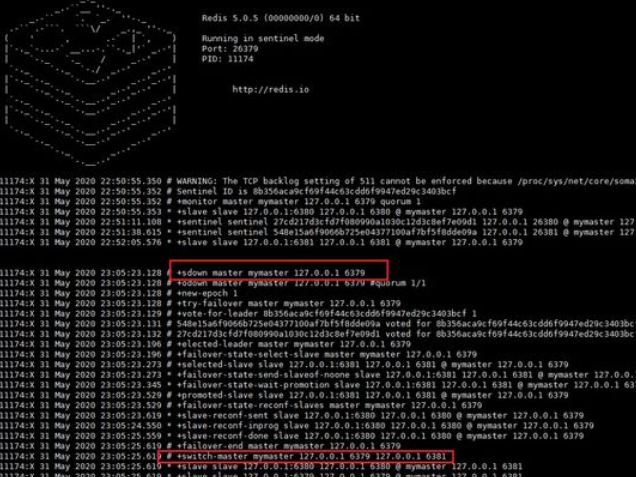
You can see that 6381 has become a master
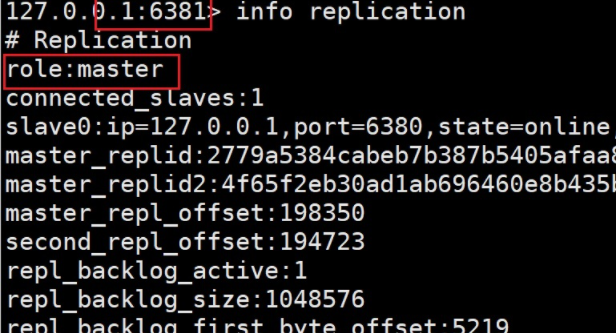
Then we can see that even if we restore the original master node to operation, it only exists as a slave and loses the identity of big brother. It can be said that Feng Shui has changed in turn
Cluster cluster mode
Redis's Cluster mode is quite simple to start
There are two main steps
- configuration file
- Start validation
configuration file
Let's prepare six configuration files, port 700170027003700470057006
They are named redis7001 conf …redis7006.conf
redis7001. The contents of the conf configuration file are as follows (remember to copy 6 copies and replace the port number)
# port
port 7001
# Enable cluster mode
cluster-enabled yes
# Name the node according to the node you enable. It's best to keep consistent with the port. This is used to save the name, status and other information of other nodes
cluster-config-file nodes_7001.conf
# Timeout
cluster-node-timeout 5000
appendonly yes
# Background operation
daemonize yes
# Unprotected mode
protected-mode no
pidfile  /var/run/redis_7001.pid
Start redis node
- Start node by node
redis-server redis7001.conf
...
redis-server redis7006.conf
See the following startup conditions

- Start cluster
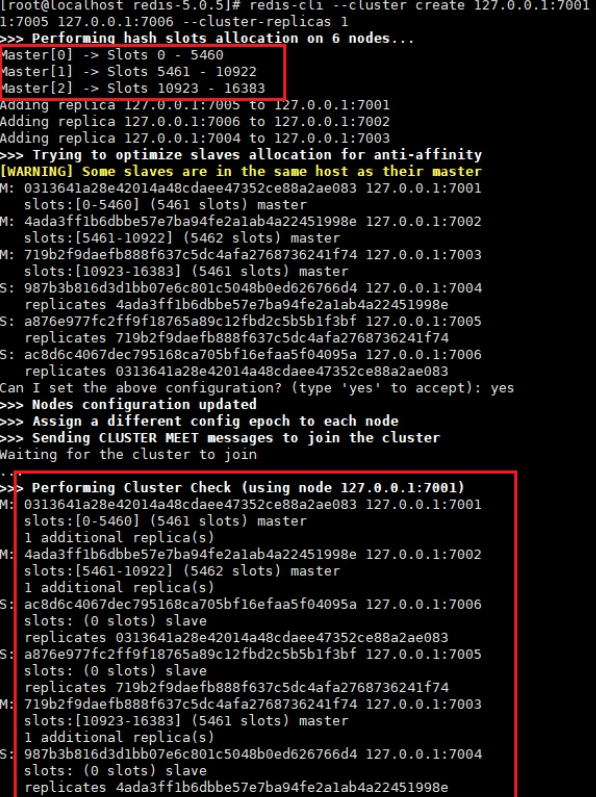
# Execute command # --The cluster replica 1 command means to create a slave when creating a master $ redis-cli --cluster create 127.0.0.1:7001 127.0.0.1:7002 127.0.0.1:7003 127.0.0.1:7004 127.0.0.1:7005 127.0.0.1:7006 --cluste r-replicas 1 # Successful execution results are as follows # We can see that 700170027003 has become the master node, # slot [0-5460], [5461-10922], [10923-16383] are occupied respectively >>> Performing hash slots allocation on 6 nodes... Master[0] -> Slots 0 - 5460 Master[1] -> Slots 5461 - 10922 Master[2] -> Slots 10923 - 16383 Adding replica 127.0.0.1:7005 to 127.0.0.1:7001 Adding replica 127.0.0.1:7006 to 127.0.0.1:7002 Adding replica 127.0.0.1:7004 to 127.0.0.1:7003 >>> Trying to optimize slaves allocation for anti-affinity [WARNING] Some slaves are in the same host as their master M: 0313641a28e42014a48cdaee47352ce88a2ae083 127.0.0.1:7001 slots:[0-5460] (5461 slots) master M: 4ada3ff1b6dbbe57e7ba94fe2a1ab4a22451998e 127.0.0.1:7002 slots:[5461-10922] (5462 slots) master M: 719b2f9daefb888f637c5dc4afa2768736241f74 127.0.0.1:7003 slots:[10923-16383] (5461 slots) master S: 987b3b816d3d1bb07e6c801c5048b0ed626766d4 127.0.0.1:7004 replicates 4ada3ff1b6dbbe57e7ba94fe2a1ab4a22451998e S: a876e977fc2ff9f18765a89c12fbd2c5b5b1f3bf 127.0.0.1:7005 replicates 719b2f9daefb888f637c5dc4afa2768736241f74 S: ac8d6c4067dec795168ca705bf16efaa5f04095a 127.0.0.1:7006 replicates 0313641a28e42014a48cdaee47352ce88a2ae083 Can I set the above configuration? (type 'yes' to accept): yes # Here is a process to manually enter yes to confirm >>> Nodes configuration updated >>> Assign a different config epoch to each node >>> Sending CLUSTER MEET messages to join the cluster Waiting for the cluster to join ... >>> Performing Cluster Check (using node 127.0.0.1:7001) M: 0313641a28e42014a48cdaee47352ce88a2ae083 127.0.0.1:7001 slots:[0-5460] (5461 slots) master 1 additional replica(s) M: 4ada3ff1b6dbbe57e7ba94fe2a1ab4a22451998e 127.0.0.1:7002 slots:[5461-10922] (5462 slots) master 1 additional replica(s) S: ac8d6c4067dec795168ca705bf16efaa5f04095a 127.0.0.1:7006 slots: (0 slots) slave replicates 0313641a28e42014a48cdaee47352ce88a2ae083 S: a876e977fc2ff9f18765a89c12fbd2c5b5b1f3bf 127.0.0.1:7005 slots: (0 slots) slave replicates 719b2f9daefb888f637c5dc4afa2768736241f74 M: 719b2f9daefb888f637c5dc4afa2768736241f74 127.0.0.1:7003 slots:[10923-16383] (5461 slots) master 1 additional replica(s) S: 987b3b816d3d1bb07e6c801c5048b0ed626766d4 127.0.0.1:7004 slots: (0 slots) slave replicates 4ada3ff1b6dbbe57e7ba94fe2a1ab4a22451998e [OK] All nodes agree about slots configuration. >>> Check for open slots... >>> Check slots coverage... [OK] All 16384 slots covered.
data validation
# Note that in the cluster mode, the parameter - c should be taken to indicate the cluster, otherwise the data cannot be accessed normally!!! [root@localhost redis-5.0.5]# redis-cli -p 7100 -c # Set k1 v1 127.0.0.1:7001> set k1 v1 -> Redirected to slot [12706] located at 127.0.0.1:7003 OK # You can see the characteristics of the cluster: save the data to the calculated slot, and here it automatically jumps to 7003 127.0.0.1:7003> get k1 "v1" # Let's go back to 7001 and try to get k1 [root@localhost redis-5.0.5]# redis-cli -p 7001 -c 127.0.0.1:7001> get k1 -> Redirected to slot [12706] located at 127.0.0.1:7003 "v1" # We can see the redirection process 127.0.0.1:7003>