English Version | Chinese version
Explain the implementation principle of Jest framework in simple terms
https://github.com/Wscats/jest-tutorial
What is Jest
Jest is a JavaScript testing framework developed by Facebook, which is used to create, run and write JavaScript libraries for testing.
Jest is published as an NPM package and can be installed and run in any JavaScript project. Jest is one of the most popular front-end test libraries.
What does testing mean
In technical terms, testing means checking that our code meets certain expectations. For example, a function called sum should return the expected output of a given number of operation results.
There are many types of tests, and soon you will be inundated with terms, but to make a long story short, the tests are divided into three categories:
- unit testing
- integration testing
- E2E test
How do I know what to test
In terms of testing, even the simplest code block may confuse beginners. The most common question is "how do I know what to test?".
If you are writing a web page, a good starting point is to test each page of the application and each user interaction. However, web pages also need to be composed of code units such as tested functions and modules.
Most of the time, there are two situations:
- You inherit legacy code that comes with no tests
- You have to implement a new function out of thin air
What should I do? In both cases, you can see the test as: checking whether the function produces the expected results. The most typical test process is as follows:
- Import the function to test
- Give the function an input
- Define the desired output
- Check whether the function produces the expected output
Generally, it's that simple. Mastering the following core ideas, writing tests will no longer be terrible:
Input - > expected output - > assertion result.
Test blocks, assertions, and matchers
We will create a simple Javascript function code for the addition of two numbers, and write the corresponding Jest based test for it
const sum = (a, b) => a + b;
Now, to test, create a test file in the same folder, named test Spec.js, the special suffix is Jest's convention, which is used to find all test files. We will also import the function under test to execute the code under test. The Jest test follows the BDD style test. Each test should have a main test block and can have multiple test blocks. Now you can write test blocks for the sum method. Here, we write a test to add two numbers and verify the expected results. We will provide numbers 1 and 2 and expect output 3.
Test requires two parameters: a string describing the test block and a callback function to wrap the actual test. expect wraps the objective function and combines it with the matcher toBe to check whether the calculation result of the function meets the expectation.
This is a complete test:
test("sum test", () => {
  expect(sum(1, 2)).toBe(3);
});
We observed the above code and found two points:
- Test block is a separate test block, which has the function of describing and dividing the scope, that is, it represents the general container for the test we want to write for the calculation function sum.
- expect is an assertion that calls the sum method in the function under test with inputs 1 and 2 and expects output 3.
- toBe is a matcher used to check the expected value. If the expected result is not met, an exception should be thrown.
How to implement test blocks
In fact, the test block is not complex. The simplest implementation is as follows. We need to store the callback function of the actual test in the test package, so encapsulate a dispatch method to receive the command type and callback function:
const test = (name, fn) => {
  dispatch({ type: "ADD_TEST", fn, name });
};
We need to create a callback function in the global state to save the test. The callback function of the test uses an array to store it.
global["STATE_SYMBOL"] = {
  testBlock: [],
};
At this time, the dispatch method only needs to identify the corresponding command and save the tested callback function into the global state.
const dispatch = (event) => {
  const { fn, type, name } = event;
  switch (type) {
    case "ADD_TEST":
      const { testBlock } = global["STATE_SYMBOL"];
      testBlock.push({ fn, name });
      break;
  }
};
How to implement assertion and matcher
The implementation of the assertion library is also very simple. You only need to encapsulate a function and expose the matcher method to meet the following formula:
expect(A).toBe(B)
Here we implement toBe, a common method. When the result is not equal to the expectation, we can throw an error:
const expect = (actual) => ({
    toBe(expected) {
        if (actual !== expected) {
            throw new Error(`${actual} is not equal to ${expected}`);
        }
    }
};
In fact, try/catch will be used in the test block to catch errors and print stack information to locate problems.
In simple cases, we can also use the assert module provided by Node to assert. Of course, there are many more complex assertion methods, which have the same principle in essence.
CLI and configuration
After writing the test, we need to enter the command in the command line to run the single test. Under normal circumstances, the command is similar to the following:
node jest xxx.spec.js
The essence here is to parse the parameters of the command line.
const testPath = process.argv.slice(2)[0];
const code = fs.readFileSync(path.join(process.cwd(), testPath)).toString();
In complex situations, you may also need to read the parameters of the local Jest configuration file to change the execution environment. Here, Jest uses the third-party libraries yargs execa and chalk to parse, execute and print commands.
simulation
In complex test scenarios, we can't avoid a Jest term: mock
In the Jest document, we can find Jest's description of simulation as follows: "the simulation function makes it easy to link the test code by erasing the actual implementation of the function, capturing the calls to the function and the parameters passed in these calls“
In short, you can create simulations by assigning the following code snippets to functions or dependencies:
jest.mock("fs", {
  readFile: jest.fn(() => "wscats"),
});
This is a simple simulation example, which simulates the return value of the fs module readFile function when testing specific business logic.
How to simulate a function
Next, we will study how to implement it. First, jest Mock, the first parameter accepts the module name or module path, and the second parameter is the specific implementation of the exposed method of the module
const jest = {
  mock(mockPath, mockExports = {}) {
    const path = require.resolve(mockPath, { paths: ["."] });
    require.cache[path] = {
      id: path,
      filename: path,
      loaded: true,
      exports: mockExports,
    };
  },
};
In fact, our scheme is consistent with the test block implementation above. We only need to find a place to save the specific implementation method and replace it when we really use the modified module later, so we save it in require In the cache, of course, we can also store it in the global state.
And jest FN is not difficult to implement. Here, we use a closure mockFn to save the replaced functions and parameters, which is convenient for subsequent tests to check and count the call data.
const jest = {
  fn(impl = () => {}) {
    const mockFn = (...args) => {
      mockFn.mock.calls.push(args);
      return impl(...args);
    };
    mockFn.originImpl = impl;
    mockFn.mock = { calls: [] };
    return mockFn;
  },
};
execution environment
Some students may have noticed that in the testing framework, we do not need to manually introduce test, expect and jest functions. Each test file can be used directly, so we need to create a running environment for injecting these methods.
V8 virtual machines and scopes
Since everything is ready, we only need to inject the method required for the V8 virtual machine test, that is, the injection test scope.
const context = {
  console: console.Console({ stdout: process.stdout, stderr: process.stderr }),
  jest,
  expect,
  require,
  test: (name, fn) => dispatch({ type: "ADD_TEST", fn, name }),
};
After the scope is injected, we can make the code of the test file run in the V8 virtual machine. The code I pass in here is the code that has been processed into a string. Jest will do some code processing, security processing and SourceMap sewing here. Our example doesn't need to be so complicated.
vm.runInContext(code, context);
Before and after code execution, you can use the time difference to calculate the running time of single test. Here, Jest will pre evaluate the size and quantity of single test files to decide whether to enable Worker to optimize the execution speed
const start = new Date();
const end = new Date();
log("\x1b[32m%s\x1b[0m", `Time: ${end - start}ms`);
Run single test callback
After the V8 virtual machine is executed, the global state will collect all wrapped test callback functions in the test block. Finally, we only need to traverse and take out all these callback functions and execute them.
testBlock.forEach(async (item) => {
  const { fn, name } = item;
  try {
    await fn.apply(this);
    log("\x1b[32m%s\x1b[0m", `√ ${name} passed`);
  } catch {
    log("\x1b[32m%s\x1b[0m", `× ${name} error`);
  }
});
Hook function
We can also add a life cycle in the single test execution process, such as before each, after each, after all and before all hook functions.
Adding a hook function to the above infrastructure actually means injecting a corresponding callback function in each process of executing the test. For example, before each is placed before the testBlock traverses and executes the test function, and after each is placed after the testBlock traverses and executes the test function. It is very simple. You can expose the hook function at any time only by placing it in the right position.
testBlock.forEach(async (item) => {
  const { fn, name } = item;
  +beforeEachBlock.forEach(async (beforeEach) => await beforeEach());
  await fn.apply(this);
  +afterEachBlock.forEach(async (afterEach) => await afterEach());
});
Before all and after all can be placed before and after all tests in testBlock are run.
+beforeAllBlock.forEach(async (beforeAll) => await beforeAll());
testBlock.forEach(async (item) => {}) +
  afterAllBlock.forEach(async (afterAll) => await afterAll());
So far, we have implemented a simple testing framework. On this basis, we can enrich assertion methods, matchers and support parameter configuration. The personal notes of the source code are attached below.
jest-cli
Download the Jest source code and execute it in the root directory
yarn
npm run build
It essentially runs two files in the script folder, build JS and buildts js:
"scripts": {
    "build": "yarn build:js && yarn build:ts",
    "build:js": "node ./scripts/build.js",
    "build:ts": "node ./scripts/buildTs.js",
}
build.js essentially uses the babel library, creates a new build folder in package/xxx package, and then uses transformFileSync to generate files into the build folder:
const transformed = babel.transformFileSync(file, options).code;
And buildts JS essentially uses the tsc command, compiles the ts file into the build folder, and uses the execa library to execute the command:
const args = ["tsc", "-b", ...packagesWithTs, ...process.argv.slice(2)];
await execa("yarn", args, { stdio: "inherit" });

The successful execution will be shown as follows. It will help you compile all the js and ts files in the packages folder into the build folder of the directory:

Next, we can start jest's command:
npm run jest
# Equivalent to
# node ./packages/jest-cli/bin/jest.js
Here, parsing can be performed according to different parameters passed in, for example:
npm run jest -h
node ./packages/jest-cli/bin/jest.js /path/test.spec.js
Will execute jest JS file, and then enter the run method in the build/cli file. The run method will analyze various parameters in the command. The specific principle is that the yargs library cooperates with process Argv implementation
const importLocal = require("import-local");

if (!importLocal(__filename)) {
  if (process.env.NODE_ENV == null) {
    process.env.NODE_ENV = "test";
  }

  require("../build/cli").run();
}
jest-config
After obtaining various command parameters, the method of runCLI core will be executed, which is @ jest / core - > packages / jest core / SRC / cli / index The core method of TS library.
import { runCLI } from "@jest/core";
const outputStream = argv.json || argv.useStderr ? process.stderr : process.stdout;
const { results, globalConfig } = await runCLI(argv, projects);
In the runCLI method, the parameter argv parsed in the command will be used to read the information of the configuration file in conjunction with the readConfigs method. The readConfigs comes from packages / jest config / SRC / index TS, there will be normalize to fill in and initialize some default configured parameters. Its default parameters are in packages / jest config / SRC / defaults TS file. For example, if only js single test is run, the default setting is required Resolve ('jest runner ') is the runner running the single test. It also generates outputStream output content to the console in conjunction with the chalk library.
By the way, let's talk about the principle and idea of introducing the jest module. First, we will need Resolve (modulename) finds the path of the module, saves the path to the configuration, and then uses the tool library packages / jest util / SRC / requireOrImportModule The requireOrImportModule method of TS calls the encapsulated native import/reqiure method to take out the module with the path in the configuration file.
- globalConfig configuration from argv
- configs comes from jest config. JS configuration
const { globalConfig, configs, hasDeprecationWarnings } = await readConfigs(
  argv,
  projects
);

if (argv.debug) {
  /*code*/
}
if (argv.showConfig) {
  /*code*/
}
if (argv.clearCache) {
  /*code*/
}
if (argv.selectProjects) {
  /*code*/
}
jest-haste-map
Jest Haste map is used to obtain all the files in the project and their dependencies. It realizes this by viewing the import/require call, extracting them from each file and building a map, including each file and its dependencies. Here, Haste is a module system used by Facebook, and it also has something called HasteContext, Because it has HastFS (Haste file system), HastFS is just a list of files in the system and all dependencies associated with it. It is a map data structure, in which the key is the path and the value is metadata. The contexts generated here will be used until the onRunComplete stage.
const { contexts, hasteMapInstances } = await buildContextsAndHasteMaps(
  configs,
  globalConfig,
  outputStream
);
jest-runner
_ In the run10000 method, the contexts will be obtained according to the configuration information globalConfig and configs. The contexts will store the configuration information and path of each local file, and then enter the runWithoutWatch method with the callback function onComplete, global configuration globalConfig and scope contexts.

Next, you will enter packages / jest core / SRC / runJest In the runjet method of the TS file, all unit tests will be traversed using the passed contexts and saved in an array.
let allTests: Array<Test> = [];
contexts.map(async (context, index) => {
  const searchSource = searchSources[index];
  const matches = await getTestPaths(
    globalConfig,
    searchSource,
    outputStream,
    changedFilesPromise && (await changedFilesPromise),
    jestHooks,
    filter
  );
  allTests = allTests.concat(matches.tests);
  return { context, matches };
});
The Sequencer method is used to sort the single test
const Sequencer: typeof TestSequencer = await requireOrImportModule(
  globalConfig.testSequencer
);
const sequencer = new Sequencer();
allTests = await sequencer.sort(allTests);
The runJest method calls a key method packages / jest core / SRC / testscheduler The scheduleTests method of TS.
const results = await new TestScheduler(
  globalConfig,
  { startRun },
  testSchedulerContext
).scheduleTests(allTests, testWatcher);
The scheduleTests method will do many things. It will collect the contexts in allTests into contexts, the duration into the timings array, and subscribe to four life cycles before executing all single tests:
- test-file-start
- test-file-success
- test-file-failure
- test-case-result
Then traverse the contexts and store it with a new empty object testRunners. The createScriptTransformer method provided by @ jest/transform will be called to process the introduced module.
import { createScriptTransformer } from "@jest/transform";

const transformer = await createScriptTransformer(config);
const Runner: typeof TestRunner = interopRequireDefault(
  transformer.requireAndTranspileModule(config.runner)
).default;
const runner = new Runner(this._globalConfig, {
  changedFiles: this._context?.changedFiles,
  sourcesRelatedToTestsInChangedFiles: this._context?.sourcesRelatedToTestsInChangedFiles,
});
testRunners[config.runner] = runner;
The scheduleTests method calls packages / jest runner / SRC / index The runTests method of TS.
async runTests(tests, watcher, onStart, onResult, onFailure, options) {
  return await (options.serial
    ? this._createInBandTestRun(tests, watcher, onStart, onResult, onFailure)
    : this._createParallelTestRun(
        tests,
        watcher,
        onStart,
        onResult,
        onFailure
      ));
}
Finally_ createParallelTestRun or_ In the createInBandTestRun method:
- _createParallelTestRun
There will be a runTestInWorker method. As the name suggests, this method is to perform single test in the worker.
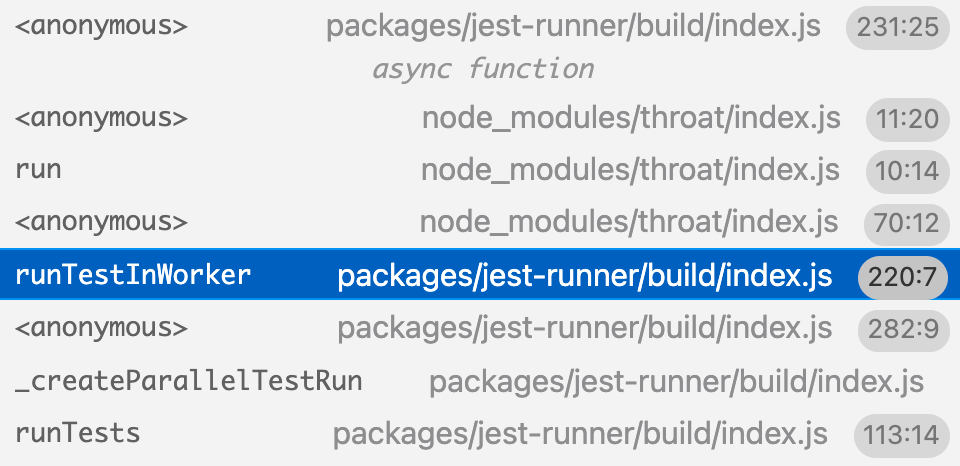
- _ Packages / jest runner / SRC / runTest will be executed in createInBandTestRun TS is a core method runTest, and runJest executes a method runTestInternal, which will prepare a lot of things before executing a single test, involving global method rewriting and hijacking of import and export methods.
await this.eventEmitter.emit("test-file-start", [test]);
return runTest(
  test.path,
  this._globalConfig,
  test.context.config,
  test.context.resolver,
  this._context,
  sendMessageToJest
);
In the runTestInternal method, the fs module will be used to read the contents of the file and put it into cacheFS for caching, which is convenient for fast reading in the future. For example, if the contents of the file are json, it can be read directly in cacheFS, and date Now time difference calculation takes time.
const testSource = fs().readFileSync(path, "utf8");
const cacheFS = new Map([[path, testSource]]);
Packages / jest Runtime / SRC / index. Exe will be introduced into the runTestInternal method TS, it will help you cache and read modules and trigger execution.
const runtime = new Runtime(
  config,
  environment,
  resolver,
  transformer,
  cacheFS,
  {
    changedFiles: context?.changedFiles,
    collectCoverage: globalConfig.collectCoverage,
    collectCoverageFrom: globalConfig.collectCoverageFrom,
    collectCoverageOnlyFrom: globalConfig.collectCoverageOnlyFrom,
    coverageProvider: globalConfig.coverageProvider,
    sourcesRelatedToTestsInChangedFiles: context?.sourcesRelatedToTestsInChangedFiles,
  },
  path
);
Here, the @ jest/console package is used to rewrite the global console. In order that the console of the single test file code block can print the results on the node terminal smoothly, cooperate with the jest environment node package to put the global environment Global is completely rewritten to facilitate subsequent methods to obtain these scopes in the vm.
// In essence, it is rewritten using the node's console to facilitate subsequent coverage of the console method in the vm scope
testConsole = new BufferedConsole();
const environment = new TestEnvironment(config, {
  console: testConsole, // Suspected useless code
  docblockPragmas,
  testPath: path,
});
// How to really rewrite console
setGlobal(environment.global, "console", testConsole);
Runtime mainly uses these two methods to load modules. First, judge whether to use ESM module. If so, use runtime unstable_ Importmodule loads the module and runs it. If not, use runtime Requiremedule loads the module and runs it.
const esm = runtime.unstable_shouldLoadAsEsm(path);

if (esm) {
  await runtime.unstable_importModule(path);
} else {
  runtime.requireModule(path);
}
jest-circus
Next, the testFramework in runTestInternal will accept the incoming runtime call to run the single test file. The testFramework method comes from a library with interesting names, packages / jest circle / SRC / legacy code todo rewrite / jestadapter TS, where legacy code todo rewrite means to-do rewriting of legacy code. Jest circle mainly rewrites some methods of the global, involving these:
- afterAll
- afterEach
- beforeAll
- beforeEach
- describe
- it
- test
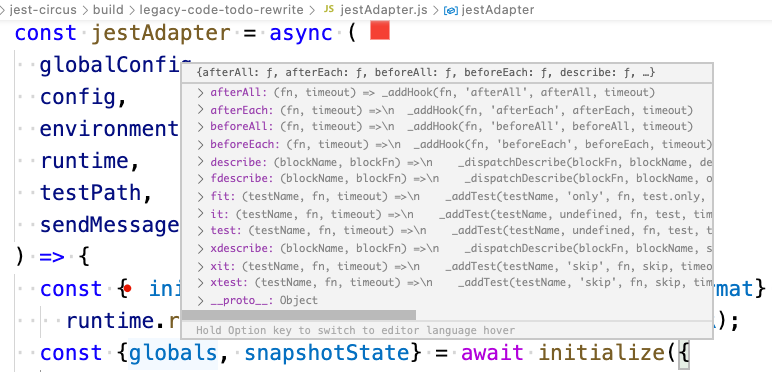
Before calling the single test, it will be in the jestAdapter function, that is, the runtime mentioned above Requiremedule loads XXX Spec.js file. Before execution, initialize has been used to preset the execution environment globals and snapstates, and rewrite beforeEach. If resetModules, clearMocks, resetMocks, restoreMocks and setupFilesAfterEnv are configured, the following methods will be executed respectively:
- runtime.resetModules
- runtime.clearAllMocks
- runtime.resetAllMocks
- runtime.restoreAllMocks
- runtime. Requiremedule or runtime unstable_ importModule
After initializing the initialize method, initialize overwrites the global methods such as describe and test. These methods are in / packages / jest circle / SRC / index TS is rewritten here. Note that there is a dispatchSync method in the test method, which is a key method. A state will be maintained globally. dispatchSync is to save the functions and other information in the test code block into the state. In dispatchSync, name is used in conjunction with the eventHandler method to modify the state, This idea is very similar to the data flow in redux.
const test: Global.It = () => {
  return (test = (testName, fn, timeout) => (testName, mode, fn, testFn, timeout) => {
    return dispatchSync({
      asyncError,
      fn,
      mode,
      name: "add_test",
      testName,
      timeout,
    });
  });
};
Single test XXX Spec.js, i.e. testPath file, will be imported and executed after initialize. Note that the single test will be executed after importing here, because the single test XXX The spec.js file is written according to the specification, and there will be code blocks such as test and describe. Therefore, at this time, all callback functions accepted by test and describe will be stored in the global state.
const esm = runtime.unstable_shouldLoadAsEsm(testPath);
if (esm) {
  await runtime.unstable_importModule(testPath);
} else {
  runtime.requireModule(testPath);
}
jest-runtime
Here, you will first determine whether to use the esm module. If so, use unstable_ The importmodule method is used. Otherwise, the requiremedule method is used. The following function will be used.
this._loadModule(localModule, from, moduleName, modulePath, options, moduleRegistry);
_ The logic of loadModule has only three main parts
- Judge whether to use json suffix file, execute readFile to read text, and use transformJson and json Parse the output of the grid.
- Judge whether the node suffix file is, and execute the require native method to introduce the module.
- If the above two conditions are not met, execute_ execModule execution module.
_ The execModule will use babel to convert the source code read by fs. This transformFile is packages / jest Runtime / SRC / index The transform method of TS.
const transformedCode = this.transformFile(filename, options);

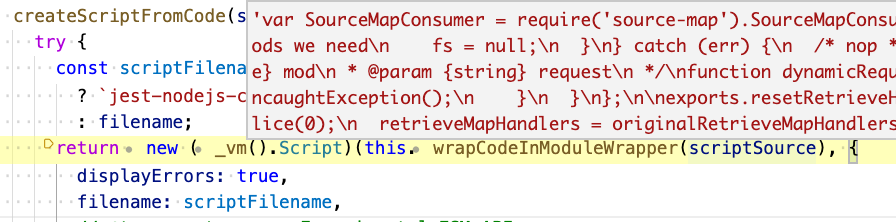
_ The execModule will use the createScriptFromCode method to call the node's native vm module to execute js. The vm module accepts the secure source code and uses the V8 virtual machine to execute the code immediately or delay the execution of the code with the incoming context. Here, it can accept different scopes to execute the same code to calculate different results, It is very suitable for the use of the test framework. The injected vmContext here is the above global rewrite scope, including afterAll, afterEach, beforeAll, beforeEach, describe, it, test, so our single test code will get these methods with the injection scope when running.
const vm = require("vm");
const script = new vm().Script(scriptSourceCode, option);
const filename = module.filename;
const vmContext = this._environment.getVmContext();
script.runInContext(vmContext, {
  filename,
});
After copying the global method and saving the state above, it will enter the logic of the callback function that actually executes the description, in packages / jest circle / SRC / run In the run method of TS, we use the getState method to get the description code block, and then use the_ Runtestsfor describe block executes this function, and then enters_ The runTest method, and then use_ callCircusHook hook hook functions before and after execution, using_ callCircusTest execution.
const run = async (): Promise<Circus.RunResult> => {
  const { rootDescribeBlock } = getState();
  await dispatch({ name: "run_start" });
  await _runTestsForDescribeBlock(rootDescribeBlock);
  await dispatch({ name: "run_finish" });
  return makeRunResult(getState().rootDescribeBlock, getState().unhandledErrors);
};

const _runTest = async (test, parentSkipped) => {
  // beforeEach
  // test function block, testContext scope
  await _callCircusTest(test, testContext);
  // afterEach
};
This is the core position of hook function implementation and the core element of Jest function.
last
I hope this article can help you understand the core implementation and principle of the Jest test framework. Thank you for your patient reading. If the articles and notes can give you a little help or inspiration, please don't be stingy with your Star and Fork. The articles are updated synchronously and continuously. Your comments must be the biggest driving force for me to move forward 😁