Explore Spring principles
Explore IoC principles
First, let's have a general understanding of the loading process of ApplicationContext:
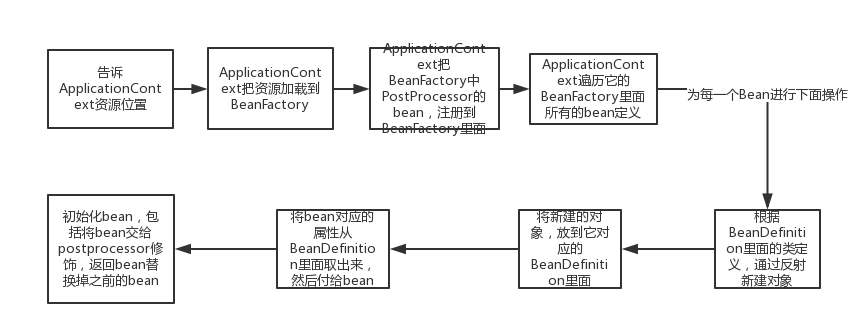
We can see that the whole process is extremely complex and cannot be explained in one sentence, so let's start with ApplicationContext.
Because the source code of Spring is extremely complex, it is impossible for us to do the source code line by line from the bottom up as we do with other frameworks (you can click it yourself, there is a lot of code). We can start with some of the most basic interface definitions and gradually disintegrate from top to bottom. Then let's take a look at what the top-level interface of ApplicationContext is, all the way up, We will find that there is an AbstractApplicationContext class. We directly right-click to generate a UML class diagram.
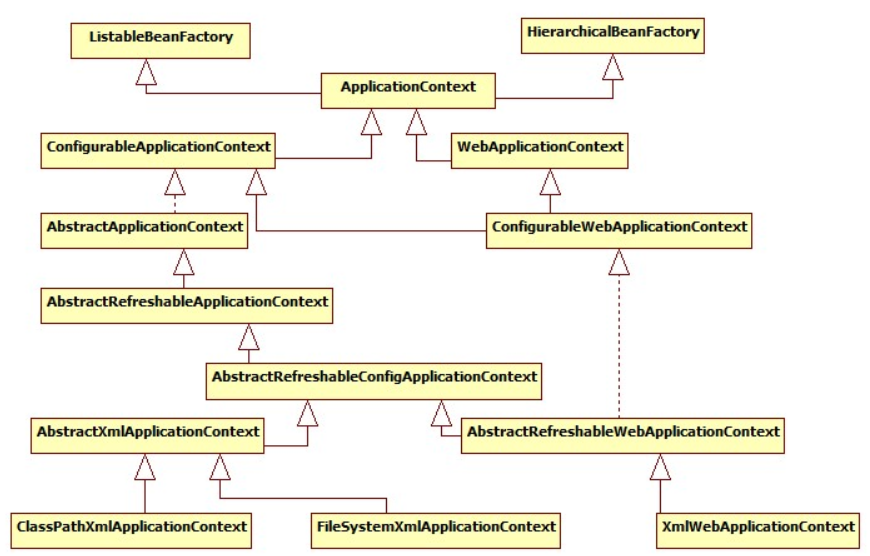
We found that the top layer is actually a BeanFactory interface, so we'll start with this interface.
We can see that many behaviors are defined in this interface:
public interface BeanFactory {
    String FACTORY_BEAN_PREFIX = "&";

    Object getBean(String var1) throws BeansException;

    <T> T getBean(String var1, Class<T> var2) throws BeansException;

    Object getBean(String var1, Object... var2) throws BeansException;

    <T> T getBean(Class<T> var1) throws BeansException;

    <T> T getBean(Class<T> var1, Object... var2) throws BeansException;

    <T> ObjectProvider<T> getBeanProvider(Class<T> var1);

    <T> ObjectProvider<T> getBeanProvider(ResolvableType var1);

    boolean containsBean(String var1);

    boolean isSingleton(String var1) throws NoSuchBeanDefinitionException;

    boolean isPrototype(String var1) throws NoSuchBeanDefinitionException;

    boolean isTypeMatch(String var1, ResolvableType var2) throws NoSuchBeanDefinitionException;

    boolean isTypeMatch(String var1, Class<?> var2) throws NoSuchBeanDefinitionException;

    @Nullable
    Class<?> getType(String var1) throws NoSuchBeanDefinitionException;

    @Nullable
    Class<?> getType(String var1, boolean var2) throws NoSuchBeanDefinitionException;

    String[] getAliases(String var1);
}
We found that the most familiar one is the getBean() method, which has been overloaded many times and can accept a variety of parameters.
Therefore, we can conclude that the most basic behavior of an IoC container has been defined in this interface, that is, all BeanFactory implementation classes should have the basic ability of container management beans. Just like its name, it is a Bean factory, which is used to produce Bean instance objects.
We can find an abstract method of gettbean () that implements this abstract class:
public Object getBean(String name) throws BeansException {
    return this.doGetBean(name, (Class)null, (Object[])null, false);
}
Then, let's doGetBean() to see what is done in the method:
protected <T> T doGetBean(String name, @Nullable Class<T> requiredType, @Nullable Object[] args, boolean typeCheckOnly) throws BeansException {
    String beanName = this.transformedBeanName(name);
    Object sharedInstance = this.getSingleton(beanName);
    Object beanInstance;
    if (sharedInstance != null && args == null) {
      ...
Because all beans are singleton mode by default, and there will only be one object, it will first call the getSingleton() method of the parent class to directly obtain the singleton object. If any, it can directly obtain the instance of the Bean. If no else will enter the else code block, let's go on and make a judgment first:
if (this.isPrototypeCurrentlyInCreation(beanName)) {
    throw new BeanCurrentlyInCreationException(beanName);
}
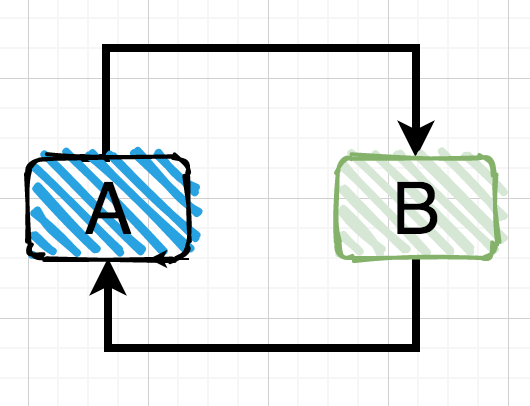
This is to solve the processing of circular dependency. For example, both A and B are created in the prototype mode, and B needs to be injected into A, and A needs to be injected into B. at this time, B needs B before A is created, and B has not been created at this time, because B needs A, and A waits for B, so it can only cycle indefinitely, Therefore, there is the problem of circular dependency (similarly, this can happen for one object and multiple objects). However, in the singleton mode, since each Bean will only create one instance, Spring has A full opportunity to deal with the problem of circular dependency. It only needs A correct assignment operation to realize the loop. So how to solve the problem of circular dependency in singleton mode?
Let's go back to the getSingleton() method. The singleton mode can automatically solve the circular dependency problem:
@Nullable
protected Object getSingleton(String beanName, boolean allowEarlyReference) {
    Object singletonObject = this.singletonObjects.get(beanName);
  	//First take the Bean instance from the first layer list and return it directly
    if (singletonObject == null && this.isSingletonCurrentlyInCreation(beanName)) {
      	//The first floor is not available and has been determined to be in a circular state. See if the second floor is available
        singletonObject = this.earlySingletonObjects.get(beanName);
        if (singletonObject == null && allowEarlyReference) {
            synchronized(this.singletonObjects) {
              	//Lock and execute the above process again
                singletonObject = this.singletonObjects.get(beanName);
                if (singletonObject == null) {
                    singletonObject = this.earlySingletonObjects.get(beanName);
                    if (singletonObject == null) {
                      	//The instance is still not obtained, so it can only be obtained from singletonFactory
                        ObjectFactory<?> singletonFactory = (ObjectFactory)this.singletonFactories.get(beanName);
                        if (singletonFactory != null) {
                            singletonObject = singletonFactory.getObject();
                          	//Throw it into earlySingletonObjects, and you can get it directly on the second floor next time
                            this.earlySingletonObjects.put(beanName, singletonObject);
                            this.singletonFactories.remove(beanName);
                        }
                    }
                }
            }
        }
    }

    return singletonObject;
}
It seems very complicated. In fact, it uses a three-tier list to deal with the problem of circular dependency. include:
- singletonObjects
- earlySingletonObjects
- singletonFactories
When the first layer cannot be obtained, it will then judge whether the Bean is in the creation state. Issingletoncurrent yincreation(), it will query from a Set set, which stores the instance objects that have been created but have not been injected with attributes, that is, it is in the creation state, If you find that this Bean is in the state of being created (it must be because a Bean needs to inject an instance of this Bean), you can conclude that it should have circular dependency.
earlySingletonObjects is equivalent to a table that specifically deals with circular dependencies. It generally contains all instances in singletonObjects. If there are still no instances in this table, go on, At this time, it will be obtained from singletonFactories (all beans will be thrown into singletonFactories after initialization, that is, when they are only created but have not yet been dependency injected). After obtaining it, drop the instance of this Bean into earlySingletonObjects and remove the instance from singletonFactories.
Finally, let's sort out the process. Let's use our example just now. A depends on B, and B depends on a:
- If A loads first, then A enters singletonFactories first. Note that dependency injection has not been carried out at this time, and B in A is still null
- singletonFactories: A
- earlySingletonObjects:
- singletonObjects:
- Then it must be injected into the dependency B of A, but B has not been initialized, so now load B first, and enter singletonFactories after the construction of B is completed
- singletonFactories: A,B
- earlySingletonObjects:
- singletonObjects:
- Start injecting dependency for B and find that B depends on A. at this time, you have to get the instance of A. according to the above analysis, if a is still in singleton factories, it will be thrown into earlySingletonObjects, removed from singleton factories, and then returned to the instance of a (note that the dependency of B in a is still null)
- singletonFactories: B
- earlySingletonObjects: A
- singletonObjects:
- At this time, B has completed dependency injection, so it can be directly thrown into singletonObjects
- singletonFactories:
- earlySingletonObjects: A
- singletonObjects: B
- Then inject B into A to complete the dependency injection of A, and A is also thrown into singletonObjects. So far, the circular dependency is completed, and A and B complete the instance creation
- singletonFactories:
- earlySingletonObjects:
- singletonObjects: A,B
After combing the whole process, it is very simple to understand how Spring solves the circular dependency of singleton mode.
Now let's go back to the previous place. In the prototype mode, if a circular dependency occurs, an exception will be thrown directly. If it does not exist, it will go down:
//BeanFactory has a parent-child relationship
BeanFactory parentBeanFactory = this.getParentBeanFactory();
//If there is a parent BeanFactory, and the current BeanFactory does not have the definition of this Bean
if (parentBeanFactory != null && !this.containsBeanDefinition(beanName)) {
  	//This is because Bean may have an alias. Find the original name
    String nameToLookup = this.originalBeanName(name);
    if (parentBeanFactory instanceof AbstractBeanFactory) {
      	//Recursive lookup to parent BeanFactory
        return ((AbstractBeanFactory)parentBeanFactory).doGetBean(nameToLookup, requiredType, args, typeCheckOnly);
    }

    if (args != null) {
      	//Find according to parameters
        return parentBeanFactory.getBean(nameToLookup, args);
    }

    if (requiredType != null) {
      	//Find by type
        return parentBeanFactory.getBean(nameToLookup, requiredType);
    }

  	//Various search
    return parentBeanFactory.getBean(nameToLookup);
}
In other words, BeanFactory will first check whether there is a Bean definition. If not, it will directly use the parent BeanFactory to find it. A new interface BeanDefinition appears here. Since the factory needs to produce goods, it must get the raw materials and production formula of the goods. So does our Bean. The Bean factory needs to get the information of the Bean before it can generate the instance object of the Bean, and BeanDefinition is used to store the information of the Bean, All Bean information is obtained after reading from XML configuration file or annotation scanning.
Let's go on to see that if this BeanFactory does not have a parent BeanFactory or contains the definition of a Bean, it will move on. At this time, we can only create a Bean ourselves. First, we will get a RootBeanDefinition object:
try {
    if (requiredType != null) {
        beanCreation.tag("beanType", requiredType::toString);
    }

    RootBeanDefinition mbd = this.getMergedLocalBeanDefinition(beanName);
The following content is very complicated, but we can know that it must be processed according to the corresponding type (singleton, prototype), and finally create a new object to return. The loading process of a Bean is:
First get the definition of BeanDefinition, select the corresponding construction method, instantiate it through reflection, then fill in the attributes (dependency injection), and then call the init method. Finally, if there is AOP, a proxy object will be generated, and finally the returned Bean object is the one we really get.
Finally, let's go back to ApplicationContext. In fact, it is an enhanced version of BeanFactory. On the basis of the most basic Bean management, it also adds:
- Internationalization (MessageSource)
- Access resources, such as URL s and files (ResourceLoader)
- Load multiple (inherited) contexts
- Message sending and response mechanism (ApplicationEventPublisher)
- AOP mechanism
We found that the refresh() method will be called to refresh the application context in both the and the construction methods:
public AnnotationConfigApplicationContext(Class<?>... componentClasses) {
    this();
    this.register(componentClasses);
    this.refresh();
}
This method will be explained after explaining the principle of AOP. To sum up, most of the principles of IoC container have been explained.
Explore AOP principles
As mentioned earlier, PostProcessor is actually a post-processing mechanism provided by Spring. It allows us to intervene in the creation process of Bean, BeanFactory and BeanDefinition, which is equivalent to a final processing, and the final result (such as Bean instance, Bean definition, etc.) is the result returned by the post processor, It is the last step of the whole loading process.
The AOP mechanism is implemented through it. Let's first understand the first interface, BeanPostProcessor, which is equivalent to a post action of Bean initialization. We can directly implement this interface:
//Note that the post processor should also be registered
@Component
public class TestBeanProcessor implements BeanPostProcessor {
    @Override
    public Object postProcessAfterInitialization(Object bean, String beanName) throws BeansException {
        System.out.println(beanName);  //Print the name of the bean
        return bean;
    }

    @Override
    public Object postProcessBeforeInitialization(Object bean, String beanName) throws BeansException {
        return BeanPostProcessor.super.postProcessBeforeInitialization(bean, beanName);
    }
}
We found that this interface includes two methods, one is postProcessAfterInitialization for processing after Bean initialization, and the other is postProcessBeforeInitialization for processing before Bean initialization. Note that the initialization here is not to create an object, but to call the initialization method of the class, such as:
@Component
public class TestBeanProcessor implements BeanPostProcessor {
    @Override
    public Object postProcessAfterInitialization(Object bean, String beanName) throws BeansException {
        System.out.println("I am after:"+beanName);
        return bean;   //The Bean returned here is equivalent to the final result. We can still intervene in the modification. What is returned here is what
    }

    @Override
    public Object postProcessBeforeInitialization(Object bean, String beanName) throws BeansException {
        System.out.println("I was before:"+beanName);
        return bean;   //The Bean returned here will be handed over to the next stage, that is, the initialization method
    }
}
@Component
public class TestServiceImpl implements TestService{

    public TestServiceImpl(){
        System.out.println("I am the construction method");
    }

    @PostConstruct
    public void init(){
        System.out.println("I'm the initialization method");
    }

    TestMapper mapper;

    @Autowired
    public void setMapper(TestMapper mapper) {
        System.out.println("I am dependent on injection");
        this.mapper = mapper;
    }

  	...
The loading order of TestServiceImpl is:
I am the construction method
 I am dependent on injection
 I was before: testServiceImpl
 I'm the initialization method
 I am after: testServiceImpl
Now let's summarize the loading process of a Bean:
[Bean definition] scan beans first, Load Bean definition - > [dependency injection] create Bean instance through reflection according to Bean definition - > [dependency injection] for dependency injection (by the way, solve the circular dependency problem) - > [initialize Bean] methods before and after the initialization of beanpostprocessor - > [initialize Bean]Bean initialization methods - > [initialize Bean] methods before and after the initialization of beanpostprocessor - > [complete] The final Bean loading instance
Using this mechanism, it is very simple to understand the implementation process of AOP. AOP is actually implemented through this mechanism. Its implementation class is AnnotationAwareAspectJAutoProxyCreator, and it proxies the Bean at the end, Therefore, the final result we get is actually an object of dynamic proxy (the detailed implementation process will not be listed here, and those interested can continue to go deep)
Then there must be some doubt. This class has not been registered. It should not participate in the initialization process of Bean. Why is it loaded directly?
Remember @ EnableAspectJAutoProxy? Let's see how it is defined:
@Target({ElementType.TYPE})
@Retention(RetentionPolicy.RUNTIME)
@Documented
@Import({AspectJAutoProxyRegistrar.class})
public @interface EnableAspectJAutoProxy {
    boolean proxyTargetClass() default false;

    boolean exposeProxy() default false;
}
We found that @ Import is used to register aspectjautoproxyregister. What is this class? Let's go on to see:
class AspectJAutoProxyRegistrar implements ImportBeanDefinitionRegistrar {
    AspectJAutoProxyRegistrar() {
    }

    public void registerBeanDefinitions(AnnotationMetadata importingClassMetadata, BeanDefinitionRegistry registry) {
      	//Register AnnotationAwareAspectJAutoProxyCreator into the container
        AopConfigUtils.registerAspectJAnnotationAutoProxyCreatorIfNecessary(registry);
        AnnotationAttributes enableAspectJAutoProxy = AnnotationConfigUtils.attributesFor(importingClassMetadata, EnableAspectJAutoProxy.class);
        if (enableAspectJAutoProxy != null) {
            if (enableAspectJAutoProxy.getBoolean("proxyTargetClass")) {
                AopConfigUtils.forceAutoProxyCreatorToUseClassProxying(registry);
            }

            if (enableAspectJAutoProxy.getBoolean("exposeProxy")) {
                AopConfigUtils.forceAutoProxyCreatorToExposeProxy(registry);
            }
        }

    }
}
It implements the interface, which is also a Bean loading mechanism provided by Spring. It supports adding Bean definitions directly to the container, and the container will also load the Bean:
- ImportBeanDefinitionRegistrar class can only be loaded through other classes @ Import, usually startup class or configuration class.
- Using @ Import, if the class in parentheses is the implementation class of ImportBeanDefinitionRegistrar, the method in the interface will be called (generally used to register beans)
- The class that implements this interface has the ability to register bean s.
We can see that this interface provides a BeanDefinitionRegistry, which is used to register the definition of beans.
So when we hit the @EnableAspectJAutoProxy annotation, we first load the AspectJAutoProxyRegistrar through @Import, then call the registerBeanDefinitions method, then use the tool class to register AnnotationAwareAspectJAutoProxyCreator to the container, so that after every Bean is created, if AOP is needed, Then it will be processed through the post processor of AOP, and finally a proxy object will be returned.
We can also try to write our own ImportBeanDefinitionRegistrar implementation. First, write a test Bean:
public class TestBean {

    @PostConstruct
    void init(){
        System.out.println("I'm initialized!");
    }
}
public class TestBeanDefinitionRegistrar implements ImportBeanDefinitionRegistrar {

    @Override
    public void registerBeanDefinitions(AnnotationMetadata importingClassMetadata, BeanDefinitionRegistry registry) {
        BeanDefinition definition = BeanDefinitionBuilder.rootBeanDefinition(Student.class).getBeanDefinition();
        registry.registerBeanDefinition("lbwnb", definition);
    }
}
Observe the console output and load the Bean instance successfully.
BeanFactory postprocessor is similar to BeanPostProcessor. Like the former, it is also used to process post actions by ourselves, but here is used to process post actions loaded by BeanFactory. BeanDefinitionRegistryPostProcessor directly inherits from BeanFactory postprocessor and adds a new action postProcessBeanDefinitionRegistry, You can dynamically add Bean definitions or modify existing Bean definitions here. Here we will directly demonstrate the implementation of BeanDefinitionRegistryPostProcessor:
@Component
public class TestDefinitionProcessor implements BeanDefinitionRegistryPostProcessor {
    @Override
    public void postProcessBeanDefinitionRegistry(BeanDefinitionRegistry registry) throws BeansException {
        System.out.println("I am Bean Define post-processing!");
        BeanDefinition definition = BeanDefinitionBuilder.rootBeanDefinition(TestBean.class).getBeanDefinition();
        registry.registerBeanDefinition("lbwnb", definition);
    }

    @Override
    public void postProcessBeanFactory(ConfigurableListableBeanFactory configurableListableBeanFactory) throws BeansException {
        System.out.println("I am Bean Factory post processing!");
    }
}
Registering Bean definitions here is actually the same as the previous method.
Finally, let's improve the Bean loading process (the bold part is new):
[Bean definition] scan beans first, Load Bean definition - > [Bean definition] Bean definition and Bean factory post-processing - > [dependency injection] create Bean instance through reflection according to Bean definition - > [dependency injection] dependency injection (by the way, solve the circular dependency problem) - > [initialize Bean]BeanPostProcessor initialization front method - > [initialize Bean]Bean initialization method - > [initialize Bean] Before and after the initialization of beanpostprocessor, the method - > finish] the final instance of Bean loading completion
Finally, let's study the refresh() method in ApplicationContext:
public void refresh() throws BeansException, IllegalStateException {
    synchronized(this.startupShutdownMonitor) {
        StartupStep contextRefresh = this.applicationStartup.start("spring.context.refresh");
        this.prepareRefresh();
        ConfigurableListableBeanFactory beanFactory = this.obtainFreshBeanFactory();
      	//Initialize Bean factory
        this.prepareBeanFactory(beanFactory);

        try {
            this.postProcessBeanFactory(beanFactory);
            StartupStep beanPostProcess = this.applicationStartup.start("spring.context.beans.post-process");
          	//Call all Bean factories and Bean registration post processors
            this.invokeBeanFactoryPostProcessors(beanFactory);
          	//Register Bean post processor (including Spring internal)
            this.registerBeanPostProcessors(beanFactory);
            beanPostProcess.end();
          	//Internationalization support
            this.initMessageSource();
          	//Monitoring and event broadcasting
            this.initApplicationEventMulticaster();
            this.onRefresh();
            this.registerListeners();
          	//Instantiate all beans
            this.finishBeanFactoryInitialization(beanFactory);
            this.finishRefresh();
        } catch (BeansException var10) {
            if (this.logger.isWarnEnabled()) {
                this.logger.warn("Exception encountered during context initialization - cancelling refresh attempt: " + var10);
            }

            this.destroyBeans();
            this.cancelRefresh(var10);
            throw var10;
        } finally {
            this.resetCommonCaches();
            contextRefresh.end();
        }

    }
}
We can mark breakpoints on these parts to observe the overall loading process of this method.
Mybatis integration principle
Through the previous understanding, let's see how @ MapperScan of Mybatis is implemented. Now it's very simple to understand.
We can directly open and view:
@Retention(RetentionPolicy.RUNTIME)
@Target({ElementType.TYPE})
@Documented
@Import({MapperScannerRegistrar.class})
@Repeatable(MapperScans.class)
public @interface MapperScan {
    String[] value() default {};

    String[] basePackages() default {};
  	...
We found that, like Aop, it also registers beans through the register mechanism and @ Import. Let's see what mappercannerregister is. The key codes are as follows:
void registerBeanDefinitions(AnnotationMetadata annoMeta, AnnotationAttributes annoAttrs, BeanDefinitionRegistry registry, String beanName) {
    BeanDefinitionBuilder builder = BeanDefinitionBuilder.genericBeanDefinition(MapperScannerConfigurer.class);
    builder.addPropertyValue("processPropertyPlaceHolders", true);
    Class<? extends Annotation> annotationClass = annoAttrs.getClass("annotationClass");
    if (!Annotation.class.equals(annotationClass)) {
        builder.addPropertyValue("annotationClass", annotationClass);
    }

    Class<?> markerInterface = annoAttrs.getClass("markerInterface");
    if (!Class.class.equals(markerInterface)) {
        builder.addPropertyValue("markerInterface", markerInterface);
    }

    Class<? extends BeanNameGenerator> generatorClass = annoAttrs.getClass("nameGenerator");
    if (!BeanNameGenerator.class.equals(generatorClass)) {
        builder.addPropertyValue("nameGenerator", BeanUtils.instantiateClass(generatorClass));
    }

    Class<? extends MapperFactoryBean> mapperFactoryBeanClass = annoAttrs.getClass("factoryBean");
    if (!MapperFactoryBean.class.equals(mapperFactoryBeanClass)) {
        builder.addPropertyValue("mapperFactoryBeanClass", mapperFactoryBeanClass);
    }

    String sqlSessionTemplateRef = annoAttrs.getString("sqlSessionTemplateRef");
    if (StringUtils.hasText(sqlSessionTemplateRef)) {
        builder.addPropertyValue("sqlSessionTemplateBeanName", annoAttrs.getString("sqlSessionTemplateRef"));
    }

    String sqlSessionFactoryRef = annoAttrs.getString("sqlSessionFactoryRef");
    if (StringUtils.hasText(sqlSessionFactoryRef)) {
        builder.addPropertyValue("sqlSessionFactoryBeanName", annoAttrs.getString("sqlSessionFactoryRef"));
    }

    List<String> basePackages = new ArrayList();
    basePackages.addAll((Collection)Arrays.stream(annoAttrs.getStringArray("value")).filter(StringUtils::hasText).collect(Collectors.toList()));
    basePackages.addAll((Collection)Arrays.stream(annoAttrs.getStringArray("basePackages")).filter(StringUtils::hasText).collect(Collectors.toList()));
    basePackages.addAll((Collection)Arrays.stream(annoAttrs.getClassArray("basePackageClasses")).map(ClassUtils::getPackageName).collect(Collectors.toList()));
    if (basePackages.isEmpty()) {
        basePackages.add(getDefaultBasePackage(annoMeta));
    }

    String lazyInitialization = annoAttrs.getString("lazyInitialization");
    if (StringUtils.hasText(lazyInitialization)) {
        builder.addPropertyValue("lazyInitialization", lazyInitialization);
    }

    String defaultScope = annoAttrs.getString("defaultScope");
    if (!"".equals(defaultScope)) {
        builder.addPropertyValue("defaultScope", defaultScope);
    }

    builder.addPropertyValue("basePackage", StringUtils.collectionToCommaDelimitedString(basePackages));
    registry.registerBeanDefinition(beanName, builder.getBeanDefinition());
}
Although it's a long time, these codes are adding some Bean defined attributes, and the most critical is the mappercannerconfigurer at the top. Mybatis registers its Bean information into the container. What's the purpose of this class?
public class MapperScannerConfigurer implements BeanDefinitionRegistryPostProcessor, InitializingBean, ApplicationContextAware, BeanNameAware {
    private String basePackage;
It implements BeanDefinitionRegistryPostProcessor, that is, it provides post-processing for Bean information loading. Let's take a look at what it does in Bean information post-processing:
public void postProcessBeanDefinitionRegistry(BeanDefinitionRegistry registry) {
    if (this.processPropertyPlaceHolders) {
        this.processPropertyPlaceHolders();
    }

  	//Initialize the classpath Mapper scanner, which is equivalent to a tool class and can quickly scan the class definition information under the whole package
  	//Classpathmappercanner is a scanner implemented by Mybatis, which modifies some scanning rules
    ClassPathMapperScanner scanner = new ClassPathMapperScanner(registry);
    scanner.setAddToConfig(this.addToConfig);
    scanner.setAnnotationClass(this.annotationClass);
    scanner.setMarkerInterface(this.markerInterface);
    scanner.setSqlSessionFactory(this.sqlSessionFactory);
    scanner.setSqlSessionTemplate(this.sqlSessionTemplate);
    scanner.setSqlSessionFactoryBeanName(this.sqlSessionFactoryBeanName);
    scanner.setSqlSessionTemplateBeanName(this.sqlSessionTemplateBeanName);
    scanner.setResourceLoader(this.applicationContext);
    scanner.setBeanNameGenerator(this.nameGenerator);
    scanner.setMapperFactoryBeanClass(this.mapperFactoryBeanClass);
    if (StringUtils.hasText(this.lazyInitialization)) {
        scanner.setLazyInitialization(Boolean.valueOf(this.lazyInitialization));
    }

    if (StringUtils.hasText(this.defaultScope)) {
        scanner.setDefaultScope(this.defaultScope);
    }

  	//Add a filter. It will be configured here that all interfaces can be scanned (so you can scan and load even if you don't add @ Mapper annotation)
    scanner.registerFilters();
  	//Start scanning
    scanner.scan(StringUtils.tokenizeToStringArray(this.basePackage, ",; \t\n"));
}
After scanning, the doScan() method will be called. Let's go on to see (this is the scanning method in ClassPathMapperScanner):
public Set<BeanDefinitionHolder> doScan(String... basePackages) {
    Set<BeanDefinitionHolder> beanDefinitions = super.doScan(basePackages);
  	//First, scan all Bean definitions from the package
    if (beanDefinitions.isEmpty()) {
        LOGGER.warn(() -> {
            return "No MyBatis mapper was found in '" + Arrays.toString(basePackages) + "' package. Please check your configuration.";
        });
    } else {
      	//Processing all Bean definitions is actually generating the corresponding Mapper proxy object and registering it in the container
        this.processBeanDefinitions(beanDefinitions);
    }

  	//Finally, all Bean definition collections are returned
    return beanDefinitions;
}
Through the breakpoint, we found that the Bean definition obtained from the final processing found that this Bean is a MapperFactoryBean, which is different from the ordinary Bean. The FactoryBean is equivalent to adding a layer of shell to the ordinary Bean. Instead of relying on Spring to create it directly through reflection, it uses the method in the interface:
public interface FactoryBean<T> {
    String OBJECT_TYPE_ATTRIBUTE = "factoryBeanObjectType";

    @Nullable
    T getObject() throws Exception;

    @Nullable
    Class<?> getObjectType();

    default boolean isSingleton() {
        return true;
    }
}
Through the getObject() method, you can get the Bean instance.
Note that the concepts of FactoryBean and BeanFactory must be distinguished here:
- Bean Factory is a Factory, that is, IOC container or object Factory. All beans are managed by BeanFactory (that is, IOC container).
- A factory bean is a factory bean (or an IOC object), so it is not a factory bean in nature. When using the factory bean in the container, the container will not return the factory bean itself, but the object it generates. To get the implementation class of FactoryBean itself, add &, which is written as getBean (string & BeanName), before the BeanName in getBean(String BeanName).
We can also write an implementation ourselves:
@Component("test")
public class TestFb implements FactoryBean<Student> {
    @Override
    public Student getObject() throws Exception {
        System.out.println("Got students");
        return new Student();
    }

    @Override
    public Class<?> getObjectType() {
        return Student.class;
    }
}
public static void main(String[] args) {
    log.info("The project is starting...");
    ApplicationContext context = new AnnotationConfigApplicationContext(TestConfiguration.class);
    System.out.println(context.getBean("&test"));   //Get FactoryBean itself (add & make it like a C language pointer)
    System.out.println(context.getBean("test"));   //Get the result after FactoryBean calls getObject()
}
Therefore, in fact, our Mapper is finally registered in the container and loaded in the form of FactoryBean:
public T getObject() throws Exception {
    return this.getSqlSession().getMapper(this.mapperInterface);
}
In this way, the principle of @ MapperScan of Mybatis is fully explained.
After understanding the underlying principles of Spring, we can actually write a Spring framework according to these implementation principles.