Installation and use
// Import express module
const express = require('express');
// Register express module
const app = express();
//Mount routing
app.get('/',(req,res)=>{
    res.send(`<h1>home page</h1>`);
})
app.get('/user',(req,res)=>{
    //req request object get request parameters
    res.send(req.query);
})
app.get('/user/:id',(req,res)=>{
    // req request object to get dynamic parameters
    res.send(req.params);
})
// Start server
app.listen(80,()=>{
    console.log("server running at http://127.0.0.1");
})
Managed static resources
//Managed static resources
//The path prefix is in the front, followed by static resources
app.use('/public',express.static('./clock'));
Route definition
// The route in Express consists of three parts: the type of request, the URL address of the request and the processing function. The format is as follows:
	app.METHOD(PATH,HANDLER)
// Type of METHOD request
// The URL address of the PATH request
// HANDLER function
	app.get('/user/,(req,res)=>{
		res.send(`This is routing`);
	});
Route matching mechanism
- Match according to the defined order
- The corresponding processing function will not be called until the request type and the requested URL match successfully at the same time
Modular routing
router.js custom routing module file
// Import express
const express = require('express');
// Start routing
const router = express.Router();
// Mount routing
router.get('/',(req,res)=>{
    res.send(`This is the home page`);
})
router.get('/user/list',(req,res)=>{
    res.send(`get user list`);
})
router.post('/user/add',(req,res)=>{
    res.send('post new add');
})
// Share out
module.exports = router;
server.js entry file
// 1.  Import express module
const express = require('express');
// 2. Start the express module
const app = express();
// 3. Import routing module
const router = require('./router');
// 4. Register routing
app.use('/api',router);
// 5. Start the server
app.listen(8080,()=>{
    console.log("server running at http://127.0.0.1:8080");
})
middleware
Middleware refers to the intermediate processing link of business process
Middleware generally needs to be registered before routing
After the middleware registers the routing error level
express middleware call process
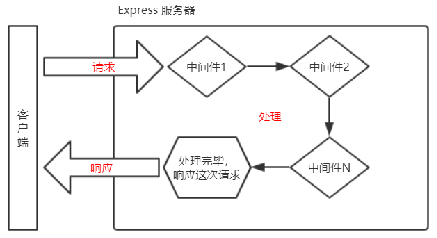
express middleware format
Express middleware is essentially a function processing function. The format of express middleware is as follows:
app.get('/',(req,res,next)=>{
    next();	//The next function is the key to realize the continuous call of multiple middleware. It means to transfer the flow relationship to the next middleware or route.
})
Define a middleware function
const mw = function(req,res,next){
	console.log(`This is a middleware`);
	next();
}
Register global Middleware
// Import express module
const express = require('express');
// Instantiate express module
const app = express();
// First Middleware
const mw = (req,res,next)=>{
    req.a = 'a'
    console.log(`This is a middleware`);
    next();
}
// Second Middleware
const mw1 = (req,res,next)=>{
    req.a = 'a1'
    console.log(`Second Middleware`);
    next()
}
// The third Middleware
const mw2 = (req,res,next)=>{
    req.a = 'a2'
    console.log(`The third Middleware`);
    next()
}

// Register global Middleware
app.use(mw);
app.use(mw1);
app.use(mw2);

// Mount routing
app.get('/',(req,res)=>{
    console.log(req.a);     //Multiple middleware share the same req request object and res response object
    res.send(`home page`);
})

// Turn on the server
app.listen(80,()=>{
    console.log("server running at http://127.0.0.1");
})
Register local Middleware
const express = require("express");

const app = express();

const mw1 = (req,res,next)=>{
    console.log('First Middleware');
    next();
}

const mw2 = (req,res,next)=>{
    console.log('Second Middleware');
    next();
}

// Register the first writing format of local Middleware
app.get('/',mw1,mw2,(req,res)=>{
    res.send("Home page.");
})

// Register the second writing format of local Middleware
app.post('/user',[mw1,mw2],(req,res)=>{
    res.send("User Page.");
})


app.listen(80,()=>{
    console.log("server running at http://127.0.0.1");
})
Middleware classification
- The middleware bound to the app instance is the application level middleware app Use ('middleware ');
- The middleware bound to the router instance is the routing level middleware router Use ("middleware");
- Error level middleware (register middleware after routing)
//Error level Middleware

const express = require('express');

const app = express();

const mw = (err,req,res,next)=>{
    res.send('Error:'+ err.message);
    next();
}

app.get('/api',(req,res)=>{
    // Customize an error and throw it
    throw new Error('Server error');
    res.send('api');
})

//The registration error level route needs to be registered after the route
app.use(mw);

app.listen(80,()=>{
    console.log("server running at http://127.0.0.1");
})
- express built-in Middleware
- express.static is a built-in middleware for quickly hosting static resources
- express.json parsing request body data in JSON format (compatible, only available in version 4.16.0 +)
- express.urlencoded parses the request body data in URL encoded format (compatible, only available in version 4.16.0 +)
const express = require('express');

const app = express();

// Register for express json () middleware, parsing json request body data
app.use(express.json());
// Register for express Urlencoded () middleware, parsing x-www-form-urlencoded request body data
app.use(express.urlencoded({extended:false}));

app.post('/json',(req,res)=>{
    // req. The body attribute can accept the request body data sent by the client. If it is not parsed, it defaults to underfined
    res.send(req.body);
})

app.post('/urlencoded',(req,res)=>{
    res.send(req.body);
})

app.listen(80,()=>{
    console.log("server running at http://127.0.0.1");
})
- Third party Middleware
const express = require('express');
// Import the third-party middleware body parser
const parser = require("body-parser");
const app = express();

// Middleware registration third party
app.use(parser.urlencoded({extended:false}));

app.post('/api/user',(req,res)=>{
    res.send(req.body);
})

app.listen(80,()=>{
    console.log("server running at http://127.0.0.1");
})
Custom parsing data middleware
Middleware content parse js
// Import nodejs built-in module querystring
const qs = require('querystring');


const mw = (req,res,next)=>{
    //Define a string
    let str = '';
    // Listen to the data event of the req object to get the data sent by the client to the server
    // The client will cut the data and send it to the server in batches. So the data event may be triggered multiple times,
    // Every time the data event is triggered, the data obtained is only a part of the complete data, and the received data needs to be spliced manually
    req.on('data',function(chunk){
        str += chunk
    });
    // Listen for the end event of req object. When the request body data is received, the end event of req will be triggered automatically
    req.on('end',function(){
        // Import querystring module and parse str data with parse method
        const body = qs.parse(str);
        // Mount the data in req On the body
        req.body = body;
        // Enter route
        next();
    })
}
// Share out
module.exports = mw;
Import file calling Middleware
const express = require('express');

const app = express();
// Import custom Middleware
const mw = require('./07.concent-parse');
// Registration Middleware
app.use(mw);
// Mount routing
app.post('/user',(req,res)=>{
    res.send(req.body);
})

app.listen(80,()=>{
    console.log("server running at http://127.0.0.1");
})
})
Custom API interface
apiRouter.js interface file
const express = require('express');
const router = express.Router();

router.get('/get',(req,res)=>{
    const query = req.query;
    res.send({
        status:1,
        msg:"GET request",
        data:query
    })
})

router.post('/post',(req,res)=>{
    const body = req.body;
    res.send({
        status:1,
        msg:"POST request",
        data:body
    })
})

module.exports = router;
app.js entry file
const express = require('express');

const app = express();

const apiRouter = require('./apiRouter');

app.use(express.urlencoded({extended:false}))
app.use(express.json())

app.use('/api',apiRouter);

app.listen(80,()=>{
    console.log("server running at http://127.0.0.1");
})
CORS cross domain resource sharing
Installing and using CORS Middleware
const cors = require('cors');
app.use(cors());
CORS definition
CORS (cross origin resource sharing) consists of a series of HTTP response headers, which determine whether the browser prevents the front-end JS code from obtaining resources across domains
CORS response header
- Access-Control-Allow-Origin
//If the value of access control allow origin field is specified as wildcard *, it means that requests from any domain are allowed. The example code is as follows:
res.setHeader('Access-Control-Allow-Origin','*');
//Specify the cross domain request from Baidu
res.setHeader('Access-Control-Allow-Origin','www.baidu.com');
- Access-Control-Allow-Headers
By default, CORS only supports the client to send the following 9 request headers to the server:
Accept, accept language, content language, DPR, Downlink, save data, viewport Width, Width, content type (values are limited to one of text/plain, multipart / form data, application/x-www-form-urlencoded)
If the client sends additional request header information to the server, you need to declare the additional request header on the server through access control allow headers, otherwise the request will fail!
//Allow the client to send additional content type request headers and X-Custom-Header request headers to the server
res.setHeader('Access-Control-Allow-Headers','Content-Type,X-Custom-Header');
- Access-Control-Allow-Methods
By default, CORS only supports GET, POST and HEAD requests initiated by clients.
If the client wants to request the resources of the server through PUT, DELETE, etc., it needs to indicate the HTTP method allowed by the actual request through access control alow methods on the server side.
//Only POST GET request methods are allowed
res.setHeader("Access-Control-Allow-Methods","GET,POST")
//Allow all request methods
res.setHeader("Access-Control-Allow-Methods","*")
Simple request and pre inspection request
- Simple request
1. Request method: one of GET, POST and HEAD
2. The HTTP header information shall not exceed the following fields: no custom header field, Accept, Accept language, content language, DPR, Downlink, save data, viewport Width, Width and content type (only three values: application/x-www-form-urlencoded, multipart / form data and text/plain)
- Pre inspection request
1. As long as the request meets any of the following conditions, a pre inspection request is required:
1.1 the request Method is the request Method type other than GET, POST and HEAD
1.2 the request header contains a custom header field
1.3 send data in application/json format to the server
Before the formal communication between the browser and the server, the browser will send an OPTION request for pre check to know whether the server allows the actual request. Therefore, this OPTION request is called "pre check request". After the server successfully responds to the pre inspection request, it will send the real request and carry the real data.
- difference
Characteristics of simple request: only one request will occur between the client and the server.
Characteristics of pre check request: two requests will occur between the client and the server. After the pre check request of OPTION is successful, the real request will be initiated.
mysql operation
const express =require('express');

const app = express();

const mysql = require('mysql');

const db = mysql.createPool({
    host:'127.0.0.1',
    user:'root',
    password:'',
    database:'mydb01'
})

//query data base
// const str = 'select * from users';
// db.query(str,(err,res)=>{
//     if(err) return console.log(err.message);
//     console.log(res);
// })

//Insert new data
// Placeholder?
// const str = 'insert into users (username,password) values(?,?)';
// const data = {username:'lwq',password:'123321'};
// db.query(str,[data.username,data.password],(err,res)=>{
//     if(err) return console.log('Insert failed ');
//     if(res.affectedRows===1){
//         console.log('Insert succeeded ');
//     }
// })
//Convenient way to insert data
// const sql = 'insert into users set ?';
// const data = {username:'lwq1',password:'admin321'};
// db.query(sql,data,(err,res)=>{
//     if(err) return console.log('Insert failed ');
//     if(res.affectedRows===1){
//         console.log('Insert succeeded ');
//     }
// })

//Convenient way to update data
const sql = 'update users set ? where id=?';
const data = {id:2,username:'zz',password:'000000'};
db.query(sql,[data,data.id],(err,res)=>{
    if(err) return console.log('Update failed');
    // Insert and update operations as long as the request is successful affectedrows =
    if(res.affectedRows === 1){
        console.log("Update successful");
    }
})
User authentication
session
There is no cross domain problem in the back-end interface of the request, and session authentication is used
// TODO_01: Please configure Session Middleware
const session = require('express-session');
app.use(session({
  secret:'hjc_is_good',//Arbitrary string
  resave:false,//Fixed writing
  saveUninitialized:true//Fixed writing
}))

// Login API interface
app.post('/api/login', (req, res) => {
  // Judge whether the login information submitted by the user is correct
  if (req.body.username !== 'admin' || req.body.password !== '000000') {
    return res.send({ status: 1, msg: 'Login failed' })
  }

  // TODO_02: please save the user information after successful login to the Session
  req.session.user = req.body;	//Mount the login information in session user
  req.session.islogin = true;	//Login status

  res.send({ status: 0, msg: 'Login successful' })
})

// Interface to get user name
app.get('/api/username', (req, res) => {
  // TODO_03: please get the user's name from the Session and respond to the client
  if(req.session.islogin !== true){
    return res.send({status:1,msg:"Unlisted account"});
  }
  // console.log(req.session);
  res.send({status:0,msg:'success',username:req.session.user.username});
})

// Exit the logged in interface
app.post('/api/logout', (req, res) => {
  // TODO_04: clear Session information
  req.session.destroy(); //Clear the session information saved by the server
  res.send({
    status:0,
    msg:'Exit successful'
  })
})
jwt
JWT (full English Name: JSON Web Token) is the most popular cross domain authentication solution at present
JWT usually consists of three parts: Header, Payload and Signature. English "." is used between the three separate
The Payload part is the real user information, which is the string generated after the user information is encrypted.
Header and Signature are security related parts, just to ensure the security of Token
The recommended approach is to put the HTTP request header in the JWT Authorization field
- Install JSON webtoken and express JWT Middleware
- Import the two modules and register the two middleware
- Configure an encrypted string screctStr
- Call the sign() method provided by the jsonwebtoken package to encrypt the user's information into a JWT string and respond to the client
- Every time the client accesses those authorized interfaces, it needs to actively send the Token string to the server through the Authorization field in the request header for identity authentication.
- The server can automatically restore the Token parsing sent by the client to JSON objects through express JWT, a middleware
- Use req The user parses the string information from the JWT object
- Capture the error generated after parsing JWT failed
- This error can be captured and processed through the error middleware of Express
//1. Import express JWT and JSON webtoken modules
const expressJWT = require('express-jwt');
const jwt = require('jsonwebtoken');

//2. Define secret key
const secretKey = 'hjcisgood';  //Arbitrary string

//3. Register parsing Middleware
//unless({path:[/^\/api\//]}) /api / this type of route does not need to be resolved
app.use(expressJWT({secret:secretKey,algorithms:['HS-256']}).unless({path:[/^\/api\//]}))

//4. Call jwt Sign() generates a jwt string and responds to the client
//Login interface
app.post('/api/login', function (req, res) {
  // Put req The data in the body request body is transferred to the userinfo constant
  const userinfo = req.body
  // Login failed
  if (userinfo.username !== 'admin' || userinfo.password !== '000000') {
    return res.send({
      status: 400,
      message: 'Login failed!'
    })
  }
  // {expiresIn:'60s'} set token expiration time
  tokenStr = jwe.sign({username:userinfo.username},secretKey,{expiresIn:'60s'});
  res.send({
  	status:0,
  	message:'Login successful',
  	token: tokenStr
  })
})


//5. This is an API interface with permission
app.get('/admin/getinfo', function (req, res) {
  // TODO_05: use req User gets the user information and sends the user information to the client using the data attribute
  res.send({
    status: 200,
    message: 'User information obtained successfully!',
    data: req.user // The user information to be sent to the client is jwt parsed and restored into a json object and saved in req In user
  })
})
//5.1 the front end can call this interface only when the authorization request header value is bear + < token >

//6. Registration error: the middleware captures the error caused by jwt parsing failure
app.use((err,req,res,next)=>{
	if(err.name==="UnauthorizedError"){
		res.send({status:401,message:"invalid token"});
	}
	res.send({status:500,message:"unknown error"});
})
nodemon tool
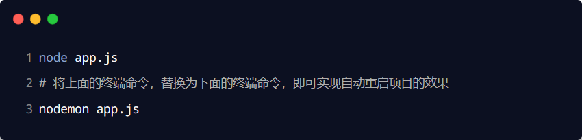
In the terminal, run the following command to install nodemon as a globally available tool:

Using nodemon