1, Introduction
The express framework is based on node JS web application framework can help you create a website with complete functions from front-end to back-end; Vue is a popular front-end framework, which is mainly used to build user interface, and has the characteristics of componentization and responsiveness; Therefore, it is understood that express is responsible for the back end and Vue is responsible for the front end. HTTP is used for data exchange between them.
2, Start building
Back end - express environment setup
1. Install the express frame
npm install -g express
2. Install express generator
npm install -g express-generator
Then use express --version to check whether the installation is successful
3. Create an express project
Rapid project generation using express generator scaffold
express --no-view server
This command creates a viewless express project named server
The project directory is as follows:

- There is a www file in the bin directory to start the project. It listens to port 3000 by default
- Static files (images, js, css) are stored in the public directory
- Routing files are stored in the routes directory. Routing is used to determine the corresponding relationship between URL s and resources. The code in this directory is mainly used to receive requests from the front end and then respond
- The views directory stores the template engine files, which will eventually be rendered as html pages
- app.js file is the entry file of the whole project. It introduces some modules required by the project, creates an express instance, and sets the overall route
- package.json is a dependency package description file. Some dependency packages can be installed with one click through npm install
- package-lock.json is generated after npm install. It contains a detailed description of the installed dependency packages. It needs to be uploaded to git to ensure that other people have the same dependency version when installing
Enter the project directory (/ server), execute npm install to install the dependent modules required by the project, and then the node will be generated_ The modules directory stores the downloaded dependent modules
Now execute the command npm start to start the project and access it through the browser http://localhost:3000/ , you can see the following page:

Then we create a new test. Net in the routes directory JS file, as follows:
var express = require('express');
var router = express.Router();

router.get('/', function (req, res, next) {
  res.send('Response successful!')
});

module.exports = router;
Then in app JS file:
var testRouter = require('./routes/test')
app.use('/test', testRouter)
The path / test corresponds to test JS file; After the modification is successful, we restart the project and visit http://localhost:3000/test , you can see the following page:

At this point, the express backend is set up
Front end - vue environment construction
1. Install Vue cli
npm install -g @vue/cli
Then check with vue -V
2. Create vue project
Here, use the vue cli scaffolding tool to quickly build a vue project and execute the command to create a vue project named client
vue create client
During this period, you will be prompted to make some configuration choices (explained in the next issue). Just press enter all the way here to select the default
After successful creation, the project directory is as follows:

-
assets store pictures, CSS style files, etc
-
Components store vue components
-
router was created later to manage routes
-
App. The Vue file is the root component of the project
-
main.js is the entry file of the project, which is used to import modules, initialize vue instances, etc
Execute npm install in the project directory to install project dependencies and automatically generate nodes_ Modules directory and package lock JSON file
3. Start vue project
Execute the command npm run serve to start the vue project. After successful startup, the following is displayed:

visit http://localhost:8080/ , you can see the welcome interface of vue
Front and rear end interaction
1. Create vue view
Now that our front and back-end projects have been started, we need to exchange data through HTTP; HTTP related modules have been integrated in express. You can use express Route () object to perform HTTP operation; In Vue, you need to use the promise based HTTP library axios, execute the command npm install axios --save in the client directory, and then create a new test in the view directory vue
<template>
  <div>
    <h1>{{ this.msg }}</h1>
  </div>
</template>

<script>
import axios from "axios";
export default {
  name: "Test",
  data() {
    return {
      msg: "",
    };
  },
  created() {
    axios
      .get("http://localhost:3000/test")
      .then((res) => {
        this.msg = res.data;
      })
      .catch((err) => {
        console.log(err);
      });
  },
};
</script>

<!-- Add "scoped" attribute to limit CSS to this component only -->
<style scoped>
h1,
h2 {
  font-weight: normal;
}
</style>
2. Binding route
Index. In router directory Binding route in JS
import Test from '../views/Test.vue'

const routes = [
  {
    ...
  },
  {
    path: '/test',
    name: 'Test',
    component: Test
  }
]
3. Cross domain implementation
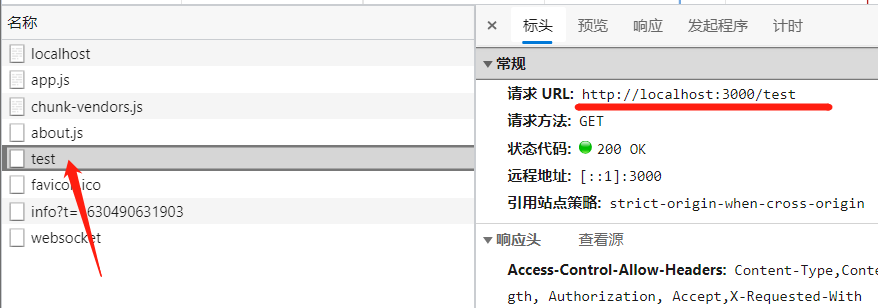
The axios module is introduced here to http://localhost:3000/test Make a get request, assign the response data to the variable msg and render it to the page; In order to realize the cross domain problem between express and vue, you need to_ App JS file:
app.all('*', function (req, res, next) {
  res.header('Access-Control-Allow-Origin', '*')
  res.header('Access-Control-Allow-Headers', 'Content-Type,Content-Length, Authorization, Accept,X-Requested-With')
  res.header('Access-Control-Allow-Methods', 'PUT,POST,GET,DELETE,OPTIONS')
  res.header('X-Powered-By', ' 3.2.1')
  req.method == "OPTIONS" ? res.send(200) : next()
})
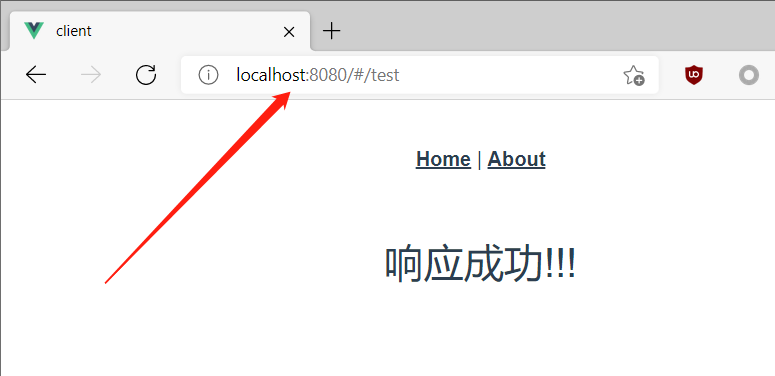
Restart the express service and refresh the vue page. You can see the following page:

Open the developer toolbar of the browser to see the request details

So far, the simple Express + Vue development environment has been completed