FastDFS
1, Introduction to FastDFS
1. Why do I need FastDFS
- In the distributed cluster environment, when a file is uploaded to node A and node B is accessed through the load balancing algorithm, the file cannot be accessed. At this time, the problem of sometimes accessible and sometimes inaccessible will occur
- At the same time, redundant backup of files (i.e. saving multiple copies after uploading files to avoid that one file is broken and cannot be accessed), load balancing, linear capacity expansion and other functions should be considered, which are not available for single node file upload
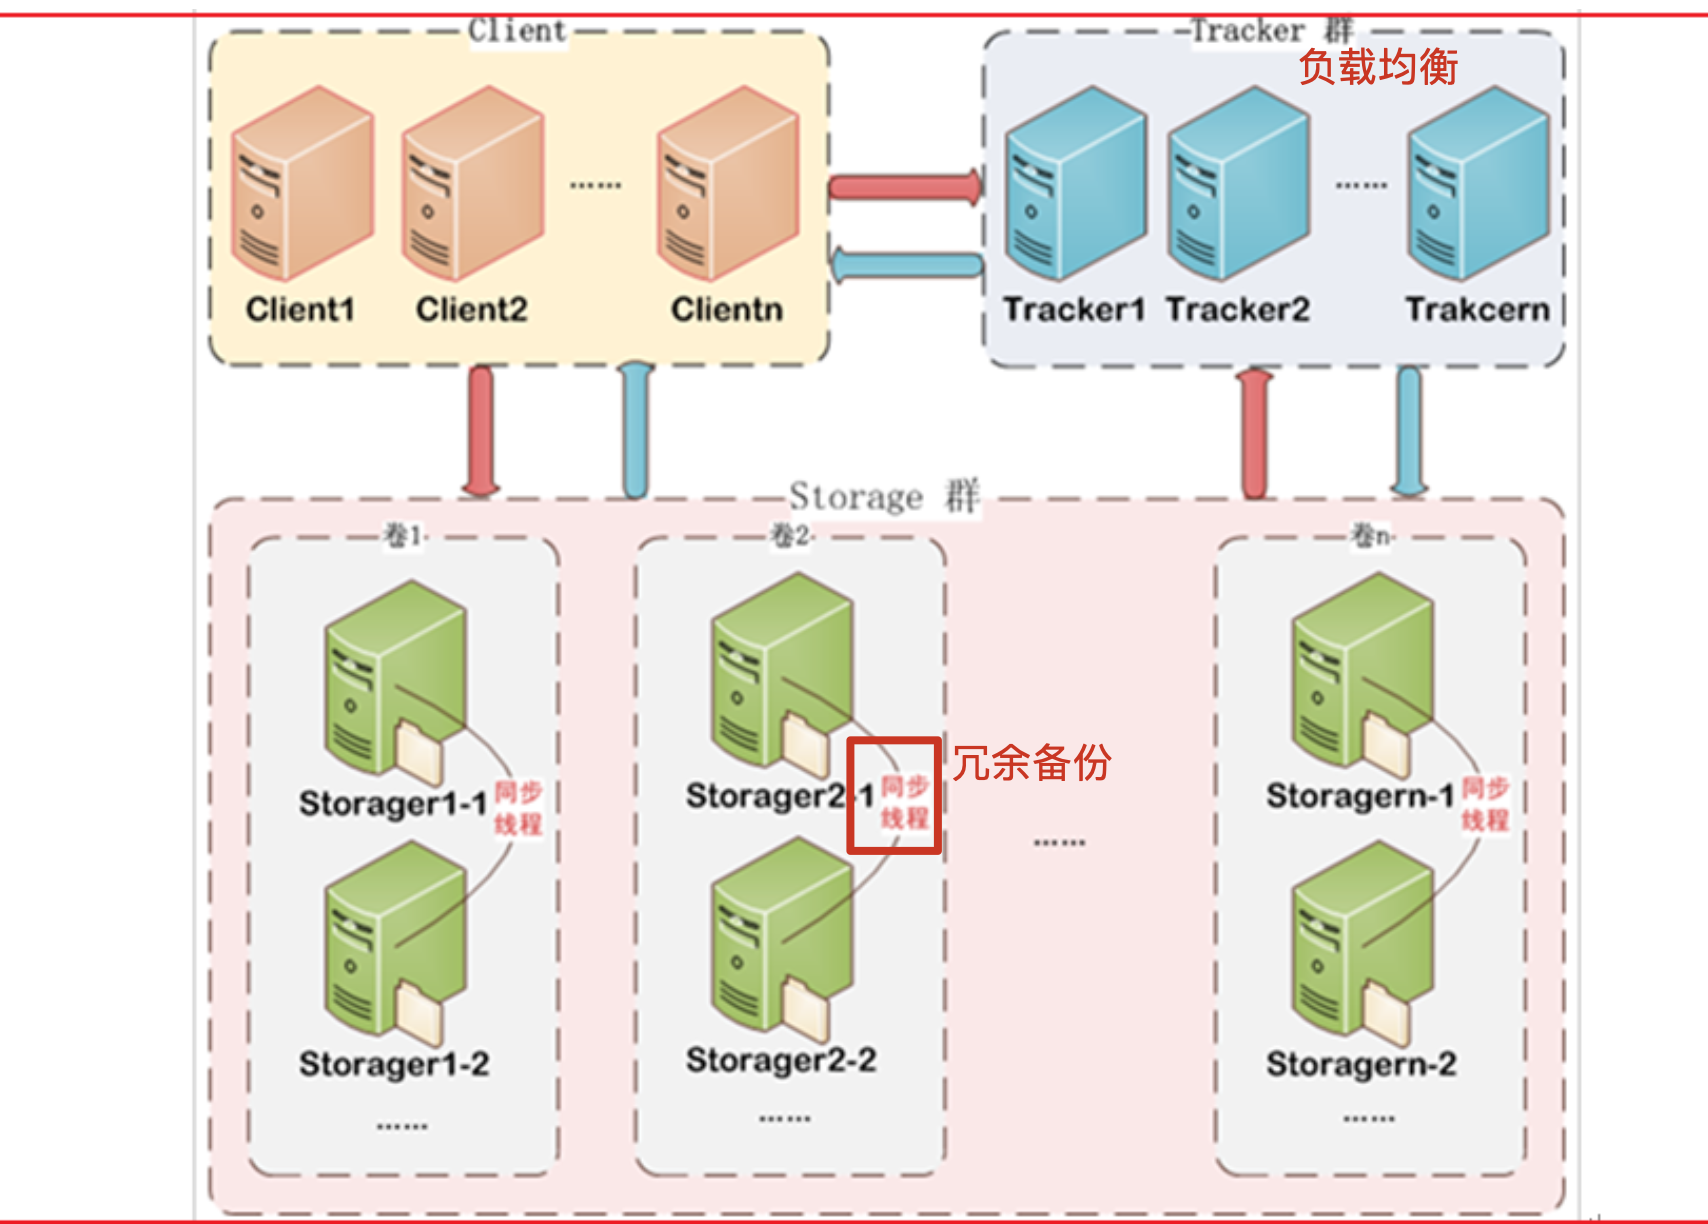
2. FastDFS architecture
FastDFS is an open source lightweight distributed file system. It manages files. Its functions include file storage, file synchronization, file access (file upload, file download), etc. It solves the problems of mass storage and load balancing. It is especially suitable for online services based on documents, such as photo album websites, video websites and so on.
FastDFS is tailor-made for the Internet. It fully considers mechanisms such as redundant backup, load balancing and linear capacity expansion, and pays attention to indicators such as high availability and high performance. Using FastDFS, it is easy to build a set of high-performance file server clusters to provide file upload, download and other services.
3. File upload process
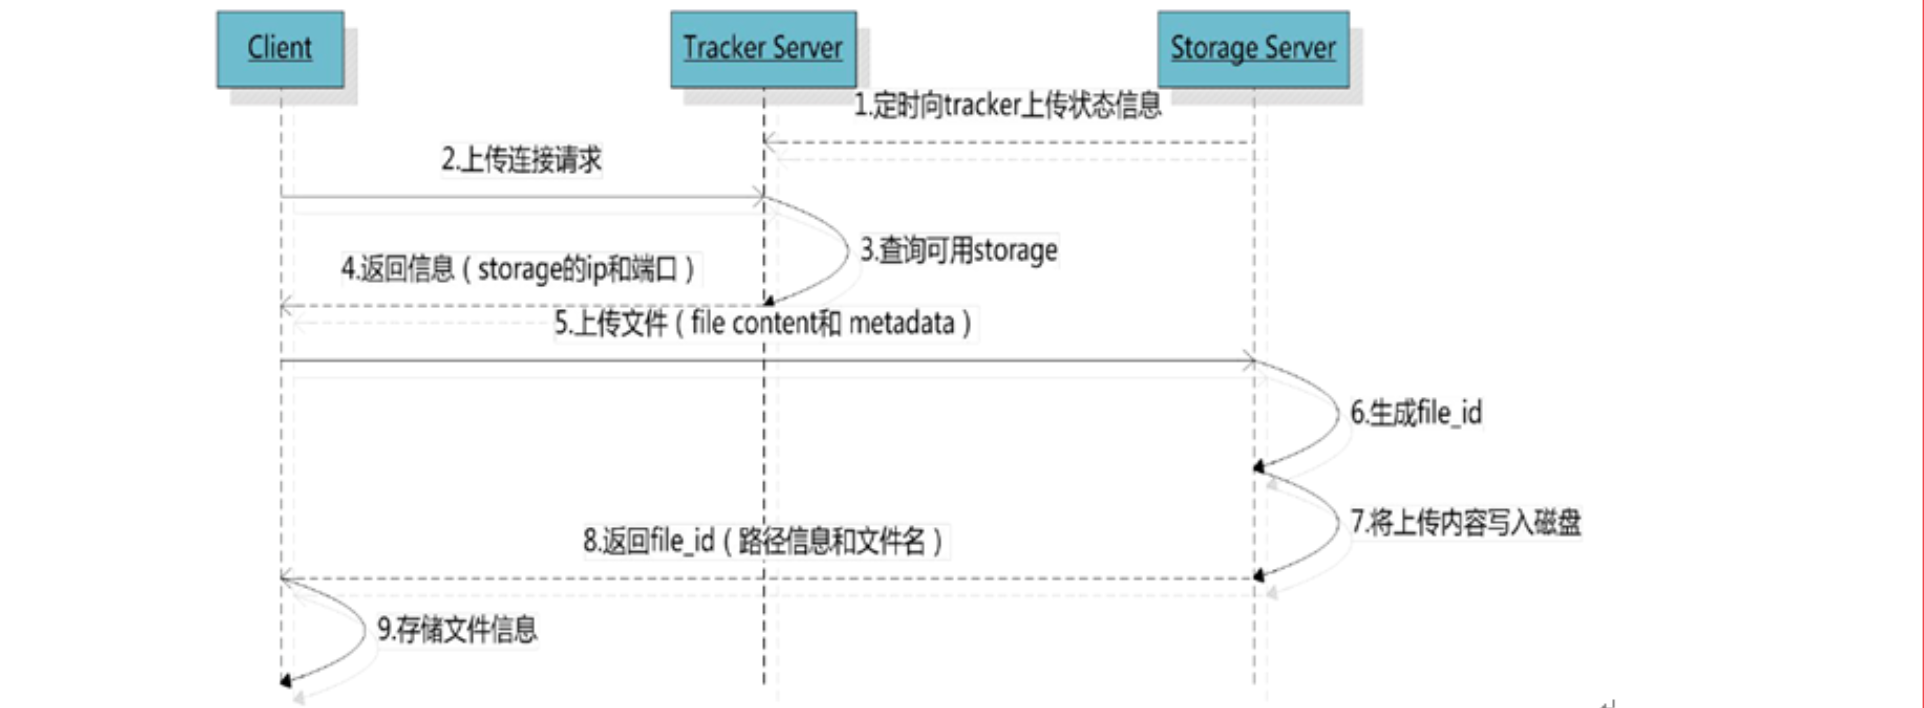
After the client uploads the file, the storage server returns the file ID to the client, which is used to access the index information of the file in the future. File index information includes: group name, virtual disk path, two-level data directory, and file name.

**Group name: * * the name of the storage group where the file is uploaded. After the file is uploaded successfully, it will be returned by the storage server and needs to be saved by the client.
**Virtual disk path: * * the virtual path configured by storage, which is the same as the disk option store_path * corresponds to. If store is configured_ Path0 is M00. If store is configured_ Path1 is M01, and so on.
**Two level data directory: * * the two-level directory created by the storage server under each virtual disk path is used to store data files.
**File name: * * different from the file upload. It is generated by the storage server according to specific information. The file name includes: IP address of the source storage server, file creation timestamp, file size, random number, file extension name and other information.
2, FastDFS installation
Here, we use docker for installation. If there are any partners who have not studied docker, we suggest to learn docker to open the door to a new world
1. Pull docker image
There are many mirror versions of fastdfs. Here we choose a more reliable one
docker pull morunchang/fastdfs
2. Run tracker
If you forget what a tracker is, please look at the previous FastDFS architecture
Here -- net=host
docker run -d --name tracker --net=host morunchang/fastdfs sh tracker.sh
- The network mode used is – net=host. The host mode does not need to map the container port host. Instead, the Ip of your machine can be the group name, that is, the storage group
- If you want to add a new storage server, run the command again and pay attention to changing the new group name
Alternatively, we can manually specify the port mapping:
docker run -d -p 22122:22122 --name=tracker morunchang/fastdfs sh tracker.sh
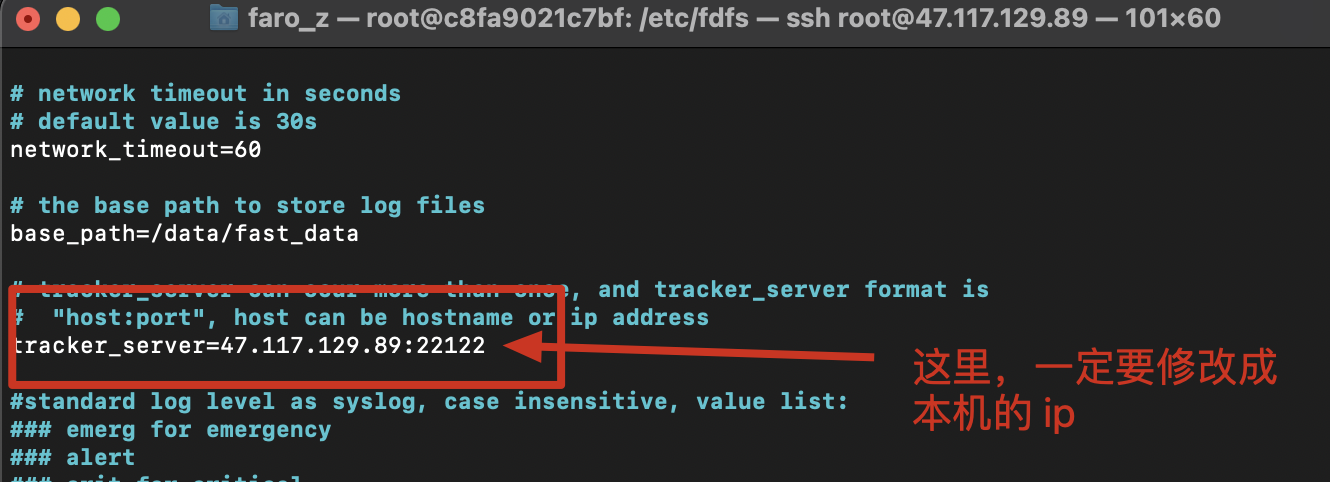
To modify the configuration file of the tracker:
# Enter the bash of the tracker
docker exec -it tracker bash

# Enter the tracker configuration file directory
cd /etc/fdfs/

# Open the file to be modified
vi client.conf
3. Run storage
docker run -d --name storage --net=host -e TRACKER_IP=<Yours tracker Where ip address>:22122 -e
GROUP_NAME=<Group name> morunchang/fastdfs sh storage.sh

docker run -d --name storage --net=host -e TRACKER_IP=47.117.129.89:22122 -e GROUP_NAME=group1    morunchang/fastdfs sh storage.sh
- The network mode used is – net=host. The host mode can be replaced by the Ip of your machine without mapping the container port to the host
- GROUP_NAME is the group name, that is, the group of storage
- If you want to add a new storage server, run the command again and pay attention to changing the new group name
Traditional methods can also be used:
docker run -d -p 23000:23000 --name=storage -e TRACKER_IP=47.117.129.89:22122 -e GROUP_NAME=group1 morunchang/fastdfs sh storage.sh
**Note: * * in order to test, we do not mount the data volume. In actual operation, we must mount the data volume, otherwise all the pictures stored will be lost once the container is closed
4. Modify the nginx configuration file of storage
In Fastdfs, nginx is built in. We need to modify its configuration
Modify the configuration of nginx:
Enter the storage container and modify nginx conf
docker exec -it storage /bin/bash
After entering
vi /etc/nginx/conf/nginx.conf
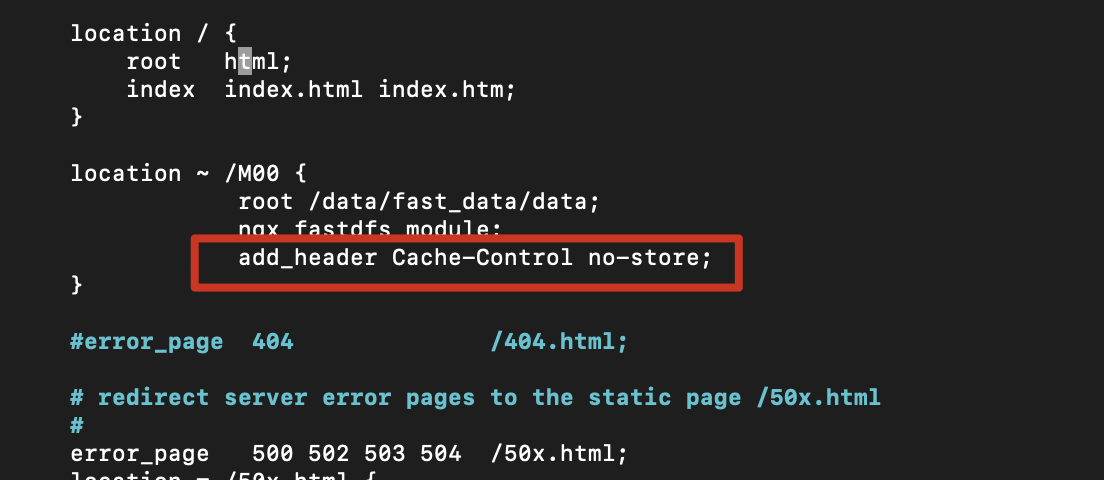
Add the following contents (generally existing, do not change)
location ~ /M00 { root /data/fast_data/data; ngx_fastdfs_module;}
Disable caching:
add_header Cache-Control no-store;
Exit container
exit
Restart the storage container
docker restart storage
5. Test whether the configuration is successful
Here, we create a random file in the tracker container and directory, and then try to send it to storage
Create any file:
echo "faroz" > faroz.txt
When sending, execute the following instructions:
fdfs_upload_file /etc/fdfs/client.conf faroz.txt
If the storage location is returned, it means that we have successfully sent it

3, File upload microservice
Next, we try to import fastdfs in the spring cloud project
I won't demonstrate the configuration of the whole spring cloud project here. For the specific configuration, please refer to my previous blog
1. New file upload module

2. Import Maven dependencies
<?xml version="1.0" encoding="UTF-8"?><project xmlns="http://maven. apache. org/POM/4.0.0" xmlns:xsi=" http://www.w3.org/2001/XMLSchema-instance " xsi:schemaLocation=" http://maven.apache.org/POM/4.0.0 http://maven.apache.org/xsd/maven-4.0.0.xsd "> <parent> <artifactId>SpringCloudStudy</artifactId> <groupId>top.faroz</groupId> <version>1.0-SNAPSHOT</version> </parent> <modelVersion>4.0.0</modelVersion> <artifactId>fastdfs-client</artifactId> <properties> <maven.compiler.source>8</maven.compiler.source> <maven.compiler.target>8</maven.compi ler. target> </properties> <dependencies> <dependency> <groupId>org. springframework. boot</groupId> <artifactId>spring-boot-starter-web</artifactId> </dependency> <dependency> <groupId>org. springframework. cloud</groupId> <artifactId>spring-cloud-starter-netflix-eureka-client</artifactId> </dependency> <!-- Fastdfs dependency -- > < dependency > < groupid > com github. tobato</groupId> <artifactId>fastdfs-client</artifactId> <version>1.26.7</version> </dependency> </dependencies></project>
3. Configuration file
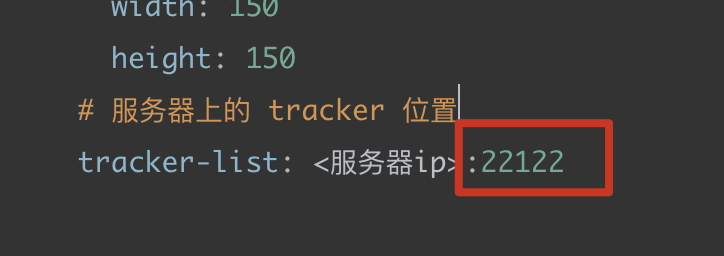
server: port: 9004logging: #file: demo.log pattern: console: "%d - %msg%n" level: org.springframework.web: debug top.faroz: debugspring: application: name: upload-service # springMVC Configuration related to file upload servlet: multipart: enabled: true max-file-size: 10MB #Single file upload size max-request-size: 20MB #Total file upload size# fastdfs Related configuration fdfs: # Link timeout connect-timeout: 60 # Read time so-timeout: 60 # Generate thumbnail parameters thumb-image: width: 150 height: 150 # On server tracker position tracker-list: <The server ip>:22122eureka: client: service-url: defaultZone: http://127.0.0.1:10086/eureka instance: # prefer IP address to host name. Prefer IP address: true #ip address: 127.0.0.1 # renewal interval: 30 seconds by default. Lease renewal interval in seconds: 5 # service effective time. 90 seconds by default. Lease expiration duration in seconds: 5
The above paragraph is to configure the location of our tracker service. If you use ECS, remember to open the port

4. Startup class
@SpringBootApplication@EnableEurekaClientpublic class UploadApplication { public static void main(String[] args) { SpringApplication.run(UploadApplication.class, args); }}
5. Custom config class
@Configuration@Import(FdfsClientConfig.class)public class DfsConfig {}
6. Write file upload tool class
@Component
@Slf4j
public class FastdfsUtil {


    @Resource
    private FastFileStorageClient storageClient;

    /**
     * Upload file
     * @param multipartFile
     * @return
     * @throws IOException
     */
    public String upload(MultipartFile multipartFile) throws IOException {

        // To obtain the extension file name, we use the tool class to realize the duplicate name, or in the form of intercepting a string
        String extName = FilenameUtils.getExtension(multipartFile.getOriginalFilename());

        // Upload the file and return to storePath, which contains the file group and file path
        StorePath storePath = storageClient.uploadImageAndCrtThumbImage(multipartFile.getInputStream(),
                multipartFile.getSize(),
                extName,
                null);

        // Returns the full pathname of the file uploaded by fastdfs
        return storePath.getFullPath();
    }

    public void deleteFile(String url) {
        if (StringUtils.isEmpty(url)) {
            log.info("Error, incoming url Empty");
            return;
        }
        // Obtain storePath related information according to the url
        StorePath storePath = StorePath.parseFromUrl(url);
        storageClient.deleteFile(storePath.getGroup(),storePath.getPath());
    }
}
7. Write a controller for file upload and deletion
@RestController
public class FileController {

    @Resource
    private FastdfsUtil fastdfsUtil;

    /**
     * File upload
     * Header information headers = "content type = multipart / form data" must be specified here
     * @param file
     * @return
     */
    @PostMapping(value = "/uploadFile",headers = "content-type=multipart/form-data")
    public ResponseEntity<String> upload(@RequestParam("file") MultipartFile file) {
        String result ="";
        try {
            String upload = fastdfsUtil.upload(file);
            if (StringUtils.isEmpty(upload)) {
                result="Upload failed";
            } else {
                result=upload;
            }
        } catch (IOException e) {
            e.printStackTrace();
            result="The server encountered an exception";
        }
        return ResponseEntity.ok(result);
    }

    /**
     *
     * @param path path Such as group1 / M00 / 00 / 00 / wkhjzf3wedmapsglaabszahj0eu111 jpg
     * @return
     */
    @RequestMapping("/deleteByPath")
    public ResponseEntity<String> delete(String path) {
        fastdfsUtil.deleteFile(path);
        return ResponseEntity.ok("Delete succeeded!");
    }

}