brief introduction
FastDFS is an open source, high performance, distributed file system (DFS).
The FastDFS system has three roles: Tracker Server, Storage Server, and Client.
Tracker Server: Track the server, mainly for scheduling and balancing purposes; manages all storage server s and groups, and each store connects to Tracker after startup, informs itself of the group it belongs to, and maintains a periodic heartbeat.
Storage Server: Storage server, which mainly provides capacity and backup services; in groups, there can be more than one storage server in each group, and data can be backed up each other.
Client: Client, the server that uploads and downloads data, the server where our own project is deployed.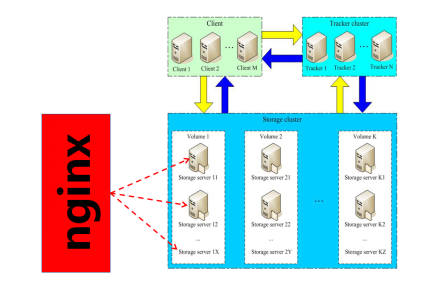
install
Environmental preparation
gcc gcc-c++ perl is required for source compilation and unzip is required for package decompression
 yum -y install gcc gcc-c++ perl unzip
Download required packages in advance (Unified download in / usr/local/src directory)
Download the libfastcommon environment package: wget https://github.com/happyfish100/libfastcommon/archive/V1.0.7.tar.gz
 Download the FastDFS package: wget https://github.com/happyfish100/fastdfs/archive/V5.05.tar.gz
 Download the nginx source package: wget-c https://nginx.org/download/nginx-1.12.1.tar.gz
 Download the fastdfs-nginx-module plug-in package: WGet https://github.com/happyfish100/fastdfs-nginx-module/archive/5e5f3566bbfa57418b5506aaefbe107a42c9fcb1.zip
1. Install libfastcommon
Unzip and enter
tar -zxvf V1.0.7.tar.gz
cd libfastcommon-1.0.7
Compile, Install
 ./make.sh
 ./make.sh install
Libfastcommon.so is installed by default to/usr/lib64/libfastcommon.so.However, the Lib directory set by the main FastDFS program that we subsequently installed is/usr/local/lib, so soft links need to be created.
ln -s /usr/lib64/libfastcommon.so /usr/local/lib/libfastcommon.so
ln -s /usr/lib64/libfastcommon.so /usr/lib/libfastcommon.so
ln -s /usr/lib64/libfdfsclient.so /usr/local/lib/libfdfsclient.so
ln -s /usr/lib64/libfdfsclient.so /usr/lib/libfdfsclient.so
2. Download and install FastDFS
Unzip and enter
 tar -zxvf V5.05.tar.gz
 cd fastdfs-5.05
Compile, Install
 ./make.sh
 ./make.sh install
The corresponding files and directories after installation are as follows:
Service script for fastdfs
/etc/init.d/fdfs_storaged
/etc/init.d/fdfs_tracker
fastdfs profile
/etc/fdfs/client.conf.sample
/etc/fdfs/storage.conf.sample
/etc/fdfs/tracker.conf.sample
The command tool is in/usr/bin/.
The bin directory set by the FastDFS service script is/usr/local/bin, but the actual command is installed under/usr/bin/We need to establish a soft link from/usr/bin to/usr/local/bin
ln -s /usr/bin/fdfs_trackerd /usr/local/bin
ln -s /usr/bin/fdfs_storaged /usr/local/bin
ln -s /usr/bin/stop.sh /usr/local/bin
ln -s /usr/bin/restart.sh /usr/local/bin
3. Configure FastDFS Tracker
Enter/etc/fdfs, copy the FastDFS tracker sample configuration file tracker.conf.sample, and rename it tracker.conf
 cd /etc/fdfs
 cp tracker.conf.sample tracker.conf
 vim tracker.conf
Edit tracker.conf, which needs to be modified below. The other defaults are fine.
# Tracker data and log directory address (root directory must exist, subdirectories will be created automatically)
base_path=/home/fastdfs/tracker
# HTTP Service Port
http.server_port=80
Create a tracker base data directory, the directory corresponding to base_path
mkdir -p /home/fastdfs/tracker
Start Tracker
# service fdfs_trackerd start
//or
# systemctl start fdfs_trackerd

netstat -unltp|grep fdfs

Close
service fdfs_trackerd stop
4. Configure FastDFS Storage
Enter / etc/fdfs directory
# cd /etc/fdfs
# cp storage.conf.sample storage.conf
# vim storage.conf
Edit storage.conf
# Storage data and log directory address (root must exist, subdirectories will be generated automatically)
base_path=/home/fastdfs/storage
# If you do not configure store_path0, it is the same path as base_path, which is commented out here.
#store_path0=/home/fastdfs/file
# Write one line per tracker server when there are multiple tracker servers
tracker_server=192.168.244.8:22122
# Access Port
http.server_port=80
Create a Storage base data directory corresponding to the base_path directory
# mkdir -p /home/fastdfs/storage
Start Storage
# service fdfs_storaged
#View Status
# netstat -unltp|grep fdfs
#Close
# service fdfs_storaged stop

See if Storage and Tracker are communicating
/usr/bin/fdfs_monitor /etc/fdfs/storage.conf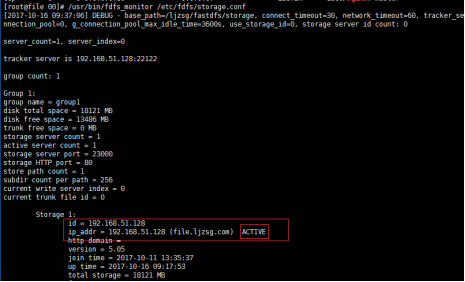
5. File upload test
Modify client profile in Tracker server
# cd /etc/fdfs
# cp client.conf.sample client.conf
# vim client.conf
Modify the following configuration, other defaults.
# Client's data and log directories
base_path=/home/fastdfs/client
# Tracker Port
tracker_server=192.168.244.8:22122
#Port of tracker server
http.tracker_server_port=8081
Upload Test
# /usr/bin/fdfs_upload_file /etc/fdfs/client.conf xxx.jpg


Install nginx
1. Environment required to install nginx
Installation of PCR E pcre-devel
# yum install -y pcre pcre-devel
zlib installation
# yum install -y zlib zlib-devel
OpenSSL Installation
# yum install -y openssl openssl-devel
2. Install nginx
# tar -zxvf nginx-1.12.1.tar.gz
# cd nginx-1.12.1

# ./configure

# make
# make install

#start-up
# cd /usr/local/nginx/sbin/
# ./nginx

# ./nginx -s stop
# ./nginx -s quit
# ./nginx -s reload

/usr/local/nginx/sbin/nginx -V

Modify nginx.conf
# vim /usr/local/nginx/conf/nginx.conf
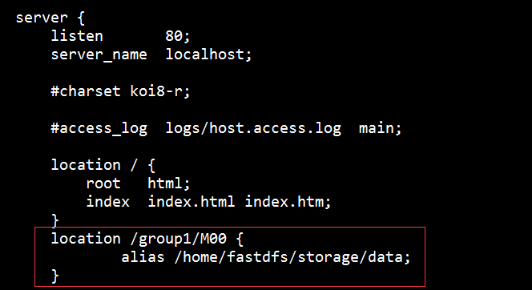
#Add the following line to map/group1/M00 to/home/fastdfs/storage/data
location /group1/M00 {
alias /home/fastdfs/storage/data;
}restart
# /usr/local/nginx/sbin/nginx -s reload
Files uploaded before browser access, successful.
http://192.168.244.8/group1/M00/00/00/wKj0CF0cTBKAYwBiAABdrZgsqUU227.jpg
3.Nginx's fastdfs module
Unzip fastdfs-nginx-module
# decompression
# unzip 5e5f3566bbfa57418b5506aaefbe107a42c9fcb1.zip
# rename
# mv fastdfs-nginx-module-5e5f3566bbfa57418b5506aaefbe107a42c9fcb1 fastdfs-nginx-module
Configure Nginx
# Stop nginx service first
# /usr/local/nginx/sbin/nginx -s stop
//Enter nginx unpack directory
# cd /usr/local/src/nginx-1.12.1/

# add module
# ./configure --add-module=../fastdfs-nginx-module/src
//Recompile, Install
# make && make install

#View the Nginx version module
# /usr/local/nginx/sbin/nginx -V

Copy the configuration file from the fastdfs-nginx-module source to the / etc/fdfs directory and modify it
# cd /usr/local/src/fastdfs-nginx-module/src
# cp mod_fastdfs.conf /etc/fdfs/
Modify the following configuration, other defaults
# Connection timeout
connect_timeout=10
# Tracker Server
tracker_server=192.168.244.8:22122
# Set to true if the uri of the file ID contains/group**
url_have_group_name = true
# Storage configuration store_path0 path must be consistent with storage.conf and commented out uniformly
#store_path0= /home/yuqing/fastdfs
Copy part of FastDFS configuration file to / etc/fdfs directory
# cd /usr/local/src/fastdfs-5.05/conf/
# cp anti-steal.jpg http.conf mime.types /etc/fdfs/
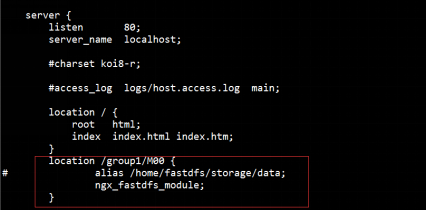
Configure nginx, modify nginx.conf
Add fastdfs-nginx module under port 80
location ~/group0/M00 {
ngx_fastdfs_module;
}
Be careful:
The listen 80 port value is to correspond to http.server_port=80 (changed to 80 before) in /etc/fdfs/storage.conf.
start nginx
# /usr/local/nginx/sbin/nginx

Re-upload a picture and open it with your browser. Installation is successful.