First understand the three installation modes of Hadoop
Features: high reliability (not afraid of loss), high efficiency (fast processing speed), high fault tolerance
- ps: use Hadoop version:
Next, Hadoop 2 8.5, although Hadoop has been updated to 3.5 X is over; However, we always adhere to the view of "using the old instead of the new", because after all, the old version is relatively stable (although the JDK version is 16, we will still use jdk8 and jdk11), including various hives and hbases used in the later stage, which need to correspond to the Hadoop version, so it is difficult to find such resources; Of course, if you come to the company, the company will also provide you with the corresponding version, which can be used directly.
Hadoop
HDFS: distributed file system - requires installation
MapReduce: distributed offline computing framework - no installation required - logical concept - coding required
Yarn: distributed resource scheduling system - needs to be installed
Installation method:
- Local mode
- Pseudo distributed mode - one computer
- Fully distributed
1. Local mode configuration
(in this mode, hdfs and yarn components cannot be used, only mapreduce can be used -- generally, it is only used to test mapreduce)
Generally, the directory is set to (/ opt directory generally stores third-party software) - app stores the installed software, and software stores the compressed package of third-party software
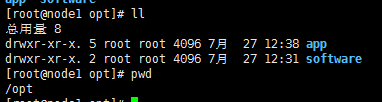
- Unzip the hadoop compressed package to the / opt/app directory

-
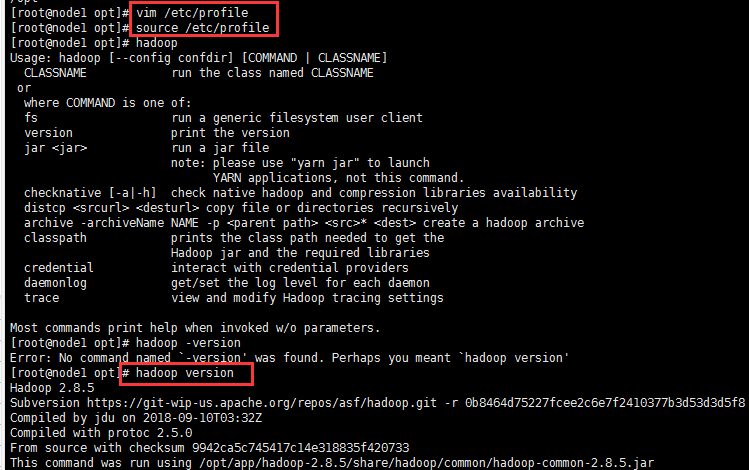
vim /etc/profile to change the system environment variables (configure Hadoop environment variables: the purpose is to use Hadoop commands in any directory)
export HADOOP_HOME=/opt/app/hadoop-2.8.5
export PATH=$PATH:$HADOOP_HOME/bin:$HADOOP_HOME/sbin
-
source /etc/profile
hadoop version
2. Pseudo distributed mode
(in this mode, both hdfs and yarn components of hadoop are on the same machine, and the configuration file needs to be modified)
A huge file needs to be stored. A single computer can't store this file, so we can cut this file into several parts and put them on different computers. But then there is a problem: the files stored on the three machines are not related to each other. How can large files be downloaded? At this time, HDFS can be installed on each computer for "relationship definition". Next, we will discuss this key technology HDFS
Master-slave mode – distributed software: one master node and multiple slave nodes
-
Familiar with concepts
-
HDFS{
NameNode: store metadata {leader, know where to put the data}
DataNode: store data (employee)
SecondaryNameNode: (secretary)
}
-
Yarn{
ResourceManager (equivalent to NameNode: Leader)NodeManager (equivalent to DataNode: employee)
}
-
-
Configuration item

(. sh file for jdk configuration connected to Java: configure JAVA_HOME=/opt/app/jdk1.8)
(. xml file for corresponding configuration: core(common), hdfs, mapred, yarn)
1.core-site.xml
<!--appoint HDFS in namenode Your address must be core-site In, cannot be placed in hdfs-site.xml Otherwise, it cannot be used hdfs-->
<property>
  <name>fs.defaultFS</name>
  <value>hdfs://192.168.0.20:9000</value>
</property>
<!--appoint Hadoop The storage directory where temporary files are generated at run time-->
<property>
  <name>hadoop.tmp.dir</name>
  <value>/opt/app/hadoop-2.8.5/temp</value>
</property>
2.hdfs-site.xml
<!--appoint HDFS Number of copies in-->
<property>
  <name>dfs.replication</name>
  <value>1</value>
</property>
3.mapred-site.xml
<!--adopt yarn Go run-->
<property>
  <name>mapreduce.framework.name</name>
  <value>yarn</value>
</property>
4.yarn-site.xml

<property>
  <name>yarn.nodemanager.aux-services</name>
  <value>mapreduce_shuffle</value>
</property>

<!--appoint Yarn of ResourceManager address-->
<property>
  <name>yarn.resourcemanager.hostname</name>
  <value>192.168.0.20</value>
</property>
-
Format NameNode
(equivalent to creating the temp directory declared in core-site.xml)
{you can only format it once. If you have to format it, you can delete the generated temp file}
hadoop namenode -format
-
Start hdfs service and yarn Service
start-dfs.sh
start-yarn.sh
-
Access verification
namenode Visit website{http://ip:50070}
yarn Visit URL{http://ip:8088}

-
supplement
In this way, you will find that you need to enter the password repeatedly when starting each node. If you don't want to do so, find a solution:
Configure SSH key free login
1. Generate key
cd ~/.ssh
ssh-keygen -t rsa

2. Give the password to others
ssh-copy-id 192.168.0.20

3. Fully distributed
(a cluster composed of at least 3 nodes) --- generally used in production deployment
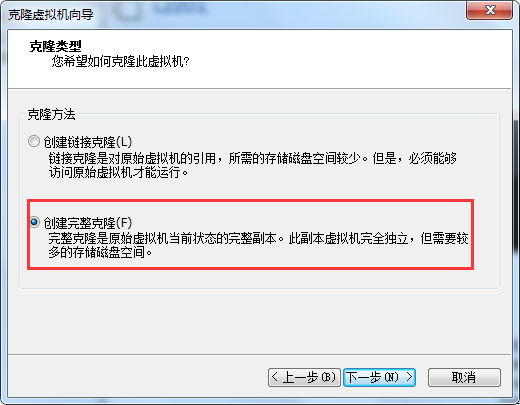
1. Three virtual machines need to be prepared: created by cloning (creating a full clone)
2. Configure the static network of 3 virtual machines
192.168.0.20 ,192.168.0.21,192.168.0.22
3. Configure password free login of 3 virtual machines
- the process is consistent with the secret free login mentioned in pseudo distribution
(successful interface)

4. Synchronization time
-
Install ntp
yum install -y ntp
vim /etc/ntp.conf
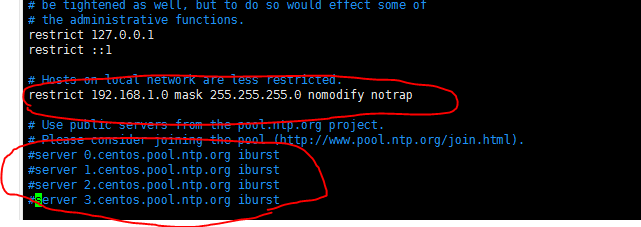
In the first circle here, my network segment should be 192.168.0.0
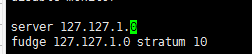
(the above two pictures need to be modified and added in ntp.conf)
-
Modify / etc/sysconfig/ntpd
Add code
SYNC_HWCLOCK=yes
-
Add as boot
systemctl enable ntpd
Then configure scheduled tasks on node2 and node3
crontab -e
*/1 * * * * /usr/sbin/ntpdate 192.168.0.20
 Sync every 1 minute node1 Time on primary server
5. Officially start cluster configuration

core-site.xml
  <!-- appoint HDFS in NameNode Address of -->
  <property>
      <name>fs.defaultFS</name>
      <value>hdfs://node1:9000</value>
  </property>
  <!-- appoint hadoop The storage directory where files are generated at run time -->
  <property>
      <name>hadoop.tmp.dir</name>
      <value>/opt/app/hadoop/temp</value>
  </property>
hdfs-site.xml
<configuration>
    <!--Back up one copy on each of the three machines-->
      <property>
          <name>dfs.replication</name>
          <value>3</value>
      </property>
      <!--secondary namenode address-->
      <property>
          <name>dfs.namenode.secondary.http-address</name>
          <value>node3:50090</value>
      </property>
      <!--hdfs Cancel user permission verification-->
       <property>
          <name>dfs.permissions.enabled</name>
          <value>false</value>
      </property>

      <!--If yes true(Default), then namenode It is required to connect datanode The address resolved to the host name
      If datanode If the host name is configured, this item can be left blank. The default value is true However, the host name must be/etc/hosts Configure host mapping in file
      If datanode Configured is IP  Then you need to change this value to false  otherwise IP Hosts are treated as host names ip check
      Note: configured by default hadoop Using host+hostName Configuration mode of datanode Need to be configured as host name
      -->
      <property>
          <name>dfs.namenode.datanode.registration.ip-hostname-check</name>
          <value>true</value>
      </property>
  </configuration>
slaves
  vim /opt/app/hadoop/etc/hadoop/slaves
  node1
  node2
  node3
yarn-site.xml
<!-- Site specific YARN configuration properties -->
<property>
  <name>yarn.nodemanager.aux-services</name>
  <value>mapreduce_shuffle</value>
</property>

<!--appoint Yarn of ResourceManager address-->
<property>
  <name>yarn.resourcemanager.hostname</name>
  <value>node2</value>
</property>
mapred-site.xml
  <configuration>
      <!-- appoint mr Run in yarn upper -->
      <property>
          <name>mapreduce.framework.name</name>
          <value>yarn</value>
      </property>
      <property>
          <name>yarn.app.mapreduce.am.env</name>
          <value>HADOOP_MAPRED_HOME=${HADOOP_HOME}</value>
      </property>
      <property>
          <name>mapreduce.map.env</name>
          <value>HADOOP_MAPRED_HOME=${HADOOP_HOME}</value>
      </property>
      <property>
          <name>mapreduce.reduce.env</name>
          <value>HADOOP_MAPRED_HOME=${HADOOP_HOME}</value>
      </property>
  </configuration>
After changing the hadoop configuration file on node1, start distribution
scp -r /opt/app/hadoop-2.8.5 root@node2:/opt/app
scp -r /opt/app/hadoop-2.8.5 root@node3:/opt/app
Remember to format each after distribution! (or format it first and then distribute it to node2 and node3 nodes)
The configuration of basic items of other details has been very detailed in pseudo distribution, so I won't say much here. Only by boldly trying and constantly trying and making mistakes can we improve!
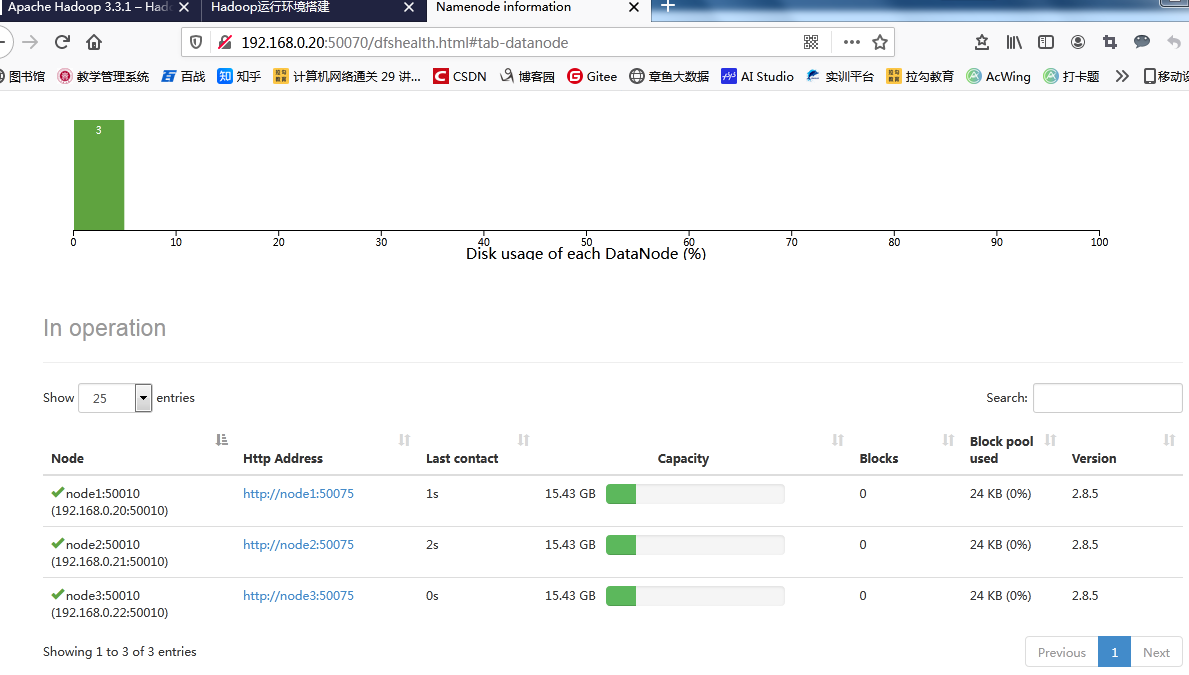
After success, check the namenode success interface, and you can see that three datanode nodes have been opened