To tell you the truth, this article has been revised many times. If you read this article carefully, you won't write fish_redux, please spray me in the comments.
preface
Come and learn the hard fish_redux framework, the official document of this framework is really more than fluent_ There are too many documents on the official website of bloc, but once you know how to write them, the pages will pile up very well, with clear structure and logic.
In fact, when I understood the framework at that time, I always wanted to write an article to record, but I didn't write it because I was busy (lan). Now I think it's still necessary to record the use process. After all, just starting the framework is a painful process, so I must make a record of the process.
This is not only the recorded article, but also the example given in the article, which I re conceived to write, and the process is also clear and detailed.

Several problems
- Transition animation of page switching
- How does the page update data
- fish_ How to transfer data between modules of Redux
- Page Jump value, and accept the value returned from the next page
- How to use with ListView
- How ListView uses adapter and how data is bound to item
-
How to use Page as a widget (bottom NavigationBar, NavigationRail and other navigation bar controls will be used)
- This is used directly: xxxpage Buildpage (null)
If you're using fish_redux encountered the above problems in the process, so let's take a look at this article! Here, all the above questions will be answered!
prepare
introduce
fish_redux related address
- GitHub address: https://github.com/alibaba/fish-redux
- Pub address: https://pub.dev/packages/fish_redux
I use 0.3 The version of X is the third version, which has been greatly changed compared with the previous versions
- Introducing fish_redux plug-in. If you want to use the latest version of the plug-in, you can check it in the pub address
fish_redux: ^0.3.4
#Libraries needed for demo list
dio: ^3.0.9    #Network request framework
json_annotation: ^2.4.0 #json for serialization and deserialization
Develop plug-ins
- Here we need to install a code generation plug-in, which can help us generate a large number of files and template code
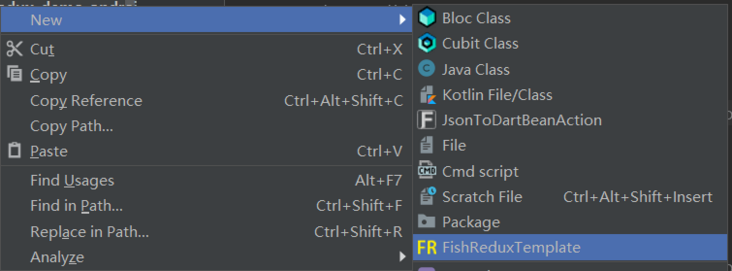
- Search "fish" in Android Studio to find the plug-in. The plug-in name is FishReduxTemplate
-

- Written by Baker JQ: Fish Redux template for Android Studio.
- Prepared by huangjianke: Fish Redux template for VSCode
establish
- Here, in the newly created count folder, select the new file and select: new -- > fishreduxtemplate
-
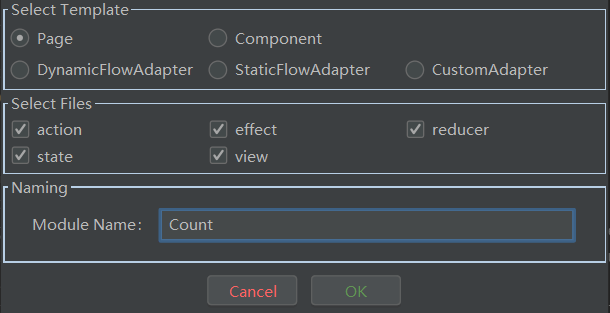
Select here: Page, select all "Select Fils" at the bottom, which is the standard redux file structure; It is recommended to use the big hump: Count
- Component: This is generally a reusable related component; You can also select the item in the list
- Adapter: there are three adapters here, all of which are unnecessary; fish_ The third edition of Redux introduces a more powerful adapter and a more flexible binding method
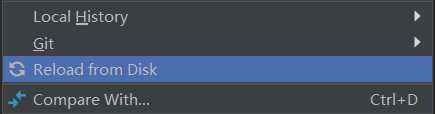
- After the creation is successful, remember to right-click the created folder and select Reload From Disk; Refresh the created file
-
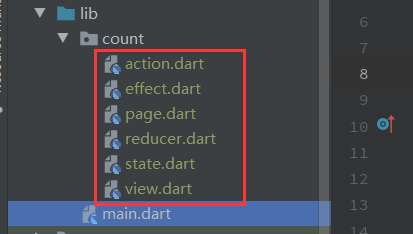
Create a successful file structure
- Page: the general page, functions of registering effect, reducer, component and adapter, and related configurations are all operated on this page
- state: This is where we store sub module variables; Initializing variables and accepting the parameters of the previous page are also important modules here
- view: it is mainly the module we write the page
- action: This is a very important module. All events are defined and transferred here
- Effect: related business logic, network request and other "side-effect" operations can be written in this module
- reducer: This module is mainly used to update data. It can also write some simple logic or data related logic operations

- OK, so far all the preparations have been completed. Now you can start the code
Development process
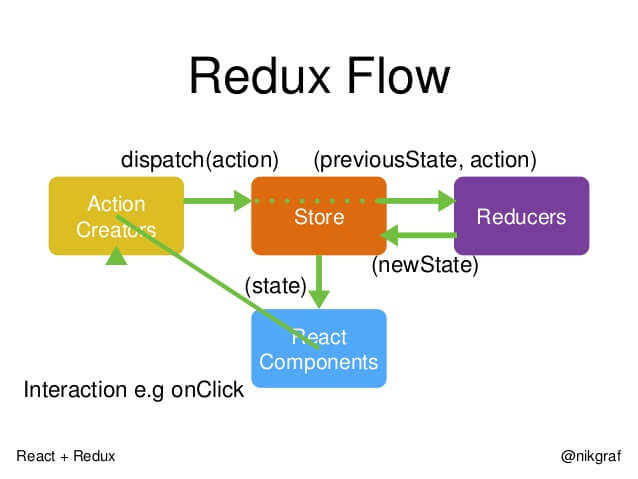
redux process
- The following figure is the redux flow chart posted on teacher Ruan Yifeng's blog
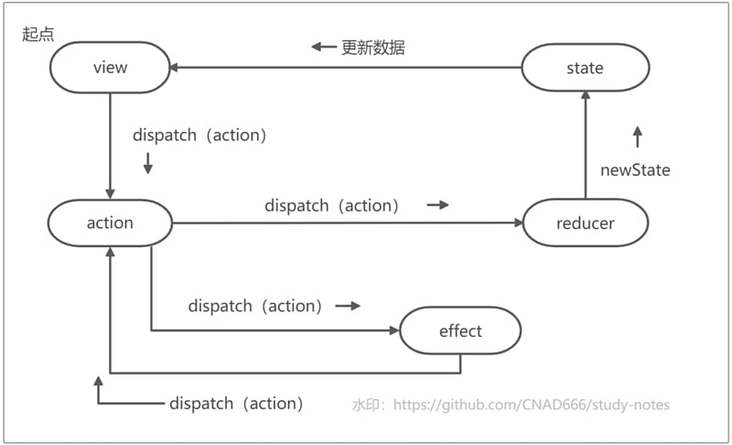
fish_redux process
-
Before writing code, read and write down the flow chart, which is drawn with your own understanding
- It can be found that the transmission of events is through the method of dispatch, and the action layer is obviously a very key layer. The transmission of events is defined and transferred in this layer
- This picture was raised for a long time in YuQue, and added its own github watermark address on it
-
Through the comparison of the two flow charts, there are still some differences
- The store in redux is global. fish_redux also has the concept of global store. Store and react are understood in sub modules; Corresponding fish_ In redux: state, view
- fish_ There is an effect layer in Redux: this layer is mainly used to process logic and related network requests
- Theoretically, reducer can handle some simple logic related to data; However, complex business logic that will produce relatively large "side effects" still needs to be written in effect
Example description
Here are some examples to demonstrate fish_ Use of Redux
-
Counter
- fish_ The normal circulation process of Redux
- fish_ How do Redux modules transfer data
-
Page Jump
- A -- > b (a jumps to B and passes the value to B page)
- B -- > A (B returns to a and returns the value to the a page)
-
List articles
- List presentation - network request
- List modification - single item refresh
- Multi style list
- List problems + Solutions
-
Global module
- Global switch topics
-
Global pattern optimization
- Greatly improve the development experience
-
Component usage
- Using component in page
- radio broadcast
-
Development tips
- Weaken reducer
- widget combined development
Counter
design sketch
-
This example demonstrates that click this operation in the view, and then update the page data; In the following process, the data is processed in effect and transferred to reducer through action transfer to update the data
- View -- > action -- > effect -- > reducer (update data)
- Note: this process will show how to transfer data to each other in each process
Standard mode
-
main
- It should be noted that system packages such as cupertino and material and fish_ The name of the "Page" class contained in Redux is repeated. You need to use hide on this kind of system package to hide the Page class in the system package
- For page switching style, you can use the corresponding page switching style in the ongeneraterote method in MaterialApp. Here, you can use the page switching style of ios: cupertino
///Hide is required to hide the Page
import 'package:flutter/cupertino.dart'hide Page;
import 'package:flutter/material.dart' hide Page;

void main() {
  runApp(MyApp());
}

Widget createApp() {
  ///Define route
  final AbstractRoutes routes = PageRoutes(
    pages: <String, Page<Object, dynamic>>{
      "CountPage": CountPage(),
    },
  );

  return MaterialApp(
    title: 'FishDemo',
    home: routes.buildPage("CountPage", null), //As default page
    onGenerateRoute: (RouteSettings settings) {
      //ios page switching style
      return CupertinoPageRoute(builder: (BuildContext context) {
        return routes.buildPage(settings.name, settings.arguments);
      })
//      Material page switching style
//      return MaterialPageRoute<Object>(builder: (BuildContext context) {
//        return routes.buildPage(settings.name, settings.arguments);
//      });
    },
  );
}-
state
- Define some variables we show on the page. Variables can be initialized in initState; The assignment method of clone method is required
class CountState implements Cloneable<CountState> {
  int count;

  @override
  CountState clone() {
    return CountState()..count = count;
  }
}

CountState initState(Map<String, dynamic> args) {
  return CountState()..count = 0;
}-
view: This is the module for writing the interface. buildView has three parameters
- State: This is our data layer. All variables required by the page are written in the state layer
- dispatch: similar to the scheduler, it calls the methods in the action layer to call back the methods in the effect and reducer layers
- viewService: this parameter, we can use the method: buildComponent("component name") to call the relevant components we encapsulated
Widget buildView(CountState state, Dispatch dispatch, ViewService viewService) {
  return _bodyWidget(state, dispatch);
}

Widget _bodyWidget(CountState state, Dispatch dispatch) {
  return Scaffold(
    appBar: AppBar(
      title: Text("FishRedux"),
    ),
    body: Center(
      child: Column(
        mainAxisAlignment: MainAxisAlignment.center,
        children: <Widget>[
          Text('You have pushed the button this many times:'),
          ///Use the variables in state to control the transformation of data
          Text(state.count.toString()),
        ],
      ),
    ),
    floatingActionButton: FloatingActionButton(
      onPressed: () {
        ///Click the event and call the action count auto increment method
        dispatch(CountActionCreator.countIncrease());
      },
      child: Icon(Icons.add),
    ),
  );
}-
action
- This layer is a very important module. All behaviors of the page can be seen intuitively in this layer
- The enumeration field in xxxaction is required. An event corresponds to an enumeration field. The enumeration field is: effect, the entry identified by the reducer layer
- The method in the xxactioncreator class is a transit method. Parameters can be passed in the method, and the parameter type can be arbitrary; The parameters in the method are placed in the payload field in the action class, and then get the payload value in the action parameter in effect and reducer to process
- It should be noted that the default template code is generated, and the Action class of return is decorated with const. If you use the payload field of Action to assign values and carry data, an error will be reported; Therefore, if you need to carry parameters here, please remove the const modifier keyword
enum CountAction { increase, updateCount }

class CountActionCreator {
  ///Go to the effect layer to process self increasing data
  static Action countIncrease() {
    return Action(CountAction.increase);
  }
  ///Go to the reducer layer to update the data. The parameters can be transferred in the payload field in the Action class. The payload is a dynamic type and can be transferred to any type
  static Action updateCount(int count) {
    return Action(CountAction.updateCount, payload: count);
  }
}-
effect
-
If you call the method in the xxxactioncreator class in action, the corresponding enumeration field will be called in combineEffects. Here, we can write the corresponding method processing logic. The method takes two parameters: action and ctx
- Action: in this object, we can get the value saved in action in the payload field
- ctx: in this object, you can get the parameters of state. You can also call the dispatch method through ctx and the method in action. Here, you can call the dispatch method. Generally, the processed data is transferred to the reducer layer through action to update the data
-
Effect<CountState> buildEffect() {
  return combineEffects(<Object, Effect<CountState>>{
    CountAction.increase: _onIncrease,
  });
}
///Self increasing number
void _onIncrease(Action action, Context<CountState> ctx) {
  ///Processing Auto increment logic
  int count = ctx.state.count + 1;
  ctx.dispatch(CountActionCreator.updateCount(count));
}-
reducer
- This layer is the way to update data, which is called in XxxxActionCreator class in action. The corresponding enumeration field will be callback in asReducer method. Here we can write a method to clone state data for some processing. There are two parameters in it: state, action.
- The state parameter often uses the clone method, which creates a new state object; The action parameter is basically to get the payload field and assign the value to state
Reducer<CountState> buildReducer() {
  return asReducer(
    <Object, Reducer<CountState>>{
      CountAction.updateCount: _updateCount,
    },
  );
}
///Notify View layer update interface
CountState _updateCount(CountState state, Action action) {
  final CountState newState = state.clone();
  newState..count = action.payload;
  return newState;
}- The page module does not need to be changed, so there is no code posted here
optimization
-
From the above example, it can be seen that such a simple data transformation is only a process of self increment of a parameter in the state, and the effect layer is somewhat redundant; So, simplify the process to the following
- view ---> action ---> reducer
- Note: delete the effect layer here, and this layer can be discarded; Then make some small changes to the view, action and reducer layer code
Get up
-
view
- Here, just slightly change the method of clicking events: countactioncreator Change countincrease() to countactioncreator updateCount()
Widget buildView(CountState state, Dispatch dispatch, ViewService viewService) {
  return _bodyWidget(state, dispatch);
}

Widget _bodyWidget(CountState state, Dispatch dispatch) {
  return Scaffold(
    appBar: AppBar(
      title: Text("FishRedux"),
    ),
    body: Center(
      child: Column(
        mainAxisAlignment: MainAxisAlignment.center,
        children: <Widget>[
          Text('You have pushed the button this many times:'),
          Text(state.count.toString()),
        ],
      ),
    ),
    floatingActionButton: FloatingActionButton(
      onPressed: () {
        ///Click the event and call the action count auto increment method
        dispatch(CountActionCreator.updateCount());
      },
      child: Icon(Icons.add),
    ),
  );
}-
action
- Only one enumeration field and one method are used here, and there is no need to pass any parameters
enum CountAction { updateCount }

class CountActionCreator {
  ///Go to the reducer layer to update the data. The parameters can be transferred in the payload field in the Action class. The payload is a dynamic type and can be transferred to any type
  static Action updateCount() {
    return Action(CountAction.updateCount);
  }
}-
reducer
- Here, directly at:_ The updateCount method handles simple autoincrement logic
Reducer<CountState> buildReducer() {
  return asReducer(
    <Object, Reducer<CountState>>{
      CountAction.updateCount: _updateCount,
    },
  );
}
///Notify View layer update interface
CountState _updateCount(CountState state, Action action) {
  final CountState newState = state.clone();
  newState..count = state.count + 1;
  return newState;
}
Done
- It can be seen that after optimization, the amount of code is greatly reduced. For different business scenarios, you can change flexibly and use the framework, but don't stick to the framework; However, if there are network requests and complex business logic, they must not be written in reducer. They must be written in effect, so as to ensure a clear decoupling structure and separate the process of processing data and updating data

Page Jump
design sketch
-
From the rendering, it is easy to see that the two pages pass values to each other
- FirstPage -- > SecondPage (the FirstPage jumps to the SecondPage and passes the value to the SecondPage)
- SecondPage -- > FirstPage (SecondPage returns to the FirstPage and returns the value to the FirstPage)
realization
- From the above rendering, it is obvious that two pages need to be implemented here. First, look at the changes of the main page
-
main
- Only two pages are added here: FirstPage and SecondPage; And changed the main page entry to: FirstPage
Widget createApp() {
  ///Define route
  final AbstractRoutes routes = PageRoutes(
    pages: <String, Page<Object, dynamic>>{
      ///Counter module demonstration
      "CountPage": CountPage(),
      ///Page value transfer jump module demonstration
      "FirstPage": FirstPage(),
      "SecondPage": SecondPage(),
    },
  );

  return MaterialApp(
    title: 'FishRedux',
    home: routes.buildPage("FirstPage", null), //As default page
    onGenerateRoute: (RouteSettings settings) {
      //ios page switching style
      return CupertinoPageRoute(builder: (BuildContext context) {
        return routes.buildPage(settings.name, settings.arguments);
      });
    },
  );
}
FirstPage
-
Let's take a look at a process of this page
- View -- > action -- > effect (jump to the SecondPage page)
- effect (get the data returned by the SecondPage) - > action -- > reducer (update page data)
-
state
-
Write the state file first. You need to define two variables here
- fixedMsg: This is the value passed to the next page
- msg: display the value variable on the page
- The initState method initializes variables and accepts the values passed by the page. Here, we give it an initial value
-
class FirstState implements Cloneable<FirstState> {
  ///The value passed to the next page
  static const String fixedMsg = "\n I am FirstPage Data transferred from the page: FirstValue";
  ///Show the value passed
  String msg;

  @override
  FirstState clone() {
    return FirstState()..msg = msg;
  }
}

FirstState initState(Map<String, dynamic> args) {
  return FirstState()..msg = "\n Not yet";
}-
view
- The page logic is quite simple, and the main thing is to process the logic in the onPressed method
Widget buildView(FirstState state, Dispatch dispatch, ViewService viewService) {
  return _bodyWidget(state, dispatch);
}

Widget _bodyWidget(FirstState state, Dispatch dispatch) {
  return Scaffold(
    appBar: AppBar(
      title: Text("FirstPage"),
    ),
    body: Center(
      child: Column(
        mainAxisAlignment: MainAxisAlignment.center,
        children: <Widget>[
          Text('The data below is SecondPage Page passed:'),
          Text(state.msg),
        ],
      ),
    ),
    floatingActionButton: FloatingActionButton(
      onPressed: () {
        ///Jump to the Second page
        dispatch(FirstActionCreator.toSecond());
      },
      child: Icon(Icons.arrow_forward),
    ),
  );
}-
action: two enumeration events need to be defined here
- toSecond: jump to the SecondPage page
- updateMsg: get the data returned from the SecondPage page, and then update the page data
enum FirstAction { toSecond , updateMsg}

class FirstActionCreator {
  ///Jump to the second page
  static Action toSecond() {
    return const Action(FirstAction.toSecond);
  }
  ///Get the data returned from the second page and update the data
  static Action updateMsg(String msg) {
    return Action(FirstAction.updateMsg, payload: msg);
  }
}-
effect
- Note here: fish_ The Action class in the Redux framework has the same name as that in the system package, so you need to hide the Action class in the system package
- You can directly use the pushNamed method to transfer the value, and the carried parameters can be written in the arguments field; The return value of pushNamed is of type Future. If you want to get its return value, the jump method needs to be written asynchronously and wait to get the return value from the SecondPage page,
///Use the hide method to hide the Action class in the system package
import 'package:flutter/cupertino.dart' hide Action;

Effect<FirstState> buildEffect() {
  return combineEffects(<Object, Effect<FirstState>>{
    FirstAction.toSecond: _toSecond,
  });
}

void _toSecond(Action action, Context<FirstState> ctx) async{
  ///Transfer values between pages; This place must write an asynchronous method and wait for the value returned from the previous page; The as keyword is a type conversion
  var result = await Navigator.of(ctx.context).pushNamed("SecondPage", arguments: {"firstValue": FirstState.fixedMsg});
  ///Get the data and update the data on the page
  ctx.dispatch(FirstActionCreator.updateMsg( (result as Map)["secondValue"]) );
}-
reducer
- Here is to get the passed value from the action and assign it to the msg field in the clone object
Reducer<FirstState> buildReducer() {
  return asReducer(
    <Object, Reducer<FirstState>>{
      FirstAction.updateMsg: _updateMsg,
    },
  );
}

FirstState _updateMsg(FirstState state, Action action) {
  return state.clone()..msg = action.payload;
}
SecondPage
-
This page is relatively simple, and subsequent updates of page data are not involved. Therefore, the reducer module can not be written. Let's see the flow of this page
- View -- > action -- > effect (pop the current page and return with the value)
-
state
- The variables and FirstPage types of this module are not described
- In initState, the args variable is used to obtain the value passed on the previous page. The Map type needs to be passed when passing the value on the previous page. Here, the corresponding value is obtained through the key
class SecondState implements Cloneable<SecondState> {
  ///The value passed to the next page
  static const String fixedMsg = "\n I am SecondPage Data transferred from the page: SecondValue";
  ///Show the value passed
  String msg;

  @override
  SecondState clone() {
    return SecondState()..msg = msg;
  }
}

SecondState initState(Map<String, dynamic> args) {
  ///Get the data passed from the previous page
  return SecondState()..msg = args["firstValue"];
}-
view
- Note that the WillPopScope control takes over the return event of the AppBar
Widget buildView(SecondState state, Dispatch dispatch, ViewService viewService) {
  return WillPopScope(
    child: _bodyWidget(state),
    onWillPop: () {
      dispatch(SecondActionCreator.backFirst());
      ///true: indicates that the return page is executed; false: indicates that the return page operation is not executed. Here, because the value needs to be passed, the return operation is taken over
      return Future.value(false);
    },
  );
}

Widget _bodyWidget(SecondState state) {
  return Scaffold(
    appBar: AppBar(
      title: Text("SecondPage"),
    ),
    body: Center(
      child: Column(
        mainAxisAlignment: MainAxisAlignment.center,
        children: <Widget>[
          Text('The data below is FirstPage Page passed:'),
          Text(state.msg),
        ],
      ),
    ),
  );
}- action
enum SecondAction { backFirst }

class SecondActionCreator {
  ///Return to the first page, then remove yourself from the stack and pass back some data
  static Action backFirst() {
    return Action(SecondAction.backFirst);
  }
}-
effect
- Here, you also need to hide the Action class in the system package
- Here, write the return data directly in the second parameter of the pop method
///Hide the Action class in the system package
import 'package:flutter/cupertino.dart' hide Action;

Effect<SecondState> buildEffect() {
  return combineEffects(<Object, Effect<SecondState>>{
    SecondAction.backFirst: _backFirst,
  });
}

void _backFirst(Action action, Context<SecondState> ctx) {
  ///pop the current page and return the corresponding data
  Navigator.pop(ctx.context, {"secondValue": SecondState.fixedMsg});
}
Done
- Because the page module does not need to be changed, it is not necessary to attach the page module code
- OK, so far, we have got the way that the two pages transfer values to each other!

List articles
-
After understanding the above two cases, I believe you can use fish_redux implements some pages; However, in the process of stacking pages, we can realize that the list module is a very important part. Let's learn it now, in fish_ How to use ListView in Redux!
- Cut the crap and go up!
List presentation - network request
design sketch
-
In the rendering, there are two operations for scrolling the list: one is to drag and drop the list; The other is to scroll the mouse wheel. flutter also supports related events triggered by the mouse better and better!
- Here, we use the api for playing Android. There is a hole in this api. It is not set to enable cross domain, so running on the web, the use of this api will report an error. I mentioned issue on the github for playing Android. Hey, I don't know when the author will solve it,,,
- This place can only save the country by turning off browser cross domain restrictions. See the settings here: https://www.jianshu.com/p/56b...
- If you run on a virtual machine, this problem will not occur at all!
prepare
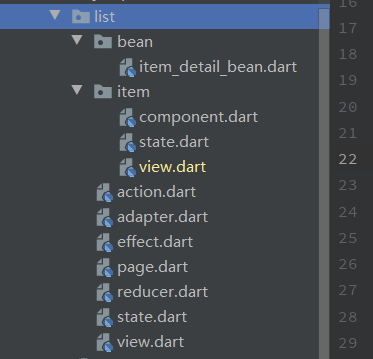
- First look at the file structure
-
main
-
The changes here are very small. Only in the routing, GuidePage and ListPage are added; At the same time, change the default page in the home field to: GuidePage page page; The navigation page code will not be posted in the article, and the link to the page will be posted below
- ListPage is the key, which will be described in detail below
-
void main() {
  runApp(createApp());
}

Widget createApp() {
  ///Define route
  final AbstractRoutes routes = PageRoutes(
    pages: <String, Page<Object, dynamic>>{
      ///Navigation page
      "GuidePage": GuidePage(),
      ///Counter module demonstration
      "CountPage": CountPage(),
      ///Page value transfer jump module demonstration
      "FirstPage": FirstPage(),
      "SecondPage": SecondPage(),
      ///List module demo
      "ListPage": ListPage(),
    },
  );

  return MaterialApp(
    title: 'FishRedux',
    home: routes.buildPage("GuidePage", null), //As default page
    onGenerateRoute: (RouteSettings settings) {
      //ios page switching style
      return CupertinoPageRoute(builder: (BuildContext context) {
        return routes.buildPage(settings.name, settings.arguments);
      });
    },
  );
}
technological process
-
Process of Adapter implementation
- Create item (component) - > create an adapter file -- > State integrate the corresponding source -- > page and bind the adapter
- Through the above four steps, you can be in fish_redux uses the adapter in the corresponding list. The process is a little troublesome, but practice makes perfect. Multi use can quickly build a complex list
-
General process: initialize the list module -- > item module -- > the logic of the list module is perfect
-
Initialize list module
- This is the normal creation of fish_redux template code and files
-
item module
- According to the json returned by the interface, create the corresponding bean -- > create the item module -- > write the state -- > write the view interface
-
Logical perfection of the list module: two places in two steps (adapter creation and binding, normal page editing)
- Create an adapter file -- > state adjustment -- > bind an adapter in the page
- view module write -- > action add update data event -- > effect get data during initialization and process -- > reducer update data
-
- The overall process is indeed a little too many, but let's follow the overall three-step process to ensure clear thinking
Initialize list module
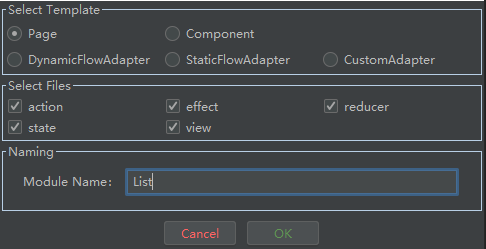
- Create a new folder here and fis on the folder_ Redux file is OK; In this place, we select page and the five overall files: action, effect, reducer, state and view; All need to be used, so select all by default, fill in the name of the Module, and click OK
item module
Follow the process
- According to the json returned by the interface, create the corresponding bean -- > create the item module -- > write the state -- > write the view interface
preparation
Widget buildView(ListState state, Dispatch dispatch, ViewService viewService) {
  return Scaffold(
    appBar: AppBar(
      title: Text("ListPage"),
    ),
    body: _itemWidget(state, viewService),
  );
}

Widget _itemWidget(ListState state, ViewService viewService) {
  if (state.items != null) {
    ///Use list
    return ListView.builder(
      itemBuilder: viewService.buildAdapter().itemBuilder,
      itemCount: viewService.buildAdapter().itemCount,
    );
  } else {
    return Center(
      child: CircularProgressIndicator(),
    );
  }
}
enum ListAction { updateItem }
class ListActionCreator {
static Action updateItem(var list) {
return Action(ListAction.updateItem, payload: list);
}
}Effect<ListState> buildEffect() {
return combineEffects(<Object, Effect<ListState>>{
///Initialization operation to be performed upon entering the page
Lifecycle.initState: _init,
});
}
void _init(Action action, Context<ListState> ctx) async {
String apiUrl = "https://www.wanandroid.com/project/list/1/json";
Response response = await Dio().get(apiUrl);
ItemDetailBean itemDetailBean =
ItemDetailBean.fromJson(json.decode(response.toString()));
List<Datas> itemDetails = itemDetailBean.data.datas;
///Build a list data source that meets the requirements
List<ItemState> items = List.generate(itemDetails.length, (index) {
return ItemState(itemDetail: itemDetails[index]);
});
///Notification update list data source
ctx.dispatch(ListActionCreator.updateItem(items));
}Reducer<ListState> buildReducer() {
return asReducer(
<Object, Reducer<ListState>>{
ListAction.updateItem: _updateItem,
},
);
}
ListState _updateItem(ListState state, Action action) {
return state.clone()..items = action.payload;
}List modification - single item refresh
design sketch
-
Create bean entity
-
Generate corresponding entities according to the json data returned by the api
-
json to entity
- Website: https://javiercbk.github.io/j...
- Plug in: FlutterJsonBeanFactory can be searched in AS
-
This place generates: ItemDetailBean; More than 200 lines of code will not be posted. For the specific content, click the link below
- ItemDetailBean Code: https://github.com/CNAD666/Ex...
-
-
Create item module
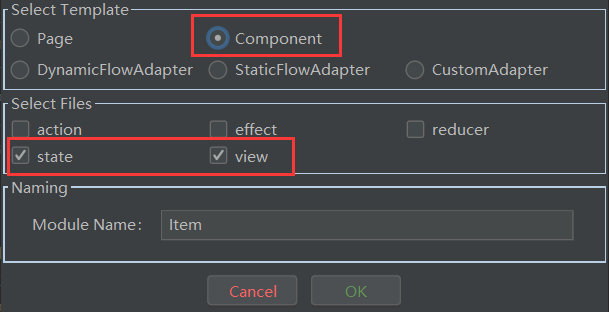
- Here, we implement a simple list. item only performs the display function; We don't need to click, update ui and other operations, so we don't need to create: effect, reducer and action files; Just select: state and view
- Create an item and select component here
file structure
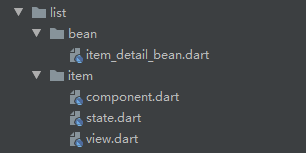
OK, the bean file is finished. Let's take a look at the file in the item file. Here, the component file does not need to be changed, so we only need to look at this place: state dart,view.dart
-
state
- This place is still written in a conventional way, because all the data that can be used in the bean generated by json is in the data class, so just create a variable of the data class here
- Because the reducer is not used, in fact, the clone implementation methods can be deleted to prevent the clone objects that may be needed later. Let's keep them for the time being
-
import 'package:fish_redux/fish_redux.dart'; import 'package:fish_redux_demo/list/bean/item_detail_bean.dart'; class ItemState implements Cloneable<ItemState> { Datas itemDetail; ItemState({this.itemDetail}); @override ItemState clone() { return ItemState() ..itemDetail = itemDetail; } } ItemState initState(Map<String, dynamic> args) { return ItemState(); } -
view
-
The item layout here is a little troublesome. On the whole, the horizontal layout (Row) is adopted, which is divided into left and right blocks
- Left: simple picture display
- Right: the vertical layout (Column) is adopted, combined with Expanded to form a proportional layout, showing three things respectively: title, content, author and time
- OK, the view here simply uses the layout formed by the data provided by state. There is nothing to pay special attention to
-
-
Widget buildView(ItemState state, Dispatch dispatch, ViewService viewService) {
  return _bodyWidget(state);
}

Widget _bodyWidget(ItemState state) {
  return Card(
    shape: RoundedRectangleBorder(borderRadius: BorderRadius.circular(20)),
    elevation: 5,
    margin: EdgeInsets.only(left: 20, right: 20, top: 20),
    child: Row(
      children: <Widget>[
        //Left picture
        Container(
          margin: EdgeInsets.all(10),
          width: 180,
          height: 100,
          child: Image.network(
            state.itemDetail.envelopePic,
            fit: BoxFit.fill,
          ),
        ),
        //Vertical layout on the right
        _rightContent(state),
      ],
    ),
  );
}

///Vertical layout and proportional layout on the right in item
Widget _rightContent(ItemState state) {
  return Expanded(
      child: Container(
    margin: EdgeInsets.all(10),
    height: 120,
    child: Column(
      mainAxisAlignment: MainAxisAlignment.start,
      children: <Widget>[
        //title
        Expanded(
          flex: 2,
          child: Container(
            alignment: Alignment.centerLeft,
            child: Text(
              state.itemDetail.title,
              style: TextStyle(fontSize: 16),
              maxLines: 1,
              overflow: TextOverflow.ellipsis,
            ),
          ),
        ),
        //content
        Expanded(
            flex: 4,
            child: Container(
              alignment: Alignment.centerLeft,
              child: Text(
                state.itemDetail.desc,
                style: TextStyle(fontSize: 12),
                maxLines: 3,
                overflow: TextOverflow.ellipsis,
              ),
            )),
        Expanded(
          flex: 3,
          child: Column(
            mainAxisAlignment: MainAxisAlignment.end,
            children: <Widget>[
              //author
              Row(
                children: <Widget>[
                  Text("Author:", style: TextStyle(fontSize: 12)),
                  Expanded(
                    child: Text(state.itemDetail.author,
                        style: TextStyle(color: Colors.blue, fontSize: 12),
                        overflow: TextOverflow.ellipsis),
                  )
                ],
              ),
              //time
              Row(children: <Widget>[
                Text("Time:", style: TextStyle(fontSize: 12)),
                Expanded(
                  child: Text(state.itemDetail.niceDate,
                      style: TextStyle(color: Colors.blue, fontSize: 12),
                      overflow: TextOverflow.ellipsis),
                )
              ])
            ],
          ),
        ),
      ],
    ),
  ));
}
The item module is finished. There is no need to change anything. Next, let's take a look at the List module
Logical perfection of list module
First and foremost, we need to establish the adapter and bind it to the page
- Create an adapter file -- > state adjustment -- > bind an adapter in the page
-
adapter creation and binding
-
Create adapter
- First, you need to create an adapter file, and then write the following code: this place needs to inherit the SourceFlowAdapter adapter, and the generics in it need to be filled in the ListState. An error will be reported in the ListState, because our ListState does not inherit MutableSource. The following state adjustment is the processing of this
- The constructor of ListItemAdapter is a general writing method. Write the item style in super. This is a pool, which should be understood as a style pool. This key is best proposed because it is also needed in the state module. You can define multiple different items, which is easy to make a list of multi style items; At present, we only need to use one and fill in: ItemComponent()
-
class ListItemAdapter extends SourceFlowAdapter<ListState> { static const String item_style = "project_tab_item"; ListItemAdapter() : super( pool: <String, Component<Object>>{ ///Define the style of the item item_style: ItemComponent(), }, ); } -
state adjustment
- The code in the state file needs to be adjusted to inherit the corresponding class and establish an association with the adapter
- ListState needs to inherit MutableSource; You must also define a List whose generic type is ItemState of item, which are required; Then implement the corresponding abstract method
- Here, just write the ItemState data to the items and the list will be updated
-
class ListState extends MutableSource implements Cloneable<ListState> { ///It must be noted that the generic type in the List needs to be defined as ItemState ///How to update the list data? You only need to update the data in the items, and the list data will be updated accordingly ///If multiple styles are used, please write out list < Object > items; List<ItemState> items; @override ListState clone() { return ListState()..items = items; } ///Use the List defined above and inherit MutableSource to bind the List and item @override Object getItemData(int index) => items[index]; @override String getItemType(int index) => ListItemAdapter.item_style; @override int get itemCount => items.length; @override void setItemData(int index, Object data) { items[index] = data; } } ListState initState(Map<String, dynamic> args) { return ListState(); } -
Bind adapter in page
- Here is to establish a connection between our ListSate and ListItemAdapter adapter
-
class ListPage extends Page<ListState, Map<String, dynamic>> {
  ListPage()
      : super(
          initState: initState,
          effect: buildEffect(),
          reducer: buildReducer(),
          view: buildView,
          dependencies: Dependencies<ListState>(
              ///Binding Adapter
              adapter: NoneConn<ListState>() + ListItemAdapter(),
              slots: <String, Dependent<ListState>>{}),
          middleware: <Middleware<ListState>>[],
        );
}
Normal page editing
Overall process
- view module write -- > action add update data event -- > effect get data during initialization and process -- > reducer update data
-
view
- The use of the list is quite simple. Just fill in the itemBuilder and itemCount parameters. Here you need to use the viewService parameter
-
action
- Just write an event to update items
-
effect
- Lifecycle.initState is the callback for page initialization. You can directly use this state callback to request the interface to obtain the corresponding data, and then update the list
- There is a pit in this place. DIO must be used together with json serial number and anti sequence library, otherwise DIO cannot parse the data source into Response type
-
reducer
- The last is the update operation. Here is the conventional writing method
- This time to demonstrate the single item update of the list. There is no operation requested by the network, so the code logic is quite simple
structure
- Let's look at the code structure
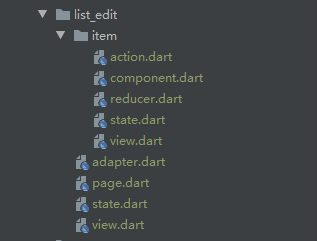
- This place is obvious, list_ There are few edit main files. Because the data source is initialized directly in the state, there is no operation to update the data later, so there is no need for three files: action, effect and reducer! The item module directly updates the data in the reducer without involving complex logic, so the effect file is not required.
List module
-
The list module is very simple. It basically does not involve any process. It is the most basic initialization process. The initialized data in the state is displayed in the view
- state ---> view
-
state
- Old rule, let's look at the code in state first
- Here, some new variables are created. The generic type is ItemState (the State of item), and the items variable initializes a set of data; Then, it also inherits MutableSource and implements its related methods
class ListEditState extends MutableSource implements Cloneable<ListEditState> {
  List<ItemState> items;

  @override
  ListEditState clone() {
    return ListEditState()..items = items;
  }

  @override
  Object getItemData(int index) => items[index];

  @override
  String getItemType(int index) => ListItemAdapter.itemName;

  @override
  int get itemCount => items.length;

  @override
  void setItemData(int index, Object data) {
    items[index] = data;
  }
}

ListEditState initState(Map<String, dynamic> args) {
  return ListEditState()
    ..items = [
      ItemState(id: 1, title: "list Item-1", itemStatus: false),
      ItemState(id: 2, title: "list Item-2", itemStatus: false),
      ItemState(id: 3, title: "list Item-3", itemStatus: false),
      ItemState(id: 4, title: "list Item-4", itemStatus: false),
      ItemState(id: 5, title: "list Item-5", itemStatus: false),
      ItemState(id: 6, title: "list Item-6", itemStatus: false),
    ];
}-
view
- The code body of view is just a listview Builder, no extra widgets
Widget buildView(ListEditState state, Dispatch dispatch, ViewService viewService) {
  return Scaffold(
    appBar: AppBar(
      title: Text("ListEditPage"),
    ),
    body: ListView.builder(
      itemBuilder: viewService.buildAdapter().itemBuilder,
      itemCount: viewService.buildAdapter().itemCount,
    ),
  );
}-
adapter
- Like the above type, the adapter inherits the SourceFlowAdapter adapter
class ListItemAdapter extends SourceFlowAdapter<ListEditState> {
  static const String itemName = "item";

  ListItemAdapter()
      : super(
          pool: <String, Component<Object>>{itemName: ItemComponent()},
        );
}-
page
- Bind the adapter in the page
class ListEditPage extends Page<ListEditState, Map<String, dynamic>> {
  ListEditPage()
      : super(
    initState: initState,
    view: buildView,
    dependencies: Dependencies<ListEditState>(
        ///Binding adapter
        adapter: NoneConn<ListEditState>() + ListItemAdapter(),
        slots: <String, Dependent<ListEditState>>{}),
    middleware: <Middleware<ListEditState>>[],
  );
}
item module
-
Next comes the more important item module. The process of the item module is also very clear
- view ---> action ---> reducer
-
state
- Old rule, let's look at the code in state first; Here is the definition of writing regular variables, which can be used in view
class ItemState implements Cloneable<ItemState> {
  int id;
  String title;
  bool itemStatus;


  ItemState({this.id, this.title, this.itemStatus});

  @override
  ItemState clone() {
    return ItemState()
      ..title = title
      ..itemStatus = itemStatus
      ..id = id;
  }
}

ItemState initState(Map<String, dynamic> args) {
  return ItemState();
}-
view
- You can see the internal click operation of the Checkbox. We passed an id parameter. Note that this id parameter is necessary to distinguish when updating the item
Widget buildView(ItemState state, Dispatch dispatch, ViewService viewService) {
  return Container(
    child: InkWell(
      onTap: () {},
      child: ListTile(
        title: Text(state.title),
        trailing: Checkbox(
          value: state.itemStatus,
          ///Click operation of Checkbox: status change
          onChanged: (value) => dispatch(ItemActionCreator.onChange(state.id)),
        ),
      ),
    ),
  );
}-
action
- A state change event
enum ItemAction { onChange }

class ItemActionCreator {
  //State change
  static Action onChange(int id) {
    return Action(ItemAction.onChange, payload: id);
  }
}-
reducer
- _ onChange will call back all itemstates, so this place must be defined by id or other unique id. which item we are operating on
- _ onChange method: when returning an item that has not been operated on, you should pay attention to: return the original state object, indicating that the state object has not been changed, and its item does not need to be refreshed; Cannot return state Clone (), which returns a brand-new state object. Each item will be refreshed. It will also cause a very strange bug, which will cause the subsequent operation of clicking item to fail
Reducer<ItemState> buildReducer() {
  return asReducer(
    <Object, Reducer<ItemState>>{
      ItemAction.onChange: _onChange,
    },
  );
}

ItemState _onChange(ItemState state, Action action) {
  if (state.id == action.payload) {
    return state.clone()..itemStatus = !state.itemStatus;
  }
  ///You must pay attention to this place and return: state; Cannot return: state Clone(), otherwise subsequent updates will fail
  return state;
}
Multi style list
Note: if multiple styles are used, the list generic of items should not be written as ItemState, but as Object; In the following code, we can see that the type returned by the implemented getItemData() method is Object, so it is entirely possible to write the list generic of items as Object.
- When we define the data source, it is entirely possible to write the generic type as Object, but when initializing the data, we must pay attention to writing it as the state in the corresponding adapter type
-
Suppose a case where the index is odd: OneComponent; When the index is an odd number: TwoComponent;
- getItemType: in this override method, when the index is odd or even, it returns the identifications of OneComponent and TwoComponent respectively
- When assigning data, you must also assign values when the index is odd and even. The generic types are OneState and TwoState respectively
- It can also be optimized in this way. Judge the data type of the current generic type in getItemType, and then return the identification of the corresponding xxcomponent
- The data type of the data source must correspond to the identification of the xxxcomponent returned by getItemType. If the data source is of Object type and mapped to the item data in the corresponding position, an error of type mismatch will be reported
The following code can be used as a reference
class ListState extends MutableSource implements Cloneable<PackageCardState> {
    List<Object> items;

    @override
    ListState clone() {
        return PackageCardState()..items = items;
    }

    @override
    Object getItemData(int index) => items[index];

    @override
    String getItemType(int index) {
        if(items[index] is OneState) {
            return PackageCardAdapter.itemStyleOne;
        }else{
            return PackageCardAdapter.itemStyleTwo;
        }
    }

    @override
    int get itemCount => items.length;

    @override
    void setItemData(int index, Object data) => items[index] = data;
}
List problems + Solutions
Multi item refresh problem in the list
Here, the single item refresh scenario is completed, and there is also a multi item refresh scenario
- Note: there is no way to refresh multiple items at a time for a list item. You can only refresh one item at a time (one clone corresponds to one refresh), and one event corresponds to one item; Here, we print multiple logs and analyze them
- Solution: the solution is to use multiple events to handle the refresh operation
For example: suppose a scenario in which only one item can be selected, one item is selected, and other items are reset to the unselected state. See the effect diagram below for the specific effect
- design sketch

- The realization of this effect is very simple, but if the idea is wrong, it will fall into the pit and can't get out
- Restore the selected state. You cannot write in the same event. You need to write a new clear event
The following codes are the overall process
- view
Widget buildView(ItemState state, Dispatch dispatch, ViewService viewService) {
  return InkWell(
    onTap: () {},
    child: ListTile(
      title: Text(state.title),
      trailing: Checkbox(
        value: state.itemStatus,
        ///Click operation of CheckBox: status change
        onChanged: (value) {
          //In radio selection mode, clear the selected item for radio selection
          dispatch(ItemActionCreator.clear());

          //Refresh selected item
          dispatch(ItemActionCreator.onChange(state.id));
        }
      ),
    ),
  );
}- action
enum ItemAction {
  onChange,
  clear,
}

class ItemActionCreator {
  //State change
  static Action onChange(int id) {
    return Action(ItemAction.onChange, payload: id);
  }

  //Clear changed status
  static Action clear() {
    return Action(ItemAction.clear);
  }
}- reducer
Reducer<ItemState> buildReducer() {
  return asReducer(
    <Object, Reducer<ItemState>>{
      ItemAction.onChange: _onChange,
      ItemAction.clear: _clear,
    },
  );
}

ItemState _onChange(ItemState state, Action action) {
  if (state.id == action.payload) {
    return state.clone()..itemStatus = !state.itemStatus;
  }

  ///You must pay attention to this place and return: state; Cannot return: state Clone(), otherwise subsequent updates will fail
  return state;
}

///Radio mode
ItemState _clear(ItemState state, Action action) {
  if (state.itemStatus) {
    return state.clone()..itemStatus = false;
  }

  ///You must pay attention to this place and return: state; Cannot return: state Clone(), otherwise subsequent updates will fail
  return state;
}
This problem is actually very simple to solve, but if it has been_ The onChange method resets the state, and you will find that it does not match your expected result; For complete and detailed effects, you can see the code in the demo
Done
- Hoo, I finally finished writing the list. To be honest, the use of this list is really a little troublesome; In fact, if you read it carefully, the trouble lies in this: adapter creation and binding; You can only write more. Practice makes perfect!
- The list module is completed, and you can write the list happily in the future!

Global mode
design sketch
- I understand the above three examples. I believe most of the pages are easy for you; Now let's take another example. The global theme function officially provided, of course, is not only the global theme, global font style, font size, etc., but also can be managed globally. Of course, you should make a plan before writing an app
Open up
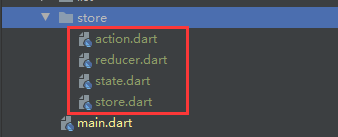
store module
-
file structure
- You need to create a new folder and four new files: action, reducer, state and store
-
state
- As an old rule, let's take a look at state first. We only define a theme color in the abstract class. This abstract class is very important. It is necessary to implement the state of all sub modules of the global mode
abstract class GlobalBaseState{
  Color themeColor;
}

class GlobalState implements GlobalBaseState, Cloneable<GlobalState>{
  @override
  Color themeColor;

  @override
  GlobalState clone() {
    return GlobalState();
  }
}-
action
- Because only the theme color is switched, only one event needs to be defined in this place
enum GlobalAction { changeThemeColor }

class GlobalActionCreator{
  static Action onChangeThemeColor(){
    return const Action(GlobalAction.changeThemeColor);
  }
}-
reducer
- Here are some operations to deal with discoloration. This is the code in the official demo of salted fish; This shows that simple logic can be written in reducer
import 'package:flutter/material.dart' hide Action;

Reducer<GlobalState> buildReducer(){
  return asReducer(
    <Object, Reducer<GlobalState>>{
      GlobalAction.changeThemeColor: _onChangeThemeColor,
    },
  );
}

List<Color> _colors = <Color>[
  Colors.green,
  Colors.red,
  Colors.black,
  Colors.blue
];

GlobalState _onChangeThemeColor(GlobalState state, Action action) {
  final Color next =
  _colors[((_colors.indexOf(state.themeColor) + 1) % _colors.length)];
  return state.clone()..themeColor = next;
}-
store
- This class needs to be called when switching the global state
///Create an app store
///At present, its function is only to switch themes
class GlobalStore{
  static Store<GlobalState> _globalStore;
  static Store<GlobalState> get store => _globalStore ??= createStore<GlobalState>(GlobalState(), buildReducer());
}
Mainchange
-
Here, the visitor field in PageRoutes is used. There are a lot of status update operation codes, so it is proposed separately; Therefore, in the main file, the following is added:
- visitor field usage
- Increase_ updateState method
void main() {
  runApp(createApp());
}

Widget createApp() {
  ///Global status update
  _updateState() {
    return (Object pageState, GlobalState appState) {
      final GlobalBaseState p = pageState;

      if (pageState is Cloneable) {
        final Object copy = pageState.clone();
        final GlobalBaseState newState = copy;
        if (p.themeColor != appState.themeColor) {
          newState.themeColor = appState.themeColor;
        }
        ///Return to the new state and set the data to the ui
        return newState;
      }
      return pageState;
    };
  }

  final AbstractRoutes routes = PageRoutes(
    ///Global state management: only pages in a specific range (state inherits the global state) need to establish a connection with the AppStore
    visitor: (String path, Page<Object, dynamic> page) {
      if (page.isTypeof<GlobalBaseState>()) {
        ///Establish one-way data connection of AppStore driven PageStore: parameter 1 AppStore parameter 2 when AppStore When the state changes, PageStore How should the state change
        page.connectExtraStore<GlobalState>(GlobalStore.store, _updateState());
      }
    },

    ///Define route
    pages: <String, Page<Object, dynamic>>{
      ///Navigation page
      "GuidePage": GuidePage(),
      ///Counter module demonstration
      "CountPage": CountPage(),
      ///Page value transfer jump module demonstration
      "FirstPage": FirstPage(),
      "SecondPage": SecondPage(),
      ///List module demo
      "ListPage": ListPage(),
    },
  );

  return MaterialApp(
    title: 'FishRedux',
    home: routes.buildPage("GuidePage", null), //As default page
    onGenerateRoute: (RouteSettings settings) {
      //ios page switching style
      return CupertinoPageRoute(builder: (BuildContext context) {
        return routes.buildPage(settings.name, settings.arguments);
      });
    },
  );
}
Sub module usage
- Here, the counter module is used as an example. Because only a small amount of code needs to be changed and only state and view are involved, the codes of other modules will not be pasted repeatedly
-
state
- In this place, only CountState implements the GlobalBaseState class with minor changes
class CountState implements Cloneable<CountState>,GlobalBaseState {
  int count;

  @override
  CountState clone() {
    return CountState()
        ..count = count
        ..themeColor = themeColor;
  }

  @override
  Color themeColor;
}

CountState initState(Map<String, dynamic> args) {
  return CountState()..count = 0;
}-
view
- There is only one line changed. Add the backgroundColor in the AppBar, and then use the global theme color in the state
Widget buildView(CountState state, Dispatch dispatch, ViewService viewService) {
  return _bodyWidget(state, dispatch);
}

Widget _bodyWidget(CountState state, Dispatch dispatch) {
  return Scaffold(
    appBar: AppBar(
      title: Text("FishRedux"),
      ///Global theme, only one line has been changed here
      backgroundColor: state.themeColor,
    ),
    body: Center(
      child: Column(
        mainAxisAlignment: MainAxisAlignment.center,
        children: <Widget>[
          Text('You have pushed the button this many times:'),
          Text(state.count.toString()),
        ],
      ),
    ),
    floatingActionButton: FloatingActionButton(
      onPressed: () {
        ///Click the event and call the action count auto increment method
        dispatch(CountActionCreator.updateCount());
      },
      child: Icon(Icons.add),
    ),
  );
}- If other modules also need theme colors, they can be changed according to the logic here
call
- It is very simple to call the status update. Just like the normal module update View, here we call the global one. One line of code is done, and it is OK to call where needed
GlobalStore.store.dispatch(GlobalActionCreator.onChangeThemeColor());
Done
- After the above three steps, we can use the global state; From the use of the above sub modules, it can be clearly felt that the global status must be planned well in the early stage. After confirmation, it is best not to add fields, otherwise multiple modules that inherit the abstract class will be popular and prompted to implement the xxx variable
Global module optimization
reflect
As mentioned in the global mode above, you need to plan the fields in the early stage to use the global module. Otherwise, if you want to add fields in the middle of the project, the states of multiple modules will pop up in a wide range, prompting you to implement the fields you add; The project starts to plan all fields. Obviously, it needs to comprehensively consider most scenarios, but people's inspiration is always unlimited. It is impossible not to change the code. It is impossible in this life. We can only find a way to see if we can add fields once and add fields later, which will not cause the popularity of other modules. We have tried many times and successfully used intermediate entities to solve this problem
Here are two aspects
-
Use common global entities
- In this way, adding fields later will not affect other modules, so that we can rectify modules one by one, and there will be no failure of the whole project
-
Encapsulate routing module and global module
- There are many pages in the later stage of the routing module, and there will be a lot of code. It is really difficult to manage to put it at the main entrance; The same applies to global modules
Because of the use of intermediate entities, there will be null pointer problems in some places. I have written it clearly in the process. You can read the optimization process completely. Ha, all of them are configured, and the null pointer will not be reported in the later expansion and use
optimization
Entrance module
-
main: major changes
- As can be seen from the following code, the routing module and the global module are proposed separately here. This place is written in a file for easy viewing; Note that RouteConfig and StoreConfig can be placed in two different files, which makes it convenient to manage routes and global field updates!
- RouteConfig: the page ID and page mapping are written separately here, so that when we jump to the page, we can directly reference the page ID in RouteConfig
- StoreConfig: the most important thing in the global module is to judge the state. The notes are clearly written. You can see the notes
void main() {
  runApp(createApp());
}

Widget createApp() {
  return MaterialApp(
    title: 'FishRedux',
    home: RouteConfig.routes.buildPage(RouteConfig.guidePage, null), //As default page
    onGenerateRoute: (RouteSettings settings) {
      //ios page switching style
      return CupertinoPageRoute(builder: (BuildContext context) {
        return RouteConfig.routes.buildPage(settings.name, settings.arguments);
      });
    },
  );
}

///Routing management
class RouteConfig {
  ///Define your route name, such as static final String routeHome = 'page/home';
  ///Navigation page
  static const String guidePage = 'page/guide';

  ///Counter page
  static const String countPage = 'page/count';

  ///Page value transfer jump module demonstration
  static const String firstPage = 'page/first';
  static const String secondPage = 'page/second';

  ///List module demo
  static const String listPage = 'page/list';
  static const String listEditPage = 'page/listEdit';

  static final AbstractRoutes routes = PageRoutes(
    pages: <String, Page<Object, dynamic>>{
      ///Map your route name to the page, such as routeconfig homePage : HomePage(),
      RouteConfig.guidePage: GuidePage(),
      RouteConfig.countPage: CountPage(),
      RouteConfig.firstPage: FirstPage(),
      RouteConfig.secondPage: SecondPage(),
      RouteConfig.listPage: ListPage(),
      RouteConfig.listEditPage: ListEditPage(),
    },
    visitor: StoreConfig.visitor,
  );
}

///Global mode
class StoreConfig {
  ///Global state management
  static _updateState() {
    return (Object pageState, GlobalState appState) {
      final GlobalBaseState p = pageState;

      if (pageState is Cloneable) {
        final Object copy = pageState.clone();
        final GlobalBaseState newState = copy;

        if (p.store == null) {
          ///It is necessary to judge whether the store object is empty for the first time
          newState.store = appState.store;
        } else {
          ///Add a field here to judge whether it needs to be updated
          if ((p.store.themeColor != appState.store.themeColor)) {
            newState.store.themeColor = appState.store.themeColor;
          }

          ///If you add a field, the same as the above judgment, and then assign a value

        }

        ///Return to the new state and set the data to the ui
        return newState;
      }
      return pageState;
    };
  }

  static visitor(String path, Page<Object, dynamic> page) {
    if (page.isTypeof<GlobalBaseState>()) {
      ///Establish one-way data connection of AppStore driven PageStore
      ///Parameter 1 AppStore parameter 2 When the state changes, pagestore How should state change
      page.connectExtraStore<GlobalState>(GlobalStore.store, _updateState());
    }
  }
}
Store module
The following two modules are the modules that need to change the code
-
state
- The intermediate entity of StoreModel is used here. Note that the initialization of the entity field store is necessary, otherwise the fields under the entity referenced by the sub module will report null pointers
abstract class GlobalBaseState{
  StoreModel store;
}

class GlobalState implements GlobalBaseState, Cloneable<GlobalState>{

  @override
  GlobalState clone() {
    return GlobalState();
  }

  @override
  StoreModel store = StoreModel(
    ///The store variable must be instantiated here, or a null pointer will be reported if the field in the variable is referenced
    ///The following fields, with initial values, are the global status displayed at the beginning
    ///This initial value should be taken from the cache or database to indicate the global state selected by the user
    themeColor: Colors.lightBlue
  );
}

///Intermediate global entity
///If you need to add fields, just add them to this entity
class StoreModel {
  Color themeColor;

  StoreModel({this.themeColor});
}-
reducer
- The change in this place is very small. Set state Change themecolor to state store. themeColor
Reducer<GlobalState> buildReducer(){
  return asReducer(
    <Object, Reducer<GlobalState>>{
      GlobalAction.changeThemeColor: _onChangeThemeColor,
    },
  );
}

List<Color> _colors = <Color>[
  Colors.green,
  Colors.red,
  Colors.black,
  Colors.blue
];

GlobalState _onChangeThemeColor(GlobalState state, Action action) {
  final Color next =
  _colors[((_colors.indexOf(state.store.themeColor) + 1) % _colors.length)];
  return state.clone()..store.themeColor = next;
}
The codes of the following two modules have not been changed, but they are also posted for the sake of integrity
- action
enum GlobalAction { changeThemeColor }

class GlobalActionCreator{
  static Action onChangeThemeColor(){
    return const Action(GlobalAction.changeThemeColor);
  }
}- store
class GlobalStore{
  static Store<GlobalState> _globalStore;
  static Store<GlobalState> get store => _globalStore ??= createStore<GlobalState>(GlobalState(), buildReducer());
}
Sub module usage
- Here, the counter module is used as an example. Because only a small amount of code needs to be changed and only state and view are involved, the codes of other modules will not be pasted repeatedly
-
state
- Because the intermediate entity is used, the implemented store field must be added in the clone method, otherwise a null pointer will be reported
class CountState implements Cloneable<CountState>, GlobalBaseState {
  int count;

  @override
  CountState clone() {
    return CountState()
      ..count = count
      ..store = store;
  }

  @override
  StoreModel store;
}

CountState initState(Map<String, dynamic> args) {
  return CountState()..count = 0;
}-
view
- There is only one line changed. Add the backgroundColor in the AppBar, and then use the global theme color in the state
Widget buildView(CountState state, Dispatch dispatch, ViewService viewService) {
  return _bodyWidget(state, dispatch);
}

Widget _bodyWidget(CountState state, Dispatch dispatch) {
  return Scaffold(
    appBar: AppBar(
      title: Text("FishRedux"),
      ///Global theme, only one line has been changed here
      backgroundColor: state.store.themeColor,
    ),
    ///The rest of the code below is omitted
}- If other modules also need theme colors, they can be changed according to the logic here
call
- As mentioned above, the following global methods are used to call in the appropriate place
GlobalStore.store.dispatch(GlobalActionCreator.onChangeThemeColor());
experience
Through the above optimization, the improvement of the use experience is not a level, which greatly improves the scalability of the global mode. Even if we add a large number of global fields in the later stage, we can change them slowly one module by one, without changing them all at once, and the probability of sudden death is greatly reduced!

Component usage
Component is a commonly used module. When using the list above, we use component. This time, let's take a look. Use component directly in the page and use it pluggable! Generally speaking, the use of component is relatively simple. The key is to establish a connection in the State.
design sketch
- The effect of the above figure is that two components are embedded in the page, and the operation of changing sub components is completed in the page
- First look at the page structure
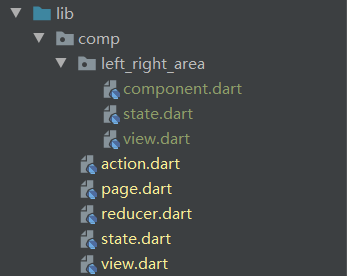
Component
A Component is written here. The code is very simple. Let's have a look
- component
The local code is automatically generated. If there is no change, it will not be posted
-
state
- initState(): we need to note that the initState() method in the Component is not called internally. Although the automatically generated code has this method, it cannot initialize. You can delete this method
class AreaState implements Cloneable<AreaState> {
  String title;
  String text;
  Color color;

  AreaState({
    this.title = "",
    this.color = Colors.blue,
    this.text = "",
  });

  @override
  AreaState clone() {
    return AreaState()
      ..color = color
      ..text = text
      ..title = title;
  }
}- view
Widget buildView(
    AreaState state, Dispatch dispatch, ViewService viewService) {
  return Scaffold(
    appBar: AppBar(
      title: Text(state.title),
      automaticallyImplyLeading: false,
    ),
    body: Container(
      height: double.infinity,
      width: double.infinity,
      alignment: Alignment.center,
      color: state.color,
      child: Text(state.text),
    ),
  );
}
Page
In CompPage, if the effect layer is not used, the file is not created. The old rule is to look at the state first
-
state
- This is a very important place. The implementation form of xconnecto depends on the official code
-
computed(): this method must be implemented. It is similar to the direct get() method, but remember not to return state directly like get() Leftareastate() or state For rightareastate, some scene initialization cannot be refreshed, because it is the same object, it will be judged that it has not changed, so the control will not be refreshed
- Note that the optimization is done here and the clone method is returned directly. This is an optimization of the official assignment writing method, which can also avoid the above problems. You can think about it
- set(): this method is to push the Component data stream back to the state of the page to keep the two state data consistent; If the Component module updates its state, an error will be reported if this method is not written
class CompState implements Cloneable<CompState> {
  AreaState leftAreaState;
  AreaState rightAreaState;

  @override
  CompState clone() {
    return CompState()
      ..rightAreaState = rightAreaState
      ..leftAreaState = leftAreaState;
  }
}

CompState initState(Map<String, dynamic> args) {
  ///Initialization data
  return CompState()
    ..rightAreaState = AreaState(
      title: "LeftAreaComponent",
      text: "LeftAreaComponent",
      color: Colors.indigoAccent,
    )
    ..leftAreaState = AreaState(
      title: "RightAreaComponent",
      text: "RightAreaComponent",
      color: Colors.blue,
    );
}

///Left Component connector
class LeftAreaConnector extends ConnOp<CompState, AreaState>
    with ReselectMixin<CompState, AreaState> {
  @override
  AreaState computed(CompState state) {
    return state.leftAreaState.clone();
  }

  @override
  void set(CompState state, AreaState subState) {
    state.leftAreaState = subState;
  }
}

///Right Component connector
class RightAreaConnector extends ConnOp<CompState, AreaState>
    with ReselectMixin<CompState, AreaState> {
  @override
  AreaState computed(CompState state) {
    return state.rightAreaState.clone();
  }

  @override
  void set(CompState state, AreaState subState) {
    state.rightAreaState = subState;
  }
}-
page
- After writing the connector, we can bind it in the Page and use the Component
class CompPage extends Page<CompState, Map<String, dynamic>> {
  CompPage()
      : super(
          initState: initState,
          reducer: buildReducer(),
          view: buildView,
          dependencies: Dependencies<CompState>(
              adapter: null,
              slots: <String, Dependent<CompState>>{
                //Bind Component
                "leftArea": LeftAreaConnector() + AreaComponent(),
                "rightArea": RightAreaConnector() + AreaComponent(),
              }),
          middleware: <Middleware<CompState>>[],
        );
}-
view
- Using Component is very simple: viewservice buildComponent("xxxxxx")
Widget buildView(CompState state, Dispatch dispatch, ViewService viewService) {
  return Container(
    color: Colors.white,
    child: Column(
      children: [
        ///Component part
        Expanded(
          flex: 3,
          child: Row(
            children: [
              Expanded(child: viewService.buildComponent("leftArea")),
              Expanded(child: viewService.buildComponent("rightArea")),
            ],
          ),
        ),

        ///Push button
        Expanded(
            flex: 1,
            child: Center(
              child: RawMaterialButton(
                fillColor: Colors.blue,
                shape: StadiumBorder(),
                onPressed: () => dispatch(CompActionCreator.change()),
                child: Text("change"),
              ),
            ))
      ],
    ),
  );
}- action
enum CompAction { change }

class CompActionCreator {
  static Action change() {
    return const Action(CompAction.change);
  }
}- reducer
Reducer<CompState> buildReducer() {
  return asReducer(
    <Object, Reducer<CompState>>{
      CompAction.change: _change,
    },
  );
}

CompState _change(CompState state, Action action) {
  final CompState newState = state.clone();
  //Change state in leftAreaComponent
  newState.leftAreaState.text = "LeftAreaState: ${Random().nextInt(1000)}";
  newState.leftAreaState.color =
      Color.fromRGBO(randomColor(), randomColor(), randomColor(), 1);

  //Change state in rightAreaComponent
  newState.rightAreaState.text = "RightAreaState: ${Random().nextInt(1000)}";
  newState.rightAreaState.color =
      Color.fromRGBO(randomColor(), randomColor(), randomColor(), 1);

  return newState;
}

int randomColor() {
  return Random().nextInt(255);
}
To sum up
In general, the use of Component is relatively simple; If we extract a Component from a complex list, it is obvious that there is an initialization process. Here, we need to: adjust the request parameter or list details, handle them on the page, and then update the State of the bound sub Component, so as to initialize a module; As for the subsequent operations such as refresh and drop-down, let the Component handle it by itself
radio broadcast
Broadcasting can play a great role in complex business scenarios. It can easily use cross page interaction and cross Component interaction!
fish_redux has a broadcast communication mode, which is very simple to use. This is an api of the effect layer and ctx parameters, which is introduced here
use
Note: Please note that the broadcast can notify the enumeration method of any page. You can write an enumeration event alone or not. You can directly use the enumeration event of a page
-
action
- A separate action file is written for broadcast events, which is only convenient for demonstration. You can also create a broadcast enumeration action without creating a separate action
enum BroadcastAction { toNotify }

class BroadcastActionCreator {
  ///Broadcast notification
  static Action toNotify(String msg) {
    return Action(BroadcastAction.toNotify, payload: msg);
  }
}-
Send broadcast
- This is the method of page Jump, which is written here. If you want to see the detailed code, you can go to the demo address
void _backFirst(Action action, Context<SecondState> ctx) {
  //Broadcast communication
  ctx.broadcast(BroadcastActionCreator.toNotify("Send broadcast notification on page 2"));
}- Accept broadcast
Effect<FirstState> buildEffect() {
  return combineEffects(<Object, Effect<FirstState>>{
    //Accept broadcast messages sent
    BroadcastAction.toNotify: _receiveNotify,
  });
}
void _receiveNotify(Action action, Context<FirstState> ctx) async {
  ///Accept broadcast
  print("Jump to next page:${action.payload}");
}
explain
The use of broadcast is quite simple. It is basically consistent with the use of dispatch. Dispatch is a module, and broadcast is in Page or Component, which can communicate and interact. In many cases, we operate on one Page, and other pages also need to do some synchronous processing. Using broadcast is very simple
Note: broadcast sending and receiving is a one to many relationship. If you send at one place, you can receive at multiple places; If an event sent by a dispatch is accepted in the effect, it is not acceptable in the reducer (it is intercepted)
Development tips
Weaken reducer
Infinitely weakening the role of reducer layer
- In daily use fish_redux and fluent_ After the bloc, you can actually deeply understand that the reducer layer is actually equivalent to the yield in the bloc
Or the function of the emit keyword can be weakened to just refresh the status; This can greatly simplify the development process and only focus on
View - > action - > effect (reducer: use unified refresh event) - In the following example code, the operation of processing data is directly processed in the effect layer. If the data needs to be changed, it is directly processed in CTX State, involving the operation of refreshing the page, and uniformly calling onRefresh events; For a page with dozens of forms, this operation can greatly improve your development speed and experience. You can try it yourself
Reducer<TestState> buildReducer() {
  return asReducer(
    <Object, Reducer<TestState>>{
      TestAction.onRefresh: _onRefresh,
    },
  );
}

TestState _onRefresh(TreeState state, Action action) {
  return state.clone();
}- You can view the details Play android Project code; It took some time to play with the android project code, and all modules were reconstructed, causing liver pain
widget combined development
explain
This development form can be said to be a convention. In android, views are encapsulated. There is a corresponding set of logical self consistent functions in the View, and then these views are combined in the main xm; This idea can be extended to Flutter, and the development experience is hundreds of floors, so that your widget combination can be more flexible and changeable
- In the view module, the page is constructed by means of widget combination, only passing in the necessary data source and retaining some click callbacks
-
Why use widget composition to construct pages?
- For a very complex interface, the page must be divided into small modules, and then combined. Each small module Widget should be able to handle its own functions logically and consistently; The code presented by this combination will be very hierarchical, and your code will not suddenly become a ship
-
Composite widget keys
- Generally speaking, we don't pay attention to the implementation of the internal pages of the widget. We only need to care about the data source required by the widget and the feedback of the widget to the interaction; For example: after I click the widget, the widget will call back the event and convey some data to me; As for the internal implementation, the external does not care. Do not pass the dispatch to the encapsulated widget, which will make the events we are concerned about encapsulated internally
- Please check for details Play android Project code
last
Demo address
- This article, to tell the truth, spent a lot of energy to write and a lot of time to conceive; It's mainly examples. You must rewrite them yourself and think over whether the examples are reasonable. Your scalp is cool.
- Code address: Code demo address
- fish_redux version - playing Android: fish_redux version - playing android
- If you think you have something to gain, give me a praise! Your praise is the biggest driving force of my codeword!
Series articles
-
Solution
- Improve nesting issues: Flutter improves the problem of taowa hell (example of imitation Himalayan PC page)
- Dialog solution, wall crack recommendation: A more elegant fluent dialog solution
-
State management
- Recommendations for wall cracks of small and medium-sized projects: Flutter GetX - simple charm!
- flutter_bloc usage analysis - Sao Nian, are you still building bloc!
Transferred from: https://segmentfault.com/a/1190000038149626