You may be asked during the interview
- What are the five attributes of vuex, their differences and uses
The answer in this place still needs careful consideration
If you answer casually, your thinking may be confused
Checked the official website about vue There are still many knowledge points about the five attributes of x
Official website: https://vuex.vuejs.org/zh/guide/
01 Preface
When we use Vue JS when developing a medium to large single page application, you often encounter the following problems:
- How to make multiple Vue components share state??
- How do Vue components communicate??
Usually, when the project is not very complex, we will use the global event bus to solve it, but with the increase of complexity, these codes will become difficult to maintain. Therefore, we need a more user-friendly solution, so Vuex was born.
02 what is vuex?
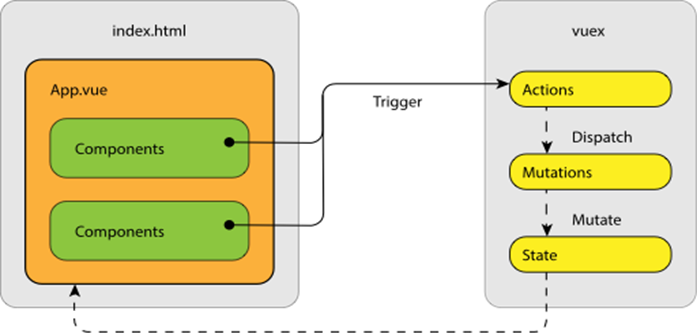
- VueX is a special for vue The state management architecture designed by JS application uniformly manages and maintains the changeable state of each vue component (you can understand it as some data in vue components).
- It uses centralized storage to manage the state of all components of the application, and uses corresponding rules to ensure that the state changes in a predictable way.
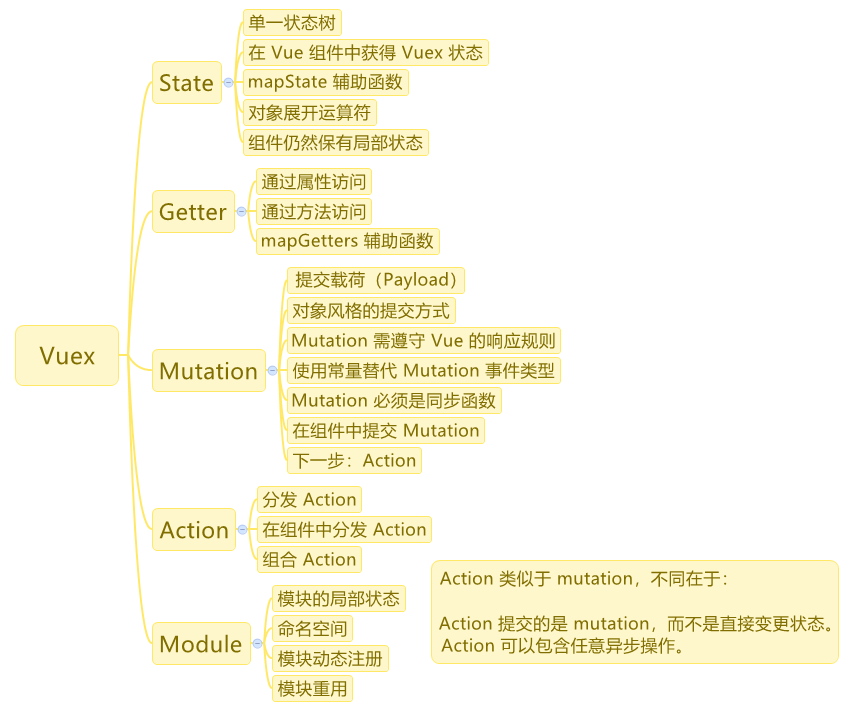
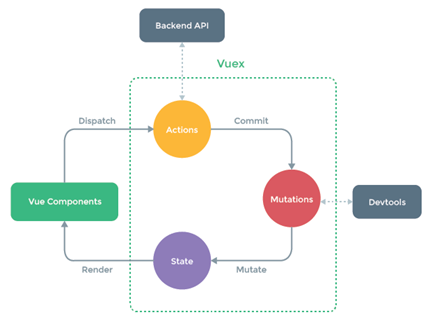
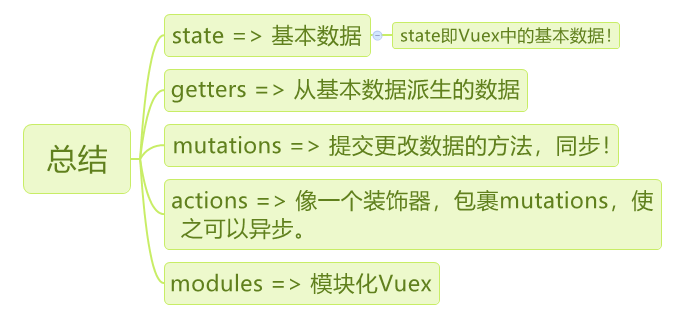
- Vue has five core concepts: state, getters, variations, actions and modules.
- Vuex is also integrated into Vue's official debugging tool devtools extension, which provides advanced debugging functions such as time travel debugging with zero configuration and import and export of state snapshots.
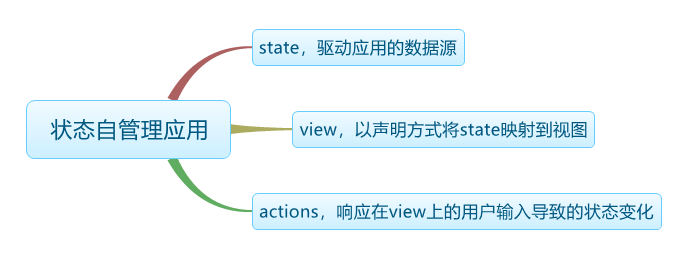
- State management: simple understanding is to uniformly manage and maintain the changeable state of various vue components (you can understand it as some data in vue components)
- Vuex draws on Flux, Redux, and The Elm Architecture. Unlike other modes, vuex is dedicated to Vue JS designed state management library to take advantage of Vue JS fine-grained data response mechanism for efficient state update.
Learning materials:
Official website documents: http://vuex.vuejs.org/en/
Chinese documents: https://github.com/vuejs/vuex/tree/dev/docs/zh-cn
The official website says:
The core of every vuex application is the store. The "store" is basically a container that contains most of the states in your application. Vuex differs from simple global objects in the following two points:
- Vuex's state store is responsive. When Vue components read the status from the store, if the status in the store changes, the corresponding components will be updated efficiently.
- You can't directly change the state in the store. The only way to change the state in the store is to explicitly commit the mutation. This makes it easy for us to track the changes of each state, so that we can implement some tools to help us better understand our application.
03 under what circumstances should I use Vuex?
- Although Vuex can help us manage shared state, it also comes with more concepts and frameworks. This requires a trade-off between short-term and long-term benefits.
- If you don't plan to develop large single page applications, using Vuex can be cumbersome and redundant. That's true - if your application is simple enough, you'd better not use Vuex. A simple
global event bus is enough for you. However, if you need to build a medium and large-scale single page application, you are likely to consider how to better manage the state outside the component, and Vuex will become a natural choice.
04 installation
- NPM installation
npm install vuex
- 1
- In a modular packaging system, you must explicitly use Vue Use() to install Vuex:
import Vue from 'vue'
import Vuex from 'vuex'
Vue.use(Vuex)
- 1
- 2
- 3
- 4
05 the simplest Store
After installing Vuex, let's create a store. The creation process is straightforward - you only need to provide an initial state object and some changes:
const store = new Vuex.Store({
  state: {
    count: 0
  },
  mutations: {
    increment (state) {
      state.count++
    }
  }
})
- 1
- 2
- 3
- 4
- 5
- 6
- 7
- 8
- 9
- 10
Create a new folder vuex under src and enter vuex new store js,
In the store Add the following code to JS:
import Vue  from 'vue';
import Vuex from 'vuex';
Vue.use(Vuex)
export default new Vuex.Store({
state: {
count: 0
},
mutations: {
increment (state) {
state.count++
}
}
})
- 1
- 2
- 3
- 4
- 5
- 6
- 7
- 8
- 9
- 10
- 11
- 12
- 13
- 14
Now, you can use store State to get the status object, and through store The commit method triggers a state change:
store.commit('increment')
console.log(store.state.count) // -> 1
- 1
- 2
On app Add code to Vue file and add a button and click event to templet template
<button v-on:click="addClick">plus</button>
- 1
Introduce store and add methods in < script > (methods are the same level as data)
import store from './vuex/store'
methods:
  {
    addClick:function(){
	store.commit('increment')
      	console.log(store.state.count) // -> 1
    }
  }
- 1
- 2
- 3
- 4
- 5
- 6
- 7
- 8
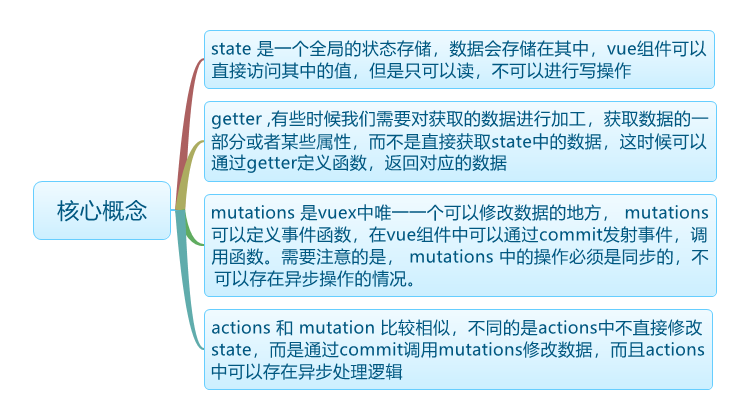
06 core concepts: state, getter, variations and actions
mutations
The only way to change the state in Vuex's store is to submit the mutation. mutations in Vuex are very similar to events: each mutation has a string event type and a callback function (handler). This callback function is where we actually change the state, and it will accept state as the first parameter:
const store = new Vuex.Store({
  state: {
    count: 1
  },
  mutations: {
    increment (state) {
      // Change state
      state.count++
    }
  }
})
- 1
- 2
- 3
- 4
- 5
- 6
- 7
- 8
- 9
- 10
- 11
You cannot call a mutation callback function directly. To wake up a mutation, you call store Commit method (parameter is callback function name):
store.commit('increment')
- 1
The first parameter of the mutation callback function is always store. You can send it to store Commit passes in an additional parameter, that is, the payload of mutation:
// ...
mutations: {
  increment (state, n) {
    state.count += n
  }
}
store.commit('increment', 10)
- 1
- 2
- 3
- 4
- 5
- 6
- 7
In most cases, the payload should be an object, which can contain multiple fields and the recorded mutation will be easier to read:
// ...
mutations: {
  increment (state, payload) {
    state.count += payload.amount
  }
}
store.commit('increment', {
  amount: 10
})
- 1
- 2
- 3
- 4
- 5
- 6
- 7
- 8
- 9
Changes object style submission method
Another way to submit a mutation is to use the object containing the type attribute directly:
store.commit({
  type: 'increment',
  amount: 10
})
- 1
- 2
- 3
- 4
When the object style submission method is used, the entire object is passed to the mutation function as a load, so the handler remains unchanged:
mutations: {
  increment (state, payload) {
    state.count += payload.amount
  }
}
- 1
- 2
- 3
- 4
- 5
You can use this in the component$ store.commit ('xxx ') submit the mutation, or use the mapMutations auxiliary function to map the methods in the component to store Commit call (store needs to be injected into the root node).
import { mapMutations } from 'vuex'
export default {
  // ...
  methods: {
    ...mapMutations([
      'increment' // Map this Increment() is this$ store. commit('increment')
    ]),
    ...mapMutations({
      add: 'increment' // Map this Add() is this$ store. commit('increment')
    })
  }
}
- 1
- 2
- 3
- 4
- 5
- 6
- 7
- 8
- 9
- 10
- 11
- 12
actions
action is similar to mutation in that:
- action submits the mutation instead of directly changing the state.
- An action can contain any asynchronous operation.
In vuex, actions is only an architectural concept, which is not necessary. It is essentially a function. You can do whatever you want. You can perform various tasks asynchronously. To modify state data, you still need to trigger mutation through commit.
You can compare movement to the warehouse administrator, who is responsible for warehouse management, and action to the leader, who can command the warehouse administrator to operate, but will not do it himself.
Register a simple action:
const store = new Vuex.Store({
  state: {
    count: 0
  },
  mutations: {
    increment (state) {
      state.count++
    }
  },
- 1
- 2
- 3
- 4
- 5
- 6
- 7
- 8
- 9
 actions: {
    increment (context) {
	context.commit('increment')
    }
  }
})
- 1
- 2
- 3
- 4
- 5
- 6
The first parameter of actions is context, which exposes a set of methods / attributes that are the same as the store instance, so you can call context directly Commit or access context State or context getters . We usually use the parameter deconstruction of es6 to simplify our code and write it directly as {commit}
actions: {
  increment ({ commit }) {
    commit('increment')
  }
}
- 1
- 2
- 3
- 4
- 5
Action through store The dispatch method triggers:
- store.dispatch('increment')
At first glance, it seems superfluous. Isn't it more convenient for us to distribute mutation directly? In fact, this is not the case. Remember that mutation must execute this restriction synchronously? Action is not constrained! We can perform asynchronous operations inside the action:
actions: {
  incrementAsync ({ commit }) {
    setTimeout(() => {
      commit('increment')
    }, 1000)
  }
}
- 1
- 2
- 3
- 4
- 5
- 6
- 7
Actions supports the same load mode and object mode for distribution:
- Distribute as load
store.dispatch('incrementAsync', {
  amount: 10
})
- 1
- 2
- 3
- Distribute as objects
store.dispatch({
  type: 'incrementAsync',
  amount: 10
})
- 1
- 2
- 3
- 4
Distribute actions in components
Use this in the component$ store.dispatch ('xxx ') distributes actions, or uses the mapActions helper function to map the component's methods to store Dispatch call (store needs to be injected into the root node first):
import { mapActions } from 'vuex'
export default {
  // ...
  methods: {
    ...mapActions([
      'increment' // Map this Increment() is this$ store. dispatch('increment')
    ]),
    ...mapActions({
      add: 'increment' // Map this Add() is this$ store. dispatch('increment')
    })
  }
}
- 1
- 2
- 3
- 4
- 5
- 6
- 7
- 8
- 9
- 10
- 11
- 12
Combined Actions
Actions are usually asynchronous, so how do you know when the action ends? More importantly, how can we combine multiple actions to handle more complex asynchronous processes?
The first thing you need to know is store The return of dispatch is the return value of the triggered action function, so you can return Promise in action:
actions: {
  actionA ({ commit }) {
    return new Promise((resolve, reject) => {
      setTimeout(() => {
        commit('someMutation')
        resolve()
      }, 1000)
    })
  }
}
- 1
- 2
- 3
- 4
- 5
- 6
- 7
- 8
- 9
- 10
Now you can:
store.dispatch('actionA').then(() => {
  // ...
})
- 1
- 2
- 3
In another action, you can also:
actions: {
  // ...
  actionB ({ dispatch, commit }) {
    return dispatch('actionA').then(() => {
      commit('someOtherMutation')
    })
  }
}
- 1
- 2
- 3
- 4
- 5
- 6
- 7
- 8
Finally, if we take advantage of the upcoming new feature of JavaScript [async / await], we can combine action s like this:
Suppose getData() and getOtherData() return Promise
actions: {
  async actionA ({ commit }) {
    commit('gotData', await getData())
  },
  async actionB ({ dispatch, commit }) {
    await dispatch('actionA') // Wait for actionA to complete
    commit('gotOtherData', await getOtherData())
  }
}
- 1
- 2
- 3
- 4
- 5
- 6
- 7
- 8
- 9
Modules
Using a single state tree results in all States of the application being concentrated into a large object. However, when the application becomes large, the store object becomes bloated.
In order to solve the above problems, Vuex runs. We split the store into multiple modules. Each module has its own state, mutation, action, getters, and even nested sub modules - similar segmentation from top to bottom:
const moduleA = {
  state: { ... },
  mutations: { ... },
  actions: { ... },
  getters: { ... }
}
- 1
- 2
- 3
- 4
- 5
- 6
onst moduleB = {
  state: { ... },
  mutations: { ... },
  actions: { ... }
}
- 1
- 2
- 3
- 4
- 5
const store = new Vuex.Store({
  modules: {
    a: moduleA,
    b: moduleB
  }
})
store. state. A / / - > module a status
store. state. B / / - > status of moduleb
- 1
- 2
- 3
- 4
- 5
- 6
- 7
- 8
- 9
Local state of the module
For the mutation and getter inside the module, the first parameter received is the local state of the module.
const moduleA = {
  state: { count: 0 },
  mutations: {
    increment: (state) {
      // Local state of state module
      state.count++
    }
  },
- 1
- 2
- 3
- 4
- 5
- 6
- 7
- 8
 getters: {
    doubleCount (state) {
      return state.count * 2
    }
  }
}
- 1
- 2
- 3
- 4
- 5
- 6
Similarly, for the action inside the module, context State is the local state, and the state of the root node is context rootState:
const moduleA = {
  // ...
  actions: {
    incrementIfOdd ({ state, commit }) {
      if (state.count % 2 === 1) {
        commit('increment')
      }
    }
  }
}
- 1
- 2
- 3
- 4
- 5
- 6
- 7
- 8
- 9
- 10
For getter s inside the module, the root node status is used as the third parameter:
const moduleA = {
  // ...
  getters: {
    sumWithRootCount (state, getters, rootState) {
      return state.count + rootState.count
    }
  }
}
- 1
- 2
- 3
- 4
- 5
- 6
- 7
- 8
07 project structure
For large applications, we will want to split the Vuex related code into modules. The following is an example of a project structure:
├── index.html
├── main.js
├── api
│   └── ... # Extract API request
├── components
│   ├── App.vue
│   └── ...
└── store
    ├── index.js          # Where we assemble the module and export the store
    ├── actions.js        # Root level action
    ├── mutations.js      # Root level mutation
    └── modules
        ├── cart.js       # Shopping Cart module
        └── products.js   # Product module
- 1
- 2
- 3
- 4
- 5
- 6
- 7
- 8
- 9
- 10
- 11
- 12
- 13
- 14
08 vuex simple application example
Create a storage for sharing. In this example, it will be injected into the component through vue/vuex.
Define the actions that the component can call, which are still centrally defined.
Defines the changes of the actual contact storage state. By doing so, actions can form more than one mutation, or execute logic to determine which mutation to call. This means that you don't have to worry about the business logic in the component anymore. Success!
When the status is updated, any component that has getter s, dynamic properties and mapped to store s will be updated immediately.
main.js
A store is created with Vuex and passed directly into the application
import Vue from 'vue'
import App from './App.vue'
import store from './vuex/store'
new Vue({
el: '#app',
store,
render: h => h(App)
})
- 1
- 2
- 3
- 4
- 5
- 6
- 7
- 8
- 9
- 10
store.js
export default new Vuex.Store({
  state: {
    messages: []
  },
  actions: {
    newMessage ({commit}, msg) {
      commit('NEW_MESSAGE', msg)
    }
  },
  mutations: {
    NEW_MESSAGE (state, msg) {
      state.messages.push(msg)
    }
  }
})
- 1
- 2
- 3
- 4
- 5
- 6
- 7
- 8
- 9
- 10
- 11
- 12
- 13
- 14
- 15
Client.vue
<template>
    <div>
        <h1>{{ clientid }}</h1>
        <div>
            <ul>
                <li v-for="message in messages">
                    <label>{{ message.sender }}:</label> {{ message.text }}
                </li>
            </ul>
            <div>
                <input v-model="msg" placeholder="Enter a message, then hit [enter]" @keyup.enter="trySendMessage">
            </div>
        </div>
    </div>
</template>
- 1
- 2
- 3
- 4
- 5
- 6
- 7
- 8
- 9
- 10
- 11
- 12
- 13
- 14
- 15
<script>
import { mapState, mapActions } from 'vuex'
<span class="token keyword">export</span> <span class="token keyword">default</span> <span class="token punctuation">{<!-- --></span>
<span class="token function">data</span><span class="token punctuation">(</span><span class="token punctuation">)</span> <span class="token punctuation">{<!-- --></span>
<span class="token keyword">return</span> <span class="token punctuation">{<!-- --></span>
msg<span class="token punctuation">:</span> <span class="token string">''</span>
<span class="token punctuation">}</span>
<span class="token punctuation">}</span><span class="token punctuation">,</span>
props<span class="token punctuation">:</span> <span class="token punctuation">[</span><span class="token string">'clientid'</span><span class="token punctuation">]</span><span class="token punctuation">,</span>
computed<span class="token punctuation">:</span><span class="token punctuation">{<!-- --></span>
<span class="token operator">...</span><span class="token function">mapState</span><span class="token punctuation">(</span><span class="token punctuation">{<!-- --></span>
messages<span class="token punctuation">:</span> state <span class="token operator">=></span> state<span class="token punctuation">.</span>messages
<span class="token punctuation">}</span><span class="token punctuation">)</span>
<span class="token punctuation">}</span><span class="token punctuation">,</span>
methods: {
trySendMessage() {
this.newMessage({
text: this.msg,
sender: this.clientid
})
this.resetMessage()
},
resetMessage() {
this.msg = ''
},
...mapActions(['newMessage'])
}
}
</script>
<style>
</style>
- 1
- 2
- 3
- 4
- 5
- 6
- 7
- 8
- 9
- 10
- 11
- 12
- 13
- 14
- 15
- 16
- 17
- 18
- 19
- 20
- 21
- 22
- 23
- 24
- 25
- 26
- 27
- 28
- 29
- 30
- 31
- 32
App.vue
 <div>
        <client clientid="Client A"></client>
</div>
<div>
        <client clientid="Client B"></client>
</div>
- 1
- 2
- 3
- 4
- 5
- 6
<script>
  import client from './components/Client.vue'
  import store from './vuex/store'
export default {
  name: 'app',
  data () {
    return {
      msg: 'Welcome to Your Vue.js App'
    }
  },
  components:{client}
}
</script>
- 1
- 2
- 3
- 4
- 5
- 6
- 7
- 8
- 9
- 10
- 11
- 12
- 13
Reference link:
https://www.cnblogs.com/y896926473/articles/6709733.html