Learning objectives of this article
- Be able to understand the concept and function of vue components
- Be able to master the ability of packaging components
- Ability to use communication between components
- Able to complete todo case
1. vue components
1.0_ Why use components
I've made a folding panel before
Requirements: now you want multiple parts to be folded and expanded
Scenario 1: copy code
- Code duplication redundancy
- Not conducive to maintenance
-
The case is written in less style, so download it
yarn add less less-loader@5.0.0 -D
-
Template label - on this basis, copy several more copies of the template to be reused (explain the bad places and lead to the solution)
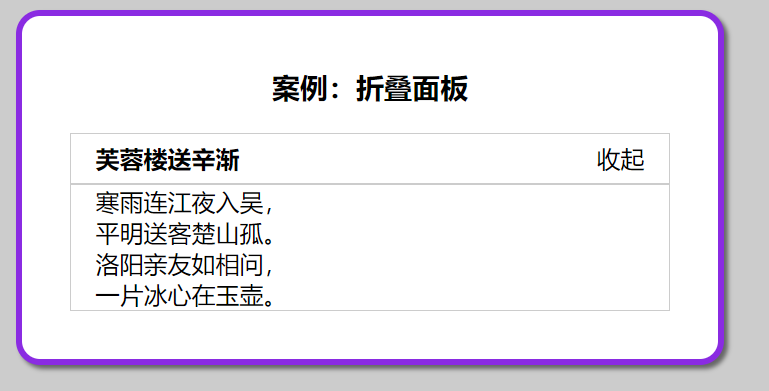
Case: folding panel
Send Xin Jian to Furong building
Conclusion: the code is very redundant and repetitive. The solution is to adopt our component-based development method. Look down
1.1_vue component_ concept
Components are reusable Vue instances that encapsulate tags, styles, and JS code
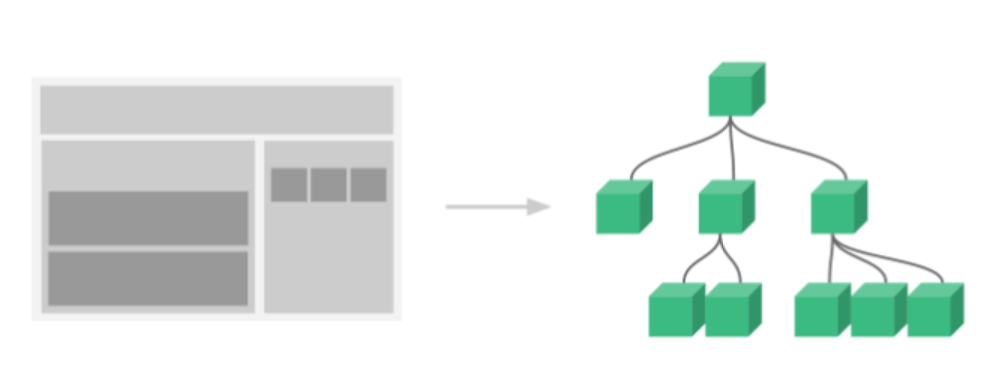
Componentization: the idea of encapsulation encapsulates the reusable parts of the page into components, so as to facilitate the development and maintenance of the project
A page can be divided into components. A component is a whole. Each component can have its own independent structure style and behavior (html, css and js)
1.2_vue component_ Basic use
Objective: each component is an independent individual, which is embodied in the code vue file
Pithy formula: which part of the label is reused, which part is encapsulated in the component
(important): a template in a component can only have one root label
(data is an independent function within a scope):
Steps:
- Create component components / panel vue
Encapsulation label + style + js - components are independent for reuse
<template>
  <div>
    <div class="title">
      <h4>Send Xin Jian to Furong building</h4>
      <span class="btn" @click="isShow = !isShow">
        {{ isShow ? "Put away" : "open" }}
      </span>
    </div>
    <div class="container" v-show="isShow">
      <p>Cold and rainy rivers enter Wu at night,</p>
      <p>Seeing off guests in pingming, Chu mountain is lonely.</p>
      <p>Luoyang relatives and friends ask each other,</p>
      <p>A piece of ice is in the jade pot.</p>
    </div>
  </div>
</template>

<script>
export default {
  data() {
    return {
      isShow: false,
    };
  },
};
</script>

<style scoped>
.title {
  display: flex;
  justify-content: space-between;
  align-items: center;
  border: 1px solid #ccc;
  padding: 0 1em;
}
.title h4 {
  line-height: 2;
  margin: 0;
}
.container {
  border: 1px solid #ccc;
  padding: 0 1em;
}
.btn {
  /* Change the mouse to the shape of the hand */
  cursor: pointer;
}
</style>
- Registration component: it needs to be registered before use
Global - register for use
The global entry is in main JS, register on new Vue
Syntax:
import Vue from 'vue'
import Component object from 'vue File path'

Vue.component("Component name", Component object)
main.js - demo now
// Target: global registration (one definition everywhere)
// 1. Create component - file name vue
// 2. Lead in components
import Pannel from './components/Pannel'
// 3. Global - register components
/*
  Syntax:
  Vue.component("Component name "(component object)
*/
Vue.component("PannelG", Pannel)
After the PannelG component name is registered globally, it can be used as a label in any Vue file template
Both single and double labels can be in lowercase plus - form. After running, the user-defined label will be parsed as a component and replaced to this position with the label encapsulated in the component
<PannelG></PannelG>
<PannelG/>
<pannel-g></pannel-g>
Local - registered use
Syntax:
import Component object from 'vue File path'

export default {
    components: {
        "Component name": Component object
    }
}
Introduction, registration and use in any vue file
<template>
  <div id="app">
    <h3>Case: folding panel</h3>
    <!-- 4. The component name is used as a label -->
    <!-- <Component name></Component name> -->
    <PannelG></PannelG>
    <PannelL></PannelL>
  </div>
</template>

<script>
// Target: local registration (multi use)
// 1. Create component - file name vue
// 2. Lead in components
import Pannel from './components/Pannel_1'
export default {
  // 3. Local - register components
  /*
    Syntax:
    components: {
      "Component name ": Component Object
    }
  */
  components: {
    PannelL: Pannel
  }
}
</script>
Component Usage Summary:
- (create) encapsulate html+css+vue into a separate In vue file
- (import registration) component file = > get component configuration object
- (use) the current page is used as a label
1.3_vue component scoped function
Purpose: to solve the problem that multiple component style names are the same and conflict
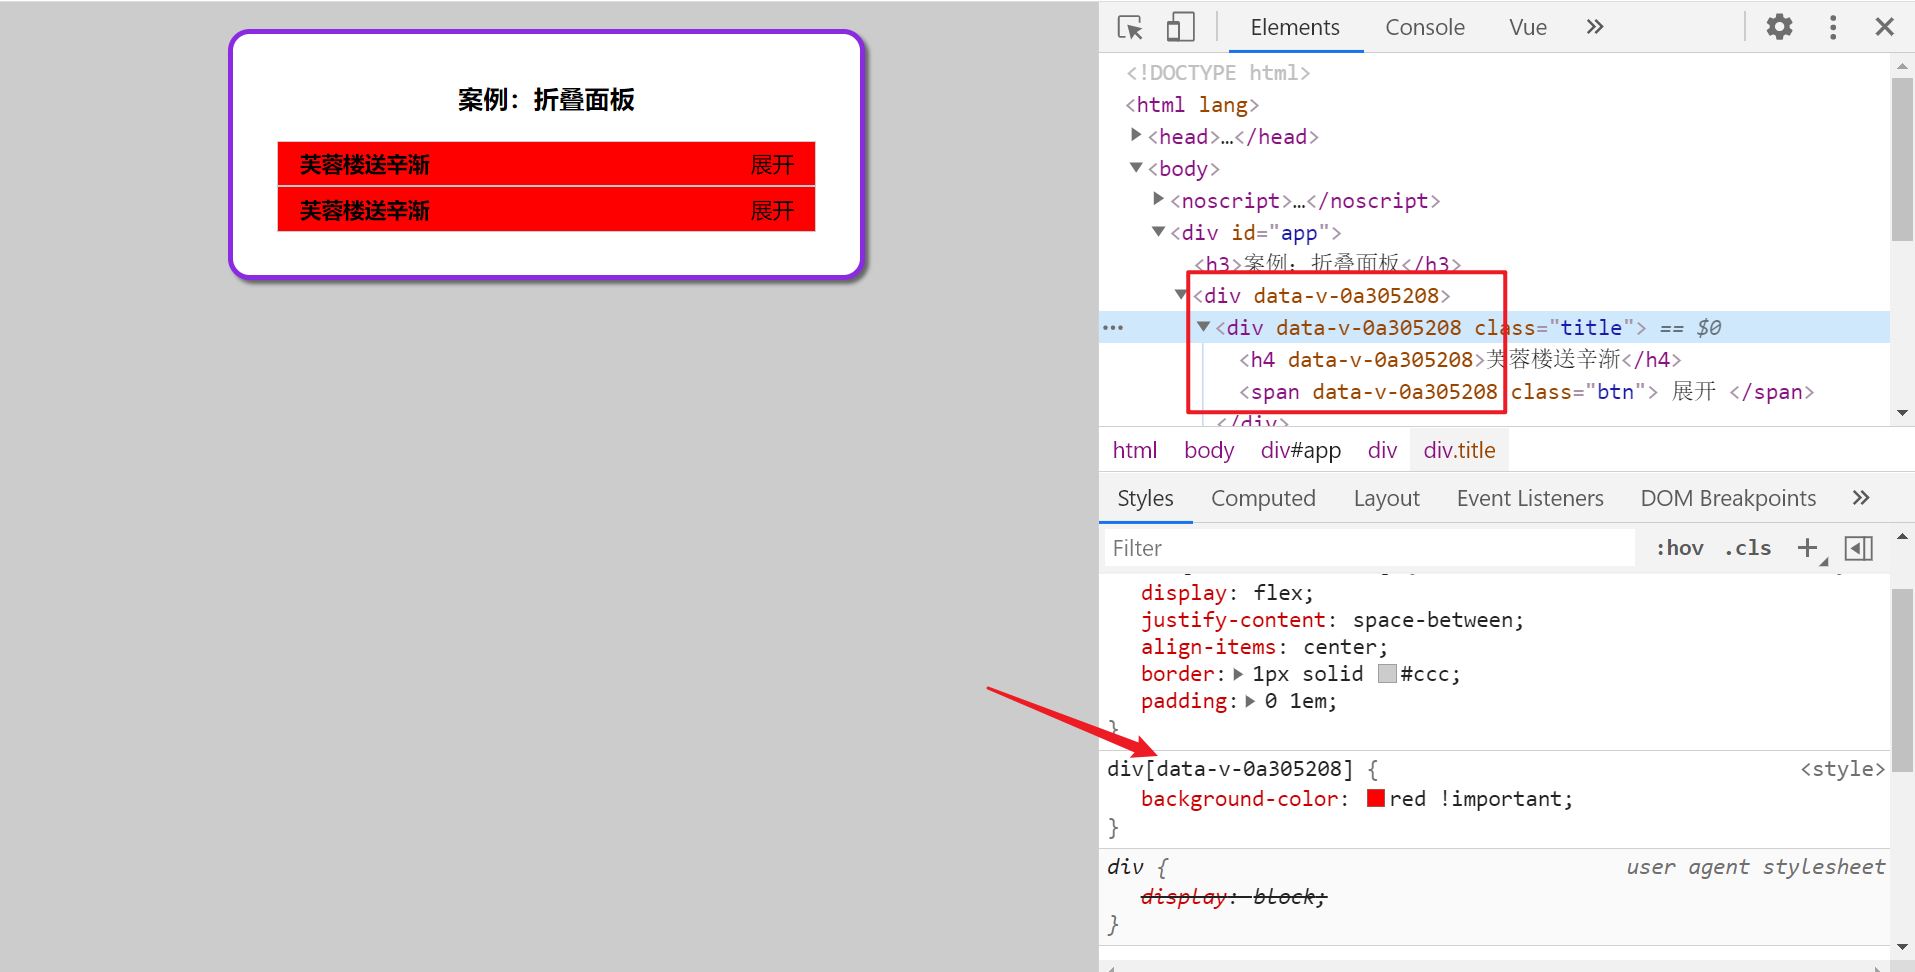
Requirement: div tag name selector, setting background color
Problem: it is found that both the div in the component and the div outside the component are effective
Solution: to pannel Add the scoped attribute to the style tag in the Vue component
<style scoped>
Adding scoped attribute to style will add a randomly generated attribute starting with data-v to the label of this component
And it must be the element of the current component to have this custom attribute and be affected by this style
Summary: add scoped to style, and the style in the component will only take effect in the current vue component
2. vue component communication
Because the variables and values of each component are independent
Component communication first focuses on the transfer of parent to child, and child to parent
Parent: vue files that use other components
Sub: introduced component (embedded)
For example: app Vue (parent) MyProduct Vue (sub)
2.0_vue component communication_ Parent to child props
Purpose: pass values to components from the outside, learn the grammar first, and look at the usage scenario in the exercise
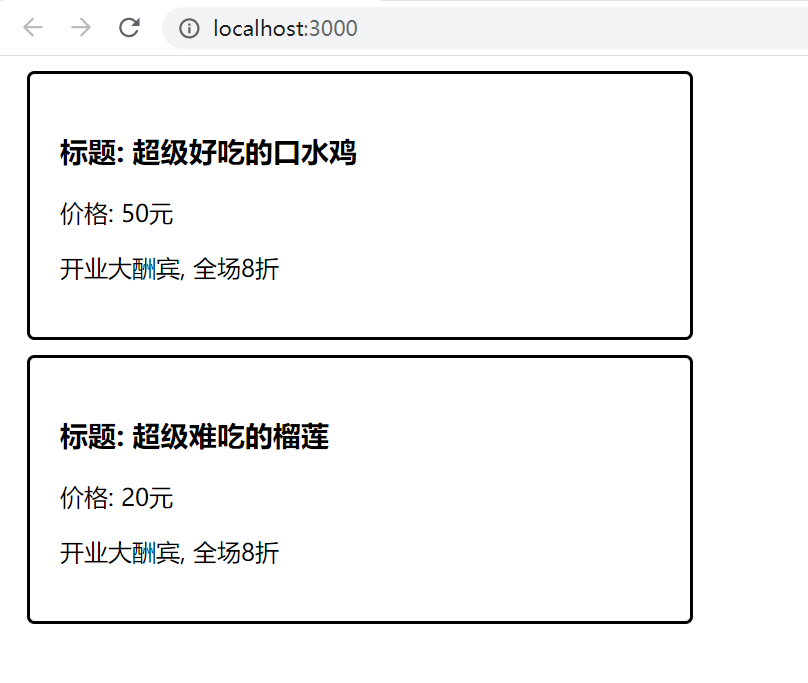
Requirement: encapsulate a commodity component MyProduct Vue - External incoming specific data to be displayed, as shown in the following figure
Steps:
-
Create component components / MyProduct Vue - copy the label below
-
The props defined variable inside the component is used to receive the value passed in from the outside
-
App. The registration component is introduced into Vue. When used, specific data is passed in to the component for display
components/MyProduct.vue - prepare label
<template>
  <div class="my-product">
    <h3>title: {{ title }}</h3>
    <p>Price: {{ price }}element</p>
    <p>{{ intro }}</p>
  </div>
</template>

<script>
export default {
  props: ['title', 'price', 'intro']
}
</script>

<style>
.my-product {
  width: 400px;
  padding: 20px;
  border: 2px solid #000;
  border-radius: 5px;
  margin: 10px;
}
</style>
App. Use and pass in data in Vue
<template>
  <div>
    <!--
      target: father(App.vue) -> son(MyProduct.vue) Enter by value transfer respectively
      demand: Each component displays different data information
      step(Pithy formula):
        1. Subcomponents - props - variable (Ready to receive)
        2. Parent component - Pass the value in
     -->
    <Product title="Delicious salivary chicken" price="50" intro="Grand reward for opening, 20% off"></Product>
    <Product title="What a lovely adorable" price="20" intro="The boss is not at home, 10% off the court"></Product>
    <Product title="What an expensive Beijing roast duck" price="290" :intro="str"></Product>
  </div>
</template>

<script>
// 1. Create a component (. vue file)
// 2. Lead in components
import Product from './components/MyProduct'
export default {
  data(){
    return {
      str: "How expensive, Come on, yummy"
    }
  },
  // 3. Register components
  components: {
    // Product: Product // key and value variables have the same name - short form
    Product
  }
}
</script>

<style>

</style>
Summary: components encapsulate reusable labels and styles, while specific data needs to be imported from outside
2.1_vue component communication_ Parent child fit cycle
Purpose: transfer the data cycle to the display in the component respectively
data
list: [
    { id: 1, proname: "Super delicious lollipop", proprice: 18.8, info: 'Grand reward for opening, 20% off' },
    { id: 2, proname: "Super delicious big chicken leg", proprice: 34.2, info: 'Delicious but not greasy, Come and buy it' },
    { id: 3, proname: "Super invincible ice cream", proprice: 14.2, info: 'hot summer , Have an ice cream' },
],
Correct code (not reproducible)`
<template>
  <div>
    <MyProduct v-for="obj in list" :key="obj.id"
    :title="obj.proname"
    :price="obj.proprice"
    :intro="obj.info"
    ></MyProduct>
  </div>
</template>

<script>
// Target: recycle components - pass in data separately
// 1. Create components
// 2. Lead in components
import MyProduct from './components/MyProduct'
export default {
  data() {
    return {
      list: [
        {
          id: 1,
          proname: "Super delicious lollipop",
          proprice: 18.8,
          info: "Grand reward for opening, 20% off",
        },
        {
          id: 2,
          proname: "Super delicious big chicken leg",
          proprice: 34.2,
          info: "Delicious but not greasy, Come and buy it",
        },
        {
          id: 3,
          proname: "Super invincible ice cream",
          proprice: 14.2,
          info: "hot summer , Have an ice cream",
        },
      ],
    };
  },
  // 3. Register components
  components: {
    // MyProduct: MyProduct
    MyProduct
  }
};
</script>

<style>
</style>
Unidirectional data flow
The principle of one-way data flow should be followed in vue
- When the data of the parent component changes, the child component will automatically change
- The child component cannot directly modify the props passed by the parent component. Props is read-only
What the parent component passes to the child component is an object. When the child component modifies the properties of the object, it will not report an error. The object is a reference type and updates each other
Summary: the value of props cannot be re assigned. The attribute value of object reference relationship changes and affects each other
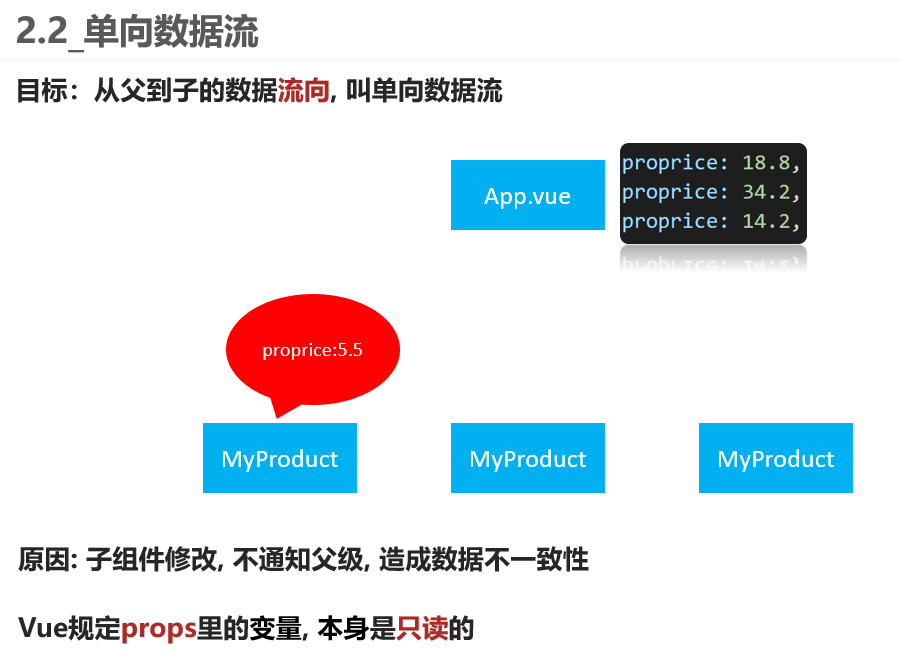
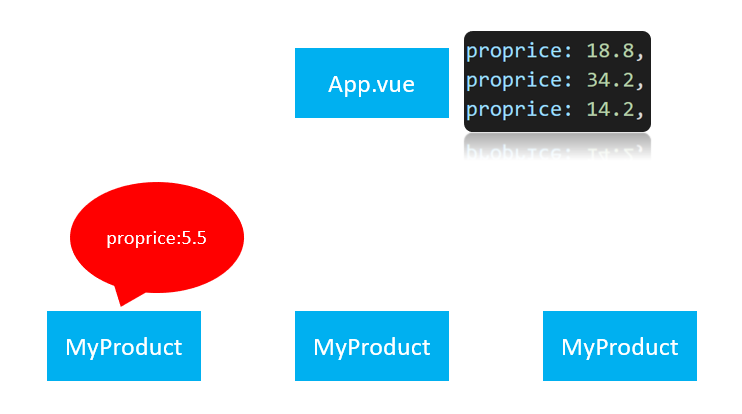
2.2_vue component communication_ Unidirectional data flow
Target: props variable itself is read-only and cannot be re assigned
Target: the data flow from parent to child is called one-way data flow
Cause: the child component is modified without notifying the parent, resulting in data inconsistency
If the first MyProduct Vue modifies the commodity price to 5.5, but app 18.8 was still recorded in Vue - the data is inconsistent
So: Vue specifies that the variables in props are read-only
Summary: therefore, the props variable itself cannot be re assigned
Question: how can I modify the value received by the subcomponent? In fact, it will affect the father, and then the data response will affect the sons
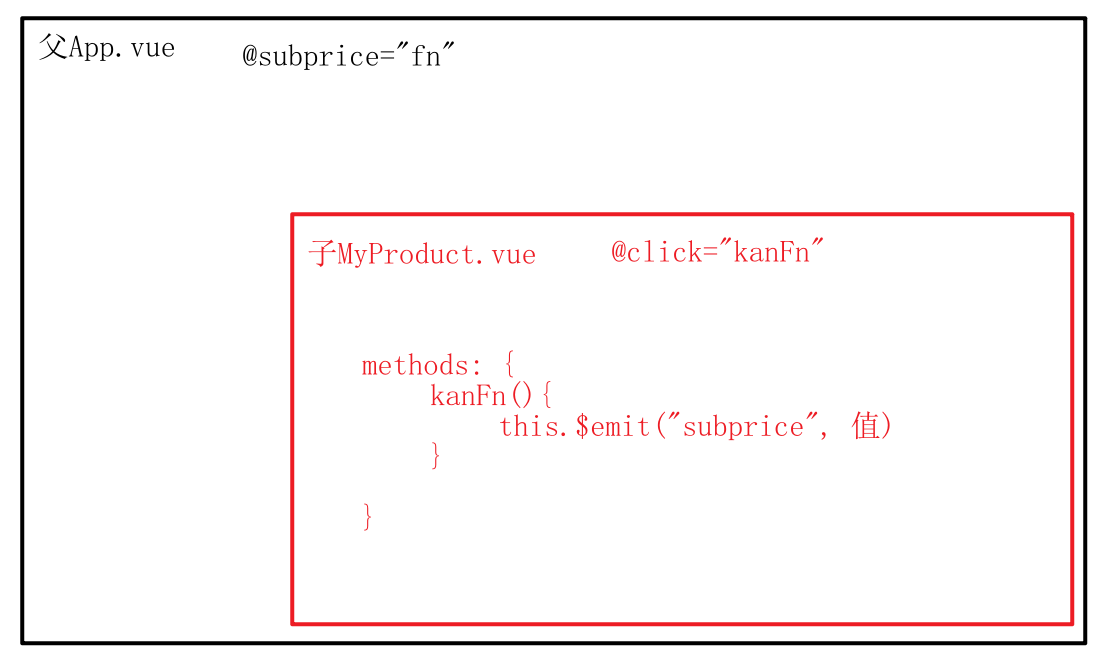
2.3_vue component communication_ Son to father
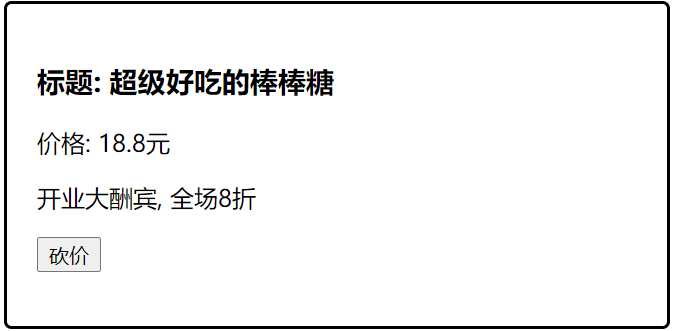
Objective: pass the value from the sub component to the outside for use
Requirements: examples in class, bargaining function, sub components Click to realize random bargaining-1 function
Syntax:
- Custom method: @ parent event name
- Sub: this$ Emit ("custom event name", value transfer) - execute the function code in the parent methods
components/MyProduct_sub.vue
<template>
  <div class="my-product">
    <h3>title: {{ title }}</h3>
    <p>Price: {{ price }}element</p>
    <p>{{ intro }}</p>
    <button @click="subFn">Treasure knife-Cut 1 yuan</button>
  </div>
</template>

<script>
import eventBus from '../EventBus'
export default {
  props: ['index', 'title', 'price', 'intro'],
  methods: {
    subFn(){
      this.$emit('subprice', this.index, 1) // Son to father
      eventBus.$emit("send", this.index, 1) // Cross component
    }
  }
}
</script>

<style>
.my-product {
  width: 400px;
  padding: 20px;
  border: 2px solid #000;
  border-radius: 5px;
  margin: 10px;
}
</style>
App.vue
<template>
  <div>
    <!-- target: Son to father -->
    <!-- 1. Parent component, @Custom event name="father methods function" -->
    <MyProduct v-for="(obj, ind) in list" :key="obj.id"
    :title="obj.proname"
    :price="obj.proprice"
    :intro="obj.info"
    :index="ind"
    @subprice="fn"
    ></MyProduct>
  </div>
</template>

<script>

import MyProduct from './components/MyProduct_sub'
export default {
  data() {
    return {
      list: [
        {
          id: 1,
          proname: "Super delicious lollipop",
          proprice: 18.8,
          info: "Grand reward for opening, 20% off",
        },
        {
          id: 2,
          proname: "Super delicious big chicken leg",
          proprice: 34.2,
          info: "Delicious but not greasy, Come and buy it",
        },
        {
          id: 3,
          proname: "Super invincible ice cream",
          proprice: 14.2,
          info: "hot summer , Have an ice cream",
        },
      ],
    };
  },
  components: {
    MyProduct
  },
  methods: {
    fn(inde, price){
      // Logic code
      this.list[inde].proprice > 1 && (this.list[inde].proprice = (this.list[inde].proprice - price).toFixed(2))
    }
  }
};
</script>

<style>
</style>
Summary: define the parent event and method, and wait for the child component to trigger the event to pass the value to the method
2.4_ Stage summary
Objective: To summarize the parent-child component relationship - Communication Technology pithy
What are the components
- Is a vue instance that encapsulates tags, styles, and JS code
Component benefits
- Easy to reuse and expand
What kinds of component communication and how to implement it
-
Parent - > child
-
Father < - son
2.5_vue component communication - EventBus
Objective: commonly used when communicating across components
The relationship between the two components is very complex, and it is very troublesome to communicate through parent-child components. At this time, a general component communication scheme can be used: event bus
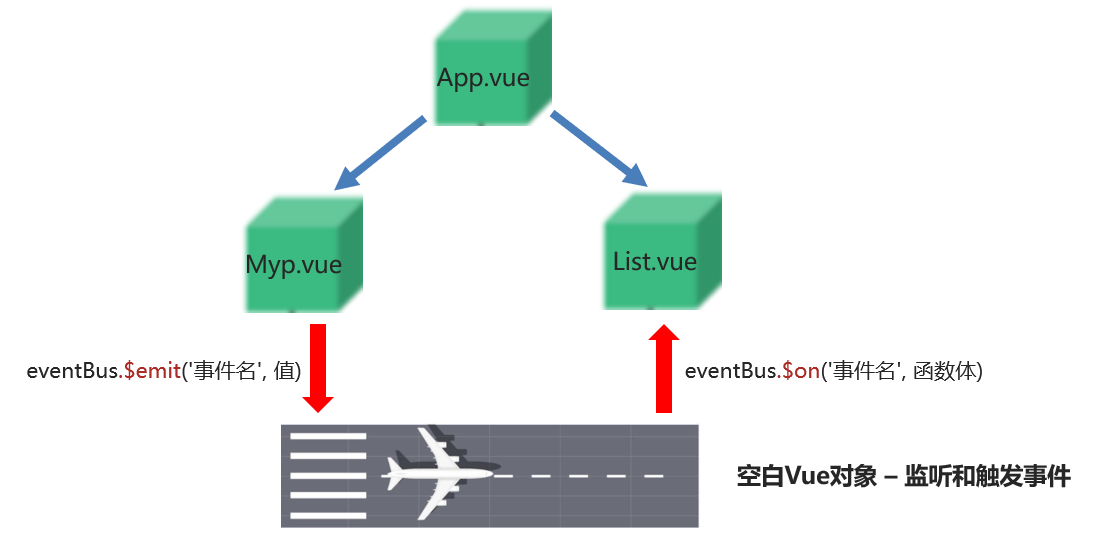
Core grammar
EventBus/index.js - define event bus object
import Vue from 'vue'
// Export blank vue objects
export default new Vue()
List.vue registration event - waiting to receive the value to be haggled (direct copy) - prepare brother page
<template>
  <ul class="my-product">
      <li v-for="(item, index) in arr" :key="index">
          <span>{{ item.proname }}</span>
          <span>{{ item.proprice }}</span>
      </li>
  </ul>
</template>

<script>
export default {
  props: ['arr'],
}
</script>

<style>
.my-product {
  width: 400px;
  padding: 20px;
  border: 2px solid #000;
  border-radius: 5px;
  margin: 10px;
}
</style>
components/MyProduct_ Sub.vue (take students to write the events that trigger eventBus)
<template>
  <div class="my-product">
    <h3>title: {{ title }}</h3>
    <p>Price: {{ price }}element</p>
    <p>{{ intro }}</p>
    <button @click="subFn">Treasure knife-Cut 1 yuan</button>
  </div>
</template>

<script>
import eventBus from '../EventBus'
export default {
  props: ['index', 'title', 'price', 'intro'],
  methods: {
    subFn(){
      this.$emit('subprice', this.index, 1) // Son to father
      eventBus.$emit("send", this.index, 1) // Cross component
    }
  }
}
</script>

<style>
.my-product {
  width: 400px;
  padding: 20px;
  border: 2px solid #000;
  border-radius: 5px;
  margin: 10px;
}
</style>
List.vue correct code (EventBus receiver)
<template>
  <ul class="my-product">
    <li v-for="(item, index) in arr" :key="index">
      <span>{{ item.proname }}</span>
      <span>{{ item.proprice }}</span>
    </li>
  </ul>
</template>

<script>
// Target: value transfer across components
// 1. Introduce a blank vue object (EventBus)
// 2. Receiver - $on listening event
import eventBus from "../EventBus";
export default {
  props: ["arr"],
  // 3. After the component is created, listen to the send event
  created() {
    eventBus.$on("send", (index, price) => {
      this.arr[index].proprice > 1 &&
        (this.arr[index].proprice = (this.arr[index].proprice - price).toFixed(2));
    });
  },
};
</script>

<style>
.my-product {
  width: 400px;
  padding: 20px;
  border: 2px solid #000;
  border-radius: 5px;
  margin: 10px;
}
</style>
Summary: an empty Vue object is only responsible for the $on registration event. e m i t triggers the event. Be sure to ensure that the event is triggered by emit. Be sure to ensure that the event is triggered by emit. Be sure to ensure that on executes first
2.6_ Component communication description
Vue's component communication is not only these three methods, but also several methods. If you want to know, you can check it in the article before Xiaobian. Here, Xiaobian only lists the three methods commonly used above for you
3. todo case
Complete effect demonstration
3.0_todo case - creating projects and components
Goal: build a new project and get everything ready
- Requirement 1: create a new project
- Requirement 2: component creation – prepare labels and styles (copy from. md notes)
analysis:
① : initialize todo project
② : create 3 components and code inside (copy in preview. md)
③ : prepare the style file of styles (copy from preview)
④: App.vue is introduced for registration. The outermost container class name is todoapp
Prepare in advance: prepare the style file of styles (copy it from the preview materials) in app Vue introduction and use
// 1.0 Style Introduction
import "./styles/base.css"
import "./styles/index.css"
According to the requirements: we define three components for reuse
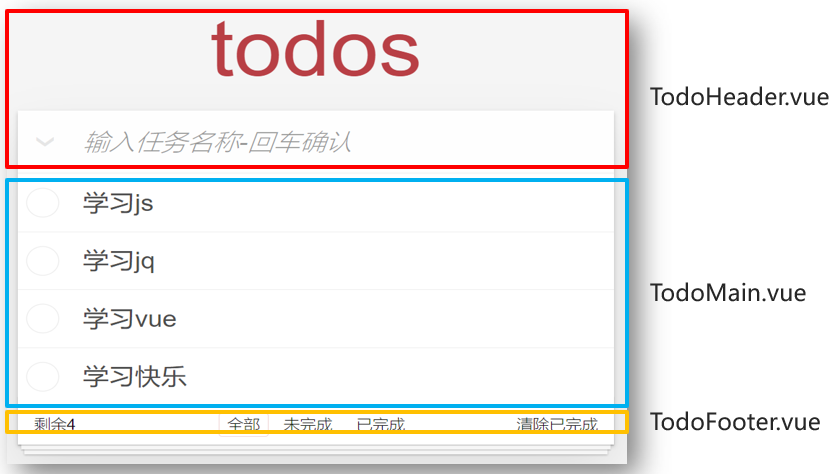
components/TodoHeader.vue - copy label and class name
<template>
  <header class="header">
    <h1>todos</h1>
    <input id="toggle-all" class="toggle-all" type="checkbox" >
    <label for="toggle-all"></label>
    <input
      class="new-todo"
      placeholder="Enter task name-Enter to confirm"
      autofocus
    />
  </header>
</template>

<script>
export default {

}
</script>
components/TodoMain.vue - copy label and class name
<template>
  <ul class="todo-list">
    <!-- completed: Completed class name -->
    <li class="completed" >
      <div class="view">
        <input class="toggle" type="checkbox" />
        <label>Task name</label>
        <button class="destroy"></button>
      </div>
    </li>
  </ul>

</template>

<script>
export default {
}
</script>
components/TodoFooter.vue - copy label and class name
<template>
  <footer class="footer">
    <span class="todo-count">surplus<strong>Quantity value</strong></span>
    <ul class="filters">
      <li>
        <a class="selected" href="javascript:;" >whole</a>
      </li>
      <li>
        <a href="javascript:;">hang in the air</a>
      </li>
      <li>
        <a href="javascript:;" >Completed</a>
      </li>
    </ul>
    <button class="clear-completed" >Cleanup completed</button>
  </footer>
</template>

<script>
export default {

}
</script>
App. Introduction and use in Vue
<template>
  <section class="todoapp">
    <!-- Except for the hump, You can also use-Conversion link -->
    <TodoHeader></TodoHeader>
    <TodoMain></TodoMain>
    <TodoFooter></TodoFooter>
  </section>
</template>

<script>
// 1.0 Style Introduction
import "./styles/base.css"
import "./styles/index.css"

import TodoHeader from "./components/TodoHeader";
import TodoMain from "./components/TodoMain";
import TodoFooter from "./components/TodoFooter";


export default {
  components: {
    TodoHeader,
    TodoMain,
    TodoFooter,
  },
};
</script>
3.1_todo case - laying to-do tasks
Purpose: to display the to-do tasks to todomain On Vue assembly
- Requirement 1: display the to-do tasks to todomain On Vue assembly
- Requirement 2: Associate selected status and set related styles
analysis:
①: App.vue – prepare the array to pass into todomain Within Vue
② : v-for loop display data
③ The: v-model binding check box is selected
④ : set the finish dash style according to the selected status
App.vue
 <TodoMain :arr="showArr"></TodoMain>

export default {
  data() {
    return {
      list: [
        { id: 100, name: "having dinner", isDone: true },
        { id: 201, name: "sleep", isDone: false },
        { id: 103, name: "Beat beans", isDone: true },
      ],
    };
  }
};
TodoMain.vue
<template>
  <ul class="todo-list">
    <!-- 2.2 Circular task-Association selected status-Laying data -->
    <!-- completed: Completed class name -->
    <li :class="{completed: obj.isDone}" v-for="(obj, index) in arr" :key='obj.id'>
      <div class="view">
        <input class="toggle" type="checkbox" v-model="obj.isDone"/>
        <label>{{ obj.name }}</label>
        <!-- 4.0 Register click event -->
        <button @click="delFn(index)" class="destroy"></button>
      </div>
    </li>
  </ul>
</template>

<script>
export default {
  props: ["list"]
};
</script>

<style>
</style>
3.2_todo case - add task
Objective: enter the task name to be completed in the top input box and click enter to complete the new function
- Demand: enter a task and press enter to add a to-do task
analysis:
①: TodoHeader.vue – input box – keyboard event – enter key
② : pass the child to the parent and put the to-do task – app Vue – add to the array list
③ : if the original array is changed, all the places used will be updated
④ : the input box is empty, prompting the user to enter content
TodoHeader.vue
<template>
  <header class="header">
    <h1>todos</h1>
    <input id="toggle-all" class="toggle-all" type="checkbox" v-model="isAll">
    <label for="toggle-all"></label>
    <!-- 3.0 Keyboard events-Enter key
         3.1 Input box - v-model Get value
     -->
    <input
      class="new-todo"
      placeholder="Enter task name-Enter to confirm"
      autofocus
      @keydown.enter="downFn"
      v-model="task"
    />
  </header>
</template>

<script>
// 3. Objective - new task
export default {
  data(){
    return {
      task: ""
    }
  },
  methods: {
    downFn(){
      if (this.task.trim().length === 0) {
        alert("Task name cannot be empty");
        return;
      }
      // 3.2 (important) - the name of the current task should be added to the list array
      // Son to father Technology
      this.$emit("create", this.task)
      this.task = ""
    }
  }
}
</script>
App.vue
<TodoHeader @create="createFn"></TodoHeader>

methods: {
   createFn(taskName){ // Add task
      // 3.3 push to array
      let id = this.list.length == 0 ? 100 : this.list[this.list.length - 1].id + 1
      this.list.push({
        id: id,
        name: taskName,
        isDone: false
      })
    },
}
3.3_todo case - delete task
Objective: to achieve point x and delete the task function
- Requirement: click the x after the task to delete the current task
analysis:
① : x tab – click event – incoming id
② : pass the child to the father, and return the id – app In Vue – delete a corresponding object in the array list
③ : if the original array is changed, all the places used will be updated
App.vue - incoming custom event waiting to receive sequence number to be deleted
<TodoMain :arr="showArr" @del="deleteFn"></TodoMain>

methods: {
    deleteFn(theId){ // Delete task
      let index = this.list.findIndex(obj => obj.id === theId)
      this.list.splice(index, 1)
    },
},
TodoMain.vue - pass the id back to delete (delete the data wherever you want)
<!-- 4.0 Register click event -->
<button class="destroy" @click="delFn(obj.id)"></button>

methods: {
     delFn(id){
      // 4.1 son to father
      this.$emit('del', id)
    }
}
3.4_todo case - bottom statistics
Objective: to display the total number of current tasks
- Demand: count the number of current tasks
analysis:
①: App.vue - array list - passed to todofooter vue
② : display / define calculation attributes directly on the label for display
③ : as long as the original array is changed, all places where this array is used will be updated
TodoFooter.vue - receive list statistics direct display
<template>
  <footer class="footer">
    <span class="todo-count">surplus<strong>{{ count }}</strong></span>
    <ul class="filters">
      <li>
        <a class="selected" href="javascript:;">whole</a>
      </li>
      <li>
        <a href="javascript:;">hang in the air</a>
      </li>
      <li>
        <a href="javascript:;">Completed</a>
      </li>
    </ul>
    <button class="clear-completed">Cleanup completed</button>
  </footer>
</template>

<script>
export default {
  // 5.0 props definition
  props: ['farr'],
  // 5.1 calculation attribute - task quantity
  computed: {
    count(){
      return this.farr.length
    }
  },
}
</script>

<style>

</style>
App.vue - incoming data
<TodoFooter :farr="showArr"></TodoFooter>
3.5_todo case - data switching
Purpose: click the bottom to switch data
- Requirement 1: click the switch at the bottom – who has the border
- Requirement 2: switch different data display correspondingly
analysis:
①: TodoFooter.vue – define isSel – the value is all, yes, no, one of them
② selected: multiple classes judge who should have the class name respectively
③ : Click to modify the value of isSel
④ : pass the child to the parent, and pass the type isSel to app vue
⑤ : define the calculation attribute showArr and decide which data to display from the list to todomain Vue and todofooter vue
App.vue
<TodoFooter :farr="showArr" @changeType="typeFn"></TodoFooter>

<script>
    export default{
       data(){
            return {
              // ... Other omissions
              getSel: "all" // Show all by default
            }
        },
        methods: {
            // ... Other omissions
            typeFn(str){ // 'all', 'yes',' no '/ / modify type
              this.getSel = str
            },
        },
        // 6.5 define showArr array - filtered by list matching conditions
          computed: {
            showArr(){
              if (this.getSel === 'yes') { // Show completed
                return this.list.filter(obj => obj.isDone === true)
              } else if (this.getSel === 'no') { // Show incomplete
                return this.list.filter(obj => obj.isDone === false)
              } else {
                return this.list // show all
              }
            }
          },
    }
</script>
TodoFooter.vue
<template>
  <footer class="footer">
    <span class="todo-count">surplus<strong>{{ count }}</strong></span>
    <ul class="filters" @click="fn">
      <li>
        <!-- 6.1 Determine who should have a highlighted style: dynamic class
            6.2 User clicks to switch isSel Values saved in
         -->
        <a :class="{selected: isSel === 'all'}" href="javascript:;" @click="isSel='all'">whole</a>
      </li>
      <li>
        <a :class="{selected: isSel === 'no'}" href="javascript:;" @click="isSel='no'">hang in the air</a>
      </li>
      <li>
        <a :class="{selected: isSel === 'yes'}" href="javascript:;" @click="isSel='yes'">Completed</a>
      </li>
    </ul>
    <!-- 7. target: Cleanup completed -->
    <!-- 7.0 Click event -->
    <button class="clear-completed" >Cleanup completed</button>
  </footer>
</template>

<script>
// 5. Objective: quantity statistics
export default {
  // 5.0 props definition
  props: ['farr'],
  // 5.1 calculation attribute - task quantity
  computed: {
    count(){
      return this.farr.length
    }
  },
  // 6. Goal: who lights up
  // 6.0 variable isSel
  data(){
    return {
      isSel: 'all' // All: 'all', completed 'yes', incomplete' no '
    }
  },
  methods: {
    fn(){ // Toggle filter criteria
      // 6.3 child - > parent type string passed to app vue
      this.$emit("changeType", this.isSel)
    }
  }
}
</script>
3.6_todo case - emptying completed
Purpose: click the button in the lower right corner to clear the completed tasks
- Requirements: click the link label in the lower right corner to clear the completed tasks
analysis:
① : empty tag – click event
② Child to parent – app Vue – an emptying method
③ : filter the incomplete overlay list array (regardless of recovery)
App.vue - pass in a custom event first - because you have to receive todofooter Click events in Vue
<TodoFooter :farr="showArr" @changeType="typeFn" @clear="clearFun"></TodoFooter>

<script>
    methods: {
        // ... Omit others
        clearFun(){ // Cleanup completed
          this.list = this.list.filter(obj => obj.isDone == false)
        }
    }
</script>
TodoFooter.vue
<!-- 7. target: Cleanup completed -->
<!-- 7.0 Click event -->
<button class="clear-completed" @click="clearFn">Cleanup completed</button>

<script>
	methods: {
        clearFn(){ // Empty completed tasks
          // 7.1 trigger app clearFun method corresponding to events in Vue
          this.$emit('clear')
        }
    }
</script>
3.7_todo case - data cache
Purpose: after adding / modifying the status / deleting, synchronize the data to the local storage of the browser immediately
- Requirements: no matter how it changes – ensure that the data is still after refresh
analysis:
①: App.vue - listening list array change - depth
② : overwrite save locally – note that only JSON strings can be saved locally
③ : refresh the page – the list should take value locally by default – empty array without data should be considered
App.vue
<script>
    export default {
        data(){
            return {
                // 8.1 default from local value
                list: JSON.parse(localStorage.getItem('todoList')) || [],
                // 6.4 first transfer receiving type string
                getSel: "all" // Show all by default
            }
        },
        // 8. Target: data cache
        watch: {
            list: {
                deep: true,
                handler(){
                    // 8.0 as long as the list changes - overwrite save to localStorage
                    localStorage.setItem('todoList', JSON.stringify(this.list))
                }
            }
        }
    };
</script>
3.8_todo case - select all function
Objective: click the v sign in the upper left corner to set one key to complete, and then click again to cancel the selection of all
- Requirement 1: click Select all – the small selection box is affected
- Requirement 2: select all the small boxes (manually) – select all and select automatically
analysis:
①: TodoHeader.vue – calculate attributes - isAll
②: App.vue – pass in the array list – affect the small selection box in the set of isAll
③ : count the last status of the small selection box in the get of isAll, affect isAll – affect the status of all selection
④ : consider the empty array without data - select all and should not be checked
Tip: it is to traverse all objects and modify the value of their completion status attribute
TodoHeader.vue
<!-- 9. target: Select all status
9.0 v-model Associated select all status
 Page change(Check true, Unchecked false) -> v-model -> isAll variable
-->
<input id="toggle-all" class="toggle-all" type="checkbox" v-model="isAll">

<script>
    export default {
        // ... Other omissions
        // 9.1 defining calculation attributes
        computed: {
            isAll: {
                set(checked){ // Only true / false
                    // 9.3 affect the isDone attribute bound by each small checkbox in the array
                    this.arr.forEach(obj => obj.isDone = checked)
                },
                get(){
                    // 9.4 statistical status of small selection box - > select all box
                    // 9.5 if there is no data, return false directly - do not make all checked
                    return this.arr.length !== 0 && this.arr.every(obj => obj.isDone === true)
                }
            }
        },
    }
</script>
App.vue
<TodoHeader :arr="list" @create="createFn"></TodoHeader>
Today's summary
-
Concept and function of components and how they are created and used
-
Master component communication, including parent to child and child to parent value transmission
-
Familiar with the use and principle of EventBus
Interview questions
1. Please describe the process of packaging vue components
First, components can improve the development efficiency of the whole project. It can abstract the page into several relatively independent modules, which solves the problems of our traditional project development: low efficiency, difficult maintenance, reusability and so on.
-
Analyze requirements: determine the business requirements and separate the reusable structures, styles and functions in the page into a component to realize reuse
-
Specific steps: Vue Component or in the new Vue configuration item components, define the component name. You can accept the parameters and values passed to the component in props. After modifying the data, the sub component wants to pass the data to the parent component. You can use the $emit method.
2. How do Vue components transfer values
Parent to child - > props definition variable - > parent in use component passes value to props variable with attribute
The child triggers the parent's event to the parent - > $emit - > the parent is using the method of @ custom event name = parent (the child brings out the value)
3. Why must Vue component data be a function
Each component is an instance of Vue. For independent scope, variables are not allowed to pollute other people's variables
4. Let's talk about the naming specification of components
There are two ways to name components (in Vue.Component/components). One is to use the chain to name "my component" and the other is to use the big hump to name "MyComponent",
Because we should follow the custom component name in the W3C specification (all lowercase letters and must contain a hyphen), so as to avoid conflicts with current and future HTML elements
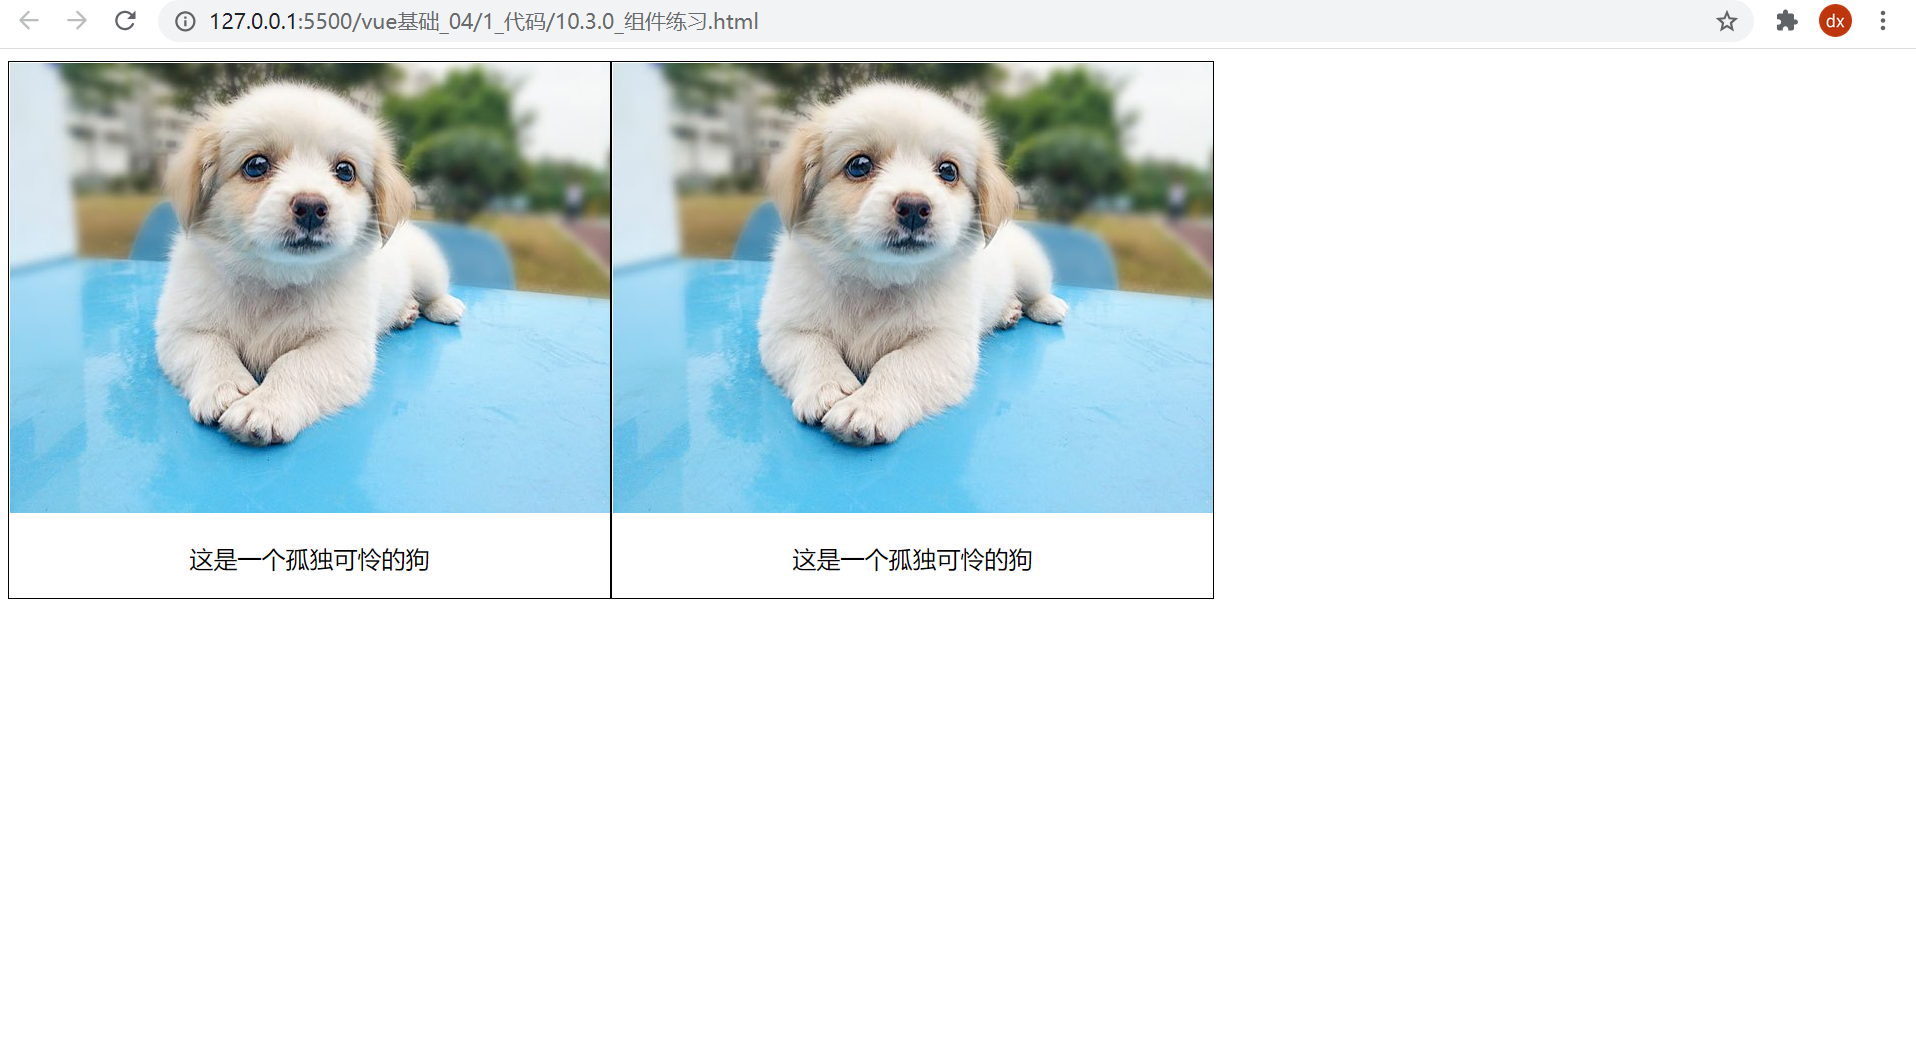
Additional exercises_ 1. Do you like little dogs
Objective: to encapsulate the Dog component, which is used to reuse the display of pictures and titles
effect:
Correct answer (don't look at it first)
components/practise/Dog1.vue
<template>
  <div class="my_div">
    <img
      src="https://scpic.chinaz.net/files/pic/pic9/202003/zzpic23514.jpg"
      alt=""
    />
    <p>This is a lonely and poor dog</p>
  </div>
</template>

<script>
export default {};
</script>

<style>
.my_div {
  width: 200px;
  border: 1px solid black;
  text-align: center;
  float: left;
}

.my_div img {
  width: 100%;
  height: 200px;
}
</style>
On app Used in Vue
<template>
  <div>
    <Dog></Dog>
    <Dog/>
  </div>
</template>

<script>
import Dog from '@/components/practise/Dog1'
export default {
  components: {
    Dog
  }
}
</script>

<style>

</style>
Summary: the repeated parts are encapsulated into components and then registered for use
Additional exercises_ 2. Click the text to change color
Objective: to modify the Dog component and realize the click color change in the component
Tip: text is in the component, so events and methods should be in the component - independent
Illustration:
Correct code (don't look at it first)
components/practise/Dog2.vue
<template>
  <div class="my_div">
    <img
      src="https://scpic.chinaz.net/files/pic/pic9/202003/zzpic23514.jpg"
      alt=""
    />
    <p :style="{backgroundColor: colorStr}" @click="btn">This is a lonely and poor dog</p>
  </div>
</template>

<script>
export default {
  data(){
    return {
      colorStr: ""
    }
  },
  methods: {
    btn(){
      this.colorStr = `rgb(${Math.floor(Math.random() * 256)}, ${Math.floor(Math.random() * 256)}, ${Math.floor(Math.random() * 256)})`
    }
  }
};
</script>

<style>
.my_div {
  width: 200px;
  border: 1px solid black;
  text-align: center;
  float: left;
}

.my_div img {
  width: 100%;
  height: 200px;
}
</style>
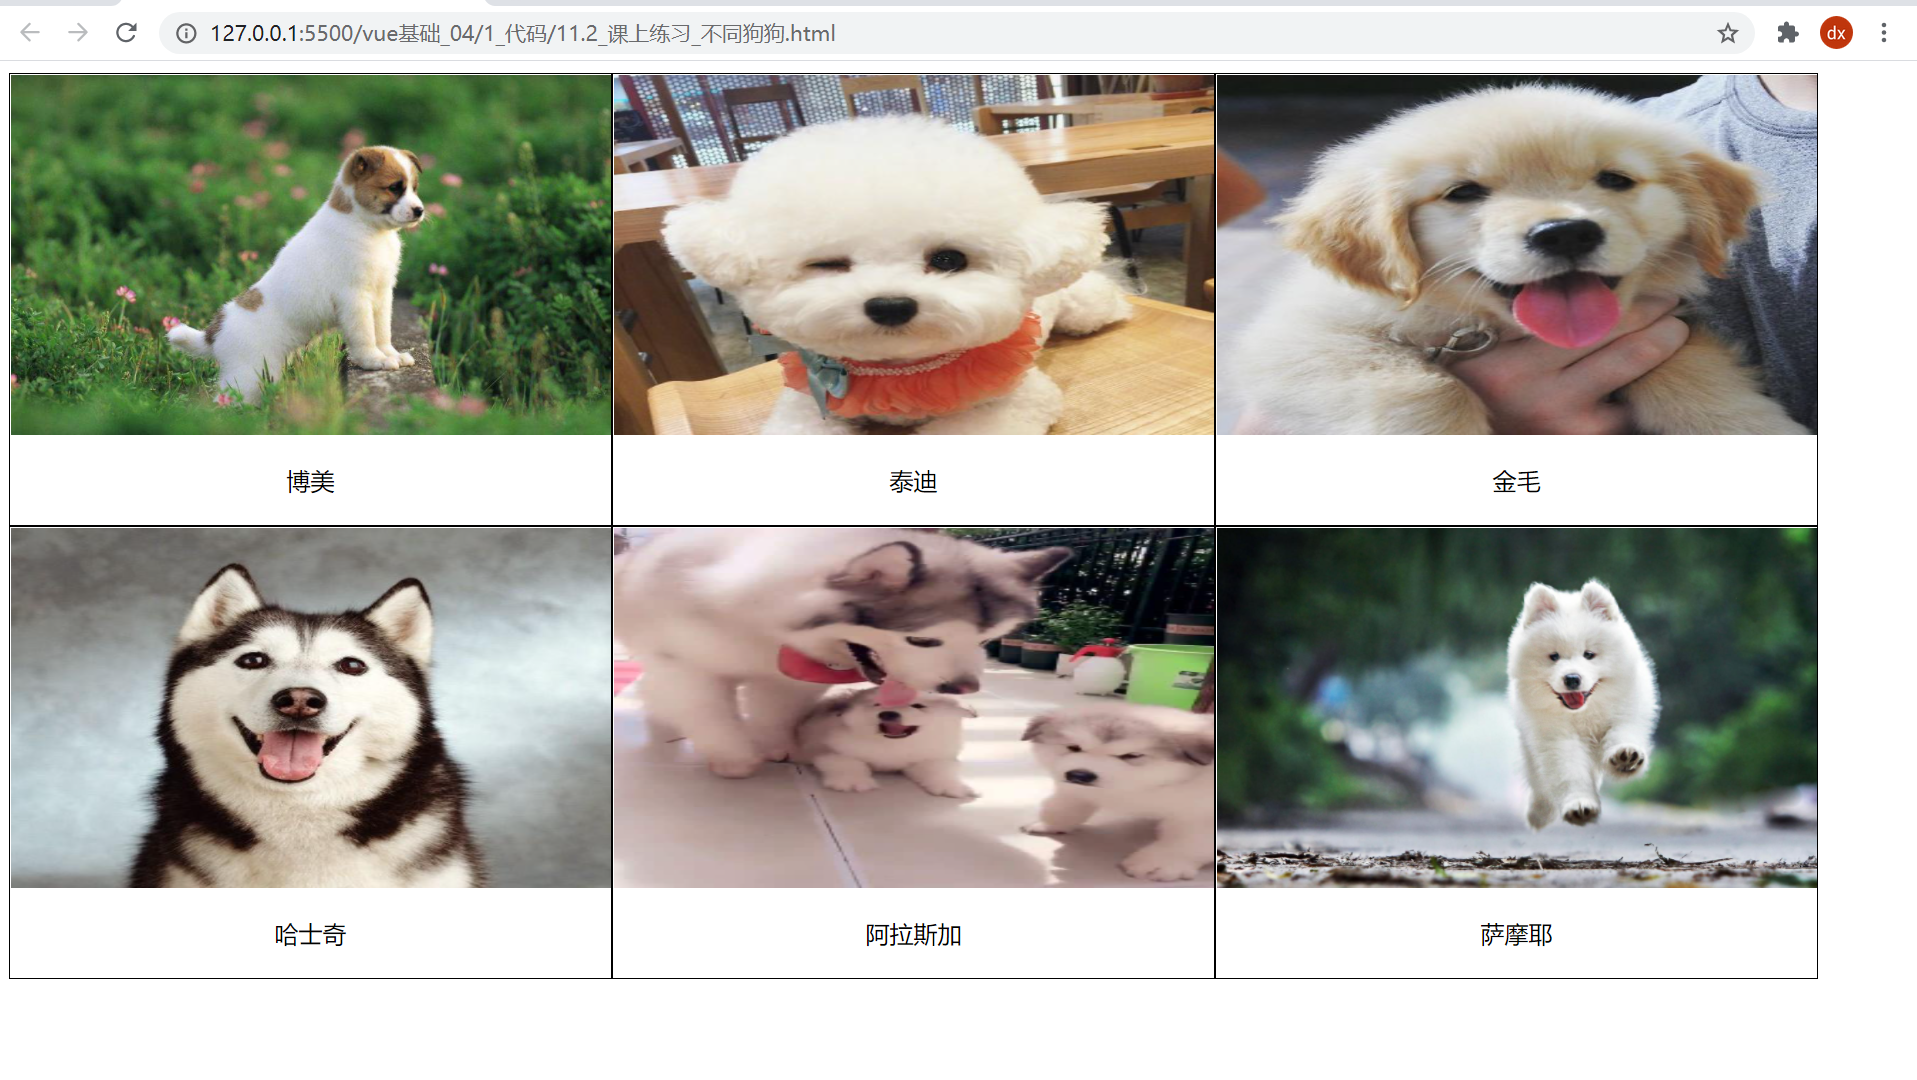
Additional exercises_ 3. Selling dogs
Objective: to recycle data with component display
Data:
[
    {
        dogImgUrl:
        "http://nwzimg.wezhan.cn/contents/sitefiles2029/10146688/images/21129958.jpg",
        dogName: "Pomeranian",
    },
    {
        dogImgUrl:
        "https://ss2.bdstatic.com/70cFvnSh_Q1YnxGkpoWK1HF6hhy/it/u=1224576619,1307855467&fm=26&gp=0.jpg",
        dogName: "poodle",
    },
    {
        dogImgUrl:
        "https://ss2.bdstatic.com/70cFvnSh_Q1YnxGkpoWK1HF6hhy/it/u=2967740259,1518632757&fm=26&gp=0.jpg",
        dogName: "Golden hair",
    },
    {
        dogImgUrl:
        "https://pic1.zhimg.com/80/v2-7ba4342e6fedb9c5f3726eb0888867da_1440w.jpg?source=1940ef5c",
        dogName: "Siberian Husky",
    },
    {
        dogImgUrl:
        "https://timgsa.baidu.com/timg?image&quality=80&size=b9999_10000&sec=1563813435580&di=946902d419c3643e33a0c9113fc8d780&imgtype=0&src=http%3A%2F%2Fvpic.video.qq.com%2F3388556%2Fd0522aynh3x_ori_3.jpg",
        dogName: "Alaska",
    },
    {
        dogImgUrl:
        "https://timgsa.baidu.com/timg?image&quality=80&size=b9999_10000&sec=1563813454815&di=ecdd2ebf479568453d704dffacdfa12c&imgtype=0&src=http%3A%2F%2Fwww.officedoyen.com%2Fuploads%2Fallimg%2F150408%2F1-15040Q10J5B0.jpg",
        dogName: "Samoye",
    },
]
Illustration:
Correct code (not reproducible)
components/practise/Dog3.vue
<template>
  <div class="my_div">
    <img :src="imgurl" alt="" />
    <p :style="{ backgroundColor: colorStr }" @click="btn">{{ dogname }}</p>
  </div>
</template>

<script>
export default {
  props: ["imgurl", "dogname"],
  data() {
    return {
      colorStr: "",
    };
  },
  methods: {
    btn() {
      this.colorStr = `rgb(${Math.floor(Math.random() * 256)}, ${Math.floor(
        Math.random() * 256
      )}, ${Math.floor(Math.random() * 256)})`;


    },
  },
};
</script>

<style scoped>
.my_div {
  width: 200px;
  border: 1px solid black;
  text-align: center;
  float: left;
}

.my_div img {
  width: 100%;
  height: 200px;
}
</style>
App.vue is introduced and used to transfer the data cycle to the component display
<template>
  <div>
    <Dog v-for="(obj, index) in arr"
    :key="index"
    :imgurl="obj.dogImgUrl"
    :dogname="obj.dogName"
    ></Dog>
  </div>
</template>

<script>
import Dog from '@/components/practise/Dog3'
export default {
  data() {
    return {
      // 1. Prepare data
      arr: [
        {
          dogImgUrl:
            "http://nwzimg.wezhan.cn/contents/sitefiles2029/10146688/images/21129958.jpg",
          dogName: "Pomeranian",
        },
        {
          dogImgUrl:
            "https://ss2.bdstatic.com/70cFvnSh_Q1YnxGkpoWK1HF6hhy/it/u=1224576619,1307855467&fm=26&gp=0.jpg",
          dogName: "poodle",
        },
        {
          dogImgUrl:
            "https://ss2.bdstatic.com/70cFvnSh_Q1YnxGkpoWK1HF6hhy/it/u=2967740259,1518632757&fm=26&gp=0.jpg",
          dogName: "Golden hair",
        },
        {
          dogImgUrl:
            "https://pic1.zhimg.com/80/v2-7ba4342e6fedb9c5f3726eb0888867da_1440w.jpg?source=1940ef5c",
          dogName: "Siberian Husky",
        },
        {
          dogImgUrl:
            "https://timgsa.baidu.com/timg?image&quality=80&size=b9999_10000&sec=1563813435580&di=946902d419c3643e33a0c9113fc8d780&imgtype=0&src=http%3A%2F%2Fvpic.video.qq.com%2F3388556%2Fd0522aynh3x_ori_3.jpg",
          dogName: "Alaska",
        },
        {
          dogImgUrl:
            "https://timgsa.baidu.com/timg?image&quality=80&size=b9999_10000&sec=1563813454815&di=ecdd2ebf479568453d704dffacdfa12c&imgtype=0&src=http%3A%2F%2Fwww.officedoyen.com%2Fuploads%2Fallimg%2F150408%2F1-15040Q10J5B0.jpg",
          dogName: "Samoye",
        },
      ],
    };
  },
  components: {
    Dog
  }
};
</script>
Additional exercises_ 4. Choose your favorite dog
Objective: the user clicks the dog's name and displays the name once in the list on the right
effect:
Correct code (not reproducible)
components/practise/Dog4.vue
<template>
  <div class="my_div">
    <img :src="imgurl" alt="" />
    <p :style="{ backgroundColor: colorStr }" @click="btn">{{ dogname }}</p>
  </div>
</template>

<script>
export default {
  props: ["imgurl", "dogname"],
  data() {
    return {
      colorStr: "",
    };
  },
  methods: {
    btn() {
      this.colorStr = `rgb(${Math.floor(Math.random() * 256)}, ${Math.floor(
        Math.random() * 256
      )}, ${Math.floor(Math.random() * 256)})`;

      // Supplement: trigger parent event
      this.$emit("love", this.dogname);
    },
  },
};
</script>

<style scoped>
.my_div {
  width: 200px;
  border: 1px solid black;
  text-align: center;
  float: left;
}

.my_div img {
  width: 100%;
  height: 200px;
}
</style>
App.vue
<template>
  <div>
    <Dog
      v-for="(obj, index) in arr"
      :key="index"
      :imgurl="obj.dogImgUrl"
      :dogname="obj.dogName"
      @love="fn"
    ></Dog>

    <hr />
    <p>Show favorite dog:</p>
    <ul>
      <li v-for="(item, index) in loveArr" :key="index">{{ item }}</li>
    </ul>
  </div>
</template>

<script>
import Dog from "@/components/practise/Dog4";
export default {
  data() {
    return {
      // 1. Prepare data
      arr: [
        {
          dogImgUrl:
            "http://nwzimg.wezhan.cn/contents/sitefiles2029/10146688/images/21129958.jpg",
          dogName: "Pomeranian",
        },
        {
          dogImgUrl:
            "https://ss2.bdstatic.com/70cFvnSh_Q1YnxGkpoWK1HF6hhy/it/u=1224576619,1307855467&fm=26&gp=0.jpg",
          dogName: "poodle",
        },
        {
          dogImgUrl:
            "https://ss2.bdstatic.com/70cFvnSh_Q1YnxGkpoWK1HF6hhy/it/u=2967740259,1518632757&fm=26&gp=0.jpg",
          dogName: "Golden hair",
        },
        {
          dogImgUrl:
            "https://pic1.zhimg.com/80/v2-7ba4342e6fedb9c5f3726eb0888867da_1440w.jpg?source=1940ef5c",
          dogName: "Siberian Husky",
        },
        {
          dogImgUrl:
            "https://timgsa.baidu.com/timg?image&quality=80&size=b9999_10000&sec=1563813435580&di=946902d419c3643e33a0c9113fc8d780&imgtype=0&src=http%3A%2F%2Fvpic.video.qq.com%2F3388556%2Fd0522aynh3x_ori_3.jpg",
          dogName: "Alaska",
        },
        {
          dogImgUrl:
            "https://timgsa.baidu.com/timg?image&quality=80&size=b9999_10000&sec=1563813454815&di=ecdd2ebf479568453d704dffacdfa12c&imgtype=0&src=http%3A%2F%2Fwww.officedoyen.com%2Fuploads%2Fallimg%2F150408%2F1-15040Q10J5B0.jpg",
          dogName: "Samoye",
        },
      ],
      loveArr: []
    };
  },
  components: {
    Dog,
  },
  methods: {
    fn(dogName) {
      this.loveArr.push(dogName)
    },
  },
};
</script>

<style >
</style>
Additional exercises_ 5. Sold out
Objective: to complete the selling out effect of the figure
Requirements:
- If it is 0, it will be displayed that it is sold out!!!
- If the inventory has value, it will not be sold out!!!
- If the inventory has a value, the cumulative total quantity of goods
Requirement: a line is a component for reuse. Here, it is required to use Table > tr (that is, encapsulate tr components)
Note for component usage: html is parsed normally, and Table > tr or Select > option. Although vue rendering page can be customized, it also needs to follow the label relationship of the browser
- You cannot use components directly in Table > tr. you need to specify the component name in the is attribute of tr
- Select > option also cannot encapsulate the options component. You need to specify the component name in the is attribute of option
Effect demonstration:
The array in vue instance data is as follows
goodsArr: [
    {
        count: 0,
        goodsName: "Watermelon"
    }, {
        count: 0,
        goodsName: "Banana"
    }, {
        count: 0,
        goodsName: "Orange"
    }, {
        count: 0,
        goodsName: "Pineapple"
    }, {
        count: 0,
        goodsName: "Strawberry"
    }
]
Correct code (not reproducible)
components/practise/MyTr.vue
<template>
  <tr>
    <td>
      <input type="number" v-model.number="obj['count']"/>
    </td>
    <td>
      <span>{{ obj["goodsName"] }}</span>
    </td>
    <td>
      <span v-show="obj['count'] == 0">Sold out!!!</span>
    </td>
  </tr>
</template>

<script>
export default {
    // Importing objects is risky, but if it is a one-to-one relationship, you can import objects - directly modify the value in the object to affect the external effect
    props: ["obj"]
};
</script>

<style>
</style>
App.vue use
<template>
  <div>
    <table>
      <!-- 2. use tr assembly, Incoming required data -->
      <tr
        is="myTr"
        v-for="(item, index) in goodsArr"
        :key="index"
        :obj="item"
        :index="index"
      ></tr>
    </table>
    <p>All Number:{{ sumNumber }}</p>
  </div>
</template>

<script>
import MyTr from '@/components/practise/MyTr'
export default {
  data() {
    return {
      goodsArr: [
        {
          count: 0,
          goodsName: "Watermelon",
        },
        {
          count: 0,
          goodsName: "Banana",
        },
        {
          count: 0,
          goodsName: "Orange",
        },
        {
          count: 0,
          goodsName: "Pineapple",
        },
        {
          count: 0,
          goodsName: "Strawberry",
        },
      ],
    };
  },
  components: {
    MyTr
  },
  computed: {
    sumNumber(){
      return this.goodsArr.reduce((sum, obj) => sum += obj.count * 1, 0)
    }
  }
};
</script>

<style>
</style>
Additional exercises_ 6. Buy something delicious
Objective: display the commodity list, then package the components to realize the functions of increase and decrease, and count the total price at the end
Requirements: trade name, increase the quantity, reduce this one, and package it into components for use
Effect demonstration:
Data:
[
    {
        "shopName": "Cobic chips",
        "price": 5.5,
        "count": 0
    },
    {
        "shopName": "strawberry jam",
        "price": 3.5,
        "count": 0
    },
    {
        "shopName": "braised pork in brown sauce",
        "price": 55,
        "count": 0
    },
    {
        "shopName": "instant noodles",
        "price": 12,
        "count": 0
    }
]
Correct code (not reproducible)
components/practise/Food.vue
<template>
  <div>
    <span>{{ goodsname }}</span>
    <button @click="add(ind)">+</button>
    <span> {{ count }} </span>
    <button @click="sec(ind)">-</button>
  </div>
</template>

<script>
export default {
    props: ['goodsname', 'ind', 'count'], // Trade name, index, quantity
    methods: {
        add(ind){
            this.$emit('addE', ind)
        },
        sec(ind){
            this.$emit("secE", ind)
        }
    }
};
</script>
App.vue
<template>
  <div>
    <p>The list of goods is as follows:</p>
    <div v-for="(obj, index) in shopData" :key="index">
      {{ obj.shopName }} -- {{ obj.price }}element/share
    </div>
    <p>Please select the purchase quantity:</p>
    <Food
      v-for="(obj, index) in shopData"
      :key="index + ' '"
      :goodsname="obj.shopName"
      :ind="index"
      :count="obj.count"
      @addE="addFn"
      @secE="secFn"
    >
    </Food>
    <p>The total price is: {{ allPrice }}</p>
  </div>
</template>

<script>
import Food from "@/components/practise/Food";
export default {
  data() {
    return {
      // Commodity data
      shopData: [
        {
          shopName: "Cobic chips",
          price: 5.5,
          count: 0,
        },
        {
          shopName: "strawberry jam",
          price: 3.5,
          count: 0,
        },
        {
          shopName: "braised pork in brown sauce",
          price: 55,
          count: 0,
        },
        {
          shopName: "instant noodles",
          price: 12,
          count: 0,
        },
      ],
    };
  },
  components: {
    Food,
  },
  methods: {
    addFn(ind){
      this.shopData[ind].count++
    },
    secFn(ind){
      this.shopData[ind].count > 0 && this.shopData[ind].count--
    }
  },
  computed: {
    allPrice(){
      return this.shopData.reduce((sum, obj) => sum += obj.count * obj.price, 0)
    }
  }
};
</script>
Write at the end
It's not easy to be original. I also hope you guys can support extcolor{blue} {it's not easy to be original. I also hope you guys can support} it's not easy to be original. I also hope you guys can support it
?? Praise, your recognition is the driving force of my creation! extcolor{green} {like it, your recognition is the driving force of my creation!} Praise, your recognition is the driving force of my creation!
Collection, your favor is the direction of my efforts! extcolor{green} {collection, your favor is the direction of my efforts!} Collection, your favor is the direction of my efforts!
Comment, your opinion is the wealth of my progress! extcolor{green} {comment, your opinion is the wealth of my progress!} Comment, your opinion is the wealth of my progress!