Flume
1, Overview
1.Flume definition
Flume is a highly available, reliable and distributed system for massive log collection, aggregation and transmission provided by Cloudera. Flume is based on streaming architecture, which is flexible and simple.

2.Flume advantages
① It can be integrated with any storage process
② When the input data rate is greater than the write destination storage rate, flume will buffer to reduce the pressure on hdfs.
③ The transaction in flume is based on channel and uses two transaction models (sender + receiver) to ensure that messages are sent reliably.
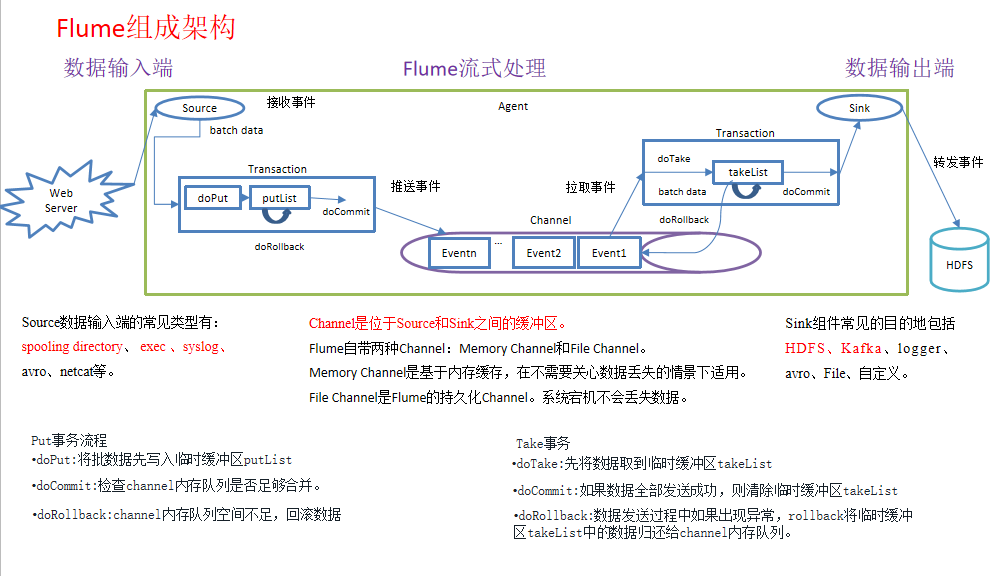
Flume uses two independent transactions to deliver events from source to channel and from channel to sink. Once all the data in the transaction is successfully committed to the channel, the source considers that the data reading is completed. Similarly, only the data successfully written by sink will be removed from the channel.
3.Flume composition structure
Figure Flume composition architecture
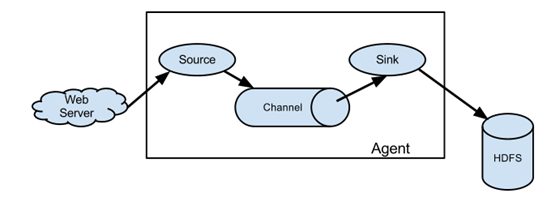
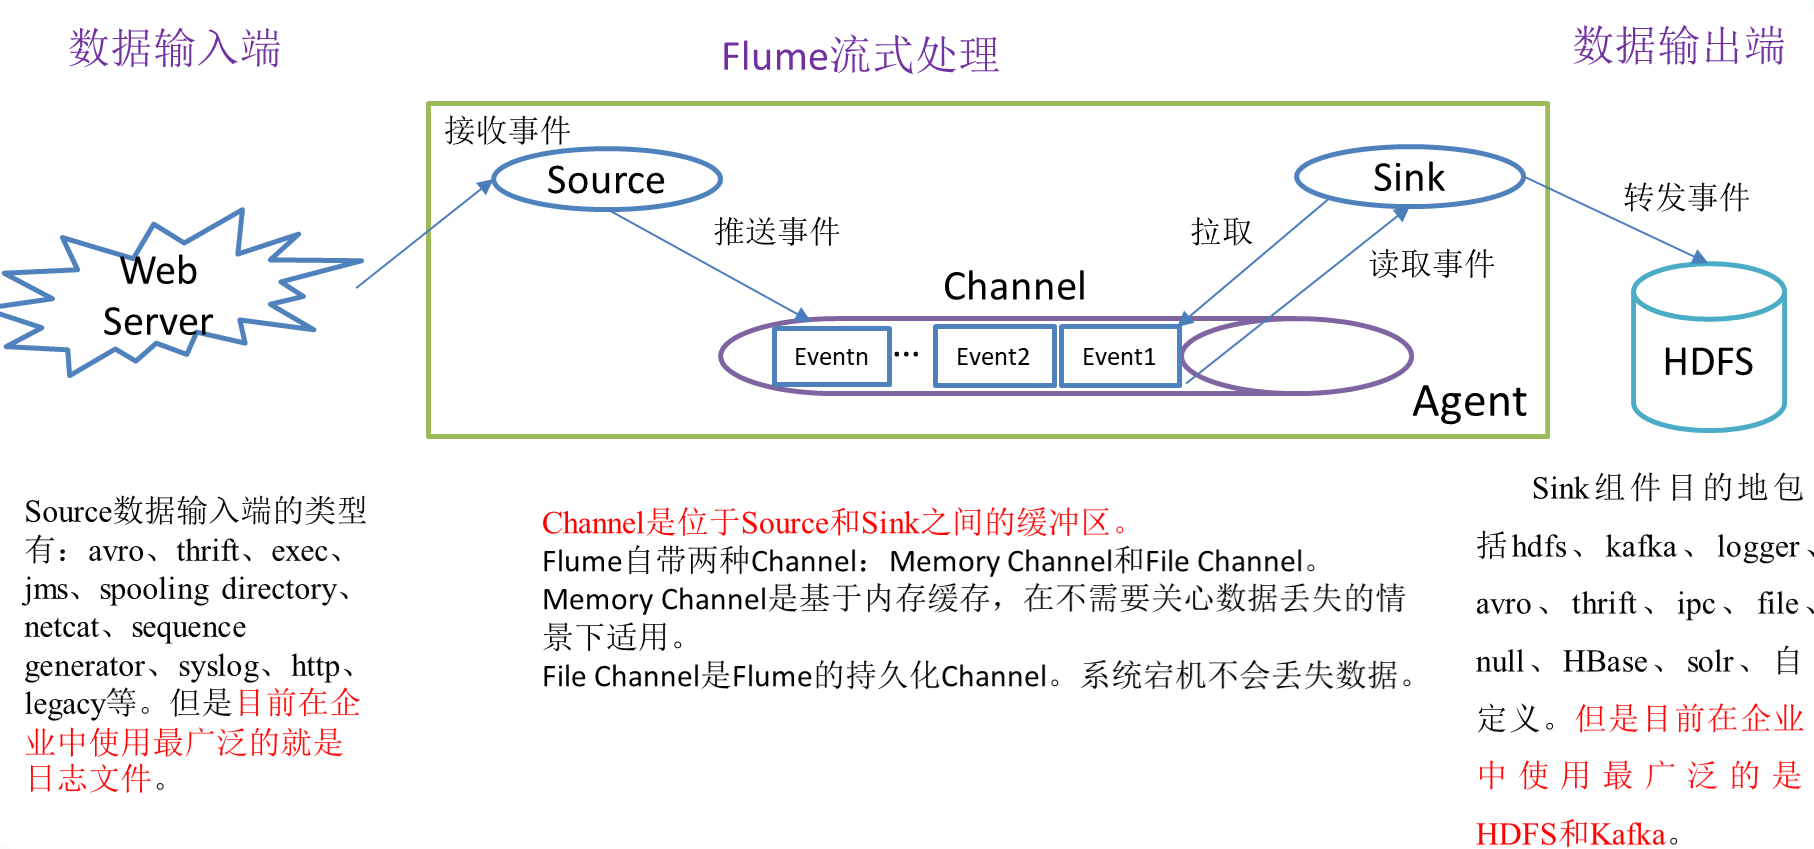
Figure detailed explanation of Flume composition structure
4.Flume assembly
-
Agent
Agent is a JVM process that sends data from the source to the destination in the form of events.
Agent is mainly composed of three parts: Source, Channel and Sink.
-
Source (data source, i.e. accept data)
Source is the component responsible for receiving data to Flume Agent. The source component can handle various types and formats of log data, including avro, thrift, exec, jms, spooling directory, netcat, sequence generator, syslog, http and legacy.
-
Channel (cache data to solve the problem of different rates between Source and Sink)
Channel is the buffer between Source and Sink. Therefore, channel allows Source and Sink to operate at different rates. Channel is thread safe and can handle write operations of several sources and read operations of several Sink at the same time.
Flume comes with two channels: Memory Channel and File Channel.
Memory Channel is a queue in memory. Memory Channel is applicable when there is no need to care about data loss. If you need to care about data loss, the Memory Channel should not be used because data loss will be caused by program death, machine downtime or restart.
File Channel writes all events to disk. Therefore, data will not be lost in case of program shutdown or machine downtime.
-
Sink (destination, i.e. to whom the data is delivered and sent to the destination) (each sink takes data in only one channel, i.e. only one channel)
Sink constantly polls events in the Channel and removes them in batches, and writes these events in batches to the storage or indexing system, or is sent to another Flume Agent.
Sink is completely transactional. Before bulk deleting data from the Channel, each sink starts a transaction with the Channel. Once batch events are successfully written out to the storage system or the next Flume Agent, sink will commit transactions using the Channel. Once the transaction is committed, the Channel deletes the event from its own internal buffer.
Sink component destinations include hdfs, kafka, logger, avro, thrift, ipc, file, null, HBase, solr, and custom.
-
Event source accepts packets
Transmission unit, the basic unit of Flume data transmission, sends data from the source to the destination in the form of events. Event consists of an optional header and a byte array containing data. Header is a HashMap containing key value string pairs.
headers message header (stored in the form of k-v) body message body (hexadecimal, message content)

2, Installation
1. Installation address
1) Flume official website address
2) Document viewing address
http://flume.apache.org/FlumeUserGuide.html
3) Download address
http://archive.apache.org/dist/flume/
2. Installation steps
Preparation: install JDK and configure environment variables (ip, firewall, domain name, hostname)
1) Add apache-flume-1.9.0-bin tar. GZ upload to the / opt/module directory of linux
2) Unzip apache-flume-1.9.0-bin.exe tar. GZ to / opt/installs directory
3) Set flume env under flume/conf Modify the sh.template file to flume env SH and configure flume env SH file
[root@flume45 installs]# tar -zxvf apache-flume-1.9.0-bin.tar.gz -C /opt/installs/
[root@flume45 installs]# mv apache-flume-1.9.0-bin/ flume1.9
[root@flume45 conf]#pwd
/opt/installs/flume1.9/conf
[root@flume45 conf]# mv flume-env.sh.template flume-env.sh
[root@flume45 conf]# vi flume-env.sh
export JAVA_HOME=/opt/installs/jdk1.8/

[root@flume45 flume1.9]# bin/flume-ng version
Flume 1.9.0
Source code repository: https://git-wip-us.apache.org/repos/asf/flume.git
Revision: d4fcab4f501d41597bc616921329a4339f73585e
Compiled by fszabo on Mon Dec 17 20:45:25 CET 2018
From source with checksum 35db629a3bda49d23e9b3690c80737f9
3, Enterprise development case
1. Monitoring port data cases
- Case requirements
First, start the Flume task to monitor the local 44444 port [server];
Then send a message [Client] to the local 44444 port through the netcat tool;
Finally, Flume displays the monitored data on the console in real time.
-
requirement analysis

-
Implementation steps
-
Installing the netcat tool
netcat can monitor the network port of the computer and realize data transmission based on Tcp/IP.
[root@flume45 flume1.9]# yum install -y nc
-
Create Flume Agent configuration file Demo1 netcat memory logger conf
stay flume Create under directory job Folder and enter job folder
[root@flume45 flume1.9]# mkdir job
 stay job Create under folder Flume Agent configuration file demo1-netcat-memory-logger.conf
[root@flume45 job]# touch demo1-netcat-memory-logger.conf
[root@flume45 job]# ls
demo1-netcat-memory-logger.conf

stay flume-netcat-logger.conf Add the following content to the file
[root@flume45 job]# vim demo1-netcat-memory-logger.conf

# Add the following
# Name the components on this agent
a1.sources = r1
a1.sinks = k1
a1.channels = c1

# Describe/configure the source
a1.sources.r1.type = netcat
a1.sources.r1.bind = 0.0.0.0
a1.sources.r1.port = 44444

# Describe the sink
a1.sinks.k1.type = logger

# Use a channel which buffers events in memory
a1.channels.c1.type = memory

# Bind the source and sink to the channel
a1.sources.r1.channels = c1
a1.sinks.k1.channel = c1
Note: the configuration file comes from the official manual http://flume.apache.org/FlumeUserGuide.html
- Start flume listening port first
[root@flume0 apache-flume-1.9.0-bin]# bin/flume-ng agent --conf conf --name a1 --conf-file job/demo1-netcat-memory-logger.conf -Dflume.root.logger=INFO,console
Parameter Description:
-- conf conf /: indicates that the configuration file is stored in the conf / directory (also abbreviated as - c)
-- name a1: indicates that the agent is named a1
--conf-file job/xxxx.conf: flume the configuration file read this time is XXXX in the job folder Conf file.
-Dflume.root.logger==INFO,console: - D indicates that flume is dynamically modified when flume is running root. The logger parameter attribute value, and set the console log printing level to info level. Log levels include: log, info, warn and error.
- Use the netcat tool to send content to port 444 of this machine
[root@flume45 flume1.9]# nc localhost 44444
hah
OK
8997534
OK
568974
OK
- Observe the received data on the Flume monitoring page
2021-07-05 17:43:16,961 (SinkRunner-PollingRunner-DefaultSinkProcessor) [INFO - org.apache.flume.sink.LoggerSink.process(LoggerSink.java:95)] Event: { headers:{} body: 68 61 68    		hah }
2021-07-05 17:43:33,406 (SinkRunner-PollingRunner-DefaultSinkProcessor) [INFO - org.apache.flume.sink.LoggerSink.process(LoggerSink.java:95)] Event: { headers:{} body: 38 39 39 37 35 33 34   8997534 }
2021-07-05 17:43:50,033 (SinkRunner-PollingRunner-DefaultSinkProcessor) [INFO - org.apache.flume.sink.LoggerSink.process(LoggerSink.java:95)] Event: { headers:{} body: 35 36 38 39 37 34      568974 }
2. Read local files to HDFS cases in real time
Preparation: set up hadoop environment and start hdfs
1) Case requirements: monitor the contents of log files in real time and upload them to HDFS
2) Demand analysis:

3) Implementation steps:
-
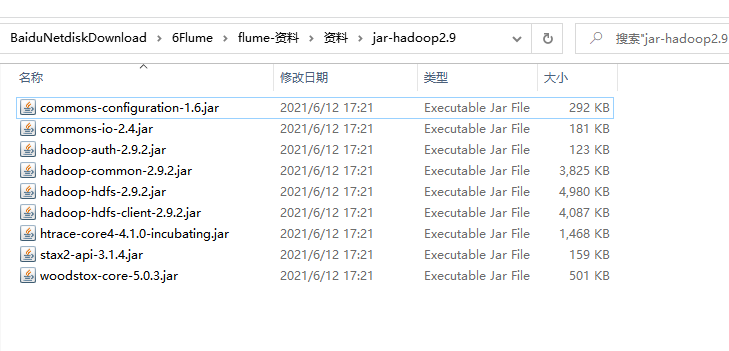
Flume must hold Hadoop related jar packages to output data to HDFS
Copy the following jar package to / opt / installs / flume1 9 / lib folder.
-
In the job directory, create demo2-exec-memory-hdfs Conf file
[root@flume45 job]# touch demo2-exec-memory-hdfs.conf

# The contents are as follows
# Name the components on this agent
a2.sources = r2
a2.sinks = k2
a2.channels = c2

# Describe/configure the source
a2.sources.r2.type = exec(Command type, the command is given below)
a2.sources.r2.command = tail -F /opt/a.log

# Describe the sink
a2.sinks.k2.type = hdfs
a2.sinks.k2.hdfs.path = hdfs://flume0:9000/flume/%y-%m-%d/%H
# Increase the timestamp, otherwise the upload of hdfs fails
a2.sinks.k2.hdfs.useLocalTimeStamp = true
#Set the file type and modify the upload file format type. By default, the serialization cannot be understood and is changed to text type
a2.sinks.k2.hdfs.fileType = DataStream

# Use a channel which buffers events in memory
a2.channels.c2.type = memory

# Bind the source and sink to the channel
a2.sources.r2.channels = c2
a2.sinks.k2.channel = c2
For all time-related escape sequences, there must be a key with "timestamp" in the Event Header
(unless hdfs.uselocaltimestamp is set to true, this method will automatically add a timestamp using the TimestampInterceptor). (a3.sinks.k3.hdfs.useLocalTimeStamp = true)
-
Perform monitoring configuration
[root@flume45 flume1.9]# bin/flume-ng agent --conf conf --name a2 --conf-file job/demo2-exec-memory-hdfs.conf -Dflume.root.logger=INFO,console
-
Use echo command to simulate log generation
[root@flume45 test]# echo hello >> a.log
-
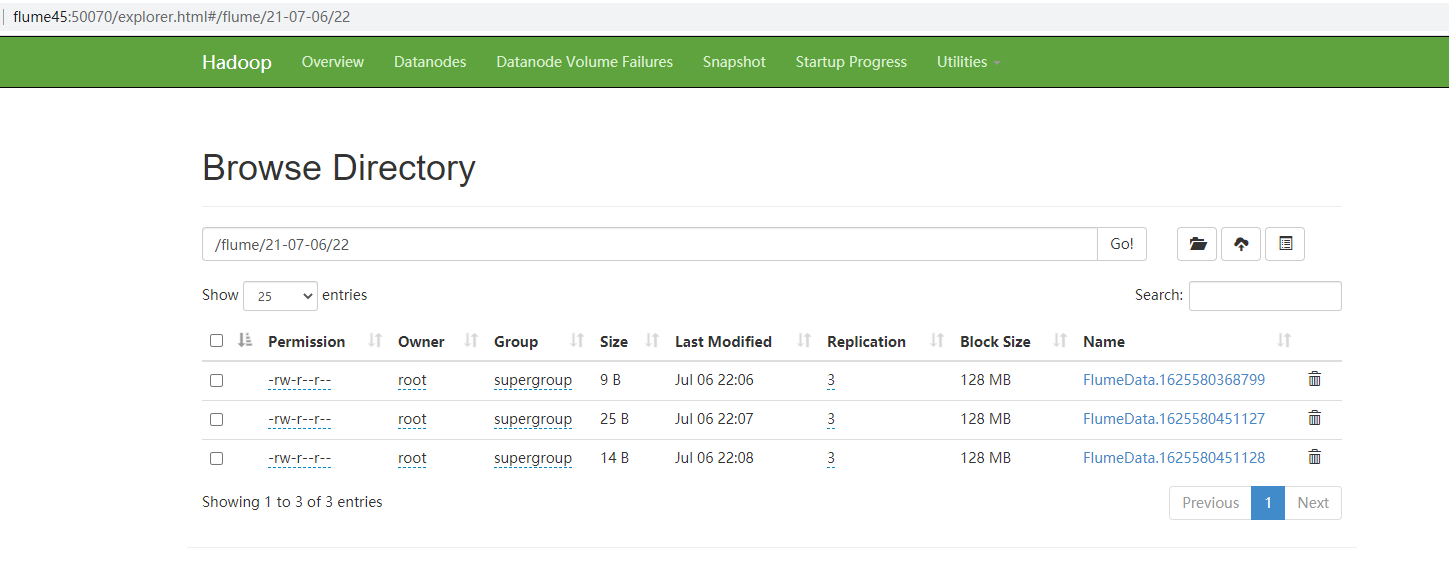
Accessing hdfs http://flume45:50070
Note: clock synchronization problem
linux time synchronization command:
1. Install the software using yum. In case of any query during software installation, select y. ntp is the time synchronization command: yum -y install ntp
2. Execute the synchronization command: ntpdate time1 aliyun. com
3. View current system time: date
Time synchronization has special significance in distributed programs. It effectively avoids the possibility that two hosts may receive error messages from future files in the process of data transmission in the distributed file system.
3. Read the directory file to the HDFS case in real time
1) Case requirement: use Flume to listen to files in the whole directory
2) Demand analysis:

3) Implementation steps:
-
Create demo3 spoolingdir MEM HDFS conf
[root@flume45 job]# touch demo3-SpoolingDir-mem-hdfs.conf

# The contents are as follows
a3.sources = r3
a3.sinks = k3
a3.channels = c3

# Describe/configure the source monitoring directory (you need to create the monitored folder in advance)
a3.sources.r3.type = spooldir
a3.sources.r3.spoolDir = /opt/test/upload
a3.sources.r3.fileSuffix = .done
(prevent agent The downtime can be distinguished by repeated reading and adding a suffix. The file reading is completed.done sign)
# Describe the sink
a3.sinks.k3.type = hdfs
a3.sinks.k3.hdfs.path = hdfs://flume45:9000/flume2/upload/%y-%m-%d/%H
a3.sinks.k3.hdfs.useLocalTimeStamp = true
a3.sinks.k3.hdfs.fileType = DataStream

# Use a channel which buffers events in memory
a3.channels.c3.type = memory

# Bind the source and sink to the channel
a3.sources.r3.channels = c3
a3.sinks.k3.channel = c3
-
Start monitor folder command
[root@flume45 flume1.9]# bin/flume-ng agent --conf conf --name a3 --conf-file job/demo3-SpoolingDir-mem-hdfs.conf -Dflume.root.logger=INFO,console
Note: when using Spooling Directory Source
1) do not create and continuously modify files in the monitoring directory, and subsequent additions will not take effect
2) the uploaded files will be displayed in done end
3) the monitored folder scans for file changes every 500 milliseconds
-
Add files to the upload folder
[root@flume45 test]# mkdir /opt/test/upload
[root@flume45 test]# cp a.log /opt/test/upload/
[root@flume45 upload]# ls
a.log.done
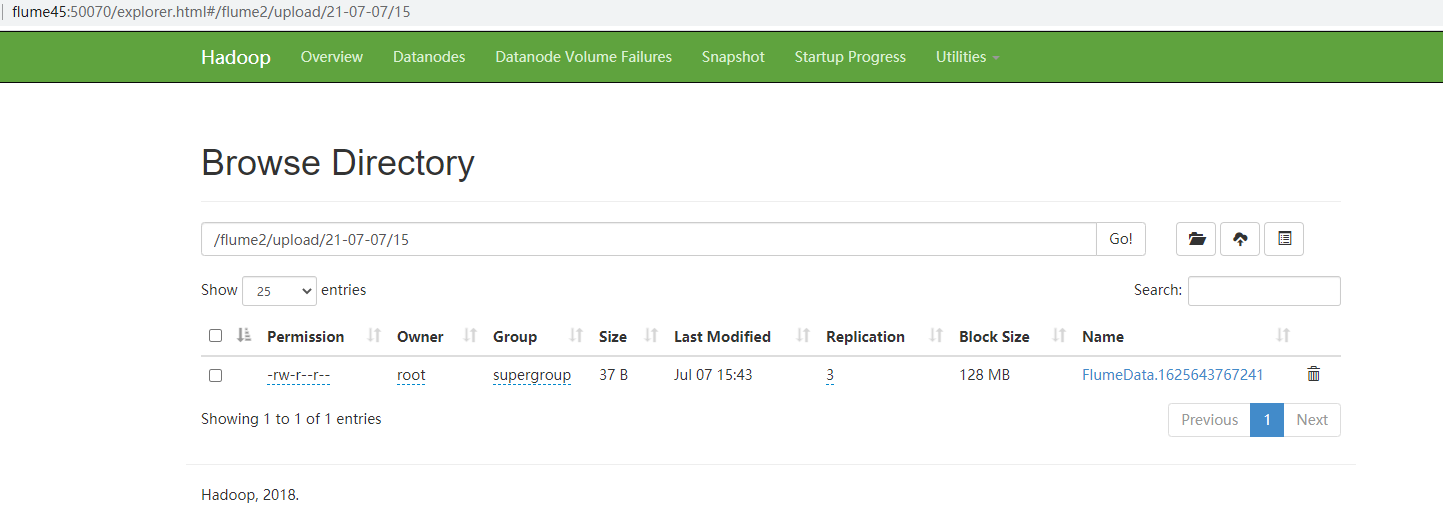
-
Accessing hdfs http://flume45:50070
4. Single data source multi export case (the selector is explained in Chapter 6)
The schematic diagram of single Source, multi-Channel and Sink is shown in the figure:
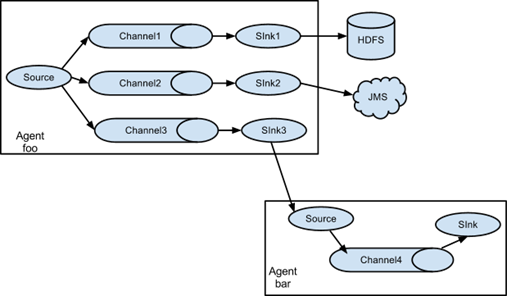
1) Case requirements: Flume-1 is used to monitor file changes, and Flume-1 passes the changes to Flume-2,
Flume-2 is responsible for storing to HDFS. At the same time, Flume-1 transmits the changes to Flume-3,
Flume-3 is responsible for outputting to the local file system.
2) Demand analysis:

3) Implementation steps:
-
preparation
stay/optinstalls/flume1.9/job Create under directory group4 folder
[root@flume45 job]# mkdir group4

stay/opt Create under directory datas/flume folder
[root@flume45 job]# mkdir -p /opt/datas/flume2
 monitor a.log file
-
In the group1 directory, create demo4-exec-memory-avro conf
[root@flume45 job]# mkdir group4
[root@flume45 group4]# touch demo4-exec-memory-avro.conf
[root@flume45 group4]# touch demo4-avro-memory-hdfs.conf
[root@flume45 group4]# touch demo4-avro-memory-file_roll.conf

# Configure one source, two channel s and two sink for receiving log files

# Add the following
# Name the components on this agent
a1.sources = r1
a1.channels = c1 c2
a1.sinks = k1 k2

# Copy data flow to all channel s
a1.sources.r1.selector.type = replicating

# Describe/configure the source
a1.sources.r1.type = exec
a1.sources.r1.command = tail -F /opt/datas/flume2/a.log

# Describe the channel
a1.channels.c1.type = memory
a1.channels.c2.type = memory

# Describe the sink
# avro on sink side is a data sender
a1.sinks.k1.type = avro
a1.sinks.k1.hostname = flume45
a1.sinks.k1.port = 4141

a1.sinks.k2.type = avro
a1.sinks.k2.hostname = flume45
a1.sinks.k2.port = 4242

# Bind the source and sink to the channel
a1.sources.r1.channels = c1 c2
a1.sinks.k1.channel = c1
a1.sinks.k2.channel = c2
Note: Avro is a language independent data serialization and RPC framework created by Doug Cutting, founder of Hadoop.
Note: RPC (Remote Procedure Call) - Remote Procedure Call. It is a protocol that requests services from remote computer programs through the network without understanding the underlying network technology.
-
In the group4 directory, create demo4 Avro memory HDFS conf
[root@flume45 group4]# touch demo4-avro-memory-hdfs.conf

# Add the following
# Name the components on this agent
a2.sources = r2
a2.sinks = k2
a2.channels = c2

# Describe/configure the source
# avro on the source side is a data receiving service
a2.sources.r2.type = avro
a2.sources.r2.bind = 0.0.0.0
a2.sources.r2.port = 4141

# Describe the channel
a2.channels.c2.type = memory

# Describe the sink
a2.sinks.k2.type = hdfs
a2.sinks.k2.hdfs.path = hdfs://flume45:9000/flume4/%y-%m-%d/%H
#Data display storage format
a2.sinks.k2.hdfs.fileType = DataStream
#Use local timestamp
a2.sinks.k2.hdfs.useLocalTimeStamp = true

# Bind the source and sink to the channel
a2.sources.r2.channels = c2
a2.sinks.k2.channel = c2
-
In the group4 directory, create demo4 Avro memory file_ roll. conf
[root@flume45 group45]# touch demo4-avro-memory-file.conf

# Add the following
# Name the components on this agent
a3.sources = r3
a3.channels = c3
a3.sinks = k3

# Describe/configure the source
a3.sources.r3.type = avro
a3.sources.r3.bind = 0.0.0.0
a3.sources.r3.port = 4242

# Describe the channel
a3.channels.c3.type = memory

# Describe the sink
# Output to / opt / data / flume2
a3.sinks.k3.type = file_roll
a3.sinks.k3.sink.directory = /opt/datas/flume2

# Configure the scroll time
a3.sinks.k3.sink.rollInterval = 3000

# Bind the source and sink to the channel
a3.sources.r3.channels = c3
a3.sinks.k3.channel = c3
Tip: the output local directory must be an existing directory. If the directory does not exist, a new directory will not be created.
-
Execution profile
[root@flume45 flume1.9]# bin/flume-ng agent --conf conf --name a3 --conf-file job/group4/demo4-avro-memory-file_roll.conf

[root@flume45 flume1.9]# bin/flume-ng agent --conf conf --name a2 --conf-file job/group4/demo4-avro-memory-hdfs.conf

[root@flume45 flume1.9]# bin/flume-ng agent --conf conf --name a1 --conf-file job/group4/demo4-exec-memory-avro.conf
-
Submit test data
[root@flume45 flume2]# echo hahaha >> a.log
-
Check data on HDFS
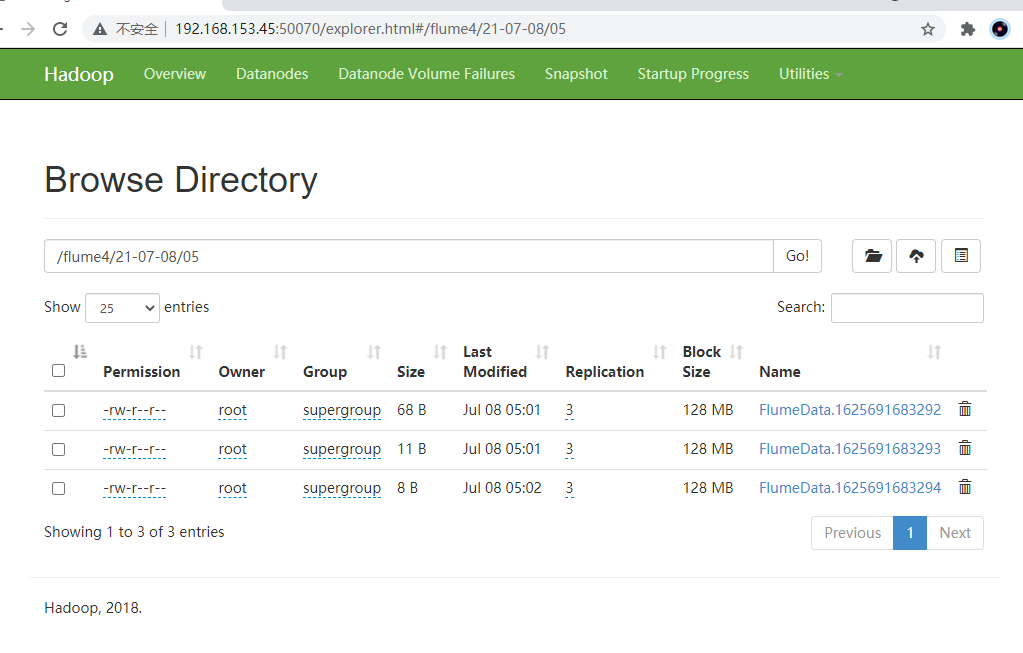
-
Check the data in / opt / data / flume2 / a.log

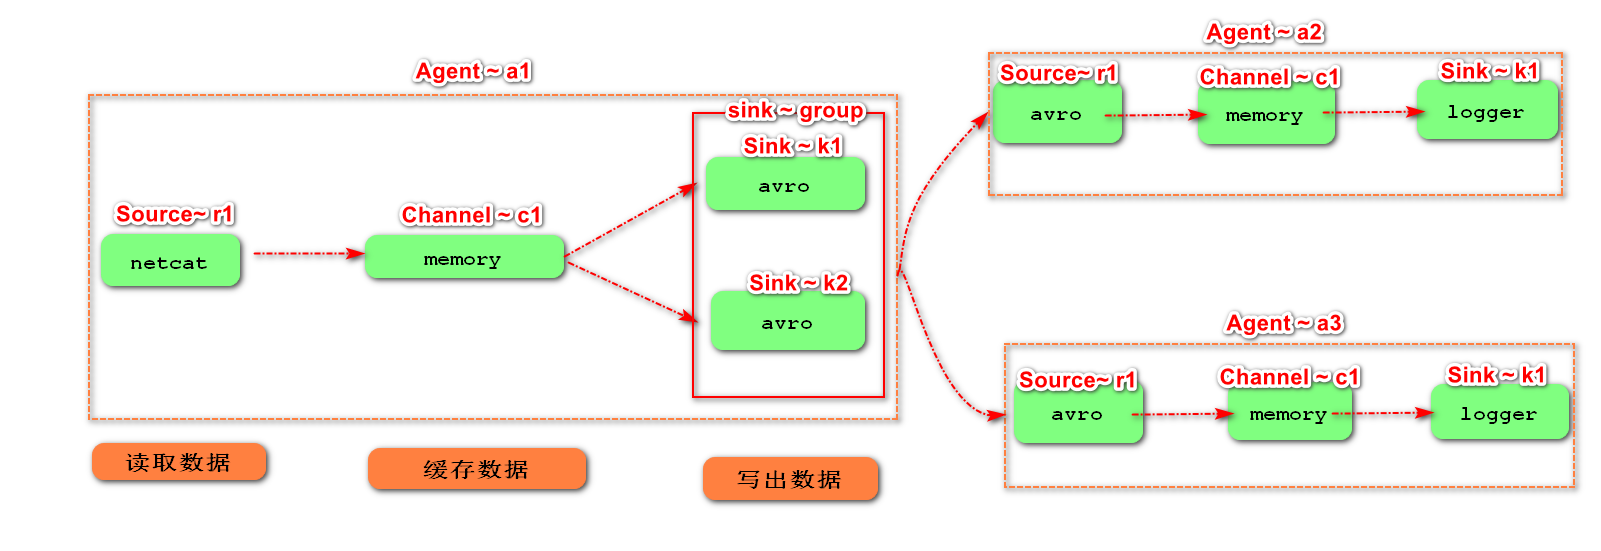
5. Single data source multi export case (Sink group)
Sink group: a sink gets the data in the channel.
There are two schemes for handling event s in sink group:
I. load balancing:_ Balance (two equal, polling)
II. Disaster recovery: failover (the higher the priority number, the higher the priority)
The schematic diagram of single Source, Channel and multi sink (load balancing) is shown in the figure.
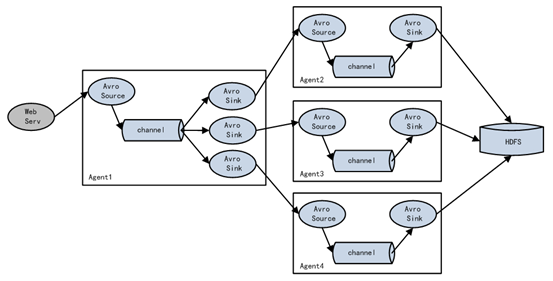
1) Case requirements: flume-1 is used to monitor network port 44444. Flume-1 transmits the changes to Flume-2, which is responsible for outputting them to the console. At the same time, flume-1 transmits the changes to Flume-3, which is also responsible for outputting them to the console
2) Demand analysis:
3) Implementation steps:
-
preparation
stay/optinstalls/flume1.9/job Create under directory group5 folder
[root@flume45 job]# mkdir group5
-
In the group5 directory, create demo5 group sins conf
[root@flume45 job]# cd group5
[root@flume45 group5]# touch demo5-netcat-memeory-avro.conf

# Configure one source, one channel and two sink for receiving log files

# Add the following
# Name the components on this agent
a1.sources = r1
a1.channels = c1
a1.sinkgroups = g1
a1.sinks = k1 k2

# Describe/configure the source
a1.sources.r1.type = netcat
a1.sources.r1.bind = flume45
a1.sources.r1.port = 44444

# Describe the channel
a1.channels.c1.type = memory

a1.sinkgroups.g1.sinks = k1 k2
#sink's strategy for handling event s: load balancing
a1.sinkgroups.g1.processor.type = load_balance

# Describe the sink
a1.sinks.k1.type = avro
a1.sinks.k1.hostname = flume45
a1.sinks.k1.port = 4141

a1.sinks.k2.type = avro
a1.sinks.k2.hostname = flume45
a1.sinks.k2.port = 4242

# Bind the source and sink to the channel
a1.sources.r1.channels = c1
a1.sinks.k1.channel = c1
a1.sinks.k2.channel = c1
-
In the group5 directory, create demo5-sink-to-first conf
[root@flume45 group5]# touch demo5-sink-to-first.conf

# Add the following
# Name the components on this agent
a2.sources = r2
a2.sinks = k2
a2.channels = c2

# Describe/configure the source
a2.sources.r2.type = avro
a2.sources.r2.bind = 0.0.0.0
a2.sources.r2.port = 4141

# Describe the sink
a2.sinks.k2.type = logger

# Describe the channel
a2.channels.c2.type = memory

# Bind the source and sink to the channel
a2.sources.r2.channels = c2
a2.sinks.k2.channel = c2
-
In the group5 directory, create demo5-sink-to-second conf
[root@flume45 group5]# touch demo5-sink-to-second.conf

# Name the components on this agent
a3.sources = r1
a3.sinks = k1
a3.channels = c2

# Describe/configure the source
a3.sources.r1.type = avro
a3.sources.r1.bind = 0.0.0.0
a3.sources.r1.port = 4242

# Describe the sink
a3.sinks.k1.type = logger

# Describe the channel
a3.channels.c2.type = memory

# Bind the source and sink to the channel
a3.sources.r1.channels = c2
a3.sinks.k1.channel = c2
**In fact, just change it a3 Just change it
-
Execution profile
[root@flume45 flume1.9]# bin/flume-ng agent --conf conf --name a3 --conf-file job/group2/demo5-sink-to-second.conf -Dflume.root.logger=INFO,console

[root@flume45 flume1.9]# bin/flume-ng agent --conf conf --name a2 --conf-file job/group2/demo5-sink-to-first.conf -Dflume.root.logger=INFO,console

[root@flume45 flume1.9]# bin/flume-ng agent --conf conf --name a1 --conf-file job/group2/demo5-netcat-memory-avro.conf
-
Use the netcat tool to send content to port 444 of this machine
nc flume45 44444
-
View the console print logs of Flume2 and Flume3
Two printing methods:
	polling  robin((default)
	random random
6. Multi data source summary cases
Schematic diagram of summarizing data from multiple sources to single Flume:
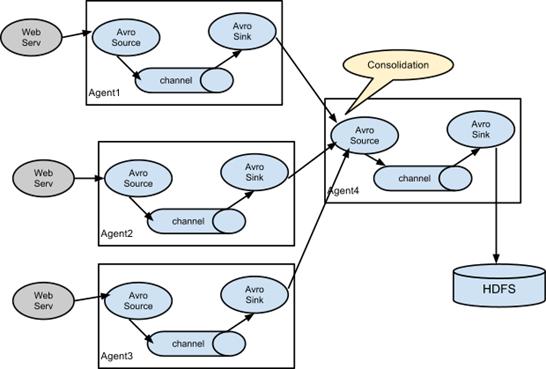
1) Case requirements:
Realize sending the data of multiple agents to one agent
2) Demand analysis:
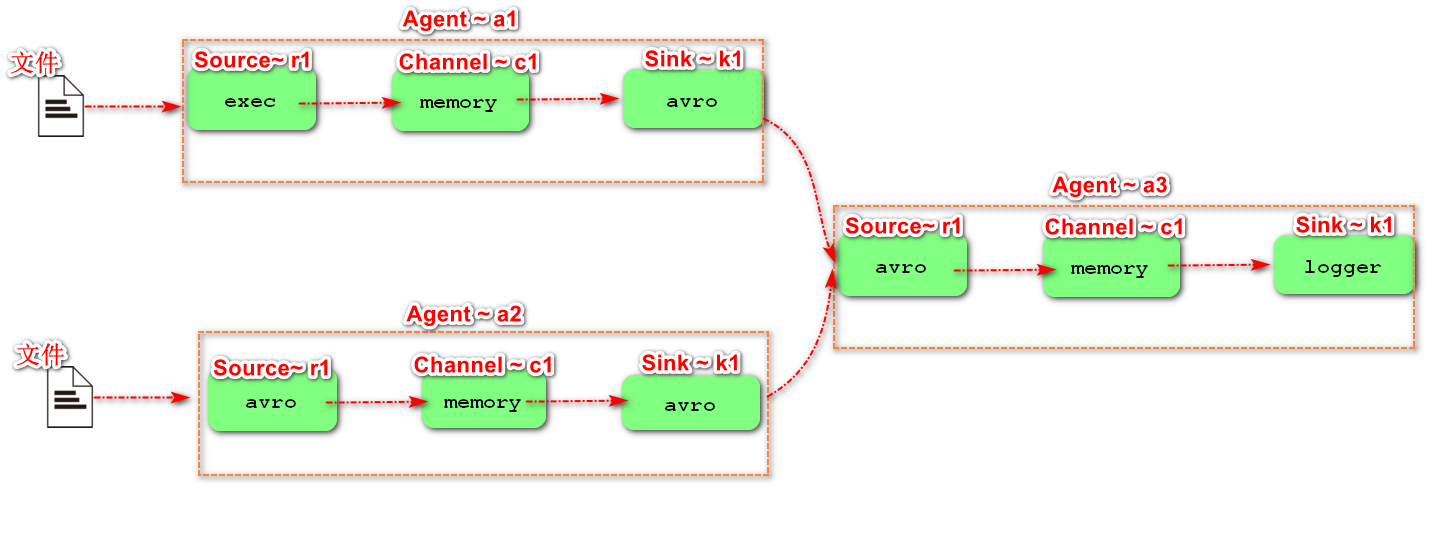
3) Implementation steps:
-
preparation
stay/opt/installs/flume1.9/job Create under directory group6 folder
[root@flume45 job]# mkdir group6
-
In the group6 directory, create demo6-agent1 conf
[root@flume45 group6]# touch demo6-agent1.conf

# The contents are as follows
a1.sources = r1
a1.channels = c1
a1.sinks = k1

a1.sources.r1.type = exec
a1.sources.r1.command = tail -F /opt/test6/a.log

a1.channels.c1.type = memory

a1.sinks.k1.type = avro
a1.sinks.k1.hostname = flume45
a1.sinks.k1.port = 4141

a1.sources.r1.channels = c1
a1.sinks.k1.channel = c1
-
In the group6 directory, create demo6-agent2 conf
[root@flume45 group6]# touch demo6-agent2.conf

# The contents are as follows
a2.sources = r1
a2.channels = c1
a2.sinks = k1

a2.sources.r1.type = exec
a2.sources.r1.command = tail -F /opt/test6/b.log

a2.channels.c1.type = memory

a2.sinks.k1.type = avro
a2.sinks.k1.hostname = flume45
a2.sinks.k1.port = 4141

a2.sources.r1.channels = c1
a2.sinks.k1.channel = c1
-
In the group6 directory, create demo6-agent3 conf
[root@flume45 group6]# touch demo6-agent3.conf

# The contents are as follows
a3.sources = r1
a3.channels = c1
a3.sinks = k1

a3.sources.r1.type = avro
a3.sources.r1.bind = flume45
a3.sources.r1.port = 4141

a3.channels.c1.type = memory

a3.sinks.k1.type = logger

a3.sources.r1.channels = c1
a3.sinks.k1.channel = c1
-
Execution profile
[root@flume45 flume1.9]# bin/flume-ng agent --conf conf --name a3 --conf-file job/group6/demo6-agent3.conf -Dflume.root.logger=INFO,console

[root@flume45 flume1.9]# bin/flume-ng agent --conf conf --name a2 --conf-file job/group6/demo6-agent2.conf

[root@flume45 flume1.9]# bin/flume-ng agent --conf conf --name a1 --conf-file job/group6/demo6-agent1.conf
-
Use the echo command to add content to a.log and b.log to view the results
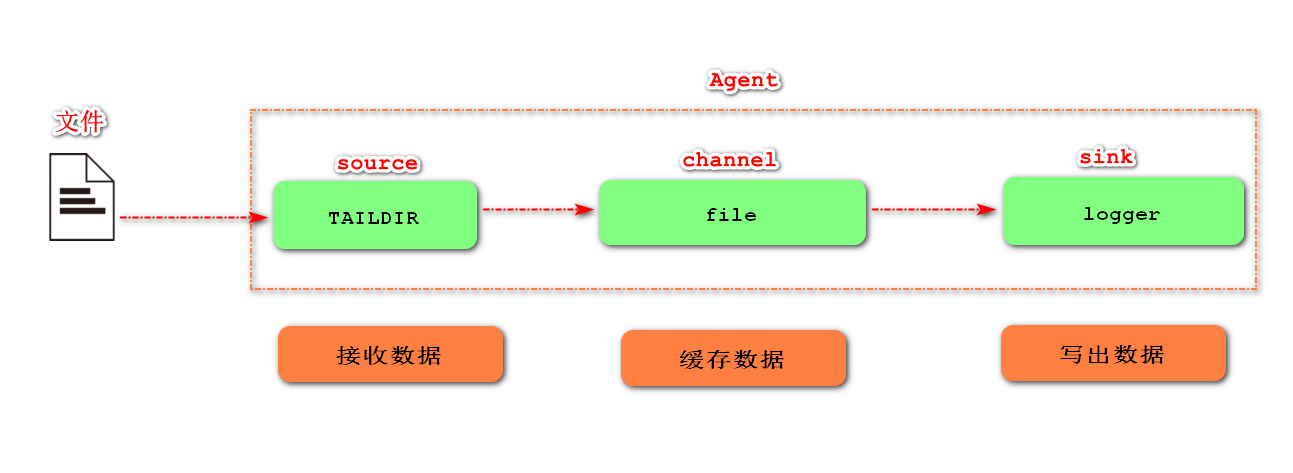
7.Taildir Source multi directory breakpoint continuation (flume 1.7, important level)
After reading the file, TAILDIR source will continue to read the file to check whether the file has the latest file content. If there is the latest file content, it will read the new content of the file
Note: flume 1.7.0 introduces the taildirSource component
Multiple directories: listen to multiple directories at the same time
Breakpoint continuation: the read location will be recorded. If the agent hangs, it can continue to read the original location after restarting
- Requirements: monitor multiple directories to realize breakpoint continuous transmission
- Demand analysis:
- Implementation steps
-
Create a conf file in the job directory of flume
[root@flume45 job]# touch demo7-taildir-file-logger.conf
-
In demo7 taildir file logger Write an agent in the conf file
a1.sources = r1
a1.channels = c1
a1.sinks = k1

#The directory needs to be created in advance
a1.sources.r1.type = TAILDIR
a1.sources.r1.filegroups = f1 f2
a1.sources.r1.filegroups.f1 = /opt/datas/flume/ceshi.log
#Regular expression writing method (. Will match any character, * represents one or more occurrences, that is. * represents any character)
a1.sources.r1.filegroups.f2 = /opt/test/logs/.*log.*

a1.channels.c1.type = file

a1.sinks.k1.type = logger

a1.sources.r1.channels = c1
a1.sinks.k1.channel = c1
3. Create the specified directory and corresponding files
stay/opt/datas/Create under flume catalogue
 stay/opt/test/Create under directory logs catalogue
4. Start the agent
bin/flume-ng agent --conf conf -name a1 --conf-file job/demo7-taildir-file-logger.conf -Dflume.root.logger=INFO,console
5. Create a file to test log file
[root@flume45 flume]# touch ceshi.log
[root@flume45 flume]# echo hello >> ceshi.log
[root@flume45 flume]# echo hahaha >> ceshi.log

[root@flume45 logs]# touch aa.log
[root@flume45 logs]# echo hahaha99999 >> aa.log
[root@flume45 logs]# echo cartyuio >> aa.log
Reasons for continued transmission of breakpoints:

4, Four topologies of Flume
1. Serial mode

This mode connects multiple flumes sequentially, starting from the initial source to the destination storage system for the final sink transfer. This mode does not recommend bridging too many flumes. Too many flumes will not only affect the transmission rate, but also affect the whole transmission system once a node flume goes down during transmission.
Avro: RPC technology of Hadoop framework, RPC: remote procedure call
RPC(dubbo/avro) technology: call remote methods just like calling local methods, hiding the underlying details of RPC.
# When two agent s are connected, it must be Avro sink -- > Avro source
a1.sources = r1
a1.channels = c1
a1.sinks = k1

a1.sources.r1.type = exec
a1.sources.r1.command = tail -F /opt/datas/a.log

a1.channels.c1.type = memory
# (to which machine)
a1.sinks.k1.type = avro
a1.sinks.k1.hostname = flume45
a1.sinks.k1.port = 4545

a1.sources.r1.channels = c1
a1.sinks.k1.channel = c1

a2.sources = r2
a2.channels = c2
a2.sinks = k2

# (message received from which machine)
a2.sources.r2.type = avro
a2.sources.r2.bind = 0.0.0.0
a2.sources.r2.port = 4545

a2.channels.c2.type = memory

a2.sinks.k2.type = logger

a2.sources.r2.channels = c2
a2.sinks.k2.channel = c2
# Start a2 first and then a1
2. Single Source, multi-Channel,Sink mode (copy mode)
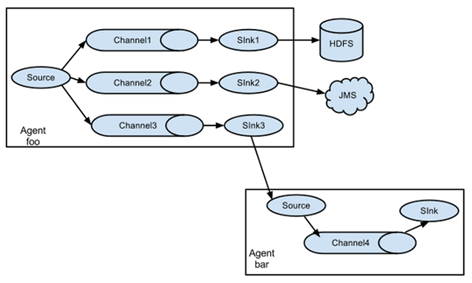
Flume supports the flow of events to one or more destinations. This mode copies the data source to multiple channels, each channel has the same data, and sink can choose to transfer to different destinations.
3. Single Source,Channel and multi Sink mode (load balancing)
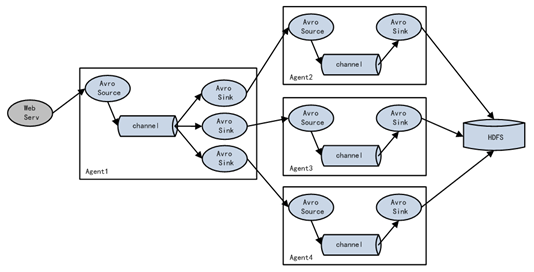
Flume supports logical grouping of multiple sinks into a sink group. Flume sends data to different sinks, which mainly solves the problems of load balancing and failover.
4. Aggregation mode
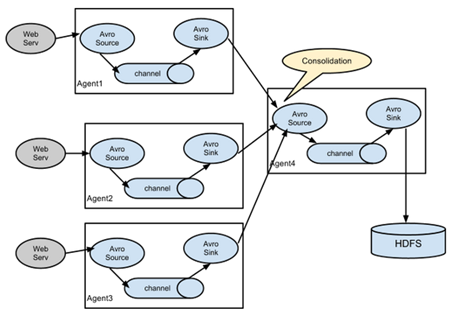
This combination of flume can well solve this problem. Each server deploys a flume to collect logs, which is transmitted to a flume that collects logs, and then the flume is uploaded to hdfs, hive, hbase, jms, etc. for log analysis.
5, Interceptor
flume implements the function of modifying and filtering events by using Interceptors. For example, a website produces a large amount of data every day, but many data may be incomplete (lack of important fields) or redundant. If these data are not specially processed, the efficiency of the system will be reduced. Then the interceptor comes in handy.
1. Interceptor position and function
Location: the interceptor is located between source and channel.
Function: it can label the past messages in the event header.
2.flume built-in interceptor
First list a table of flume built-in interceptors:

Since the interceptor usually handles the Event Header, let me introduce Event first

-
event is the basic unit for processing messages in flume, which is composed of zero or more header s and body.
-
The Header is in the form of key/value, which can be used to make routing decisions or carry other structured information (such as the timestamp of the event or the server hostname of the event source). You can think of it as providing the same function as HTTP headers - this method is used to transmit additional information outside the body.
-
Body is a byte array that contains the actual contents.
-
Different source s provided by flume will add different header s to the generated event s
1.1 timestamp interceptor
The Timestamp Interceptor interceptor can insert a timestamp with the keyword timestamp into the event header.
[root@flume45 job]# mkdir interceptors
[root@flume45 job]# cd interceptors/
[root@flume45 interceptors]# touch demo1-timestamp.conf

#The contents of the document are as follows
a1.sources = r1
a1.channels = c1
a1.sinks = k1

a1.sources.r1.type = netcat
a1.sources.r1.bind = flume45
a1.sources.r1.port = 44444

#timestamp interceptor
a1.sources.r1.interceptors = i1
a1.sources.r1.interceptors.i1.type = timestamp
a1.sources.r1.interceptors.i2.type = host

a1.channels.c1.type = memory

a1.sinks.k1.type = logger

a1.sources.r1.channels = c1
a1.sinks.k1.channel = c1
test
[root@flume0 interceptors]# nc flume45 44444
test result
2021-07-09 03:09:18,635 (SinkRunner-PollingRunner-DefaultSinkProcessor) [INFO - org .apache.flume.sink.LoggerSink.process(LoggerSink.java:95)] Event: { headers:{host=192.168.153.45, timestamp=1625771356107} body: 68 61 68 68 61 20              hahha  }
2021-07-09 03:09:20,814 (SinkRunner-PollingRunner-DefaultSinkProcessor) [INFO - org  .apache.flume.sink.LoggerSink.process(LoggerSink.java:95)] Event: { headers:{host=192.168.153.45, timestamp=1625771360814} body: 31 32 33 34 35       			12345 }
1.2 host interceptor
The interceptor can insert the host name or ip address of the default keyword host into the event header (note that it is the host name or ip address of the machine on which the agent runs)
[root@flume45 job]# mkdir interceptors
[root@flume45 job]# cd interceptors/
[root@flume45 interceptors]# touch demo1-timestamp.conf

#The contents of the document are as follows
a1.sources = r1
a1.channels = c1
a1.sinks = k1

a1.sources.r1.type = netcat
a1.sources.r1.bind = flume45
a1.sources.r1.port = 44444

#timestamp interceptor
a1.sources.r1.interceptors = i1
a1.sources.r1.interceptors.i1.type = timestamp
a1.sources.r1.interceptors.i2.type = host

a1.channels.c1.type = memory

a1.sinks.k1.type = logger

a1.sources.r1.channels = c1
a1.sinks.k1.channel = c1
test
[root@flume0 interceptors]# nc flume45 44444
test result
2021-07-09 03:09:18,635 (SinkRunner-PollingRunner-DefaultSinkProcessor) [INFO - org .apache.flume.sink.LoggerSink.process(LoggerSink.java:95)] Event: { headers:{host=192.168.153.45, timestamp=1625771356107} body: 68 61 68 68 61 20              hahha  }
2021-07-09 03:09:20,814 (SinkRunner-PollingRunner-DefaultSinkProcessor) [INFO - org  .apache.flume.sink.LoggerSink.process(LoggerSink.java:95)] Event: { headers:{host=192.168.153.45, timestamp=1625771360814} body: 31 32 33 34 35       			12345 }
1.3 Regex Filtering Interceptor
The Regex Filtering Interceptor interceptor is used to filter events and filter out events that match the configured regular expression. Can be used to include and exclude events. It is often used for data cleaning to filter out data through regular expressions.
[root@flume45 interceptors]# touch demo3-regex-filtering.conf

#The contents of the document are as follows
a1.sources = r1
a1.channels = c1
a1.sinks = k1

a1.sources.r1.type = netcat
a1.sources.r1.bind = flume45
a1.sources.r1.port = 44444

#host interceptor
a1.sources.r1.interceptors = i1
a1.sources.r1.interceptors.i1.type = regex_filter
# Regular expression: all numeric data (accept: data conforming to regular expression)
a1.sources.r1.interceptors.i1.regex = ^[0-9]*$
#Exclude the data that conforms to the regular expression (write a regular expression for the data you don't want to exclude). Depending on the business requirements, choose one to use
a1.sources.r1.interceptors.i1.excludeEvents  = true

a1.channels.c1.type = memory

a1.sinks.k1.type = logger

a1.sources.r1.channels = c1
a1.sinks.k1.channel = c1
Regex Filtering field development reference scenario: Troubleshooting error logs
2007-02-13 15:22:26 [com.sms.test.TestLogTool]-[INFO] this is info
2007-02-13 15:22:26 [com.sms.test.TestLogTool]-[ERROR] my exception  com.sms.test.TestLogTool.main(TestLogTool.java:8)
Corresponding regular expression
a1.sources.r1.interceptors.i3.regex = ^((?!error).)*$
1.4 multiple interceptors can be used at the same time
# Interceptor: acts on the Source to decorate or filter event s in the set order

a1.sources.r1.interceptors = i1 i2 i3
a1.sources.r1.interceptors.i1.type = timestamp
a1.sources.r1.interceptors.i2.type = host
a1.sources.r1.interceptors.i3.type = regex_filter
a1.sources.r1.interceptors.i3.regex = ^[0-9]*$
6, Custom interceptor
Overview: in actual development, there may be many types of logs generated by a server, and different types of logs may need to be sent to different analysis systems. At this time, the Multiplexing structure in Flume topology will be used. The principle of Multiplexing is to send different events to different channels according to the value of a key in the Header of the event. Therefore, we need to customize an Interceptor to give different values to the keys in the headers of different types of events.
Case demonstration: we simulate logs with port data and different types of logs with numbers (single) and letters (single). We need to customize the interceptor to distinguish numbers and letters and send them to different analysis systems (channels).
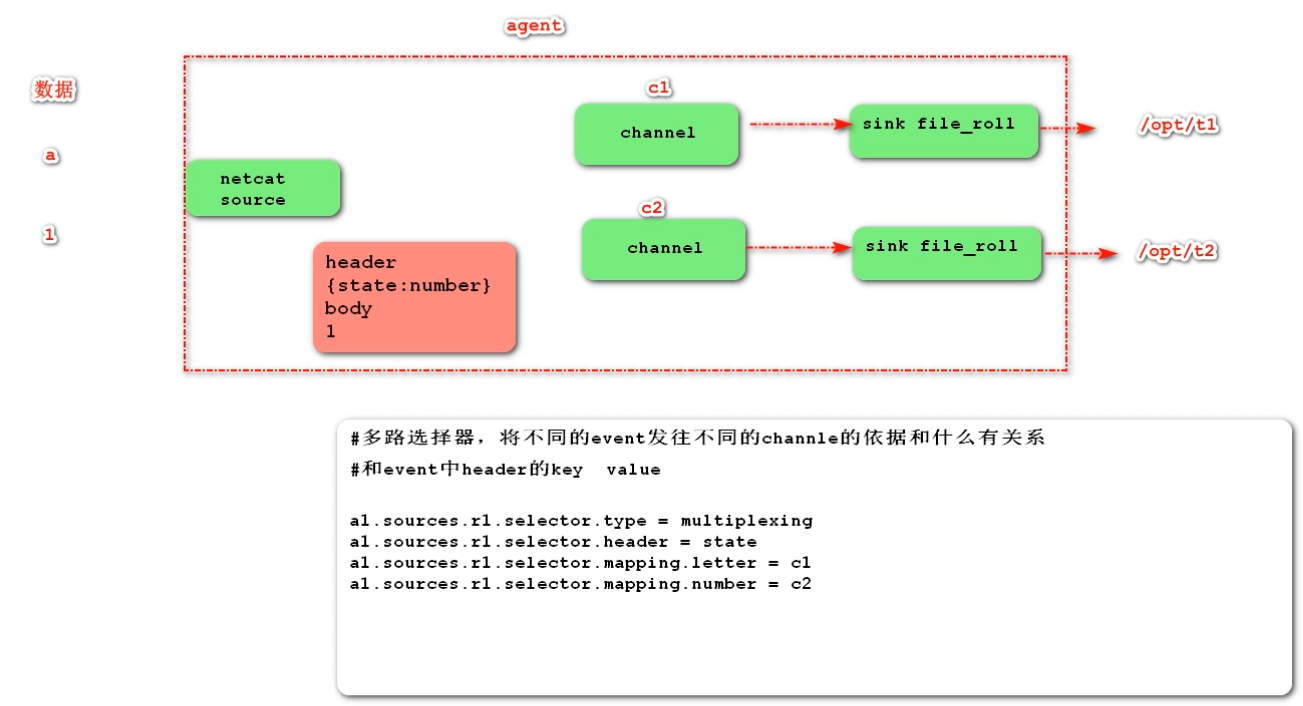
Implementation steps
1. Create a project and introduce the following dependencies
<dependency>
    <groupId>org.apache.flume</groupId>
    <artifactId>flume-ng-core</artifactId>
    <version>1.9.0</version>
</dependency>
2. Customize the interceptor and realize the interceptor interface
package test;

import org.apache.flume.Context;
import org.apache.flume.Event;
import org.apache.flume.interceptor.Interceptor;
import java.util.HashMap;
import java.util.List;
import java.util.Map;

public class MyInterceptor implements Interceptor{
    @Override
    public void initialize() {}

    @Override
    //Process the intercepted event
    public Event intercept(Event event) {
        byte[] body = event.getBody();
        Map<String,String> header = new HashMap<>();
        if (body[0]>='a'&&body[0]<='z'){
            header.put("state","letter");
        }else {
            header.put("state","number");
        }
        event.setHeaders(header);
        return event;
    }

    @Override
    public List<Event> intercept(List<Event> list) {
        for (Event e : list) {
            intercept(e);
        }
        return list;
    }

    @Override
    public void close() {}

    //Define a static inner class
    public static class Builder implements Interceptor.Builder{
		@Override
        public Interceptor build() {
            return new MyInterceptor();
        }

        @Override
        public void configure(Context context) {}
    }
}
3. Type the project into a jar package and upload it to the lib directory of flume installation directory
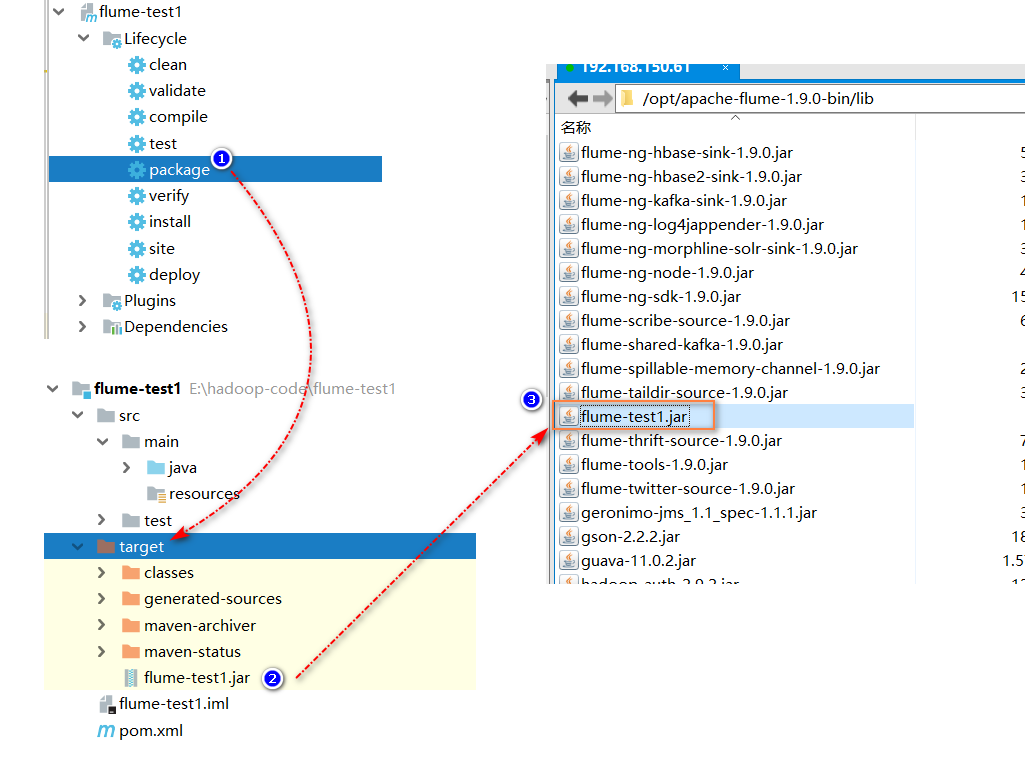
4. Write an agent and create it in the interceptors directory under the job directory, named my conf
a1.sources = r1
a1.channels = c1 c2
a1.sinks = k1 k2

a1.sources.r1.type = netcat
a1.sources.r1.bind = 0.0.0.0
a1.sources.r1.port = 44444

a1.sources.r1.interceptors = i1
a1.sources.r1.interceptors.i1.type = test.MyInterceptor$Builder

a1.sources.r1.selector.type = multiplexing
a1.sources.r1.selector.header = state
a1.sources.r1.selector.mapping.letter = c1
a1.sources.r1.selector.mapping.number = c2
a1.sources.r1.selector.default  = c2

a1.channels.c1.type = memory
a1.channels.c2.type = memory

a1.sinks.k1.type = file_roll
a1.sinks.k1.sink.directory  = /root/t1
a1.sinks.k1.sink.rollInterval = 600

a1.sinks.k2.type = file_roll
a1.sinks.k2.sink.directory = /root/t2
a1.sinks.k1.sink.rollInterval = 600

a1.sources.r1.channels = c1 c2
a1.sinks.k1.channel = c1
a1.sinks.k2.channel = c2
5. Create t1 and t2 folders in / root directory
6. Test
[root@flume45 flume1.9]# bin/flume-ng agent --conf conf --name a1 --conf-file job/interceptors/my.conf -Dflume.roogger=INFO,console
7. View t1 and t2 files respectively
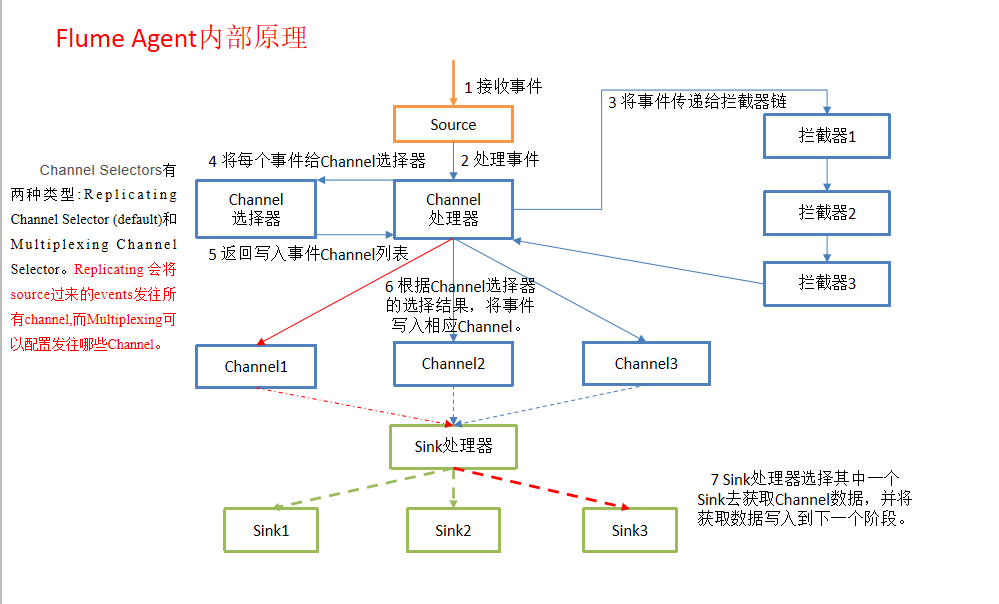
7, Flume internal process principle
1.Flume Agent internal principle
2.Flume composition structure and transaction details
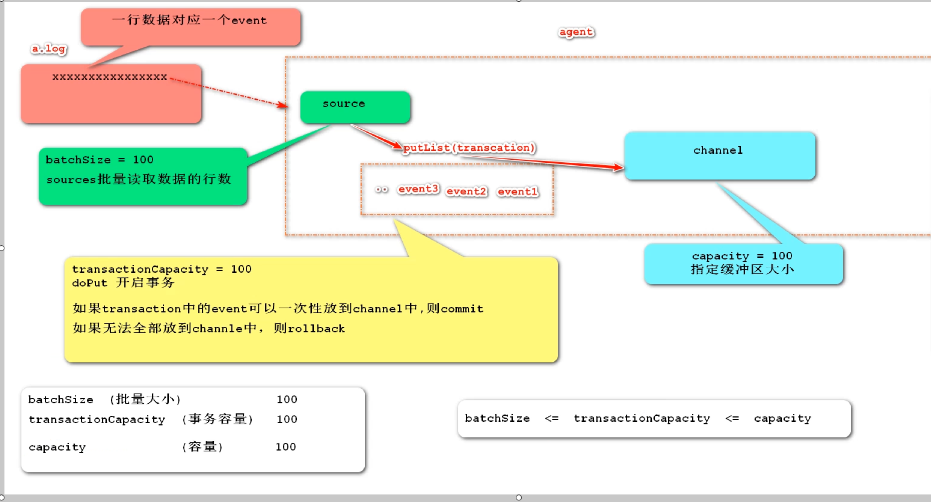
batchSize(Batch size 100 default): appoint sources Number of rows of bulk read data/second
	Max number of lines to read and send to the channel at a time. Using the default is usually fine.
transactionCapacity(Transaction capacity 100 default): appoint Transaction What can be accommodated by the regional office event quantity
	The maximum number of events the channel will take from a source or give to a sink per transaction
Capacity(Capacity 100 default)appoint channel Buffer size:
	The maximum number of events stored in the channel
 Relationship among the three:
	batchSize<=transactionCapacity<=Capacity
8, Channel selector
Before the event enters the Channel, you can use the Channel selector to enter the specified event into the specified Channel
Flume has two built-in selectors, replicating and multiplexing. If no selector is specified in the Source configuration, the replication Channel selector will be automatically used.
| property name | default | describe |
|---|---|---|
| selector.type | replicating | Replicating |
| selector.type | multiplexing | multiplexing (i.e. selecting one of them) |
Copying selector
Function: hand over the data of source to multiple channel s at the same time
1. Copying the Channel selector
Features: data synchronization to each Channel
[root@flume45 job]# mkdir selector
[root@flume45 job]# cd selector
[root@flume45 selector]# touch selector.conf

# The contents are as follows
a1.sources = r1
a1.channels = c1 c2
a1.sinks = k1 k2

a1.sources.r1.type = avro
a1.sources.r1.bind = 0.0.0.0
a1.sources.r1.port = 666

a1.sources.r1.selector.type = replicating
a1.channels.c1.type = memory
a1.channels.c2.type = memory

a1.sinks.k1.type = file_roll
a1.sinks.k1.sink.directory = /opt/datas/selector1
a1.sinks.k1.sink.rollInterval = 3000

a1.sinks.k2.type = file_roll
a1.sinks.k2.sink.directory = /opt/datas/selector2
a1.sinks.k2.sink.rollInterval = 3000

a1.sources.r1.channels = c1 c2
a1.sinks.k1.channel = c1
a1.sinks.k2.channel = c2
Code test
<dependency>
    <groupId>org.apache.flume</groupId>
    <artifactId>flume-ng-sdk</artifactId>
    <version>1.9.0</version>
</dependency>

package test;

import org.apache.flume.Event;
import org.apache.flume.api.RpcClient;
import org.apache.flume.api.RpcClientFactory;
import org.apache.flume.event.EventBuilder;

import java.util.HashMap;
import java.util.Map;

public class TestSelector {
    public static void main(String[] args) throws Exception {
      	//Copy selector
        //1. Create an rpc client object
        RpcClient client = RpcClientFactory.getDefaultInstance("flume45", 666);
        //2. Create an event object
        Event event = EventBuilder.withBody("hahaha".getBytes());
        //3. Send event object to server
        client.append(event);
        //4. Close the client connection
        client.close();
    }
}
Test result: both files have sink output
2. Multiplexing Channel selector
Features: data is shunted to the specified Channel
[root@flume45 selector]# touch selector2.conf

# The contents are as follows
a1.sources = r1
a1.channels = c1 c2
a1.sinks = k1 k2

a1.sources.r1.type = avro
a1.sources.r1.bind = 0.0.0.0
a1.sources.r1.port = 666

a1.sources.r1.selector.type = multiplexing
a1.sources.r1.selector.header = state
a1.sources.r1.selector.mapping.android = c1
a1.sources.r1.selector.mapping.ios = c2

a1.channels.c1.type = memory
a1.channels.c2.type = memory

a1.sinks.k1.type = file_roll
a1.sinks.k1.sink.directory = /opt/datas/selector1
a1.sinks.k1.sink.rollInterval = 600

a1.sinks.k2.type = file_roll
a1.sinks.k2.sink.directory = /opt/datas/selector1
a1.sinks.k2.sink.rollInterval = 600

a1.sources.r1.channels = c1 c2
a1.sinks.k1.channel = c1
a1.sinks.k2.channel = c2
Code test
<dependency>
    <groupId>org.apache.flume</groupId>
    <artifactId>flume-ng-sdk</artifactId>
    <version>1.9.0</version>
</dependency>

package test;

import org.apache.flume.Event;
import org.apache.flume.api.RpcClient;
import org.apache.flume.api.RpcClientFactory;
import org.apache.flume.event.EventBuilder;

import java.util.HashMap;
import java.util.Map;

public class TestSelector {
    public static void main(String[] args) throws Exception {
        //1. Create an rpc client object
        RpcClient client = RpcClientFactory.getDefaultInstance("flume45", 666);
        //2. Create an event object
        Map map = new HashMap();
        map.put("state","android");
        Event event = EventBuilder.withBody("I'm from Andrew event".getBytes(),map);
        //3. Send the event object to the server
        client.append(event);
        //4. Close the client connection
        client.close();
    }
}
Test results: according to headers put("state","app1"); Setting determines which channel to send data to
9, Apply for Alibaba cloud SMS
-
Log in to alicloud( https://account.aliyun.com/ )
-
Search SMS service
-
Open SMS service
-
Management console
-
Fast learning
-
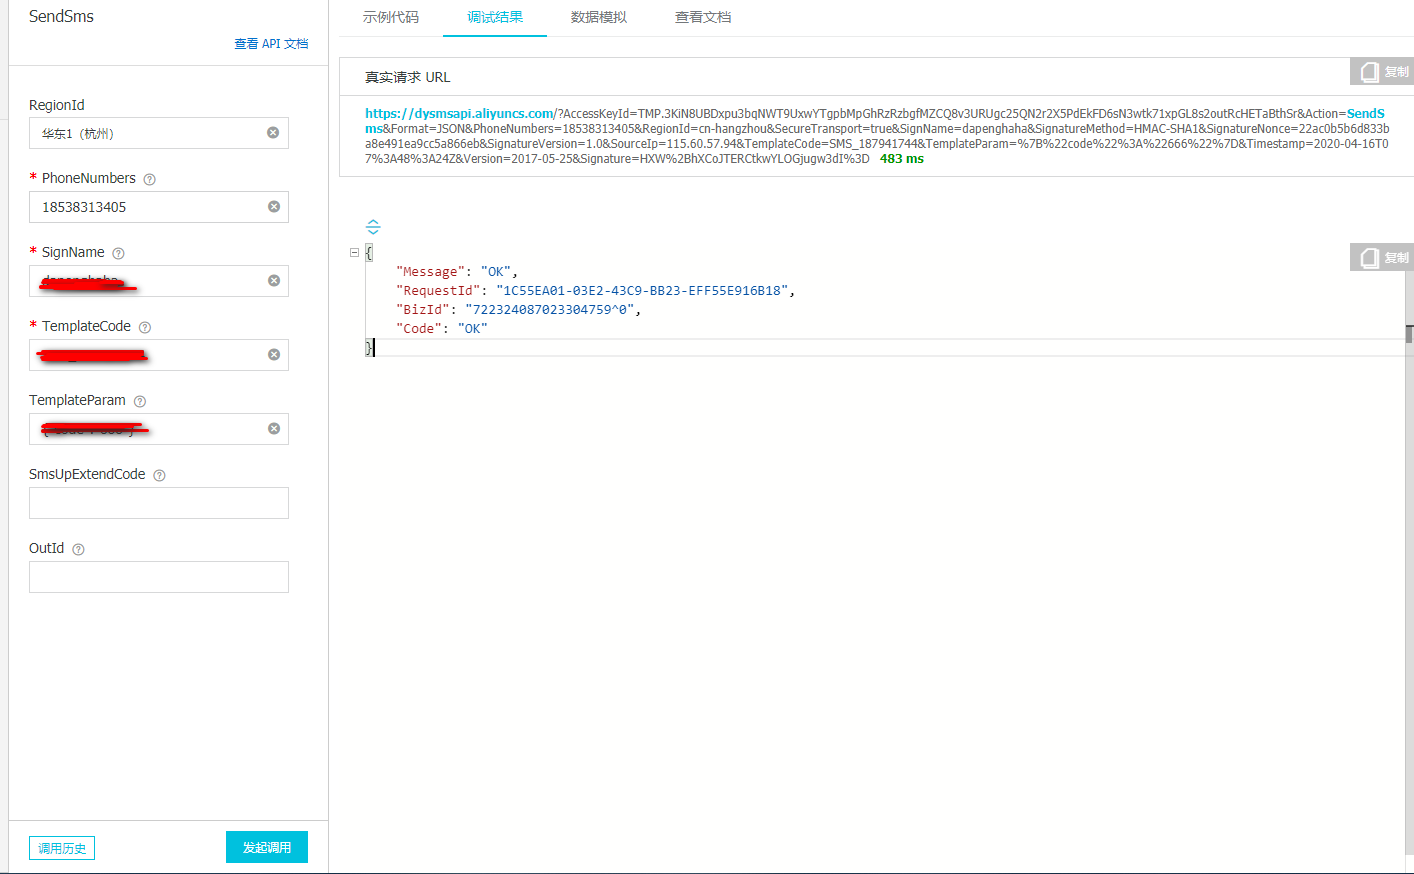
Expected result: SMS sending is completed through the console
-
Fill in the relevant parameters in the list on the left and click to initiate the call. The debugging result on the right responds to the normal json string, and the corresponding filled PhoneNumbers can receive the verification code SMS
10, flume interview questions
1. What are the functions of flume's source, sink and channel?
① Source Component is specially used to collect data, and can process various types and formats of log data
	include avro,exec,spooling directory,netcat,tail dir
② Channel The component caches the collected data and can be stored in the Memory or File in
③ Sink Component is a component used to send data to the destination
	Destinations include Hdfs,Logger,avro,file,kafka
2. Function of flume's channel selector?
channel selectors You can let different project logs pass through different channel To different sink Middle go
 On official documents channel selector There are two types: Replicating channel selector (default) and
multiplexing channel selector

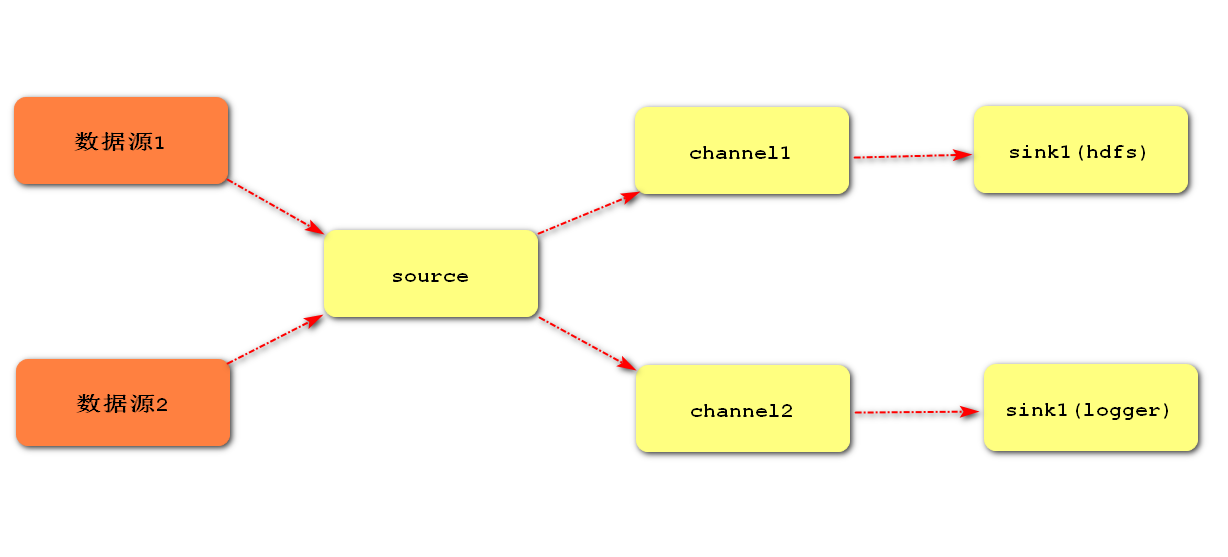
These two selector The differences are: replicating Will source Come here events Send all channel,and multiplexing You can choose which to send to channle
3.flume parameter tuning?
1.source
	increase source The number of can be increased source Ability to read files. For example, when a directory generates too many files, you need to split the file directory into multiple file directories and configure multiple files at the same time source To ensure source Have sufficient ability to obtain newly generated data.
	batchSize Parameter determination source One batch transportation to channle of event The number of bars can be improved by appropriately increasing this parameter source carry event reach channle Performance at

2.channle
	type choice memory Good performance, but may result in data loss. type choice file Better fault tolerance, but slightly worse performance.
	use file Channel Time dataDirs Configuring directories under multiple different disks can improve performance.
	Capacity Parameter determination Channel Can accommodate the largest event Number of entries. transactionCapacity Parameters determine each Source to channel It says the biggest event Number of pieces and each time Sink from channel Read the most in it event Number of entries. transactionCapacity Need greater than Source and Sink of batchSize Parameters.

capacity >= transactionCapacity >= (source and sink of batchSize)

3.sink
	increase Sink The number of can be increased Sink consumption event Ability. Sink Not the more the better, just enough, too much Sink It will occupy system resources and cause unnecessary waste of system resources.
	batchSize Parameter determination Sink One batch from Channel Read event The number of bars can be improved by appropriately increasing this parameter Sink from Channel Move out event Performance.

4. Transaction mechanism of flume
Flume Use two separate transactions to be responsible for Soucrce reach Channel,And from Channel reach Sink Event delivery. such as spooling directory source Create an event for each line of the file. Once all the events in the transaction are passed to the Channel And the submission is successful, then Soucrce Mark the file as complete. Similarly, transactions are handled in a similar manner Channel reach Sink If the event cannot be recorded for some reason, the transaction will be rolled back. And all events will remain until Channel Waiting for retransmission.
5. Will flume collected data be lost?
No, Channel storage can be stored in File, and data transmission has its own transactions
6.Flume uploads hdfs file scrolling
# Test case list
a1.sources = r1
a1.channels = c1
a1.sinks = k1

a1.sources.r1.type = TAILDIR
a1.sources.r1.filegroups = f1
a1.sources.r1.filegroups.f1 = /opt/testFile.log

a1.sources.r1.interceptors = i1
a1.sources.r1.interceptors.i1.type = timestamp

a1.channels.c1.type = memory

a1.sinks.k1.type = hdfs
a1.sinks.k1.hdfs.path = hdfs://flume45:9000/flume6/%y-%m-%d/$H
a1.sinks.k1.hdfs.fileType = DataStream
a1.sinks.k1.hdfs.rollInterval = 0
a1.sinks.k1.hdfs.rollSize = 10485760
a1.sinks.k1.hdfs.rollICount = 0

a1.sources.r1.channels = c1
a1.sinks.k1.channel = c1
7. Dealing with small hdfs files
1.flume Upload files and scroll to generate new files
	hdfs.rollInterval  time              30s
	hdfs.rollSize      file size          one thousand and twenty-four
	hdfs.rollCount     event Quantity related     10

2.Expectation 10 M Generate a file, and the and time are the same event Quantity independent
hdfs.rollInterval=0
hdfs.rollSize=10485760
hdfs.rollCount=0

3.Problems after three properties have been configured
	hadoop Number of distributed environment replicas 3    flume Internal default value,There will be no small problems
	Pseudo distributed environment      Number of copies 1    hdfs-site.xml
	because flume The default number of copies of the underlying uploaded file is 3. In the pseudo distributed environment, the number of copies we set is 1, but flume I don't know
 cause flume When the underlying source code is processed, it leads to rollInterval/rollSize/rollCount Not effective

4.Solution
  take hadoop Lower hdfs-site.xml Copy to flume of conf Directory, without additional configuration, flume Will automatically identify

understand shell Script, loop, to a.log Print content, sleep Play the role of sleep
#!/bin/bash

i=0
while ((1))
do
   echo "hello world,$i" >> /opt/a.log
   #echo hello
   let i++
   sleep 0.01
done

The upper side can only generate files by scrolling, and the file directory can be generated by scrolling through the configuration at the lower side
#Scroll folders by time
hdfs.round = true
#How many time units to create a new folder
hdfs.roundValue = 10
#Redefine time units
hdfs.roundUnit = minute

#How often do I generate a new file? 0 means disabled
a2.sinks.k2.hdfs.rollInterval = 0
#Set the scroll size of each file 1048576 = 1M
a2.sinks.k2.hdfs.rollSize = 1048576
#File scrolling is independent of the number of events
a2.sinks.k2.hdfs.rollCount = 0

hdfs.round	     false	 Should the timestamp be rounded down (if true, affects all time based escape sequences except %t)
hdfs.roundValue	 1	     Rounded down to the highest multiple of this (in the unit configured using hdfs.roundUnit), less than current time.
hdfs.roundUnit	 second	 The unit of the round down value - second, minute or hour.

Special note: if the test uses hadoop Pseudo distributed environment, need to hadoop Lower hdfs-site.xml Copy to flume of conf Directory
8.Flume summary
1.Flume Function: collect data
2.Flume Three important components: Source/Channel/Sink
3.Common component types:
	Source:netcat,exec,spooldir,http,taildir(1.7 important)
	Channel:memory,file
	Sink: logger,hdfs,file_roll,kafka
4.Flume Medium and multi-layer channel,many sink Topology diagram
	Two agent Tandem, left sink,right source All avro
	avro.sink.hostname = (Host receiving data IP)    bind((which host is currently bound)
	many channel,many sink  Function: one agent Output the data to two destinations respectively, source Output data to channel,Using the copy selector
	sink Group role: sink There is only one in the group sink Can get channel Data for load balancing or disaster recovery.
	Data summary (first level) agent The data is summarized to the second layer agent)Function: reduce write hdfs pressure(Equivalent to buffer)
5.Interceptor
	Function: in source take event Pass to channel Between work, you can event Event header Perform the operation.
		Messages can be intercepted and processed according to conditions such as regular expressions body Content of the.
6.selector
	Copy selectors: multiple channel Get the same event
	Multiplexer:according to header Judge and select event To whom channel
7.custom interceptor
	Define a class to implement Interceptor Interface, implementation interceptor method    Purpose: treatment event
	Define a static internal class to implement Interceptor.Builder Interface purpose: create interceptor object
	Build project jar,Throw to flume/lib Directory
	a1.sources.r1.interceptor = i1
	a1.sources.r1.interceptor.i1.type = Package name.Class name $Builder