1, Overview
Screen sharing is the most common function in video conferences, online classes, live games and other scenes. Screen sharing is the real-time sharing of screen images. There are several main end-to-end steps: screen recording and acquisition, video coding and packaging, real-time transmission, video unpacking and decoding, and video rendering.
Generally speaking, during real-time screen sharing, the sharing initiator captures the picture of the specified source in the screen (including the specified screen, specified area, specified program, etc.) at a fixed sampling frequency (generally 8 - 15 frames are enough), and distributes it at the corresponding frame rate on the real-time network after video coding and compression (the scheme of keeping the text / graphic edge information undistorted should be selected).
Therefore, screen acquisition is the basis of real-time screen sharing, and its application scenarios are also very wide.
Nowadays, Flutter is more and more widely used, and there are more and more pure Flutter projects. In this article, we mainly share the implementation of screen acquisition of Flutter.
2, Implementation process
Before introducing the implementation process in detail, let's take a look at the capabilities provided by the native system for screen recording.
1. iOS 11.0 provides ReplayKit 2 to collect global screen content across apps, but it can only be started through the control center; iOS 12.0 provides the ability to start ReplayKit from within the App on this basis.
2. Android 5.0 system provides MediaProjection function, which can collect the global screen content only by pop-up and obtaining the user's consent.
Let's take another look at the differences between Android / iOS screen capture capabilities.
1. iOS ReplayKit collects screen data by starting a Broadcast Upload Extension subprocess. It needs to solve the communication and interaction problem between the main App process and the screen collection subprocess. At the same time, the subprocess also has the limitation that the maximum runtime memory can not exceed 50M.
2. Android's MediaProject runs directly in the main process of the App and can easily obtain the Surface of screen data.
Although it is impossible to avoid native code, we can try our best to realize fluent screen acquisition with the least native code. Abstract and encapsulate the screen acquisition capabilities at both ends into a general Dart layer interface. After one deployment, you can happily start and stop screen acquisition in the Dart layer.
Next, let's introduce the implementation processes of iOS and Android respectively.
1,iOS
Open the Runner Xcode Project under the iOS directory in the fluent app project, create a new Broadcast Upload Extension Target, and process the business logic of the ReplayKit sub process here.
First of all, we need to deal with the cross process communication between the main App process and the ReplayKit sub process. Due to the frequent callback of audio/video buffer collected by the screen, considering the performance and the ecology of the fluent plug-in, it is obviously the most reliable solution to deal with the audio and video buffer on the native side. The rest to be solved is to start Stop the transmission of signaling and necessary configuration information.
For the operation of starting ReplayKit, you can create a new RPSystemBroadcastPickerView on the native side through the MethodChannel of fluent, which is a View provided by the system, including a Button that directly pops up the acquisition window of the startup screen after clicking. By traversing the Sub View to find the Button and trigger the click operation, the problem of starting the replay kit is solved.
static Future<bool?> launchReplayKitBroadcast(String extensionName) async {
    return await _channel.invokeMethod(
        'launchReplayKitBroadcast', {'extensionName': extensionName});
}
- (void)handleMethodCall:(FlutterMethodCall*)call result:(FlutterResult)result {
if ([@"launchReplayKitBroadcast" isEqualToString:call.method]) {
[self launchReplayKitBroadcast:call.arguments[@"extensionName"] result:result];
} else {
result(FlutterMethodNotImplemented);
}
}
- (void)launchReplayKitBroadcast:(NSString *)extensionName result:(FlutterResult)result {
if (@available(iOS 12.0, *)) {
RPSystemBroadcastPickerView *broadcastPickerView = [[RPSystemBroadcastPickerView alloc] initWithFrame:CGRectMake(0, 0, 44, 44)];
NSString *bundlePath = [[NSBundle mainBundle] pathForResource:extensionName ofType:@"appex" inDirectory:@"PlugIns"];
if (!bundlePath) {
NSString *nullBundlePathErrorMessage = [NSString stringWithFormat:@"Can not find path for bundle `%@.appex`", extensionName];
NSLog(@"%@", nullBundlePathErrorMessage);
result([FlutterError errorWithCode:@"NULL_BUNDLE_PATH" message:nullBundlePathErrorMessage details:nil]);
return;
}
NSBundle *bundle = [NSBundle bundleWithPath:bundlePath];
if (!bundle) {
NSString *nullBundleErrorMessage = [NSString stringWithFormat:@"Can not find bundle at path: `%@`", bundlePath];
NSLog(@"%@", nullBundleErrorMessage);
result([FlutterError errorWithCode:@"NULL_BUNDLE" message:nullBundleErrorMessage details:nil]);
return;
}
broadcastPickerView.preferredExtension = bundle.bundleIdentifier;
for (UIView *subView in broadcastPickerView.subviews) {
if ([subView isMemberOfClass:[UIButton class]]) {
UIButton *button = (UIButton *)subView;
[button sendActionsForControlEvents:UIControlEventAllEvents];
}
}
result(@(YES));
} else {
NSString *notAvailiableMessage = @"RPSystemBroadcastPickerView is only available on iOS 12.0 or above";
NSLog(@"%@", notAvailiableMessage);
result([FlutterError errorWithCode:@"NOT_AVAILIABLE" message:notAvailiableMessage details:nil]);
}
}Then there is the synchronization of configuration information:
Scheme 1 is to use the App Group capability of iOS, share configuration information between processes through NSUserDefaults persistent configuration, enable the App Group capability in Runner Target and Broadcast Upload Extension Target respectively, and set the same App Group ID, and then read and write the configuration in this App Group through - [NSUserDefaults initWithSuiteName].
Future<void> setParamsForCreateEngine(int appID, String appSign, bool onlyCaptureVideo) async {
    await SharedPreferenceAppGroup.setInt('ZG_SCREEN_CAPTURE_APP_ID', appID);
    await SharedPreferenceAppGroup.setString('ZG_SCREEN_CAPTURE_APP_SIGN', appSign);
    await SharedPreferenceAppGroup.setInt("ZG_SCREEN_CAPTURE_SCENARIO", 0);
    await SharedPreferenceAppGroup.setBool("ZG_SCREEN_CAPTURE_ONLY_CAPTURE_VIDEO", onlyCaptureVideo);
}
- (void)syncParametersFromMainAppProcess {
// Get parameters for [createEngine]
self.appID = [(NSNumber *)[self.userDefaults valueForKey:@"ZG_SCREEN_CAPTURE_APP_ID"] unsignedIntValue];
self.appSign = (NSString *)[self.userDefaults valueForKey:@"ZG_SCREEN_CAPTURE_APP_SIGN"];
self.scenario = (ZegoScenario)[(NSNumber *)[self.userDefaults valueForKey:@"ZG_SCREEN_CAPTURE_SCENARIO"] intValue];
}The second scheme is to use the cross process notification CFNotificationCenter getdarwin notifycenter to carry the configuration information to realize the inter process communication.
The next step is to stop the replaykit operation. It is also the use of the above CFNotification cross process notification, in the Flutter main App launched the end of the screen collection notice, ReplayKit sub process receives the notification after calling -[RPBroadcastSampleHandler finishBroadcastWithError:] to end the screen collection.
static Future<bool?> finishReplayKitBroadcast(String notificationName) async {
    return await _channel.invokeMethod(
        'finishReplayKitBroadcast', {'notificationName': notificationName});
}
- (void)handleMethodCall:(FlutterMethodCall*)call result:(FlutterResult)result {
if ([@"finishReplayKitBroadcast" isEqualToString:call.method]) {
NSString *notificationName = call.arguments[@"notificationName"];
CFNotificationCenterPostNotification(CFNotificationCenterGetDarwinNotifyCenter(), (CFStringRef)notificationName, NULL, nil, YES);
result(@(YES));
} else {
result(FlutterMethodNotImplemented);
}
}
// Add an observer for stop broadcast notification
CFNotificationCenterAddObserver(CFNotificationCenterGetDarwinNotifyCenter(),
(__bridge const void *)(self),
onBroadcastFinish,
(CFStringRef)@"ZGFinishReplayKitBroadcastNotificationName",
NULL,
CFNotificationSuspensionBehaviorDeliverImmediately);
// Handle stop broadcast notification from main app process
static void onBroadcastFinish(CFNotificationCenterRef center, void *observer, CFStringRef name, const void *object, CFDictionaryRef userInfo) {
// Stop broadcast
[[ZGScreenCaptureManager sharedManager] stopBroadcast:^{
RPBroadcastSampleHandler *handler = [ZGScreenCaptureManager sharedManager].sampleHandler;
if (handler) {
// Finish broadcast extension process with no error
#pragma clang diagnostic push
#pragma clang diagnostic ignored "-Wnonnull"
[handler finishBroadcastWithError:nil];
#pragma clang diagnostic pop
} else {
NSLog(@"⚠️ RPBroadcastSampleHandler is null, can not stop broadcast upload extension process");
}
}];
}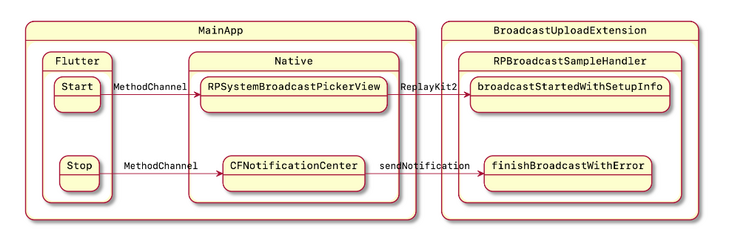
(iOS Implementation flow diagram)
2,Android
The implementation of Android is relatively simple compared with iOS. When starting screen acquisition, you can directly use the MethodChannel of fluent to pop up a pop-up window requesting screen acquisition permission from the user through MediaProjectionManager on the native side. After receiving the confirmation, you can call MediaProjectionManager The getmediaprojection () function gets the MediaProjection object.
It should be noted that due to the increasing tightening of Android's permission management, if your App's target API Version (Target SDK) is greater than or equal to 29, that is, Android Q (10.0), you need to start an additional foreground service. According to the migration document of Android Q, functions such as MediaProjection that need to use the foreground service must be run in an independent foreground service.
First, you need to implement an inherited Android app. The Service class invokes the getMediaProjection() function in the onStartCommand callback to get the MediaProjection object.
@Override
public int onStartCommand(Intent intent, int flags, int startId) {

    int resultCode = intent.getIntExtra("code", -1);
    Intent resultData = intent.getParcelableExtra("data");

    String notificationText = intent.getStringExtra("notificationText");
    int notificationIcon = intent.getIntExtra("notificationIcon", -1);
    createNotificationChannel(notificationText, notificationIcon);

    MediaProjectionManager manager = (MediaProjectionManager)getSystemService(Context.MEDIA_PROJECTION_SERVICE);
    MediaProjection mediaProjection = manager.getMediaProjection(resultCode, resultData);
    RequestMediaProjectionPermissionManager.getInstance().onMediaProjectionCreated(mediaProjection, RequestMediaProjectionPermissionManager.ERROR_CODE_SUCCEED);

    return super.onStartCommand(intent, flags, startId);
}
Then you also need to find the Android manifest Register this class in XML.
<service
    android:name=".internal.MediaProjectionService"
    android:enabled="true"
    android:foregroundServiceType="mediaProjection"
/>
Then judge the system version when starting screen acquisition. If it is running in Android Q and later systems, start the foreground service. Otherwise, you can directly obtain the MediaProjection object.
@RequiresApi(api = Build.VERSION_CODES.LOLLIPOP)
private void createMediaProjection(int resultCode, Intent intent) {
    if (Build.VERSION.SDK_INT >= Build.VERSION_CODES.Q) {
        service = new Intent(this.context, MediaProjectionService.class);
        service.putExtra("code", resultCode);
        service.putExtra("data", intent);
        service.putExtra("notificationIcon", this.foregroundNotificationIcon);
        service.putExtra("notificationText", this.foregroundNotificationText);
        this.context.startForegroundService(service);
    } else {
        MediaProjectionManager manager = (MediaProjectionManager) context.getSystemService(Context.MEDIA_PROJECTION_SERVICE);
        MediaProjection mediaProjection = manager.getMediaProjection(resultCode, intent);
        this.onMediaProjectionCreated(mediaProjection, ERROR_CODE_SUCCEED);
    }
}
Then, according to the needs of the business scenario, the consumer who collects the buffer from the screen gets the Surface. For example, if you want to save the screen recording, you can get the Surface from mediadecoder. If you want to record the live broadcast, you can call the interface of the audio and video live broadcast SDK to get the Surface.
With MediaProjection and the consumer's Surface, the next step is to call MediaProjection The createvirtualdisplay() function is passed into the Surface to create a VirtualDisplay instance, so as to obtain the screen acquisition buffer.
VirtualDisplay virtualDisplay = mediaProjection.createVirtualDisplay("ScreenCapture", width, height, 1,
DisplayManager.VIRTUAL_DISPLAY_FLAG_PUBLIC, surface, null, handler);
Finally, end the screen acquisition. Compared with the complex operation of iOS, Android only needs to release the VirtualDisplay and MediaProjection instance objects.
3, Practical example
The following is an example Demo that implements iOS/Android screen acquisition and uses zego RTC fluent SDK for streaming live broadcast.
Download link: https://github.com/zegoim/zego-express-example-screen-capture-flutter
The zego RTC shuttle SDK provides a docking entry for video frame data on the native side, which can send the screen acquisition buffer obtained in the above process to the RTC SDK, so as to quickly realize screen sharing and streaming.
After obtaining the SampleBuffer from the system, the iOS side can directly send it to the RTC SDK, which can automatically process video and audio frames.
- (void)processSampleBuffer:(CMSampleBufferRef)sampleBuffer withType:(RPSampleBufferType)sampleBufferType {
    [[ZGScreenCaptureManager sharedManager] handleSampleBuffer:sampleBuffer withType:sampleBufferType];
}
After creating a video object from the virtual surface SDK, you can obtain the required data from the virtual surface SDK.
SurfaceTexture texture = ZegoCustomVideoCaptureManager.getInstance().getSurfaceTexture(0);
texture.setDefaultBufferSize(width, height);
Surface surface = new Surface(texture);
HandlerThread handlerThread = new HandlerThread("ZegoScreenCapture");
handlerThread.start();
Handler handler = new Handler(handlerThread.getLooper());

VirtualDisplay virtualDisplay = mediaProjection.createVirtualDisplay("ScreenCapture", width, height, 1,
    DisplayManager.VIRTUAL_DISPLAY_FLAG_PUBLIC, surface, null, handler);
4, Summary and Prospect
Finally, let's summarize the main contents of the implementation of fluent screen acquisition.
Firstly, we should understand the screen acquisition capability provided by iOS / Android native in principle. Secondly, we introduce the interaction between Flutter and native, and how to control the start and stop of screen acquisition on the Flutter side. Finally, the example shows how to connect with Zego RTC SDK to realize screen sharing and streaming.
At present, Flutter on Desktop tends to be stable. Zego RTC Flutter SDK has provided preliminary support for Windows. We will continue to explore the application of Flutter on Desktop. Please look forward to it!