wechat-todayFood
Weixin applet imitates today's delicious food
Beginning to learn the Weixin program, well, not bad, very interesting! So I did one by myself. You don't have to look at the title to know that I'm eating. I don't want to be exposed so soon, but this little program is so interesting. Okay, I'm going to get to the point. Let's go and see my demo.
Development tools:
- Download Developer Tools: Weixin Small Program Official Website After downloading, it can be developed. If you want to publish your applet, you need to get AppId when you create the applet, so you can go. https://mp.weixin.qq.com Details are available here.
- Development documentation: Weixin Small Procedure Books This is a treasure trove for developing small programs, which includes various components, API s, frameworks and so on.
3. Easy Mork: easy-mock Through its service of generating simulated data quickly, it can provide us with a data interface url, and then send data requests using wx. request (url: url,....}), most of my data is simulated through Mork.
After creating the applet:
Some basic files are generated automatically:
- Page folder, Page folder contains all your page files, at least. js. wxml. WXS suffix file,. json optional
- utlis folder, place some js files that need to be used globally
- app.js Controls the Global Logical Structure
- app.json configures some global data, where all pages are registered
* app.wxml Content Structure
* app.wxss global style
Page registration:
  "pages":[
    "pages/index/index",
    "pages/detail/detail"
  ],
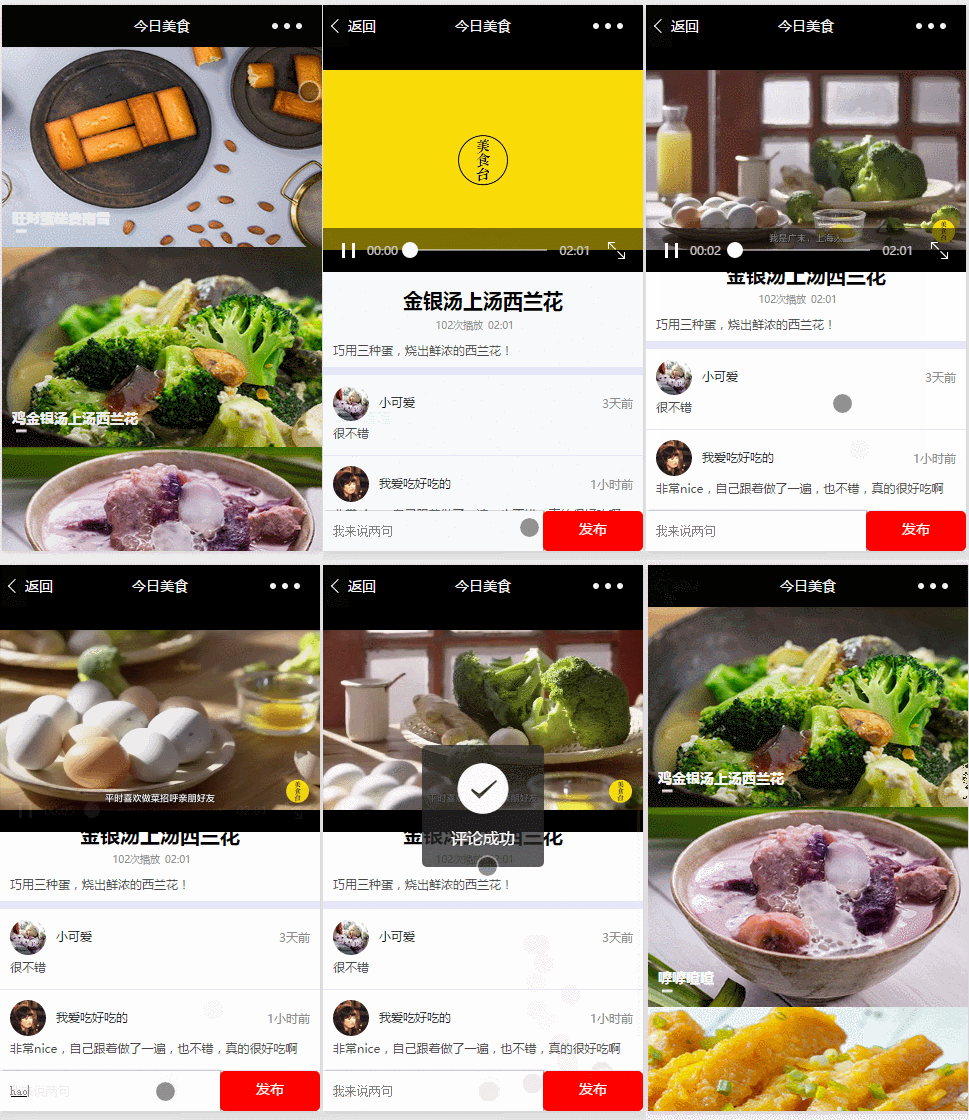
Effect Preview:

Project function:
* Insert a group of pictures on the home page and jump
* scroll-view, scroll view area generation
* Video playback, using video components
* Comments
* Comments show
* Access to data and interactive feedback
* Getting User Information
* Dynamic access to comment time
* Using mock to transmit data
Analysis of Specific Functions
1. Insert a group of pictures and jump
Because we want to insert a set of pictures, we can use wx:for={}}
HTML structure
<view wx:for="{{foodList}}" wx:key="item" bindtap="bindViewTap" id="{{item.id}}" class="list">
   <view class="image">
 <image src="{{item.src}}"/>
   </view>
js configuration
I inserted the address information of the picture in the data array.
//Event Handler
bindViewTap: function(e) {
  console.log(e.currentTarget.id)
  var id = e.currentTarget.id
  wx.navigateTo({
    url: '../detail/detail?id='+ id
  })
   },
2. Scroll view area generation using scroll-view
When you need to set up a scroll area, wrap the content with the scroll-view tag
HTML structure
<scroll-view class="scroll-user" style="height:{{windowHeight}}px" scroll-y="true" bindscrolltolower="handleLower" bindscrolltoupper="handleUpper">
    <view class="box">
            <text  class="text1">{{videoInfo.title}}</text>
            <text class="text2">{{videoInfo.number}}</text>
            <text  class="text3">{{videoInfo.time}}</text>
            <text  class="text4">{{videoInfo.desc}}</text>
    </view>
<view class="comment" wx:for="{{userlist}}">
          <view class="userInfo">
            <view class="userinfo-top">
            <image class="userinfo-avatar" src="{{item.avatarUrl}}" background-size="cover"></image>
            <text class="userinfo-nickname">{{item.nickName}}</text>
            <text class="text4">{{item.time}}</text>
            </view>
            <text class="con">{{item.desc}}</text>
            <div class="clear"></div>
          </view>
</view>
<view class="comment" wx:for="{{comment}}">
          <view class="userInfo">
            <view class="userinfo-top">
            <image class="userinfo-avatar" src="{{item.avatarUrl}}" background-size="cover"></image>
            <text class="userinfo-nickname">{{item.nickName}}</text>
            <text class="text4">{{item.time}}</text>
            </view>
            <text class="con">{{item.desc}}</text>
          </view>
</view>
</scroll-view>
js configuration
handleUpper: function (event) {
    console.log("handleUpper");
  },handleLower: function (event) {

console.log("handleLower");
  },
3. Video playback, video component use (this is the pit I stepped on!)
HTML structure
<view class="video">
            <video src="{{videoInfo.src}}" crossOrigin="anonymous"autoplay controls/>
              <button bindtap="bindButtonTap"></button>
</view>
<view class="video">
       <video id="item.id" src=""  controls binderror="videoErrorCallback" hidden="{{hiddenVideo}}"></video>
       <button bindtap="bindButtonTap"></button>
</view>
js configuration
Write videoInfo: {}, hiddenVideo: true in data.
    onReady: function (res) {
    this.videoContext = wx.createVideoContext('item.id')
 },
  videoErrorCallback: function(e) {
  console.log('Video Error Information:')
  console.log(e.detail.errMsg)
 },
 bindButtonTap:function(){
        var that = this;
        wx.chooseVideo({
            sourceType:['album','camera'],
            maxDuration:60,
            camera:['front','back'],
            success:function(res){
                that.setData({
                    src:res.api_url
                })
            }
        })
    },
})
4. Comment (the biggest pit!)
Include:
* Access to data and interactive feedback
* Getting User Information
* Dynamic access to comment time
HTML structure
<view class="inputtext">
        <input type="text" name="com" class="text"bindinput="bindInput" value="{{content}}" placeholder="Let me say a few words." />
        <button type="submit"  bindtap="issue"  class="btn">Release</button>
     </view>
</view>
js configuration
Enter comments and get their information:
comment:[],
bindInput:function(e){
  var that=this;
  var value= e.detail.value;
  console.log(value);
  that.setData({
    content:value
  })
},
Data acquisition and interactive feedback:
content:"",
issue:function(){
  var that=this ;
  var arr=new Array();
  if(this.data.content===""){
    wx.showModal({
  title: 'Tips',
  content: 'Please fill in the comments.',
  success: function(res) {
    if (res.confirm) {
      console.log('User Click OK')
    } else if (res.cancel) {
      console.log('User Click Cancel')
    }
  }
  })
  }else{
  arr.push({
    nickName:this.data.nickName,
    avatarUrl:this.data.avatarUrl,
    time:util.formatTime(new Date()),
    desc:this.data.content
  })
  this.setData({
    comment:this.data.comment.concat(arr),
    content:""
  })
  console.log(this.data.comment)
  console.log(this.data.nickName)
 setTimeout (function(){
  wx.showToast({
    title: 'Successful comments',
    icon: 'success',
    duration: 2000
  })
},1000)
}
},
Dynamic access to comment time
In util.js
module.exports = {
  formatTime: formatTime
}
5. Get user information:
HTML structure
<view class="userInfo">
     <view class="userinfo-top">
     <image class="userinfo-avatar" src="{{item.avatarUrl}}" background-size="cover"></image>
     <text class="userinfo-nickname">{{item.nickName}}</text>
     <text class="text4">{{item.time}}</text>
     </view>
     <text class="con">{{item.desc}}</text>
</view>
js structure
    var that = this
    wx.getUserInfo({
   success: function(res) {
    var userInfo = res.userInfo
    var nickName = userInfo.nickName
    var avatarUrl = userInfo.avatarUrl
    that.setData({
      nickName:nickName,
      avatarUrl:avatarUrl
    })
  }
})
6. Transfer data with mock
var id=options.id;
    //Call the method of application instance to get global data
  var api_url='https://www.easy-mock.com/mock/5966410258618039284c745b/list/list';
  console.log(api_url);
  wx.request({
    url: api_url,
    method:'GET',
    success: function(res) {
    var info = res.data.data[id];
       that.setData({
              hidden: true,
              videoInfo: info
            })
    }
  })
Pit...
1. The data transferred from the first page is not an array, but an object whose content is obtained by getting its id.
2. When commenting, we should judge the input comment content. When adding comment information, we can regard the existing comment information and real-time comment information as two arrays. We can use push () method to add comment content, and then use concat() method to connect the two arrays.
3. Look at the document, look at the document!
Project address:
https://github.com/carolineLH...
By the way, the video may not be very easy to release. Sometimes it depends on fate. Because of the video's own rights, I am very sad too. (
Hee-hee, if you think it's good, you can give a star yo, thank you.