preface
I haven't updated Jetpack series articles for a long time. This article shares the use of Paging3. If you haven't read other Jetpack articles, you can move to the link:
Android JetPack series articles, constantly updated
In order to make myself learn more quickly, I have been making up for English recently. I can learn faster by directly reading the original official documents. Huangtian is worthy of those who have a heart. After two weeks of persistence, I have known two of the 10 words on the official documents
The source code address of this article has been uploaded: https://github.com/huanglinqing123/PagingDataDemo Welcome to start and issues
What is Paging
Think about how to handle paging loading in our previous business? Generally, we encapsulate RecycleView ourselves or use a third-party library such as xrrecycleview. Paging is the standard library of paging function provided by Google, so we don't need to realize paging function based on RecycleView ourselves. Moreover, paging provides us with many configurable options to make paging function more flexible. Paging3 is the latest version of paging library and is still in the test version. Compared with Paging2, it is much simpler to use.
Using Paging
Project construction
First, we create a new project and reference the paging Library in gradle as follows:
def paging_version = "3.0.0-alpha07"
implementation "androidx.paging:paging-runtime:$paging_version"
testImplementation "androidx.paging:paging-common:$paging_version"
As for the project example, we use Kotlin language and use collaboration and Flow, so we also need to add the library of collaboration as follows:
implementation 'org.jetbrains.kotlinx:kotlinx-coroutines-android:1.3.7-mpp-dev-11'
If you don't know about synergy and Flow, you can move to the first two articles first
This is enough for the Kotlin association process
Kotlin Flow read this article to get you started~
Project example
The use diagram of Paging in the architecture is also given in the official document
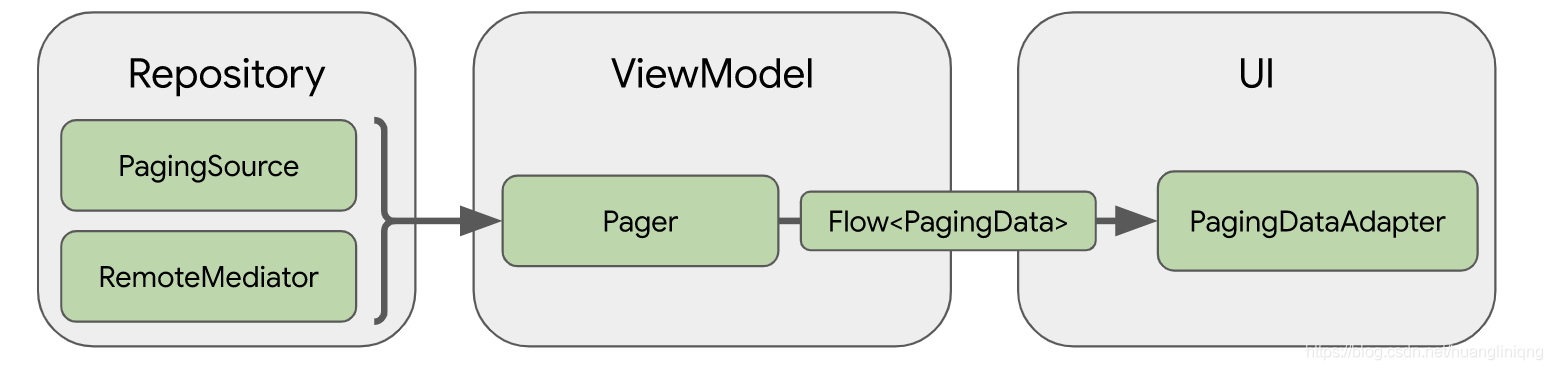
We can also clearly see from the above figure that Paging has specific performance in the warehouse layer, ViewModel and UI layer. Next, we will gradually explain how Paging works in the project architecture through an example.
API interface preparation
We use "Hongyang" for API interface "Play Android" Query daily query interface in: https://wanandroid.com/wenda/list/1/json
Here, we have written the service code of the RetrofitService class for creating network requests, as follows:
object RetrofitService {


    /**
     * okhttp client
     */
    lateinit var okHttpClient: OkHttpClient

    /**
     * Primary Url address
     */
    private const val BASEAPI = "https://www.wanandroid.com/";


    /**
     * Create service object
     */
    fun <T> createService(mClass: Class<T>): T {
        val builder: OkHttpClient.Builder = OkHttpClient.Builder();
        okHttpClient = builder.build()
        val retrofit: Retrofit = Retrofit.Builder()
            .baseUrl(BASEAPI)
            .client(okHttpClient)
            .addConverterFactory(GsonConverterFactory.create())
            .build()
        return retrofit.create(mClass) as T
    }

}
Interface with DataApi, here we declare the method as a hang function to facilitate the call in the association.
interface DataApi {

    /**
     * get data
     */
    @GET("wenda/list/{pageId}/json")
    suspend fun getData(@Path("pageId") pageId:Int): DemoReqData
}
Define data source
First, let's define the data source. The data source inherits from PagingSource. The code is as follows:
class DataSource():PagingSource<Int,DemoReqData.DataBean.DatasBean>(){
    override suspend fun load(params: LoadParams<Int>): LoadResult<Int, DemoReqData.DataBean.DatasBean> {
        TODO("Not yet implemented")
    }
}
We can see that there are two parameters Key and Value in PagingSource. Here, Key is defined as Int type, and Value DemoReqData is the entity class corresponding to the data returned by the interface, which means
We pass the Int type value (such as page number) to get the returned data information DemoReqData object.
It should be reminded that if you use Java instead of Kotlin coprocessor, you need to inherit the corresponding PagingSource, such as RxPagingSource or ListenableFuturePagingSource.
DataSource automatically generates the load method for us, and our main request operations are completed in the load method. The main codes are as follows:
override suspend fun load(params: LoadParams<Int>): LoadResult<Int, DemoReqData.DataBean.DatasBean> {

    return try {

        //Page number undefined set to 1
        var currentPage = params.key ?: 1
        //Warehouse layer request data
        var demoReqData = DataRespority().loadData(currentPage)
        //The current page number is less than the total page number plus 1
        var nextPage = if (currentPage < demoReqData?.data?.pageCount ?: 0) {
            currentPage + 1
        } else {
            //No more data
            null
        }

        if (demoReqData != null) {
            LoadResult.Page(
                data = demoReqData.data.datas,
                prevKey = null,
                nextKey = nextPage
            )
        } else {
            LoadResult.Error(throwable = Throwable())
        }


    } catch (e: Exception) {
        LoadResult.Error(throwable = e)
    }

}
In the above code, we can see that in the datasource, we request data through the datasource () warehouse layer, return null if there is no more data, and finally use loadresult Page returns the result. If the loading fails, use loadresult Error returned due to loadresult The data in the page must be of non empty type, so we need to judge whether the return is null.
Next, let's take a look at the code of the dataprosperity warehouse layer. The code is relatively simple, as shown below:
class DataRespority {

    private var netWork = RetrofitService.createService(
        DataApi::class.java
    )

    /**
     * Query nursing data
     */
    suspend fun loadData(
        pageId: Int
    ): DemoReqData? {
        return try {
            netWork.getData(pageId)
        } catch (e: Exception) {
            //Handle or catch exceptions here
            null
        }

    }
}
The official flow of Load call is as follows:
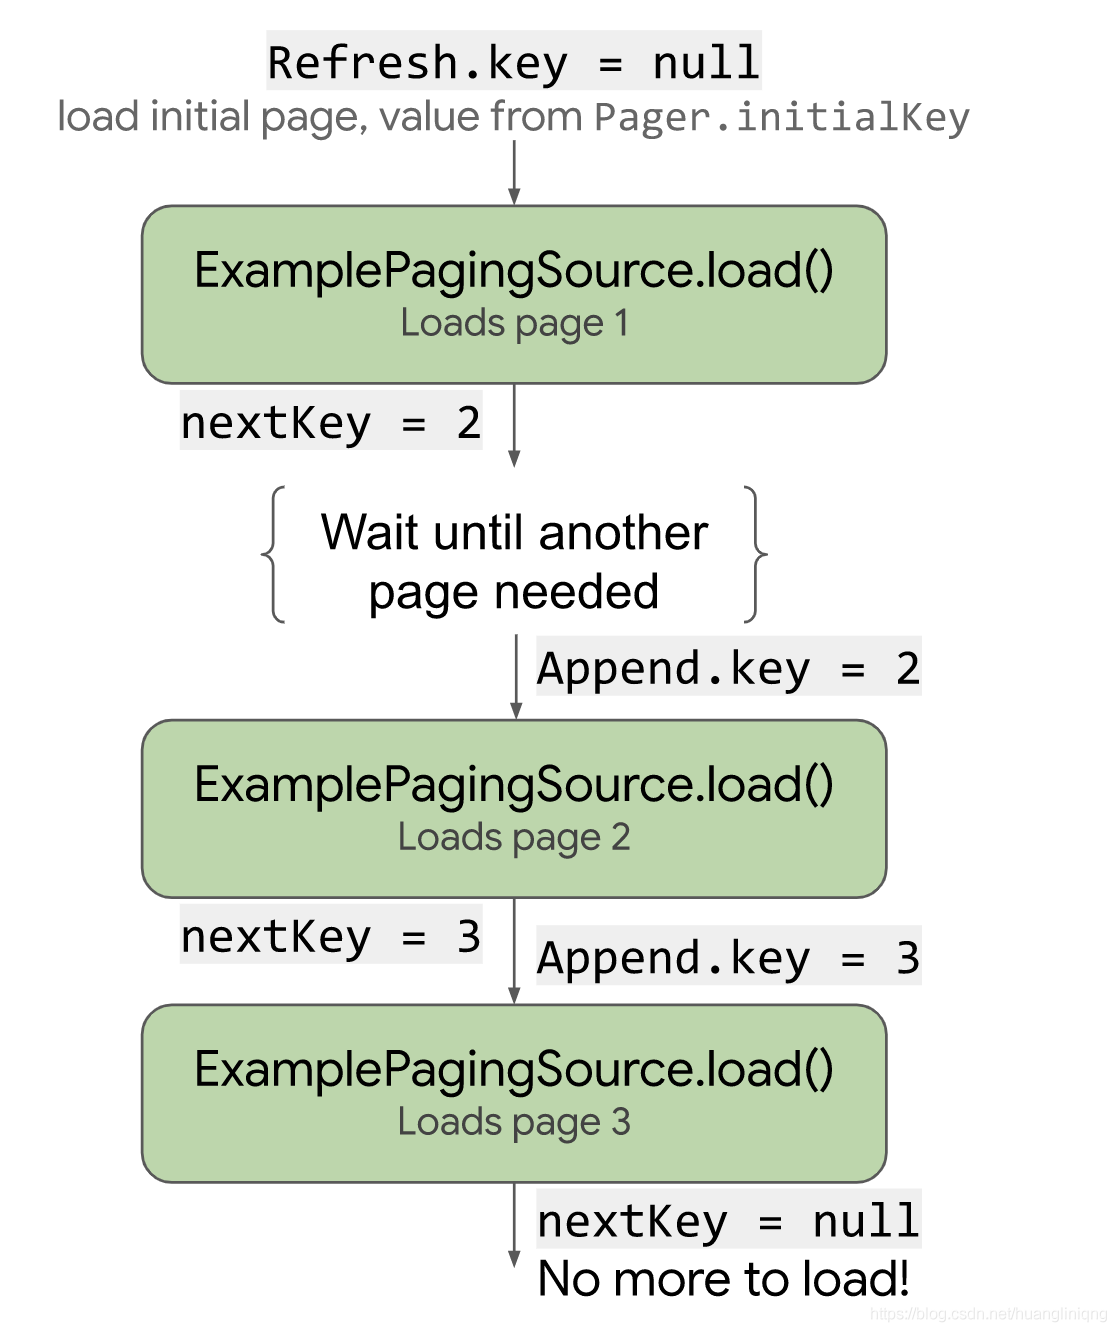
As can be seen from the above figure, the load method is automatically triggered through the configuration of Paging, and we do not need to call it every time. How do we use the DataSource?
Calling PagingSource
The Pager object calls the load() method from the PagingSource object, providing it with the LoadParams object and receiving the LoadResult object in return.
The Pager object calls the load () method from the PagingSource object, provides it with the LoadParams object, and receives the LoadResult object in return.
Therefore, we are creating a viewModel object and a pager object to call the PagingSource method. The code is as follows:
class MainActivityViewModel : ViewModel() {

    /**
     * get data
     */
    fun getData() = Pager(PagingConfig(pageSize = 1)) {
        DataSource()
    }.flow
}
In viewmodel, we define a getData method. Pager implements special customization by configuring PagingConfig. Let's see the following parameters in PagingConfig:
pageSize: defines the number of items loaded at a time from PagingSource.
prefetchDistance: prefetch distance. A simple explanation is to automatically load the next page when it is far from the bottom, that is, automatically call the load method. The default value is equal to pageSize
Enable placeholders: whether to display placeholders. When the network is bad, you can check the frame of the page, so as to improve the user experience
Some other parameters are not introduced here. From the source code of the construction method, we can see that the parameter pageSize is required and others are optional, so we pass 1 here
Define recycleview adapter
This step is not much different from the ordinary recycleview adapter we usually define, but we inherit the PagingDataAdapter. The main code is as follows:
class DataRecycleViewAdapter :
    PagingDataAdapter<DemoReqData.DataBean.DatasBean, RecyclerView.ViewHolder>(object :
        DiffUtil.ItemCallback<DemoReqData.DataBean.DatasBean>() {

        override fun areItemsTheSame(
            oldItem: DemoReqData.DataBean.DatasBean,
            newItem: DemoReqData.DataBean.DatasBean
        ): Boolean {
            return oldItem.id == newItem.id
        }

        @SuppressLint("DiffUtilEquals")
        override fun areContentsTheSame(
            oldItem: DemoReqData.DataBean.DatasBean,
            newItem: DemoReqData.DataBean.DatasBean
        ): Boolean {
            return oldItem == newItem
        }
    }) {
    override fun onBindViewHolder(holder: RecyclerView.ViewHolder, position: Int) {
        var dataBean = getItem(position)
        (holder as DataViewHolder).binding.demoReaData = dataBean
    }

    override fun onCreateViewHolder(parent: ViewGroup, viewType: Int): TestViewHolder {

    return TestViewHolder(
        DataBindingUtil.inflate(
            LayoutInflater.from(parent.context),
            R.layout.health_item_test,
            parent,
            false
        )
    )
}

    inner class DataViewHolder(private val dataBindingUtil: ItemDataBinding) :
        RecyclerView.ViewHolder(dataBindingUtil.root) {
        var binding = dataBindingUtil
    }


}
Here we want to remind you that the parameter DiffUtil is a callback used to calculate the difference between two non empty items in the list. It is usually written in a fixed way without special circumstances.
The View layer requests data and displays the results on the View
At this point, the basic work is almost done. Of course, what we said is almost done, but we can see the results soon. There are still many places to explain. In the last step, we request data in the view and bind the results to the adapter
We call the getData method in viewModel in View code. The code is as follows:
val manager = LinearLayoutManager(this)
rv_data.layoutManager = manager
rv_data.adapter = dataRecycleViewAdapter
btn_get.setOnClickListener {
lifecycleScope.launch {
mainActivityViewModel.getData().collectLatest {
dataRecycleViewAdapter.submitData(it)
}
}
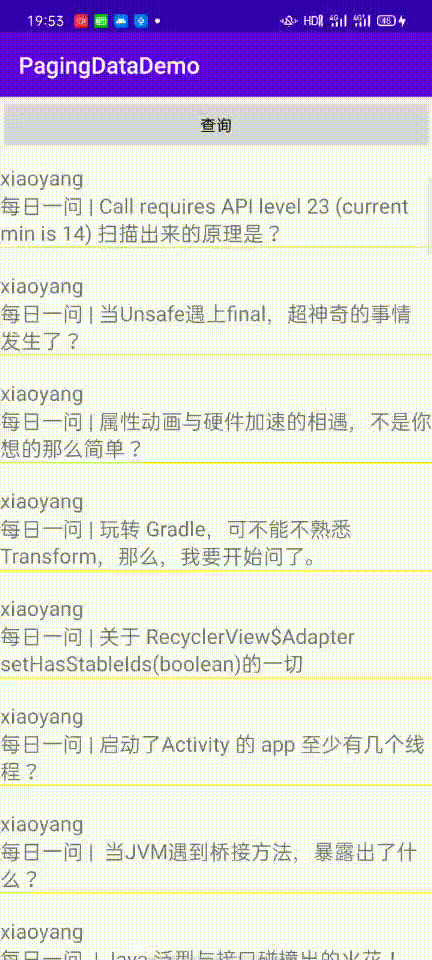
}We call the getData method in the association, receive the latest data, and provide data for adapter through the submitData method of PagingAdapter. The result is shown below (ignoring ugly UI.jpg).

When we slide down, the next page will be loaded automatically when there is 1 (pageSize) data left at the bottom.
Of course, pageSize is not required for this interface, so the returned data size will not be affected by pageSize. In this way, we use Paging3 to complete a simple data paging request.
Loading status of Paging
Paging3 provides us with a method to obtain the loading status of paging, including the way to add listening events and the way to display them directly in the adapter. First, let's look at the way to listen to events
Obtain loading status by listening to events
Above, we created a datarecycleview adapter in the Activity to display page data. We can use the addLoadStateListener method to add listening events in loading status, as shown below:
dataRecycleViewAdapter.addLoadStateListener {
    when (it.refresh) {
        is LoadState.NotLoading -> {
            Log.d(TAG, "is NotLoading")
        }
        is LoadState.Loading -> {
            Log.d(TAG, "is Loading")
        }
        is LoadState.Error -> {
            Log.d(TAG, "is Error")
        }
    }
}
it here is the CombinedLoadStates data class, which has the differences of refresh, Append and Prepend, as shown in the following table:
refresh | Use of refresh during initialization |
|---|---|
append | Use when loading more |
prepend | Used when adding data to the header of the current list |
That is, if it is monitored Refresh, when the second and third pages are loaded, the status cannot be monitored. Here, only it Refresh as an example.
There are three values of LoadState: NotLoading: when there is no loading action and no error
As the name suggests, Loading and Error correspond to Loading and Loading errors. In addition to addLoadStateListener, you can also directly use loadStateFlow. Because flow is a suspended function, we need to execute it in the process( Kotlin Flow read this article to get you started~ ), the code is as follows:
lifecycleScope.launch {
    dataRecycleViewAdapter.loadStateFlow.collectLatest {
        when (it.refresh) {
            is LoadState.NotLoading -> {

            }
            is LoadState.Loading -> {

            }
            is LoadState.Error -> {

            }
        }
    }
}
Next, let's run the example in the previous section. After running successfully, click the query button to display the data. We see that the print is as follows:
2020-11-14 16:39:19.841 23729-23729/com.example.pagingdatademo D/MainActivity: is NotLoading
2020-11-14 16:39:24.529 23729-23729/com.example.pagingdatademo D/MainActivity: Click the query button
2020-11-14 16:39:24.651 23729-23729/com.example.pagingdatademo D/MainActivity: is Loading
2020-11-14 16:39:25.292 23729-23729/com.example.pagingdatademo D/MainActivity: is NotLoading
The first is the NotLoading state, because we have no operation. After clicking the query button, it becomes the Loading state, because the data is being loaded. After the query, it returns to the NotLoading state again, which is in line with our expectations. What's the use of this state? We display a progressBar transition in the Loading state to improve the user experience. Of course, the most important thing is the Error state, because we need to inform the user in the Error state.
We reopen the App, disconnect the network, click the query button again, and print the log as follows:
2020-11-14 16:48:25.943 26846-26846/com.example.pagingdatademo D/MainActivity: is NotLoading
2020-11-14 16:48:27.218 26846-26846/com.example.pagingdatademo D/MainActivity: Click the query button
2020-11-14 16:48:27.315 26846-26846/com.example.pagingdatademo D/MainActivity: is Loading
2020-11-14 16:48:27.322 26846-26846/com.example.pagingdatademo D/MainActivity: is Error
What should be noted here is that the Error status is not automatically returned by Paging for us, but we use loadresult after catching exceptions in the DataSource The Error method tells.
We also need to listen for specific errors in the Error state. If there is no network, it will display no network UI. If the server is abnormal, it will prompt the server exception. The code is as follows:
is LoadState.Error -> {
    Log.d(TAG, "is Error:")
    when ((it.refresh as LoadState.Error).error) {
        is IOException -> {
            Log.d(TAG, "IOException")
        }
        else -> {
            Log.d(TAG, "others exception")
        }
    }
}
When the network is disconnected, click query, and the log is as follows:
2020-11-14 17:29:46.234 12512-12512/com.example.pagingdatademo D/MainActivity: Click the query button
2020-11-14 17:29:46.264 12512-12512/com.example.pagingdatademo D/MainActivity: Request page 1
2020-11-14 17:29:46.330 12512-12512/com.example.pagingdatademo D/MainActivity: is Loading
2020-11-14 17:29:46.339 12512-12512/com.example.pagingdatademo D/MainActivity: is Error:
2020-11-14 17:29:46.339 12512-12512/com.example.pagingdatademo D/MainActivity: IOException
Display in adapter
Paging3 provides us with methods to add bottom and header adapter s, namely withLoadStateFooter, withLoadStateHeader, and simultaneously add head and tail methods withLoadStateHeaderAndFooter. Here we take adding tail methods as an example
First, we create the viewHolder LoadStateViewHolder binding layout, which is the layout displayed at the bottom, a loading display and a retry button. The xml layout is as follows:
<layout>

    <androidx.constraintlayout.widget.ConstraintLayout xmlns:android="http://schemas.android.com/apk/res/android"
        xmlns:app="http://schemas.android.com/apk/res-auto"
        android:layout_width="match_parent"
        android:layout_height="match_parent">


        <LinearLayout
            android:id="@+id/ll_loading"
            android:layout_width="match_parent"
            android:layout_height="wrap_content"
            android:gravity="center"
            android:orientation="horizontal"
            android:visibility="gone"
            app:layout_constraintEnd_toEndOf="parent"
            app:layout_constraintStart_toStartOf="parent"
            app:layout_constraintTop_toTopOf="parent">

            <TextView
                android:layout_width="wrap_content"
                android:layout_height="wrap_content"
                android:text="Loading data... ..."
                android:textSize="18sp" />

            <ProgressBar
                android:layout_width="20dp"
                android:layout_height="20dp" />
        </LinearLayout>

        <Button
            android:id="@+id/btn_retry"
            android:layout_width="match_parent"
            android:layout_height="wrap_content"
            android:text="Loading failed, re request"
            android:visibility="gone"
            app:layout_constraintStart_toStartOf="parent"
            app:layout_constraintTop_toBottomOf="@id/ll_loading" />

    </androidx.constraintlayout.widget.ConstraintLayout>
</layout>
The layout of loading prompt and re request is hidden by default. The LoadStateViewHolder code is as follows:
class LoadStateViewHolder(parent: ViewGroup, var retry: () -> Void) : RecyclerView.ViewHolder(
    LayoutInflater.from(parent.context)
        .inflate(R.layout.item_loadstate, parent, false)
) {

    var itemLoadStateBindingUtil: ItemLoadstateBinding = ItemLoadstateBinding.bind(itemView)

    fun bindState(loadState: LoadState) {
        if (loadState is LoadState.Error) {
            itemLoadStateBindingUtil.btnRetry.visibility = View.VISIBLE
            itemLoadStateBindingUtil.btnRetry.setOnClickListener {
                retry()
            }
        } else if (loadState is LoadState.Loading) {
            itemLoadStateBindingUtil.llLoading.visibility = View.VISIBLE
        }

    }

}
Here, we divide and adapter into two classes, so we need to pass the parent in the adapter as a parameter. Retry () is a high-order function, which is convenient for retry logic in the adapter after clicking retry.
bindState is the setting data. Different UI s are displayed according to the State of the State.
Next, we create LoadStateFooterAdapter, which inherits from LoadStateAdapter. The corresponding viewHolder is LoadStateViewHolder. The code is as follows:
class LoadStateFooterAdapter(private val retry: () -> Void) :
    LoadStateAdapter<LoadStateViewHolder>() {

    override fun onBindViewHolder(holder: LoadStateViewHolder, loadState: LoadState) {
        (holder as LoadStateViewHolder).bindState(loadState)
    }

    override fun onCreateViewHolder(parent: ViewGroup, loadState: LoadState): LoadStateViewHolder {
        return LoadStateViewHolder(parent, retry)
    }

}
The code here is relatively simple, so we won't explain it. Finally, let's add this adapter
rv_data.adapter =
    dataRecycleViewAdapter.withLoadStateFooter(footer = LoadStateFooterAdapter(retry = {
        dataRecycleViewAdapter.retry()
    }))
It should be noted here that the adapter returned by withLoadStateFooter should be set to recyclerview. If you write as follows: datarecycleview adapter After withLoadStateFooter, setting the recycleView adapter separately will have no effect.
Here, we can click retry() method of datarecycleview adapter. After running the first page of the program for help, disconnect the network and scroll down. The effect is as follows:
In this way, we have completed the display of data loading status in the adapter.
In addition, there is an important RemoteMediator in Paging3 to better load the network database and local database. Let's share it separately later~
Updated on November 21, 2020
paging3's design concept is that it is not recommended to modify the list data directly; Instead, we operate on the data source, and the changes of the data source will be automatically updated to the list. We see that many friends in the comment area say how to delete and modify item s. Here we can use the simplest way
Modification of a single item
We all know that there is no Api in RecycleView that directly listens to the item. Generally, it takes operations in onBindViewHolder or operates in the View layer through callback. Here, the callback can also be written as a high-order function. The reason why we callback to the View layer here is that a partner commented in the comment area that we want to operate the viewModel, so we avoid injecting the viewModel into the adapter, We can directly use a higher-order function callback. Modify the datarecycleview adapter code as follows:
class DataRecycleViewAdapter(
    val itemUpdate: (Int, DemoReqData.DataBean.DatasBean?,DataRecycleViewAdapter) -> Unit
) :
    PagingDataAdapter<DemoReqData.DataBean.DatasBean, RecyclerView.ViewHolder>(object :
        DiffUtil.ItemCallback<DemoReqData.DataBean.DatasBean>() {

        override fun areItemsTheSame(
            oldItem: DemoReqData.DataBean.DatasBean,
            newItem: DemoReqData.DataBean.DatasBean
        ): Boolean {
            return oldItem.id == newItem.id
        }

        @SuppressLint("DiffUtilEquals")
        override fun areContentsTheSame(
            oldItem: DemoReqData.DataBean.DatasBean,
            newItem: DemoReqData.DataBean.DatasBean
        ): Boolean {
            return oldItem == newItem
        }
    }) {
    override fun onBindViewHolder(holder: RecyclerView.ViewHolder, position: Int) {
        val dataBean = getItem(position)
        (holder as DataViewHolder).binding.demoReaData = dataBean
        holder.binding.btnUpdate.setOnClickListener {
            itemUpdate(position, dataBean,this)
        }
    }

    override fun onCreateViewHolder(parent: ViewGroup, viewType: Int): RecyclerView.ViewHolder {
        val binding: ItemDataBinding =
            DataBindingUtil.inflate(
                LayoutInflater.from(parent.context),
                R.layout.item_data,
                parent,
                false
            )
        return DataViewHolder(binding)
    }


    inner class DataViewHolder(private val dataBindingUtil: ItemDataBinding) :
        RecyclerView.ViewHolder(dataBindingUtil.root) {
        var binding = dataBindingUtil
    }


}
To facilitate the demonstration, we add a button to update the data in the data list. The code for declaring the adapter in the Activity is modified as follows:
private var dataRecycleViewAdapter = DataRecycleViewAdapter { position, it, adapter ->
    it?.author = "Huang Linqing ${position}"
    adapter.notifyDataSetChanged()
}
We modify the author's name to the Huang Linqing and the current click number by executing the higher-order function, and then call notifyDataSetChanged. The demonstration effect is as follows:

Deletion and addition of data
We all know that before, we set a List for the adapter. If we need to delete or add, we just need to change the List, but there seems to be no way in Paging3, because the data source is PagingSource , read the introduction on the official website
A PagingSource / PagingData pair is a snapshot of the data set. A new PagingData / PagingData must be created if an update occurs, such as a reorder, insert, delete, or content update occurs. A PagingSource must detect that it cannot continue loading its snapshot (for instance, when Database query notices a table being invalidated), and call invalidate. Then a new PagingSource / PagingData pair would be created to represent data from the new state of the database query.
It roughly means that if the data changes, a new PagingData must be created, so for the time being, I don't know how to refresh after data deletion and addition without re request. If you have a good scheme, welcome to give me advice!