Introduction to JWT
background
In traditional stateful service applications, the server needs to record the client information of each session, so as to identify the client identity and process the request according to the user identity. A typical design is session in Tomcat. For example, login: after the user logs in, we save the user's information in the server session, give the user a cookie value, record the corresponding session, and then make the next request, When the user brings the cookie value (this step is automatically completed by the browser), we can identify the corresponding session and find the user's information. This method is the most convenient at present, but in distributed applications, it is not a good choice for the server to save the user's state, so JWT was born
JWT overview
JWT(JSON WEB Token) is a standard. With the help of JSON format data as the token in the WEB application request, the self-contained design of data is carried out to realize the safe information transmission of all parties. In the process of data transmission, data can also be encrypted, signed and other related processing. At the same time, JWT is also the most popular cross domain authentication solution (its official website is: https://jwt.io/ ). It is very convenient to realize user identity authentication in distributed system.
JWT data structure
JWT is usually composed of three parts: header, payload and signature. The format is as follows:
xxxxx.yyyyy.zzzzz
For example:
eyJhbGciOiJIUzI1NiJ9.eyJwZXJtaXNzaW9ucyI6InN5czpyZXM6Y3JlYXRlLHN5czpyZXM6cmV0cmlldmUiLCJleHAiOjE2MjY5MzIyNTksImlhdCI6MTYyNjkzMDQ1OSwidXNlcm5hbWUiOiJqYWNrIn0.SQrRS5nuID1Xv5GMvUgnr7xrVzB7GcRFrkNak-x16Mw
Header section
The Header part is a JSON object that describes the metadata of JWT, usually as follows.
{
  "alg": "HS256",
  "typ": "JWT"
}
In the above code, the alg attribute represents the signature algorithm, and the default is HMAC SHA256 (HS256); the typ attribute represents the type of the token, and the JWT token is uniformly written as JWT. Finally, convert the JSON object into a string using the Base64URL algorithm (see later).
Payload section
The Payload part is also a JSON object, which is used to store the actual data to be transferred. Seven official fields are specified in the JWT specification for selection.
iss (issuer): issuer
exp (expiration time): expiration time
subject (subject): subject
aud (audience): audience
nbf (Not Before): effective time
iat (Issued At): issuing time
jti (JWT ID): No
In addition to official fields, you can also define private fields in this section. The following is an example.
{
  "sub": "1234567890",
  "name": "John Doe",
  "admin": true
}
Note that JWT is not encrypted by default and can be read by anyone, so don't put secret information in this part.
The JSON object should also be converted into a string using the Base64URL algorithm.
Signature section
The Signature part is the Signature of the first two parts. Its purpose is to prevent data from being tampered with.
First, you need to specify a secret. This key is only known to the server and cannot be disclosed to the user. Then, use the signature algorithm specified in the Header (HMAC SHA256 by default) to generate a signature according to the following formula.
HMACSHA256(
  base64UrlEncode(header) + "." +
  base64UrlEncode(payload),
  secret)
After the Signature is calculated, the Header, Payload and Signature are combined into a string. Each part is separated by a dot (.) and can be returned to the user.
JWT quick start
Environmental preparation
Step 1: create a project, for example:
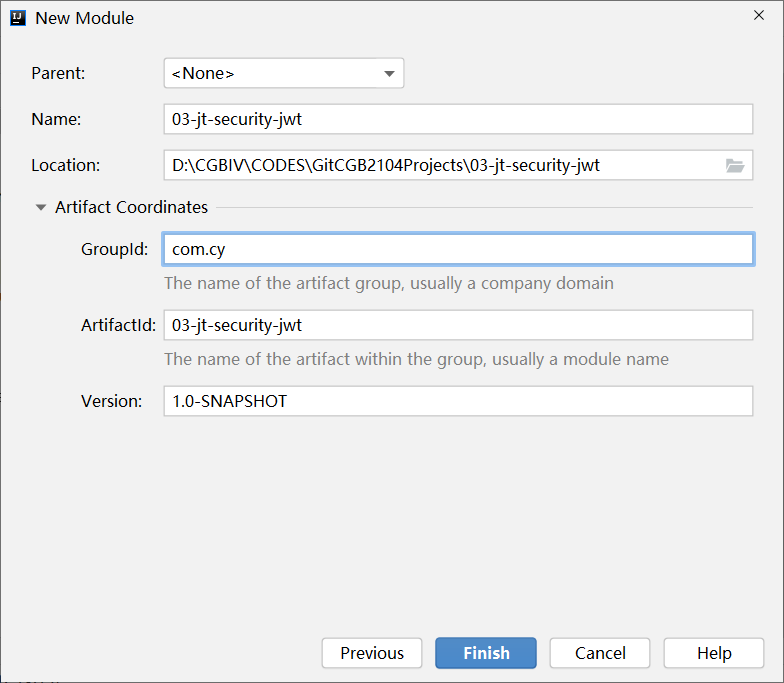
Step 2: add the dependency and its POM The contents of the XML file are as follows:
<?xml version="1.0" encoding="UTF-8"?>
<project xmlns="http://maven.apache.org/POM/4.0.0"
         xmlns:xsi="http://www.w3.org/2001/XMLSchema-instance"
         xsi:schemaLocation="http://maven.apache.org/POM/4.0.0 http://maven.apache.org/xsd/maven-4.0.0.xsd">
    <modelVersion>4.0.0</modelVersion>
    <parent>
       <artifactId>spring-boot-starter-parent</artifactId>
        <groupId>org.springframework.boot</groupId>
        <version>2.3.2.RELEASE</version>
    </parent>
    <groupId>com.cy</groupId>
    <artifactId>03-jt-security-jwt</artifactId>
    <version>1.0-SNAPSHOT</version>
    <properties>
        <maven.compiler.source>8</maven.compiler.source>
        <maven.compiler.target>8</maven.compiler.target>
    </properties>
    <dependencies>
        <dependency>
            <groupId>org.springframework.boot</groupId>
            <artifactId>spring-boot-starter-web</artifactId>
        </dependency>
        <dependency>
            <groupId>org.springframework.boot</groupId>
            <artifactId>spring-boot-starter-test</artifactId>
            <scope>test</scope>
        </dependency>
        <!--add to jwt rely on-->
        <dependency>
            <groupId>io.jsonwebtoken</groupId>
            <artifactId>jjwt</artifactId>
            <version>0.9.1</version>
        </dependency>
    </dependencies>
</project>
Step 3: create the configuration file application YML (don't write anything for the time being)
Step 4: define the startup class. The code is as follows
package com.cy.jt;
@SpringBootApplication
public class SecurityJwtApplication {
    public static void main(String[] args) {
        SpringApplication.run(
                SecurityJwtApplication.class,
                args);
    }
}
Step 4: run the startup class to check whether it can be started successfully
Create and parse token s
Write unit tests to practice the creation and parsing of Token objects, such as:
@Test
void testCreateAndParseToken(){
    //1. Create token
    //1.1 define load information
    Map<String,Object> map=new HashMap<>();
    map.put("username", "jack");
    map.put("permissions", "sys:res:create,sys:res:retrieve");
    //1.2 define expiration practices
    Calendar calendar=Calendar.getInstance();
    calendar.add(Calendar.MINUTE, 30);
    Date expirationTime=calendar.getTime();
    //1.3 define key
    String secret="AAABBBCCCDDD";
    //1.4 generating tokens
    String token= Jwts.builder()
            .setClaims(map)
            .setIssuedAt(new Date())
            .setExpiration(calendar.getTime())
            .signWith(SignatureAlgorithm.HS256,secret)
            .compact();
    System.out.println(token);
    //2. Parse token
    Claims claims = Jwts.parser().setSigningKey(secret)
            .parseClaimsJws(token)
            .getBody();
    System.out.println("claims="+claims);
}
Create JWT tool class
In order to simplify the application of JWT in the project, we usually build a tool class to encapsulate the creation and parsing of token, for example:
package com.cy.jt.security.util;
public class JwtUtils {
    /**
     * Secret key
     */
    private static String secret="AAABBBCCCDDDEEE";
    /**
     * Validity period in seconds
     * Default 30 minutes
     */
    private static Long expirationTimeInSecond=1800L;
    /**
     * Get claim from token
     *
     * @param token token
     * @return claim
     */
    public static Claims getClaimsFromToken(String token) {
        try {
            return Jwts.parser()
                    .setSigningKey(secret.getBytes())
                    .parseClaimsJws(token)
                    .getBody();
        } catch (Exception e) {
            throw new IllegalArgumentException("Token invalided.");
        }
    }
    /**
     * Judge whether the token has expired
     * @param token token
     * @return true if expired, false if not expired
     */
    private static Boolean isTokenExpired(String token) {
        Date expiration = getClaimsFromToken(token).getExpiration();
        return expiration.before(new Date());
    }
    /**
     * Generate a token for the specified user
     * @param claims User information
     * @return token
     */
    public static String generateToken(Map<String, Object> claims) {
        Date createdTime = new Date();
        Date expirationTime = new Date(System.currentTimeMillis() + expirationTimeInSecond * 1000);
        return Jwts.builder()
                .setClaims(claims)
                .setIssuedAt(createdTime)
                .setExpiration(expirationTime)
                .signWith(SignatureAlgorithm.HS256,secret)
                .compact();
    }
}
Application of JWT in project
AuthController authentication service
AuthController is defined to handle login authentication business. The code is as follows:
package com.cy.jt.security.controller;
@RestController
public class AuthController {
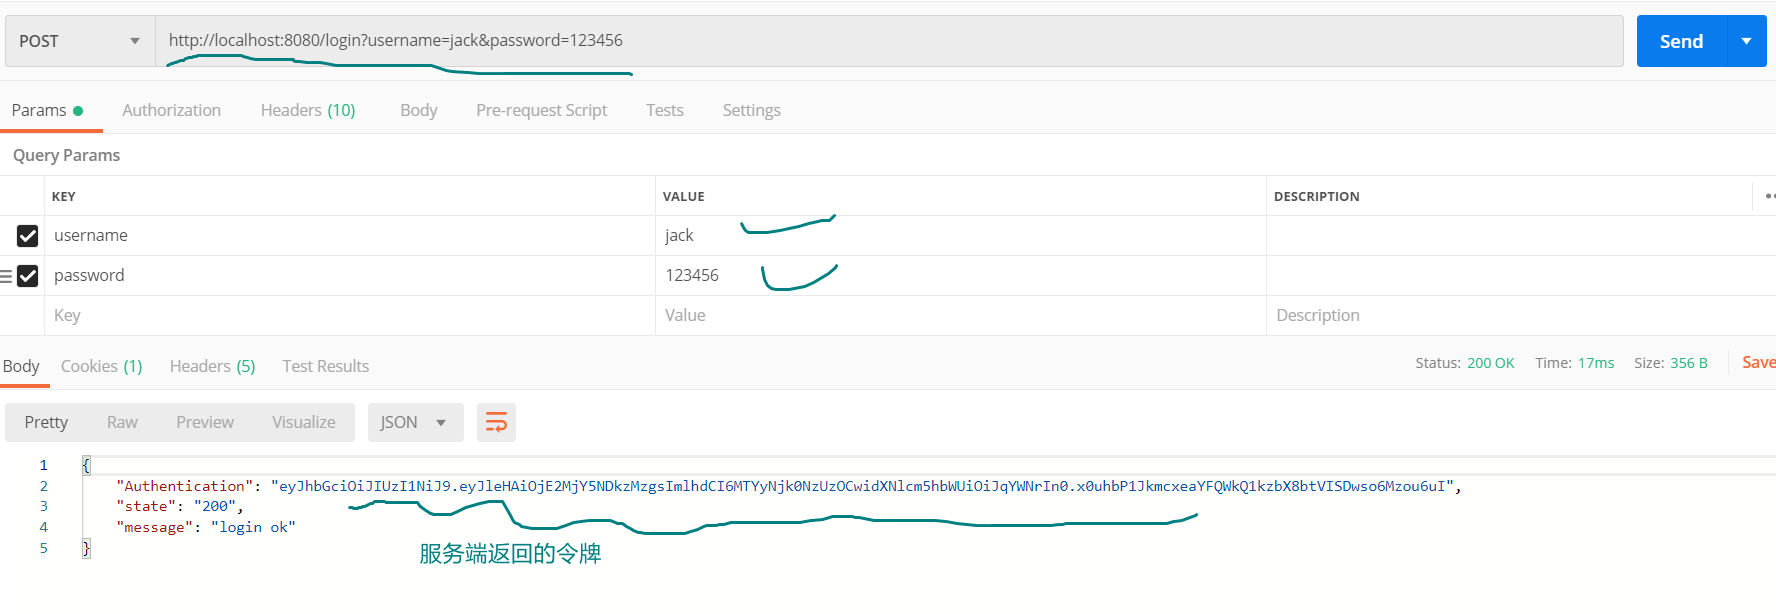
@RequestMapping("/login")
public Map<String,Object> doLogin(String username,
String password){
Map<String,Object> map=new HashMap<>();
if("jack".equals(username)&&"123456".equals(password)){
map.put("state","200");
map.put("message","login ok");
Map<String,Object> claims=new HashMap<>();//Load information
claims.put("username",username);
map.put("Authentication", JwtUtils.generatorToken(claims));
return map;
}else{
map.put("state","500");
map.put("message","login failure");
return map;
}
}
}
ResourceController resource service
Define a resource service object. After successful login, you can access the methods in this object, for example:
package com.cy.jt.security.controller;
import org.springframework.web.bind.annotation.RequestMapping;
import org.springframework.web.bind.annotation.RestController;
@RestController
public class ResourceController {
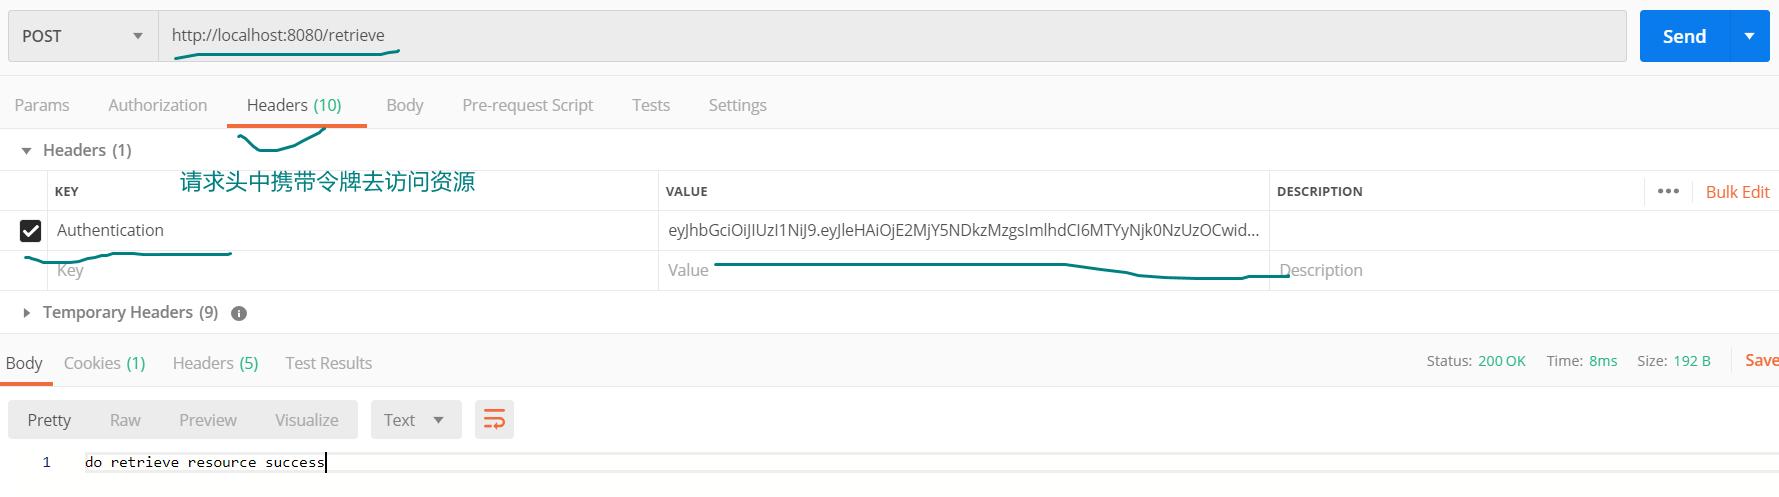
@RequestMapping("/retrieve")
public String doRetrieve(){
//Check whether the user is logged in
//Execute business query
return "do retrieve resource success";
}
@RequestMapping("/update")
public String doUpdate(){
//Check whether the user is logged in
//Execute business query
return "do update resource success";
}
}
TokenInterceptor interceptor and configuration
If the legitimacy of user identity is verified in each method, the code redundancy will be large. We can write a Spring MVC interceptor,
Perform user identity detection in the interceptor, for example:
package com.cy.jt.security.interceptor;
import com.cy.jt.security.util.JwtUtils;
import org.springframework.web.servlet.HandlerInterceptor;
import org.springframework.web.servlet.ModelAndView;
import javax.servlet.http.HttpServletRequest;
import javax.servlet.http.HttpServletResponse;
/**
 * Token (token:ticker pass) interceptor
 * HandlerInterceptor is the interceptor in Spring MVC,
 * Some actions can be performed before and after the Controller method is executed
 * 1)Handler Processor (the class described by @ RestController is regarded as a processor in Spring MVC)
 * 2)Interceptor Interceptor
 */
public class TokenInterceptor implements HandlerInterceptor {
    /**
     * preHandle Execute before the target Controller method executes
     * @param handler Target Controller object
     */
    @Override
    public boolean preHandle(HttpServletRequest request,
                             HttpServletResponse response,
                             Object handler) throws Exception {
        //http://localhost:8080/retrieve?Authentication=
        //String token= request.getParameter("Authentication");
        String token=request.getHeader("Authentication");
        //Determine whether there is a token in the request
        if(token==null||"".equals(token))
            throw new RuntimeException("please login");
        //Determines whether the token has expired
        boolean flag=JwtUtils.isTokenExpired(token);
        if(flag)
        throw new RuntimeException("login timeout,please login");
        return true;//true indicates release, and false indicates that after the request is intercepted, the delivery will not continue
    }
}
After the interceptor is written, you need to add the interceptor to the spring mvc execution chain and set the requests to be intercepted. This process can be completed through the configuration class. The code is as follows:
package com.cy.jt.security.config;
/**
 * Define Spring Web MVC configuration classes
 */
@Configuration
public class SpringWebConfig implements WebMvcConfigurer {
    /**Add interceptors to the execution chain of spring mvc
     * @param registry This object provides a list collection to which interceptors can be added
     * */
    @Override
    public void addInterceptors(InterceptorRegistry registry) {
         registry.addInterceptor(new TokenInterceptor())
                 //Configure the url to intercept
                 .addPathPatterns("/retrieve","/update");
    }
}
Postman access test
Step 1: login access test
Step 2: conduct resource access test, for example:
Summary
This chapter focuses on the background of JWT, its composition and basic application in the project, which need to be analyzed and understood in practice
Analysis of key and difficult points
- The background of the birth of JWT? (in case of stateless session under distributed architecture application platform, standardize the token (pass ticket) data format)
- Data format defined by JWT specification? (header, load - details, signature, thinking about the composition of an article,)
- Application of JAVA related API s under JWT specification? (jjwt dependency - Jwts)
- Create and parse tokens based on JAVA API under JWT specification
FAQ analysis
- What is JWT? (a standard data format)
- What are the data formats in the JWT specification? (3 parts, the first two parts will be Base64 encoded, and the most will be encrypted based on the signature algorithm)
- Can the Payload part of JWT be customized? (Claims)
- Where are JWT token objects typically created? (the server can respond to the client after creating a token)
- If JWT tokens were to be stored on the client, where would you store them? (Cookie,localStorage,sessionStorage)
- How does the JWT token pass from the client to the server? (request parameter, request header)
Bug analysis
- The same key must be used when creating and parsing a token
- The Token has expired